Please use only the external
power supply which comes
as accessory.
Status LED:
Red----------------- charging
Green ------------- fully charged
Red flashing------ Battery broken
or Short circuit
Install Quick Release Plate
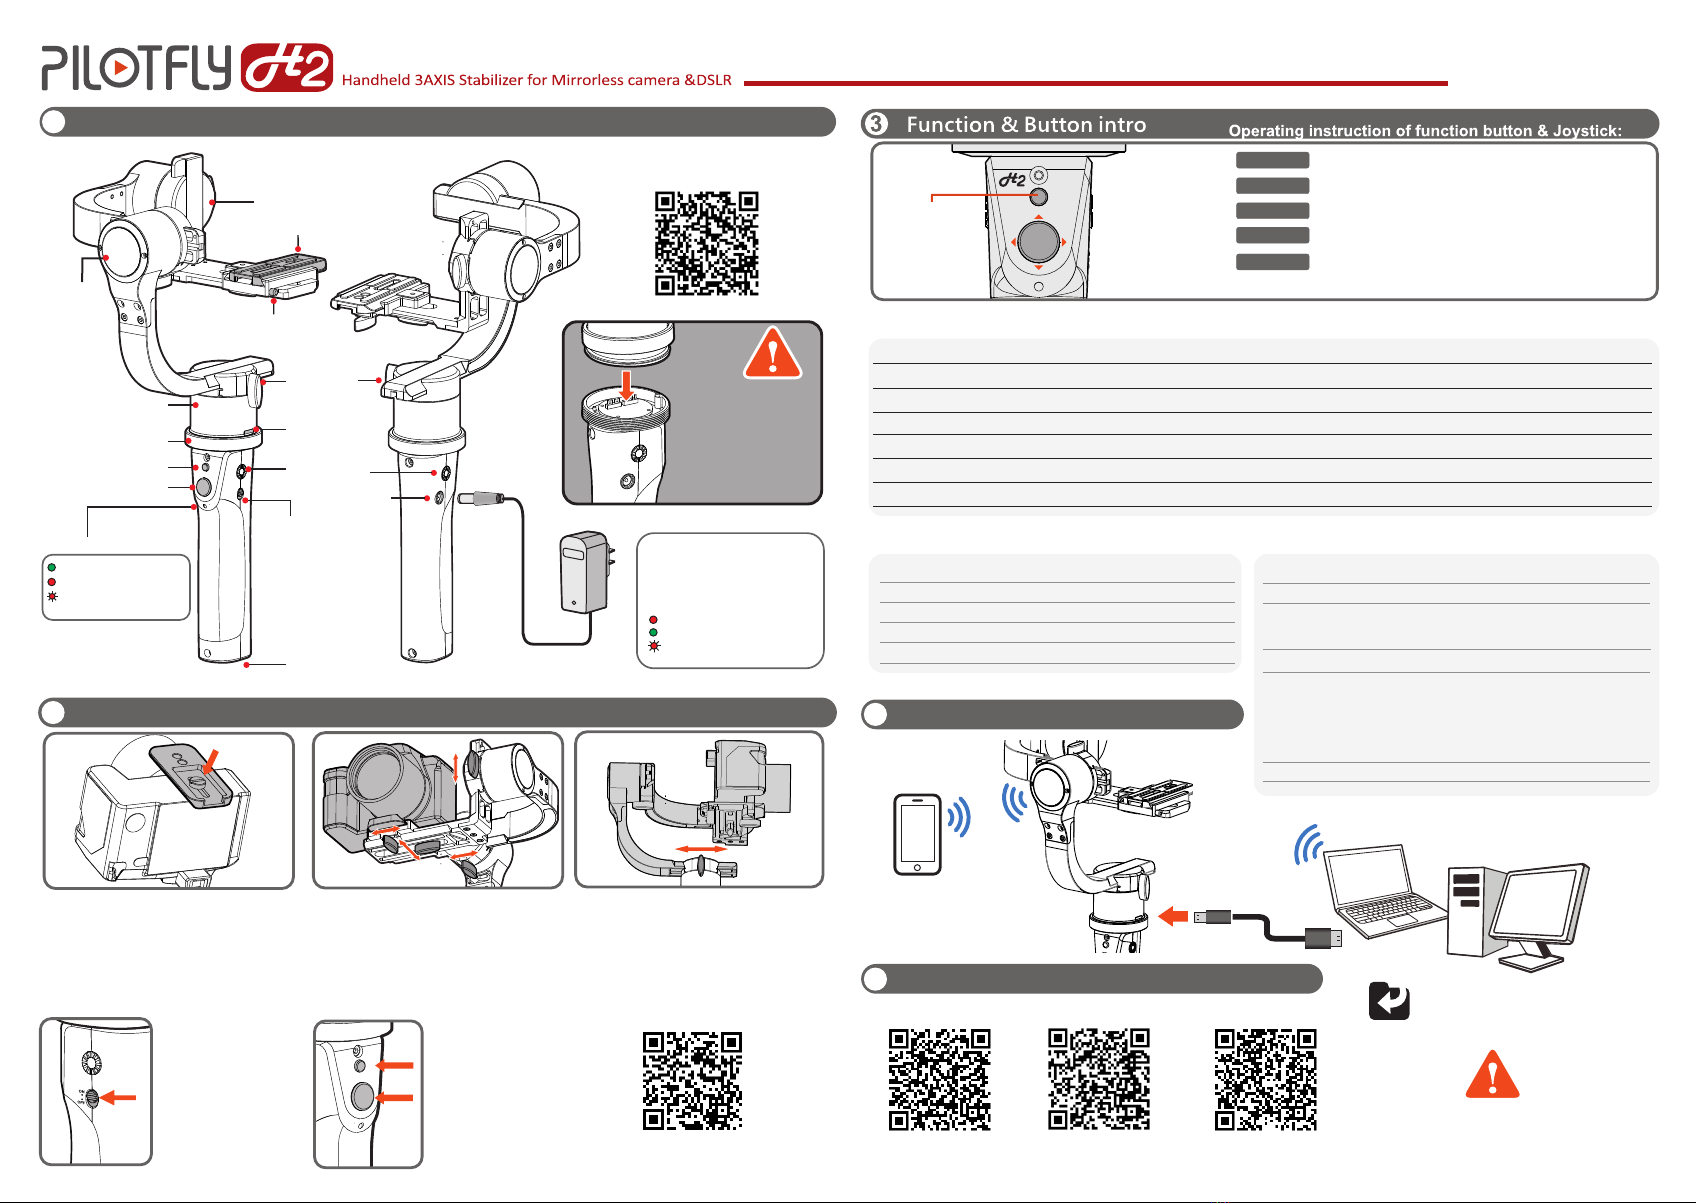
Operating instruction of the "Mode" button.
Single tap
Press & Hold 3 sec
Operation Function
Triple tap
Prevent any movement or vibrations during the Gyro calibration.
【Head mode】Camera stays in its current orientation.
Will initialize the Gyro calibration
Quadruple tap 【Follow roll mode】
Five times tap The camera will move back to the initial position called "Home position".
【Home move】
All three axes are following your movements.
【Follow mode】
Double tap 【Lock mode】
SIMPLEBGC32 APP SIMPLEBGC GUI USB Driver
Explanation
2
1
4
5
Description
Quick Installation Connectivity
Software & Driver download
Function Status Description Specification
Audio alerts:
Power on
Initialisation tone of gimbal
Calibrating
Low Battery
System boot up and initialisation
Be~Bi~Li~Bi~Li
Dn~Dn~Dn~Dn~Dn~Dn ~
Continuous cricket sound
1
Camera follows your movements
2
Camera is locked and horizontal levelled, while panning is possible.
3
Camera keeps position, all three axes are locked.
4
All three axes are following your movements.
5
Invert the handle so it is above the camera and power on the gimbal.
The gimbal will recognize automatically the invert mode. In this condition
your are also able to switch between other modes as described.
Follow mode
Lock mode
Head mode
Follow roll mode
Invert mode
Mount the adapter plate on the camera and
ensure the plate is fixed and aligned properly.
Slide the camera with the adapter plate into the
quick release system and make sure that the
safety lock is inside and holding the plate to
prevent camera from falling down.
Balancing Yaw axis
Make a precise front to back & left to right balance
and thighten up the screws shown on the picture.
Gimbal is balanced if axes remains their position.
Tilt the gimbal to 45 degrees to the right or to the
left. Gimbal is balanced if YAW axis remains its
position. If not, then balancing is necessary.
Loosen slightly the screw on the YAW axis and
shift the L-Arm to the position that YAW axis will
not rotate anymore and keeps its position.
Tighten gently the screw.
Push the mode button to
switch between the
different modes.
Use the JOYSTICK
to pan and tilt the
camera.
Pilotfly Channel / Video tutorial
Mode button:
Push the button to
switch between
different modes or to
calibrate the IMU
sensor.
4-Way-Joystick:
Panning and tilting in
any mode (While
running a script which
can be programed via
SimpleBGC software,
the 4-way-Joystick and
follow mode function
will be automatically
disabled.)
Pilotfly products are equipped with a
Bluetooth module and can be
remotely controlled via Smartphone
Android App (SimpleBGC32).
Connect the gimbal with PC or MAC via
USB cable to adjust the settings or to
upgrade the firmware.
Size:
Weight:
Batteries:
Voltage range:
Movement range:
Operation System:
370 x 190 x 190 mm
1200 g
14.8V 1800mAh Li-on rechargeable batteries
- Usage time 26 hours +
13~16.8V, Standard voltage 15.2V, 0.11A~0.8A
Tilt angle / Top 220°, Down 100°
Roll angle / Left 100°, Right 240°
Yaw angle / 360°
Precision / min ± 0.01° max ±0.04°
Windows, MAC OSX, LINUX and Android APP
Power on / off
Slide the power button to
power on and off the
gimbal. Gimbal is ready to
use after powering on.
The pitch and heading direction follows your movements.
Pitch and Roll is locked, Yaw follows the target.
Backup profiles to your computer
before you change any settings.
1/4 " Screw Hole
Mount Camera and Balance for
Pitch and Roll
Attention:
Assembling / disassembling
handle:
The handle can be detached
from the main unit. Ensure
that the markings (arrows)
are matching and handle is
powered off before you fix
the handle on the main unit.
Green---------- On
Red------------- Low battery
Red flashing-- Battery
almost empty
Instruction manual
download via QRcode
QuickGuide
Power switch
on/off
1/4 " Screw Hole
Mode Button
4-Way Joystick
Power LED
Roll motor
Yaw motor for
panning MICRO USB for
SimpleBGC setup
(no charging)
DC-In for charger
Pitch Motor
Quick release plate
Safety release button
Bluetooth pairing
password:1234
Threaded coupling
to remove handle
Lock-Knobs


