PIMAX Crystal User manual

Crystal
User Guide

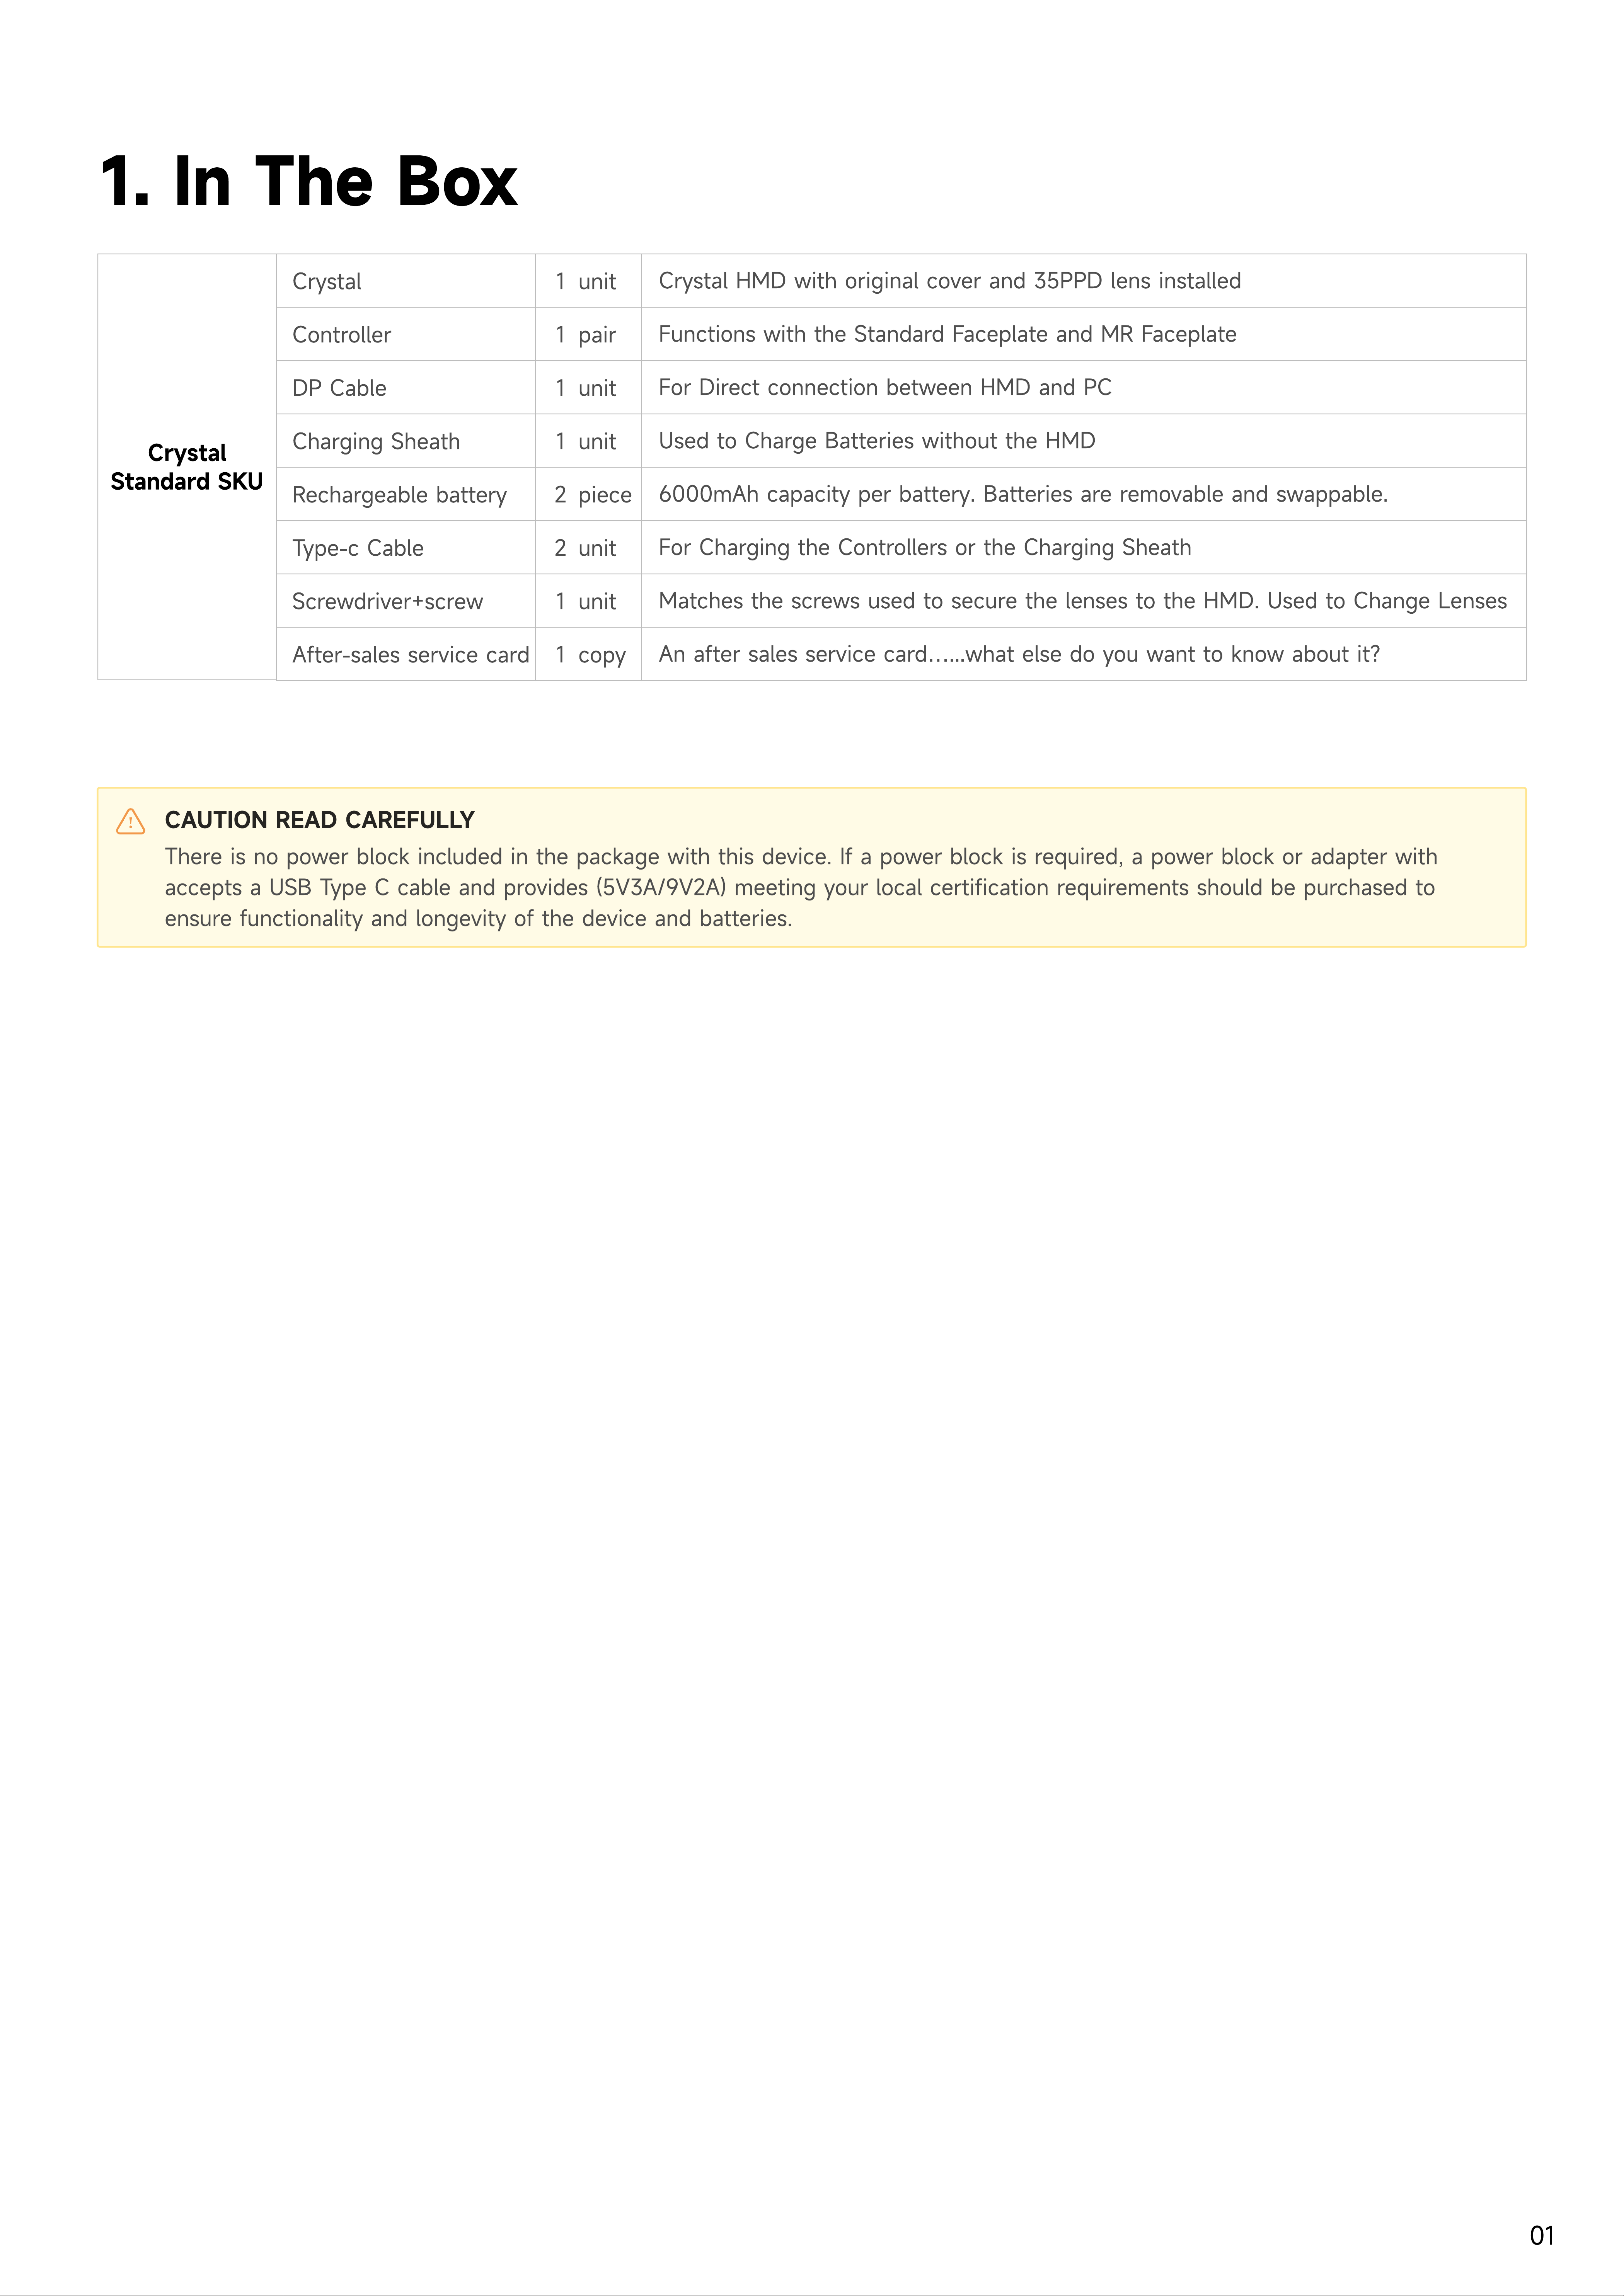
1. In the Box ................................................................................................................................................................
2. Important Health & Safety Notes .....................................................................................................................
3. Operation Guide ...................................................................................................................................................
3.1. Product Details (in box) ...........................................................................................................................
3.2. PCVR ..............................................................................................................................................................
3.2.1. PCVR Performance Requirements ...............................................................................................
3.2.2. Switching to PCVR Mode ..............................................................................................................
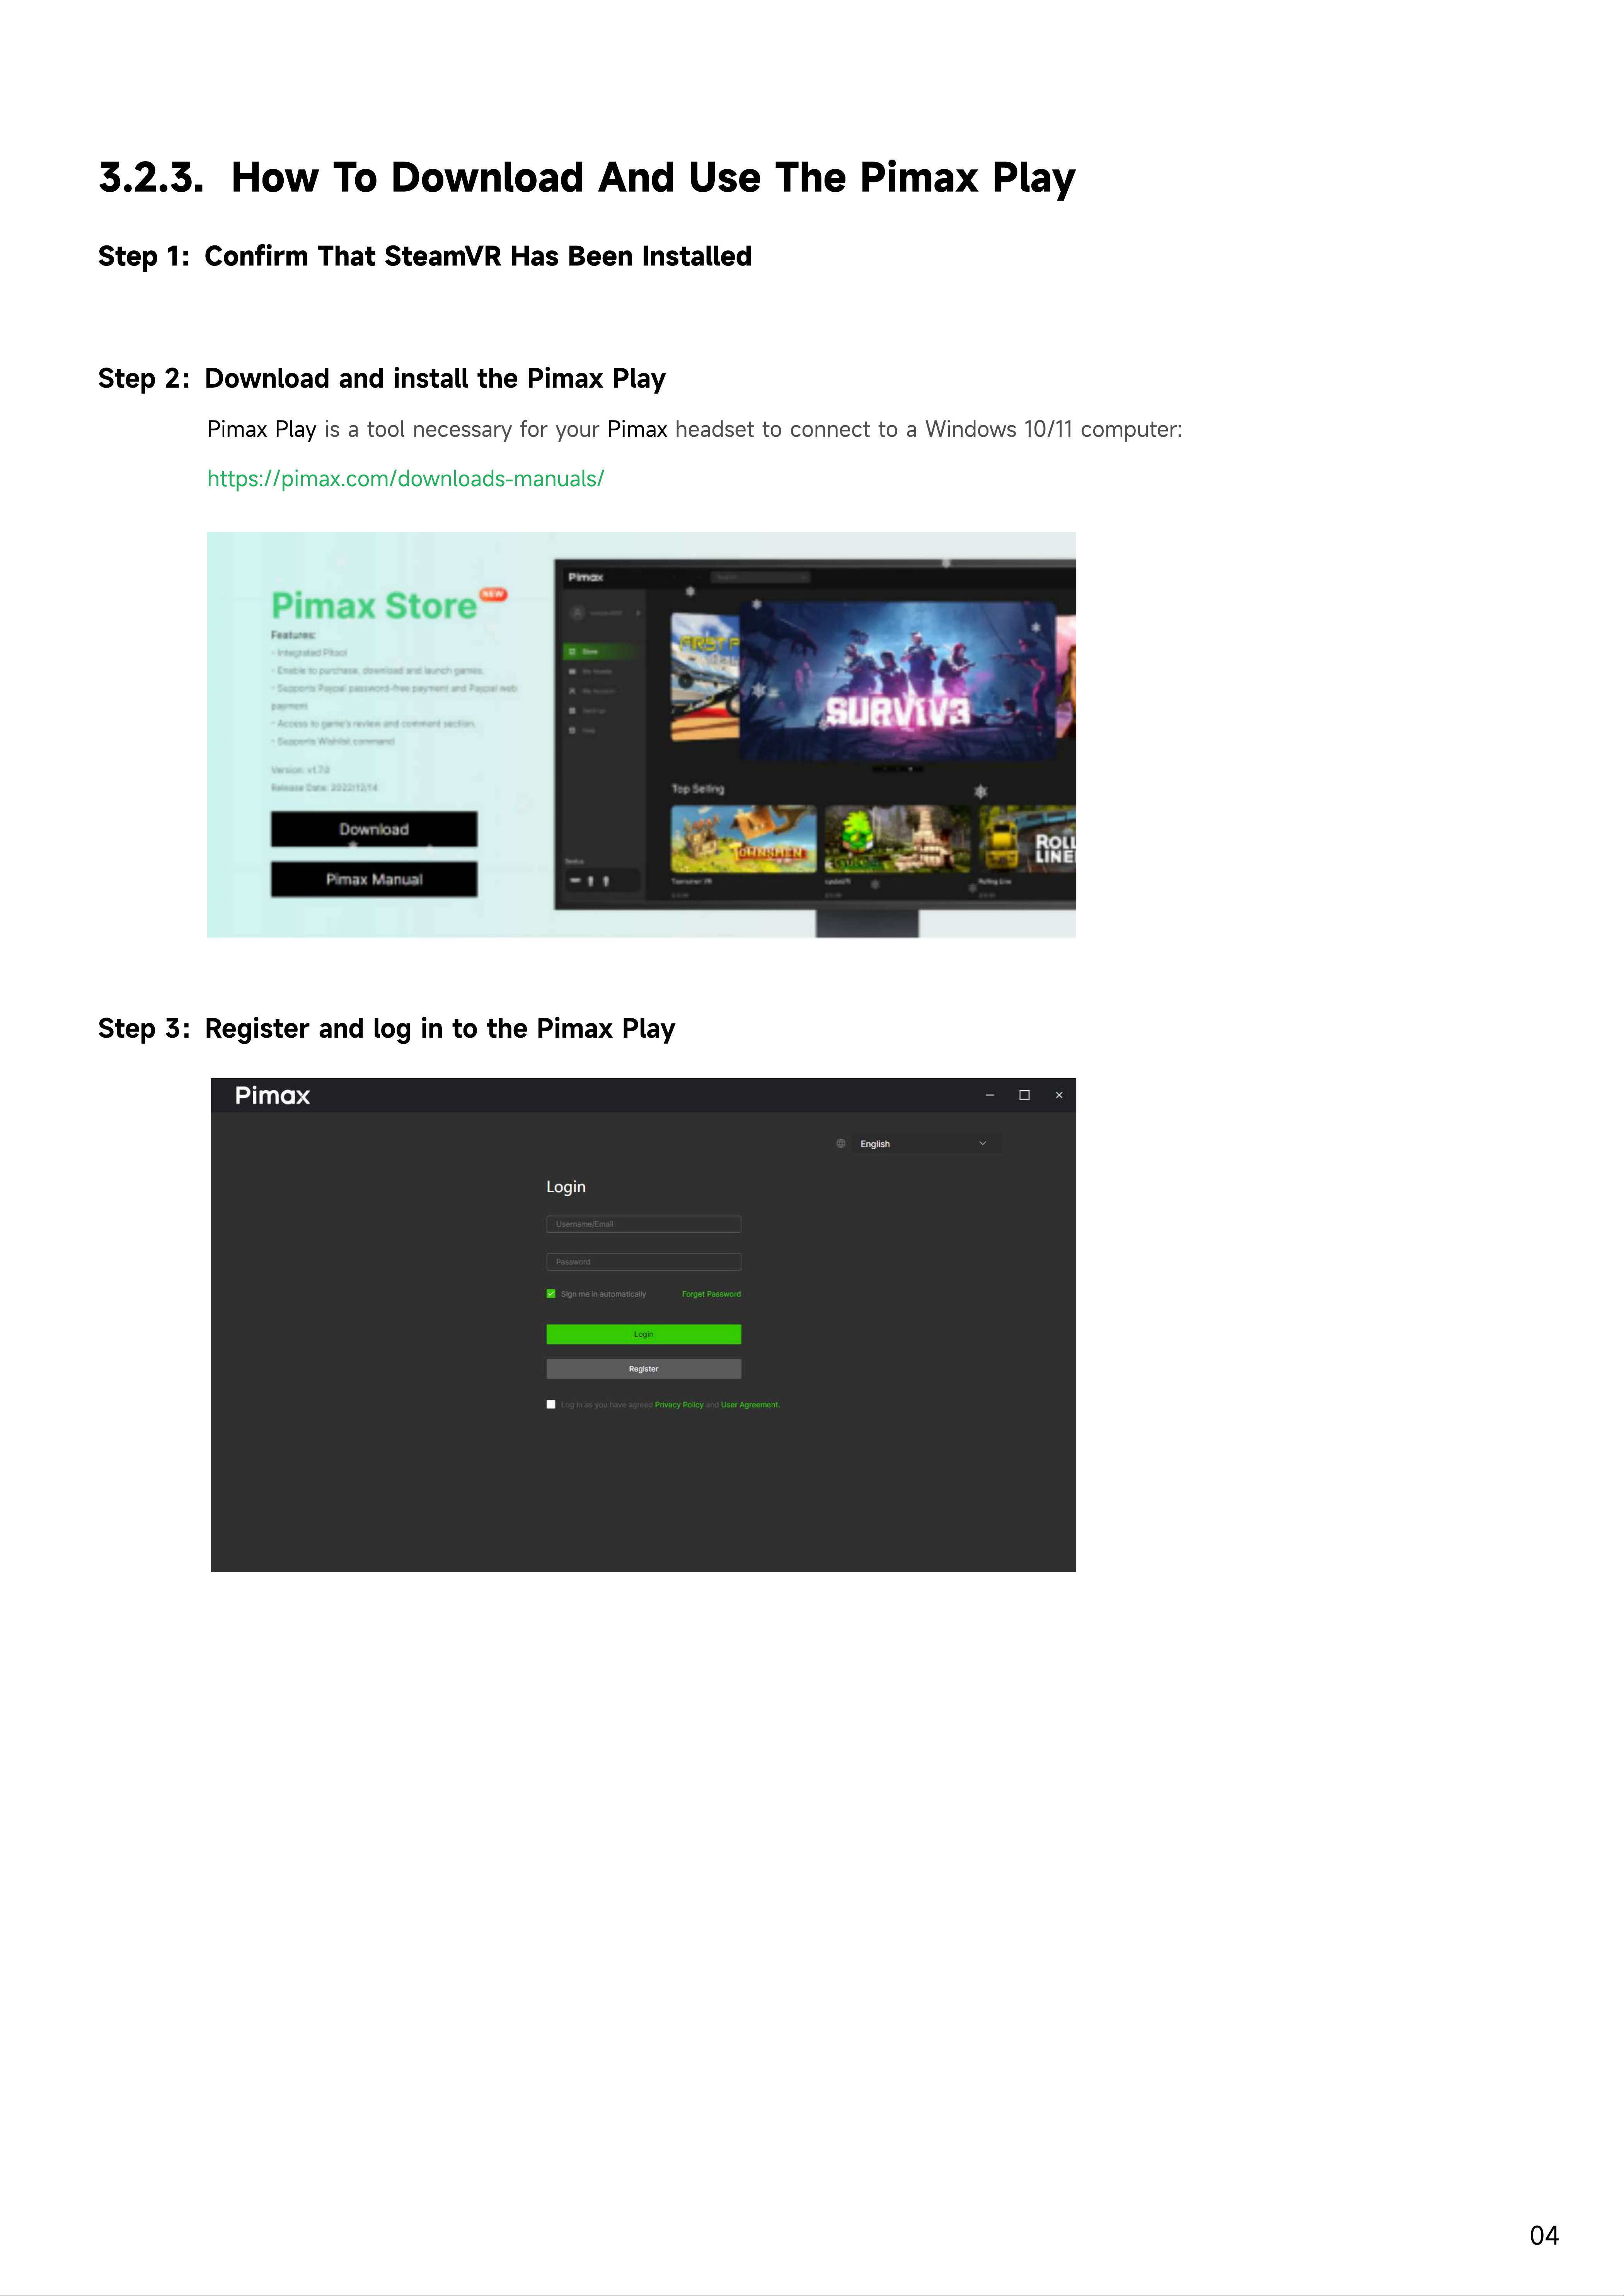
3.2.3. How to Download and Use The PIMAX PC CLIENT ..............................................................
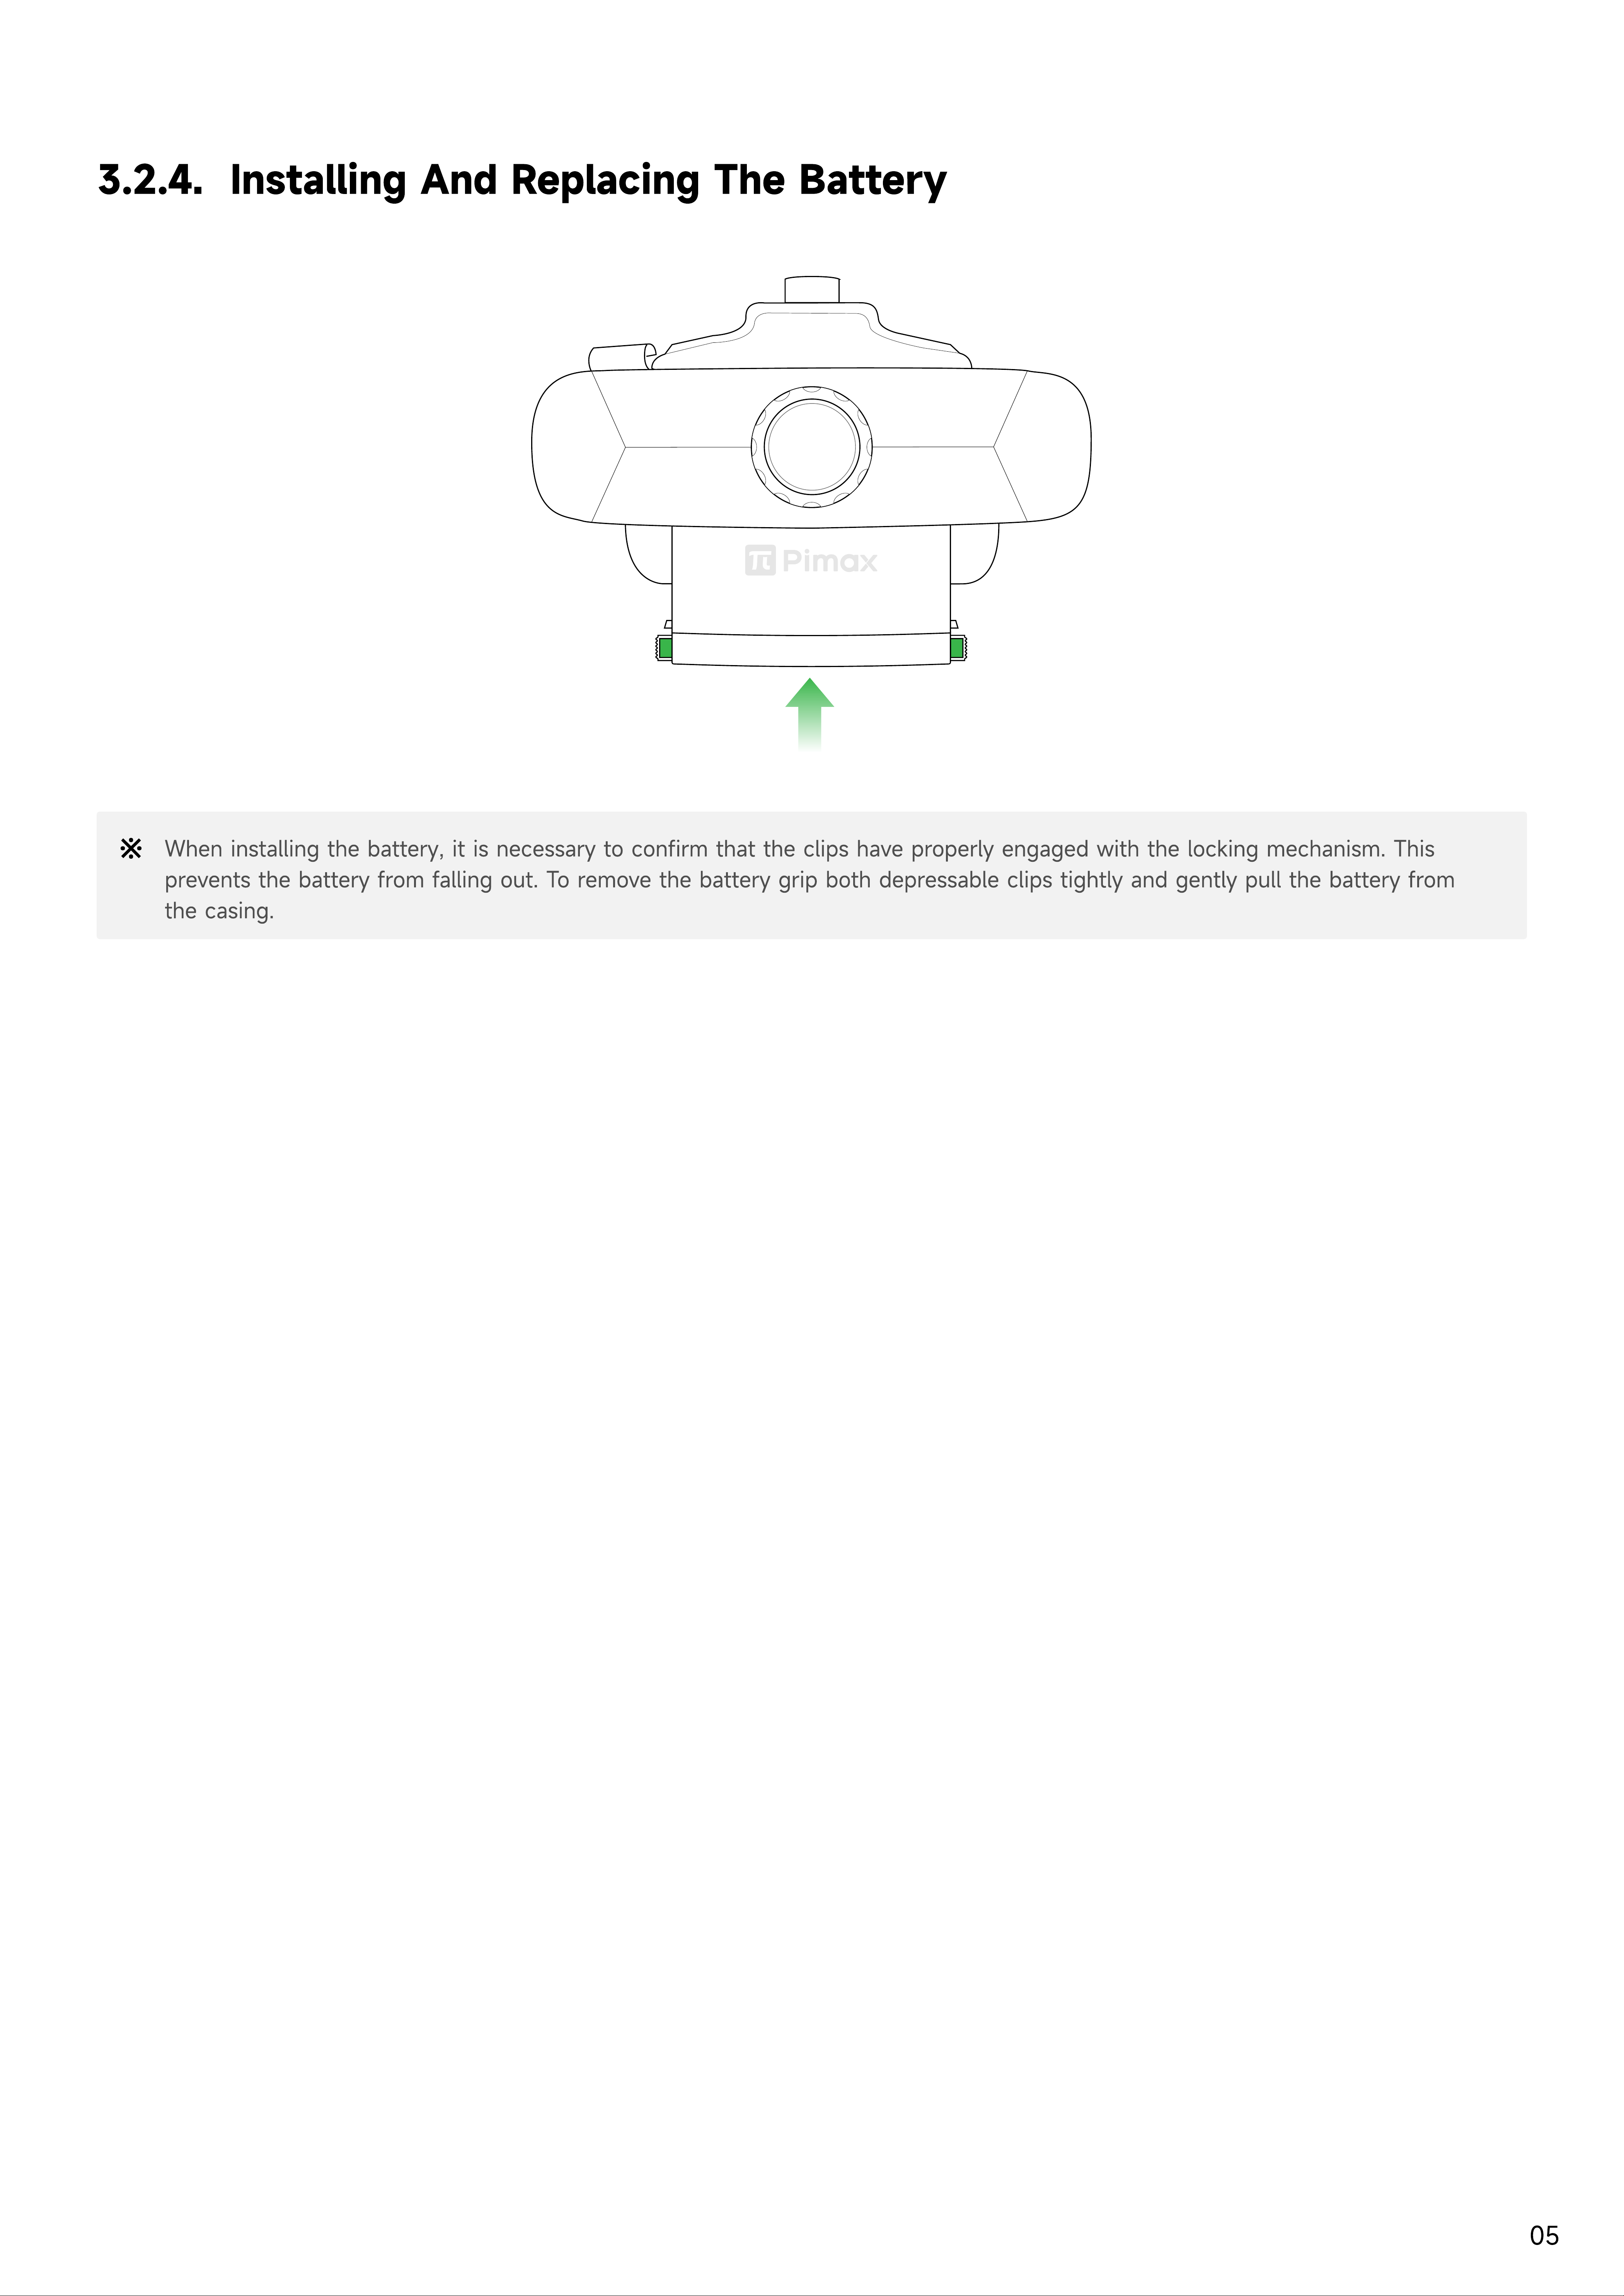
3.2.4. Installing & Replacing the Battery ..............................................................................................
3.2.5. Product Details (PCVR) ..................................................................................................................
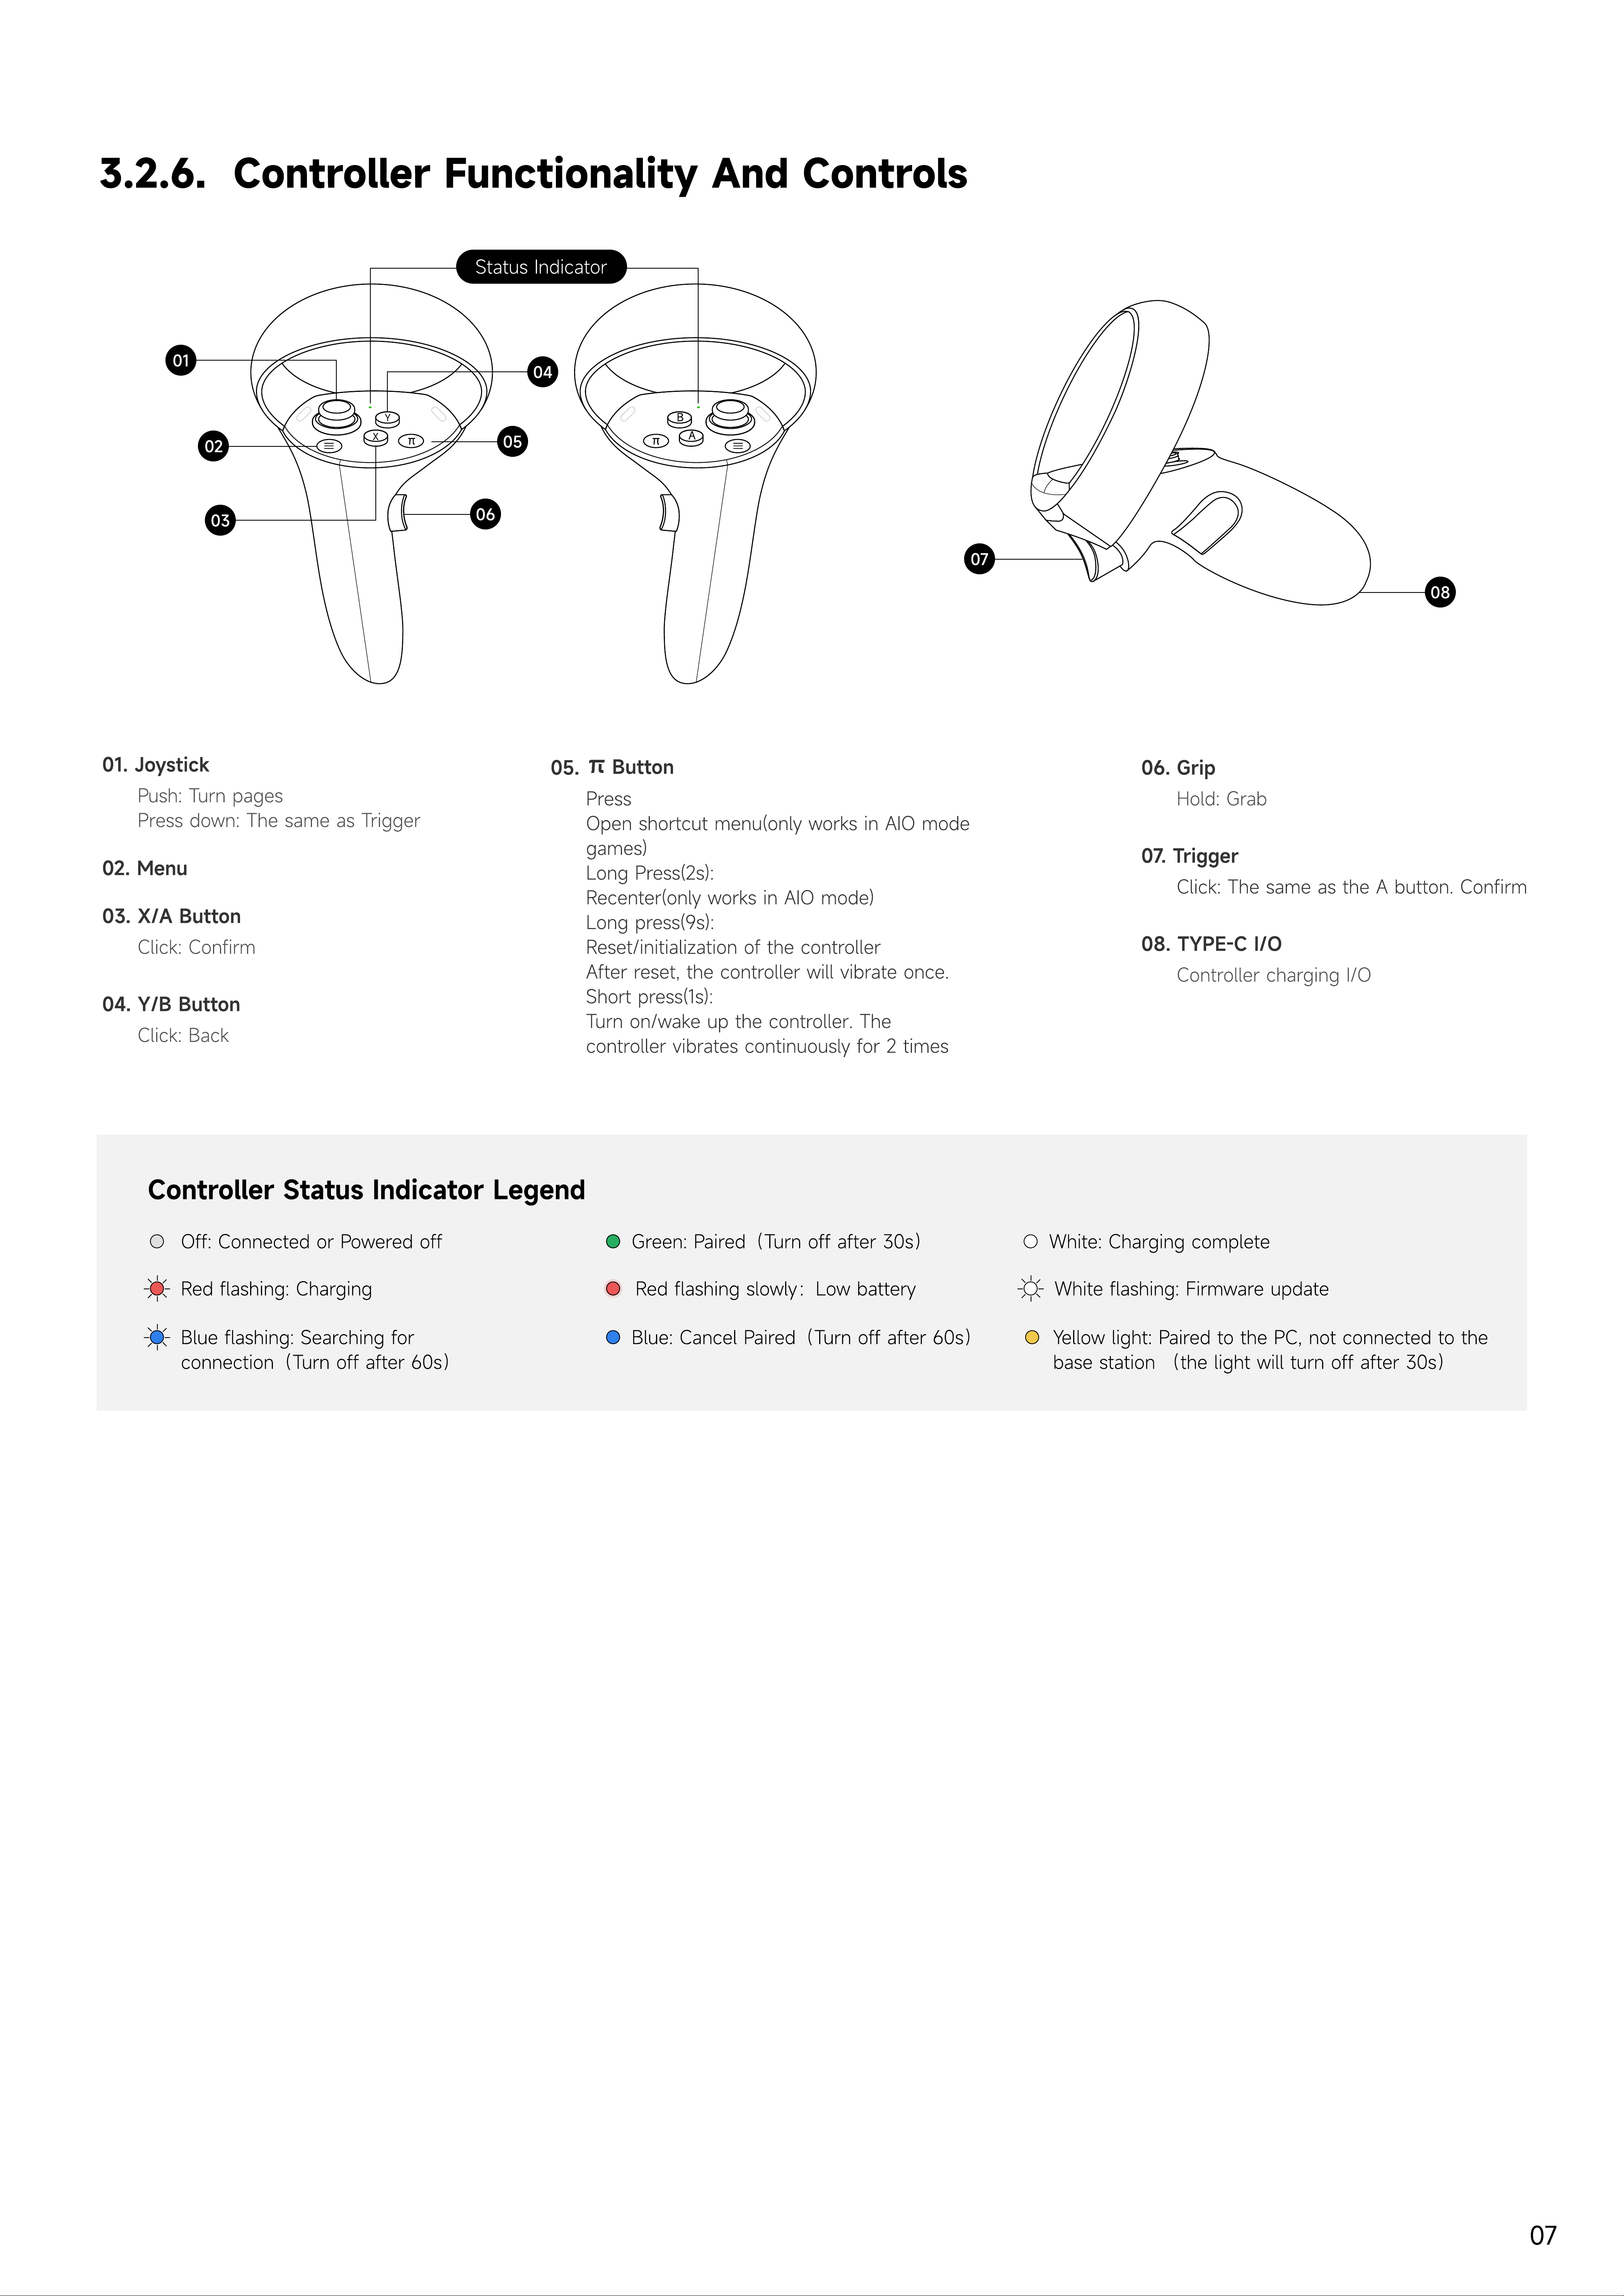
3.2.6. Controller unctionality and Controls ........................................................................................
3.2.7. How to Connect and Turn on the Headset ...............................................................................
3.2.8. New Controller Pairing (Left and Right Controller Need to be Paired Separately) .......
3.2.9. How to Adjust the Headset for a Comfortable it and View ...............................................
3.2.10. irmware Updates .........................................................................................................................
3.3. Standalone VR ..............................................................................................................................................
3.3.1. Standalone VR System Specifications (Differs from PcVR mode) .........................................
3.3.2. 6 Degrees of reedom VR ..............................................................................................................
3.3.3. Switching to Standalone VR mode ...............................................................................................
3.3.4. Powering on the Controllers ...........................................................................................................
3.3.5. Powering on the VR Headset. ........................................................................................................
3.3.6. How to Adjust the Headset for a Comfortable it and View .................................................
3.3.7. Product Details (Standalone VR) ....................................................................................................
3.3.8. Operating Instructions ......................................................................................................................
3.3.9. irmware Updates ..............................................................................................................................
4. Parts Replacement ...............................................................................................................................................
4.1. Lens replacement ........................................................................................................................................
4.2. aceplate replacement ..............................................................................................................................
4.3. Earphone replacement ..............................................................................................................................
5. Clean/Care Headset ............................................................................................................................................
6. Supervision .............................................................................................................................................................
7. Safety Warnings .....................................................................................................................................................
8. Battery safety ........................................................................................................................................................
9. Warranty Regulations ...........................................................................................................................................
0
0
0
0
0
0
0
0
0
1
1
1
1
1
1
1
1
1
1
2
2
2
2
Contents

1. In the box
01
CAUTION READ CAREFULLY
There is no power block included in the package with this device. If a power block is required, a power block or adapter with
accepts a USB Type C cable and provides (5V3 /9V2 ) meeting your local certification requirements should be purchased to
ensure functionality and longevity of the device and batteries.
Crystal HMD with original cover and 35PPD lens installe
Functions with the Standard Faceplate and MR Faceplat
For Direct connection between HMD and P
Used to Charge Batteries without the HM
6000m h capacity per battery. Batteries are removable and swappable
For Charging the Controllers or the Charging Sheat
Matches the screws used to secure the lenses to the HMD. Used to Change Lense
n after sales service card…...what else do you want to know about it?
Crysta
Controlle
DP Cabl
Charging Sheat
Rechargeable batter
Type-c Cabl
Screwdriver+scre
fter-sales service card
1
uni
pai
uni
uni
piec
uni
uni
copy
Crysta
Standard SKU

2. Important Health & Safety Notes
J This product is designed and intended to be used in an open and safe indoor area, free of any tripping or slipping hazards. To
avoid accidents, remain conscious to the potential confines of your physical area and respect the boundary of your virtual area
whenever you see it. Be sure to wear the lanyards when using the Controllers. Make sure that there is enough space around your
head and body (at least 2 meters by 2 meters) to stretch your arms to avoid damage or injury to yourself, others, and your
surroundings,
J This product is not recommended for children aged 12 and under. It is recommended to keep headsets, controllers and accessories
out of the reach of children. Teenagers aged 13 and over must use it under adult supervision to avoid accidents,
J Do not expose the optical lenses to direct sunlight or other strong light sources. Exposure to direct sunlight may cause
permanent yellow spot damage on the screen.
J This product is designed to accommodate most prescription glasses. Make sure to wear the VR Headset in a manner in which the
VR Headset lenses do not rub against or impair your prescription lenses. If your prescription lenses do not fit, contacts can also
be worn inside the device,
J This product supports both manual and auto IPD adjustments. Please pay great attention when manually adjusting the IPD. hen set
to the minimum IPD the sides of the lens barrel may touch the bridge of the nose. This is normal. Please note that using an
inappropriate IPD may increase the risk of discomfort,
J Prolonged use may cause dizziness or eye fatigue. Eye strain caused by prolonged use will typically subside as you become
accustomed to wearing the headset over multiple sessions. e recommend occasional breaks to allow your eyes to properly rest.
In the majority of cases this will relieve your eye fatigue. If you feel any discomfort, stop using the product immediately. If the
discomfort persists, seek medical advice,
J Our product and packaging are updated regularly, and the functions and contents of the standalone headset mode may be
upgraded in the future. Therefore, the content, appearance and functionality listed in this manual and product packaging are
subject to change and may not reflect the final product. These instructions are for reference only.
Screen damage caused by sunlight exposure or other strong sources of light
is not covered by the warranty[
02

3. Operation guide
03
3.1. Product etails (in box)
A Pimax Crysta9
A Controller?
A Batter1
A Charging SheatE
A 5M DP Cabl5
A Replaceable lenses
3.2. PC VR
3.2.1. PC Performance requirements
NVIDIA®️GeForce RTX 2070 and abov
Intel® Core™ i5-12500/ AMD Ryzen™ 7 3700X and above(Avoid using CPU with integrated GPU
16GB and above
GP
CP
RAM
For more detailed system requirements, please refer to the official website:https://pimax.com/crystal/
3.2.2. Switching to PCVR mode
P
CAI
O
If you switch modes while the headset is on, the headset will restart automatically. This is normal.

04
3.2.3. How to Download and Use the Pimax Play
Step 1:Confirm that Steam R has been installed
Pimax Play Pimax is a tool necessary for your headset to connect to a Windows 10/11 computer
https://pimax.com/downloads-manuals/
Step 2:Download and install the Pimax Play
Step 3:Register and log in to the Pimax Play

05
3.2.4. Installing and Replacing the Battery
When installing the battery, it is necessary to confirm that the clips ha e properly engaged with the locking mechanism. This
pre ents the battery from falling out. To remo e the battery grip both depressable clips tightly and gently pull the battery from
the casing.

06
3.2.5. Product Details (PCVR)
03. Power button
Power on: press and hold for 2 second
Shutdown: press and hold for 5 second
Restart: press and hold for 10 second
Sleep mode:Short press in power-on state
06. Interpupulary Distance Adjustment Button
10. Proximity Sensor
The system wakes up when the VR headset
is put on and sleeps when VR headset is
taken off.
13. DP extension cable port
A more convenient way to connect DP cable.
This extension can be forgone in favor of a
direct connection if the user prefers.
01. Volume button
11. PC/AIO Switch
07. Tracking Camera
Do not block cameras when the headset is
in use.
04. Vents 08. Removable Foam Facial Interface
02. Status
i
ndicator
0
5
.
M
i
n
i
-H
D
MI
I/O
F
or connecting wireless modules
0
9
.
E
ye Tracking Camera
Do not block cameras when the headset is
in use.
12. Side T
Y
P
E-
C I/O
U
sed for charging the headset and data
transmission
14.
L
eft/Right
L
oudspeaker
Replaceable earphones
1
5
. Power Cable
※W
arning: Do not bend
,
punch or drag the
cable.
C
able damage can cause a variety of
issues.
16. Top Strap
U
sed to ad
j
ust the pressure applied to the
top of the head.
1
9
. Bottom T
Y
P
E-
C I/O
U
sed to connect accessories such as hand
and gesture tracking modules.
17. Battery Sheath
18. Strap Dial
VR
H
eadset
S
tatus
In
dicator
L
e
g
e
n
d
Y
ellow: Replace the battery
(I
t will turn off
after replacement or after shutdown
)
Red:
L
ow power
W
hite:
C
harging completed
W
hite flashing: the headset is turning on
(
the light will turn off after
3
s
)
B
lue:
C
harging
(C
onnect the DP cable
)
O
ff: Sleeping
/
Powered off
/
interrupt
08
09
12
01
02
03
07
06
10
11
05
04

07
3.2.6. Controller Functionality and Controls
03. X/ button
Click: Confirm
06. Grip
Hold: Grab
01. Joystick
Push: Turn page
Press down: The same as Trigger
07. Trigger
Click: The same as the A button. Confirm
04. Y/B button
Click: Back
08. TYPE-C I/O
Controller charging I/O
02. Menu
05. button
Pres
Open shortcut menu(only works in AIO mode
games
Long Press(2s)
Recenter(only works in AIO mode
Long press(9s):
Reset/initialization of the controlle
After reset, the controller will vibrate once
Short press(1s):
Turn on/wake up the controller. The
controller vibrates continuously for 2 times
Y
ellow light: Paired to the PC, not connected to the
base station
(
the light will turn off after
30
s
)
Controll r
Status
Indicator
L g nd
Red flashing slowly
:
Low battery
W
hite: Charging complete
Blue flashing: Searching for
connection
(
Turn off after
60
s
)
Red flashing: Charging
W
hite flashing:
F
irmware update
Blue: Cancel Paired
(
Turn off after
60
s
)
Green: Paired
(
Turn off after
30
s
)
Off: Connected or Powered off
A
B
π
X
Y
π
07
02
08
06
05
04
Status Indicator
01
03

08
3.2.7. Connect to PC
Step 1: Connect the ower ada ter to the USB-HUB.
Step 2: Connect the DP cable. Put two USB lugs into the USB-HUB, and the DP cable into the com uter.
Step 3: Connect the USB-HUB to the PC.Use the se arate USB to USB cable.
Step 4: Connect the DP cable to the headset.
For a more detailed guide, lease refer to the PimaxClient beginners guide.

09
3.2. . New controller pairing (left and right controller need to be
paired separately)
Step 1: Charge the controller for at least 15 minutes before pairing to ensure sufficient power of the controller.
Step 2: Cancel pairing: Press the menu button + π button at the same time until the blue light is on.
Step 3: Click SET PAIR in the Pimax Play, then press and hold A+B/X+Y until the controller’s indicator light begins flashing blue.
Step 4: According to the prompt, and then click PAIR in the Pimax Play.
Step 5: Wait for the controller’s green indicator light to come on. Once the light comes on the Pimax Play will that the controllers
have been paired and the UI should show the controller graphic illuminated in the color green.
When the indicator light Flashes Red, it is charging. If the indicator does not flash, re-plug the charging cable or press the π
button.
It is paired by default when leaving the factory.
ì The pairing of controllers needs to be done individually one by oneÔ
ì During the pairing process, it is necessary to ensure that the headset is not in sleep mode.

10
3.2.9. How to djust the Headset for a Comfortable Fit and View
Step 1: Adjust the strap dial located on the back of the main strap to tighten or loosen the fit.
Step 2: Fine-tune the top headstrap to adjust the headset’s vertical position on your face.
Step 3: Fine-tune the length and position of the straps until you are comfortable with the fit and visual experience.
Step 4: The Auto IPD feature will adjust the IPD to the appropriate position.
Step 5: Press the headband down to the back of the head and tighten the strap dial.
You can also adjust the IPD in the "device settings → IPD" on the PimaxClient, enter the value of your IPD, and click "setting"
to adjust the IPD to the appropriate position;
CAUTION READ CAREFULLY
îí Do not forcibly move the lens cylinder to avoid damage×
Öí Please note that improper IPD may cause visual ghosting or eye fatigue. Accurate IPD settings help to obtain clear images and
reduce eye fatigue.
Step 6: Adjust the head strap to reduce pressure on the forehead.

11
3.2.10. How to Update Firmware
Open the Pimax Play on your PC. Navi ate to "Device Settin s → Check for Updates" in the client. Pimax Play; The system will check the
currently installed software and firmware version, and will prompt you to perform an update if there is a new version available on the server.
CAUTION READ CAREFULLY
rm When updatin the device firmware, the headset must be paired with the controllers to perform the OTA update:b
Nm Before updatin the firmware, please check the power of the headset and controllers. We that you only perform updates when
the power of the headset and controllers More than 3 battery li htsb
Jm Please do not unplu the USB cable or turn off the computer when updatin the device firmware;
3.3. Standalone VR
3.3.1. Standalone VR System Specifications
3.2 inches *
Androi
SnapDra on™ XR
Qualcomm® Adreno™ 65
8G
256G
Wifi6E 2.4G 5G 6
BT5.
Type-C * 3, mini-HDMI, DP1.
Power Button, Volume Button, IPD adjustment Button
Scree
Syste
CP
GP
RA
RO
WIF
Bluetoot
I/
Button
Items Specifications
3.3.2.
6
D
e
g
rees
o
f Freedom VR
The device can track your translational and rotational movements in all directions
(
up/down, left/ri ht, forward/backward, pitch, roll, and
yaw
)
.
Y
our movements in the real world will be captured and translated to what you see in the virtual world when interactin with
appropriate content
Ensure a safe environment before you start your VR experience.
rm Clear a safe indoor area of at least 2 meters by 2 meters.
K
eep the room bri ht, avoid spaces with mainly sin le
-
colored walls,
lass, mirrors, movin pictures or other similar objectsm
Nm Remove the protective film that covers the headset
’
s front cameras. Wear the lanyards connected to the Controllers. *Controllers
used without
L
anyards are at risk of bein dropped or thrown durin ameplaym
Jm Set up your environment by followin instructions on the VR Headset screen.
CAUTION READ CAREFULLY
This product can not uarantee your safety even with a uardian system, you will need to always pay attention to the surroundin
safety. While a uardian boundary can serve as a uide to help you ensure your own safety, the responsibility to create, maintain,
and make use of a safe playspace falls solely on the user.

12
3.3.3. Switching to Standalone VR mode
P
CAI
O
3.3.4. Powering on the Controllers
If you switch between PCVR and Standalone mode while the headset is on, the headset will restart once automatically. This is
normal behavior.
Press and hold the π Button for 2 seconds (blue light/green light always on)
CAUTION READ CAREFULLY
Before turning on the controllers, please charge the batteries for a period of time (>30 minutes) in advance to ensure that the
controllers have sufficient power.

13
3.3.5. Powering on the VR Headset
Press and ho d the power button for 2s to turn on the headset.
3.3.6. How to adjust the Headset for a Comfortable Fit and View
Step 1: Adjust the strap dia counter-c ockwise to open the strap to it’s widest setting.
Step 2: P ace the headset on your head, adjusting the position of the headset so that your eyes are in the position of best visua
qua ity.
Step 3: Tighten the rear dia unti sufficient pressure is achieved.
Step 4: Adjust the top strap unti the headset’s vertica position remains at it’s optima ocation for your eyes.
Step 5: The headset’s auto ipd wi adjust the ens position automatica y to give you the c earest image. Manua adjustments can
be made using the ipd adjustment buttons on the top eft of the headset.
CAUTION READ CAREFULLY
D
o not forcib y move the ens cy inder to avoid damaging the motor mechanism
P ease note that improper
I
P
D
settings may cause visua ghosting or eye fatigue. Accurate
I
P
D
settings he p to obtain c ear
images and reduce eye fatigue.
Step
6
:
F
ine tune both straps and headset position unti a comfortab e fit is achieved.
P
CAI
O
The first boot wi take a ong time to oad, p ease eave the he met for 1
0
minutes before use.

14
3.3.7. Product Details (AIO)
01. Volu e button
02. Status indicator
03. Power button
Power on: press and hold for 2 second
Shutdown: press and hold for 5 second
Restart: press and hold for 10 second
Sleep mode:Short press in power-on state
04. Mini-HDMI I/O
For connecting wireless modules
05. IPD adjust ent button
06. Tracking Ca era
Do not block when using
07. Foa mask
08. Eye Tracking Ca era
Do not block when using
09. Proxi ity Sensor
After wearing the headset, the system wakes
up automatically
10. PC/
A
IO Switc
h
11. Side T
Y
PE-C I/O
U
sed for charging the headset and data
transmission
12. S
p
eaker Syste
Replaceable earphone
13. Power Ca
b
le
※W
arning: Do not bend, punch or drag
14. To
p
Stra
p
U
sed to ad
j
ust the head pressure
15.
B
attery S
h
eat
h
16. Stra
p
Dial
17.
B
otto T
Y
PE-C I/O
U
sed to connect accessories such as hand
and gesture tracking modules
.
H
eadset
S
tatus I
n
dicator
Y
ellow: Replace the battery
(I
t will turn off
after replacement or after shutdown
)
Red:
L
ow power
W
hite:
C
harging completed
W
hite flashing: the headset is powering
on
(
the light will turn off after
3
s
)
B
lue:
C
harging
O
ff: Sleeping
/
Powered off
/
interrupt
0
08
11
01
02
03
06
13
14
15
16
05
12
09
10
1
04

15
03. X/A button
Click: Confirm
06. Gr p
Hold: Grab
01. Joyst ck
Push: Turn page
Press down: The same as Trigger
07. Tr gger
Click: The same as the A button to Confirm
04. Y/B button
Click: Back
08. TYPE-C I/O
Controller charging I/O
02. Menu
Single-click: Screensho
Double-click: Screen recording
05. π button
Single-click: Reset Vie
Double-click: Call up shortcut men
Long press (9s): the controller will reset/turn
on. After a reset, the controllers will vibrate
once. The vibration duration will last 2
Short press (1s): the controller starts up/
wakes up from standby, and the controllers
will vibrate continuously 2 times. The
duration of each vibration is 0.5s
Y
ellow light: Paired to the PC, not connected to the
base station
(
the light will turn off after
3
0s
)
Controll r
Status
Indicator
L g nd
Red flashing slowly
:
Low battery
W
hite: Charging complete
Blue flashing: Searching for connection
(Tun off after
6
0s)
Red flashing: Charging
W
hite flashing:
F
irmware update
Blue: Cancel Paired
(
Turn off after
6
0s
)
Green: Paired
(
Turn off after
3
0s
)
Off: Connected or Powered off
H ads t
Control
Mod
If the Controllers are not connected, you can interact with the home screen by moving your head to direct the crosshairs over your
intended selection and clicking the Volume Up/Down button on the VR Headset.
Switching
th
point r
of
th
mast r
Controll r
O
n the home screen, short press the
T
rigger of your left or right Controller to switch the pointer to the corresponding controller.
T
he
hand with the pointer is referred to as the master controller.
Scr n
r
-
c nt ring
P
ut on the VR Headset and look straight ahead, press and hold the
π
button of the Controller or VR Headset
(
or the Volume Down
button of the VR Headset in head control mode
)
for more than
1
second to re
-
center the screen.
3.3.8. Operating Instructions
A
B
π
X
Y
π
07
02
08
06
05
04
Status Indicator
01
03

16
Disconnect the Controller
Press and hold the ome button until the status indicator turns red and the Controller vibrates.
Pairing a new Controller
If you need to pair a new Controller (the VR eadset can only connect one left Controller and one right Controller) or reconnect with an
unpaired Controller
Go to “Settings” ►“equipment”► “Controller”, click on “Pair”. Press and hold the“A button+B button”/“X button+Y button”of the controller
at the same time until you feel a slight vibration (lasting about 4s), if the status indicator of the controller changes from blue to green,
the pairing has been completed successfully.
Sleep / Wake up the Headset
Option 1 (Proximity Sensor):
Option 2 (POWER Button):
Take off the VR eadset will initiate the automatic sleep function: putting the eadset on will wake the
headset from sleep
Press the Power button of the eadset for manual sleeping or waking up.
Sleep / Wake up the Controller
Wake up
① Pick up or touch the controllers to wake them up automaticall
② Short press any button on the controllers to wake them
Sleep
① When the headset is working normally, the controllers will enter sleep mode after
being idle for 15 minute
② When one of the following conditions is met, the controllers will sleep immediately:
1. When the headset is hybernating
2. When the controllers are unpaired
3. When the headset is turned off.
Hardware reset
VR eadset reset:
If the visual in the headset free
z
es, or the headset does not respond after a short press of the Power button, you can press the Power
button of the headset for more than 1
0
seconds to reboot the headset
Controller reset:
If the controllers have no response to the home button and/or any button or the virtual controllers in the headset is stuck, you can press
and hold the
π
button of the controllers for
9
seconds to reset the controllers
The VR eadset Ad
j
ustment:
This device has no myopia ad
j
ustment function. The headset allows wearing most standard glasses with a frame width of less than
1
50
mm.
C
AUTION
REA
D C
AREFULLY
When the headset wakes up after hibernation, it may experience a temporary position shift, which it will recover from after a
moment.
C
AUTION
REA
D C
AREFULLY
The virtual security
z
one reminder function of this product cannot completely guarantee your safety in the set area. Please pay
attention to the surrounding security situation at all times
Controllers
w
ill
a
uto
m
aticall
y
l
ow
p
ower
m
ode
t
o
s
a
v
e
p
ower
i
n
t
he
f
ollowing
c
ases
:
The controller has been idle for 1
5
minute
When the eadset enters deep sleep (a while after the VR eadset is taken off)
When the Controllers are unpaire
±
When the eadset is powered off

17
3.3.9. How to Update Firmware
Open the Pimax Client on your PC. Na igate to "De ice Settings → Check for Updates" in the client. Pimax Client; The system will check the
currently installed software and firmware ersion, and will prompt you to perform an update if there is a new ersion a ailable on the ser er.
CAUTION READ CAREFULLY
sn When updating the de ice firmware, the headset must be paired with the controllers to perform the OTA update:b
Nn Before updating the firmware, please check the power of the headset and controllers. We that you only perform updates when
the power of the headset and controllers all exceed 50%b
In Please do not unplug the USB cable or turn off the computer when updating the de ice firmware;

18
4. Parts replacement
4.1. Lens replacement
Step 1: Carefully unscrew and remove the mounting
screws on the lens;
Step 2: Gently grasp the edge of the lens, rotate and lift
the lens to remove it;
Step 3: Install the lens to be replaced on the lens barrel,
and gently press the edge of the lens bracket to
ensure that the installation position is aligned
properly;
Step 4: Put the mounting screws back into their original
position and tighten gently but firmly;
CAUTION READ CAREFULLY
When replacing the lens, it is necessary to disconnect the power supply of the device, disconnect the DP cable and wear anti-
static gloves.
4.2. Faceplate replacement
Step 1: Remove the Cover;
Other manuals for Crystal
3
Table of contents
Other PIMAX Virtual Reality Headset manuals