PINC Technology PT-WS-V0-T-1-PB0-TY User manual

Operating Temperature: -20°C to +60 °C
Dimensions (LxWxH): 51x47x21 mm3
Supports Wi-Fi 802.11 b/g/n
Supports 10 Amp relay
Small size Low cost
High quality touch sensor
Inbuilt 2MB Flash for Program Storage
Contains Push Button for User Input
Contains LED’s for User Indications
Power Input: 85VAC to 265 VAC,
50/60Hz
No size differences between single and
dual gang switches
Features
PINC Technology develop the Wi-Fi touch smart switch for home
automation. The switch is compatible with anchor/Roma standard it
comes with 10 Amps of relay, small size, low cost. It supports Amazon
alexa, Google Home, IFTTT etc. Now available on e commerce website like
amazon, flipkart, snapdeal, clubfactory etc.
Modular Wi-Fi Touch Smart Switch
Connect with us
Devices supports
Raj apartment Block no 1,
Prahaladnagar, AHmedabad, Gujarat,
India, 380015, Mo :- 9925020032
business@pincTechnology.com
Smart WiFi Touch Switch
WiFI Switch
Touch Switch
Available On
Powered By
Compatible with Anchor/ROMA
www.pinctechnology.com
Pinctechnology.com/product

www.pinctechnology.com App User Manual
Wi-Fi Switch Modular PINC Technology Page 2 of 23
DON’T WANT TO READ THIS USER MANUAL DON’T WORRY JUST SEE BELOW
VIDEO FOR APP installation
1) https://youtu.be/qYRx73OUx3U
2) https://youtu.be/Y7n8NXoKYbQ
3) https://youtu.be/1XDaPbbDwgI
INDEX
1 COPYRIGHT INFO......................................................................................................................................................... 3
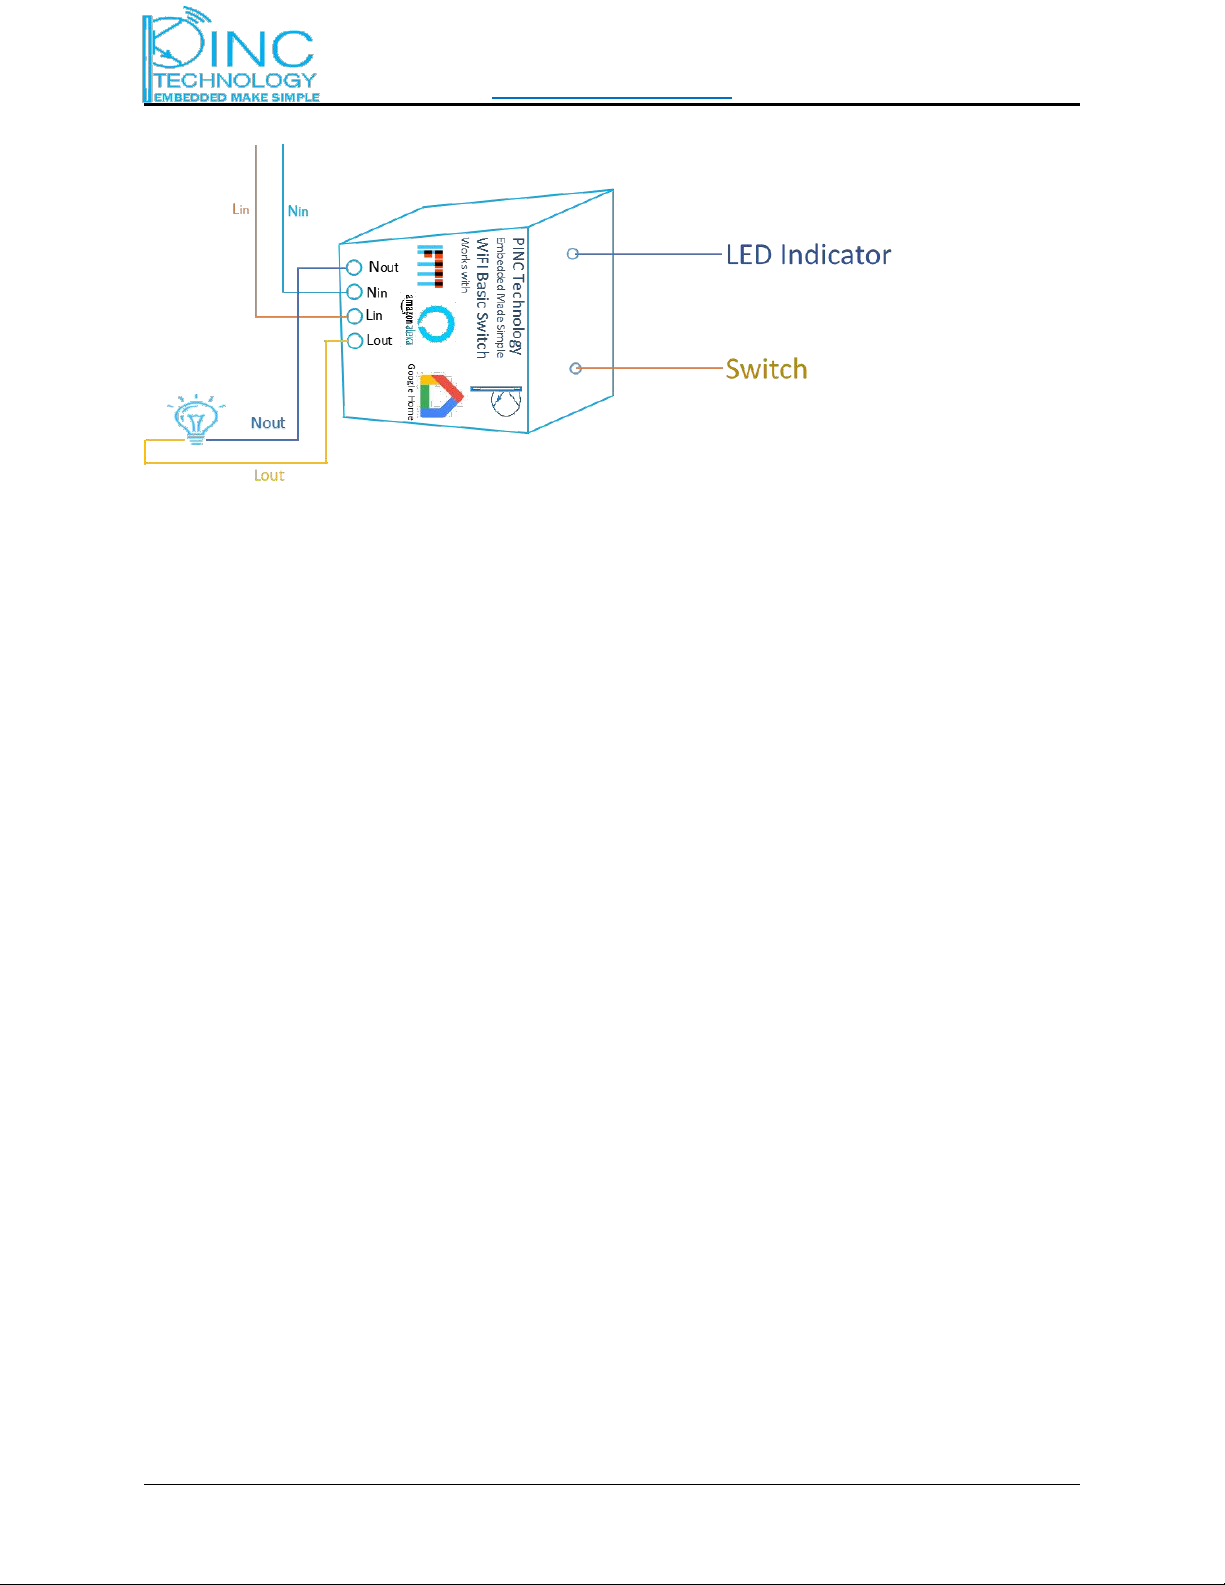
2 OVERVIEW................................................................................................................................................................... 4
2.1 WIFISWITCH FEATURES............................................................................................................................................. 6
2.2 WIFISWITCH VARIANTS............................................................................................................................................. 6
3 APP OVERVIEW............................................................................................................................................................7
3.1 EWELINK BASIC FUNCTIONS:.......................................................................................................................................7
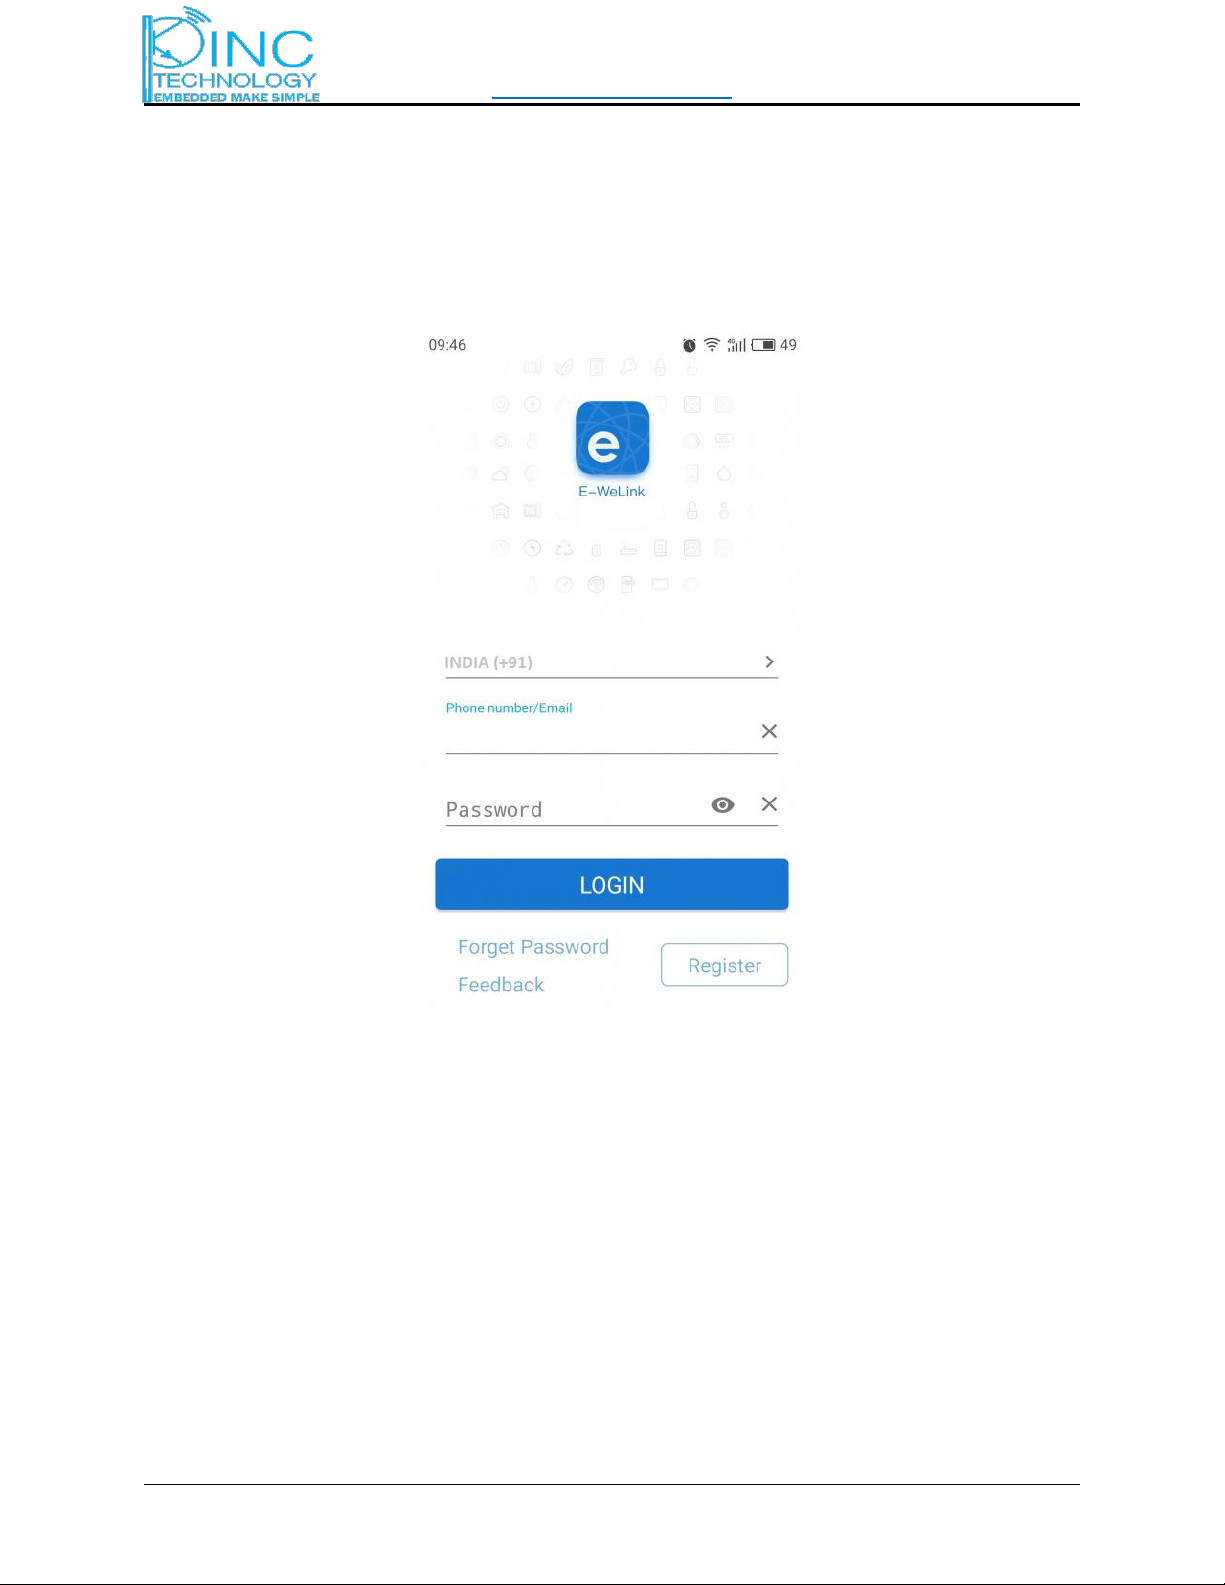
3.2 REGISTRATION AND LOG IN......................................................................................................................................... 8
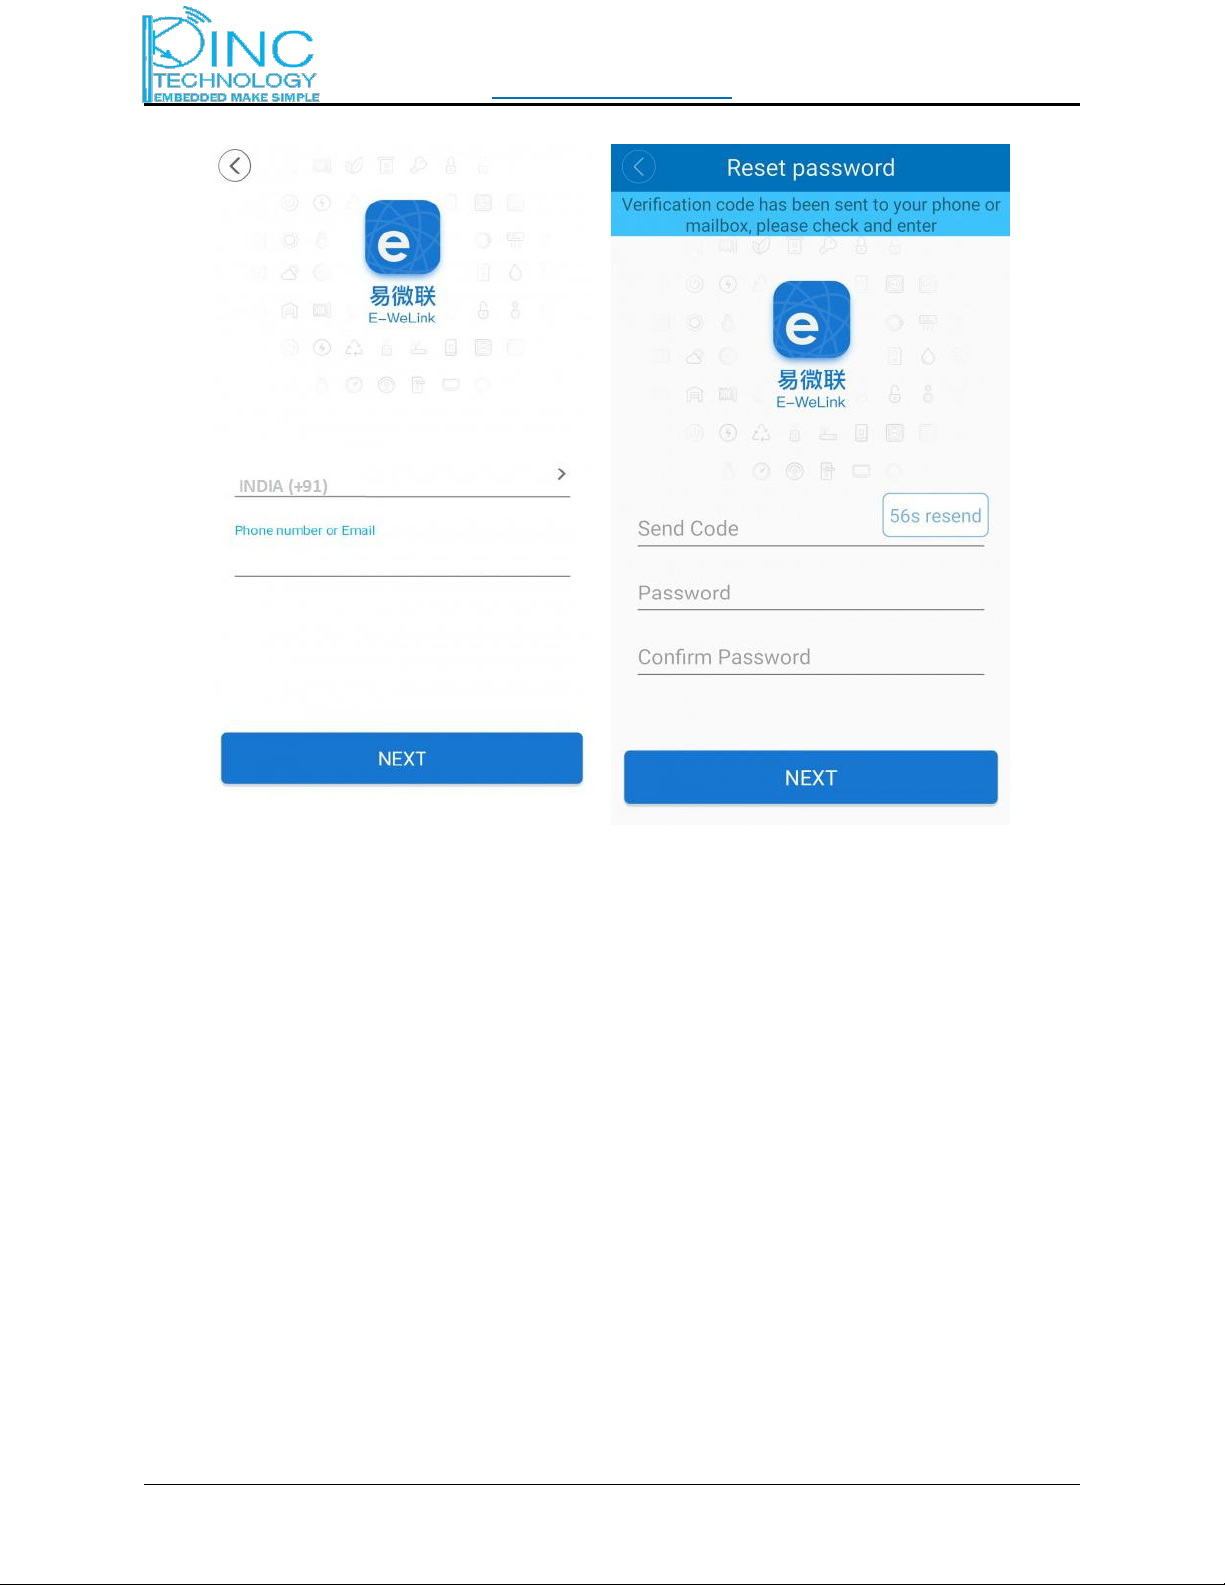
3.3 RESET PASSWORD......................................................................................................................................................9
3.4 WIFIPAIRING AND DEVICE ADDITION.........................................................................................................................10
3.5 DEVICE LIST............................................................................................................................................................ 14
3.6 DEVICE DETAILS...................................................................................................................................................... 14
3.7 DEVICE SETTINGS.....................................................................................................................................................15
3.8 SHARE CONTROL..................................................................................................................................................... 15
3.9 TIMING TASK.......................................................................................................................................................... 16
3.10 SCHEDULE TIMING.................................................................................................................................................17
3.11 COUNTDOWN TIMING............................................................................................................................................ 17
3.12 LOOP TIMING....................................................................................................................................................... 17
3.13 SCENE..................................................................................................................................................................18
3.14 CLICK TO EXECUTE................................................................................................................................................. 18
3.15 USER CENTER....................................................................................................................................................... 19
3.16 LAN CONTROL......................................................................................................................................................22
3.17 FAILURE SCENARIO................................................................................................................................................ 23
Revision History
Revision
Date
Details of change
Author
Reviewer
Approver
0.1
21-05-18
Initial draft
YP
YP
YP

www.pinctechnology.com App User Manual
Wi-Fi Switch Modular PINC Technology Page 3 of 23
1 COPYRIGHT INFO
The information contained in this document is the proprietary information of PINC Technology. The
contents are confidential and any disclosure to persons other than the officers, employees, agents or
subcontractors of the owner or licensee of this document, without the prior written consent of PINC
Technology, is strictly prohibited.
Further, no portion of this document may be reproduced, stored in a retrieval system, or transmitted in
any form or by any means, electronic or mechanical, including photocopying and recording, without the
prior written consent of PINC Technology, the copyright holder.
PINC Technology publishes this document without making any warranty as to the content contained
herein. Further PINC Technology reserves the right to make modifications, additions and deletions to
this document due to typographical errors, inaccurate information, or improvements to reference
design platforms or products mentioned in the document at any time and without notice. Such changes
will, nevertheless be incorporated into new editions of this document.

www.pinctechnology.com App User Manual
Wi-Fi Switch Modular PINC Technology Page 4 of 23
2 OVERVIEW
The “Wi-Fi Switch” is a smart switch for home automation. It consists a b/g/n Wi-Fi. It is made for Indian
anchor/Roma standard. The range of the switch out side of the wall is >80m and inside the wall >40m. It
supports IFTTT, Google home, Amazon Alexa. It is most commonly used for the home automation,
building automation etc. The switch is low cost small size, touch functions, high current, high reliability.
Mobile app is connected with cloud via internet connection. Wi-Fi Switch is connected with router via
Wi-Fi connection. Mobile app send the command and Wi-Fi switch will turn on/off accordingly.
The switch supports the tasmota firmware, Blynk SDK, Arduino SDK, ESP SDK and too many things.
Wi-Fi Router
Wi-Fi

www.pinctechnology.com App User Manual
Wi-Fi Switch Modular PINC Technology Page 5 of 23
LED Indicator is the status LED which shows the state of the Wi-Fi connection and relay connection.
When BLUE LED blinks 3 times per second then the device is in provision/Access point mode.
When BLUE LED blinks very slow rate 3 sec/1 time then it is configured mode(Connected to wife).
When RED LED is off then relay is OFF
Switch is used to turn off and on the device. The secondary function of switch is to put the Wi-Fi into
provision mode. When switch is pressed for >3 second then the app will remove all the device and put
wofo into provision mode.
When first time device come from factory then after giving power it comes into the provision/Access
point mode. If it is not in provision mode once received from the factory then you have to put it into
access point mode by pressing the switch >3 second, Until the blue LED will start blinking 3
times/second.
Lin & Nin is the phase/line and neutral input of the 120/230VAC.
Lout & Nout is the phase/line and neutral output of the 120/230VAC.

www.pinctechnology.com App User Manual
Wi-Fi Switch Modular PINC Technology Page 6 of 23
2.1 Wi-Fi Switch Features
Wi-Fi Switch contain single board solutions remote operating switch. It support 10 Amp of current.
Operating Temp. -20°C to +60 °C
Package size (L x W x H) : 51x24x48 mm3
Inbuilt b/g/n Wi-Fi interface
Inbuilt 2 MB flash for storage
Contains Push button for user interaction
Contains LED's for indication
Operating in universal power range from 85 VAC to 265 VAC
OTA Support for firmware upgrade
Wi-Fi support for b/g/n
Built-in low-power 32-bit CPU, can be concurrently used as an application processor (main-
frequency support 80MHz & 160MHz)
Built-in low-power 32-bit CPU can be concurrently used as an application processor (main-
frequency support 80MHz and 160MHz)
2.2 Wi-Fi Switch Variants
Modular Wi-Fi smart Switch contain single board solutions with Wi-Fi, Touch/Normal switch. Below are
the variants of Wi-Fi Switch board.
PT-WS-V0-T-1-PB0-TY
Sr. No.
Product Hardware
Variants
Wi-Fi Switch
Version
Touch/Tactile
No Of gang
Power
Board
1
PT-WS-V0-T-1-PB0-TY
✔
0
Touch
1
PB0
2
PT-WS-V0-T-1-PB1
✔
0
Touch
1
PB1
3
PT-WS-V0-T-2-PB0
✔
0
Touch
2
PB0
4
PT-WS-V0-T-2-PB1
✔
0
Touch
2
PB1
5
PT-WS-V0-S-1-PB0
✔
0
Switch
1
PB0
6
PT-WS-V0-S-1-PB1
✔
0
Switch
1
PB1
7
PT-WS-V0-S-2-PB0
✔
0
Switch
2
PB0
8
PT-WS-V0-S-2-PB1
✔
0
Switch
2
PB1
9
PT-NS-V0-T-2-PB1
X
0
Touch
2
PB0
10
PT-NS-V0-T-2-PB0
X
0
Touch
2
PB1
11
PT-NS-V0-T-2-PB0
X
0
Touch
2
PB0
12
PT-NS-V0-T-2-PB1
X
0
Touch
2
PB1
13
PT-WS-V0-T-1-PB0
✔
0
Touch
1
PB0
Power Board PB0>>Commercial, PB1>>Industrial
Version
Wi-Fi Switch, Normal Switch
TUYA App, eWelink App, Without App
Number of Switches/Gang
Touch Switch, Push button switch, Mechanical Switch

www.pinctechnology.com App User Manual
Wi-Fi Switch Modular PINC Technology Page 7 of 23
3 APP OVERVIEW
eWeLink is a smart home control APP that can control pinc technologies touch Wi-Fi switch home
automation devices and cooperated products. It allows you to remote control and manage your favorite
smart devices in a single App. The smart home devices connect to home appliances and electronic
devices via WiFi, allowing you to remote control through the APP eWeLink. There isn't a limit to the
number of devices you can add to eWeLink, although we usually say 150.
3.1 eWeLink Basic Functions:
Remote on/off
Countdown/schedule timer
Share control
Group/scene management
Scene/smart scene
By adding the smart home devices to the eWeLink account, users can control the devices by following
and accessing to Coolkit's WeChat subscription account, or by adding a widget to mobile desktop later
on.
Users can download latest iOS eWeLink from Apple APP Store and Android eWeLink from Google Play.
Please scan below QR code. If you are using a lower version, please uninstall and then scan and
download the latest version.

www.pinctechnology.com App User Manual
Wi-Fi Switch Modular PINC Technology Page 8 of 23
Now we will explain how to use eWeLink.
3.2 Registration and Log in
eWeLink supports multiple languages. It currently includes simplified English, Danish, Russian, Italian,
Polish, France, Spanish, German, Turkish, Slovakia, Greece, Bulgaria, Czech, Slovenian,
Portuguese(Brazil), etc. It will support more languages in the future.
It supports registration by email or mobile phone number. We suggest you update your app to the latest
version. Users from Asian countries should register with mobile phone number. While users outside Asian
area should register with email address. Turkey users also need to register with phone number. But
sometimes the app will judge which server is more stable in your location, then it will auto judge whether to
let you connect with Asian servers (register with phone number) or other servers(register with email).
Select your country/region code, input a valid mobile phone number, then your phone will receive an SMS
containing a verification code on the phone number you provided. If you do not receive the SMS, please
disable SMS blocking. If registered by email address, you'll also need to select a random country code, you’ll
receive an email containing a verification code. Fill in the verification code and password, confirm password
and submit. For safety, the password should be no less than 8 characters. If you failed to receive any code,
please submit a feedback on the App.
One account can only log in to one mobile phone. If you have logged in with phone A, later you log in with
phone B, your device will auto-exit from phone A.

www.pinctechnology.com App User Manual
Wi-Fi Switch Modular PINC Technology Page 10 of 23
3.4 Wi-Fi Pairing and Device Addition
eWeLink obtains device status and controls devices by sending commands through the cloud server. This
means all devices must first connect to the Wi-Fi router and connect to our Amazon AWS server. So
every new device must be paired with user's home Wi-Fi and added to eWeLink account.
Before adding a device, Android phone must allow Wi-Fi. Please make sure the Wi-Fi your phone
connects is the same as the one you select in eWeLink device pairing Wi-Fi option. Please note that all
eWeLink products should be paired via the Wi-Fi router, starting from 3.1.0, LAN is not allowed any
more.
Instructions are given below on how to pair with Wi-Fi and add a new device:

www.pinctechnology.com App User Manual
Wi-Fi Switch Modular PINC Technology Page 11 of 23
Step 1. Long press your device Wi-Fi pairing switch until it begins fast blinking.
Step 2. Open eWeLink. Click "+" to add the device. For Android, please select the pairing icon according
to how the LED blinks. Click NEXT.
For iOS, please go to phone Setting>WiFi>connect to the WiFi that begins with ITEAD-*****, enter
default password 12345678. Then go back to eWeLink, select the pairing icon (TOUCH or AP) according
to how the LED blinks. Tap on NEXT.

www.pinctechnology.com App User Manual
Wi-Fi Switch Modular PINC Technology Page 13 of 23
Step 3. Enter your home WiFi SSID and password. You must make sure the WiFi your are entering with is
the same with the one your phone connecting. If different, it will cause offline problem. If no password,
keep it blank. For the present, eWeLink only supports 2.4G wifi communication protocol. 5G band Wi-Fi
network is not supported. Tap on NEXT.

www.pinctechnology.com App User Manual
Wi-Fi Switch Modular PINC Technology Page 14 of 23
Step 4. eWeLink will auto-search and connect to your device. After this process, you can name the
device and submit. That's all!
After successfully added, make sure you don't change the Wi-Fi the product connects. Once you change
the WiFi, you must delete and re-add it to your account via the new WiFi.
3.5 Device List
After successfully added, all devices will be seen in the device list. Users can see which devices are
online which are not. Users can also see Wi-Fi signal strength, and whether there is new firmware to
update, etc. Users can directly turn on/off the device by tapping the small switch icon. Besides, users
can delete devices by tapping on the delete icon. Tap on the clock icon to see all timing schedules.
If you have too many devices, you may group them. Tap on the top "All Device" option to expand the
group information. Click "Manage Group" to set up different group for your devices.
3.6 Device Details
Tap on a specified device to enter into device control interface. Different devices will have different functions
and layout. Take some devices for example.
Although different device types will have a different interface, they still have some icons in common.
Setting: change device name, check the firmware version, enable/disable vibration switch.
Product info.: check manufacturer and model.

www.pinctechnology.com App User Manual
Wi-Fi Switch Modular PINC Technology Page 15 of 23
Share: the owner can share the device to other eWeLink users.
Timer: add new single/repeat schedules to turn on/off the device.
Countdown: add countdown timers to turn on/off the device.
3.7 Device Settings
In the upper right corner, there's a button contains device "Setting" and "Delete". In "Setting", you can
change the name of device and channel. Check firmware version and update to latest firmware. You can
enable or disable touch vibration. And most importantly, you can set power on state for your device.
Usually, when the electricity is cut off, when it comes again, your switch stays in off. Now by setting
power on state, your device will automatically in ON, OFF or KEEP when power on. KEEP: your device
will be in the same state as it is before electricity cut off.
3.8 Share Control
Device owner can share control of the devices to others, and thus others can turn on/off the device on
eWeLink. Or you can create multiple accounts, add all device to one account, then share the devices
with the other accounts. In sharing devices, the owner can authorize timer permissions to let the other
users create, modify, edit and delete timers. This functionality is great for the family as it will be great to
invite them to control together. The latest version supports to write a note in the sharing message, you
can write down your name so that the other user know who you are. There isn't a limit to the number of
users you can share with.

www.pinctechnology.com App User Manual
Wi-Fi Switch Modular PINC Technology Page 16 of 23
While sharing devices, both should stay on eWeLink. Because if the account you want to share is not
online, he/she will not receive the invitation message.
How to make it? Firstly click Share, enter the eWeLink account info.(select country code, enter the
phone number or email address) you want to share, tick the timer permissions you want to give, then
click OK. Remember do not enter the country code ahead of your phone number. The other account will
receive an invitation message. When he/she click Accept, the device will be shared successfully. The
other user has access to turn on/off the device and to change the timers.
Once the device has been deleted by the owner, it will also disappear from the others' shared list.
Note:
1.Only when the two accounts are registered with the servers of the same continent can be shared with, no
cross-continent accounts can be shared. If you use VPN to create accounts, they may connect to the server of
different continents. If you are located at the junction of two continents, for example, Asian-European
junction, the two accounts may connect to different servers. It's impossible to share from a phone number
based account to an email account or vice versa, because the phone number based account is connecting to
Asian servers, while the email based account doesn't.
2. The other users you share with can't access to scene, group or device power on status.
3.9 Timing Task
Timing task is a basic feature of all devices. The timing setting allows you to set a specified time to turn
on/off the device. Please note that deal to chip capacity limit, it only supports totally 8 enabled timing

www.pinctechnology.com App User Manual
Wi-Fi Switch Modular PINC Technology Page 17 of 23
tasks each device(including scheduled/countdown/loop timer). Currently, we provide three timing
types: scheduled timing, countdown timing and loop timing.
3.10 Schedule Timing
In schedule timer, you can set to turn on or off the device at the specified time for once or repeat dates.
3.11 Countdown Timing
Countdown timer allows users to turn on/off the device after a preset time.
3.12 Loop Timing
Loop timer can be auto-executed every preset time(say 1hr), and continue for a shorter preset time(say
20min). You can also choose not to tick the continuous cycle. For example, use loop timer to control
oxygen pump for the fish tank. You can use loop timer to turn on oxygen pump every hour and keep it
running for 20min and then auto-turn off each time.
The screenshot below is set the device to turn on every 10min and keep it working for 5min each time.

www.pinctechnology.com App User Manual
Wi-Fi Switch Modular PINC Technology Page 18 of 23
3.13 Scene
A scene is set up to auto-execute an action for all devices in the same scene. There are three kinds of
scenes, they are different in the trigger condition. The first one is triggered by a click, the second one is
triggered by some data of a device, such as temperature, humidity, light, air quality and noise level, the
third one is triggered by status from another device. Note that only device owner can create scenes,
and the system can save max 21 scenes(this limit was added at the end of 2017). Scenes can't be shared
to other users.
IFTTT doesn't support to use one applet to trigger another applet, so as our scene feature.
For example, you created two scenes: when device A is turned on, then turn on device B. When device B
is turned on, then turn on device C. The result is: When your device A is turned on, only device B can be
turned on, while device C won't be turned on.
3.14 Click to execute
By creating a scene like this, users can turn on/off a group of devices simultaneously. For example,
create a scene “Leave”, add all the devices to be set on or off to the scene, save it. Once you shut the
door, take out your phone and enter into the scene, go to scene “Leave”, tap on “Run”, all devices will
be turned off immediately.

www.pinctechnology.com App User Manual
Wi-Fi Switch Modular PINC Technology Page 19 of 23
Users should select “Click to execute”in the condition, add different existing devices, name the scene
and save it. The 2 channel and multichannel devices can even set power on state: on, off or keep.
If you don't find your device on the list, please check if your app version is too low. You should always
update to the latest version, which supports most features.
3.15 User Center
In user center, users can see some settings and information.

www.pinctechnology.com App User Manual
Wi-Fi Switch Modular PINC Technology Page 20 of 23
On the top, users can see how many groups and scenes they have created.
Feedback: Users can submit your feedback on Feedback. Our IT support will follow up the feedback and
reply in workdays.
You can also submit feedback on the login interface, as shown below:
This manual suits for next models
10
Table of contents
Popular Switch manuals by other brands

Videotec
Videotec SM84A operating instructions

Emerson
Emerson AVOCENT Installer/user guide

Essex Electronics
Essex Electronics Hand-E-Wave HEW-1S installation instructions

Linksys
Linksys NMH300 - Media Hub Home Entertainment... Quick installation guide

Cisco
Cisco 2960G-48TC - Catalyst Switch Product support bulletin

D-Link
D-Link Web Smart DES-1210-28P reference guide