Pioneer PDP 503CMX User manual

「据付工事」について
●
●
K042_Ja
本機は十分な技術・技能を有する専門業
者が据付けを行うことを前提に販売され
ているものです。据付け・取付けは必ず
工事専門業者または販売店にご依頼くだ
さい。
なお、据付け・取付けの不備、誤使用、改造、
天災などによる事故損傷については、弊
社は一切責任を負いません。

15
日本語
En
English
Français
Deutsch
Italiano
Nederlands
Español
Chinese
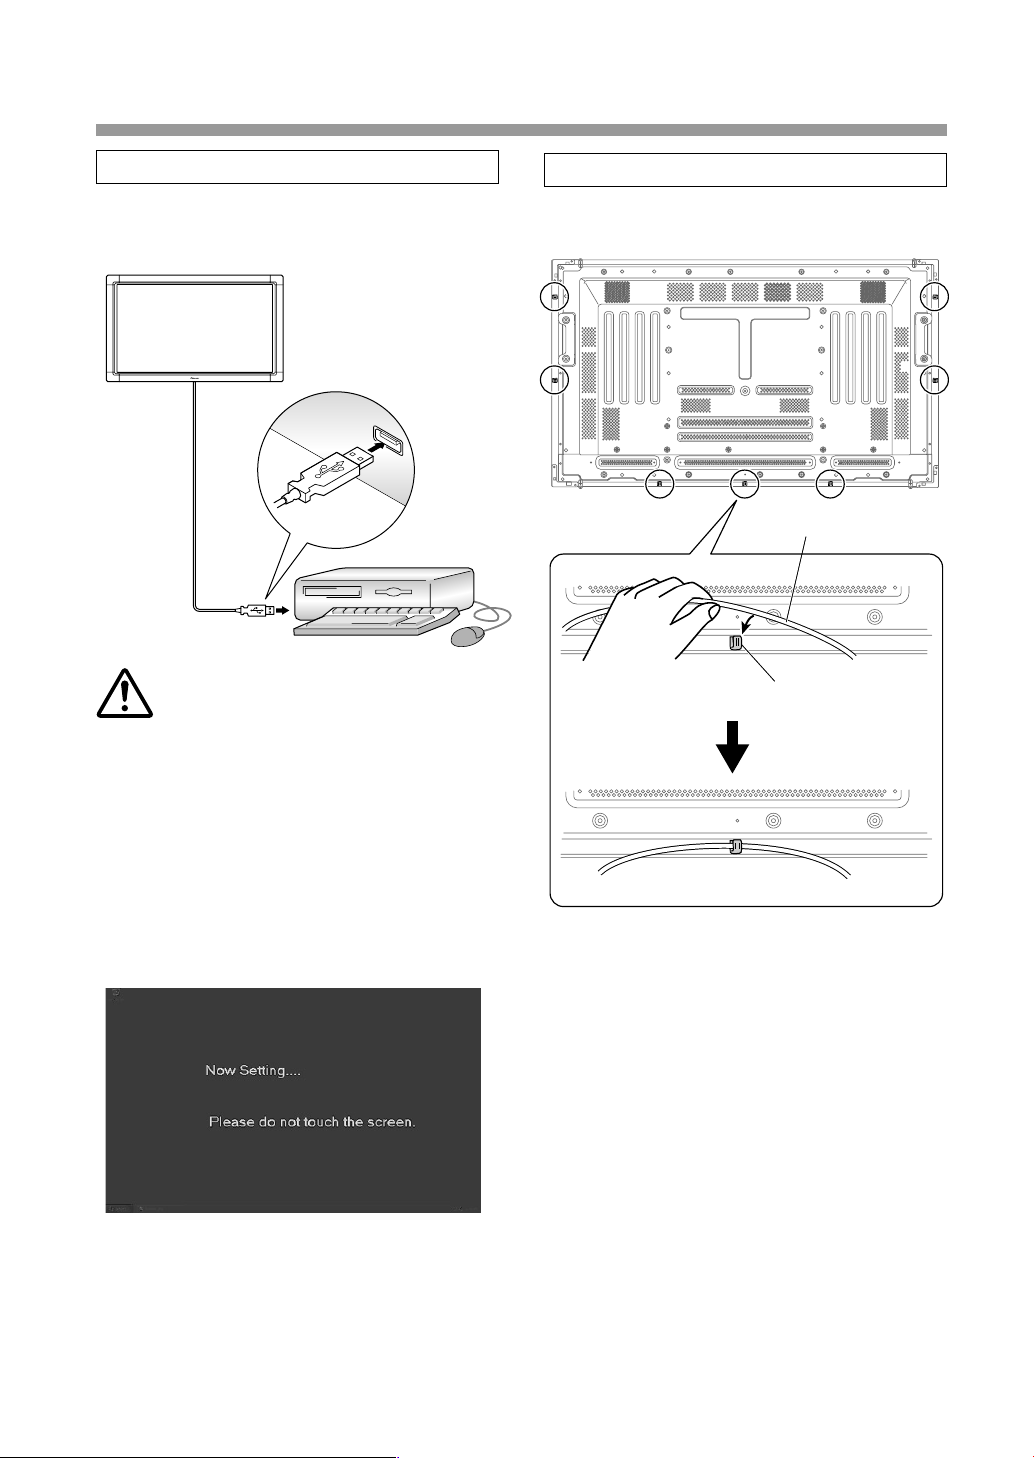
Notes on Installation Work:
This product is marketed assuming that it is installed by qualified personnel with enough skill and competence. Always
have an installation specialist or your dealer install and set up the product.
PIONEER cannot assume liabilities for damage caused by mistake in installation or mounting, misuse, modification or a
natural disaster.
D3-4-2-1-1_En-A
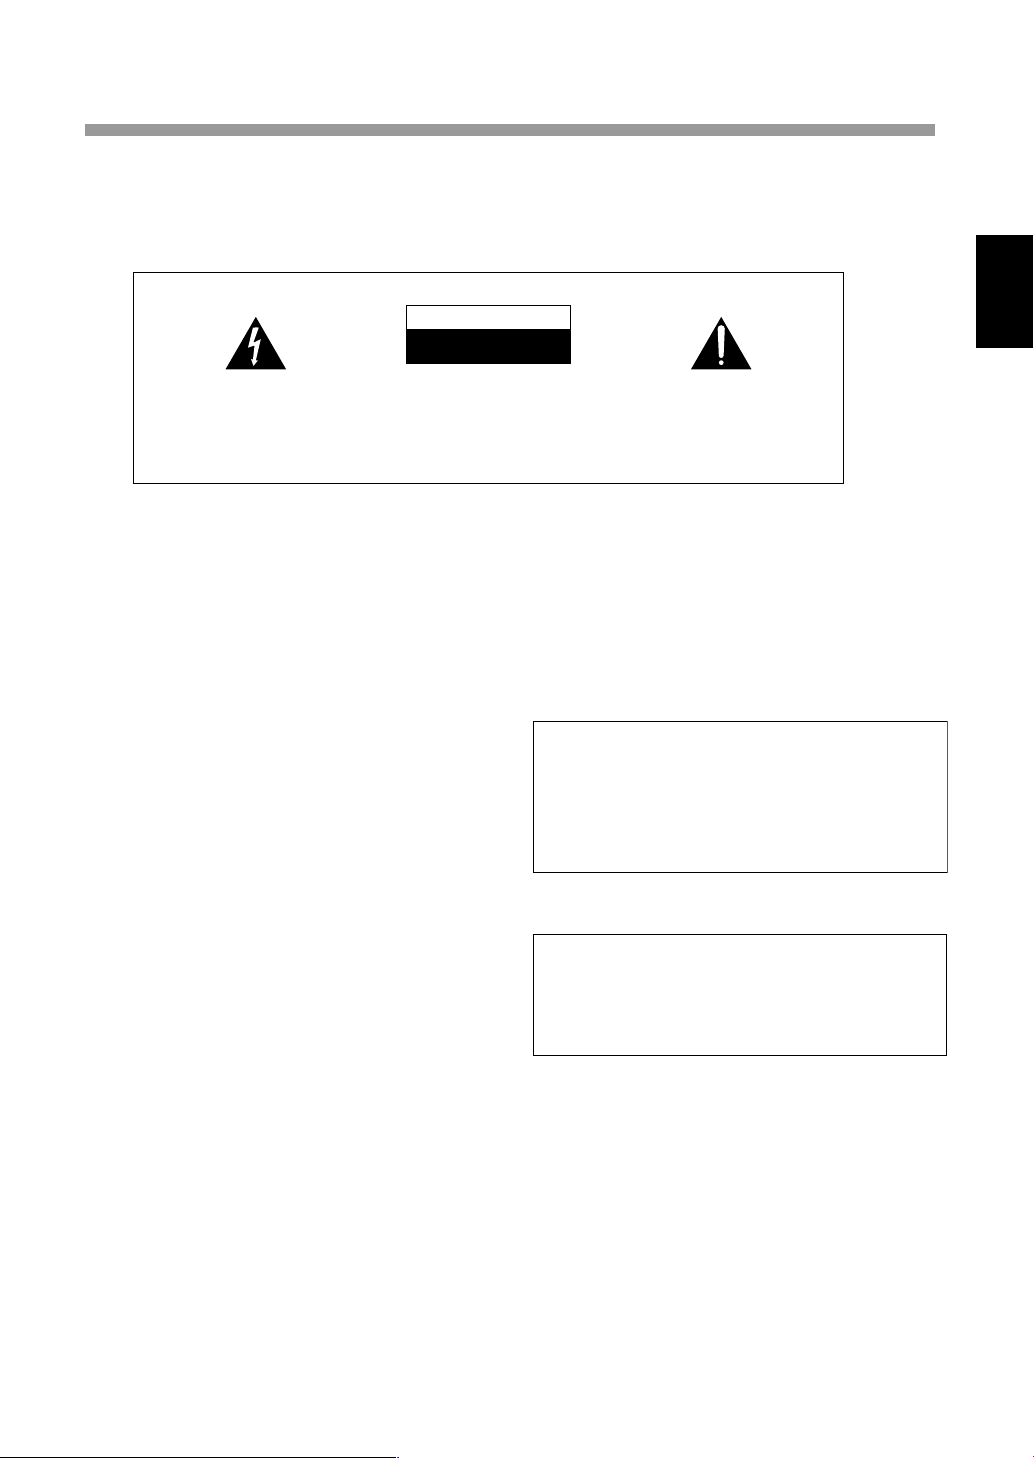
The exclamation point within an equilateral
triangle is intended to alert the user to the
presence of important operating and
maintenance (servicing) instructions in the
literature accompanying the appliance.
The lightning flash with arrowhead symbol,
within an equilateral triangle, is intended to
alert the user to the presence of uninsulated
"dangerous voltage" within the product's
enclosure that may be of sufficient
magnitude to constitute a risk of electric
shock to persons.
CAUTION:
TO PREVENT THE RISK OF ELECTRIC
SHOCK, DO NOT REMOVE COVER (OR
BACK). NO USER-SERVICEABLE PARTS
INSIDE. REFER SERVICING TO QUALIFIED
SERVICE PERSONNEL.
CAUTION
RISK OF ELECTRIC SHOCK
DO NOT OPEN
IMPORTANT
SAFETY PRECAUTIONS
To ensure proper heat radiation, distance the unit slightly
from other equipment, walls, etc. (normally more than 10
cm). Avoid the following installations which will block
vents and cause heat to build up inside, resulting in fire
hazards.
• Do not attempt to fit the unit inside narrow spaces where
ventilation is poor
• Do not place on carpet
• Do not cover with cloth, etc.
• Do not place on its side
• Do not place it upside down
• If planning special installation such as fitting close to
the wall, placing it horizontally, etc., be sure to consult
your Pioneer dealer first.
WARNING
This equipment is not waterproof. To prevent a fire
or shock hazard, do not place any container filed
with liquid near this equipment (such as a vase or
flower pot) or expose it to dripping, splashing, rain
or moisture.
D3-4-2-1-3_A_En
Operating Environment
Operating environment temperature and humidity:
0 ºC – +40 ºC (+32 ºF – +104 ºF); less than 85 %RH
(cooling vents not blocked)
Do not install this unit in a poorly ventilated area, or in
locations exposed to high humidity or direct sunlight (or
strong artificial light) D3-4-2-1-7c_A_En
Note for Dealers:
Following installation, please use this manual to explain
all aspects of operation and safety precautions to
customers.
WARNING: Handling the cord on this product or
cords associated with accessories sold with the
product will expose you to lead, a chemical known to
the State of California and other governmental
entities to cause cancer and birth defects or other
reproductive harm.
D36-P4_En
Wash hands after handling
WARNING
To prevent a fire hazard, do not place any naked
flame sources (such as a lighted candle) on the
equipment. D3-4-2-1-7a_A_En

16
En
This product complies with the Low Voltage Directive
(73/23/EEC, amended by 93/68/EEC), EMC Directives
(89/336/EEC, amended by 92/31/EEC and
93/68/EEC).
D3-4-2-1-9a_En
NOTE: This equipment has been tested and found to comply with the limits for a Class B digital device, pursuant to
Part 15 of the FCC Rules. These limits are designed to provide reasonable protection against harmful interference in
a residential installation. This equipment generates, uses, and can radiate radio frequency energy and, if not
installed and used in accordance with the instructions, may cause harmful interference to radio communications.
However, there is no guarantee that interference will not occur in a particular installation. If this equipment does
cause harmful interference to radio or television reception, which can be determined by turning the equipment off
and on, the user is encouraged to try to correct the interference by one or more of the following measures:
–Reorient or relocate the receiving antenna.
–Increase the separation between the equipment and receiver.
–Connect the equipment into an outlet on a circuit different from that to which the receiver is connected.
–Consult the dealer or an experienced radio/TV technician for help.
D8-10-1-2_En
CAUTION: This product satisfies FCC regulations when shielded cables and connectors are used to connect the
unit to other equipment. To prevent electromagnetic interference with electric appliances such as radios and
televisions, use shielded cables and connectors for connections.
D8-10-3a_En
FEDERAL COMMUNICATIONS COMMISSION
DECLARATION OF CONFORMITY
This device complies with part 15 of the FCC Rules. Operation is subject to the following
two conditions: (1)This device may not cause harmful interference, and (2) this device
must accept any interference received, including interference that may cause undesired
operation.
Product Name: HANDWRITING DEVICE
Model Number: PDK-50HW3
Product Category: Class B Personal Computers & Peripherals
Responsible Party Name: PIONEER ELECTRONICS SERVICE INC.
Address: 1925 East, Dominguez Street, Long Beach,CA 90901-1760, USA
Phone: 310-952-2915
URL: http://Pioneerelectronics.com
[for US model]
SAFETY PRECAUTIONS
Information to User
Alteration or modifications carried out without appropriate authorization may invalidate the user’s right to operate
the equipment.
D8-10-2_En
[for US model]
IMPORTANT NOTICE
The serial number for this equipment is located on the
bottom of the frame. Please write this serial number
on your enclosed warranty card and keep it in a secure
area.This is for your security.

17
日本語
En
English
Français
Deutsch
Italiano
Nederlands
Español
Chinese
Thank you for buying this Pioneer product.
Please read through these operating instructions
so you will know how to operate your model
properly. After you have finished reading the
instructions, put them away in a safe place for
future reference.
Contents
SAFETY PRECAUTIONS ....................................................................................................15
ACCESSORIES...................................................................................................................18
NAME AND FUNCTION OF PARTS ...................................................................................18
Main Unit .........................................................................................................................18
Pen .................................................................................................................................. 19
Changing the Pen Battery
Replacing the Pen Tip
INSTALLATION ................................................................................................................. 20
Attach the Main Unit....................................................................................................... 20
Attach the Pen Stand ...................................................................................................... 20
Connections and System Settings.................................................................................. 21
Connecting the Plasma Display to a Computer
Adjusting the Plasma Display
Installing the Driver Software
Connect the Unit to the Computer
How to Use Cable Clip
Alignment of Pen Tip and Cursor Position
TROUBLESHOOTING ....................................................................................................... 24
CLEANING ........................................................................................................................25
SPECIFICATIONS .............................................................................................................. 26
For details regarding operation, handling and safety
precautions of the Pioneer plasma display, consult
the Plasma Display Operating Instructions.
CAUTIONS REGARDING HANDLING
This unit has been designed for use only with
Pioneer Plasma Display models PDP-504CMX/
PDP-504CMX-S/PDP-503CMX and PDP-50MXE1/
PDP-50MXE1-S/PDP-503MXE.
It cannot be used with models PDP-502MX or PDP-
502MXE.
SAFETY PRECAUTIONS

18
En
ACCESSORIES
Using this list, confirm that all accessories are present, and check them off one-by-one here ✔.
Pen (x1)
AAA (LR03) alkaline batteries (x2)
Replacement tips (x2)
Pen stand (x1)
Allen bolt (x1)
Operating Instructions (x1)
CD-ROM(Driver software disc) (x1)
Driver Installation Guide (x1)
Rear side
of unit
Mode selector switch
Set the mode switch in
accordance with whether
you will use the special
pen or other device to
input characters and lines
on the screen.
PEN Mode:
In this mode, the
special accessory
pen can be used to write
on the screen. Using the
special pen allows the
drawing of more clearly
delineated characters and
lines.
NORMAL Mode:
In this mode, your
finger or other
object can be used to write
on the screen. This mode
will produce lower screen
definition, however,
compared to drawing with
the dedicated input pen.
Power indicator
(Lights green when ON)
IR transmitting filter
PEN
NORMAL
NAME AND FUNCTION OF PARTS
Main Unit
NOTE:
When the power switch is first turned on, the power indicator will
flash orange; while the indicator is flashing, do not touch the
screen, since the unit is initializing its internal settings.

19
日本語
En
English
Français
Deutsch
Italiano
Nederlands
Español
Chinese
Tip
Cap
Pen tip
(corresponds to left mouse button)
LED indicator
Battery cover
Large button
(corresponds to right
mouse button)
Small button
(The function corresponding to middle
mouse button can be assigned using
the driver software.)
Holes in rear end of pen
Pen
If pen operation becomes difficult:
The pen may fail to operate properly if the holes in
rear end of pen are blocked. Also, the pen may
begin operating erratically when the battery
becomes depleted. In this event, change the
battery at your earliest opportunity.
Confirming Battery Life:
When the small button is depressed fully, an LED
indicator will light. If the indicator fails to light, or
lights only dimly, the battery is depleted and
should be replaced.
NOTES:
÷Insert battery correctly, aligning +/– polarities
with the indications on the battery case.
÷To prevent damage from battery leakage,
remove the battery when not using the pen for
an extended period (1 month or more). If battery
leakage occurs, wipe away any battery fluid
from inside the case and replace the battery
with a new one.
÷The provided alkaline battery should not be
recharged, short-circuited, disassembled, or
disposed of in fire.
÷When disposing of used batteries, please
comply with governmental regulations or
environmental public instruction’s rules that
apply in your country / area.
AAA (LR03) alkaline battery
Battery cover
Changing the Pen Battery
Replacing the PenTip
If the tip becomes deformed and writing quality
deteriorates, replace the tip with one of the
supplied extras.
1. Pull out the tip.
CAUTION:
If you continue using a pen with a damaged or worn
tip, the monitor screen may be damaged.
2. Insert a new tip.
NAME AND FUNCTION OF PARTS

20
En
INSTALLATION
NOTES:
÷Always install the plasma display on a mobile
cart before installing this unit.
÷After installing this unit, never attempt to lift the
plasma display to install on a mobile cart.
÷If the need arises to move the unit after it is
installed on a mobile cart, take care not to apply
pressure on the unit when moving. Always lift
by the mobile cart when moving.
1 Release USB cable from cable clip.
2. Place the unit over the front of the
plasma display.
3.
Use the locking fixture on the rear panel
to secure the four corners of the unit.
1Rotate the locking fixture in the direction
indicated by the arrow (rotate in the opposite
direction for the left-side fixture), to secure
the unit in place.
2Press in the locking fixture's stopper to
prevent the fixture from moving.
Attach the Pen Stand
Use the furnished Allen bolt to fasten the pen stand in
place to the rear side of the unit.
Pen stand Allen bolt
Attach the Main Unit
÷Tighten the Allen bolt using an Allen wrench
(width across flats of 6 mm).
Locking fixture
Stopper
Rear side of unit
Cable clip
USB Cable

21
日本語
En
English
Français
Deutsch
Italiano
Nederlands
Español
Chinese
INSTALLATION
Connections and System
Settings
Connecting the Plasma Display to a
Computer
Consult the section "Installation and Connections"
of the plasma display's Operating Instructions for
details on connections to a computer.
7Next, adjust “SCREEN”to set the image
position and clock.
÷Confirm that "MASK CONTROL" and "ORBITER"
are set to "OFF". Consult the plasma display's
Operating Instructions for details on how to con-
firm these settings.
÷Confirm that the "ENERGY SAVE" item is set to
"STANDARD".
÷The proper screen settings cannot be made if
"POINT ZOOM" is used to enlarge part of the
screen, or if SPLIT button is used to divide the
screen into multiple smaller screens.
÷If "AUTO SET UP MODE" is set to "ACTIVE", the
displayed screen may require recalibration.
:XGA
:
:
SIGNAL FORMAT
CLAMP POSITION
:
AUTO
POWER MANAGEMENT
OFF
MENU INPUT1
PICTURE SCREEN SETUP OPTION
Adjusting the Plasma Display
Turn on power to plasma display and computer. Look
at the plasma display's Operating Instruction items
for "System Settings" and "PICTURE/SCREEN
Adjustment".
7First, set the “System Settings”.
Set “SIGNAL FORMAT”.
To use 1280 x 768 (60 Hz/70 Hz) screen
resolution and refresh rate, set “SIGNAL
FORMAT”to "WXGA."
With the screen image turned on, select MENU
=SETUP =SIGNAL FORMAT =SET, and
change the XGA setting to WXGA.
Example of menu displayed on the PDP-
504CMX/PDP-50MXE1
Installing the Driver Software
Consult the Driver Installation Guide for the driver
software (provided with this unit).

22
En
INSTALLATION
USB cable Computer
Connect the Unit to the Computer
Connect the unit's USB cable to the computer.
(Connect to the USB1.1 or USB2.0 port.)
NOTE:
When connecting a USB hub, use only self-powered
types (with AC outlet power connection) with the
capacity to provide 500mA current.
When a USB cable is connected, the
accompanying screen message will appear:
The power indicator will flash orange, and then flash
alternately in green and orange. Do not touch the
screen while the indicator is flashing, since
automatic settings are being made during this time.
Cable clip
USB Cable
How to Use Cable Clip
Use the cable clip to hold the unit's USB cable.

23
日本語
En
English
Français
Deutsch
Italiano
Nederlands
Español
Chinese
Alignment of Pen Tip and Cursor
Position
Confirm that the onscreen cursor aligns properly
with the position of the pen tip.
If the cursor position differs from that of the
physical pen tip, adjust as follows:
1. Using your mouse, left-click on the
CBdrvU icon in the task tray.
NOTE:
The actual appearance of your task tray may differ
depending on your computer configuration.
2. When the pop-up menu appears, left-
click on "Calibration..."
3. Follow the calibration instructions that
appear onscreen.
NOTE:
Input to the unit can be performed with a finger or
other object in addition to the special dedicated
pen; mechanical pencils or other sharp objects
should not be used, however, since the screen
may be scratched as a result. When performing
onscreen operations, the dedicated pen or a
fingertip should always be used.
INSTALLATION
Mouse cursor
(screen display
position)
Pen tip

24
En
TROUBLESHOOTING
Incorrect operations are often mistaken for trouble and malfunctions. If you think there is something wrong
with this component, check the points below. Sometimes the trouble may originate from another
component. Thus, also check the other electrical appliances also in use.
If the trouble cannot be rectified even after checking the following items, contact your dealer or nearest
PIONEER service center.
Symptom
No power
No response when operated.
USB cable is not recognized by
computer when connected.
Cursor position is far from that
of pen tip on screen.
Cursor position diverges
slightly from that of pen tip on
screen.
Cursor position diverges from
pen after initial setting.
The special dedicated pen does
not respond.
Cause
÷USB cable is disconnected from
computer.
÷Computer power is not turned on.
÷USB cable is disconnected.
÷USB port may not be operating
due to some problem with com-
puter or Windows operating sys-
tem.
÷A screen resolution other than
1280x768 is being used. Or
resolution has been changed.
÷The plasma display's screen
display size setting has been
changed.
÷Driver software is not installed
properly.
÷The plasma display's screen
display position has shifted.
÷The plasma display's AUTO SET
UP screen position adjustment
has been reset.
÷Plasma display's [MASK CON-
TROL] or [ORBITER] is set to
[ON].
÷Battery is depleted.
÷Insufficient pen tip pressure is
being used so that the pen tip
switch doesn't turn on.
÷The holes in rear end of pen are
blocked.
÷The pen is being used outside of
its effective range.
÷The unit is receiving ultrasonic
influence from other device.
÷You are wearing gloves while
holding the pen (pen's ultrasonic
signals are being absorbed).
÷Driver software is not installed
properly.
Solution
÷Connect USB cable to computer
correctly.
÷Turn on power to computer.
÷Connect USB cable correctly.
÷Consult computer manufacturer
for BIOS and driver software up-
dates where applicable.
÷Change the driver software
settings as required.
÷Install driver software correctly.
÷Use the plasma display's calibra-
tion mode to adjust the vertical
and horizontal position.
÷Depending on the image, slight
divergences can be manually cor-
rected.
÷Set [MASK CONTROL], [OR-
BITER] to [OFF].
÷Check the LED indicator, and if it
does not light brightly, replace
battery.
÷Press the tip to the screen with
sufficient pressure to turn on the
pen tip switch.
÷Do not cover the holes in rear
end of pen.
÷Use only within the proper
onscreen usage range.
÷Do not place any device near the
unit that issues ultrasonic
waves.
÷Remove gloves.
÷Install driver software correctly.

25
日本語
En
English
Français
Deutsch
Italiano
Nederlands
Español
Chinese
CLEANING
In order to promote long life and optimum performance, regular cleaning is recommended. Wipe the
screen surface and pen gently with a soft cloth to prevent dust buildup. In the case of severe soiling, dip
a soft cloth in a mild solution of a neutral detergent, wring well, and wipe the screen surface gently, then
follow with a dry, soft cloth.
CAUTION:
Never use benzene, thinners or other volatile chemicals to clean the unit, since deformation or
discoloration of the unit and pen may occur.
CAUTION:
÷If two or more units are operated closely together in PEN mode, mutual interference may occur,
resulting in malfunction. If two or more units are to be used closely together, set them all to
NORMAL mode.
÷Due to the characteristics of its scanning mode, this product cannot be used simultaneously by two
different people. If more than one person is to operate the unit, each person should use it
separately, one person at a time. Also, malfunction may occur if the screen is touched during input
by another hand or object besides the pen tip or fingertip (clothes or necktie, etc.). For this reason,
do not touch the screen with objects other than the actual tip of the input instrument (fingertip or
pen tip).
÷The pen may malfunction or input may be disrupted if the pen is held at an excessively sharp angle
to the screen. So far as possible, hold the pen perpendicularly to the screen during use.
÷If USB cable is to be connected to a computer port incapable of supplying 500mA of current, use an
AC powered USB hub with capability of supplying 500mA from outlet.
Symptom
Cannot input with finger.
No response to input or can't
write in some places.
Computer remains in power sav-
ing mode even when operations
are performed.
"The device is not connected.
The device is disabled." mes-
sage appears.
Cause
÷Driver software setup is incorrect.
÷Mode selector switch on unit's
rear is set to PEN.
÷User touched screen during boot
process (during display of mes-
sage "Now setting....")
÷Dirt or other object blocked infra-
red signal filter, blocking signal.
÷Main unit will not operate when
computer is in power-saving
mode.
÷USB cable is loose or has been
disconnected.
Solution
÷Check driver setup and reset if
appropriate.
÷Set switch to NORMAL.
÷Disconnect USB connector and
reconnect.
÷Remove dirt or other obstruction;
disconnect and reconnect USB
connector.
÷Change power-saving mode as
appropriate.
÷Connect USB cable securely.
TROUBLESHOOTING

26
En
Dimensional Diagram
(View when this unit installed on the PDP-504CMX/PDP-50MXE1)
Unit: mm
(excluding the bolt head)
758
120220
1258
115
74
92
56
58
Published by Pioneer Corporation.
Copyright © 2004 Pioneer Corporation.
All rights reserved.
Scanning system ........................................................................................... Infrared scanning
Power indicator .................................................................................................................. LED
Interface ...................................................................................................................... USB 1.1
Power supply .............................................................................. self-powered from USB port
Power consumption ........................................................................................ Maximum 2.5W
External dimensions
(including plasma display, excluding pen stand) ................. 1,258 (W) x 758 (H) x 115 (D) mm
Weight (excluding plasma display, including pen stand[0.6 kg]) ..................................... 7.4 kg
Dedicated Pen
Transmission ................................................................................................... Ultrasonic wave
Operation switches ............................................................................... Pen tip (x1), Body (x2)
Power ...................................................................................... AAA (LR03) alkaline battery x 1
External dimensions .............................................................................. 18.5 (W) x 186 (L) mm
Weight (including battery) ................................................................................................. 43 g
Accessories
Pen ......................................................................................................................................... 1
AAA (LR03) alkaline batteries .................................................................................................................... 2
Replacement pen tips ............................................................................................................2
Allen bolt ................................................................................................................................ 1
Pen stand ............................................................................................................................... 1
Operating Instructions............................................................................................................ 1
CD-ROM(Driver software disc) .............................................................................................. 1
Driver Installation Guide ......................................................................................................... 1
÷Specifications and appearance may change without notice.
SPECIFICATIONS

27
Fr
Français
PRÉCAUTIONS DE SÉCURITÉ
Ce point d’exclamation, placé dans un
triangle équilatéral, a pour but d’attirer
l’attention de l’utilisateur sur la présence,
dans les documents qui accompagnent
l’appareil, d’explications importantes du
point de vue de l’exploitation ou de
l’entretien.
Ce symbole de l’éclair, placédans un
triangle équilatéral, a pour but d’attirer
l’attention de l’utilisateur sur la présence, à
l’intérieur du coffret de l’appareil, de
“tensions dangereuses”non isolées d’une
grandeur suffisante pour représenter un
risque d’électrocution pour les êtres
humains.
IMPORTANT
ATTENTION:
POUR ÉVITER TOUT RISQUE
D’ÉLECTROCUTION, NE PAS ENLEVER LE
COUVERCLE (NI LE PANNEAU ARRIÈRE).
AUCUNE PIÈCE RÉPARABLE PAR
L’UTILISATEUR NE SE TROUVE À
L’INTÉRIEUR. CONFIER TOUT ENTRETIEN À
UN PERSONNEL QUALIFIÉUNIQUEMENT.
ATTENTION
DANGER D´ELECTROCUTION
NE PAS OUVRIR
D3-4-2-1-1_Fr
Remarques sur l’installation:
Ce produit est vendu en assumant qu’il sera installé par un personnel suffisamment expérimenté et qualifié. Faites toujours
réaliser le montage et l’installation par un spécialiste ou par votre revendeur.
PIONEER ne peut être tenu responsable pour tout dommage causé par une erreur d’installation ou de montage, une
mauvaise utilisation ou un désastre naturel.
AVERTISSEMENT
Cet appareil n’est pas étanche. Pour éviter les
risques d’incendie et de décharge électrique, ne
placez près de lui un récipient rempli d’eau, tel
qu’un vase ou un pot de fleurs, et ne l’exposez pas
àdes gouttes d’eau, des éclaboussures, de la pluie
ou de l’humidité.
D3-4-2-1-3_A_Fr
Pour garantir un rayonnement thermique adéquat, placer
l’unité à une certaine distance des autres équipements,
murs, etc. (normalement à une distance supérieure à 10
cm). Eviter les modes d’installation décrits ciaprès qui
entraînent l’obstruction des orifices et provoquent une
accumulation de chaleur interne, d’où un risque
d’incendie.
• Ne pas essayer de placer l’unité dans des espaces
réduirts et mal ventilés
• Ne pas la placer sur un tapis
• Ne pas la recouvrir d’un tissu etc.
• Ne pas la placer sur le côté
• Ne pas la renverser
• Si une installation spéciale est envisagée, comme un
montage à proximité immédiate du mur, un placement
horizontal, consulter d’abord le revendeur Pioneer de
votre région.
Ce produit est conforme àla directive relative aux
appareils basse tension (73/23/CEE), àla directive
CE relative àla compatibilitéelectromagnétique
(89/336/CEE, amendements 92/31/CEE et
93/68/CEE). D3-4-2-1-9a_Fr
AVERTISSEMENT
Pour éviter les risques d’incendie, ne placez aucune
flamme nue (telle qu’une bougie allumée) sur
l’appareil. D3-4-2-1-7a_A_Fr
Milieu de fonctionnement
T
empérature et humiditédu milieu de fonctionnement :
De 0 à+40ºC (de +32 à+104ºF); Humiditérelative
inférieure à85% (orifices de ventilation non obstrués)
N’installez pas l’appareil dans un endroit mal ventiléou
un lieu soumis àune forte humiditéou en plein soleil
(ou àune forte lumière artificielle).
D3-4-2-1-7c_A_Fr
Avis à l’Utilisateur
Les altérations ou les modifications effectués sans autorisation appropriée peuvent invalider les droits de
l’utilisateur à faire fonctionner l’appareil.
[Pour le mode`le des USA]
REMARQUE IMPORTANTE
Le numéro de modèle et le numéro de série de ceTéléviseur de projection figurent sur le panneau arrière.
Veuillez noter le numéro de série sur la carte de garantie ci-jointe et gardez-la dans un lieu sûr pour la consulter ultérieurement.

28
Fr
Nous vous remercions pour cet achat d’un produit
Pioneer.
Nous vous demandons de lire soigneusement ce
mode d’emploi; vous serez ainsi àmême de faire
fonctionner l’appareil correctement. Après avoir
bien lu le mode d’emploi, le ranger dans un endroit
sûr pour pouvoir s’y référer ultérieurement.
Pour les détails sur le fonctionnement, le
maniement et les précautions de sécuritéde l'écan
àplasma de Pioneer, veuillez consulter le Mode
d'emploi de l'écran àplasma.
Table des Matieres
PRÉCAUTIONS DE SÉCURITÉ............................................................................................ 27
ACCESSOIRES ................................................................................................................... 29
NOMENCLATURE ET FONCTIONS DES PIÈCES .............................................................. 29
Unitéprincipale .............................................................................................................. 29
Crayon ............................................................................................................................ 30
Changement de la pile du crayon
Remplacement de la mine du crayon
INSTALLATION ................................................................................................................... 31
Mise en place de l’unitéprincipale ................................................................................ 31
Fixation du porte-crayon ................................................................................................ 31
Branchements et paramétrages du système................................................................ 32
Branchement de l’écran àplasma àun ordinateur
Ajustement de l’écran àplasma
Installation du logiciel de pilotage
Branchement de l’unitésur un ordinateur
Comment utiliser le serre-câble
Alignement de la mine du crayon et de la position du curseur
GUIDE DE DÉPANNAGE ..................................................................................................... 35
NETTOYAGE .......................................................................................................................37
FICHE TECHNIQUE ............................................................................................................ 37
AVERTISSEMENTS CONCERNANT
L’USAGE
Cette unitéest conçue pour une utilisation avec
les modèles d'Écran àplasma Pioneer PDP-
504CMX/PDP-504CMX-S/PDP-503CMX et PDP-
50MXE1/PDP-50MXE1-S/PDP-503MXE. Elle ne
peut pas servir avec les modèles PDP-502MX ou
PDP-502MXE.
PRÉCAUTIONS DE SÉCURITÉ
Remarque pour le revendeur :
Après l'installation, utilisez ce manuel pour expliquer
tous les aspects du fonctionnement et les précautions
de sécuritéàl'utilisateur de ce produit.

29
Fr
Français
Sur cette liste, cochez chacun des carrés ✔après vous être assuréque l’accessoire illustréest présent.
Boulon à6 pans (x1)
Unitéprincipale
ACCESSOIRES
NOMENCLATURE ET FONCTIONS DES PIÈCES
Crayon (x1)
Pile alcaline AAA (LR03) (x2)
Mine de rechange (x2)
Porte-crayon (x1)
Sélecteur de mode
Réglez ce sélecteur selon que
vous voulez utiliser le crayon
spécial ou un autre instrument
pour la saisie de caractères et
de lignes sur l’écran.
Mode PEN:
Àcette position, ous
pouvez utiliser le crayon
spécial, fourni comme
accessoire, pour écrire sur
l’écran. L’emploi du crayon
spécial permet le tracéde
caractères et de lignes plus
clairement définies.
Mode NORMAL:
Àcette position, vous
pouvez utiliser le doigt
ou un autre objet pour
écrire sur l’écran. Notez que la
définition des tracés sur l’écran
sera moindre qu’avec le crayon
spécial de saisie.
Voyant d’alimentation
(Alluméen vert: Écran sous tension)
PEN
NORMAL
Face arrière
de l’unité
Filtre de transmission àinfrarouge
REMARQUE:
Lors de la première mise sous tension, le voyant d’alimentation
clignote en orange. Pendant ce clignotement , ne touchez pas
l’écran car l’unitéeffectue alors l’initialisation de ses réglages
internes.)
Guide d'installation du logiciel pilote
(x1)
CD-Rom
(Disque de logiciel de pilotage) (x1)
Mode d’emploi (x1)

30
Fr
Mine
Capuchon
Mine du crayon
(correspond au bouton gauche de souris)
Voyant LED
Couvercle
de pile
Orifices àl'arrière du crayon
Grand bouton
(correspond au bouton
droit de souris)
Petit bouton
(La fonction correspondant au bouton
central de la souris peut être attribuée
en utilisant le logiciel pilote.)
Pile alcaline AAA (LR03)
Couvercle de pile
NOMENCLATURE ET FONCTIONS DES PIÈCES
Si l’utilisation du crayon devient difficile:
Le crayon risque de ne pas fonctionner
correctement si les orifices àson extrémitésont
obstrués. Il peut aussi commencer àfonctionner
de façon bizarre lorsque la pile est presque
épuisée. Dans ce cas, remplacez la pile dans les
meilleurs délais.
Vérification de la charge de la pile:
Lorsque le petit bouton est actionnéàfond, le
voyant LED s’allume. S’il ne s’allume pas ou si
sa clartéest faible, c’est que la pile est épuisée.
Remplacez-la.
Crayon
Changement de la pile du crayon
REMARQUES:
÷Insérez correctement la pile en faisant
correspondre ses polarités +/–avec les indications
dans le logement de la pile.
÷Pour éviter des dégâts que causerait un
suintement d’électrolyte de la pile, retirez celle-ci
si le crayon ne sera pas utilisépendant une durée
prolongée (un mois ou plus). Si une fuite de la pile
s’est produite, essuyez convenablement
l’électrolyte àl’intérieur du boîtier et remplacez la
pile par une neuve.
÷La pile alcaline fournie ne peut pas être
rechargée, court-circuitée, démontée ou jetée
dans un feu.
÷Lorsque vous diposez de piles / batteries usées,
veuillez vous conformer aux normes
gouvernementales ou environnementales en
vigueur dans votre pays ou région.
Remplacement de la mine du crayon
Si la mine s'est déformée ou si la qualitéde
l'écriture se dégrade, remplacer la mine par une de
celles fournies comme accessoires.
1. Extrayez la mine.
ATTENTION:
Si vous continuez d'utiliser un crayon dont la mine
est endommagée ou usée, vous risquez d'abîmer
l'écran.
2. Insérez une nouvelle mine.

31
Fr
Français
REMARQUES:
÷Installez toujours l’écran àplasma sur un
support mobile avant de placer cette unité.
÷Après avoir installécette unité, n’essayez jamais
de lever l’écran àplasma pour le placer sur le
support mobile.
÷S’il est nécessaire de déplacer l’unitéaprès
l’avoir installée sur le support mobile, veillez à
ne pas presser sur l’unitépendant le
déplacement. Soulevez-la toujours par le
support mobile pour la déplacer.
1. Libérez le câble USB de son serre-câble.
Mise en place de l’unitéprincipale
÷Serrez le boulon à6 pans au moyen d'une
cléhexagonale (largeur de 6 mm entre
plats).
Câble USB
Serre-câble
INSTALLATION
2. Placez l’unitésur l’avant de l’écran à
plasma.
3. Utilisez l'applique de fixation sur la face
arrière pour immobiliser les quatre coins
de l'appareil.
1Tournez l'applique de fixation dans le sens
indiquépar la flèche (tournez dans le sens
opposépour l'applique du côtégauche) pour
immobiliser l'unité.
2Enfoncez la butée de l'applique de fixation
pour empêcher tout mouvement de
l'applique.
Applique de fixation
Butée
Fixation du porte-crayon
Servez-vous du boulon à6 pans fourni pour fixer le
porte-crayon sur la face arrière de l’unité.
Porte-crayon Boulon à6 pans
Face arrière de l’unité

32
Fr
INSTALLATION
:
:
POSITION CLAMP
:
AUTO
GESTION D'ALIM.
ARRÊT
MENU ENTRÉE1
IMAGE
ÉCRAN
SETUP OPTION
XGA
:
TYPE DE SIGNAL
Ajustement de l’écran àplasma
Mettez sous tension l'écran àplasma et l'ordinateur.
Reportez-vous aux articles du Mode d'emploi de
l'écran àplasma en ce qui concerne les
"Paramétrages du système" et les "Réglages de
l'IMAGE et de l'ÉCRAN".
7Effectuez d'abord les "Paramétrages du
système".
Réglez "TYPE DE SIGNAL".
Pour utiliser la résolution d'écran et le taux de
rafraîchissement de 1280 x 768 (60 Hz/70 Hz),
réglez TYPE DE SIGNAL sur WXGA .
L'écran étant sous tension, sélectionnez MENU
=SETUP =TYPE DE SIGNAL =SET, puis
changez le paramètre XGA en WXGA .
Exemple de menu affichésur le PDP-504CMX/
PDP-50MXE1
7Ensuite, ajustez "ÉCRAN" pour ajuster la
position de l'image et l'horloge.
÷Confirmez que "CONTRÔLE MASQUE" et
"ORBITER" sont réglés sur "ARRÉT" . Consultez
le Mode d'emploi de l'écran àplasma pour des
détails sur la façon de confirmer ces
paramètres.
÷Assurez-vous que "ÉCONOM. D'ÉNERGIE" est
réglésur "STANDARD" .
÷Des réglages adéquats de l'écran ne seront pas
possibles si "POINT ZOOM" est utilisépour
agrandir une partie de l'écran ou si le bouton
"SPLIT" est utilisépour diviser l'écran en
plusieurs petits écrans.
÷Si "PARAMÉTRAGE AUTO." est réglee sur
"ACTIF" , l'écran affichépourrait nécessiter une
nouvelle calibration.
Branchements et paramétrages
du système
Branchement de l’écran àplasma à
un ordinateur
Reportez-vous au chapitre “Installation et
raccordements”du Mode d’emploi de l’écran à
plasma pour des détails sur le raccordement àun
ordinateur.
=

33
Fr
Français
REMARQUE:
Si vous branchez un récepteur multiport USB, utilisez
uniquement un type auto-alimenté(dotéd'une connexion
àune prise secteur), capable de fournir un courant de 500
mA.
Câble USB
Ordinateur
Installation du logiciel de pilotage
Consultez le Guide d'installation du logiciel pilote
en ce qui concerne le logiciel de périphérique
(fourni avec cet appareil).
Branchement de l’unitésur un
ordinateur
Branchez le câble USB de l'appareil sur l'ordinateur.
(Branchez-le sur le port USB1.1 ou USB2.0.)
Si un câble USB est branché, le message d'écran
apparaîtra:
Le voyant d'alimentation clignotera en orange, puis
il clignotera alternativement en vert et en orange.
Ne touchez pas l'écran pendant que le voyant
clignote, car des paramétrages automatiques sont
en cours pendant ce temps.
Comment utiliser le serre-câble
Utilisez le serre-câble pour immobiliser le câble USB
de l'appareil.
Câble USB
Serre-câble
INSTALLATION
=
Other manuals for PDP 503CMX
4
This manual suits for next models
1
Table of contents
Languages: