Pirelli Discus DEX P200H User manual

1
2
3
4
5
6
FRONT PANEL
LED
Label LED Color LED Behavior
g Green Steady ON: The device is
powered on
OFF: The device is
powered off
e Green/
Yellow/Red
Static
Green:
PLC link Established
with speed is greater
or equal than
threshold 2
(100Mbps)
Static:
Yellow
PLC link Established
with speed is
between threshold 1
(80Mbps) and
threshold 2
(100Mbps)
Static:
Red PLC link Established with speed is below or equal
threshold 1 (80Mbps)
OFF No data received by an associated and
authenticated device on the PLC link
f Green Steady ON: Ethernet Link is established and Ethernet activity
present (traffic in up/down direction)
OFF: No Ethernet Link is established
REAR PANEL
PORTS DESCRIPTION
a AC power plug
d One Ethernet port 10/100 Mbps
BUTTONS DESCRIPTION
b Reset to factory default
c Security button (Authentication Button)
PACKAGE CONTENTS
Your new Discus™ DEX P200H kit contains the related hardware and
software.
In it you will find:
1. Two Discus™ DEX P200H units
2. Two Ethernet cables
3. One installation CD-ROM (Pirelli Device Manager and QIG)
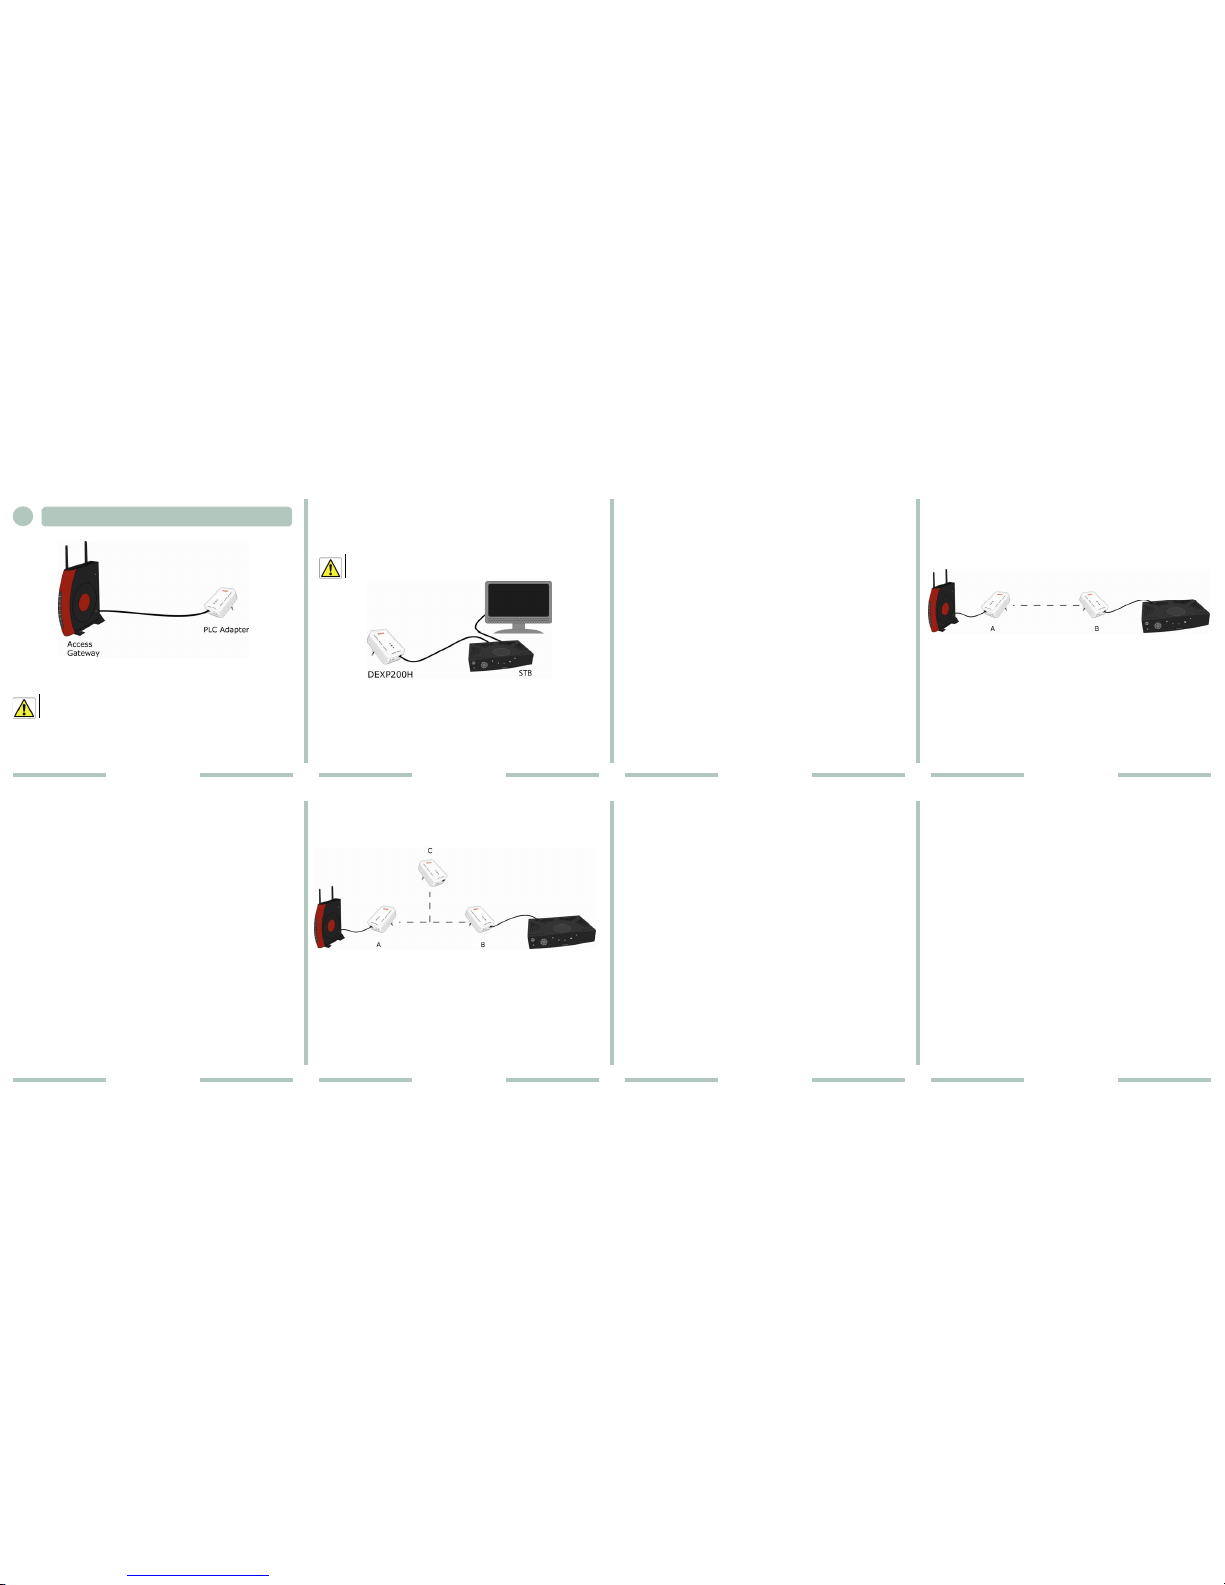
By purchasing your Discus™ DEX P200H, based on PLC technology
compliant with Homeplug AV standard, you have entered into the
word of Broadband Connectivity. DEX P200H Extenders, high
performance and cost effective external dongles, make the Customer
able to connect the Home Gateway to any Ethernet terminal (e.g. Set
Top Box), avoiding un-esthetical new cabling, wiring works and
technical on-site support.
This Quick Installation Guide is meant to help the User installing
Discus™ DEX P200H and distributing Broadband Services (e.g. High
Definition Video Streaming) throughout Home Network, quickly and
easily.
1Positioning the Extenders
You should preferably place the extenders in a position that:
•is not exposed to high moisture and water dropping
•is not exposed to direct sunlight and heat sources
•is not too close to fluorescent lighting fixture and other sources
of electrical noise such as radio sets, transmitters and
amplifiers
NOTE: Nominal performances cannot be guaranteed in presence of
fluorescent lighting fixture and Switching power supply interference !
2System Requirements
Before starting you must ensure the following:
•One avalable 10/100 Mbps Ethernet port
•Windows 2000/XP operating system
NOTE: Previous requirements are suggested for device configuration by
Pirelli Device Manager.

78910
11 12 13 14
3. Connect a standard LAN cable from the one device’s Ethernet port to your Access
Gateway.
4. Wait few seconds to complete startup and then check the LEDs.
•The Ethernet LED should be ON.
If the Led Status is different as defined above, check cable connections.
5. Plug the other DEX P200H into a normal wall socket.
6. Wait few seconds to complete start-up and then check the LEDs.
•The Power LED should be ON.
•The Link LED will be ON if other Powerline devices are detected, otherwise it will be
OFF.
7. Connect a standard LAN cable from the one device’s Etherne
t
port to your Ethernet terminal (e.g. Set Top Box).
8. Wait few seconds to complete start-up and then check the LEDs.
•The Ethernet LED should be ON.
If the Led Status is different as defined above, check cable
connections.
NOTE: DEX P200H devices should communicate automaticall
y
thanks to factory default configuration
HOW TO ASSOCIATE THE DEVICES
FIRST SCENARIO
This procedure describes how to associate two un-associated devices.
Two un-associated adapters (a,b) are forming a new network (Network AB).
The procedure is as follows:
1. Press the security button on the adapter (A) for less than 3 seconds.
2. Press the security button on the adapter (B) for less than 3 seconds.
3. The Power LEDs start to flash.
4.
A
fter a few seconds the reboot procedures and after that the Powe
r
and PLC link LEDs should be on.
5. The configuration is successful.
NOTE: If the procedure fails:
1. Press and hold authentication button on the adapter (A) fo
r
at least ten seconds, until the power LED goes out and star
t
to flash (added).
2. Press and hold authentication button on the adapter (B) fo
r
at least ten seconds , until the power LED goes out and star
t
to flash (added).
3.
A
ssociate the devices again following the procedure
described above.
SECOND SCENARIO
Join an unassociated adapter (C) to an existing network (Networ
k
AB).
The procedure is as follows:
1. Press the security button on the adapter A (or B) for less than 3
seconds.
2. Press the security button (c) on the adapter (C) for less than 3
seconds.
3. The Power LEDs start to flash.
4. After a few seconds, the Power and PLC link LEDs should be on.
5. The configuration is successful.
NOTE: If the procedure fails:
1. Press and hold authentication button on the adapter (C) fo
r
at least 10 seconds, until the power LED goes out and star
t
to flash (added).
2.
A
ssociate the devices again following the procedure
described above.
3Connecting the Extenders
1. Plug the DEX P200H into a normal wall socket.
Connect PLC Adapter into power strip or surge protectors may degrade network performance.
2. Wait few seconds to complete startup and then check the LEDs.
•The Power LED should be ON.
•The Link LED will be ON if other Powerlinedevices are detected,
HOW TO RESET THE DEVICES
1. Press the reset button (d) the adapter A for 2 seconds.
2. The adapter starts the reboot procedure. All LEDs should be ON.
3. After a few seconds, the Power and PLC link LEDs should be
ON. The reset procedure is finished successfully.
Other Pirelli Extender manuals