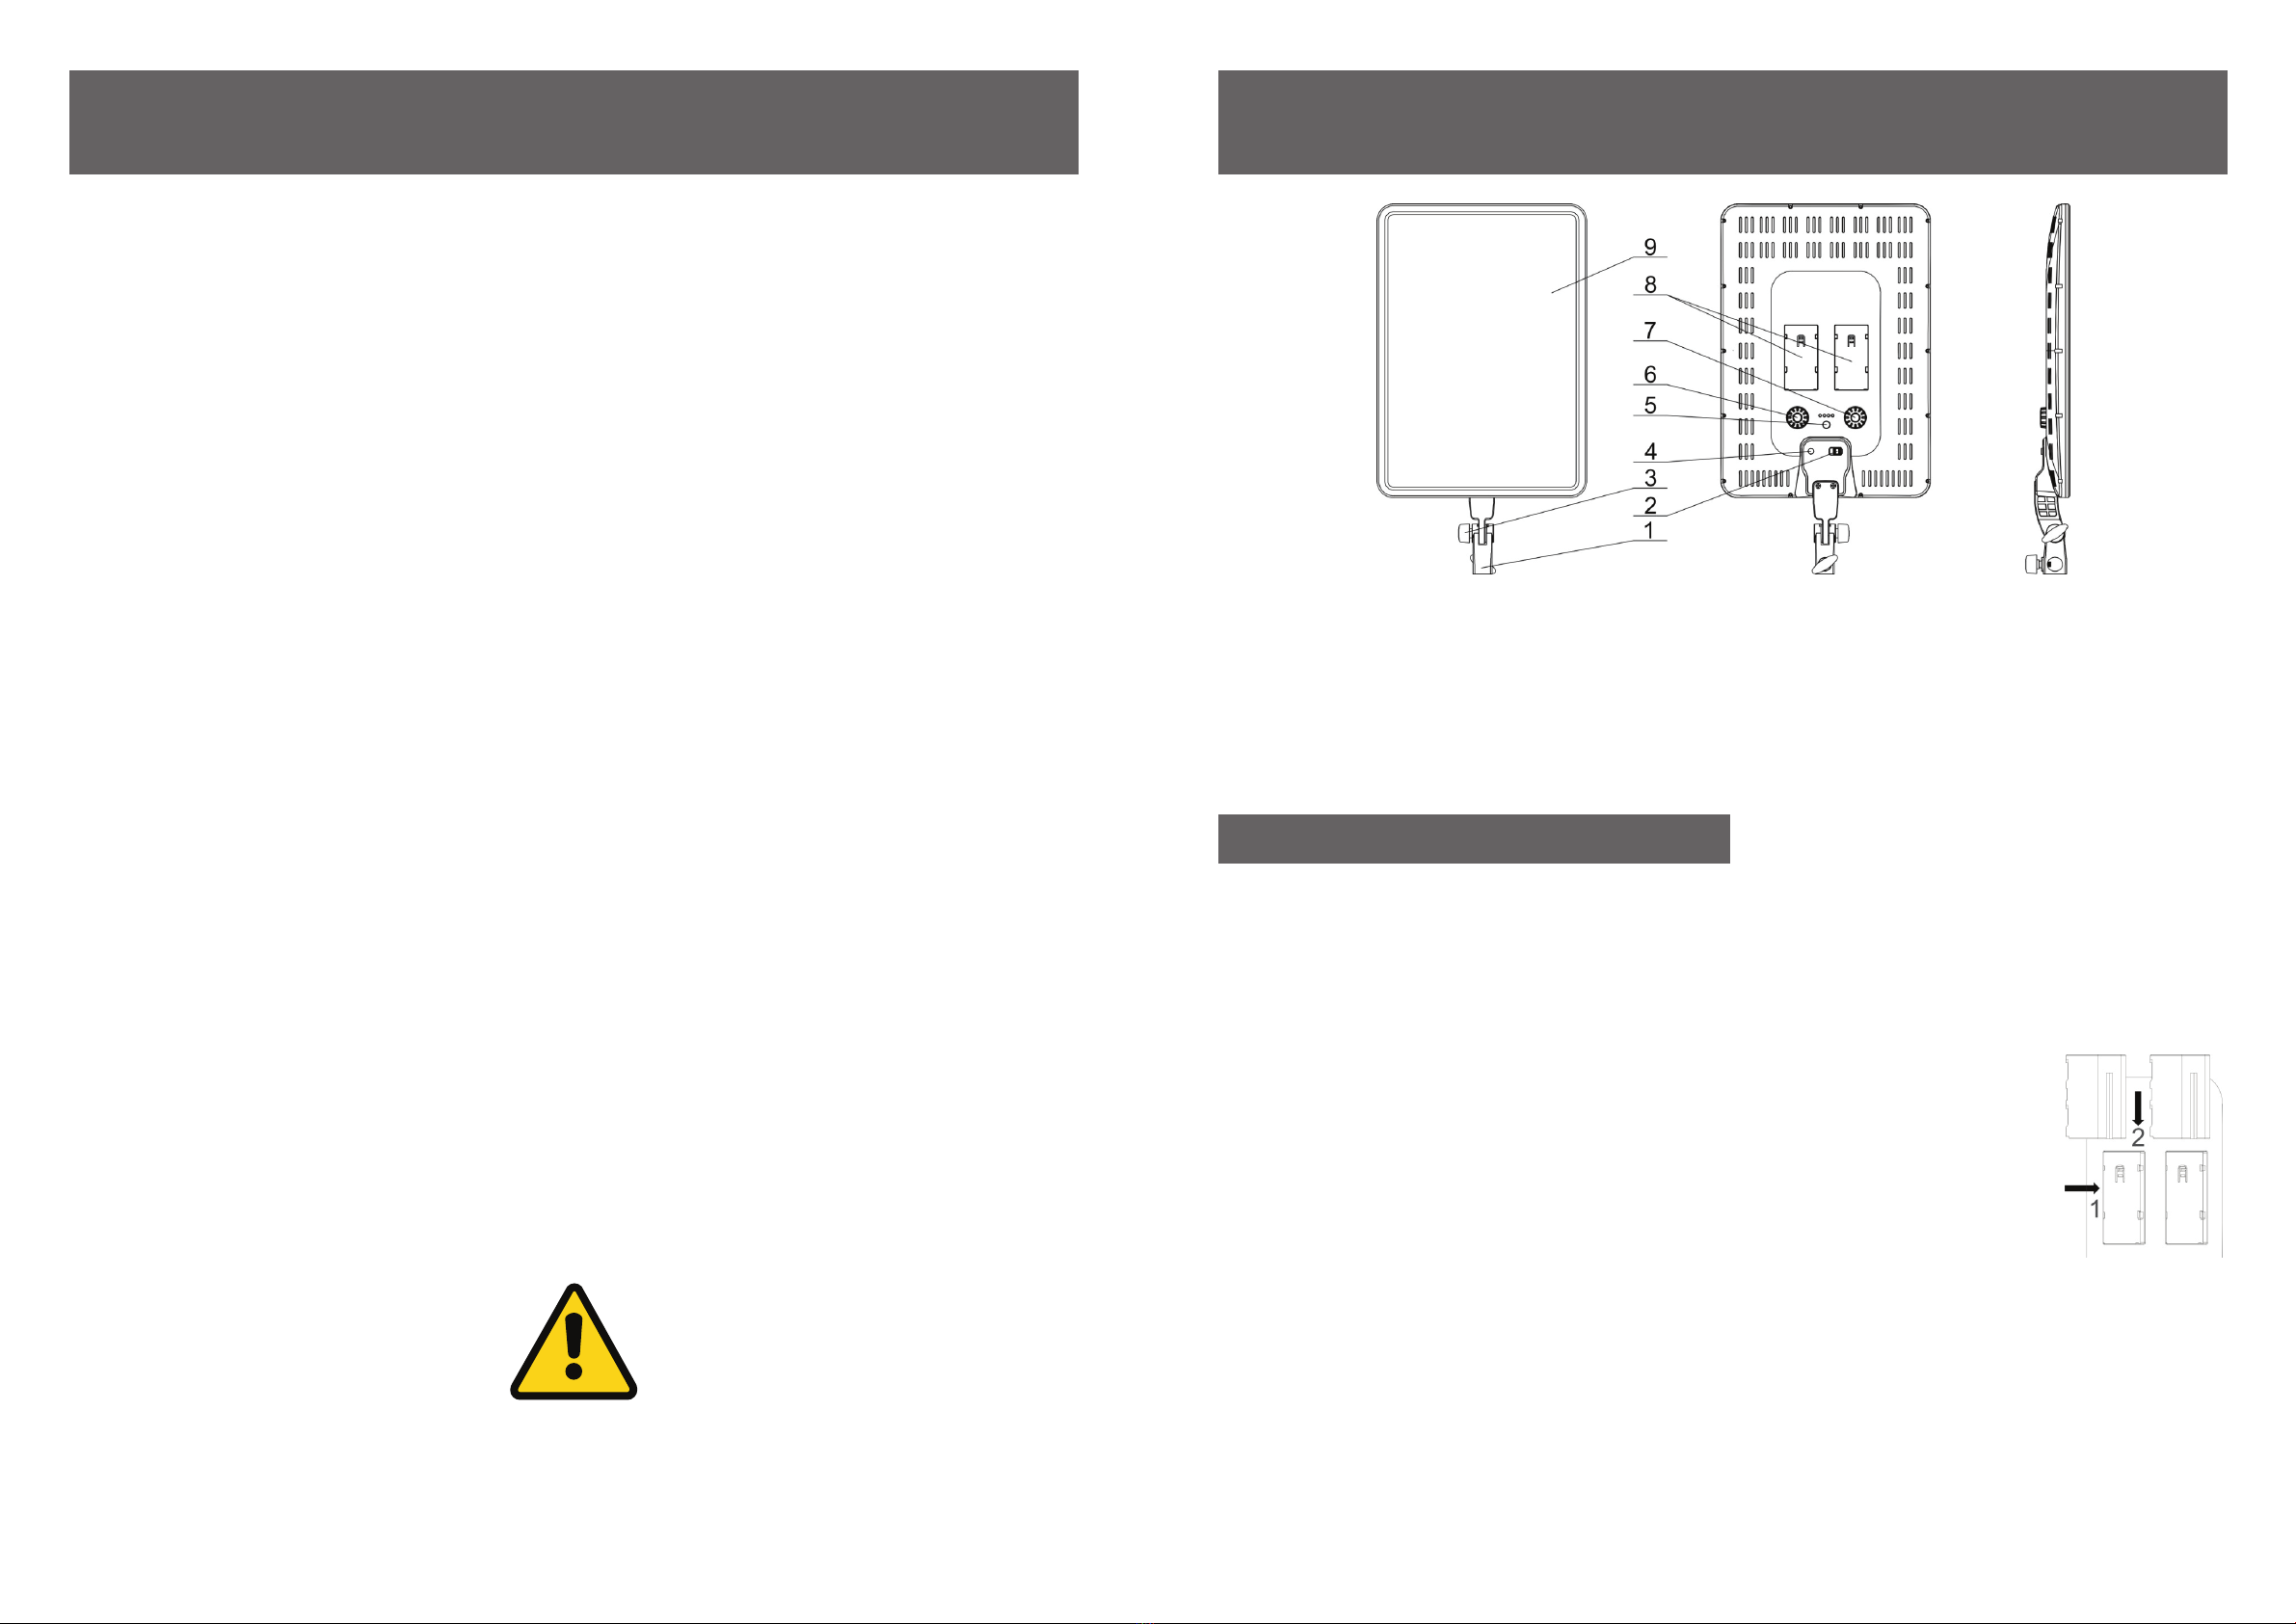
Pixapro GLOWPAD 350 Series User manual

GLOWPAD 350
Instruction Manual
Model GLOWPAD 350S GLOWPAD350D
Power Output 45W
Brightness 920 lux @ 1m - 3400 lux @ 0.5m
LED Type Edge-Lit LED Panel
Beam Angle 12 0 °
CRI >95
Colour Temperature 5600K 3200-5600K
Power Range 0-100%`
Heat Dissipation Ventilation Slits
Adapter Input 100-240V~50/60Hz
Adapter Output 15V/3A/2.5
Battery Plate 2x Sony NP-F / L-Series Compatible
Average Lifespan ≥ 50,000 hours
Dimensions 25cm x44cmx 4.2cm
Net. Weight 1.1kg
Please read these instructions carefully before using your device for the first time. It includes everything
you need to know to avoid physical injuries and damages.
Please pay attention to all safety notes in this instruction manual.
Please keep this manual safe. In case of selling or leaving the device to other persons, please don’t
forget to hand this manual over as well.
Specifications
CAUTION!
PLEASE READ
INSTRUCTIONS
BEFORE USE

32
Table of Contents Parts & How To Use
6. Colour Temperature Dial (GLOWPAD350D
Only)
7. Dimmer Dial
8. NP-F Series Battery Plates
9. LED Light Panel
1. Stand Mount
2. Power Switch
3. Angle Adjustement Screw
4. Power Adapter Input Port
5. Power Indicator / Test Button
1. Intallation
Mount the GLOPWPAD350 onto the light stand, tighten the locking Screw. To adjust the angle of the GLOW-
PAD350 Light, Loosen the Angle Adjustment Screw (3) and adjust the angle of the light to your desired position,
then tighten the Angle Adjustment screw (3) again to secure it.
2. Power Input
The GLOWPAD350 can be Powered by 2x Sony NP-F (L-Series) compatible batteries, or
using the Mains power adapter included.
• Battery Power: Insert 2x Sony NP-F (L-Series) batteries into the battery plate (8) in the
direction of the arrow. To remove the batteries, simply push the batteries upwards, and
they should disconnect
• Mains Adapter input: Connect the included mains power adapter to the Power Adapter
Port (4), located on the back of the GLOWPAD350 Panel.
Please Note: Product failure caused by using a power adapter not designed for the GLOWPAD350, will void
your warranty
3. Power Switch
To turn the GLOWPAD350 on, use the Power Switch (2) located on the back of the GLOWPAD350 panel to the
“ON” position.
How To Use
Specifications ............................................................................. 1
Parts Diagram ............................................................................. 3
How To Use ................................................................................ 3
Installation........................................................................... 3
Power Input......................................................................... 3
Power Switch...................................................................... 3
Dimmer Controls................................................................. 4
Colour Temperature Controls............................................. 4
How To Check Battery Levels............................................. 4
Troubleshooting........................................................................... 4
Health & Safety Precautions.......................................................5
Contact Information.................................................................... 6
Important Information... Please Read

54
4. Dimmer Controls
To Adjust the light output, rotate the dimmer dial (7). The brightness can be adjusted anywhere between 0-100%
power.
5. Colour Temperature Controls (GLOWPAD350D Only)
To Adjust the Colour Temperatuere of the, rotate the Colour Temperature Dial (6). The Colour Temperature can
be adjusted anywhere between 3200K and 5600K.
6. How To Check Battery Levels
To check the current battery levels, press Test button (5), and the power indicator will light up. When all of the
power indication lights are lit, it means that your batteries are fully charged. When only one of the power indica-
tor lights are lit, this means the battery power is low. If none of the power indicator lights light-up this means that
thebatteries need to be recharged.
How To Use & Troubleshooting
Description Possible Cause Possible Solutions
Nothing Happens When Power is
Switched on.
Dimmer Dial is on 0% Rotate Dimmer-Dial in a Clockwise
Direction
Low Battery Power Recharge batteries, or replace with
fully-charged batteries.
One Battery Installed Two Batteries are required to power
the GLOWPAD350
Circuit Board Damaged Please Return to Vendor for Repair
Lack of Brightness Low battery Install new battery or charge the
batteries before use.
Battery power test Inaccurate when
power switch is on
Displays low battery when you
increase the brightness and dis-
plays high battery when you lower
brightness
Battery capacity shown indicater
the length of time available for use
at its current brightness;
A high luminance requires more
power thus shortens the length
of time available for use, and
vice-versa.
Normal
Troubleshooting
Optional Accessories
Optional accessories for the PiXAPRO LED200B MKIII include:
2.4GHx Wireless Remote control, 2.4GHz Wireless remote control receiver dongle, S-Type fitting soft-
boxes, reflectors, barn door sets etc. (Sold Separately).
Health & Safety Precautions
If using AC power, ensure that voltage is within specified range (100-240V).
DO NOT place unit in direct sunlight. Store in a cool dry place, away from dust, rain and humidity.
DO NOT allow the GLOWPAD350 to come in contact with chemical solvents, gasoline, paint or pesticides
DO NOT insert any metal objects into the GLOWPAD350, as it may cause a short-circuit.
DO NOT touch the power cord or other electronic parts with wet hands or other body parts.
ENSURE you pull the plug, not the cord when disconnecting the mains power adapter
ENSURE the device is properly disconnected the power supply when the light is not in use, before mounting or during
maintenance.
AVOID prolonged exposure to heat or light, as it may affect the lifespan of the GLOWPAD350. Please turn off the
power and Remove the power adapter after use.
DO NOT attempt to repair light. If your GLOWPAD350 develops a fault, as doing so will VOID your warranty. Please
contact us at customerservice@essentialphoto.co.uk
DO NOT dismantle the head unit unless work is carried out by a qualified technician. Dismantling your LED200B
MKIII will VOID your warranty.
This manual suits for next models
2
Table of contents
Popular Light Fixture manuals by other brands

Stoane Lighting
Stoane Lighting Iris Type S Installation and maintenance instructions

DS Produkte
DS Produkte 43-9951IR3 operating instructions

Portfolio
Portfolio SLS15BK quick start guide

Eterna
Eterna vnanobh installation instructions

Intelight
Intelight STARLET EXTERNAL LED SO Installation and maintenance instructions

thomann
thomann STAIRVILLE maTrixx SC-50 LED Effect user manual