Platinum CCTV PT-351-V49 User manual

Platinum CCTV Surveillance Solutions
http://Platinum-CCTV.com
PT-351-V49 Installation and Operation Manual
PT-351-V49 CCD Pan/Tilt Dome Camera
Installation and Operation Manual

Platinum CCTV Surveillance Solutions
http://Platinum-CCTV.com
PT-351-V49 Installation and Operation Manual
For Warranty Registration, visit http://Platinum-CCTV.com
Table of Contents
Important Notes
3
Functions
3
Setup of Dome Camera
4
Installation of Dome Camera
8
Connection of Dome Camera to your system
11
Technical Specifications
13
Troubleshooting
14
2

Platinum CCTV Surveillance Solutions
http://Platinum-CCTV.com
PT-351-V49 Installation and Operation Manual
For Warranty Registration, visit http://Platinum-CCTV.com
I. Important Notes
1. Prior to installation, Please read this manual carefully
2. Please use included power supply (12VDC/1Amp)
3. During transportation, storage and installation of this product, please avoid
heavy pressure and strong vibrations, as this can cause damage to the
optical and electronic devices contained within the dome camera
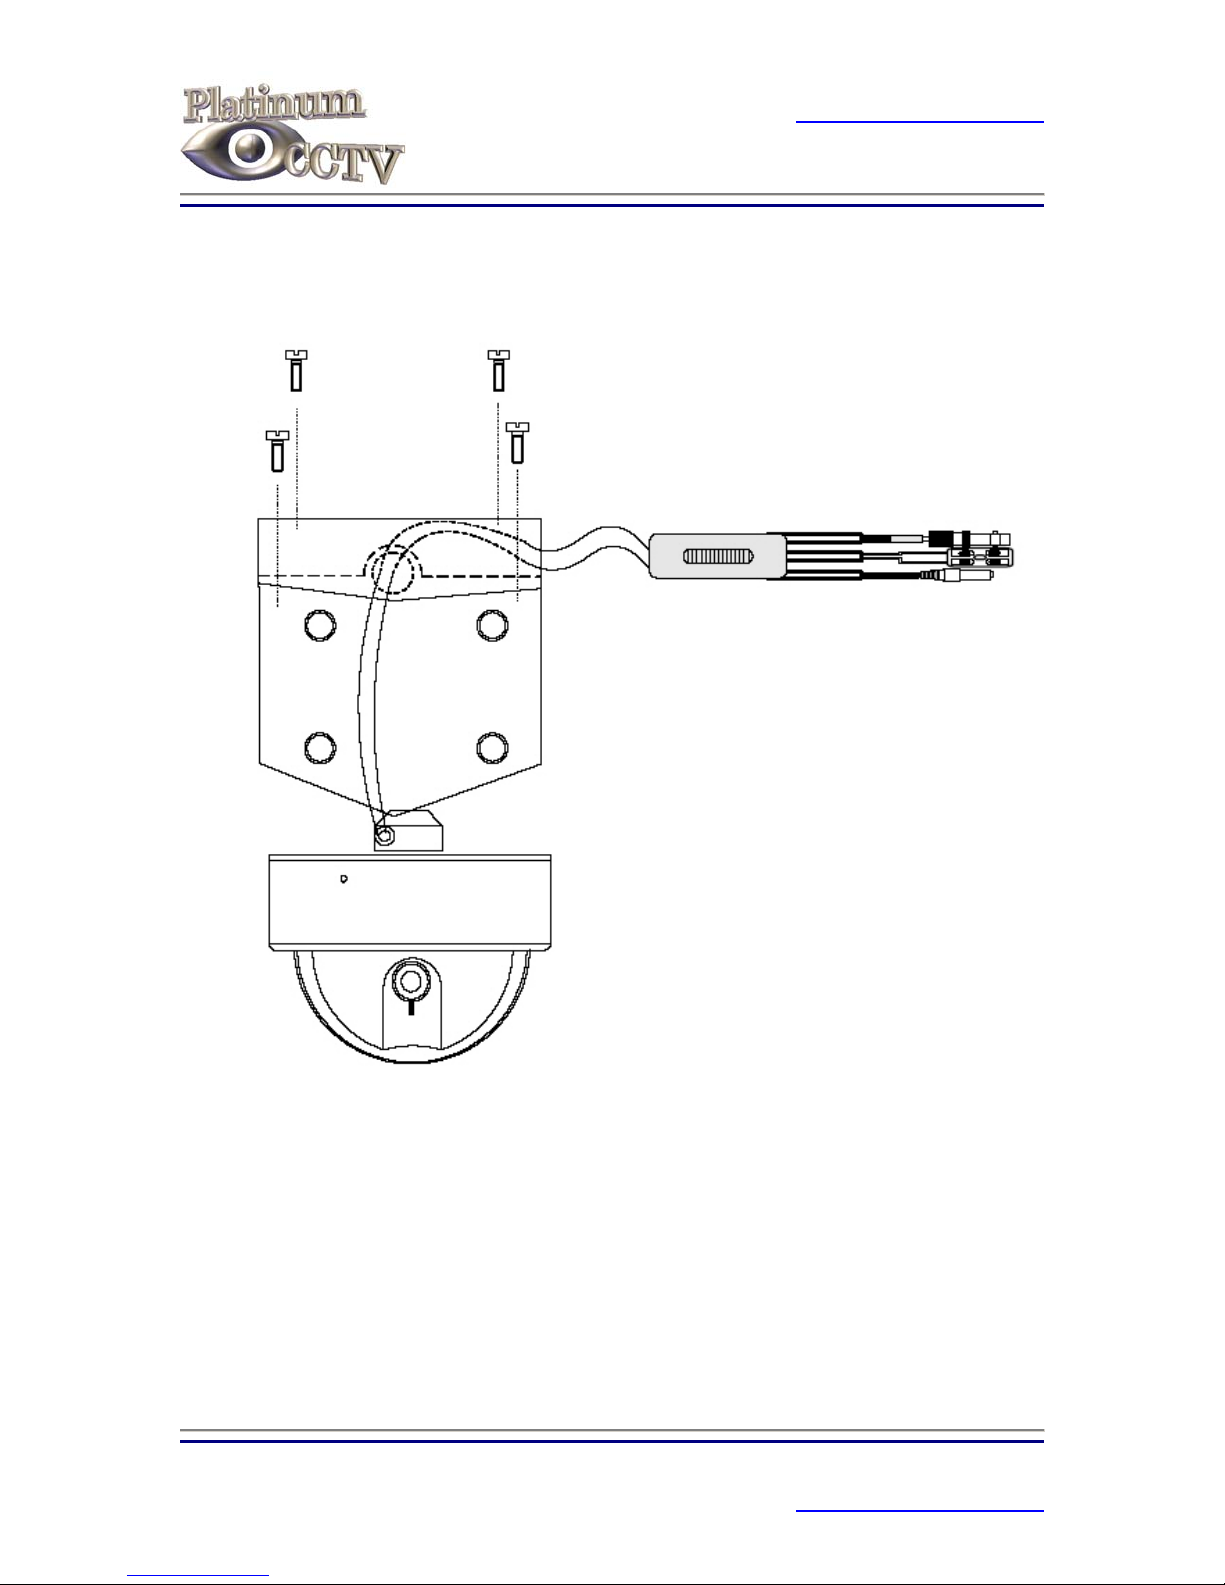
4. Do not attempt to disassemble the
camera. In order to prevent electric
shock, do not remove screws or covers.
There are no user-serviceable parts i
the dome camera nside
ome.
. This waterproof camera is rated at IP66 and
5. Always follow all local and federal
electrical safety standards during the
installation and operation of this product.
Use only the provided power supply. RS-485 and video signal cables
should be kept clear of any high voltage equipment or wiring, as this can
cause distortion of the picture or failure of the d
6vandal resistant. Please ensure that all seals
are intact before installing in an outdoor
environment.
II. Camera Functions
The PT-351-V49 Pan/Tilt Dom V product which n decoder
•High Resolution Sony Image Sensor
le)
r
e camera is a High-Tech CCT
incorporates a high-quality Sony CCD image sensor, and Pan/Tilt multifunctio
into a weatherproof armored outdoor dome camera.
•360 degree Panning continuously
•90 degree Vertical Tilt operation
•32 Preset Positions (programmab
•Automatic scanning between 2 points
•0-12 degrees per second pan/tilt speed
•Integrated Multi-Protocol Decoder
•4-9mm Varifocal Lens
•Automatic Iris and Shutte
3

Platinum CCTV Surveillance Solutions
http://Platinum-CCTV.com
PT-351-V49 Installation and Operation Manual
For Warranty Registration, visit http://Platinum-CCTV.com
III. Setup of Dome Camera
Before installing the PT-351-V49 Dome camera, please first check with your DVR
manufacturer to determine the supported protocols. If you will only be using the RF
remote control, than skip ahead to address selection.
Remove the Dome Cover of the PT-351-V49 Camera, and adjust the Switches SW1 and
SW2 to match the Protocol, Baud Rate and Address as desired for the camera using the
included charts.
1. Remove Dome Set Screws using supplied Hex Wrench
2. Separate the Dome from the camera body carefully using a flat-blade
screwdriver
4

Platinum CCTV Surveillance Solutions
http://Platinum-CCTV.com
PT-351-V49 Installation and Operation Manual
For Warranty Registration, visit http://Platinum-CCTV.com
3. Locate the Dip Switches (SW1 and SW2)
4. Set the Dome Address (SW1)
If the Dome is to be used with included RF remote control, set each dome
with independent addresses using only addresses 1 through 4. Higher
addresses will work for independent control with RS-485 but will not
function with included RF remote control.
Use the following chart to set the address of your Dome camera (SW1)
5

Platinum CCTV Surveillance Solutions
http://Platinum-CCTV.com
PT-351-V49 Installation and Operation Manual
For Warranty Registration, visit http://Platinum-CCTV.com
5. Set the Dome Protocol (SW2)
The Dome Protocol is the communication language that the Dome camera will
use to communicate via RS-485 to your DVR or PC-Based DVR System. The
Protocol setting will not affect the RF remote control, only RS-485 wire
communications.
Use the chart below to set the Dome protocol to match your controller (SW2)
6

Platinum CCTV Surveillance Solutions
http://Platinum-CCTV.com
PT-351-V49 Installation and Operation Manual
For Warranty Registration, visit http://Platinum-CCTV.com
6. Set the Dome Baud Rate (SW2)
The Dome Baud rate sets the communication speed for the RS-485
transmission. The Baud rate MUST MATCH the baud setting of your
controller!
7. Reinstall Dome
7

Platinum CCTV Surveillance Solutions
http://Platinum-CCTV.com
PT-351-V49 Installation and Operation Manual
For Warranty Registration, visit http://Platinum-CCTV.com
IV. Camera Installation
After you have completed the dome configuration, now you are ready to install the
camera. The PT-351-V49 camera can be installed in 2 different ways: Ceiling mount
and Wall Mount).
By default, the ceiling mount adapter plate is installed on the dome camera, so we will
first look at mounting the camera with the ceiling adapter.
A. Ceiling Mounting
Attach camera to ceiling using the supplied ceiling mounting plate. Run wires
through hole in the ceiling.
8

Platinum CCTV Surveillance Solutions
http://Platinum-CCTV.com
PT-351-V49 Installation and Operation Manual
For Warranty Registration, visit http://Platinum-CCTV.com
B. Wall Mounting
1. Remove Ceiling Adapter Plate from top of camera
2. Install camera onto Wall adapter mounting plate
3. Install Wall Adapter onto wall using appropriate mounting screws
9

Platinum CCTV Surveillance Solutions
http://Platinum-CCTV.com
PT-351-V49 Installation and Operation Manual
For Warranty Registration, visit http://Platinum-CCTV.com
4. Install camera with Wall adapter mounting plate onto Wall Adapter
10

Platinum CCTV Surveillance Solutions
http://Platinum-CCTV.com
PT-351-V49 Installation and Operation Manual
For Warranty Registration, visit http://Platinum-CCTV.com
V. System Diagram
System Diagram with Multiplexer, PTZ Keyboard and Monitor
*Multiplexer, PTZ Keyboard and Monitor are not included with camera
System Diagram with PC-Based DVR and RS-232 to RS-485 Adapter
*PC-DVR and RS-232 to RS-485 Adapter are not included with camera
11

Platinum CCTV Surveillance Solutions
http://Platinum-CCTV.com
PT-351-V49 Installation and Operation Manual
For Warranty Registration, visit http://Platinum-CCTV.com
System Diagram with RF Remote Control
*RF Remote Control can control up to 4 PT-351-V49 Cameras and is included with camera
12

Platinum CCTV Surveillance Solutions
http://Platinum-CCTV.com
PT-351-V49 Installation and Operation Manual
For Warranty Registration, visit http://Platinum-CCTV.com
VI. Camera Specifications
Signal Format NTSC (U.S. & Japan)
Scanning System 2:1 Interlaced
Image Sensor 1/4" Sony 420 TVL Image Sensor
Effective Pixels NTSC = 542(H) x 496(V)
Horizontal Resolution 420 TV lines
Lens 4 - 9 mm Varifocal Auto-Iris Lens
Dimensions 7.25"(D) x 5.25" (T) x 5.5" (W)
Focus Adjustable Manual
Maximum Sensitivity 0.5 Lux
Sync System Internal/External
White Balance Manual Override
Shutter Speed 1/60th to 1/120,000 sec.
Iris Control Automatic w/Manual Override
Gain Control Automatic w/Manual Override
Video Output 1.0 ± 0.2Vp-p
Camera
Specifications
Signal to Noise Ratio >50 dB
Receiver Built-in
Motor Stepping Motor
Baud Rate 2400, 4800, 9600, 19200
Preset 64 Preset Points
Cruise Tour Up to 6
Enclosure Metal Enclosure (IP-66 Rated)
Preset Speed 0~12 degrees/sec.
Pan Rotation Range 360° continuous
Tilt Range Tilt 90°
Operationals
Communication RS-485 Interface (PELCO-D, PELCO-P)
Operating Temp 0° C ~ 40° C
Duty Cycle Rated for 24 hr. continual use
Weather Resistant IP66 rating
Environmentals
Power Supply AC 12V ± 5% 800mA Max.
13

Platinum CCTV Surveillance Solutions
http://Platinum-CCTV.com
PT-351-V49 Installation and Operation Manual
For Warranty Registration, visit http://Platinum-CCTV.com
VII. Troubleshooting
Problem Possible Causes Solutions
Power supply damaged or
not plugged in correctly Replace Power supply or
plug in correctly
Incorrect Polarity of power
supply (Center Pin must be
positive)
Correct the Polarity
(Center Pin must be
12 VDC +)
Camera does not move, no
image visible on screen
when camera is powered on Problem with electronic
circuits in camera Contact Warranty Repair
facility
Insufficient Power Use only qualified power
adapter
Camera is not mounted
properly Fix Camera mounting and
retest
Abnormal Power on Self
Test – Motor sounds loud
Voltage Drop too great Use larger gauge copper
wire or move power supply
closer
Wrong Connection of Video
Circuit Check and Replace BNC
video connections
Bad Connection on Video
Circuit Check and Replace BNC
Video connections
Normal Self-Test Operation
but video does not appear
Camera Damaged Replace Camera
Wrong connection of RS-485
Control wire Correct the RS-485
connection wires (+,-)
Mismatched Address Reset the Camera address
Normal Self-Test Operation
but camera moves out of
control Mismatched Protocol
Adjust the Protocol and
Baud Speed on camera and
controller. Then power
camera off and back on
again
Abnormal Self-Test Cycle power and re-test
Bad connection of RS-485 Correct RS-485 Connections
Problem might be on DVR
side, not camera Check for troubles on DVR
or Keyboard
Camera out of control
Too heavy load or too long
distance of communication Connect 120 ohm resistor
on furthest Dome
14
Table of contents
Other Platinum CCTV Security Camera manuals

Platinum CCTV
Platinum CCTV PTZ-2000-10 User manual

Platinum CCTV
Platinum CCTV KC-DVR1080P User guide

Platinum CCTV
Platinum CCTV AD-2000 User manual

Platinum CCTV
Platinum CCTV KC-DVRMB1 User guide

Platinum CCTV
Platinum CCTV PTZ-1500-27 User manual

Platinum CCTV
Platinum CCTV PTZ-2201-10 User manual

Platinum CCTV
Platinum CCTV CD-4261 User manual

Platinum CCTV
Platinum CCTV CH-DVRHD1 User guide

Platinum CCTV
Platinum CCTV CD-5260 User manual

Platinum CCTV
Platinum CCTV CD-8260 User manual