pline DHR NDM6 Mk.2 User manual

PLine from Model Engineering Company
http://pline.co.in
V1.0 (2019-2020)
PLEASE READ THIS OWNERS MANUAL CAREFULLY BEFORE OPERATING THE MODEL
Caution!!
This model is an accurate replica of the original locomotive. It has sharp and moving parts. The
locomotive drive gears are brass & stainless steel with sharp edges.
AT ANY TIME, OPERATORS MUST NOT COME IN CONTACT WITH THE MODEL WHILE IT IS
POWERED. UNDER NO CIRCUMSTANCES SHALL Model Engineering Company OR ANY OF ITS
ASSOCIATES BE HELD RESPONSIBLE FOR ANY INCIDENTAL OR CONSEQUENTIAL DAMAGES
ARISING IN REGARD TO ANY PLINE PRODUCT.
Items included:
1. NDM6 Mk.2 Model Locomotive X 1 off (Serial No. 2019.X)
2. Owner’s Manual X 1 off
Required:
1. 12v 4000mAh rechargeable Battery pack for Locomotive
2. 2.4Ghz Transmitter & Receiver
3. Suitable Electronic Speed Controller 20A or more
4. Diesel Sound/Horn unit & matching 1.5” diameter, 8 ohms Speaker
5. Suitable battery packs & chargers for serials 1 & 2
Battery Pack Selection:
Your NDM6 Mk.2 locomotive is not supplied with a Battery Pack, due to International Shipping &
Security norms. We recommend any deep-cycle Battery pack with an output of 12v rated at 4000mAh
(or higher rating) for the locomotive and batteries for the transmitter as recommended by its
manufacturer.
Connect your preferred locomotive battery pack to the terminal Connector leads inside the locomotive’s
bonnet by removing the bonnet hatches. The cab roof and bonnet hatches are snap fitted, and can be
easily removed by lifting them straight up. BE CAREFUL TO CONNECT THE CORRECT POLARITY OF THE
BATTERY TERMINALS TO THE BATTERY LEAD WIRES, COLOURED RED FOR +VE & BLACK FOR –VE
POLARITIES. INCORRECT POLARITY CONNECTION CAN DAMAGE THE CONTROL SYSTEM OF YOUR
MODEL. The locomotive battery pack can be either housed inside the cab or inside the bonnet.

PLine from Model Engineering Company
http://pline.co.in
V1.0 (2019-2020)
Installing Radio Control and Diesel Sound/Horn units:
It is highly recommended that prior to installing the Radio Control and Diesel Sound/Horn units, you
thoroughly read and understand the manufacturers’ installation Instructions, for these items. It is always
helpful, to consult a Radio Control and Sound unit installation expert.
The Main Power 3-way, Centre Off, DPDT toggle switch, has six terminals, of which only four are wired.
The central terminals connect to the battery Pack’s terminals through an inline 10A glass cartridge Fuse
(pre-wired). The top two terminals are to be used to supply power to the Electronic Speed Controller
and Diesel Sound/Horn units. The remaining two lower terminals have been left unused. They can be
used to hook-up a charging socket.
Taking into consideration that Radio Control & Diesel Sound/Horn units from various manufacturers, are
wired differently, we have suggested a generic wiring schematic for your reference below.
Wire Color Coding:
RED +VE BATTERY TERMINAL
BLACK -VE BATTERY TERMINAL
BLUE/YELLOW MOTORS
ORANGE/BLACK DIRECTIONAL HEAD/MARKER/FOG LAMPS

PLine from Model Engineering Company
http://pline.co.in
V1.0 (2019-2020)
Sound:
Depending on the specifications of Diesel Sound/Horn unit that you have chosen for your model, when
the model is powered on and is not moving, you should hear the engine idling sound. As you speed up or
down in either forward or reverse directions the engine sound should also rev up or down in a
synchronized fashion, and idle when the model comes to a standstill.
Lights:
The lights are directional and on the motors. So when the model moves in any direction, the head,
markers lamps and fog lamp in that direction light up.
NOTE: An unwired smaller SPDT toggle switch has been provided in the cab so that, if required, it can be
wired to control the power to the Diesel Sound/Horn unit and the locomotive’s lights.
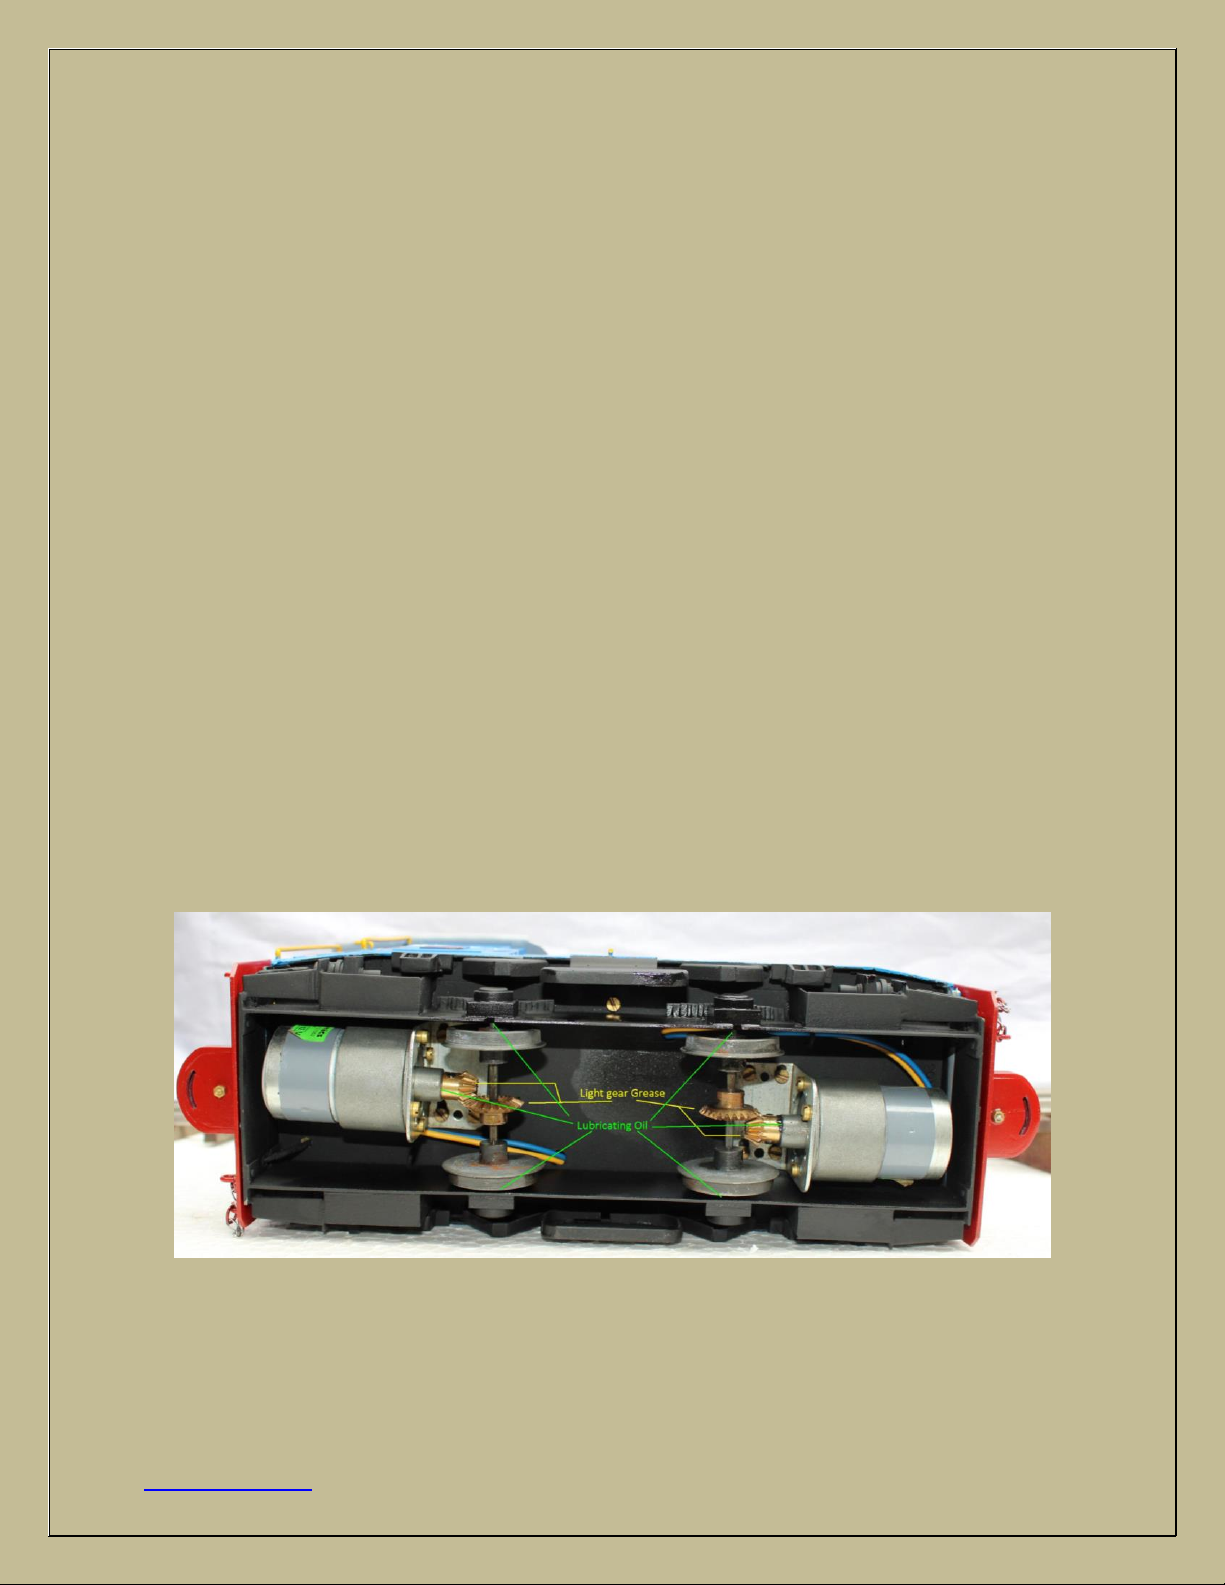
Lubricating:
With a bit of care, your PLine NDM6 Mk2. should give you many years of pleasure and reliable service.
Lubrication is of prime importance for a model of this type with moving parts. Always use quality
lubricants. This should not be a problem, for there are many modern lubricants available in hobby and
sport shops. Light oil such as Labelle #108 or Hoppe’s Gun Oil would be good enough for lubricating
most of the moving parts. For the brass bevel gears, use a light gear grease, or any another hobby gear
lubricant. The brass bevel gears driving each axle can be lubricated by applying grease on the gear teeth
using a small flat blade screw driver. To access the moving parts of this model, it is best to carefully
place it on its side on a soft towel or foam sheet. Use oil that is a bit heavier to lubricate the axle ends.
Do not over lubricate, for excess oil only picks up unwanted dirt. Be careful to keep lubrication off the
painted surfaces, as this causes shiny areas. Thorough Lubrication of the locomotive should be done
every 3 hours of operation.
Operating the model:
Once the Radio Control and Diesel Sound/Horn units have been wired in and battery packs connected to
the Locomotive and Transmitter, double check all the wiring to make sure you have the correct
connections as recommended by the manufacturers of your Radio Control and Diesel Sound/Horn units.

PLine from Model Engineering Company
http://pline.co.in
V1.0 (2019-2020)
Next switch the transmitter ‘ON’. The model can now be powered ‘ON’ by flipping the main power 3-
way switch in the cab downwards. Always SWITCH ‘ON’ the Tx first before POWERING ON the model.
Gradually increase the throttle on the transmitter and the locomotive will move in any of the two
directions, while gaining speed. Try to move the model in the opposite direction by controlling the
direction & throttle controls, on your transmitter. The model should ideally come to a stop when, the
neutral position, on the transmitter, is reached. This position can be fine adjusted using the trim
buttons on the transmitter (refer to your Radio Control unit’s operation manual).
CAUTION: DO NOT RUN THE MOTORS ON FULL THROTTLE IN THE FIRST 60 MINUTES OF RUNNING. Run
the model at half throttle in any one direction for a few minutes, then stop, and then run it again at half
throttle for a few minutes more. Repeat this procedure for about half an hour until the model runs
smoothly in both directions. Once you have run your Model on half throttle in both directions on a test
track for at least about an hour, your model should be ready to run at Full throttle on the Outdoor
layout.
Maintenance:
Clean the body of the Model with a clean soft lint free cotton cloth. To remove stubborn grease stains
from the painted surface use a detergent solution with a lint free cloth. With a little care your PLine
NDM6 Mk.2 locomotive will give you years of trouble free running.
Decal attaching reference photos of prototype:
Use the prototype photos below to apply the decals in the correct places on your model.
Side view with English “Indian Railways” markings
Similar markings in Hindi, on opposite side of bonnet.

PLine from Model Engineering Company
http://pline.co.in
V1.0 (2019-2020)
Front buffer beam
Rear buffer beam
Cab rear view
IMPORTANT!
Some parts may have loosened during shipment. Inspect your model prior to any
THANK YOU!
Manufactured by : Model Engineering Company
47, Sankharitola Street, Calcutta-700014, India.
Note: The brand name “PLine”is solely owned by Model Engineering Company.
Table of contents
Other pline Toy manuals