pline DHR NDM6 User manual

Owner’s Manual: DHR NDM6 Locomotive in 16mm scale
Model Engineering Company
47, Sankharitola Street, Calcutta-700014, India.
Visit us at: http://pline.co.in
Email: info@pline.co.in
16-17v1.0
PLine
Built in Brass
DHR NDM6 Locomotive Model (
16mm scale)
PLEASE READ THIS OWNERS MANUAL CAREFULLY BEFORE OPERATING THE
MODEL
Caution!!
This model is an accurate replica of the original locomotive. It has sharp and moving parts.
The locomotive drive gears are brass & stainless steel with sharp edges.
AT ANY TIME, OPERATORS MUST NOT COME IN CONTACT WITH THE MODEL WHILE IT IS
POWERED. UNDER NO CIRCUMSTANCES SHALL Model Engineering Company OR ANY OF ITS
ASSOCIATES BE HELD RESPONSIBLE FOR ANY INCIDENTAL OR CONSEQUENTIAL DAMAGES
ARISING IN REGARD TO ANY PLINE PRODUCT.

Owner’s Manual: DHR NDM6 Locomotive in 16mm scale
Model Engineering Company
47, Sankharitola Street, Calcutta-700014, India.
Visit us at: http://pline.co.in
Email: info@pline.co.in
16-17v1.0
Items included:
1. NDM6 Model Locomotive X 1 off
2. Owner’s Manual X 1 off
Required:
1. 12v 1.3Ah rechargeable Battery pack for Locomotive X 1 off
2. RC set and batteries for transmitter
3. Diesel loco Sound board with horn
4. M3 Allen key to alter wheel gauge
Battery Pack Selection:
Your NDM6 locomotive & transmitter are not supplied with the Battery Packs due to International
Shipping & Security norms. We recommend any deep-cycle Battery pack with an output of 12v rated
at 1.3Ah (or higher rating) for the locomotive.
Once the RC & sound units are installed, connect your preferred battery pack to the terminal
Connector leads inside the locomotive cab by removing the cab roof. The roof is snap fitted and can
be removed by lifting it up straight. BE CAREFUL TO CONNECT THE CORRECT POLARITY OF THE
BATTERY TERMINALS TO THE CONNECTOR STRIP. THE WIRES ARE COLOURED RED FOR +VE & BLACK
FOR –VE POLARITY. INCORRECT POLARITY CONNECTION CAN DAMAGE THE CONTROL SYSTEM OF
YOUR MODEL. The locomotive battery pack can be housed inside the cab.

Owner’s Manual: DHR NDM6 Locomotive in 16mm scale
Model Engineering Company
47, Sankharitola Street, Calcutta-700014, India.
Visit us at: http://pline.co.in
Email: info@pline.co.in
16-17v1.0
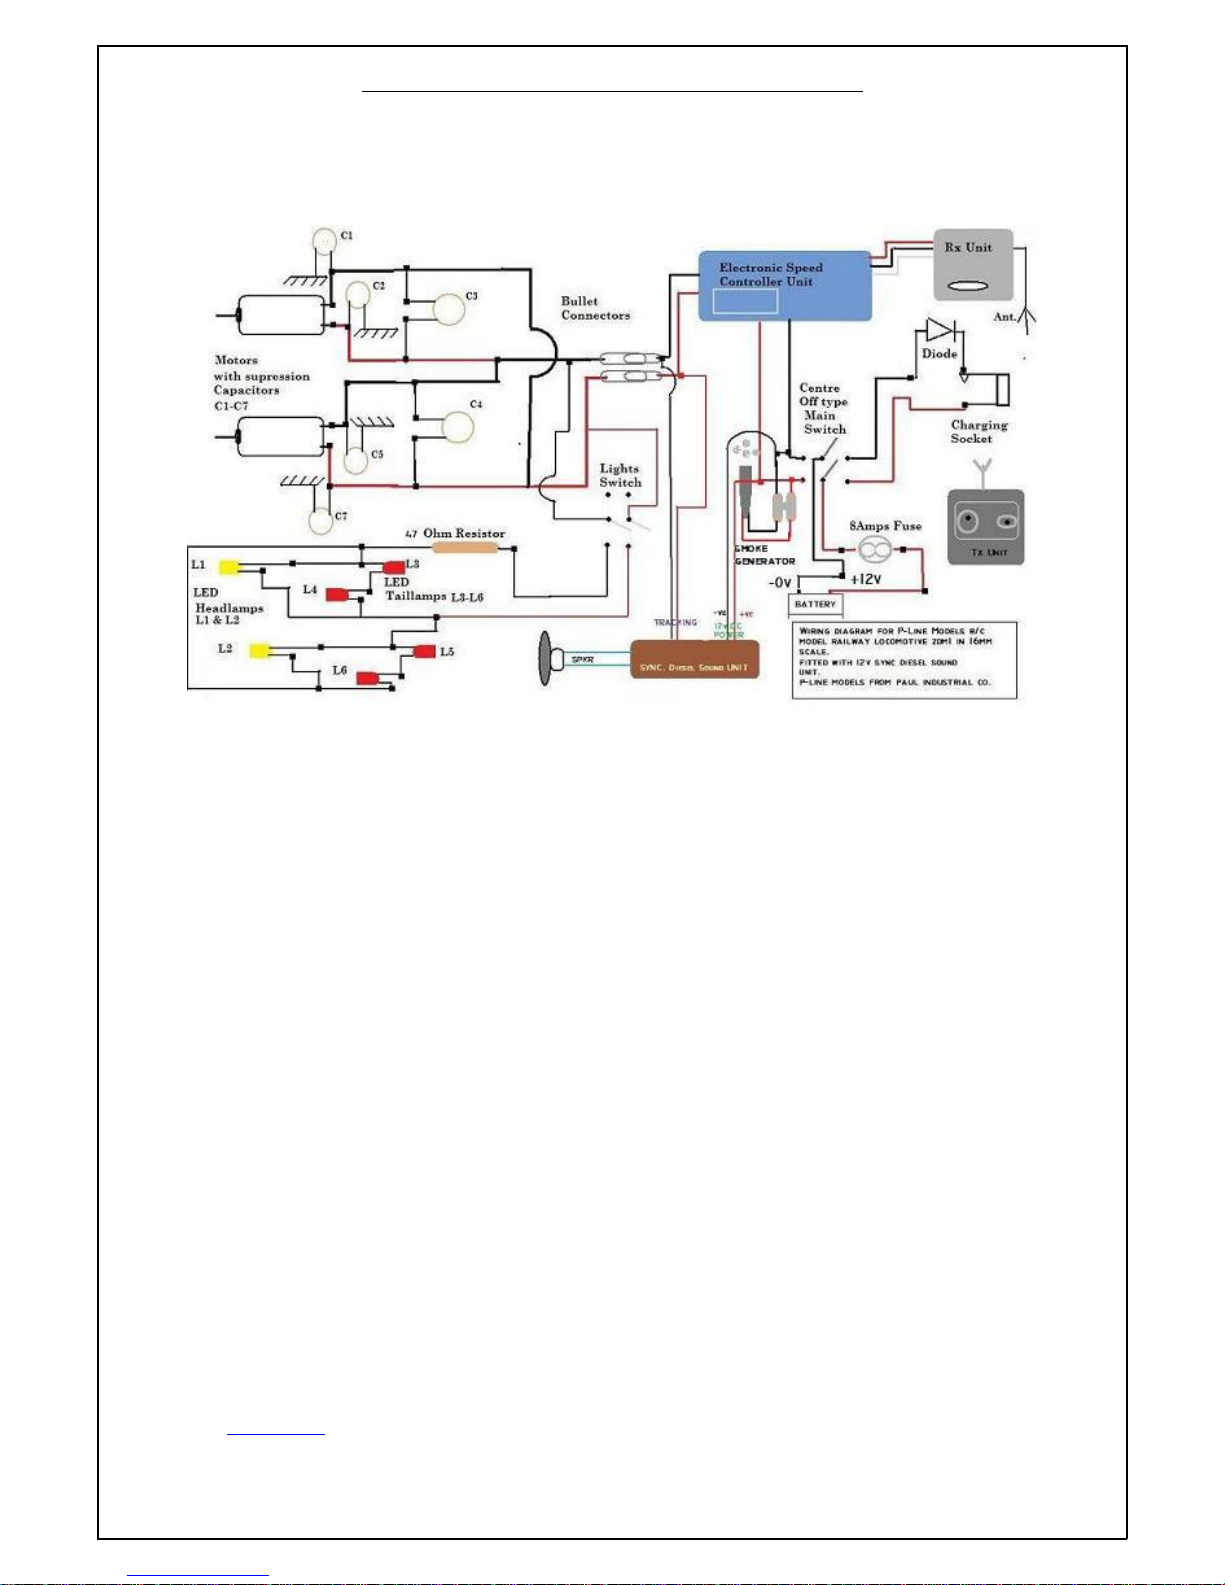
Suggested wiring diagram:
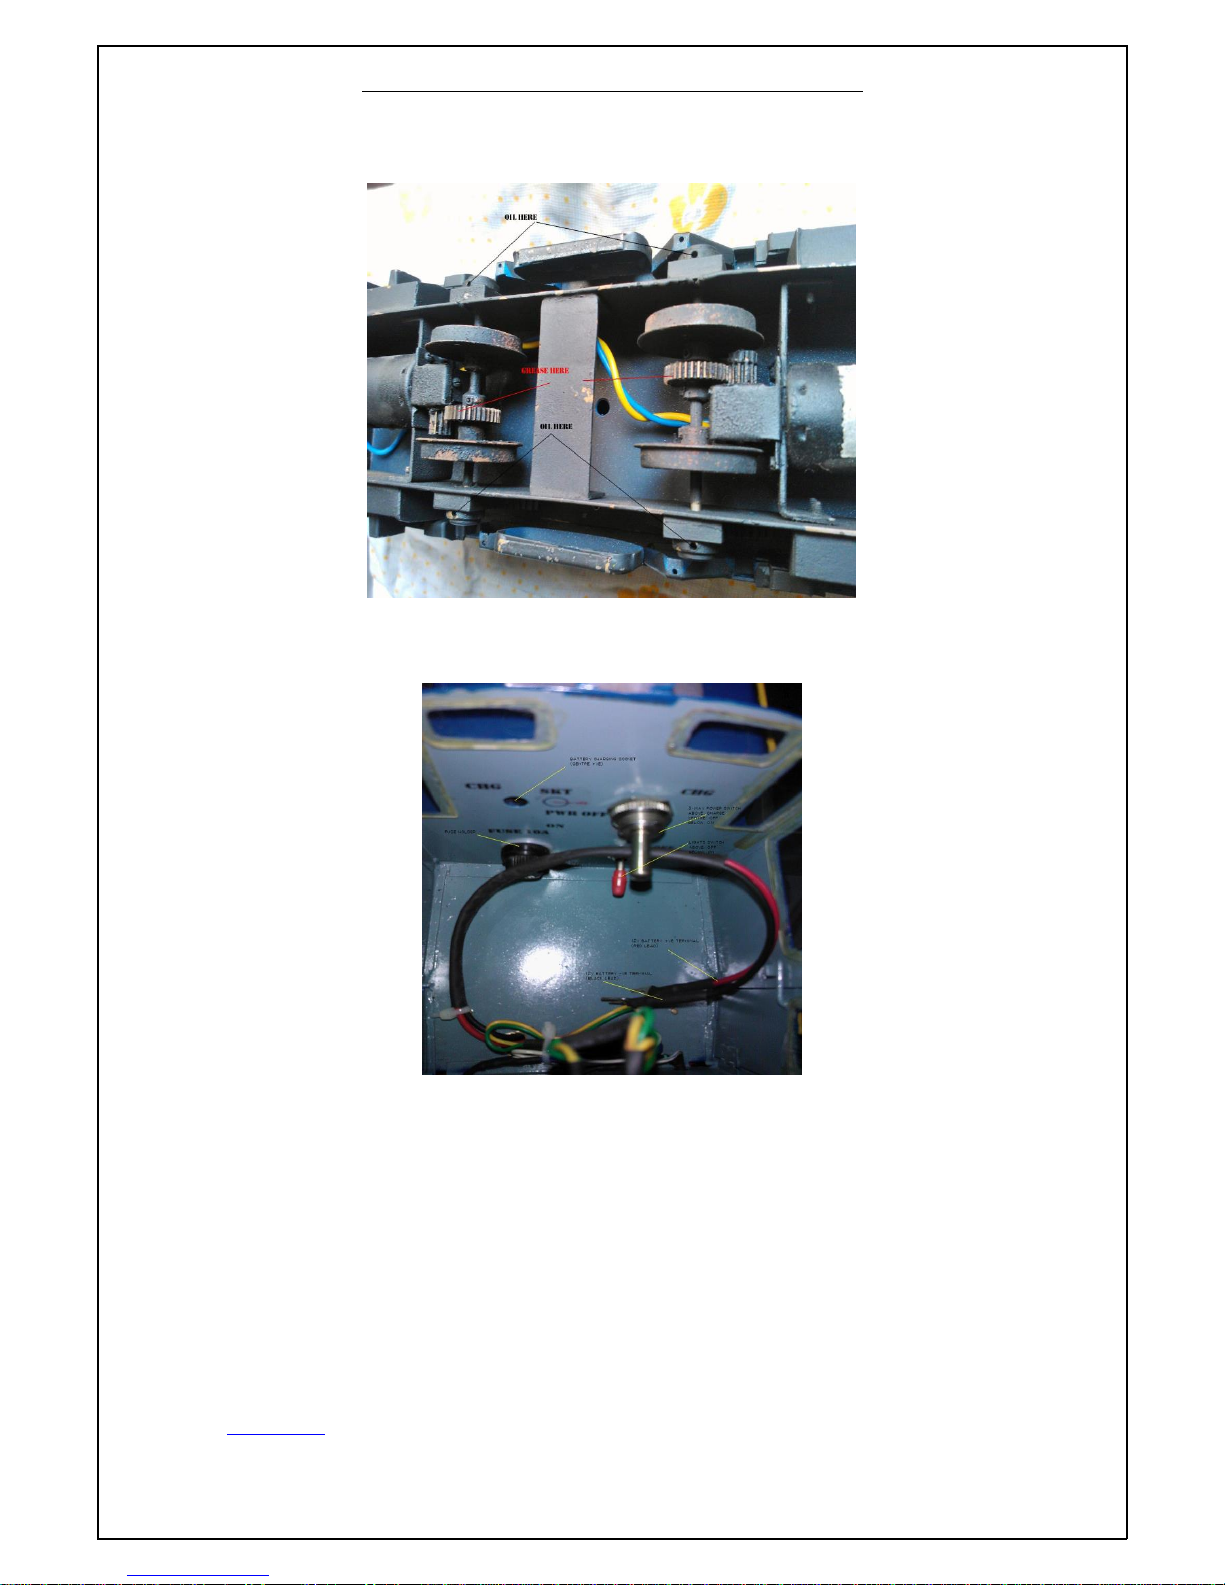
Lubricating:
With a bit of care, your PLine NDM6 should give you many years of pleasure and reliable service.
Lubrication is of prime importance for a model of this type with moving parts. Always use quality
lubricants. This should not be a problem, for there are many modern lubricants available in hobby and
sport shops. Light oil such as Labelle #108 or Hoppe’s Gun Oil would be good enough for lubricating
most of the moving parts. For gears use a suitable gear grease such as Permatex Super Lube or
another hobby gear lubricant.
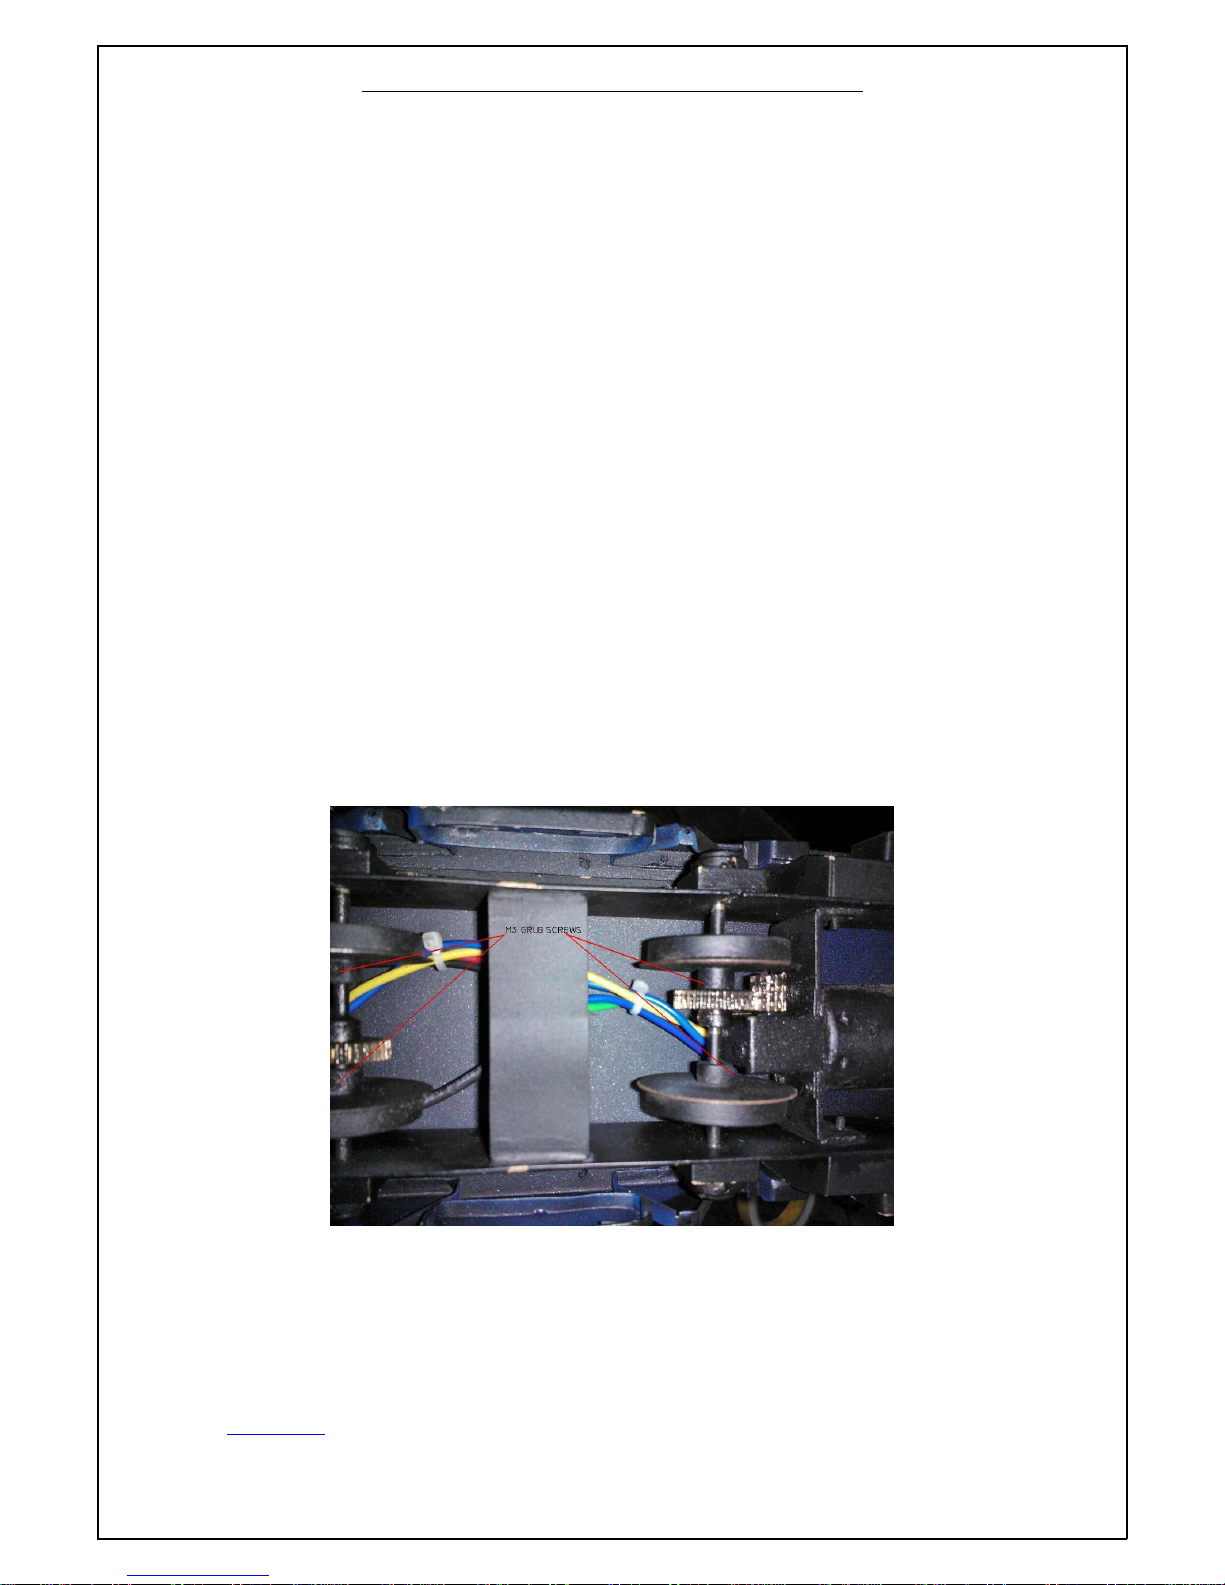
The spur gears driving each axle can be lubricated by applying grease on the gear teeth using a small
screw driver.
To access the many moving parts of this model it is best to carefully place it on its side on a soft towel
or foam sheet. A drop of light oil on every moving part is necessary, and there aren’t many on this
locomotive. Use oil that is a bit heavier to lubricate the axle bushings and pivot points of the Power
Bogies. Each Model is provided with Oiler holes on the Axle boxes of each wheel. There are 4 Oiler
holes on each Locomotive with their openings facing downwards towards the rail top. Use a drop of
Lubricating Oil to lubricate each Axle box. Be sure to lubricate all the wheel bearings, gear bearings
etc. that you can see. Do not over lubricate, for excess oil only picks up unwanted dirt. Be careful to
keep lubrication off the painted surfaces as this causes shiny areas.
The main worm gear box is lubricated in the factory and will not need any attention when you first
run your model. However, in time, you should make sure that the gears are will lubricated with
suitable gear grease.

Owner’s Manual: DHR NDM6 Locomotive in 16mm scale
Model Engineering Company
47, Sankharitola Street, Calcutta-700014, India.
Visit us at: http://pline.co.in
Email: info@pline.co.in
16-17v1.0
Thorough Lubrication of the locomotive should be done every 5 hours of operation.
Operating the model:
Cab controls (above)
With batteries connected to the locomotive and the transmitter, switch the transmitter ‘ON’. The
model can now be powered ‘ON’ by flipping the main power 3-way switch in the cab downwards.
Always SWITCH ‘ON’ the Tx first before POWERING ON the model.

Owner’s Manual: DHR NDM6 Locomotive in 16mm scale
Model Engineering Company
47, Sankharitola Street, Calcutta-700014, India.
Visit us at: http://pline.co.in
Email: info@pline.co.in
16-17v1.0
By moving the throttle control on the Tx gradually, the locomotive will move forward, while gaining
speed, and moving the same Tx joystick in opposite direction, would reverse the model and increase
speed. The model ideally should come to a stop when the same joystick is in the neutral or centre
position.
CAUTION: DO NOT RUN THE MOTORS ON FULL THROTTLE IN THE FIRST 60 MINUTES OF RUNNING.
Run the model at half throttle in any one direction for a few minutes, then stop, and then run it again
at half throttle for a few minutes more. Repeat this procedure for about half an hour until the model
runs smoothly in both directions. Once you have run your Model on half throttle in both directions on
a test track for at least about an hour, your model should be ready to run at Full throttle on the
Outdoor layout.
Altering wheel gauge:
Your NDM6 locomotive is fitted with gauge adjustable wheels to run on both 32mm & 45mm gauge
tracks. Before altering wheel gauge, make sure that the battery pack for the locomotive is
disconnected and removed from the model. Turn the model upside down on a clean piece of cloth, so
that you have access to the wheels. The wheels are locked in place using M3 grub screws. Use a
suitable M3 Allen wrench to loosen the M3 grub screws on the wheel hubs (at the rear of the wheels).
Slide the wheels on the axles to get the required gauge. Once the desired gauge has been attained,
tighten the M3 grub screws with the Allen wrench to the lock the wheels for the desired gauge. For
reference the back to back wheel distance for 45mm gauge is 40mm while that for 32mm gauge is
28mm.

Owner’s Manual: DHR NDM6 Locomotive in 16mm scale
Model Engineering Company
47, Sankharitola Street, Calcutta-700014, India.
Visit us at: http://pline.co.in
Email: info@pline.co.in
16-17v1.0
Wheel grub screw positions (above)
Maintenance:
Clean the body of the Model with a clean soft lint free cotton cloth. To remove stubborn grease stains
from the painted surface use a detergent solution with a lint free cloth. With a little care your PLine
NDM6 Locomotive will give you years of trouble free running.
IMPORTANT!
Some parts may have loosened during shipment. Inspect your model prior to
THANK YOU!
Table of contents
Other pline Toy manuals
Popular Toy manuals by other brands

Hornby
Hornby WEST COUNTRY/BATTLE of BRITAIN CLASS Operating and maintenance instructions

REVELL
REVELL Boeing 737-800 TUIfly "HaribAIR" Assembly manual

LeapFrog
LeapFrog 100 Words About Places I Go Parents' guide

Multiplex
Multiplex EasyGlider Building instructions

marklin
marklin 89390 manual

TITAN MODEL KITS
TITAN MODEL KITS A330-200 Assembly guide

Eduard
Eduard B-24J cockpit interior S.A. manual

HOMCOM
HOMCOM 350-049V01 Assembly instructions

Mega Bloks
Mega Bloks Warriors fortless 9890 Assembly manual

REVELL
REVELL Alpha Jet „Patrouille de France“ Assembly instructions

Durafly
Durafly Ugly Stick manual

Metal Origin
Metal Origin Sd.Kfz.234/2 PUMA instructions