PNI Clementine 9440 User manual

Panou control
PNI Clementine 9440
Manual de utilizare
PNI Clementine 9440

9
rosu
Conector antena
Galben
Galben
Alb
Rosu
Iesire video
Iesire video
Iesire audio (Stanga)
Iesire audio (Dreapta)
negru
gri
gri/negru
mov
mov/negru
verde
verde/negru
alb
alb/negru
Difuzor
stanga-fata Difuzor
dreapta-fata
Difuzor
dreapta-spate
Difuzor
stanga-spate
galben siguranta
albastru
Schema conectori
Problema Motiv Solutie
Probleme si solutii
Produsul
nu porneste
1. Alimentarea nu este conectata corespunzator
2. Siguranta este arsa sau nu sunt conectate
firele de alimentare
Conectati corespunzator alimentarea
Verificati siguranta sau firele de
alimentare
Ecranul LCD
este oprit
1. Firul galben nu este conectat la plus
permanent
2.Siguranta este arsa sau firul galben este
inrerupt
Verificati daca firul galben este
conectat la plus permanent
Inlocuiti siguranta.
plus permanent (baterie+)
plus contact
minus permanent (baterie-)
antena automata
Nu se aude
1. Nu este alimentat
2. Nu sunt conectate firele difuzoarelor
3. Nu sunt fisiere audio pe cardul
SD/MMC sau pe USB
4. Cardul SD/MMC sau memoria USB
nu este conectata corespunzator
Inlocuiti cablul de alimentare
Verificati firele difuzoarelor
Verificati cardul de memorie SD/MMC
sau memoria USB
Se aude incet
sau neclar
1. Curent alimentare insuficient
2. Antena nu este conectata corespunzator
Inlocuiti bateria masinii
Verificati conexiunea antenei
Sunetul este
mono
1. Nu este conectat unul din difuzoare
2. Circuitul amplificatorului este defect
Verificati si conectati firul difuzorului
Se inlocuieste circuitul
Nota: Datele tehnice pot fi modificate ulterior fara o anuntare in prealabil.

8
Instructiuni montaj
1. Cititi cu atentie inainte de montaj.
2. Dispozitivul trebuie montat de catre personal calificat.
3. Dupa conectarea celorlalte componente(difuzoare, antena radio, etc),
conectati firele de alimentare.
4. Firele expuse trebuie izolate.
5. Inainte de a monta dispozitivul, ascundeti firele cu atentie.
6. Dispozitivul se alimenteaza doar de la curent continuu cu o tensiune
de 10V~15V.
7. Conectati firele conform schemei de montaj.
In caz contrar exista riscul de a avaria sistemul electric.
chei demontare rama de
montare
spatiul 1DIN in bord
fixati
clemele
Apasati clemele pentru a fixa rama in bord
Panou control
PNI Clementine 9440
Manual de utilizare
PNI Clementine 9440
Pornire/Mod(oprire apel)
Next (Urmatorul)
Volum
EQ (Egalizator)
Senzor telecomanda
Ecran LCD
Eject
Port USB
Eliberare panou frontal
Previous (Anterior)
Microfon
Ceas
Mute
Banda FM/AS(Raspunde Apel)
LOUD
1/
2/Intro
3/Repetare
4/Aleator
5/-10s
6/+10s
Intrare AUX

7
Intrare auxiliara
Apasati scurt butonul POW/MOD pentru a selecta sursa audio AUX.
Functia poate fi utilizata cu ajutorul unui cablu audio.
Specificatii
FM
Domeniul de frecvente
Sensibilitate utila
Raport semnal/zgomot
Separare stereo
Redare DISC
Formate suportate
Timp protectie de soc electronica
Frecventa raspuns
Raport semnal/zgomot
Separare canale
Distorsiune armonica la 1kHz
Balans canal stereo
Caracteristici generale
Voltaj
Putere maxima de iesire
Impedanta difuzoare
Dimensiuni
Ll
h
Port AUX IN
2
Operatii de baza
1. Pornire/Oprire/Mod
Apasati scurt butonul PWR/MOD pentru a porni dispozitivul.
Tineti apasat lung pentru oprire.
Cand este pornit, apasati scurt butonul PWR/MOD pentru a selecta sursa de redare:
Nota: Sursele de redare DISC/USB/SD sunt disponibile doar atunci cand
este introdus un suport media de acest tip.
2. Schimbarea benzii/Memorare automata (BND/AS)
In modul radio, apasati scurt butonul BND/AS pentru a schimba banda radio.
Apasati lung butonul BND/AS pentru memorarea automata a canalelor. Dispozitivul
va incepe cautarea canalelor si le va memora pe butoanele numerotate de la 1 la 6.
Dupa ce se vor memora canalele gasite, dispozitivul va reda fiecare din canalele
memorate timp de 5 secunde.
Apasati scurt butonul BND/AS pentru a selecta canalul dorit.
3. Next (urmatorul)
In modul radio, apasati scurt tasta pentru a cauta automat canalele urmatoare,
apasati lung pentru cautare manuala a urmatoarelor canale.
In modul DISC/USB/SD, apasati scurt tasta pentru a trece la urmatorul fisier,
apasati lung pentru a derula inainte.
4. Previous (anterior)
In modul radio, apasati scurt tasta pentru a cauta automat canalele anterioare,
apasati lung pentru a cauta manual canalele anterioare.
In modul DISC/USB/SD apasati scurt tasta pentru a trece la fisierul anterior,
apasati lung pentru a derula inapoi.
5. Volum
1) Intoarceti butonul de volum spre dreapta pentru a creste volumul si spre stanga pentru
a reduce volumul.
2) Apasati scurt pe rotita de volum pentru a intra in meniul de setari, precum: BAS, TRE,
BAL, FAD, LOUD, DSP, VOL.
3) Apasati scurt pe butonul de volum, va fi afisat “BAS 00”, apoi rotiti butonul spre dreapta
pentru a creste sau spre stanga pentru a descreste nivelul de bass.
Intervalul de ajustare este de la “BAS-07” pana la “BAS+07”.
Apasati inca o data scurt, va fi afisat “TRE 00”, apoi rotiti butonul de volum spre dreapta
pentru a creste sau spre stanga pentru a descreste nivelul de treble.
Intervalul de ajustare este de la “TRE-07” pana la “TRE+07”.
Apasati inca o data scurt, va fi afisat “BAL 00”, apoi rotiti butonul de volum spre dreapta
pentru a descreste volumul difuzoarelor din stanga sau spre stanga pentru a descreste
volumul difuzoarelor din dreapta.
Intervalul de ajustare este de la “L10” pana la “R10”.
Apasati inca o data scurt, va fi afisat “FAD 00”, apoi rotiti butonul de volum spre dreapta
pentru a descreste volumul difuzoarelor din spate sau spre stanga pentru a descreste
volumul difuzoarelor din fata.
Intervalul de ajustare este de la “F10” pana la “R10”.

63
Apasati scurt inca o data, va fi afisat “LOUD OFF”, apoi rotiti butonul de volum pentru a
selecta “LOUD ON”.
Apasati scurt inca o data, va fi afisat “DSP OFF”, apoi rotiti vutonul de volum pentru a
selecta modul de egalizare: CLASS, ROCK, POP, FLAT, DSP OFF.
In modul radio, apasati scurt inca o data, va fi afisat “DX”, apoi rotiti butonul de volum
pentru a selecta LOCAL (“LOC”).
Apasati scurt inca o data, va fi afisat “STEREO”, apoi rotiti butonul de volum pentru a
selecta “MONO”.
6. Apasati scurt butonul RESET pentru a reporni dispozitivul
7. Reglarea ceasului
Apasati scurt tasta CLK, va fi afisata ora. Apasati lung tasta CLK, pe ecran se vor afisa
cifrele orei in mod pulsatoriu, apoi rotiti butonul de volum pentru a seta ora.
Apasati scurt tasta CLK pentru a seta minutul. Rotiti butonul de volum pentru a ajusta.
Apasati inca o data scurt tasta CLK.
8. 1/
In modul radio apasati scurt tasta 1/ pentru a asculta canalul memorat.
Apasati lung pentru a memora un canal pe aceasta pozitie.
In modul DISC/USB/SD apasati scurt tasta 1/ pentru a pune pauza.
9. 2/INT
In modul radio apasati scurt tasta 2/INT pentru a asculta canalul memorat.
Apasati lung pentru a memora un canal pe aceasta pozitie.
In modul DISC/USB/SD apasati scurt tasta 2/INT si dispozitivul va reda cate 10 secunde
din fiecare fisier.
10. 3/RPT
In modul radio apasati scurt tasta 3/RPT pentru a asculta canalul memorat.
Apasati lung pentru a memora un canal pe aceasta pozitie.
In modul DISC/USB/SD apasati scurt tasta 3/RPT pentru a repeta fisierul curent.
11. 4/RDM
In modul radio apasati scurt tasta 4/RDM pentru a asculta canalul memorat.
Apasati lung pentru a memora un canal pe aceasta pozitie.
In modul DISC/USB/SD apasati scurt tasta 4/RDM pentru a reda fisierele in mod aleator.
12. 5/-10
In modul radio apasati scurt tasta 5/-10 pentru a asculta canalul memorat.
Apasati lung pentru a memora un canal pe aceasta pozitie.
In modul DISC/USB/SD apasati scurt tasta 5/-10 pentru a sari inapoi peste 10 fisiere.
13. 6/+10
In modul radio apasati scurt tasta 6/+10 pentru a asculta canalul memorat.
Apasati lung pentru a memora un canal pe aceasta pozitie.
In modul DISC/USB/SD apasati scurt tasta 6/+10 pentru a sari inainte peste 10 fisiere.
14. MUTE
Apasati scurt tasta MUTE pentru a opri sunetul. Apasati inca o data pentru a reporni.
15. EQ
Apasati tasta EQ pentru a alege modul de egalizare al sunetului.
Sunt disponibile presetarile CLASSIC, ROCK, POP, FLAT, DSP OFF.
Redare VCD
Redarea de pe discuri VCD este similara cu redarea de pe CD/MP3.
Pentru discuri VCD 2.0 este posibila si navigarea in meniului discului. Apasati scurt
butonul de redare pentru fisiere. Apasati scurt butonul pentru a reveni la meniu.
Redare DVD
Redarea de pe discuri DVD este similara cu redarea de pe VCD 2.0.
Daca discul suporta mai multe piste audio, apasati tasta L/R pentru a schimba pista.
Daca discul suporta selectarea subtitrarii, apasati tasta SUB-T pentru a schimba.
Daca discul suporta reglarea unghiului de vizualizare, apasati tasta ANGLE pentru a
modifica acest parametru.
Pentru mai multe functii, apasati tasta SETUP.
Cand redati fisiere video sau audio, pictograma corespunzatoare tipului de fisier va fi
afisata pe ecran.
Nota: Daca discul nu este compatibil sau nu poate fi citit de catre dispozitiv, aceste se
va comuta automat pe modul radio.
Redare fisiere multimedia
Daca pe suportul media exista fisiere audio, video si foto, apasati lung tasta BND/AS
pentru a selecta tipul de fisier pe care doriti sa il redati.
Operare radio
Dispozitivul poate memora pana la 18 canale FM (FM1, FM2, FM3, fiecare cate 6 canale).
Intervalul de frecventa incepe de la 87.5MHz pana la 108MHz, in trepte de 50KHz.
In modul radio apasati scurt tasta BND/AS pentru a comuta intre FM1, FM2 si FM3.
Memorare canale automat
In modul radio tineti apasat lung tasta BND/AS. Dispozitivul va incepe automat cautarea
si memorarea canalelor pe fiecare buton de memorie.
Cautare canale
In modul radio, apasati scurt tastele / pentru a cauta automat canalele anterioare
sau cele urmatoare.
Apasati lung tastele / pentru a cauta manual canalele anterioare sau pe cele
urmatoare.
Memorare canale manual
Daca au fost gasite canale dupa cautarea manuala, tineti apasat lung unul din cele 6
butoane de memorie pentru a memora canalul respectiv.
Pentru a asculta un canal memorat, apasati scurt unul din butoanele de memorie.

4
Prezentare telecomanda
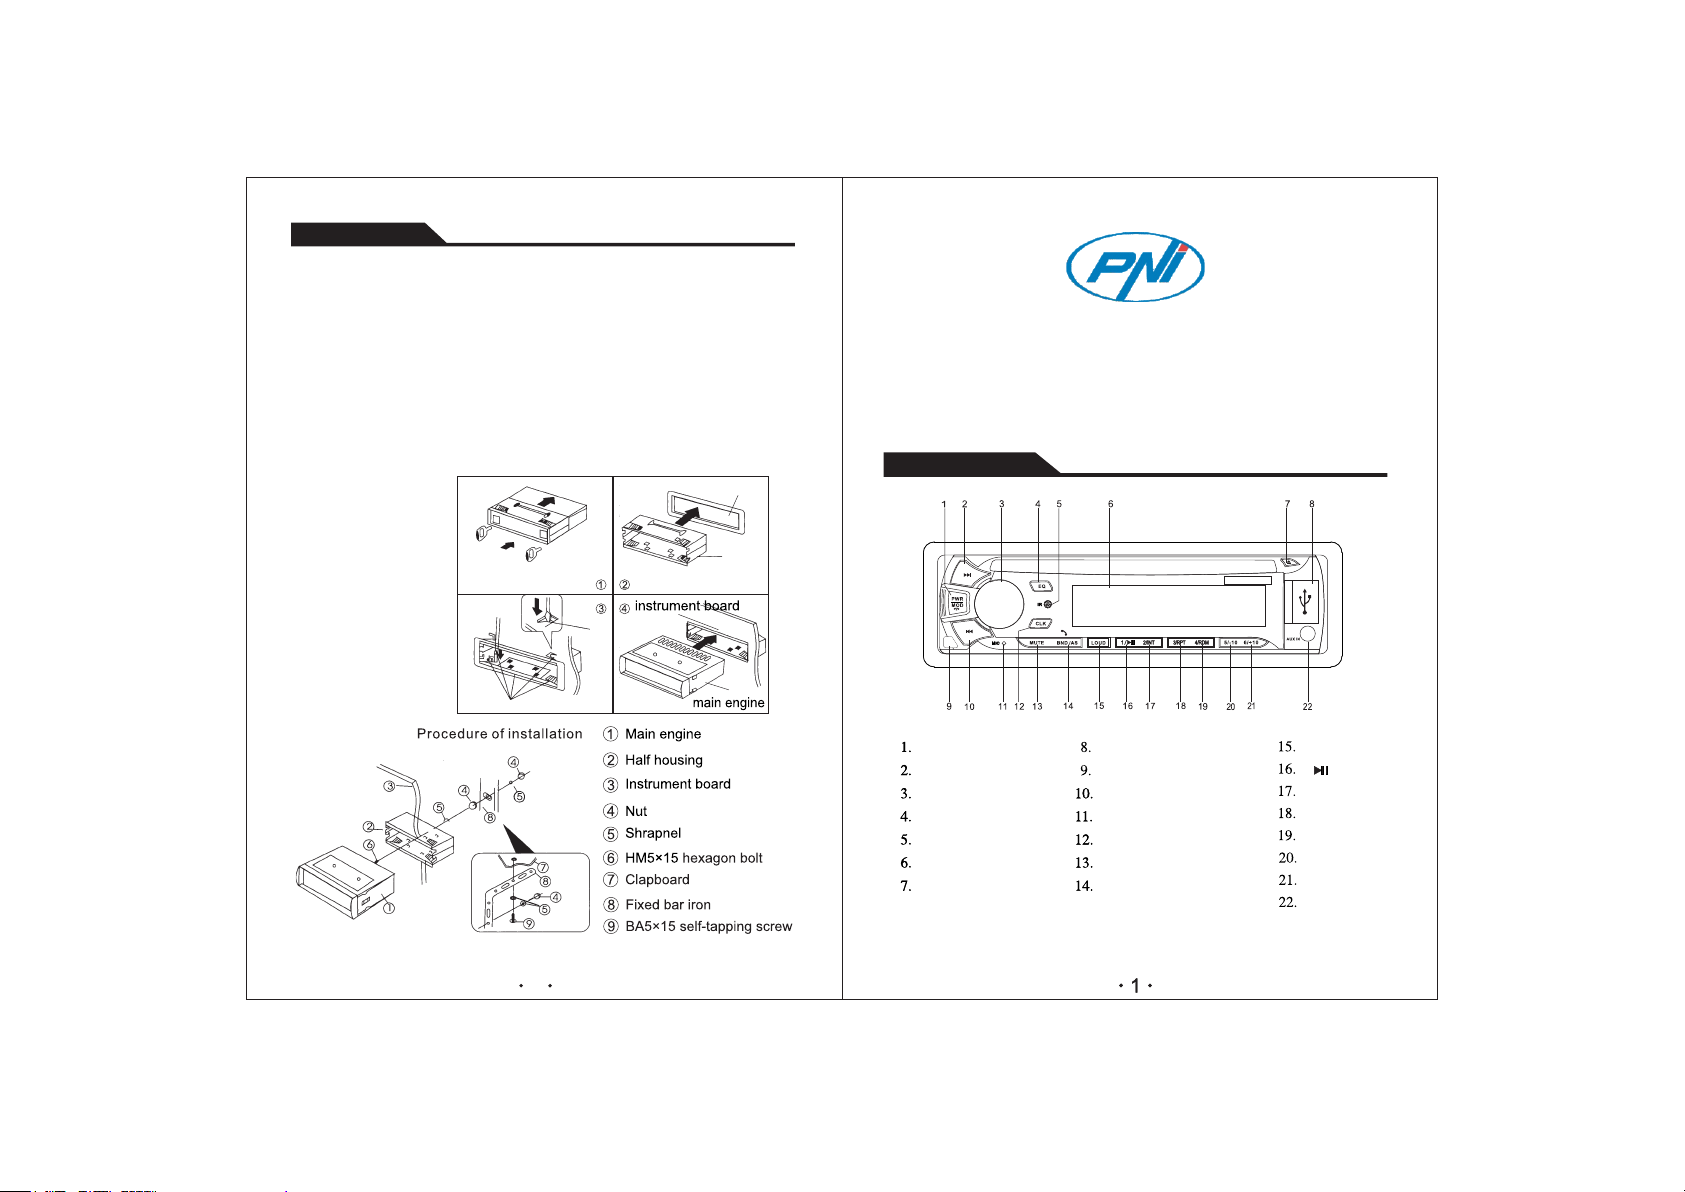
1. POWER: Apasati scurt pentru a porni,
apasati lung pentru a opri dispozitivul.
2. VOL+: apasati scurt pentru a creste
volumul sau pentru reglarea ceasului.
3. VOL-: apasati scurt pentru a scadea
volumul sau pentru reglarea ceasului.
4. SEL: pentru setare BAS, TRE, BAL,
FAD, BEEP, EQ, LOUD, LOC si Stereo.
5. : apasati scurt pentru a naviga
spre stanga.
6. L/R: apasati scurt pentru a selecta
canalul de sunet, sau limba de redare.
7. TITLE/PBC: In modul DVD, apasati
scurt pentru pentru a afisa titlul
fisierului. In modul VCD, apasati scurt
pentru a afisa controalele de redare.
8. GOTO: apasati scurt GOTO pentru
a selecta fisierul dorit.
9. ANGLE: apasati scurt pentru a
schimba ungiul de vizualizare in
modul DVD.
10. DISP: apasati scurt pentru a afisa
ora, apasati lung pentru a seta ora.
11. SUB-T: apasati scurt pentru a
selecta subtitrarea.
12. BAND: in modul radio, apasati scurt
pentru a schimba banda FM.
13. Cifrele: apasati scurt cifrele pentru a
reda canalul memorat corespunzator cifrei.
14. : apasati scurt pentru a naviga in sus.
15. : confirma setarile.
Reda si opreste redarea.
16: : apasati scurt pentru a naviga
la dreapta.
17. : apasati scurt pentru a naviga in jos.
18. SETUP: apasati scurt pentru a modifica
setarile sistemului.
19. : reveniti la meniul anterior.
20. REPT: apasati scurt pentru a repeta
fisierul curent.
21. : apasati scurt pentru a merge la
fisierul anterior sau pentru a cauta automat
canalul anterior. Apasati lung pentru a
pentru a derula rapid inapoi sau pentru
cautarea manuala a canalului anterior.
22. : apasati scurt pentru a merge la
fisierul urmator sau pentru a cauta automat
canalul urmator. Apasati lung pentru a
pentru a derula rapid inainte sau pentru
cautarea manuala a canalului urmator.
5
1. Conectare prin Bluetooth
Cand dispozitivul este pornit, functia Bluetooth este activa si automat va incepe
cautarea sau imperecherea cu telefonul.
Daca telefonul a mai fost conectat la dispozitiv, acestea se vor conecta automat
daca telefonul are activata functia Bluetooth.
Dispozitivul se poate conecta doar la cate un telefon odata.
Deconectati telefonul curent pentru a conecta un altul.
2. Functie Hands-free
Raspunde apel: cand telefonul este apelat, soneria se va auzi si in difuzoarele
masinii. Apasati tasta BND/AS de pe dispozitiv sau direct de pe telefon pentru
a raspunde apelului.
Inchide apel: pentru a inchide apelul, apasati tasta PWR/MOD de pe dispozitiv
sau inchideti direct de pe telefon.
Volum apel: puteti ajusta volumul de pe telefon sau cu butonul de volum al
dispozitivului.
3. Redare audio prin Bluetooth
Cand telefonul este conectat la dispozitiv, apasati tasta PWR/MOD pentru a
comuta pe modul “Bluetooth music”, apoi puteti reda fisiere audio direct de
pe telefon prin Bluetooth.
Operare redare disc
Apasati tasta PWR/MOD pentru a intra in modul DISC.
Se va continua redarea ultimului fisier ascultat.
Apasati scurt tasta pentru a elimina discul.
Dispozitivul ca comuta automat pe modul radio.
In timpul redarii in modul DISC apasati scurt tasta pentru a trece la umatorul fisier.
La apasarea lunga a tastei , dispozitivul va incepe sa deruleze inainte cu viteza 2x,
apasand inca o data tasta , viteza va creste la 4x si in continuare la 8x, 20x.
Apasati tasta 1/ pentru a reveni la redarea normala a fisierului.
Redare CD
In modul CD folositi tastele / pentru a schimba fisierele.
Apasati tasta 10+ de pe telecomanda apoi tastati numarul de indicativ al fisierului
pentru a sari direct la acesta.
Functie Bluetooth

Panou control
PNI Clementine 9440
User manual
PNI Clementine 9440

9
Red
antenna socket
Yellow
Yellow
White
Red
video output
video output
audio output (left)
audio output (right)
Black
Grey
Grey/Black
Purple
Purple/Black
Green
Green/Black
White
White/Black
front-left
speaker front-right
speaker
rear-right
speaker
rear-left
speaker
Yellow Fuse
Blue
Connection diagram
Fault Reason Solution
Troubleshooting
Power is OFF
1. Power supply is not properly connected.
2. The fuse is broken or the power wire is not
connected.
Connect the power supply properly.
Check the fuse and the power wire.
No display
on LCD
1. Yellow wire is not connected with the ignition
lock wire.
2. The fuse on the yellow wire is broken.
Check if the yellow wire is connected
with the ignition lock wire.
Replace the fuse.
positive battery pole ( + )
ignition lock
negative battery pole ( - )
Connect to automatic
antenna
No sound
1. The power is not connected.
2. Speaker wires are not connected.
3. There are no files on the USB memory, or
the SD/MMC memory card.
4. SD/MMC card or USB memory
is not properly connected.
Replace power supply plug.
Check speaker wiring.
Check SD/MMC memory card or
the USB memory and clean it with
ethyl alcohol if it is dirty.
Low sound or
not clear
1. Battery power is low.
2. Antenna is not properly connected.
Replace car battery.
Check antenna connection.
Sound is
mono
1. One of the speakers is not connected.
2. Amplifier circuit is broken.
Check and connect all speakers.
Replace circuit.
Note: Technical data is subject to change without prior notice.

8
Installation instructions
1. Read carefully before installing the device.
2. The device should be installed by professional installer.
3. After connecting all the other parts(speakers, radio antenna, etc),
connect the power wires.
4. Exposed wires should be insulated.
5. Before installing the device, wires should be tucked away neatly.
6. The device should be connected only to direct current of 10V~15V.
7. Connect the wires according to the connection diagram.
Any mistake will cause malfunctioning or damaging the electric system.
removing keys
mounting
frame
dashboard 1DIN mounting
block
out
Curve the blocks to fix the frame in dashboard.
Control panel
PNI Clementine 9440
User manual
PNI Clementine 9440
Power/Mode(hang up)
Next
Volume
EQ (Equalizer)
RC sensor
LCD Screen
Eject key
USB port
Release front panel
Previous
Microphone
Clock
Mute
FM Band/AS(answer call)
LOUD
1/
2/Intro
3/Repeat
4/Random
5/-10s
6/+10s
AUX input
dashboard
frame
main unit

2
Basic operation
1. Power on/off/Mode
Short press PWR/MOD to turn on the device.
Long press PWR/MOD to turn off.
In powered on status, short press PWR/MOD to select playback source:
Note: DISC/USB/SD sources are only available when corresponding device
is connected.
2. Band switch/Auto storage (BND/AS)
In radio mode short press BND/AS to switch between FM bands (FM1, FM2, FM3).
Long press BND/AS to autostore the FM channels. The device will automatically
search radio channels and store them on the 1-6 keys.
When storage is completed, the device will play every channel for 5 seconds.
Short press BND/AS to choose the desired channel.
3. Next
In radio mode, short press key to automatically search the next channels,
long press to manually search the next channels.
In DISC/USB/SD mode, short press key to play the next file,
long press to fast forward.
4. Previous
In radio mode, short press key to automatically search previous channels,
long press to manually search the previous channels.
In DISC/USB/SD mode, short press to play the previous file,
long press to rewind.
5. Volume
1) Turn the volume knob clockwise(CW) to increase the volume or
counterclockwise(CCW) to decrease the volume.
2) Short press the volume knob to enter sound settings: BAS, TRE, BAL, FAD,
LOUD, DSP, VOL.
3) Short press volume knob, “BAS 00” will be displayed and then rotate the knob CW
to increase or CCW to decrease bass level.
Adjusting range: “BAS-07” ~ “BAS+07”.
Short press again, “TRE 00” will be displayed and then rotate the knob CW to increase
or CCW to decrease treble level.
Adjusting range: “TRE-07” ~ “TRE+07”.
Short press again, “BAL 00” will be displayed and then rotate the knob CW to decrease
left speakers volume or CCW to decrease right speakers volume.
Adjusting range: “L10” ~ “R10”.
Short press again, “FAD 00” will be displayed and then rotate the knob CW to decrease
rear speakers volume or CCW to decrease front speakers volume.
Adjusting range: “F10” ~ “R10”.
7
Auxiliary input
Short press POW/MOD key to select AUX input source.
This function can be used with an audio cable.
Specifications
FM
Frequency range
Maximum sensitivity
Signal to noise ratio
Stereo separation
DISC playback
Supported formats
Electronic shock protection time
Frequency response
Signal to noise ratio
Channel separation
Harmonic voltage distortion
Stereo channel balance
General specs
Voltage
Maximum output power
Speaker impedance
Size
Ll
h
AUX input

6
VCD Playback
VCD playback is similar to CD/MP3 playback.
For VCD 2.0 you can use the disc menu if it has one. Short press play button to select
a file. Short press button to return to the menu.
DVD Playback
DVD playback is similar to VCD 2.0 playback.
If the disc supports multiple audio tracks, press L/R key to switch between.
If the disc supports multi-subtitle, press SUB-T key to change subtitle.
If the disc supports multi-angle, press ANGLE to change.
For more functions, press SETUP to edit.
When playing video or audio files, the corresponding icon will appear on the screen.
Note: If the disc is not compatible or cannot be read, the device will automaticaly
switch to radio mode.
3
Short press again, “LOUD OFF” will be displayed, then rotate the volume knob to
select “LOUD ON”.
Short press again, “DSP OFF” will be displayed, then rotate the volume knob to select
equalizer type: CLASS, ROCK, POP, FLAT, DSP OFF.
Short press again, “DX” will be displayed, then rotate the volume knob to select
LOCAL (“LOC”).
Short press again, “STEREO” will be displayed, then rotate the volume knob to select
“MONO”.
6. Short press the RESET button to reset the unit.
7. Clock adjustment
Short press CLK key, the clock will be displayed. Long press CLK key, clock digits will
be flashing on the screen, then rotate the volume knob to set the hour.
Short press CLK key to set the minute and then rotate the volume knob to adjust.
Press again CLK key.
8. 1/
In radio mode press 1/ key to listen to the channel stored on this position.
Long press to store manually searched channel.
In DISC/USB/SD modes short press 1/ key to play/pause.
9. 2/INT
In radio mode press 2/INT key to listen to the channel stored on this position.
Long press to store manually searched channel.
In DISC/USB/SD modes short press 2/INT, the device will play first 10 seconds from
each file.
10. 3/RPT
In radio mode press 3/RPT key to listen to the channel stored on this position.
Long press to store manually searched channel.
In DISC/USB/SD modes short press 3/RPT to repead current file.
11. 4/RDM
In radio mode press 4/RDM key to listen to the channel stored on this position.
Long press to store manually searched channel.
In DISC/USB/SD modes short press 4/RDM to random play files.
12. 5/-10
In radio mode press 5/-10 key to listen to the channel stored on this position.
Long press to store manually searched channel.
In DISC/USB/SD modes short press 5/-10 to jump 10 files back.
13. 6/+10
In radio mode press 6/+10 key to listen to the channel stored on this position.
Long press to store manually searched channel.
In DISC/USB/SD modes short press 6/+10 to jump 10 files forward.
14. MUTE
Short press MUTE to mute the sound. Press again to turn back on.
15. EQ
Press EQ to choose between equalizer modes.
Choose between following presets: CLASSIC, ROCK, POP, FLAT, DSP OFF.
Multimedia operation
When you have multimedia files on the selected source, such as audio, photo or video,
you cand switch between them by long pressing BND/AS key.
Radio operation
The device can store up to 18 FM channels (FM1, FM2, FM3, with 6 channels each).
Frequency range is between 87.5MHz and 108MHz, with 50KHz steps.
In radio mode, short press BND/AS to switch between FM1, FM2 and FM3.
Auto store channels (BND/AS)
In radio mode, long press BND/AS. The device will automaticaly search channels and
store them to the corresponding number. (1-6)
Search channels
In radio mode, short press / to automaticaly search previous or next channels
Long press / to manually search previous or next channels.
Manual storage
When a channels is found after manual search, long press one of the 6 memory
buttons to store the channel on that position.
To listen to a stored channel, simply press one of the memory buttons corresponding
to the desired channel.

45
Remote Control
1. POWER: short press to turn on, long
press to turn off.
2. VOL+: short press to increase the
volume or adjust the clock.
3. VOL-: short press to decrease the
volume or adjust the clock.
4. SEL: to edit BAS, TRE, BAL,FAD,
BEEP, EQ, LOUD, LOC and STEREO.
5. : short press to navigate left.
6. L/R: short press to select audio
track or stereo.
7. TITLE/PBC: In DVD mode, short
press to display file title. In VCD mode,
short press to activate playback controls.
8. GOTO: short press GOTO to jump to
a specific file.
9. ANGLE: short press to adjust
multi-angle playback control.
10. DISP: short press to show the time,
long press to adjust the clock.
11. SUB-T: short pres to enable subtitle
display control.
12. BAND: in radio mode, short press to
switch between FM bands.
13. Numbers: short press the numbers to
play the corresponding stored channels.
14. : short press to navigate up.
15. : confirm settings.
pause/playback function.
16: : short press to navigate right.
17. : short press to navigate down.
18. SETUP: short press to enter
system settings.
19. : return to the main menu.
20. REPT: short press to repeat current file.
21. : short press to play the previous file
or automatically search previous channel,
long press to rewind or manually search
previous.
22. : short press to to play the next file
or automatically search next channel, long
press to fast forward or manually search
next channel.
1. Bluetooth pairing
With the divice turned on, the Bluetooth will automatically start of matching or searching.
If the phone has been connected before, then it will automatically connect, if the
bluetooth is activated.
The device can connect via Bluetooth to one phone at a time.
Disconnect the current phone if you want to connect another one.
2. Hands-free function
Answer call: when a call it’s being received, it will ring in the car speakers and the
phone’s also. Press BND/AS key on the device or directly answer on the phone.
Hang up: to hang up the phone call, press PWR/MOD key on the device or
simply hang up from the phone.
Call volume: to adjust call volume simply rotate the volume knob to the
corresponding direction or directly from the phone.
3. Audio playback
When the phone it’s connected to the device, press PWR/MOD to switch to
“Bluetooth music”, then simply play the audio file from your phone.
Disc playback operation
Press PWR/MOD key to enter DISC mode.
It wil play the last file played last time.
Short press to eject the disc.
The device will automaticaly switch to radio mode.
In DISC mode, short press to play the next file.
Long press key, the device will fast forward at 2x speed,
long press key again, it will speed up to 4x, and so on to 8x, 20x.
Press 1/ key to return to normal speed play.
CD playback
In CD mode, short press / to change files.
Press 10+ key on the remote, then press the numbers to jump to a
corresponding file.
Bluetooth pairing

Panou control
PNI Clementine 9440
Használati útmutató
PNI Clementine 9440

9
piros
Antenna csatlakozó
Sárga
Sárga
Fehér
Piros
Videó kimenet
Videó kimenet
Audió kimenet(Bal)
Audió kimenet (Jobb)
fekete
szürke
szürke/fekete
lila
lila/fekete
verde
zöld/fekete
fehér
fehér/fekete
Hangszoró
bal-elülső Hangszoró
jobb-elülső
Hangszoró
jobb-hátsó
Hangszoró
bal-hátsó
sárga biztosíték
kék
Csatlakozási rajz
Probléma Ok Megoldás
Problémák és megoldások
Termék nem
indul
1. A készülék nincs megfelelően csatlakoztatva
2. A biztosíték kiégett vagy a tápvezetékek
nincsenek csatlakoztatva
Csatlakoztassa megfelelően a
tápegységet
Ellenőrizze a biztosítékot vagy a
tápvezetéket
LCD kijelző
leállt
1. A sárga menet nem kapcsolódik az állandó
pluszhoz
2.A biztosíték kiégett vagy a sárga menet
megszakadt
Ellenőrizze, hogy a sárga menet az
állandó pluszhoz van csatlakoztatva
Cserélje ki a biztosítékot.
folyamatos plusz(+ elem)
plusz érinkező
folyamatus minusz (- elem)
automatikus antenna
Nem
hallatszik
1. Nincs áram alatt
2. A hangszóró vezetékei nincsenek
csatlakoztatva
3. Nincsenek audió fáljlok SD/MMC vagy USB
kártyán
4. SD/MMC vagy USB memória nincs
csatlakoztatva
Cserélje ki a tápkábelt
Ellenőrizze a hangszorók vezetékeit
Ellenőrizze SD/MMC memóriakártyát
USB memóriát
Hang lassú
nem egyértelmű
1. Nem elegendő áram
2. Az antenna nincs megfelelően csatlakoztatva
Cserélje ki az autó elemét
Ellenőrizze az antenna csatlakozását
Hang mono 1. Nincs csatlakoztatva ay egyik hangszoró
2. Az erősítő áramköre hibás
Ellenőrizze és csatlakoztassa a
hangszóró vezetékét
Cserélje ki az áramkört
Megjegyzés: A műszaki adatok késõbb előzetes értesítés nélkül megváltoztathatók.

8
Szerelési útmutató
1. Olvassa el figyelmesen a szerelés előtt.
2. A készüléket egy szakosított személy kell felszerelje.
3. Miután csatlakoztatta a többi komponenst (hangszórók, rádióantenna stb.),
csatlakoztassa a tápvezetéket.
4. A szálakat szigetelni kell.
5. A készülék telepítése előtt gondosan rejtse el a vezetékeket.
6. A készülék csak folyamatos áramforrásal táplálódik 10V ~ 15V feszültséggel
7. Csatlakoztassa a vezetékeket a bekötési rajz szerint.
Ellenkező esetben fennáll az elektromos rendszer károsodásának
veszélye.
szétszerelési kulcsok
rögzítő
keret
1DIN hely a fedélzeten
fixati
clemele
Nyomja meg a bilincseket a keret rögzítéséhez a kötőelemhez
Kezelőpanel
PNI Clementine 9440
Használati útmutató
PNI Clementine 9440
Elindítás/Mod(hívásleállítás)
Next (Következő)
Hangerő
EQ (Színtéző)
Távirányító érzékelő
LCD kijelző
Ejekt
USB rés
Elülső panel kioldása
Previous (Elöző)
Mikrofon
Óra
Némítás
FM sáv/AS(Hívás fogadása)
LOUD
1/
2/Intro
3/Ismétlés
4/Véletlenszerû
5/-10s
6/+10s
AUX bemenet

7
Kisegítő bemenet
Nyomja meg röviden a POW / MOD gombot az AUX audio forrás kiválasztásához.
A funkció audiokábellel használható.
Műszaki adatok
FM
Frekvenciatartomány
Hasznos érzékenység
Jel/zaj jelentés
Sztereó elválasztás
DISC lejátszás
Támogatott formáttumok
Elektronikus ütésvédelmi idő
Frekvenciaválasz
Jel/zaj jelentés
Csatornaelválasztás
Harmonikus torzítás 1kHz
Sztereó csatorna egyensúly
Általános tulajdonságok
Feszültség
Max. teljesjtményi kimenet
Hangszóró impedancia
Méretek
Ll
h
AUX IN rés
Alapműveletek
1. Elindítás/Leállítás/Mod
Nyomják meg röviden PWR/MOD gombot, hogy elindítsák a készüléket.
Nyomják meg hosszasan a leállításhoz.
Amikor el van indítva, nyomják meg PWR/MOD lejátszási forrás kiválasztásához:
Megjegzés: A DISC / USB / SD lejátszási források csak akkor érhetők el, ha az ilyen
típusú hordozó be van helyezve.
2. A sáv módosítása / Automatikus tárolás (BND/AS)
Rádió módban,nyomja meg röviden BND/AS a rádiósáv megváltoztatásához.
Nyomja meg hosszasan BND/AS automatikus csatornák tárolásáshoz. A készülék
elkezdi a csatornák keresését és le fogja őket menteni a számozott 1-6 gombokkal.
Miután tárolja a talált csatornákat , az eszköz minden tárolt csatornát 5 másodpercig
lejátszik.
Nyomják meg röviden BND/AS, hogy kiválassza a kivánt csatornát..
3. Next (következő)
Rádió módban , nyomja meg röviden hogy automatikusan keresse a következő
csatornákat, nyomja meg hosszasan manuális kereséshez.
DISC/USB/SD módban, nyomja meg röviden , hogy a következő fáljra lépjen,
nyomja meg hosszasan az előre görgetéshez.
4. Previous (elöző)
Rádió módban, nyomja meg röviden hogy automatikusan keresse az elöző
csatornákat,nyomja meg hosszasan manuális kereséshez.
DISC/USB/SD módban nyomja meg röviden hogy a következő fáljra lépjen,
nyomja meg hosszasan a vissza görgetéshez.
5. Hangerő
1) Forgassa jobbra a hangerőszabályzó gombot a hangerő növeléséhez, és balra
a hangerő csökkentéséhez.
2) Nyomja meg röviden a hangerőszabályzó gombot a beállítások menübe való
belépéshez, mint: BAS, TRE, BAL, FAD, LOUD, DSP, VOL.
3) Nyomja meg röviden a hangerő gombot, a "BAS 00" felirat jelenik meg, majd jobbra
forgassa a hang növeléséhez vagy balra , hogy csökkentse a basszus szintjét.
Beállítási intervallum “BAS-07”-től “BAS+07”-ig.
Nyomják meg újból röviden , “TRE 00”jelenik meg, majd jobbra vagy balra forgassa a
hangerőszabályzó gombot a hangerő csökkentéséhez vagy növeléséhez.
Beállítási intervallum “TRE-07”-tól “TRE+07”-ig.
Nyomják meg újból röviden, “BAL 00”jelenik meg, majd jobbra forgassa a hang
növeléséhez vagy balra , hogy csökkentse a hangszorók erejét.
Beállítási intervallum “L10”-től “R10”-ig.
Nyomják meg újból röviden , “FAD 00” jelenik meg, majd jobbra forgassa a
hangerőszabályzó gombot a hátsó vagy a bal oldali hangszóró hangerejének csökkentéséhez
az első hangsugárzók hangerejének csökkentéséhez.
Beállítási intervallum “F10” -től “R10”-ig.
2

VCD lejátszás
A VCD-k lejátszása hasonló a CD / MP3 lejátszáshoz.
VCD 2.0 lemezek esetén a lemezmenübe is navigálhat.Nyomja meg röviden a fájl
lejátszási gombot. Nyomja meg röviden , hogy visszalépjen a menübe.
DVD lejátszás
A DVD-n lejátszott lejátszás hasonló a VCD 2.0 lejátszásához.
Ha a lemez több hangsávot támogat, a műsorszám megváltoztatásához nyomja meg az
L / R gombot.
Ha a lemez támogatja a felirat kiválasztását, nyomja meg a SUB-T gombot a változtatáshoz.
Ha a lemez támogatja a szögbeállítást, nyomja meg az ANGLE gombot módosjtsa ezt a
paramétert.
Több beállításhoz nyomja meg a SETUP gombot.
Videó vagy hangfájlok lejátszásakor a fájl típusának megfelelő ikon lesz megjelenítve
a képernyőn.
Megjegyzés: Ha a lemez nem kompatibilis vagy nem olvasható az eszközön, ez automatikus
rádió módba lép.
Multimédiás fájlok lejátszása
Ha a hang, videó és fényképfájlok vannak a médián, nyomja meg hosszasan BND/AS gombot,
hogy kiválassza a lejátszani kivánt fájltípust
Rádió üzemmód
A készülék 18 FM csatornát tárolhat (FM1, FM2, FM3, mindegyik 6 csatornával).
Frekvencia intervallum 87.5MHz-től 108MHz-ig ,50 kHz lépésekben.
Rádió üzemmódban nyomja meg röviden BND/AS az FM1, az FM2 és az FM3 közötti váltáshoz.
Automatikus csatornák tárolása
Rádió üzemmódban nyomja meg hosszasan BND/AS gombot . A készülék automatikusan
elindítja a csatornák keresését és tárolását minden egyes memória gombon.
Csatornakeresés
Rádió üzemmódban nyomja meg röviden / az előző vagy a következő csatorna
automatikus kereséséhez
Nyomja meg hosszasan / az előző vagy a következő csatorna manuális kereséséhez.
Manuális csatorna tárolása
Ha manuális keresés után csatornákat találtak, tartsa a 6 tárolási gomb valamelyike közül a
csatorna tárolására.
Mentett csatorna meghallgatásához röviden nyomja meg a memória gomb egyikét.
Nyomják meg újból röviden , “LOUD OFF” jelenik meg , majd forgassa el a hangerőszabályzó
gombot a "LOUD ON" kiválasztásához.
Nyomják meg újból röviden ,“DSP OFF”jelenik majd forgassa el a hangerőszabályzó
gombot, hogy kiválassza a színtéző módot: CLASS, ROCK, POP, FLAT, DSP OFF.
Rádió módban , nyomják meg újból röviden “DX” jelenik meg, majd forgassa el a
hangerőszabályzó gombot, hogy kiválassza LOCAL (“LOC”).
Nyomják meg újból röviden “STEREO” jelenik meg , majd forgassa el a hangerőszabályzó
gombot, hogy kiválassza “MONO”.
6. Nyomja meg röviden RESET gombot, hogy újból elindítsa a készüléket.
7. Óra beállítása
Nyomja meg röviden a CLK gombot , megjelenik az óra. Nyomja meg hosszasan CLK gombot ,
a kijelzőn megjelenek az órák számai majd forgassa el a hangerő gombot az órabeállításáshoz
Nyomja meg röviden CLK, hogy beállítsa a percet. Forgassa el a hangerő gombot, hogy
lementse. Nyomja meg röviden újból a CLK gombot.
8. 1/
Rádió módban nyomja meg röviden 1/ , hogy hallgasa a lementett csatornát.
Nyomja meg hosszan, hogy tárolja a csatornát ebben a helyzetben
DISC/USB/SD módban nyomja meg röviden 1/ a szüneteltetéshez.
9. 2/INT
Rádió módban nyomja meg röviden 2/INT hogy hallgasa a lementett csatornát.
Nyomja meg hosszan, hogy tárolja a csatornát ebben a helyzetben
DISC/USB/SD módban nyomja meg röviden 2/INT és az eszköz minden egyes fájl 10
másodpercét lejátssza.
10. 3/RPT
Rádió módban nyomja meg röviden 3/RPT , hogy hallgasa a lementett csatornát.
Nyomja meg hosszan, hogy tárolja a csatornát ebben a helyzetben
DISC/USB/SD nyomja meg röviden 3/RPT , hogy megismételje a jelenlegi fájlt.
11. 4/RDM
Rádió módban nyomja meg röviden 4/RDM hogy hallgasa a lementett csatornát.
Nyomja meg hosszan, hogy tárolja a csatornát ebben a helyzetben
DISC/USB/SD módban nyomja meg röviden 4/RDMa fájlok véletlenszerű lejátszásához.
12. 5/-10
Rádió módban nyomja meg röviden 5/-10 hogy hallgasa a lementett csatornát.
Nyomja meg hosszan, hogy tárolja a csatornát ebben a helyzetben
DISC/USB/SD módban nyomja meg röviden 5/-10 , hogy átugorjon hátra 10 fájlt.
13. 6/+10
Rádió módban nyomja meg röviden 6/+10 hogy hallgasa a lementett csatornát.
Nyomja meg hosszan, hogy tárolja a csatornát ebben a helyzetben.
DISC/USB/SD módban nyomja meg röviden 6/+10 hogy átugorjon előre 10 fájlt.
14. MUTE
Nyomja meg röviden a MUTE gombot, hogy elnémítsa a hangot. Nyomja meg újra a gombot
újraindításához.
15. EQ
Nyomja meg a EQ gombot, hogy kiválassza a szintéző mód hangot.
A következő elérhetőek CLASSIC, ROCK, POP, FLAT, DSP OFF.
3
6

Lemez lejátszási mód
Nyomja meg PWR/MOD, hogy DISC módba lépjen.
Az utolsó lejátszott fájl lejátszásra kerül.
Nyomja meg röviden hogy eltávolítsa a lemezt.
A készülék automatikusan rádió módba lép.
Lejátszás DISC üzemmódban, röviden nyomja meg a ombot a fájlkezelőre lépéshez.
Megnyomva hosszasan , a készülék elindul előrefelé 2x sebességgel, mégegyszer
megnyomva ezt a gombot , a sebesség 4x-re, majd 8x-re, 20-szorra nő.
Nyomja meg 1/ gombot, hogy visszatérjen a normál fájl lejátszáshoz.
CD lejátszás
CD módban használja a / gobokat, hogy a fájlok váltakozásához.
Nyomja meg 10+ gombot a távírányjtóról majd írja be a fájl fájlszámát, hogy közvetlenül
rácsatlakozon.
1. Csatlakozás Bluetooth-on keresztül
Az eszköz bekapcsolásakor a Bluetooth funkció aktív, és automatikusan elindul
keresés vagy párosítás a telefonnal.
Ha a telefon csatlakoztatva van a készülékhez, akkor automatikusan csatlakozik
ha a telefon Bluetooth-kapcsolattal rendelkezik.
A készülék egyszerre csak egy telefonhoz csatlakoztatható.
Húzza ki az aktuális telefont a másikhoz való csatlakoztatáshoz.
2. Hands-free csatlakozás
Hívásfogadás: amikor tárcsázik, a csengetés hallható az autó hangszórókon is
hallható. Nyomja meg a BND / AS gombot a készüléken vagy közvetlenül a telefonján, a
telefonhívás fogadásáshoz
Beszélgetés befejezése: hogy befejezze a beszélgetést , nyomja meg PWR/MOD a
készülékről vagy zárja le közvetlenül a telefonról.
Hívás hangereje : beállíthatja a hangerőt telefonról vagy a készülék hangerő gombjától.
3.Audio lejátszás Bluetooth-on keresztül
Amikor a telefon a készülékhez van csatlakoztatva ,nyomja meg a PWR / MOD gombot a
"Bluetooth music" módba való váltáshoz, majd hangfájlokat közvetlenül a telefonról
Bluetooth-on keresztül is lejátszhat.
Bluetooth funkció
4
Távirányító leírása
1. POWER: Nyomja meg röviden az
elindításhoz, hosszasan pedig a
lezáráshoz
2. VOL+: nyomja meg röviden a hangerő
növeléséhez vagy az óra beállításához.
3. VOL-:nyomja meg röviden a gombot a
hangerő csökkentéséhez vagy az óra
beállításához.
4. SEL: BAS, TRE, BAL,FAD, BEEP, EQ,
LOUD, LOC és Sztereo beállítás.
5. : röviden nyomja meg a balra
navigáláshoz
6. L/R: röviden nyomja meg a hangcsatorna
vagy a lejátszási nyelv kiválasztásához.
7. TITLE/PBC: DVD módban, hogy
megjelenítse a fájl cjmét. VCD módban
nyomja meg röviden a lejátszás vezérlőinek
a megjelenítéséshez
8. GOTO: nyomja meg röviden GOTO, hogy
kiválassza a kivánt fájlt
9. ANGLE: nyomja meg röviden a DVD-mód
megtekintési szögének
megváltoztatásához.
10. DISP: nyomja meg röviden az idő
megjelenítéséhez, nyomja meg és tartsa
lenyomva az idő beállításához.
11. SUB-T: röviden nyomja meg a felirat
kiválasztásához.
12. BAND: rádió módban, nyomja meg röviden
az FM sáv megváltoztatásához.
13. Számok: röviden nyomja meg a számjegyeket
a számjegyhez tárolt csatornát játssza le.
14. :nyomja meg röviden a felfelé navigáláshoz
15. : megerősíti a beálljtásokat
Elindítja és megállítja a lejátszást.
16: : nyomja meg röviden a jobb felé
navigáláshoz
17. : nyomja meg röviden a lefelé navigáláshoz
18. SETUP: nyomja meg röviden, hogy ű
megváltoztassa a rendszerbeállításokat
19. :térjen vissza az elöző menühöz.
20. REPT: nyomja meg röviden az az aktuális fájl
ismétléséshez.
21. : nyomja meg röviden, hogy az elöző fájlhoz
lépjen vagy automatikusan keresse az elöző
csatornát. Hosszan nyomja meg a gyors hátra
görgetéshez vagy az elöző csatornák manuális
kereséshez
22. : nyomja meg röviden, hogy a következő
fájlhoz lépjen vagy automatikusan keresse a
következő csatornát. Hosszan nyomja meg a gyors
előre görgetéshez vagy akövetkező csatornák
manuális kereséshez
5
Other manuals for Clementine 9440
1
Table of contents
Languages:
Other PNI Car Receiver manuals