PNI GreenHouse WS55 User manual

PNI GreenHouse WS55
Solar powered LED oodlight / Proyector solar LED / Napelemes LED
fényszóró / Proiettore a LED ad energia solare / Naświetlacz LED
zasilany energią słoneczną / Reector solar cu LED
EN User manual ............................................. 2
ES Manual de usuario .................................... 4
HU Használati utasítás ................................... 6
IT Manuale utente ........................................ 8
PL Instrukcja obsługi ..................................... 10
RO Manual de utilizare ................................... 12

EN
2
INSTALLATION INSTRUCTIONS
Note: Check the correct operation of the product before installing it.
• Connect the LED oodlight to the solar panel.
Caution: The oodlight is equipped with a twilight sensor.
- If the panel is exposed to daylight, the oodlight will not start automatically.
- At night, the oodlight starts automatically.
• If you disconnect the oodlight from the solar panel, it will start automatically regardless of day / night.
• Turn the oodlight on or o by pressing the ON / OFF button on the remote control. The light will blink
twice as conrmation of executing the ON / OFF commands.
Note: Position the remote control in front of the oodlight at a distance of approx. 1 - 15 m
Installing the solar panel:
A
B
C
30 - 45°
Install the solar panel on the roof or on the wall. Attach the U-shaped
support to the solar panel with the screws included in the package.
Note: The panel should be oriented towards the sun (about 5 to 10
degrees southwest), with a 30 to 45° inclination from the horizontal
plane. The angle of inclination of the solar panel varies depending on
the geographic position, latitude and longitude of the location where it
is located.
A - Solar panel
B - U-shaped holder
C - Wall
Note: The solar panel must not be obstructed by buildings or trees to
provide continuous exposure to the sun. Also, do not install the solar
panel on the inside.
Installing the oodlight:
• Fix the wall oodlight with the screws included
in the package
• The angle of inclination of the oodlight can be
adjusted as required
• Connect the male plug to the mother plug, then
tighten the anti-humidity nut
WARNINGS
• Do not power the oodlight at a power source larger than 6V
• Do not power the oodlight at a 230V AC power source
• Make sure you have both the solar panel and the oodlight securely fastened in order to avoid accidents
in strong windy days
• Periodically clean the surface of the solar panel to ensure a good sun exposure
• The battery can only be fully charged by solar panel from sunlight under the following conditions:
AM1.5 - 1000W/m2 - 25°C for at least 8 hours.
AM1.5 = airmass coecient at sea level
1000W/m2 = the intensity of the sunlight radiation
25°C = charging temperature
In autumn, winter or on cloudy days, the intensity of the sunlight decreases greatly and also reduces the
charge on the battery, thus inuencing the oodlight’s working life.

EN
3
TROUBLESHOOTING
The light does not turn on
• Check that the wires are connected correctly or are in good condition.
• Check if the remote has charged batteries or is working
TECHNICAL DETAILS
Solar panel
Panel type Polycrystalline
dimensions 420 x 370 x 17 mm
Weight 520 g
Power 15 W
Lifetime up to 5 years
Maximum voltage 6 V
Floodlight
Dimensions 280 x 230 x 110 mm
Power voltage 6V
LED 96 LED SMD 5730
Luminous ux max. 1200 lm
Lifetime Up to 50.000 h
Built-in battery Li-Po4 15000mAh 3.2V
Constructive Power 50 W
Power consumption 1.2 A
Battery life (100%) Up to 12 h
Angle of illumination 120°
Waterproof protection class IP65
REMOTE CONTROL FUNCTIONS DESCRIPTION
ON/OFF - turn on or o the oodlight
MODE: press this button to turn on the automatic dimmer mode of the
projector: 1 hour (100%), 3 hours (70%) and until dawn (30%)
AUTO: press this button to turn on the light automatically depending on
the outside light (day/night).
3H, 5H, 8H: the timer key. By pressing one of the buttons 3H, 5H, 8H the
light will automatically turn o after 3, 5 or 8 hours.
: change light intensity 100% - 50%.

ES
4
INSTRUCCIONES DE INSTALACION
Nota: Compruebe el correcto funcionamiento del producto antes de instalarlo.
• Conecte el proyector al panel solar.
Precaución: el proyector está equipado con un sensor crepuscular.
- Si el panel está expuesto a la luz del día, el proyector no se iniciará automáticamente.
- Por la noche, el proyector arranca automáticamente..
• Si desconecta el proyector del panel solar, se iniciará automáticamente independientemente del día /
noche.
• Encienda o apague el proyector presionando el botón ENCENDIDO / APAGADO en el control remoto. La
luz parpadeará dos veces como conrmación de la ejecución de los comandos ON / OFF.
Nota: coloque el control remoto frente al proyector a una distancia de aprox. 1 - 15 m
Instalación del panel solar:
A
B
C
30 - 45°
Instale el panel solar en el techo o en la pared. Fije el soporte en forma
de U al panel solar con los tornillos incluidos en el paquete
Nota: El panel debe estar orientado hacia el sol (alrededor de 5 a 10
grados suroeste), con una inclinación de 30 a 45 ° respecto al plano
horizontal. El ángulo de inclinación del panel solar varía según la
posición geográca, la latitud y la longitud del lugar donde se ubica..
A - Panel solar
B - soporte en forma de U
C - Muro
Nota: El panel solar no debe estar obstruido por edicios o árboles
para proporcionar una exposición continua al sol. Además, no instale el
panel solar en el interior.
Instalando el proyector:
• Fije el proyector de pared con los tornillos
incluidos en el paquete.
• El ángulo de inclinación del proyector se
puede ajustar según sea necesario
• Conecte el enchufe al enchufe de la madre,
luego apriete la tuerca antihumedad
ADVERTENCIAS
• No alimente el proyector a una fuente de alimentación mayor a 6V
• No encienda el proyector a una fuente de alimentación de 230 VCA
• Asegúrese de que tanto el panel solar como el proyector estén bien sujetos para evitar accidentes en
días de mucho viento.
• Limpie periódicamente la supercie del panel solar para garantizar una buena exposición al sol
• La batería solo se puede cargar completamente con el panel solar de la luz solar en las siguientes
condiciones: AM1.5 - 1000W/m2 - 25°C por al menos 8 horas.
AM1.5 = coeciente de masa de aire a nivel del mar(airmass coecient at sea level)
1000W/m2 = La intensidad de la radiación solar.
25°C = la temperatura de carga
En otoño, invierno o en días nublados, la intensidad de la luz solar disminuye considerablemente y también
reduce la carga de la batería, lo que inuye en la vida útil del proyector.

ES
5
SOLUCIÓN DE PROBLEMAS
La luz no se enciende.
• Compruebe que los cables estén conectados correctamente o que estén en buenas condiciones.
• Compruebe si el mando a distancia tiene baterías cargadas o funciona
DETALLES TECNICOS
Panel solar
Tipo de panel Policristalino
Dimensiones 420 x 370 x 17 mm
Peso 520 g
Poder 15 W
Vida útil Hasta que 5 año
Voltaje maximo 6 V
Proyector
Dimensiones 280 x 230 x 110 mm
Alimentación 6V
Led 96 LED SMD 5730
Flujo de luz max. 1200 lm
Vida útil Hasta que 50.000 horas
Batería incorporada Li-Po4 15000mAh 3.2V
Poder constructivo 50 W
Consumo 1.2 A
Duración de la batería (100%) Hasta que 12 horas
Ángulo de iluminación 120°
Clase de protección IP65
DESCRIPCIÓN DE LAS FUNCIONES DE CONTROL REMOTO
ON/OFF - encender o apagar el proyector
MODE: presione este botón para activar el modo de atenuación automática
del proyector: 1 hora (100%), 3 horas (70%) y hasta el amanecer (30%)
AUTO: presione este botón para encender la luz automáticamente
dependiendo de la luz exterior (día / noche).
3H, 5H, 8H: la tecla del temporizador. Al presionar uno de los botones 3H,
5H, 8H, la luz se apagará automáticamente después de 3, 5 u 8 horas.
: cambiar la intensidad de la luz 100% - 50%.

HU
6
TELEPÍTÉSI ÚTMUTATÓ
Megjegyzés: Telepítés előtt ellenőrizze a termék helyes működését.
• Csatlakoztassa a kivetítőt a napelemhez.
Figyelem: A projektor szürkés érzékelővel van felszerelve.
- Ha a panel napfénynek van kitéve, a kivetítő nem indul el automatikusan.
- Éjjel a projektor automatikusan elindul.
• Ha leválasztja a kivetítőt a napelemről, automatikusan és nappal / éjjel-nappal indul el.
• Kapcsolja be vagy ki a projektort a távvezérlő BE / KI gombjának megnyomásával. A jelzőfény kétszer
villog, mint a BE / KI parancs végrehajtásának megerősítése.
Megjegyzés: Helyezze a távvezérlőt a projektor elé kb. 1 - 15 m
A napelem panel beszerelése:
A
B
C
30 - 45°
Szerelje fel a napelemet a tetőre vagy a falra. Csatlakoztassa az
U-alakú támaszt a szolárpanelhez a csomagban található csavarokkal
Megjegyzés: A panelnek a nap felé kell lennie (körülbelül 5-10 fok
délnyugatra), a vízszintes sík 30-45 ° -os lejtésével. A napkollektor
dőlésszöge a földrajzi helyzettől, a szélességtől és a hosszúsági foktól
függően változik.
A - Napelem
B - U alakú tartó
C - Fal
Megjegyzés: A napelemeket nem szabad akadályozni épületek vagy
fák által, hogy folyamatosan napsugárzásnak legyenek kitéve. Emellett
ne telepítse a napelemet belülről.
A kivetítő felszerelése:
• Rögzítse a fali projektort a csomagban
található csavarokkal
• A kivetítő dőlésszögét szükség szerint lehet
beállítani
• Csatlakoztassa a dugót az anya dugójához,
majd húzza meg a párátlanító anyát
FIGYELMEZTETÉSEK
• Ne csatlakoztassa a kivetítőt 6V-nál nagyobb tápforráshoz
• Ne csatlakoztassa a kivetítőt 230 V AC tápforráshoz
• Győződjön meg róla, hogy a napelem és a kivetítő biztonságosan rögzítve van, hogy elkerülje a
baleseteket erős, szeles napokon
• Rendszeresen tisztítsa meg a napelem panel felületét a jó napsütés érdekében
• Az akkumulátort csak napelemekkel lehet teljes mértékben feltölteni napfénytől, az alábbi feltételek
mellett: AM1.5 - 1000W/m2 - 25°C legalább 8 órán át.
AM1.5 = tengerszintű légtömeg-együttható (airmass coecient at sea level)
1000W/m2 = a napsugárzás intenzitása
25°C = a rakodási hőmérsékletet
Ősszel, télen vagy felhős napokon a napfény intenzitása jelentősen csökken, és csökkenti az akkumulátor
töltését, ezáltal befolyásolja a projektor működési élettartamát.

HU
7
HIBAELHÁRÍTÁS
A fény nem kapcsol be
• Ellenőrizze, hogy a vezetékek megfelelően vannak-e csatlakoztatva vagy jó állapotban vannak-e.
• Ellenőrizze, hogy a távvezérlő feltöltött akkumulátorokat tartalmaz-e, vagy működik
TECHNIKAI RÉSZLETEK
Napelemes panel
Panel típusa Polikristályos
Méretek 420 x 370 x 17 mm
Súly 520 g
Teljesítmény 15 W
Élettartam Akár 5 év
Maximális feszültség 6 V
LED kivetítő
Méretek 280 x 230 x 110 mm
Etetés 6V
LED 96 LED SMD 5730
Fényáram max. 1200 lm
Élettartam Akár 50 000 óra
Beépített akkumulátor Li-Po4 15000mAh 3.2V
Konstruktív hatalom 50 W
Fogyasztás 1.2 A
Az akkumulátor élettartama (100%) Akár 12 óra
A megvilágítás szöge 120°
Védelmi osztály IP65
A TÁVIRÁNYÍTÓ FUNKCIÓINAK LEÍRÁSA
ON/OFF - kapcsolja be vagy ki a fényszórót
MODE: nyomja meg ezt a gombot, hogy bekapcsolja a kivetítő
automatikus fényerő-szabályozó üzemmódját: 1 óra (100%), 3 óra (70%)
és hajnalig (30%)
AUTO: nyomja meg ezt a gombot a fény automatikus bekapcsolásához a
külső fénytől (nap / éj) függően.
3H, 5H, 8H: az időzítőgombot. A 3H, 5H, 8H gombok egyikének
megnyomásával a fény automatikusan kikapcsol 3, 5 vagy 8 óra múlva.
: módosítsa a fényintenzitást 100% - 50%.

IT
8
ISTRUZIONI DI INSTALLAZIONE
Nota: controllare il corretto funzionamento del prodotto prima di installarlo.
• Collegare il proiettore al pannello solare.
Attenzione: il proiettore è dotato di un sensore crepuscolare.
- Se il pannello è esposto alla luce del giorno, il proiettore non si avvia automaticamente.
- Di notte, il proiettore si avvia automaticamente.
• Se si scollega il proiettore dal pannello solare, si avvierà automaticamente indipendentemente dal giorno
/ dalla notte.
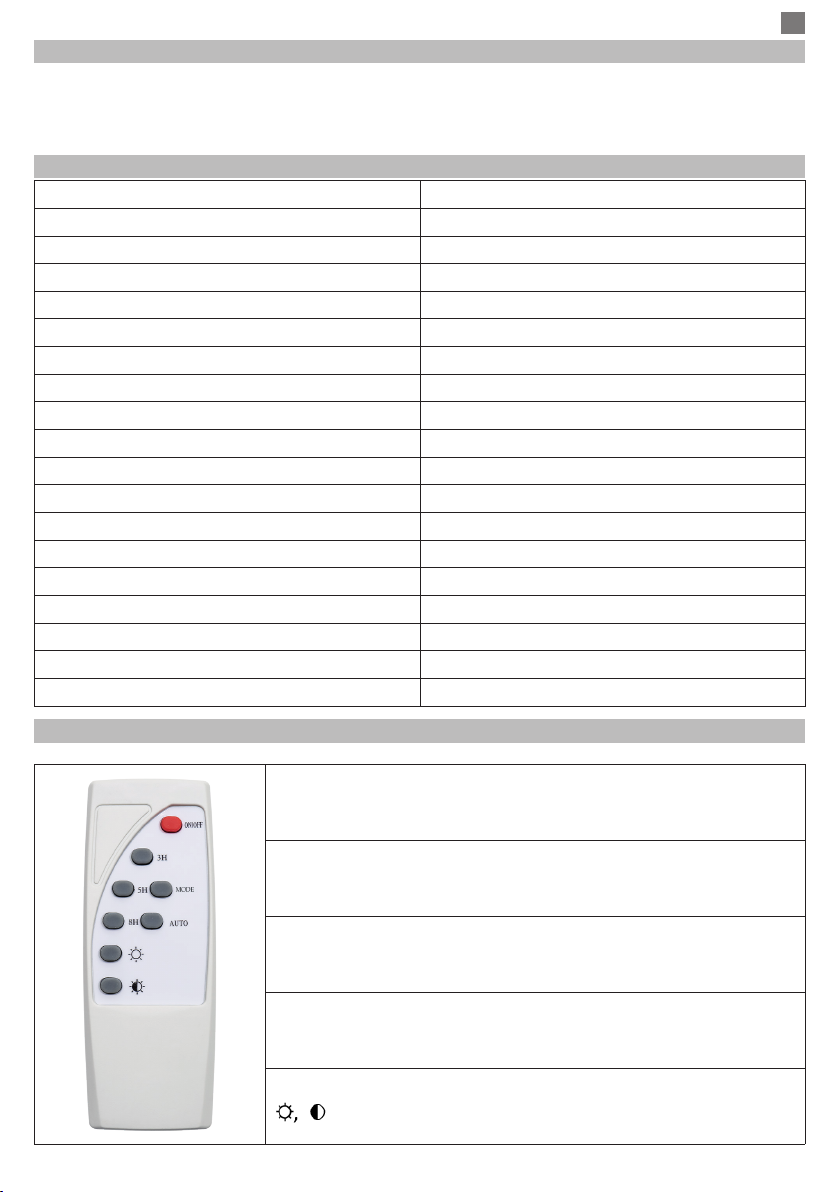
• Accendere o spegnere il proiettore premendo il tasto ON / OFF sul telecomando. La luce lampeggerà due
volte come conferma dell’esecuzione dei comandi ON / OFF.
Nota: posizionare il telecomando davanti al proiettore ad una distanza di ca. 1 - 15 m
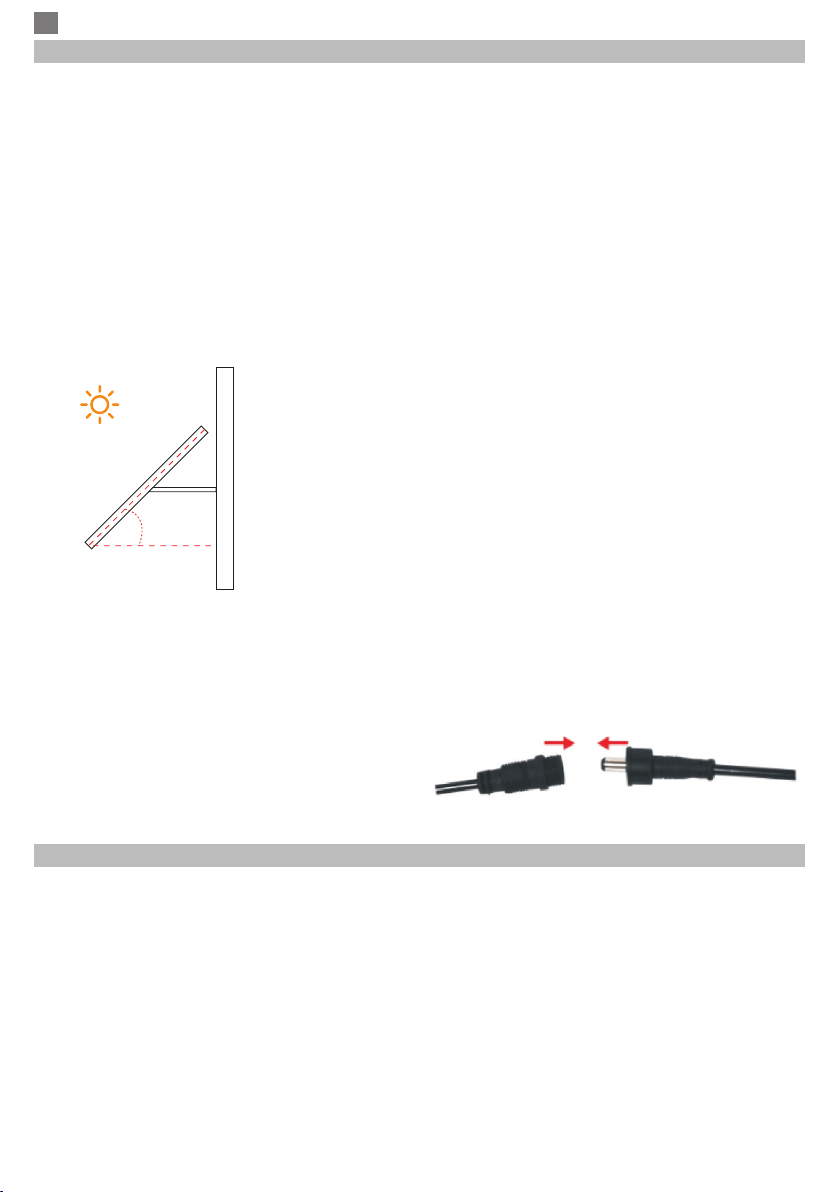
Installazione del pannello solare:
A
B
C
30 - 45°
Installare il pannello solare sul tetto o sul muro. Attaccare il supporto a
forma di U al pannello solare con le viti incluse nella confezione
Nota: il pannello deve essere orientato verso il sole (da 5 a 10 gradi a
sud-ovest), con un’inclinazione da 30 a 45 ° rispetto al piano orizzontale.
L’angolo di inclinazione del pannello solare varia in base alla posizione
geograca, alla latitudine e alla longitudine del luogo in cui si trova.
A - Pannello solare
B - Supporto a forma di U.
C - Parete
Nota: il pannello solare non deve essere ostruito da edici o alberi per
fornire un’esposizione continua al sole. Inoltre, non installare il pannello
solare all’interno.
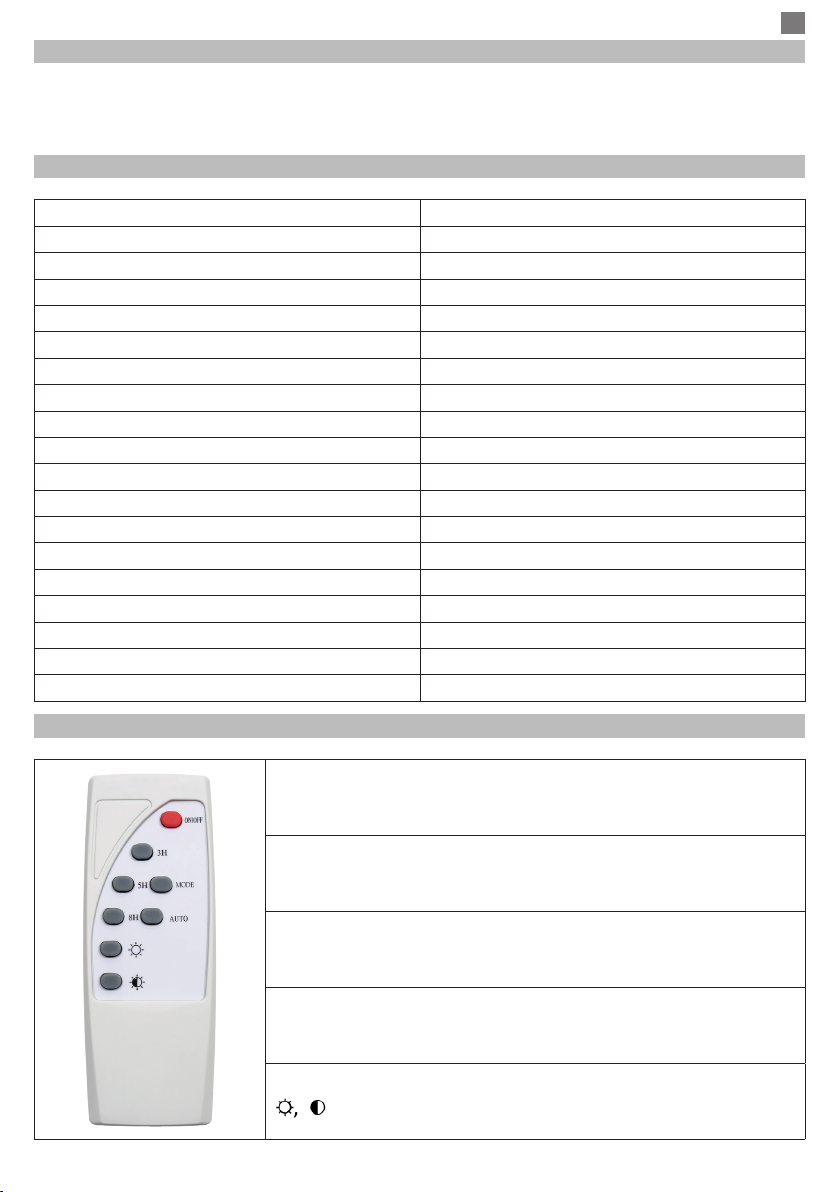
Installazione del proiettore:
• Fissare il proiettore a parete con le viti incluse
nella confezione
• L’angolo di inclinazione del proiettore può
essere regolato secondo necessità
• Collegare la spina alla presa madre, quindi
serrare il dado antiumidità
AVVERTENZE
• Non alimentare il proiettore con una fonte di alimentazione maggiore di 6V
• Non alimentare il proiettore con una fonte di alimentazione a 230V CA.
• Assicurarsi di avere il pannello solare e il proiettore saldamente ssati per evitare incidenti in giornate
ventose
• Pulire periodicamente la supercie del pannello solare per garantire una buona esposizione al sole
• La batteria può essere completamente caricata dal pannello solare dalla luce solare solo nelle seguenti
condizioni: AM1.5 - 1000W/m2 - 25°C per almeno 8 ore.
AM1.5 = Coeciente di massa d’aria a livello del mare (airmass coecient at sea level)
1000W/m2 = l’intensità della radiazione solare
25°C = la temperatura di caricamento
In autunno, in inverno o in giornate nuvolose, l’intensità della luce solare diminuisce notevolmente e riduce
anche la carica sulla batteria, inuenzando così la vita lavorativa del proiettore.

IT
9
PROBLEMI E SOLUZIONI
La luce non si accende
• Vericare che i cavi siano collegati correttamente o in buone condizioni.
• Controllare se il telecomando ha caricato le batterie o sta funzionando
DETTAGLI TECNICI
Pannello solare
Tipo di pannello Policristallino
Dimensioni 420 x 370 x 17 mm
Peso 520 g
Potenza 15 W
Durata della vita Fino a 5 anni
Tensione massima 6 V
Proiettore a LED
Dimensioni 280 x 230 x 110 mm
Alimentazione 6V
LED 96 LED SMD 5730
Flusso di luce max. 1200 lm
Durata della vita Fino a 50.000 ore
Batteria incorporata Li-Po4 15000mAh 3.2V
Potenza costruttivo 50 W
Consumo 1.2 A
Durata della batteria (100%) Fino a 12 ore
Angolo di illuminazione 120°
Classe di protezione IP65
DESCRIZIONE DELLE FUNZIONI DEL TELECOMANDO
ON/OFF - accensione / spegnimento della luce
MODE: premere questo pulsante per attivare la modalità di attenuazione
automatica della luce: 1 ora (100%), 3 ore (70%) e no all’alba (30%).
AUTO: premere questo pulsante per attivare la modalità automatica di
accensione del proiettore a seconda della luce esterna (giorno/notte).
3H, 5H, 8H: il tasto del timer. Premendo uno dei pulsanti 3H, 5H, 8H la
luce si spegnerà automaticamente dopo 3, 5 o 8 ore.
: cambiamento dell’intensità della luce 100% - 50%.

PL
10
INSTRUKCJE INSTALACJI
Uwaga: Przed rozpoczęciem instalacji sprawdź poprawność działania produktu.
• Podłącz projektor do panelu słonecznego.
Uwaga: Projektor jest wyposażony w czujnik zmierzchowy.
- Jeśli panel zostanie wystawiony na działanie światła dziennego, projektor nie uruchomi się automatycznie.
- W nocy projektor uruchamia się automatycznie.
• Jeśli odłączysz projektor od panelu słonecznego, uruchomi się on automatycznie niezależnie od dnia /
nocy.
• Włącz lub wyłącz projektor naciskając przycisk ON / OFF na pilocie. Światło będzie migać dwukrotnie
jako potwierdzenie wykonania poleceń ON / OFF.
Uwaga: Ustaw pilota przed projektorem w odległości ok. 1 - 15 m
Instalowanie panelu słonecznego:
A
B
C
30 - 45°
Zainstaluj panel słoneczny na dachu lub ścianie. Przymocuj wspornik w
kształcie litery U do panelu słonecznego za pomocą śrub znajdujących
się w opakowaniu
Uwaga: Panel powinien być skierowany w stronę słońca (około 5 do
10 stopni na południowy zachód), z nachyleniem od 30 do 45 ° od
płaszczyzny poziomej. Kąt nachylenia panelu słonecznego zmienia
się w zależności od położenia geogracznego, szerokości i długości
geogracznej miejsca, w którym się znajduje.
A - Panel słoneczny
B - Uchwyt w kształcie litery U.
C - Ściana
Uwaga: Panel słoneczny nie może być zasłonięty przez budynki lub
drzewa, aby zapewnić ciągłą ekspozycję na słońce. Ponadto, nie
instaluj panelu słonecznego od wewnątrz.
Instalowanie projektora:
• Przymocuj projektor ścienny za pomocą śrub
dołączonych do opakowania
• Kąt nachylenia projektora można regulować w
razie potrzeby
• Podłącz wtyczkę do wtyczki głównej, a
następnie dokręć nakrętkę przeciw wilgoci
OSTRZEŻENIA
• Nie zasilaj projektora przy źródle zasilania większym niż 6V
• Nie zasilaj projektora przy źródle zasilania 230 V AC
• Upewnij się, że panel słoneczny i projektor są bezpiecznie zamocowane, aby uniknąć wypadków w silne
wietrzne dni
• Okresowo czyść powierzchnię panelu słonecznego, aby zapewnić dobrą ekspozycję na słońce
• Akumulator może być w pełni naładowany przez panel słoneczny przed światłem słonecznym tylko w
następujących warunkach: AM1.5 - 1000W/m2 - 25°C przez co najmniej 8 godzin.
AM1.5 = współczynnik masy powietrza na poziomie morza (airmass coecient at sea level)
1000W/m2 = intensywność promieniowania słonecznego
25°C = temperatura ładowania

PL
11
Jesienią, zimą lub w pochmurne dni natężenie światła słonecznego znacznie się zmniejsza, a także zmniejsza
ładowanie akumulatora, wpływając w ten sposób na żywotność projektora.
PROBLEMY I ROZWIĄZANIA
Światło się nie włącza
• Sprawdź, czy przewody są prawidłowo podłączone lub są w dobrym stanie.
• Sprawdź, czy pilot ma naładowane baterie lub działa
DANE TECHNICZNE
Panel słoneczny
Rodzaj panelu Polikrystaliczny
Wymiary 420 x 370 x 17 mm
Waga 520 g
Moc 15 W
Żywotność Do 5 rok
Maksymalne napięcie 6 V
Projektor
Wymiary 280 x 230 x 110 mm
Karmienie 6V
LED 96 LED SMD 5730
Przepływ światła max. 1200 lm
Żywotność Do 50.000 godzin
Wbudowana bateria Li-Po4 15000mAh 3.2V
Moc konstruktywna 50 W
Konsumpcja 1.2 A
Żywotność baterii (100%) Do 12 godzin
Kąt oświetlenia 120°
Klasa ochrony IP65
OPIS FUNKCJI ZDALNEGO STEROWANIA
ON/OFF - włącz lub wyłącz reektor
MODE: naciśnij ten przycisk, aby włączyć tryb automatycznego
przyciemniania projektora: 1 godzina (100%), 3 godziny (70%) i do świtu
(30%)
AUTO: naciśnij ten przycisk, aby włączyć światło automatycznie w
zależności od światła zewnętrznego (dzień / noc)).
3H, 5H, 8H: klawisz zegara. Naciśnięcie jednego z przycisków 3H, 5H, 8H
spowoduje automatyczne wyłączenie światła po 3, 5 lub 8 godzinach.
: zmienić intensywność światła 100% - 50%.

RO
12
INSTRUCTIUNI INSTALARE
Nota: Vericati functionarea corecta a produsului inainte de instalarea lui.
• Conectati proiectorul la panoul solar.
Atentie: Proiectorul este echipat cu senzor crepuscular de lumina.
- Daca panoul este expus la lumina zilei, proiectorul nu va porni automat.
- Pe timp de noapte proiectorul porneste automat.
• Daca deconectati proiectorul de la panoul solar, acesta va porni automat indiferent de zi/noapte.
• Aprindeti sau stingeti proiectorul apasand pe butonul ON / OFF de pe telecomanda. Lumina va clipi de 2
ori, ca si conrmare de executare a comezilor ON/OFF.
Nota: Pozitionati telecomanda in fata proiectorului la o distanta cuprinsa intre aprox. 1 - 15 m
Instalarea panoului solar:
A
B
C
30 - 45°
Instalati panoul solar pe acoperis sau pe perete. Fixati suportul in forma
de U de panoul solar cu ajutorul suruburilor incluse in pachet
Nota: panoul trebuie orientat catre soare (aproximativ 5 - 10 grade catre
sud-vest), cu o inclinatie de 30 - 45° fata de planul orizontal. Unghiul de
inclinatie al panoului solar variaza in functie de pozitia geograca, de
latitudinea si longitudinea locatiei unde este amplasat.
A - Panou solar
B - Suport xare in forma de U
C - Perete
Nota: Panoul solar nu trebuie sa e obstructionat de cladiri sau copaci
pentru a-i asigura o expunere continua la soare. De asemenea, nu
instalati panoul solar la interior.
Instalarea proiectorului:
• Fixati proiectorul de perete cu ajutorul
suruburilor incluse in pachet
• Unghiul de inclinatie al proiectorului poate
reglat in functie de necesitati
• Conectati mufa tata cu mufa mama, dupa care
strangeti piulita anti-umiditate
AVERTIZARI
• Nu alimentati proiectorul la o sursa de curent mai mare de 6V
• Nu alimentati proiectorul la o sursa de curent de 230V AC
• Asigurati-va ca ati xat bine atat panoul solar cat si proiectorul, pentru a evita accidente in zile cu vant
puternic
• Curatati periodic suprafata panoului solar pentru a asigura o buna expunere la soare
• Bateria poate încărcată complet de panoul solar de la lumina solară în următoarele condiții:
AM1.5 - 1000W/m2 - 25°C timp de minim 8 ore.
AM1.5 = coecientul de masa a aerului la nivelul marii (airmass coecient at sea level)
1000W/m2 = intensitatea radiatiei luminii solare
25°C = temperatura de incarcare
Toamna, iarna sau in zilele innorate, intensitatea luminii solare scade foarte mult si de asemenea se reduce
ecienta de incarcare a acumulatorului, inuentand astfel durata de functionare a proiectorului.

RO
13
PROBLEME SI SOLUTII
Lumina nu se aprinde
• Vericati daca rele sunt conectate in mod corect sau daca sunt in stare buna.
• Vericati daca telecomanda are bateriile incarcate sau daca este functionala
DETALII TEHNICE
Panou solar
Tip panou Policristalin
Dimensiuni 420 x 370 x 17 mm
Greutate 520 g
Putere 15 W
Durata de viata Pana la 5 ani
Tensiune maxima 6 V
Proiector
Dimensiuni 280 x 230 x 110 mm
Alimentare 6V
LED-uri 96 LED-uri SMD 5730
Flux luminos max. 1200 lm
Durata de viata Pana la 50.000 ore
Acumulator incorporat Li-Po4 15000mAh 3.2V
Putere constructiva 50 W
Consum 1.2 A
Durata de iluminare a acumulatorului (100%) Pana la 12 ore
Unghi iluminare 120°
Clasa de protectie IP65
DESCRIERE FUNCTII TELECOMANDA
ON/OFF - aprindere / stingere proiector
MODE: apasati acest buton pentru a activa modul automat de diminuare
a intensitatii luminoase a proiectorului astfel: 1 ora (100%), 3 ore (70%) si
pana in zori (30%).
AUTO: apasati acest buton pentru a activa modul automat de aprindere a
proiectorului in functie de lumina de afara (zi/noapte).
3H, 5H, 8H: tasta temporizare. Apasand unul dintre butoanele 3H, 5H, 8H
proiectoul se va stinge automat dupa 3, 5 sau 8 ore.
: Modicare intensitate luminoasa 100% - 50%.

EN:
EU Simplied Declaration of Conformity
SC ONLINESHOP SRL declares that Solar powered LED oodlight PNI GreenHouse WS55 complies with
the Directive EMC 2014/30/EU. The full text of the EU declaration of conformity is available at the following
Internet address:
https://www.mypni.eu/products/6095/download/certications
ES:
Declaración UE de conformidad simplicada
SC ONLINESHOP SRL declara que el Proyector solar LED PNI GreenHouse WS55 cumple con la Directiva
EMC 2014/30/EU. El texto completo de la declaración de conformidad de la UE está disponible en la siguiente
dirección de Internet:
https://www.mypni.eu/products/6095/download/certications
HU:
Egyszerűsített EU Megfelelési Közlemény
SC ONLINESHOP SRL kijelenti azt, hogy a Napelemes LED reektor PNI GreenHouse WS55 megfelel az
EMC 2014/30/EU. Az EU-megfelelőségi nyilatkozat teljes szövege a következő internetes címen érhető el:
https://www.mypni.eu/products/6095/download/certications
IT:
Dichiarazione UE di conformità semplicata
SC ONLINESHOP SRL dichiara che il Proiettore a LED ad energia solare PNI GreenHouse WS55
è conforme alla direttiva EMC 2014/30/UE. Il testo completo della dichiarazione di conformità europea è
disponibile al seguente indirizzo Internet:
https://www.mypni.eu/products/6095/download/certications
PL:
Uproszczona deklaracja zgodności UE
SC ONLINESHOP SRL oświadcza, że Naświetlacz LED zasilany energią słoneczną PNI GreenHouse
WS55 jest zgodny z dyrektywą EMC 2014/30/EU. Pełny tekst deklaracji zgodności UE dostępny jest pod
następującym adresem internetowym:
https://www.mypni.eu/products/6095/download/certications
RO:
Declaratie UE de conformitate simplicata
SC ONLINESHOP SRL declara ca Reector LED 50W PNI GreenHouse WS55 cu panou solar si acumulator
este in conformitate cu Directiva EMC 2014/30/EU. Textul integral al declarației UE de conformitate este
disponibil la urmatoarea adresa de internet:
https://www.mypni.eu/products/6095/download/certications


Other manuals for GreenHouse WS55
1
Table of contents
Languages:
Other PNI Floodlight manuals