PNI GreenHouse WS55 User manual

PNI GreenHouse WS55
Solar powered LED floodlight / LED прожектор със слънчева енергия /
Solarbetriebener LED-Fluter / Proyector solar LED / Projecteur LED à énergie
solaire / Napelemes LED fényszóró / Proiettore a LED ad energia solare / LED-
schijnwerper op zonne-energie / Naświetlacz LED zasilany energią słoneczną /
Reflector LED cu panou solar
EN User manual ......................................................... 3
BG Ръководство за употреба ............................. 6
DE Benutzerhandbuch .............................................. 9
ES Manual de usuario ............................................... 12
FR Manuel utilisateur ............................................... 15
HU Használati utasítás .............................................. 18
IT Manuale utente .................................................. 21
NL Handleiding ........................................................ 24
PL Instrukcja obsługi ............................................... 27
RO Manual de utilizare ............................................. 30


3User manual
English
Instructions for use
Note: Check the correct operation of the product before installing it.
• Connect the LEDfloodlight to the solar panel. Attention:TheLEDfloodlight is equipped
with a night / day sensor that identifies the voltage received from the solar panel. If the
solar panel is exposed to daylight, the LED floodlight will not turn on automatically. The
LED floodlight will turn on automatically at night. If you disconnect the LED floodlight
from the solar panel, it will turn on automatically regardless of day or night.
• Turn the LED floodlight on or o by pressing the ON / OFF button on the remote
control. The light will flash twice before it turns on or o.
Note: Position the remote control in front of the LED floodlight 1 meter up to 15 meters away.
Solar panel installation
A
B
C
30 - 45°
Install the solar panel on the roof or on the wall. Attach
the U-shaped bracket to the solar panel using the screws
included in the package.
Note: the panel should be facing the sun (approximately 5-10
degrees to the southwest), with an inclination of 30 ° - 45°
from the horizontal plane. The angle of inclination of the
solar panel varies depending on the geographical position, the
latitude and the longitude of the location where it is located.
A - Solar panel
B - U-shaped mounting bracket
C - Wall
Note: The solar panel must not be obstructed by buildings or
trees to ensure continuous sun exposure. Also, do not install
the solar panel inside.

User manual 4
English
Installing the LED floodlight
• Secure the LED floodlight to the wall with
the screws included in the package.
• The tilt angle of the LED floodlight can be
adjusted as needed.
• Connect the male plug to the female plug,
then tighten the anti-humidity nut.
Warnings
• Do not power the LED floodlight to a power source greater than 6V
• Do not power the LED floodlight to 230V AC mains
• Make sure that both the solar panel and the LED floodlight are securely fastened to
avoid accidents on windy days.
• Periodically clean the surface of the solar panel to ensure good sun exposure
• The battery can be fully charged by the solar panel from sunlight in the following
conditions: AM1.5 - 1000W / m2 - 25 ° C for at least 8 hours.
AM1.5 = airmass coecient at sea level
1000W / m2 = intensity of sunlight radiation
25 ° C = loading temperature
In the fall, winter, or cloudy days, the intensity of the sunlight is greatly reduced and the
battery charging eciency is also reduced, thus influencing the operating time of the LED
floodlight.
Troubleshooting
The light does not turn on
• Check that the wires are connected correctly or that they are in good condition.
• Check if the remote control has a charged battery or if it is working.
Technical specifications
Solar panel
Panel type Polycrystalline
Dimensions 420 x 370 x 17 mm
Weight 520 g

5User manual
English
Power 18 W
Life span Up to 5 years
Maximum voltage 6 V
LED floodlight
Dimensions 280 x 230 x 110 mm
Power voltage 6V
LED 96 SMD 5730 LEDs
Light flow max. 1200 lm
Life span Up to 50,000 hours
Built-in battery Li-Po4 15000mAh 3.2V
Power 50 W
Current 1.2 A
Battery life (100%) Up to 12 hours
Lighting angle 120°
Water protection class IP65
Description of remote control functions
ON / OFF - turn LED floodlight on / o
MODE: press this button to activate the automatic dimming
mode of the LED floodlight as follows: 1 hour (100%), 3 hours
(70%) and until dawn (30%).
AUTO: Press this button to turn on the LED floodlight's auto-
on mode according to the outside light (day / night).
3H, 5H, 8H: Timer button. Pressing one of the 3H, 5H, 8H
buttons will automatically turn o the LED floodlight after 3,
5 or 8 hours.
: Light intensity change 100% - 50%.

Ръководство за употреба
Български
6
Инструкции за употреба
Забележка: Проверете правилната работа на продукта преди да го инсталирате.
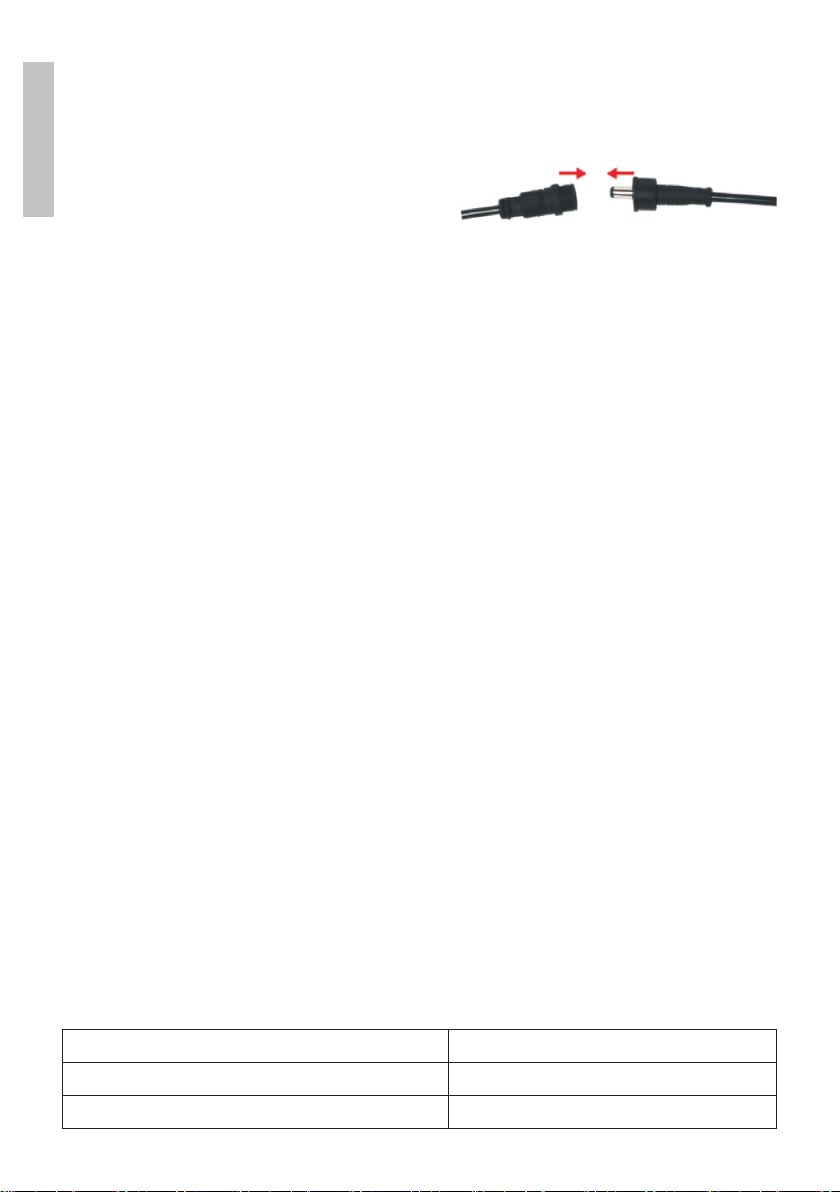
• Свържете LED прожектора към слънчевия панел. Внимание: LED прожекторът
е оборудван със сензор за нощ/ден, който идентифицира напрежението,
получено от слънчевия панел. Ако слънчевият панел е изложен на дневна
светлина, LED прожекторът няма да се включи автоматично. LED прожекторът
ще се включи автоматично през нощта. Ако изключите LED прожектора от
слънчевия панел, той ще се включи автоматично, независимо от деня или
нощта.
• Включете или изключете LED прожектора, като натиснете бутона ON/OFF
на дистанционното управление. Лампичката ще мига два пъти, преди да се
включи или изключи.
Забележка: Поставете дистанционното управление пред LED прожектора на 1
метър до 15 метра разстояние.
Монтаж на соларен панел
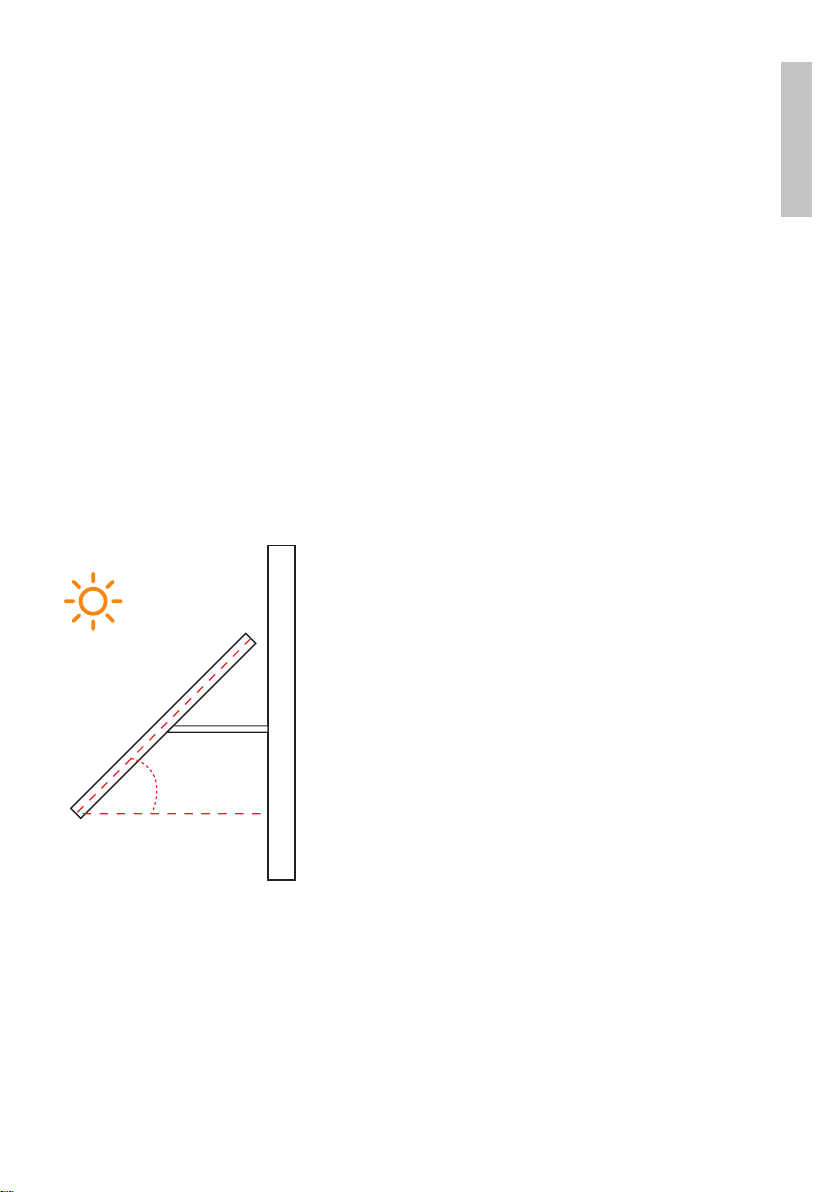
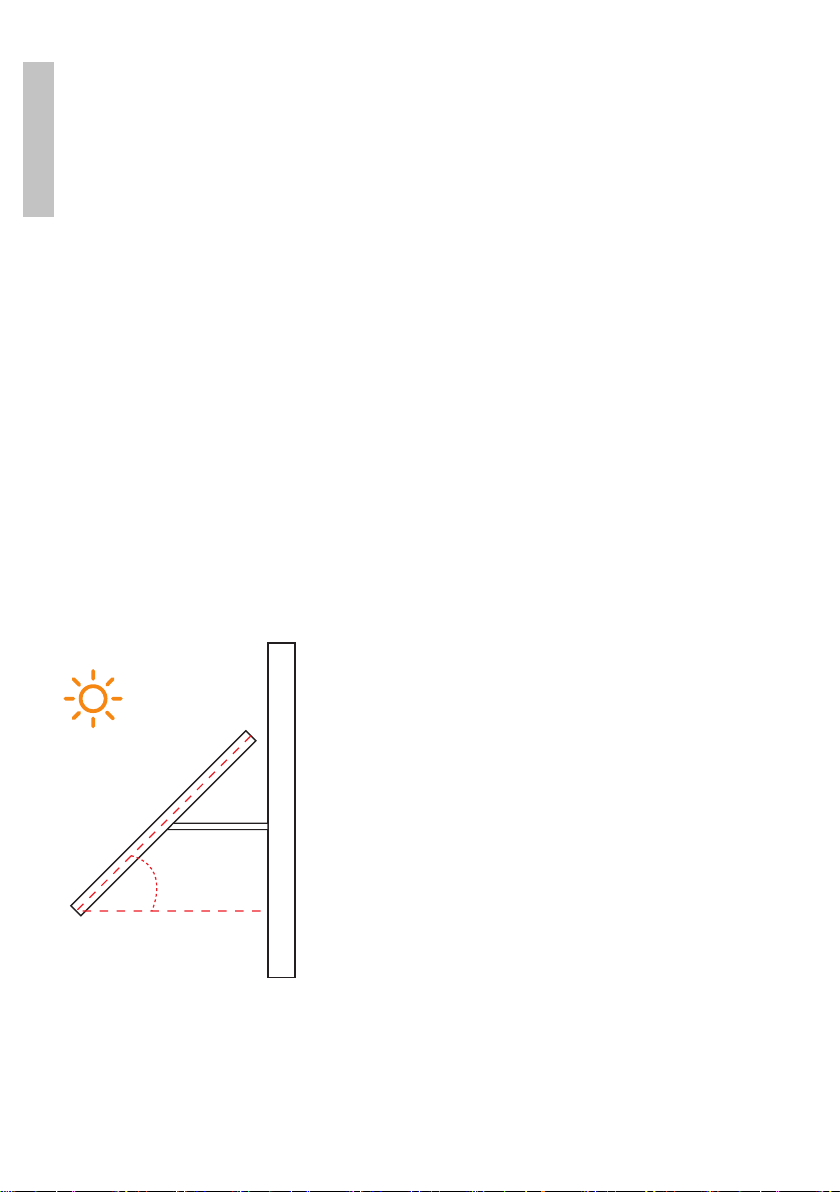
A
B
C
30 - 45°
Монтирайте слънчевия панел на покрива или
на стената. Прикрепете U-образната скоба към
слънчевия панел с помощта на винтовете, включени
в опаковката.
Забележка: панелът трябва да е обърнат към
слънцето (приблизително 5-10 градуса на югозапад),
с наклон от 30° - 45° спрямо хоризонталната
равнина. Ъгълът на наклон на слънчевия
панел варира в зависимост от географското
положение, географската ширина и дължината на
местоположението, където се намира.
A - Слънчев панел
B - U-образна монтажна скоба
C - Стена
Забележка: Слънчевият панел не трябва да бъде
препятстван от сгради или дървета, за да се осигури
непрекъснато излагане на слънце. Също така, не
инсталирайте слънчевия панел вътре.

Ръководство за употреба
Български
7
Монтаж на LED прожектора
• Закрепете LED прожектора към стената
с винтовете, включени в опаковката.
• Ъгълът на наклон на LED прожектора
може да се регулира според нуждите.
• Свържете мъжкия щепсел към
женския щепсел, след което затегнете
гайката против влага.
Предупреждения
• Не захранвайте LED прожектора към източник на захранване, по-голям от 6V
• Не захранвайте LED прожектора към 230V AC мрежа
• Уверете се, че както слънчевият панел, така и LED прожекторът са здраво
закрепени, за да избегнете инциденти през ветровитите дни.
• Периодично почиствайте повърхността на слънчевия панел, за да осигурите
добро излагане на слънце
• Батерията може да се зарежда напълно от слънчевия панел от слънчева
светлина при следните условия: AM1.5 - 1000W / m2 - 25°C за поне 8 часа.
AM1.5 = коефициент на въздушна маса на морското равнище
1000W / m2 = интензитет на слънчева радиация
25 ° C = температура на зареждане
През есента, зимата или облачните дни интензитетът на слънчевата светлина е
значително намален и ефективността на зареждане на батерията също е намалена,
като по този начин се влияе върху времето за работа на LED прожектора.
Отстраняване на неизправности
Лампата не се включва
• Проверете дали проводниците са свързани правилно или дали са в добро
състояние.
• Проверете дали дистанционното управление има заредена батерия или
работи.
Технически спецификации
Слънчев панел
Тип панел Поликристална

Ръководство за употреба
Български
8
Размери 420 x 370 x 17 мм
Тегло 520 гр
Мощност 18 W
Продължителност на живота До 5 години
Максимално напрежение 6 V
Осветяваше наводненията
размер 280 x 230 x 110 мм
Захранващо напрежение 6V
LED 96 светодиода SMD 5730
Светлинен поток макс. 1200 lm
Продължителност на живота До 50 000 часа
Вградена батерия Li-Po4 15000mAh 3.2V
Мощност 50 W
Ток 1,2 А
Живот на батерията (100%) До 12 часа
Ъгъл на осветление 120°
Клас на защита от вода IP65
Описание на функциите за дистанционно управление
ON / OFF - включване / изключване на LED прожектора
РЕЖИМ: натиснете този бутон, за да активирате режима
на автоматично затъмняване на LED прожектора, както
следва: 1 час (100%), 3 часа (70%) и до зазоряване (30%).
AUTO: Натиснете този бутон, за да включите режима
на автоматично включване на LED прожектора според
външната светлина (ден/нощ).
3H, 5H, 8H: Бутон за таймер. Натискането на един от
бутоните 3H, 5H, 8H автоматично ще изключи LED
прожектора след 3, 5 или 8 часа
: Промяна на интензитета на светлината 100% -
50%.

Benutzerhandbuch
Deutsche
9
Gebrauchsanweisung
Hinweis: Überprüfen Sie den korrekten Betrieb des Produkts, bevor Sie es installieren.
• Verbinden Sie den LED-Strahler mit dem Solarpanel. Achtung: Der LED-Scheinwerfer
ist mit einem Nacht-/Tagsensor ausgestattet, der die vom Solarpanel empfangene
Spannung erkennt. Wenn das Solarpanel Tageslicht ausgesetzt ist, schaltet sich der LED-
Strahler nicht automatisch ein. Das LED-Flutlicht schaltet sich nachts automatisch ein.
Wenn Sie den LED-Strahler vom Solarpanel trennen, schaltet er sich unabhängig von
Tag und Nacht automatisch ein.
• Schalten Sie den LED-Strahler ein oder aus, indem Sie die ON / OFF-Taste auf der
Fernbedienung drücken. Das Licht blinkt zweimal, bevor es ein- oder ausgeschaltet wird.
Hinweis: Positionieren Sie die Fernbedienung in 1 Meter bis 15 Meter Entfernung vor dem LED-
Fluter.
Installation von Solarmodulen
A
B
C
30 - 45°
Installieren Sie das Solarpanel auf dem Dach oder an der
Wand. Befestigen Sie die U-förmige Halterung mit den
im Lieferumfang enthaltenen Schrauben am Solarmodul.
Hinweis: Das Paneel sollte der Sonne zugewandt sein
(ca. 5-10 Grad nach Südwesten), mit einer Neigung von
30 ° - 45 ° zur horizontalen Ebene. Der Neigungswinkel
des Solarmoduls variiert je nach geografischer Position,
Breiten- und Längengrad des Standorts, an dem es sich
befindet.
A - Solarpanel
B - U-förmige Montagehalterung
C - Wand
Hinweis: Das Solarmodul darf nicht durch Gebäude
oder Bäume verdeckt werden, um eine kontinuierliche
Sonneneinstrahlung zu gewährleisten. Installieren Sie das
Solarpanel auch nicht im Inneren

Benutzerhandbuch
Deutsche
10
Installation des LED-Flutlichts
• Befestigen Sie den LED-Strahler mit den
im Lieferumfang enthaltenen Schrauben
an der Wand.
• Der Neigungswinkel des LED-Flutlichts
kann nach Bedarf eingestellt werden.
• Verbinden Sie den Stecker mit der Buchse
undziehenSiedanndieAnti-Feuchtigkeits-
Mutter fest.
Warnungen
• Betreiben Sie das LED-Flutlicht nicht mit einer Stromquelle mit mehr als 6 V
• Betreiben Sie den LED-Strahler nicht mit 230 V Wechselstrom
• Stellen Sie sicher, dass sowohl das Solarpanel als auch der LED-Scheinwerfer sicher
befestigt sind, um Unfälle an windigen Tagen zu vermeiden.
• Reinigen Sie die Oberfläche des Solarmoduls regelmäßig, um eine gute
Sonneneinstrahlung zu gewährleisten
• Der Akku kann unter folgenden Bedingungen durch das Solarpanel durch Sonnenlicht
vollständigaufgeladenwerden:AM1,5 -1000W/m2-25°Cfür mindestens8Stunden.
AM1,5 = Luftmassenkoezient auf Meereshöhe
1000 W / m2 = Intensität der Sonneneinstrahlung
25°C = Ladetemperatur
Im Herbst, Winter oder an bewölkten Tagen wird die Intensität des Sonnenlichts stark
reduziert und auch die Batterieladeezienz wird reduziert, was die Betriebsdauer des LED-
Flutlichts beeinflusst.
Fehlerbehebung
Das Licht geht nicht an
• Überprüfen Sie, ob die Kabel richtig angeschlossen oder in gutem Zustand sind.
• ÜberprüfenSie,obdieFernbedienungeinengeladenenAkkuhatoderobsiefunktioniert.
Technische Spezifikationen
Sonnenkollektor
Panel-Typ Polykristallin
Maße 420 x 370 x 17 mm

Benutzerhandbuch
Deutsche
11
Gewicht 520 gr
Leistung 18 W
Lebensdauer Bis zu 5 Jahre
Maximale Spannung 6 V
LED Flutlicht
Maße 280 x 230 x 110 mm
Netzspannung 6V
LED 96 SMD-5730-LEDs
Lichtfluss max. 1200 lm
Lebensdauer Bis zu 50.000 Stunden
Eingebaute Batterie Li-Po4 15000 mAh 3,2 V
Leistung 50 W
Strom 1,2 A
Akkulaufzeit (100%) Bis zu 12 Stunden
Beleuchtungswinkel 120°
Wasserschutzklasse IP65
Beschreibung der Fernbedienungsfunktionen
EIN / AUS - LED-Flutlicht ein- / ausschalten
MODE: Drücken Sie diese Taste, um den automatischen
Dimmmodus des LED-Strahlers wie folgt zu aktivieren: 1
Stunde (100 %), 3 Stunden (70 %) und bis zum Morgengrauen
(30 %).
AUTO: Drücken Sie diese Taste, um den automatischen
Einschaltmodus des LED-Flutlichts entsprechend dem
Außenlicht (Tag / Nacht) einzuschalten.
3H, 5H, 8H: Timer-Taste. Durch Drücken einer der Tasten
3H, 5H, 8H wird das LED-Flutlicht nach 3, 5 oder 8 Stunden
automatisch ausgeschaltet.
: Änderung der Lichtintensität 100 % - 50 %.

Manual de usuario
Español
12
Instrucciones de uso
Nota: Compruebe el correcto funcionamiento del producto antes de instalarlo.
• Conecte el reflector LED al panel solar. Atención: El proyector LED está equipado con
un sensor día/noche que identifica el voltaje recibido del panel solar. Si el panel solar está
expuesto a la luz del día, el reflector LED no se encenderá automáticamente. El reflector
LED se encenderá automáticamente por la noche. Si desconecta el reflector LED del
panel solar, se encenderá automáticamente sin importar el día o la noche.
• Encienda o apague el reflector LED presionando el botón ON/OFF en el control
remoto. La luz parpadeará dos veces antes de encenderse o apagarse .
Nota: Coloque el control remoto frente al reflector LED a una distancia de 1 a 15 metros..
Instalación de paneles solares
A
B
C
30 - 45°
Instale el panel solar en el techo o en la pared. Fije el
soporte en forma de U al panel solar con los tornillos
incluidos en el paquete.
Nota: el panel debe estar orientado hacia el sol
(aproximadamente 5-10 grados al suroeste), con una
inclinación de 30 ° - 45 ° desde el plano horizontal. El
ángulo de inclinación del panel solar varía según la posición
geográfica, la latitud y la longitud del lugar donde se
encuentra.
A - Panel solar
B - Soporte de montaje en forma de U
C-pared
Nota: El panel solar no debe estar obstruido por edificios
o árboles para garantizar una exposición solar continua.
Además, no instale el panel solar en el interior.

Manual de usuario
Español
13
Instalación del reflector LED
• Asegure el reflector LED a la pared con los
tornillos incluidos en el paquete.
• El ángulo de inclinación del reflector LED
se puede ajustar según sea necesario.
• Conecte el enchufe macho al enchufe
hembra, luego apriete la tuerca
antihumedad.
Advertencias
• No encienda el reflector LED a una fuente de alimentación superior a 6V
• No encienda el reflector LED a la red eléctrica de 230 V CA
• Asegúrese de que tanto el panel solar como el reflector LED estén bien sujetos para
evitar accidentes en los días ventosos.
• Limpie periódicamente la superficie del panel solar para asegurar una buena exposición
al sol
• La batería se puede cargar completamente con el panel solar de la luz solar en las
siguientes condiciones: AM1.5 - 1000W / m2 - 25 ° C durante al menos 8 horas.
AM1.5 = coeficiente de masa de aire al nivel del mar
1000W/m2 = intensidad de la radiación solar
25°C = temperatura de carga
En otoño, invierno o días nublados, la intensidad de la luz solar se reduce considerablemente
y la eficiencia de carga de la batería también se reduce, lo que influye en el tiempo de
funcionamiento del reflector LED.
Solución de problemas
La luz no enciende
• Verifique que los cables estén conectados correctamente o que estén en buenas
condiciones.
• Compruebe si el control remoto tiene la batería cargada o si está funcionando
Technical specifications
Panel solar
Tipo de panel Policristalino
Dimensiones 420x370x17mm

Manual de usuario
Español
14
Peso 520 gramos
Potencia 18 W
Esperanza de vida Hasta 5 años
Voltaje máximo 6 voltios
Luz de LED fluorescente
Tamaño 280x230x110mm
Tensión de alimentación 6V
LED 96 LED SMD 5730
Flujo de luz máx. 1200 lm
Esperanza de vida Hasta 50.000 horas
Batería integrada Li-Po4 15000mAh 3.2V
Potencia 50W
Corriente 1,2 A
Duración de la batería (100%) Hasta 12 horas
Ángulo de iluminación 120°
Clase de protección contra el agua IP65
Descripción de las funciones del control remoto
ENCENDIDO / APAGADO: enciende / apaga el reflector
LED
MODO:presioneestebotónparaactivarelmododeatenuación
automática del proyector LED de la siguiente manera: 1 hora
(100%), 3 horas (70%) y hasta el amanecer (30%).
AUTO: presione este botón para encender el modo de
encendido automático del reflector LED de acuerdo con la luz
exterior (día / noche).
3H, 5H, 8H: Botón de temporizador. Presionar uno de los
botones 3H, 5H, 8H apagará automáticamente el reflector
LED después de 3, 5 u 8 horas.
: Light intensity change 100% - 50%.

Manuel utilisateur
Français
15
Mode d’emploi
Remarque : Vérifiez le bon fonctionnement du produit avant de l’installer.
• Connectez le projecteur LED au panneau solaire. Attention : Le projecteur LED est
équipé d’un capteur nuit/jour qui identifie la tension reçue du panneau solaire. Si le
panneau solaire est exposé à la lumière du jour, le projecteur LED ne s’allumera pas
automatiquement. Le projecteur LED s’allumera automatiquement la nuit. Si vous
déconnectez le projecteur LED du panneau solaire, il s’allumera automatiquement quel
que soit le jour ou la nuit.
• Allumez ou éteignez le projecteur LED en appuyant sur le bouton ON / OFF de la
télécommande. La lumière clignotera deux fois avant de s’allumer ou de s’éteindre.
Remarque : Positionnez la télécommande devant le projecteur LED à une distance de 1 mètre
jusqu’à 15 mètres .
Pose de panneaux solaires
A
B
C
30 - 45°
Installez le panneau solaire sur le toit ou sur le mur. Fixez
le support en forme de U au panneau solaire à l’aide des vis
incluses dans l’emballage.
Remarque : le panneau doit être orienté vers le soleil
(environ 5 à 10 degrés vers le sud-ouest), avec une
inclinaison de 30° à 45° par rapport au plan horizontal.
L’angle d’inclinaison du panneau solaire varie en fonction
delapositiongéographique, de lalatitudeet de la longitude
de l’endroit où il se trouve.
A - Panneau solaire
B - Support de montage en forme de U
C - Mur
Remarque : Le panneau solaire ne doit pas être obstrué par
des bâtiments ou des arbres pour assurer une exposition
continue au soleil. Aussi, n’installez pas le panneau solaire
à l’intérieur.

Manuel utilisateur
Français
16
Installation du projecteur LED
• Fixez le projecteur LED au mur avec les vis
incluses dans l’emballage.
• L’angle d’inclinaison du projecteur LED
peut être ajusté selon les besoins.
• Connectez la fiche mâle à la fiche femelle,
puis serrez l’écrou anti-humidité.
Mises en garde
• Ne pas alimenter le projecteur LED à une source d’alimentation supérieure à 6V
• Ne pas alimenter le projecteur LED sur le secteur 230V AC
• Assurez-vous que le panneau solaire et le projecteur à LED sont solidement fixés pour
éviter les accidents les jours de vent.
• Nettoyez périodiquement la surface du panneau solaire pour assurer une bonne
exposition au soleil
• La batterie peut être complètement chargée par le panneau solaire à partir du soleil dans
les conditions suivantes : AM1.5 - 1000W/m2 - 25°C pendant au moins 8 heures.
AM1.5 = coecient de masse d’air au niveau de la mer
1000W / m2 = intensité du rayonnement solaire
25°C = température de chargement
En automne, en hiver ou par temps nuageux, l’intensité de la lumière du soleil est
considérablement réduite et l’ecacité de charge de la batterie est également réduite,
influençant ainsi la durée de fonctionnement du projecteur à LED.
Dépannage
La lumière ne s’allume pas
• Vérifiez que les fils sont connectés correctement ou qu’ils sont en bon état.
• Vérifiez si la télécommande a une batterie chargée ou si elle fonctionne.
Spécifications techniques
Panneau solaire
Type de panneau Polycristallin
Dimensions 420 x 370 x 17 mm
Poids 520g

Manuel utilisateur
Français
17
Puissance 18 W
Durée de vie Jusqu'à 5 ans
Tension maximale 6V
Projecteur LED
Taille 280 x 230 x 110 mm
Tension d'alimentation 6V
LED 96 LED CMS 5730
Flux lumineux max. 1200 lm
Durée de vie Jusqu'à 50 000 heures
Batterie intégrée Li-Po4 15000mAh 3.2V
Puissance 50W
Courant 1,2 A
Autonomie de la batterie (100%) Jusqu'à 12 heures
Angle d'éclairage 120°
Classe de protection contre l'eau IP65
Description des fonctions de la télécommande
ON / OFF - allume / éteint le projecteur LED
MODE : appuyez sur ce bouton pour activer le mode de
gradation automatique du projecteur LED comme suit : 1
heure (100 %), 3 heures (70 %) et jusqu'à l'aube (30 %).
AUTO : appuyez sur ce bouton pour activer le mode d'allumage
automatique du projecteur LED en fonction de la lumière
extérieure (jour/nuit).
3H, 5H, 8H : Bouton de minuterie. En appuyant sur l'un
des boutons 3H, 5H, 8H, le projecteur LED s'éteindra
automatiquement après 3, 5 ou 8 heures
: Changement d’intensité lumineuse 100% - 50%.

Használati utasítás
Magyar
18
Használati útmutató
Megjegyzés: Telepítés előtt ellenőrizze a termék megfelelő működését.
• Csatlakoztassa a LED-es reflektort a napelemhez. Figyelem: A LED-es reflektor
egy éjszakai / nappali érzékelővel van felszerelve, amely azonosítja a napelemtől
kapott feszültséget. Ha a napelemet napfény éri, a LED-es reflektor nem kapcsol be
automatikusan. A LED-es reflektor éjszaka automatikusan bekapcsol. Ha leválasztja a
LED-es reflektort a napelemről, az automatikusan bekapcsol, függetlenül attól, hogy
nappal vagy éjszaka.
• Kapcsolja be vagy ki a LED-es reflektort a távirányító ON / OFF gombjának
megnyomásával. A lámpa kétszer felvillan, mielőtt be- vagy kikapcsolna.
Megjegyzés: Helyezze a távirányítót a LED-es reflektor elé, 1 méter és 15 méter távolságra.
Napelem telepítés
A
B
C
30 - 45°
Szerelje fel a napelem panelt a tetőre vagy a falra. Rögzítse
az U alakú tartót a napelem panelhez a csomagban
található csavarok segítségével.
Megjegyzés: a panelnek a nap felé kell néznie (kb. 5-10
fokkal délnyugat felé), a vízszintes síkhoz képest 30-45°-
os dőléssel. A napelem dőlésszöge a földrajzi helyzettől,
a hely földrajzi szélességétől és hosszúságától függően
változik.
A - Napelem
B - U alakú tartókonzol
C - Fal
Megjegyzés: A napelemet nem takarhatják el épületek
vagy fák a folyamatos napsugárzás biztosítása érdekében.
Ezenkívül ne szerelje be a napelem panelt.

Használati utasítás
Magyar
19
A LED-es reflektor felszerelése
• Rögzítse a LED-es reflektort a falhoz a
csomagban található csavarokkal.
• A LED-es reflektor dőlésszöge igény
szerint állítható.
• Csatlakoztassa a dugós dugót a
csatlakozódugóhoz, majd húzza meg a
páramentesítő anyát.
Figyelmeztetések
• Ne csatlakoztassa a LED-es reflektort 6 V-nál nagyobb áramforráshoz
• Ne csatlakoztassa a LED-es reflektort 230 V AC hálózathoz
• Ügyeljen arra, hogy mind a napelem, mind a LED-es reflektor biztonságosan rögzítve
legyen, hogy elkerülje a baleseteket szeles napokon.
• Rendszeresen tisztítsa meg a napelem felületét, hogy biztosítsa a megfelelő napsugárzást
• Az akkumulátort a napelem a napfénytől teljesen feltöltheti a következő körülmények
között: AM1,5 - 1000 W / m2 - 25 ° C legalább 8 órán keresztül.
AM1.5 = légtömeg-együttható tengerszinten
1000W / m2 = a napfény sugárzás intenzitása
25 °C = töltési hőmérséklet
Ősszel, télen vagy borús napokon a napfény intenzitása jelentősen csökken, és az akkumulátor
töltési hatékonysága is csökken, ami befolyásolja a LED-es reflektor működési idejét.
Hibaelhárítás
A lámpa nem kapcsol be
• Ellenőrizze, hogy a vezetékek megfelelően vannak-e csatlakoztatva, vagy jó állapotban
vannak-e.
• Ellenőrizze, hogy a távirányítóban van-e feltöltött akkumulátor, vagy működik-e.
Műszaki adatok
Napelem
Panel típusa Polikristályos
Méretek 420 x 370 x 17 mm
Súly 520 g

Használati utasítás
Magyar
20
Teljesítmény 18 W
Élettartam Akár 5 év
Maximális feszültség 6 V
LED reflektor
Méretek 280 x 230 x 110 mm
Tápfeszültség 6V
VEZETTE 96 db SMD 5730 LED
Fény áramlás max. 1200 lm
Élettartam Akár 50.000 óra
Beépített akkumulátor Li-Po4 15000mAh 3,2V
Teljesítmény 50 W
Áram 1,2 A
Az akkumulátor élettartama (100%) Akár 12 óra
Világítási szög 120°
Vízvédelmi osztály IP65
A távirányító funkcióinak leírása
BE / KI - a LED-es reflektor be- és kikapcsolása
ÜZEMMÓD: nyomja meg ezt a gombot a LED-es reflektor
automatikus elsötétítési üzemmódjának aktiválásához az
alábbiak szerint: 1 óra (100%), 3 óra (70%) és hajnalig (30%).
AUTO: Nyomja meg ezt a gombot a LED-es reflektor
automatikus bekapcsolásához a külső világításnak megfelelően
(nappali / éjszakai).
3H, 5H, 8H: Időzítő gomb. A 3H, 5H, 8H gombok egyikének
megnyomása 3, 5 vagy 8 óra elteltével automatikusan
kikapcsolja a LED-es reflektort.
: Fényerősség változás 100% - 50%.
Other manuals for GreenHouse WS55
1
This manual suits for next models
1
Table of contents
Languages:
Other PNI Floodlight manuals