Polimaster PM1406 User manual


PURPOSE
AND SPECIFICATIONS
РМ1406 Food Contamination Monitor (hereafter referred to as
“
I
nstrument
”)
is
intended
to measure the radionuclide activity in various
samples – food stuffs
,
drinking
water
,
convenience
f
oods
,
raw food
materials and so on.
I
nstrument
measures specific (for solid and dry
substances) or volumetric (for liquids)
ac
tivit
y
of 137Cs+134Cs and 40К
nuclides in the
sample
.
Instrument also enables permanent or periodic radiation monitoring of the
ambient radiation background.
•Radionuclides of interest: 137Cs+134Cs; 40К;
•Measuring range of specific activity (volumetric activity) for 137Cs: 10
Bq/kg (Bq/l) to 105 Bq/kg (Bq/l) for background level not more than
0.15 µSv/h;
•Automatic correction for sample density: from 0.2 to 1.6 g/cm3
•Intrinsic error of 137Cs specific activity (volumetric activity)
measurement in the range of 102-105 Bq/kg (Bq/l) is 35% with
confidence probability 0.95;
•Intrinsic error of 137Cs specific activity (volumetric activity)
measurement in the range of 25-102 Bq/kg (Bq/l) is 50% with
confidence probability 0.951);
•Operational temperature range: 0 to +50°С (32 to 122°F);
•Ingress Protection Rating: IP 55 2);
•PC connection and power source: USB 2.0.
_____________________________
1) With Lead Box
2) Marinelli beakers are washable and dishwasher safe. Detector is protected against water jets but
is not waterproof. Use a wet cloth to clean Detector.
Do not immerse Instrument in
water! Do not use dishwasher
to clean detector!
DELIVERY SET
1. Detector, 1 pc
2. Marinelli beakers, 3 pcs
3. Plastic storage container, 1 pc
4. Lead box (optional), 1 pc
5. CD with software (not shown), 1 pc
6. Warranty card (not shown), 1 pc
7. Calibration certificate (not shown),
1 pc.
2

USING THE INSTRUMENT
General information
Take Instrument with Marinelli beakers out of the Plastic storage container
and place it on a level surface. If you are using the Lead box place the
Instrument inside it.
Don't drop the Instrument or Lead box on the floor.
The lead box is extremely heavy!
Insert the supplied CD and install the
РМ1406 software on your Windows-
based PC, laptop or tablet 1). Connect
the Detector cable to the USB port.
_______________________
1) Windows 7, Windows Vista and
Windows XP are currently supported.
Start the РМ1406 software. Background Measurement.
Click the icon to start the software. At initial start the Background
Measurement window will appear. English interface is set by default.
While in Background
Measurement mode, the
Instrument measures the
natural ambient radiation
intensity, which is
determined by cosmic
rays, natural earth
radiation and radiation of
the natural nuclides (in
various ordinary objects
around us). Background
value will be
automatically saved after
required interval is over.
During future
measurements this value
will be automatically
3

subtracted from the sample measurement results to achieve high accuracy
of the activity measurement.
Background level must be re-measured if ambient environment condition or
instrument position changes. Refer to Background Monitoring section for
more information.
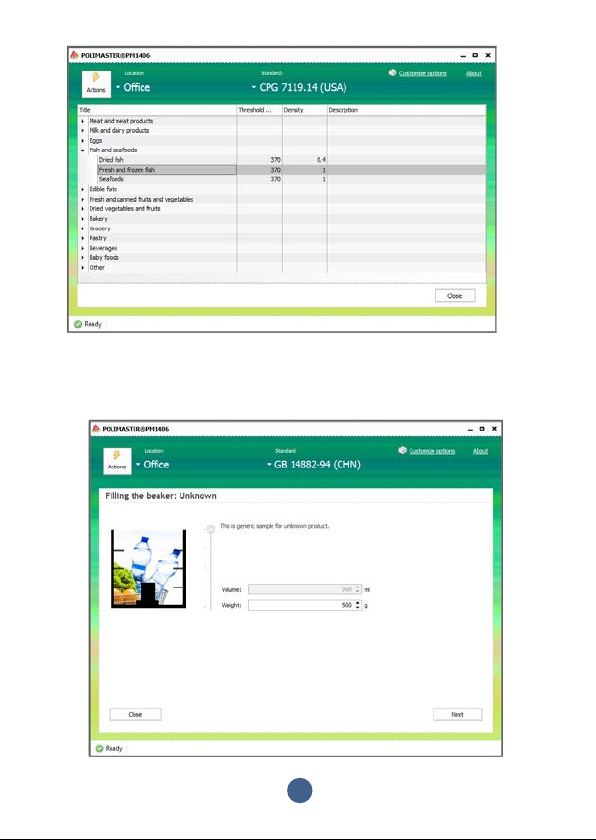
Step 1: Select the appropriate standard (defined by your country) in the
“Standard” drop-down list. Sample activity will be compared to local
regulations according to the selected standard. User can choose between
the standards for long-term measurements with the lead box, as well as for
express measurements without the lead box. Do background measurement
each time a different standard is selected.
Step 2: Select (create) required location or use a currently selected
location.
Step 3: Flag the Resume Measurement check-box if you want the
measurement process to resume after manual interruption or leave it
unchecked if you want to start a new measurement (if measurement will be
resumed, the remaining time will be automatically recalculated).
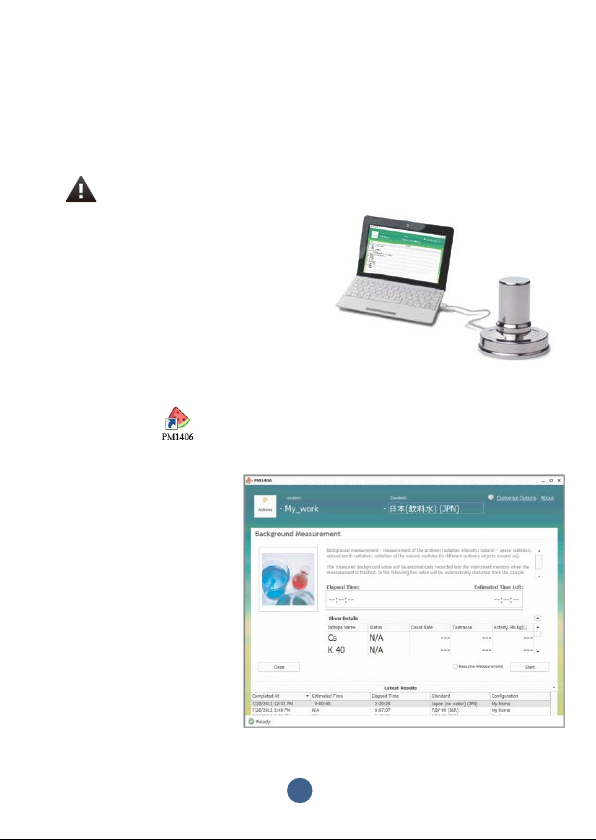
Step 4: Press Start button to initiate the background measurement.
Software will display a current background measurement time (in the
Elapsed Time field) and an approximate time period left to the end of the
measurement (Estimated Time Left field) during the process. Use /
buttons in the Show Details field to see more parameters.
The most important is the Activity, or Bq/Kg(L), parameter. It shows an
approximate level of the activity (137Cs+134Cs and 40К) that can be measured
right away if the background measurement is stopped.
Press Stop button to stop background measurement at any time. The
following dialog window will appear:
•Click Get Back to
resume background
measurement;
•Click Stop to stop
background
measurement;
•Click Stop&Save Data
to stop background
measurement and save
the results in the PC.
If you click Stop&Save Data before the end of the background
measurement interval, measurement will be stopped. Now the Instrument is
able to measure products only with the activity thresholds higher than the
current level of estimated minimum measurable product activity.
4

To measure samples with detection thresholds lower than this current value,
resume or restart the background measurement (see Step 3) to have a
more accurate background value.
The background measurement process can take a long time depending on
selected standard.
Main Program Window
Main Program Window is displayed at software start and each time after
background measurement is completed.
Operation Menu. “Actions” Tab.
Click the Actions Tab to display the following list of functions:
•Home. This item allows returning to the
main program window.
•Background Measurement. Select this
command to initiate the background
measurement function.
•Background Monitoring. Select this
command to initiate background monitoring
function.
5

•Manage Configurations. Create or select location profiles (Location) if
measurement is conducted in different locations.
To create a new instrument location profile after selecting the menu item
Manage configurations click Add button, then in the window enter the new
location name in accordance with the requirements, click Save and close to
save the new location.
Sample Activity Measurement
Sample activity measurement results are automatically compared to
permissible radiation limits (thresholds) of 137Cs+134Cs and 40Кnuclides
content in food stuffs according to selected national standard.
Step 1: Click Browse in the main program window (Sample Activity
Measurement) and select the required product from the list of food types.
The appropriate column shows the predetermined specific density value
and the activity limit (threshold) according to selected national standard.
Double click to select the product.
Select Unknown if the specific product is not listed. Products list contains
only those products which estimated minimum measurable activity allows
making samples measurement.
Determine the product's weight and volume. The beaker should be filled up
with the measured product. If this condition is not met, the measurement
results are approximate. Flag corresponding checkbox(es) to select
required radionuclide(s) (only for unknown products).
6

Your product will be controlled according to the selected nuclide(s). Set
threshold value(s) for the selected nuclide(s) and press Next button. For
listed products press Next button to enter directly the sample activity
measurement mode.
7

Step 2: Prepare the product sample as required. Put the prepared sample
into Marinelli beaker.
To prepare the sample: Clean and chop product as required to enable
sample homogeneity and to properly fill the measuring vessel.
Product type Cleaning Chopping
Meat, fish, roots,
tubers, fruit, culinary
plants, etc.
Wash with running
water, remove
inedible parts
Chop using a knife or a
food processor, etc.
Sausages, cheese,
confectionery
products
Wash with running
water, remove
inedible parts
Chop/grind food using a
knife/food processor/
grater, etc.
Dry products, cereal,
bean, pasta and
bakery products
–
Chop/grind food using
a knife/a food
processor/
grater/coffee-grinder,
8

etc.
Liquid, thick
(viscous) food – Thoroughly mix
Fill the clean, dry Marinelli beaker full with the prepared sample. Place
Marinelli beaker filled with the sample onto Detector and press Next button.
Press Start button in the window to start the sample radiation activity
measurement.
After a while the elapsing current measurement time (Elapsed Time) will be
displayed along with the maximal measurement time (Max. time) and
approximate time remaining until the measurement interval ends
(Estimated Time Left). Use \ buttons in the Show Details field to see
more parameters. The column Threshold, Bq/Kg(L) displays sample
activity limits predefined by selected national regulatory standard. Software
will automatically compare this value with the current activity value of the
product.
If the sample cannot be measured, software will display the Sample can't be
estimated message. This may appear for two reasons:
9

•Background accumulation time was too short (insufficient background
measurement);
•Selected standard doesn't allow current sample estimation.
To correct it, either redo background accumulation, or select another
standard.
If the tested sample is confidently below the limit (Threshold) the sign
will be displayed and the message will appear. See the
screenshot.
At this time the
measurement process will
be automatically prolonged
to ensure accuracy. It may
be stopped at any time.
If the tested sample is
confidently above the limit
(Threshold), the sign
will be displayed and the
message will
appear. See the
screenshot.
10

At this time the measurement process will be automatically prolonged to
ensure accuracy. It may be stopped at any time.
Background Monitoring
Background monitoring enables the user to check whether the ambient
radiation background has changed since the initial background
measurement. The background monitoring process takes significantly less
time than the background measurement process. It is recommended to do
background monitoring periodically (at least once per week or every time
after instrument location is changed) to ensure measurement accuracy. To
set the background monitoring frequency reminder refer to Customize
Options chapter. The Background Monitoring function can also be used
to check the beaker for radiation contamination.
To start background monitoring go to the Actions tab and select the
Background Monitoring command. Click Start to begin monitoring.
If the radiation background hasn't changed, the Completed status will be
displayed. See the screenshot.
If radiation background has changed or the Marinelly beaker has been
contaminated, the following message will be displayed:
Press the Yes button to switch the Instrument to the Background
Measurement mode.
Background monitoring also enables the user to check the Marinelli beaker
for radiation contamination. To do so, first start the background monitoring
function without the beaker. To estimate the radiation level of the beaker,
put it on the Detector and repeat background monitoring. If the Warning!
Background has changed message appears, thoroughly wash the beaker
11

using standard washing liquid. Repeat the Background Monitoring
procedure.
User Settings
Select Customize Options to open the user
settings window. Use a scale slider to select
required frequency for background monitoring:
Never, Before activity measurement, Weekly,
Monthly, Yearly. When the background
checking date is approaching, the Background
monitoring line in the Actions menu will be
displayed in red.
There is also a possibility to select the measurement time depending on the
measurement conditions:
•Auto - measurement time is calculated automatically depending on the
measured background, selected standards and parameters;
12

•Nonstop - measurement is carried out permanently, regardless of the
results;
•Fixed - when this option is activated, there is a possibility to set the
exact measurement time in a separate window:
Checkbox Verification mode exists to carry out the instruments verification.
When you select the checkbox Hide values lower than the minimum
level, measurement results for samples with activity below the minimum
level are displayed as a Not detected conclusion; otherwise they are
presented as a numerical value.
View tab allows you to change the menu language.
Software has the function of checking the availability of information about
new releases for the product. If there is a software update available, the
user can download it from the company's website.
If the checkbox Check update on startup is selected, the notification
window appears automatically each time you start the software.
To check the availability of the updates manually press the Check for
updates button.
In the updates are available, notification window displays the changes
related to the instrument or software, as well as the links for getting more
information and downloading the updated software.
13

Measurement results
Measurements results of the samples activity are stored in the instrument
memory and displayed at the bottom of the main program window in the
table form.
It is possible to save the measurement results using Export function, to
print them using Print function (in the upper left corner of the table), or to
print a report for each particular measurement using the Report function in
the last column of the table.
14

15
Table of contents