manuals.online logo
Brands
  1. Home
  2. •
  3. Brands
  4. •
  5. Pond Logic
  6. •
  7. Lawn And Garden Equipment
  8. •
  9. Pond Logic PondAir 2 Maintenance and service guide

Pond Logic PondAir 2 Maintenance and service guide

PondAir™ 2
PondAir™ 4
1-YEAR WARRANTY
(Item #510403).
MAINTENANCE
1.) Before performing any maintenance or cleaning, always unplug the unit from the power
source.
2.) Compressor Diaphragm: Over time the compressor diaphragm can become worn. This
will greatly reduce the air output of the unit. We recommend to replace the diaphragm
once a year. Replacement Diaphragm Kit #120920. *PondAir™ 4 requires two kits.
TROUBLESHOOTING
If you have loss of airow, check the following:
• Has the air ow regulator been adjusted? Make sure that the air ow regulator hasn’t been
turned down.
• Is the air lter blocked? This can happen if the compressor is placed in a dusty area.
• Are there leaks or blockages in the airline? Check the airline for any signs of leaks or
clogging.
• Is the airline kinked? Make sure there are no kinked restricting air ow.
• Are the air stones clogged? Over time air stones can become clogged and may need to be
cleaned or replaced. (Item #160261)
• If all of the above has been checked and you still have reduced air ow, they more than
likely the diaphragm will have to be replaced.
REPLACEMENT PARTS
REPLACEMENT PARTS ITEM #
Diaphragm Replacement Kit for PondAir™ 2 #120920
Diaphragm Replacement Kit for PondAir™ 4 #120921
Airline, 30’ Roll #490315
Replacement Blue Air Stone #160261
Replacement Check Valve #490316
WARRANTY:
All PondAir™ Pumps carry a 1 year warranty. This limited warranty is extended exclusively
to the original purchaser and begins from the date of original purchase receipt. Air stones,
airline and replacement diaphragms are wearable items and are not covered by this warranty.
Abuse or misuse of this product voids all warranty. Any sign of water damage inside the unit
voids all warranty. For warranty claims, product must be returned to the original place of
purchase with original receipt.
4
Airmax® Ecosystems
Natural. Clear Water. Guaranteed.™
www.airmaxeco.com
Airmax® Ecosystems
Natural. Clear Water. Guaranteed.™
www.airmaxeco.com
Installation & Maintenance
For Models:
• PondAir™ 2
(Item #120915)
• PondAir™ 4
(Item #120916)
073_12
CAUTION: To reduce the risk of electric shock, pull plug
before servicing this pump.
WARNING: Risk of electrical shock, this pump has not
been investigated for use in swimming pool areas. This
pump is supplied with a grounded plug. To reduce the
risk of electric shock: connect only to a properly grounded
receptacle which is serviced by a Ground Fault Interrupter.
• Do not place pump where
it might fall into water.
• Do not place pump
in direct sunshine.
• Do not place pump near
ammable or other
dangerous materials
or objects.
• Use only to pump air.
• Place horizontally and
make sure pump is
above the height of the
water surface to prevent
water siphoning out of
pond.
WARNING
!
SAFETY
• Please read these instructions thoroughly before use. Please note that Airmax® Ecosystems,
Inc. is not responsible for losses, injury, or death resulting from a failure.
• We highly recommend that all pond equipment be plugged into a GFCI (Ground Fault
Circuit Interrupter).
• Pump is not submersible and should be installed where it will not come in contact with
water.
• Close supervision is necessary when the unit is used by or near children.
• Always unplug from the power source when unit is not in use, before cleaning ad before
putting on or taking o parts.
• If an extension cord is necessary, a cord with a proper rating should be used. A cord may
overheat if the power cord is rated for less amperes or watts than the unit rating.
DANGER: To avoid possible electric shock, please follow the
following situations:
• If the compressor falls into the water, DO NOT reach for it. First unplug and then retrieve it.
• If the compressor shows any signs of abnormal water leakage, immediately unplug it from
the power source.
• After installation, the compressor should be examined to be certain that there is no water
on parts not intended to be wet.
• If the power cord has been damaged, DO NOT operate.
IMPORTANT: Airmax® Ecosystems, Inc. is not responsible for losses,
injury or death resulting from a failure to follow these safety
precautions, misuse or abuse of equipment.
TECHNICAL SPECS
MODEL VOLTAGE WATTAGE AIR FLOW MAX AIR
STONE DEPTH
POND SIZE
(GALLONS) ITEM #
PondAir™ 2 120V / 60 Hz 4 Watts 0.15 CFM 2’ Up to 1,000 120915
PondAir™ 4 120V / 60 Hz 8 Watts 0.30 CFM 2’ Up to 2,000 120916
INSTALLATION
1.) Place the PondAir™ aeration pump on a stable, level surface
above the water level in your pond. The PondAir™ aeration
pump should be covered with the recommended faux rock
or similar. Position in a shaded area, free from excessive dust
and moisture. Failure to properly cover the compressor will
void the warranty.
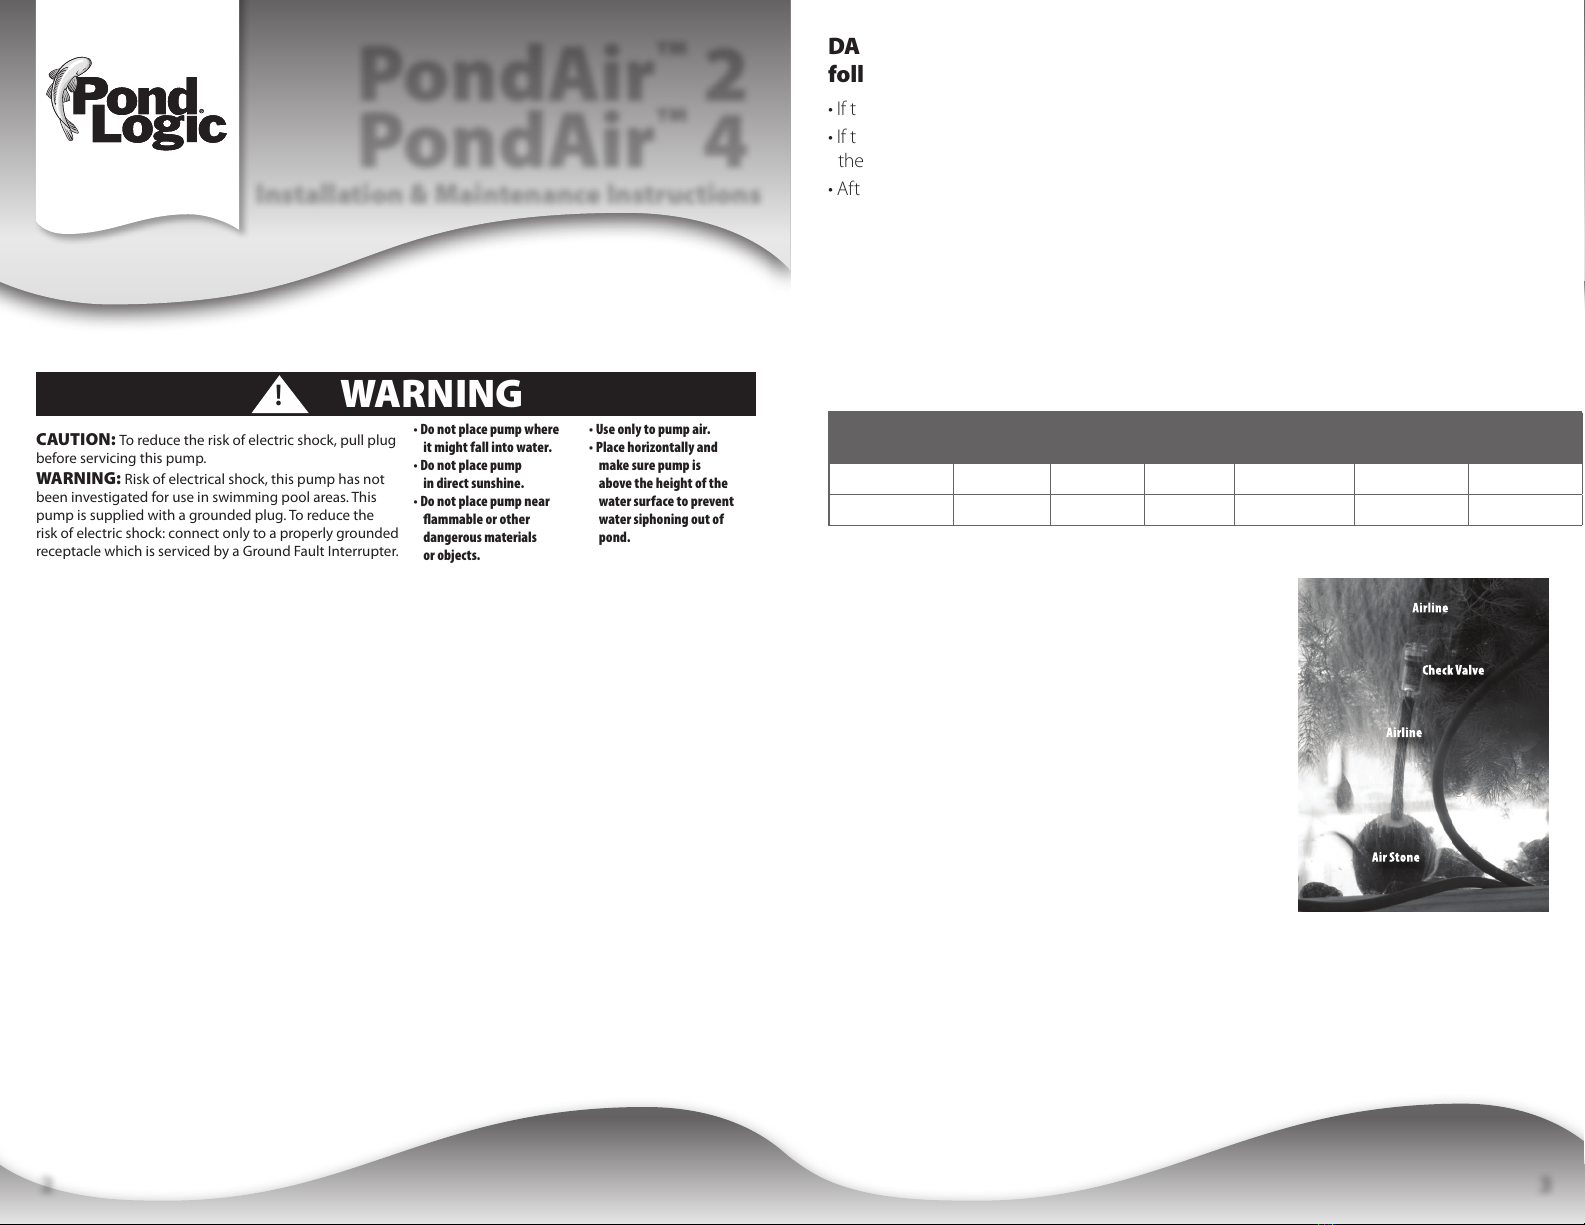
2.) Connect one end of each included air line to the outlets on
the PondAir™ aeration pump.
3.) Cut approximately 8” o each airline. Place a check valve onto
the end of each air line that is connected to the pump.
4.) Connect an air stone to each 8” section of airline and connect
to exposed end of check valve.
5.) Plug the pump into a standard 120 volt GFI outlet.
6.) Position air stones evenly around your pond to provide idea
aeration and circulation.
NOTE: For best results and to prolong the life of the compressor, we
recommend to cover the compressor with a Mini Faux Rock Cover
PondAir™ 2
PondAir™ 4
Installation & Maintenance Instructions
32

This manual suits for next models

3

Other Pond Logic Lawn And Garden Equipment manuals

Pond Logic KoiAir 1 User manual

Pond Logic

Pond Logic KoiAir 1 User manual

Pond Logic PondShelter 160350 User manual

Pond Logic

Pond Logic PondShelter 160350 User manual

Popular Lawn And Garden Equipment manuals by other brands

Draper GTP33 user manual

Draper

Draper GTP33 user manual

GARDEN POWER 274-5093 Operator's manual

GARDEN POWER

GARDEN POWER 274-5093 Operator's manual

Reimo PLAYA AIR 300 quick start guide

Reimo

Reimo PLAYA AIR 300 quick start guide

Victor Tools H070 Assembly instructions/Instructions for use

Victor Tools

Victor Tools H070 Assembly instructions/Instructions for use

Toro 30639 installation instructions

Toro

Toro 30639 installation instructions

Linn Aqua-Hobby operating instructions

Linn

Linn Aqua-Hobby operating instructions

Toro 08731 Operator's manual

Toro

Toro 08731 Operator's manual

Zenoah BCZ260L Operator's manual

Zenoah

Zenoah BCZ260L Operator's manual

Blastrac BMP-G250-X operating instructions

Blastrac

Blastrac BMP-G250-X operating instructions

Greemotion Tripott CARE AND HANDLING INSTRUCTIONS

Greemotion

Greemotion Tripott CARE AND HANDLING INSTRUCTIONS

Bosch Isio Original instructions

Bosch

Bosch Isio Original instructions

Simplicity 1694152 Illustrated parts list

Simplicity

Simplicity 1694152 Illustrated parts list

vita KEYHOLE GARDEN instruction manual

vita

vita KEYHOLE GARDEN instruction manual

Davaon Pro Bypass Secateurs USER and CARE INSTRUCTIONS

Davaon

Davaon Pro Bypass Secateurs USER and CARE INSTRUCTIONS

Gardigo 62360 instruction manual

Gardigo

Gardigo 62360 instruction manual

Toro procore sr54 Operator's manual

Toro

Toro procore sr54 Operator's manual

Hozelock Green Power manual

Hozelock

Hozelock Green Power manual

Tumbleweed 000014 Assembly instructions

Tumbleweed

Tumbleweed 000014 Assembly instructions

manuals.online logo
manuals.online logoBrands
  • About & Mission
  • Contact us
  • Privacy Policy
  • Terms and Conditions

Copyright 2025 Manuals.Online. All Rights Reserved.