pool spa warehouse The Pool WizardSuction Cleaner User manual

The Pool Wizard
Suction Cleaner
BY DAVEY
Installation and Operating
Instructions
Please pass these instructions on to the operator of this equipment.
WARNING: Failure to follow these instructions and comply with all applicable
codes may cause serious bodily injury and/or property damage.
The installation of this product should be carried out by a person knowledgable
in swimming pool plumbing requirements following the installation instructions
provided in this manual.

2
Contents Page
1. Warnings and Tips ....................................3
2. Cleaner Components ..................................4
3. Cleaner Assembly ....................................5
4. Hose Assembly .....................................6
5. Cleaning and replacing the diaphragm
and/or diaphragm connection ...........................6
6. Cleaner connection to dedicated suction line ...............8
7. Cleaner Connection to the skimmer box ...................8
8. Pressure regulator and hose weight application .............9
9. Maintenance & Winterising ............................10
10. Trouble shooting ....................................11

3
1. WARNINGS & TIPS!
Please read the warning notices very carefully because they provide
important information regarding safety in installation, maintenance and
use of the Suction Cleaner.
Keep this manual in a safe place, so that it will always be available for
further consultation.
• THIS IS NOT A TOY!
• Do not let children use or play with the
cleaner.
• Do not allow swimming in the pool during
cleaner operation.
• TURN OFF THE PUMP before connecting
cleaner to the pool.
• If there are stones, roots or metal
corrosion in contact with the underside of
the liner, clean them out before installing
the cleaner. If necessary, have a qualied
professional do the cleaning.
• If the liner is brittle, damaged or wrinkled,
have a qualied professional perform the
necessary repairs or liner replacement
before installing the cleaner.
• Make sure the cleaner is not in the pool
during any chemical sanitisation.
• TURN OFF THE PUMP before servicing the
cleaner or performing any maintenance.
Preparation before cleaner operation:
• Close the pool main drain line
• Make sure the pump lter basket and pool lter are clean
• Make sure the hoses are straight. If necessary, place the hoses under
sunlight for a few hours

4
2. Cleaner Components
Item Description Quantity
A & B Cleaner Support & Foot Pad 1
C Cleaner Diaphragm Chamber 1
DCleaner Top Ring-Bumper 1
E Cleaner Skirt/Mat 1
F Cleaner Hose Swivel Connector 1
G Cleaner Hose Weight 1
H Cleaner Skimmer Plate 45oElbow 2
ICleaner Hose Cuff Adaptor/
Vacuum Plug 1
J Cleaner Pressure Regulator 1
K
Cleaner Hose for connection to the
Top Ring Bumper (D) Diaphragm
Chamber (C) and Hose Swivel (F)
1
LCleaner Hose for connection to the
back of the Hose Swivel (F) 1
M Cleaner Hose lengths 12

5
3. Cleaner Assembly
Place the mat “E” under the cleaner support “A” and make sure the ns are
pointing upwards. Start by inserting the inner edge of the mat into the front
groove of the foot pad “B”. Stretch and insert the mat all around the groove.
The mat should be secured in the groove and free to rotate on the foot pad.
Insert the diaphragm chamber “C” into the support “A”. Align the side pins on
diaphragm chamber with the notches on the support “A”, and continue to in-
sert the chamber into the chamber of the support. Follow the arrow direction of
marking “ ” to turn the chamber until it stops.
Place the top ring “D” on a at surface with its marking “TOP” facing upward.
Insert either end of hose “K“ into the central hole of the top ring until its hose
cuff is secured by the tabs. Insert the cuff on top of diaphragm chamber “C”
into the end (with top ring) of hose “K” as far as it can go. Insert the end of
swivel connector “F” as shown into the other end of hose “K” as far as it can go.
2
3
1

6
4. Hose Assembly
First, lay down all hose sections on the ground under sunlight for about
an hour to remove hose memory. Second, measure your pool to gure out
total length of hose needed for cleaner operation. Total length of hose after
assembly should be half to one hose section length longer than the length
measured from skimmer/dedicated suction line to the farthest point in the pool.
The hoses are connected by inserting the male cuff of one section of hose into
the female cuff of the next hose. To remove the entrapped air inside the hose,
connect each hose section under the water. Start by connecting male cuff of
one hose “M” to the female cuff of another hose “M”. Finish all hose “M”
and “L” connections in sequence as shown. Female cuff on “L” is to connect
to the pressure regular “J”. After nishing the hose assembly, immerse the
cleaner into the water. When bubbles stop coming from the cleaner, connect
the female cuff of the hose “M” to the swivel connector “F”.
5. Clearing The Diaphragm And Diaphragm Connection Tube
Follow arrow direction of marking “ “ to turn the diaphragm chamber to
release it from locking position. Remove it from the support “A”.
1
2
1

7
Unscrew the screw cap of diaphragm chamber “C” and take it out. Take out
the chamber extension tube and push the inside tube (diaphragm connection
tube) forward to expose diaphragm completely. Hold the inside diaphragm
connection tube (instead of diaphragm) to pull it out completely.
Pull out the diaphragm from the connection tube. Squeeze the diaphragm a
bit and then take out the retaining ring. Now you can clear the inside of the
diaphragm and connection tube.
Notice: Never put sharp objects inside diaphragm
which may damage it and then affect the cleaning
function.
After clearing the diaphragm and connection tube, reverse the steps to assemble
back the diaphragm chamber. Make sure the retaining ring is on the diaphragm.
Note: Please follow this procedure when and
if replacement of the membrane diaphragm is
required.
2
3

8
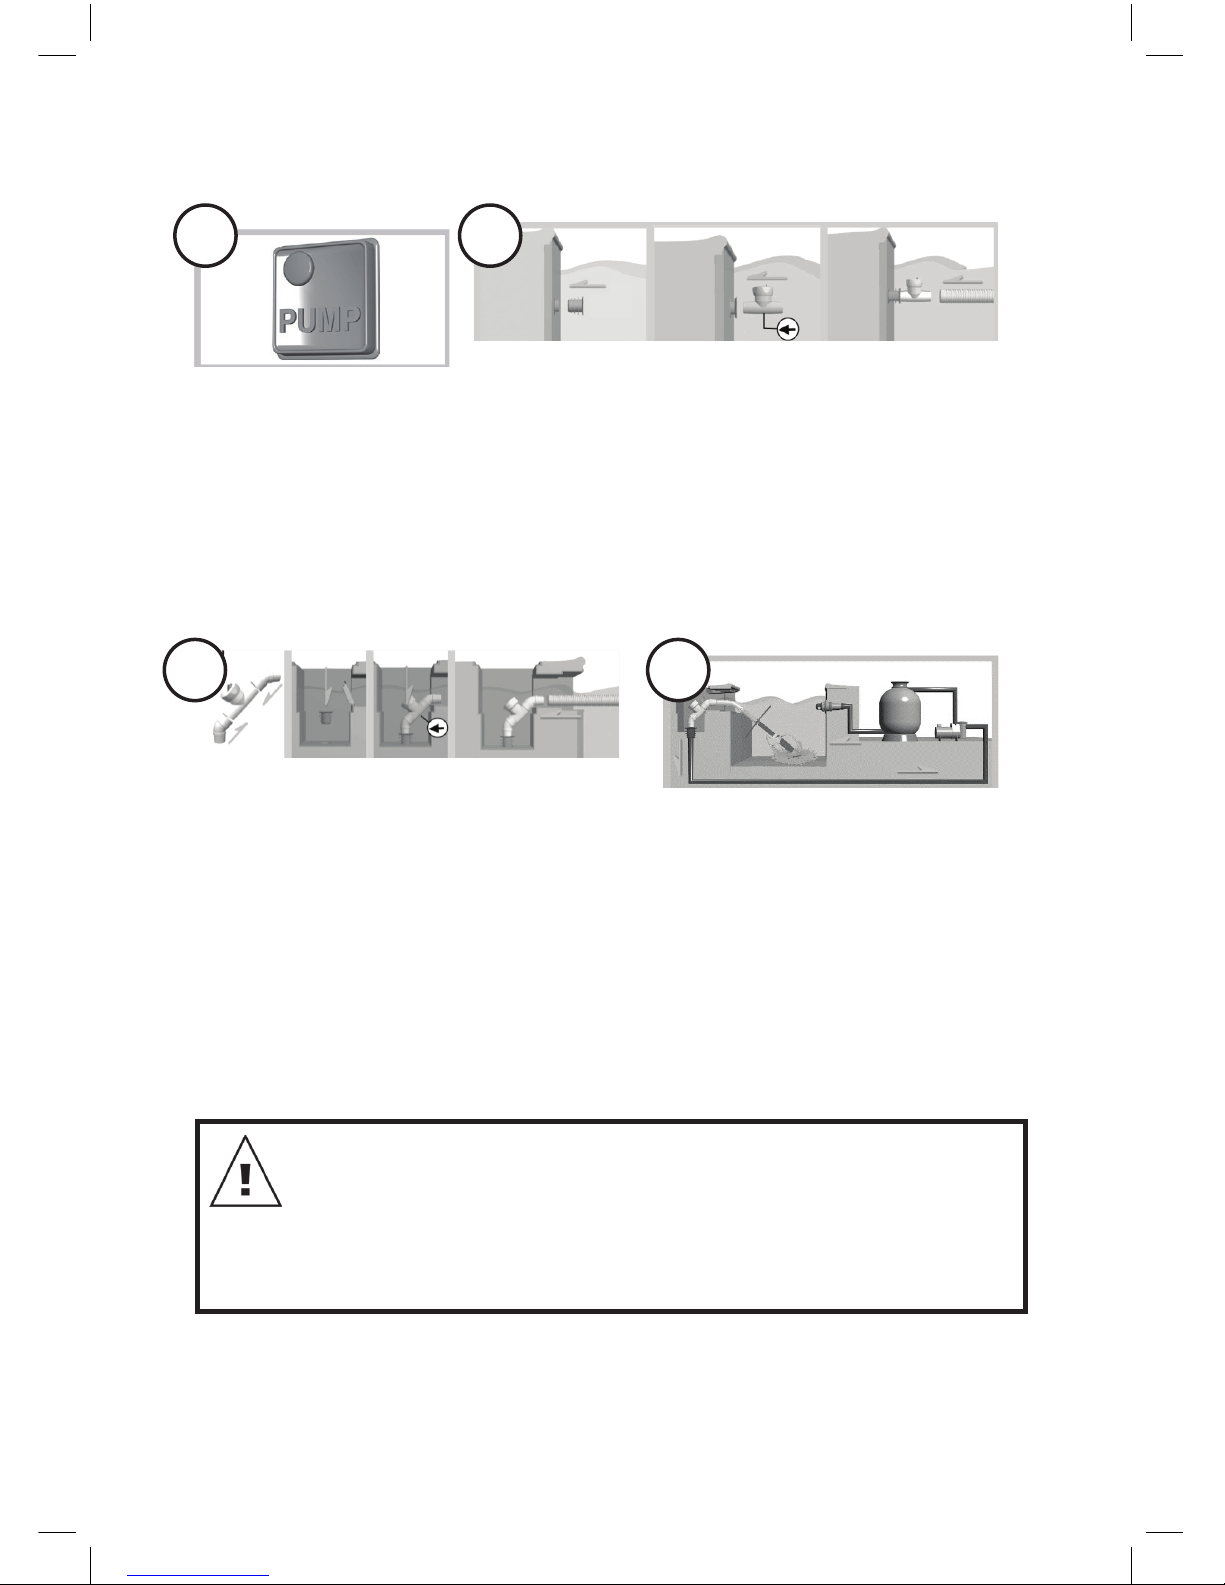
6. Cleaner Connection To Dedicated Suction Line
Turn OFF your pool
pump
If your skimmer is equipped with a dedicated
suction line, insert the vacuum plug “I” into the
vacuum hole rst and then attach the pressure
regulator “J” into the plug “I” by following the
arrow marking on pressure regulator bottom.
Finally, attach the hose “L” to this regulator as
shown.
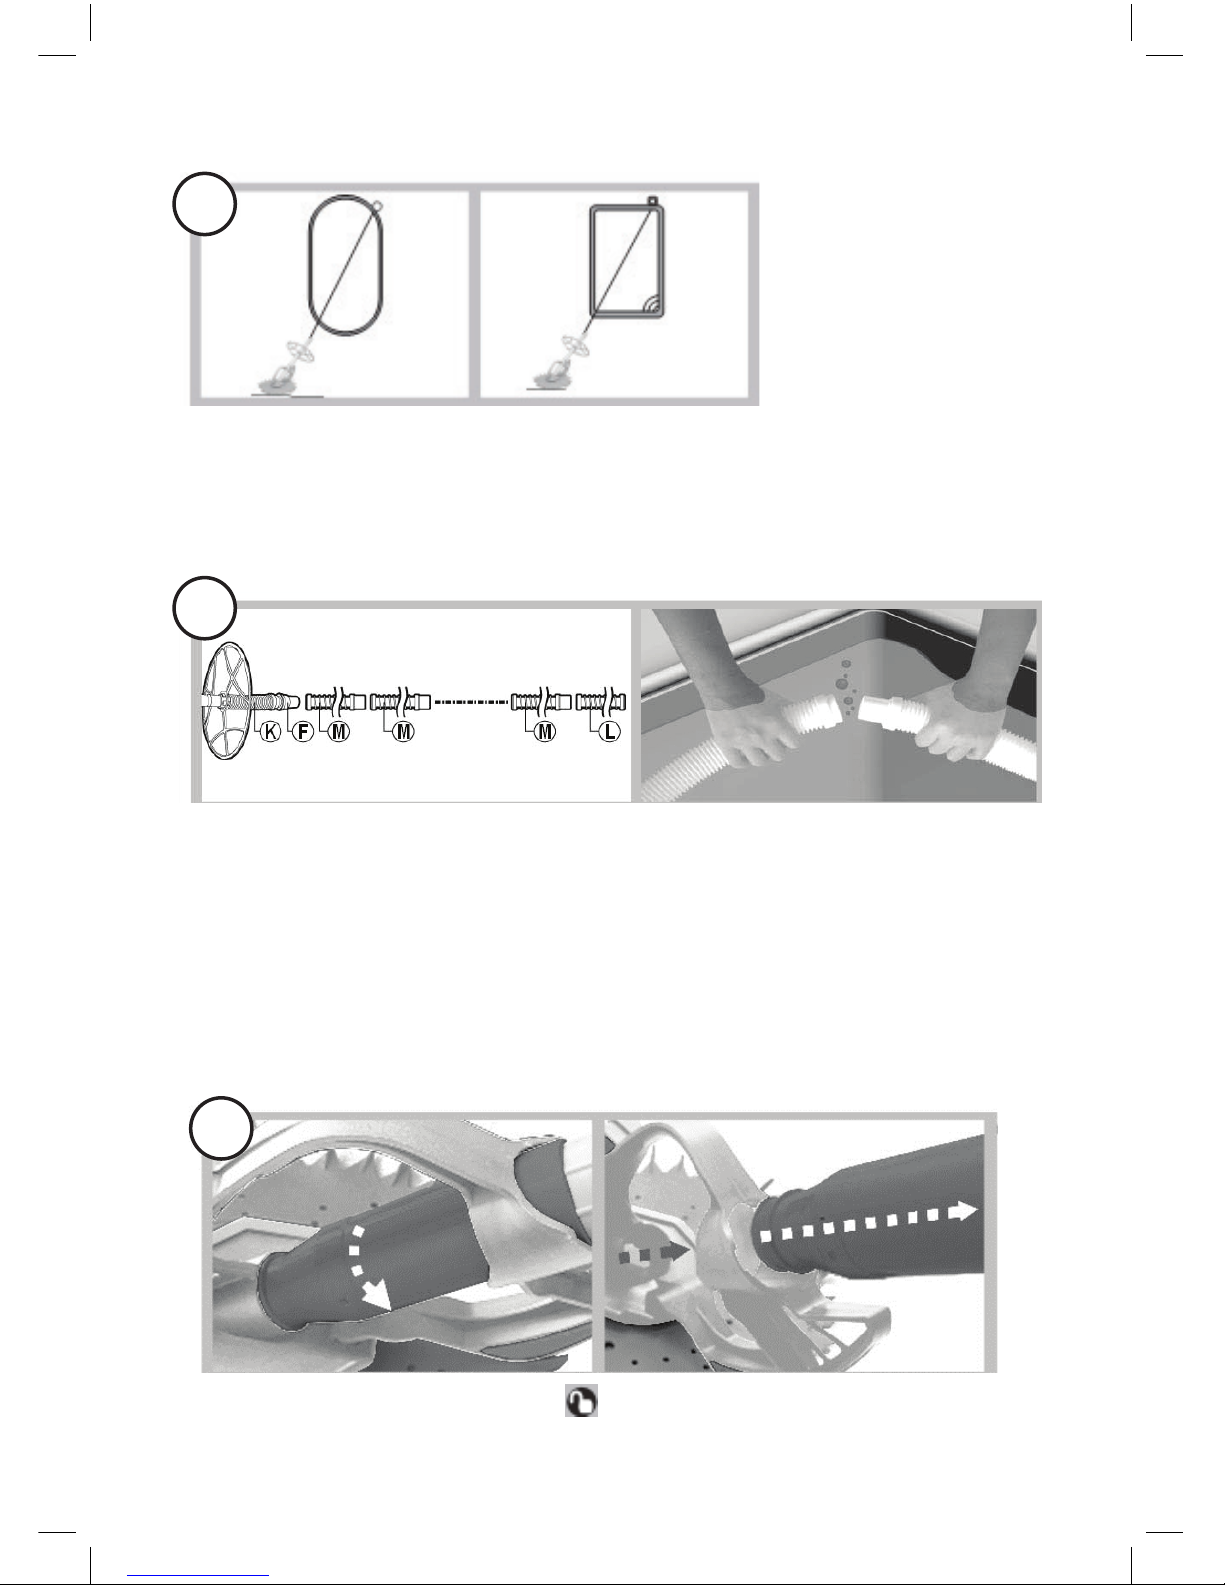
7. Cleaner Connection To Skimmer
To connect your cleaner to your pool
skimmer, remove the basket and
vacuum plate and insert vacuum plug
“I” into the hole. Assemble the elbow
“H” on both ends of pressure regulator
“J”. Follow the arrow marking on the
pressure regulator to connect the
corresponding elbow to the vacuum
plug and then connect the other elbow
with hose “L” as shown.
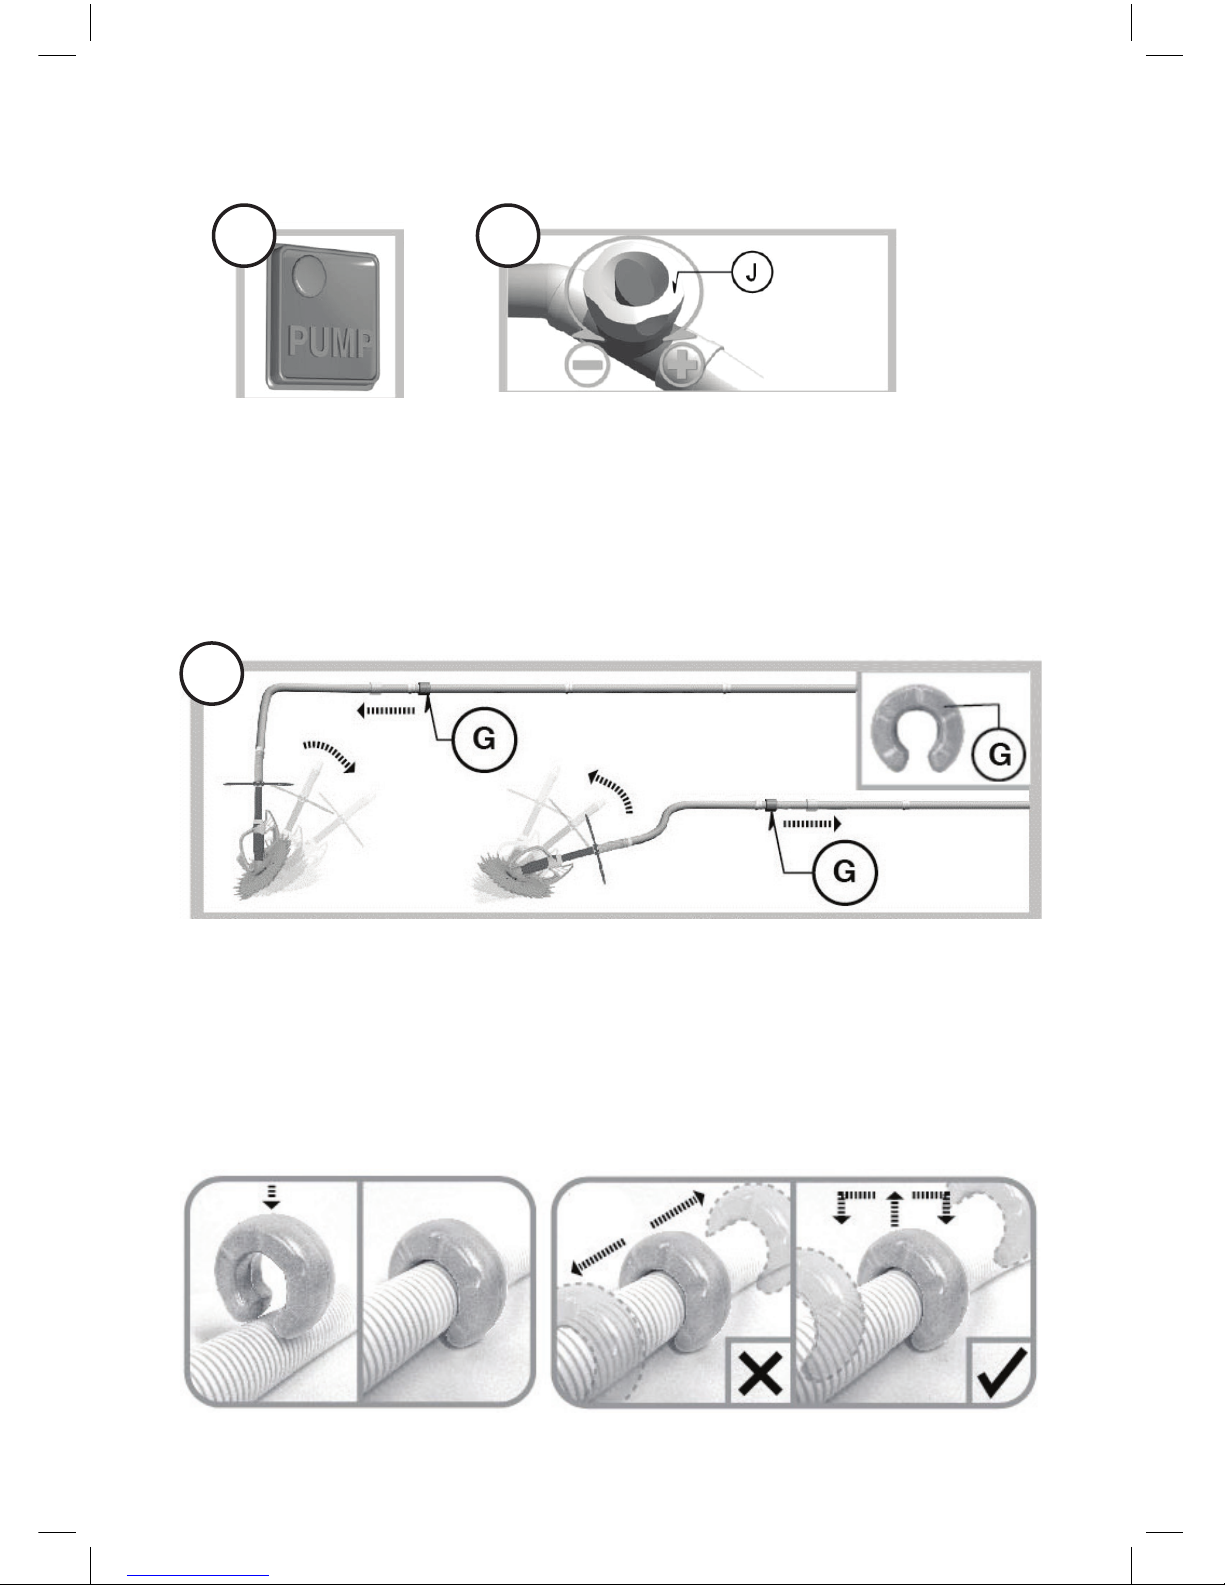
Set your ltration system
to the vacuum setting. To
operate properly, the pump
must have a minimum power
of 0.75 HP and ltration
system ow should not be
less than 6m3h(100 lpm) .
21
1 2
NOTE: The pressure regulator should be below
the water level. If the pressure regulator is out of
the water level after following above instruction,
you may connect the pressure regulator directly
to the vacuum plug.

9
8. Pressure Regulator And Hose Weight Application
Turn on the pump
and relax as your
cleaner cleans your
pool.
Too much suction may cause the hose to
compress and restrict water ow, collapse or
the cleaner to stick to the pool bottom or wall.
Too little suction may cause the cleaner to
move slowly or not climb the wall.
Turn the pressure regulator clockwise to
increase the suction and vice versa to reduce
the suction as needed.
The best position of the cleaner in the water is when its mat “E” is resting at
on the pool oor (about 45 degree angle from the main body to the pool oor).
Adjust the hose weight “G” location on the hose to control hose buoyancy.
Place the hose weight after the female cuff of the second hose section “M”
from the cleaner. If the cleaner leans forward, you can move the hose weight
towards the cleaner. If the cleaner leans backward, you can move the hose
weight further away from the cleaner.
1 2
3

10
Note: Do not try to slide the hose weight “G” along
the hose as it could damage the hose or itself. Pull
the hose upward to detach it from the hose
9. Maintenance & Winterising
• Never coil the hoses.
• Never fold or roll the mat.
• Use clean water to rinse the cleaner after every use.
• Periodically inspect the cleaner parts and accessories. Replace damaged
parts before next use.
• For winterising, drain all water from the cleaner and accessories. Detach the
mat from the cleaner and store it at. Disconnect hose sections and store
them straight. Store the cleaner and all accessories in a place away from
direct sun light.

11
10. TROUBLE SHOOTING
Problem Solution
Cleaner does not move
or moves slowly
Check if any air bubbles come from the pool re-
turn line and appear in the pump. Consult a pool
professional on how to remove the air.
Check if any air bubbles come from the hose
connections and ttings. Tighten the connections
and ttings again. Make sure all assemblies are
connected correctly.
Check if power of the pump is too weak. Check
with pump dealer.
Check if the pump basket, skimmer basket and
pool lter are full. Clean them if necessary.
Check if diaphragm is clogged or damaged.
Clean it or replace it if necessary.
Make sure the main drain is closed.
Check if the pressure regulator is over releasing
the water ow. Turn the pressure regulator clock-
wise to increase the water ow (suction)
Cleaner does not climb
the wall
Turn the pressure regulator clockwise to increase
the water ow (suction).
Check if the hose weight is at the right position.
Adjust its location as instructed in manual if nec-
essary.
Check if the mat is damaged. Replace with a
new one if necessary.
NOTE: Cleaner may not climb soft walls in some
vinyl pools or pools with safety ledges.
Cleaner’s movement
does not cover entire
pool
Make sure the hoses are not kinked or coiled.
Lay the hoses under sunlight to straighten the
hoses.
Make sure the hose total length is enough per
instruction in the manual.
Turn the eyeball of return tting to face down-
ward.
Check if the hose weight is at the right position.
Adjust its location to make sure the mat is resting
at.

12
Pool & Spa Warehouse Repair or Replacement Guarantee
In the unlikely event that this product develops any malfunction within one year of the date of
original purchase due to faulty materials or manufacture, Pool & Spa Warehouse will at our option
repair or replace it
for you free of charge, subject to the conditions below.
Should you experience any difculties with your cleaner, we suggest in the rst instance that you
contact the Pool & Spa Warehouse. Alternatively you can
send a written letter to the addresses
listed below. On receipt of your claim, we will seek
to resolve your difculties or, if the product is
faulty or defective, advise you on how to have your product repaired, obtain a replacement or a
refund.
Your One Year Guarantee naturally does not cover normal wear or tear, replacement of product
consumables (i.e. membrane diaphragm, skirt, top ring bumper or hoses), loss or damage
resulting from misuse or negligent handling, improper use for which the product was not designed
or advertised, failure to
properly follow the provided installation and operating instructions, failure
to carry out maintenance, corrosive or abrasive water or other liquid, or unauthorized persons
attempting repairs. Where applicable, your product must only be connected in the way set out in
this manual.
Your One Year Guarantee does not cover freight or any other costs incurred in making a claim.
Please retain your receipt as proof of purchase; you MUST provide evidence of the date of original
purchase when claiming under the Pool & Spa Warehouse One Year Guarantee.
Pool & Spa Warehouse shall not be liable for any loss of prots or any consequential, indirect
or special loss, damage or injury of any kind whatsoever arising directly or indirectly from the
products. This limitation
does not apply to any liability of Pool & Spa Warehouse for failure to
comply with a consumer guarantee applicable
to your product and does not affect any rights or
remedies that may be available to you under Consumer Legislation in your state, territory or
country.
If in Australia, you are entitled to a replacement or refund for a major failure and for compensation
for
any other reasonably foreseeable loss or damage. You are also entitled to have the goods
repaired
or replaced if the goods fail to be of acceptable quality and the failure does not amount
to a major failure.
Should your product require repair or service after the guarantee period; contact Pool & Spa
Warehouse on the number listed below.
The Pool & Spa Warehouse
39 Forge Street, Blacktown NSW 2148 Australia
poolandspawarehouse.com.au
Tel: 1300 766 619
* Installation and operating instructions are included with the product when purchased new.
P/N 402692
Table of contents