Pop-A-Shot Home Dual Shot User manual

HOME | DUAL SHOT
OWNER’S MANUAL

Tools
Required
Phillips Head Screwdriver (Not included)
Flat Head Screwdriver (Not included)
Allen Wrench (Included)
Wrench (Included)
Tip: The included tools will certainly do the job,
but you probably have better tools of your own.
Recommended (but not required)
Electric Screwdriver
Tip: Make sure to set the tool to a very
low torque to prevent damage to the game.
Socket Wrench Set
Level
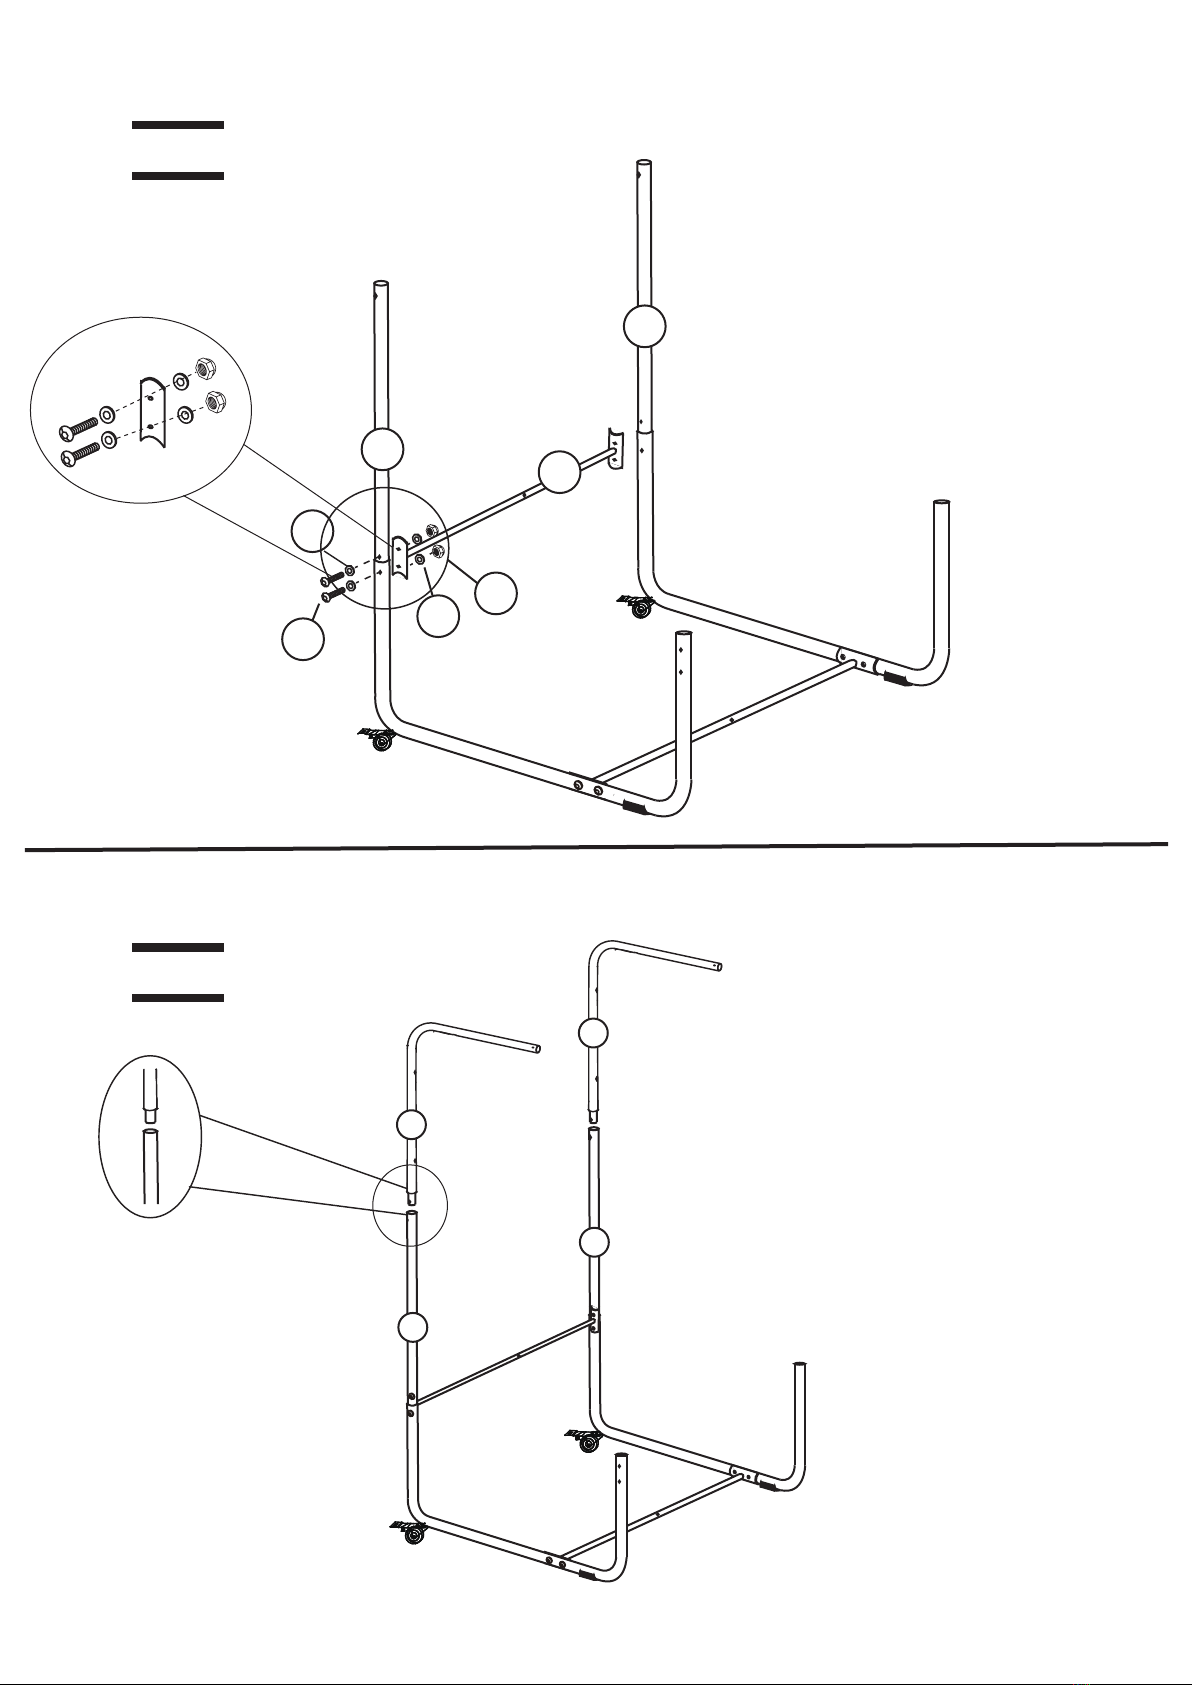
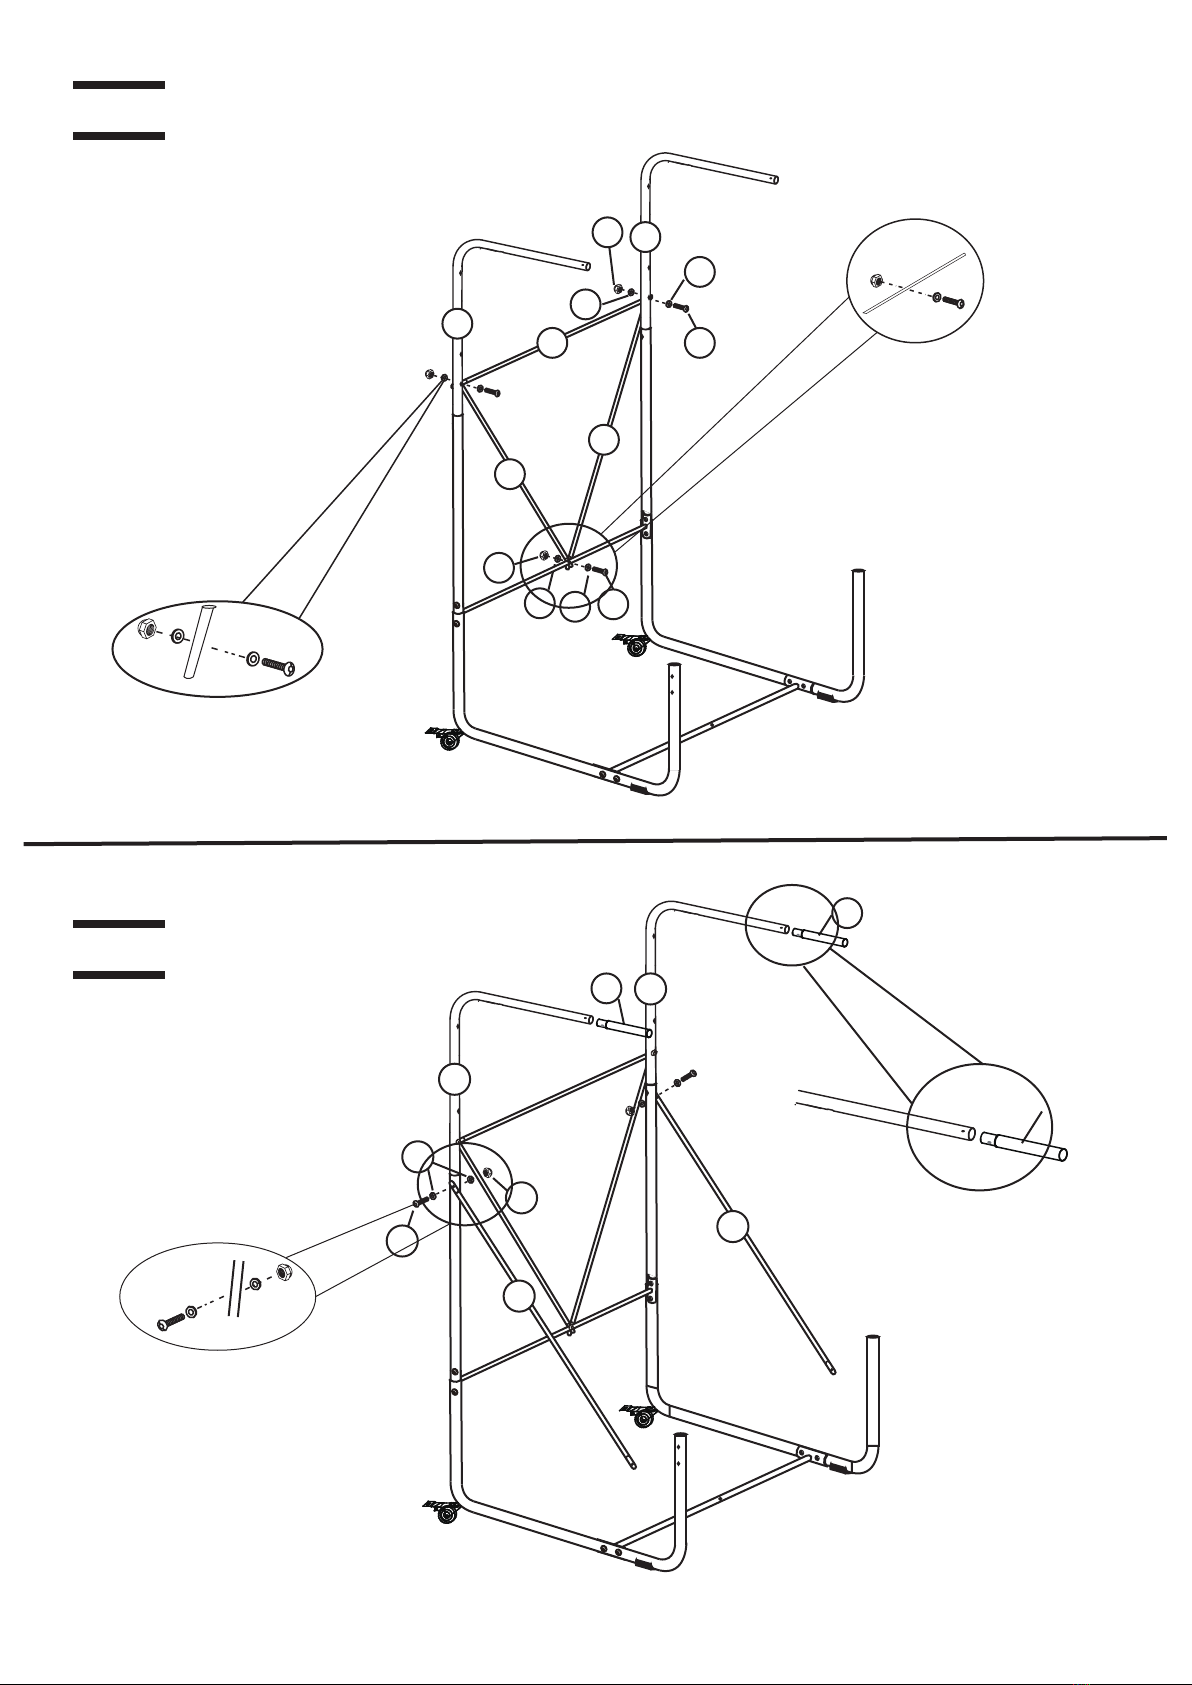
Assembly Instructions
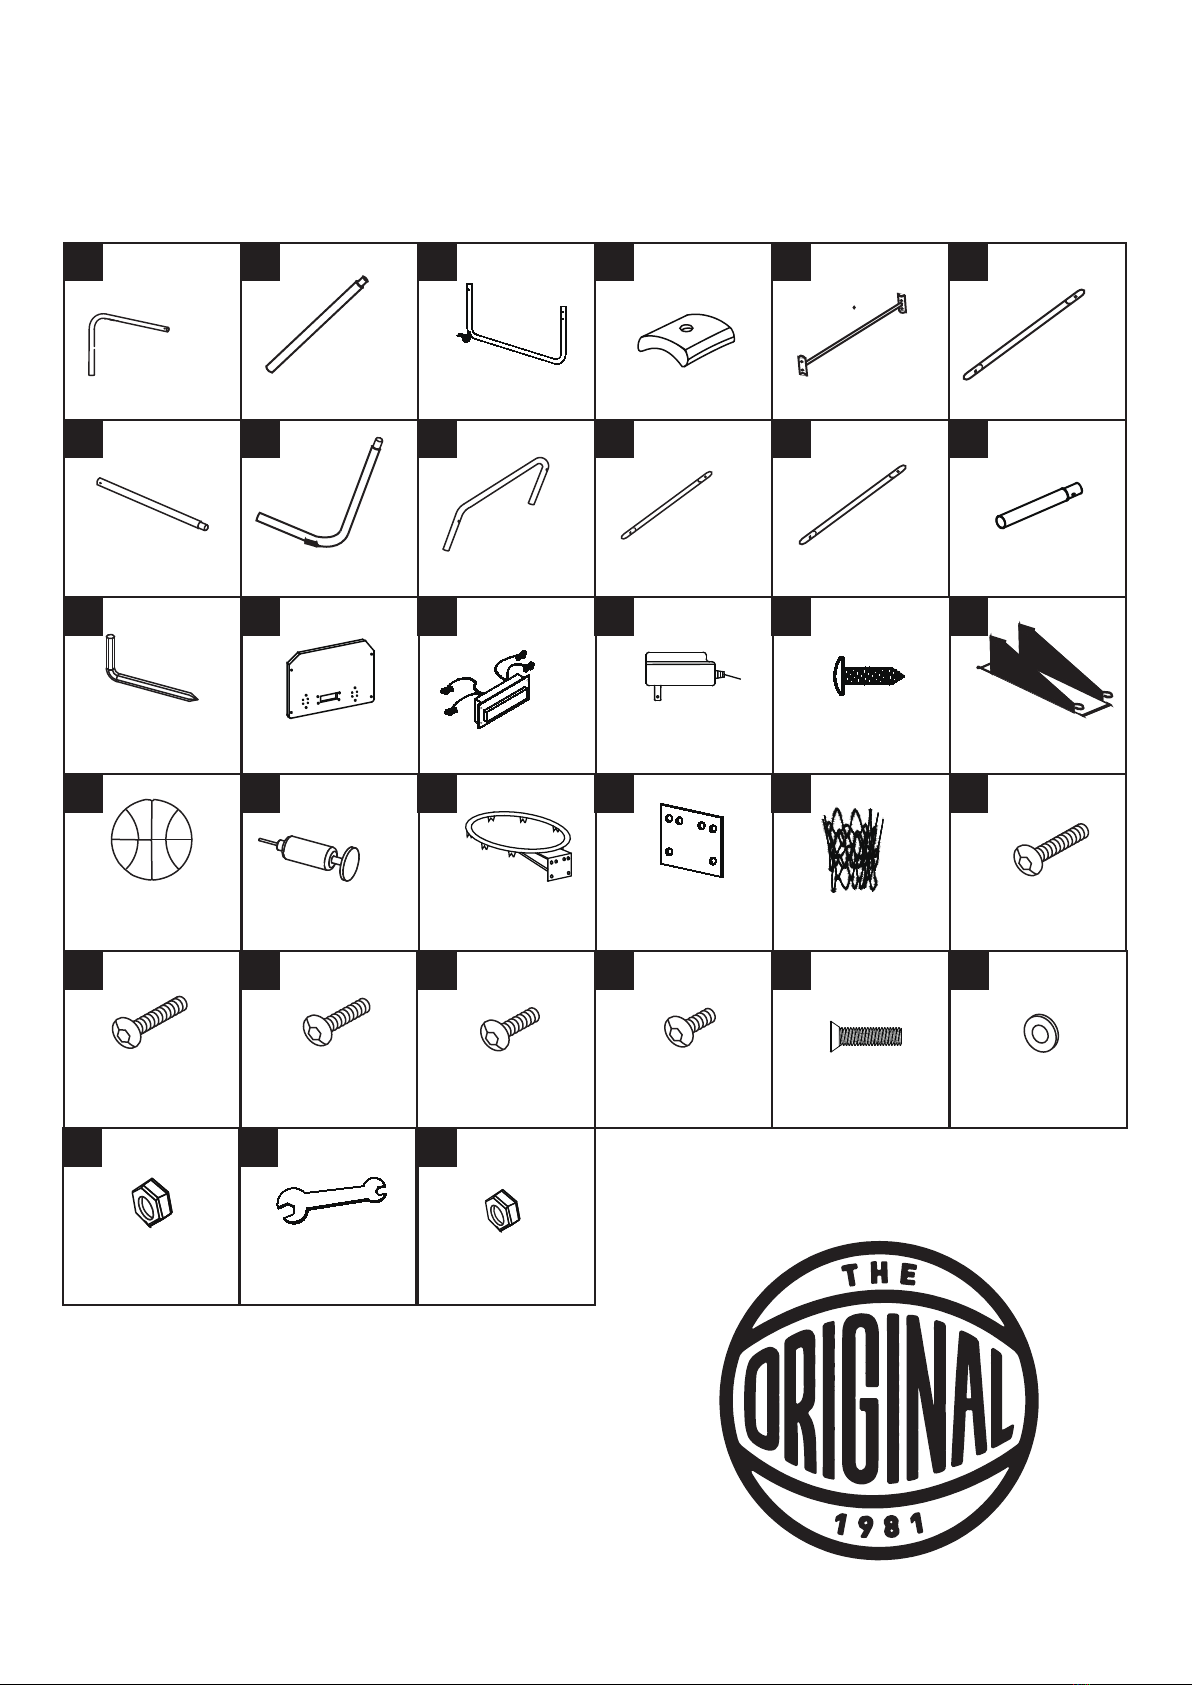
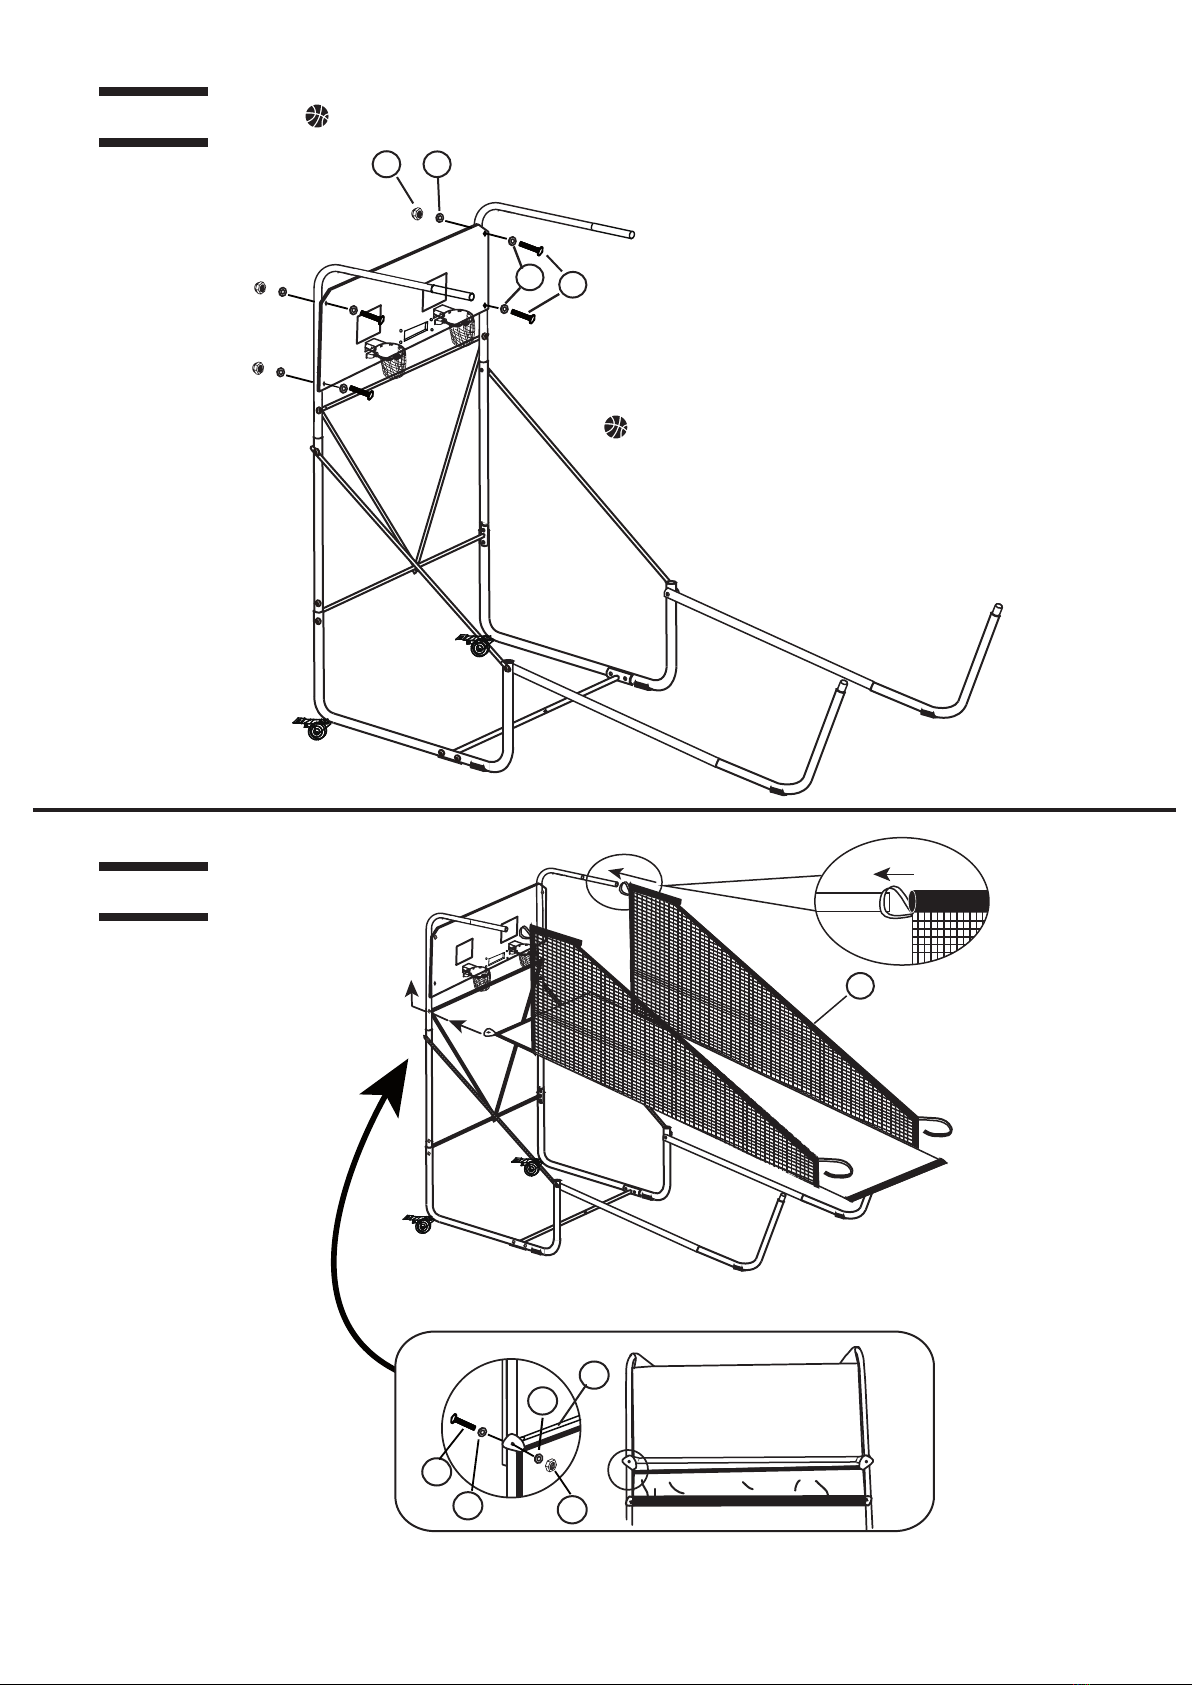
Remove all the parts from the box and verify that you have all of the listed parts as shown on the parts list page.
Find a clean, level place to begin assembling your Pop-A-Shot Home Dual Shot game.
Tip: Carefully cut or tear the four corners of the box so that the bottom can be used as your work surface.
Like most things in life, putting together your Pop-A-Shot Home Dual Shot is better when done with a friend.
Tip: If you can’t nd someone to help for the entire time, at least try to get help at certain times
(we’ll tell you when).
A few notes before we get started:
Tip: Before putting your game together, please visit our Support Page at www.pop-a-shot.net/support/homedual.
There you’ll find more hints and hacks to help you put together your new game.
We hope you love your Pop-A-Shot Home Dual Shot and will let your friends and family (and any review sites)
know how you feel. If you do have a problem (and it happens), please let us know first and give us a chance to fix it.
P: 785.827.6229
Now let’s put this thing together
Read all instructions: All the safety and operating instructions should be read carefully before this
product is operated or played.
Caution: This is not a toy and is intended for use by or under the supervision of adults. Adults should
review safety guidelines with children to avoid possible risk of electric shock or other injuries.
Recommend: The game should be periodically examined for conditions that may result in the risk of fire,
electrical shock or injury to persons. In the event such conditions exist, the game should not be used
until properly repaired.
Storage: This product is made from wood-based components and is sensitive to extreme temperatures
and moisture/humidity. Subject to these conditions will eect game play, appearance and longevity.
IMPORTANT SAFETY INSTRUCTIONS

Extra Long Bolt
123456
7 8 9 10 11 12
13 14 15 16 17 18
19 20 21 22 23 24
25 26
31 32
27 28 29
pre-installed Connector Tube Cross Tube
Top Tube Board Tube Base Tube
Cross Bar Side Arm Forward Tube
Side Tube
Allen wrench
RampTube
Back Board
Balls
Nut
BoltBolt Bolt Medium Bolt Bolt Washer
Pump Rim Back Plate Net
Score Unit Adapter Screws Ball Return Ramp
Lean Bar
PARTS LIST
x2 x2 x2 x4 x2 x4
x1 x2 x2x2 x2 x1
x1 x1 x1 x1 x8 x1
x7
x4
x1 x2 x2 x2 x2
x4 x14 x8 x1 x58
x29 x1
Wrench
30
Nut
32
x4
33 32

STEP 1
Fig. 1A
Fig. 2A
3
Attach the Base Tubes (#3) with one Connector Tube (#5) using
a Bolt (#26), two Washers (#30) and a Nut (#31) (Fig. 1A).
Attach the Board Tubes (#2) to the
Base Tubes (#3) using the spring locks (Fig. 2A).
3
3
3
4
2
2
26 30
30
31
5
STEP 2

Fig. 3A
Fig. 4A
Attach the Board Tubes (#2) and Base Tubes (#3)
with the other Connector Tube (#5)
using a Bolt (#26), two Washers (#30)
and a Nut (#31) (Fig. 3A).
Attach the Top Tubes (#1) to the
Board Tubes (#2) using the spring
locks (Fig. 4A).
2
2
26
30
30 31
2
2
1
1
5
STEP 3
STEP 4

Fig. 5A
Fig. 6A
Fig. 6B
Fig. 5B
31
28
30
30
26
30
30
31
26
31
12
12
1
1
6
6
6
1
1
11
11
30
Attach two Cross Tubes (#6) to one Board Tube (#1)
using a Bolt (#26), two Washers (#30)
and a Nut (#31) (Fig. 5A).
Then take one of those attached
Cross Tubes and attach its other end
to the other Board Tube and
a Cross Tube using a Bolt (#26),
two Washers (#30) and a Nut (#31).
Attach the Side Arms (#11) to the
Board Tubes (#2) using a Bolt (#26),
two Washers (#30) and a Nut (#31)
(Fig. 6A). Make sure the Arm is on
the outside of the Board Tube.
Attach the Forward Tubes (#12)
to the Top Tubes (#1) using
the spring locks (Fig. 6B).
Take the two dangling
Cross Tubes (#6) and
attach them to the horizontal
Connector Tube (#5) using
the Medium Bolt (#28), two
Washers (#30) and a Nut
(#31) (Fig. 5B).
Tip: Your game includes
just one Medium Bolt (#28).
STEP 5
STEP 6

8
Fig. 7A
Fig. 8B
Fig. 8A
8
7
7
Locking Pin
7
7
24
30
30
10
Attach the Side Tubes (#7) to the
Ramp Tubes (#8) using the spring locks (Fig. 7A).
Attach the Side Tubes (#7),
Base Tube (#3) and Side Arms
(#11) using an Extra Long Bolt
(#24), two Washers (#30) and a
Nut (#31) (Fig. 8A).
Attach the Cross Bar (#10) to the
Top Tubes (#1) using a Bolt (#26), two
Washers (#30) and a Nut (#31) (Fig. 8B).
STEP 7
STEP 8

14
21
27
23
30
22 31
30
Loop the Nets (#23) through the Net Hooks on the Rims (#21).
Tip: If you can, grab a helper for this part.
Attach the Rims (#21) to the Backboard (#14) using a Short Bolt (#27)
and a Washer (#30) on the front and a Back Plate (#22), Washer
(#30) and Nut (#31) on the back.
STEP 9
STEP 10

33
15
White
Wire
Grey
Wire
Brown
Wire
Black Wire
17
29 14
Tip: Try to keep your buddy around for this part.
Attach the Scoring Unit (#15) to the Backboard (#14) with a shorter Bolt (#29) through
the front of the Backboard and the Scoring Unit and secure with a Nut (#33) in the
back (Fig. 11A).
STEP 11
Fig. 11A Attach the wires using the Screws (Fig. 11A)

30
25
18
25
30
30
10
31
30
31
Tip: This is the last step where help is very helpful.
Tip: Don’t attach the bottom of the Backboard yet.
Attach the Backboard (#14) to the Top Tubes (#1)
using a Bolt (#25), two Washers (#30) and a Nut (#31)
for each of the top two holes.
Take the Ball Return Ramp
(#18) and pull each of the
sleeves over the Forward
Tubes (#12) (Fig. 13A). In
the back, pull the elastic
loop over the top Nut (#31)
on each side.
Pull the tab on each side of the Ball Return Ramp to the rear of the Backboard (#14).
Use a Bolt (#25) and one Washer (#30) on the front of the Backboard (#14). On the back, put the Ball Return
Ramp tab, a Washer (#30) and a Nut (#31) (Fig. 13B).
Fig. 13B
Fig. 13A
STEP 12
STEP 13

9
9
6
6
26
30
31
32
30
Slide the Lean Bar (#9) through the
sleeve at the end of the Ball Return Ramp (Fig. 14A).
Then attach the Lean Bar to the
Ramp Tubes (#8) using the spring
locks (Fig. 14B).
Attach a Cross Tube (#6) across the Ball Return Ramp (#18)
to the Lean Bar (#9) using a Bolt (#26), two Washers (#30)
and a Nut (#31) (Fig. 15A). Attach the Velcro straps across
the Lean Bar (Fig. 15B).
Fig. 14A
Fig. 15A
Fig. 15B
Fig. 14B
STEP 14
STEP 15

ELECTRONIC SCORER OPERATION
Install Batteries
Battery Box: Unscrew bolt using a screwdriver and open the
redroehtni)dedulcniton(seirettab”AA
A“3tresnI.xobyrettab
of polarity as shown on the inside cover. Then close the cover
using a screwdrive r. Turn the power ON using the ON/OFF switch.
COMPLETED GAME

LIMITED WARRANTY
Pop-A-Shot
(the “Company”) warrants the Product to be free from defects in
workmanship and materials under normal use and conditions FOR A PERIOD OF
90 DAYS FROM THE DATE OF ORIGINAL PURCHASE in the United States and
Canada.
What Is Covered
Except as provided below, this Limited Warranty covers all defects in materials and workmanship.
This Limited Warranty is void if the Product is:
• Damaged through improper usage, negligence, misuse, abuse, transportation damage, acts
of nature, or accident (including failure to follow the instructions supplied with the Product)
• Used in commercial applications or rentals
• Modified or repaired by anyone not authorized by the Company.
What Is Not Covered
This Limited Warranty does not cover:
Any expendable items such as batteries, light bulbs, fuses, accessories, cosmetic parts, tools•
and other items that wear out due to normal usage.
Any costs you may incur for delivery, installation, assembly or transport of your product.•
What The Company Will Pay For
THIS LIMITED WARRANTY IS AVAILABLE ONLY TO THE ORIGINAL PURCHASER OF THE
PRODUCT AND IS VALID IN THE UNITED STATES .
THE COMPANY’S LIABILITY IS LIMITED TO THE REPAIR OR REPLACEMENT, AT ITS
OPTION, OF ANY DEFECTIVE PRODUCT AND SHALL NOT INCLUDE ANY LIABILITY FOR
INDIRECT, INCIDENTAL OR CONSEQUENTIAL DAMAGES OF ANY KIND.
THIS WARRANTY IS EXPRESSLY MADE IN LIEU OF ALL OTHER WARRANTIES, EXPRESSED
OR IMPLIED.
SOME STATES DO NOT ALLOW LIMITATIONS ON HOW LONG AN IMPLIED WARRANTY
LASTS OR DO NOT ALLOW FOR EXCLUSION OF INCIDENTAL OR CONSEQUENTIAL
DAMAGES. TO THAT EXTENT, THE ABOVE LIMITATIONS MAY NOT APPLY TO YOU.
This Limited Warranty gives you specific legal rights, but you may also have other rights that vary
from state to state.
If you have questions regarding this Limited Warranty or the operation of the Product, you may call
or write us:
Pop-A-Shot
200 North Third Street
Salina, KS 67401
785.827.6229
www.pop-a-shot.net
If during the Limited Warranty period, any part or component of the Product is found by the
Company to be defective, the Company will, at its option, repair the Product, replace the Product
with a new Product (either the same or an equivalent model) or cause the original retailer of the
Product to exchange the Product with a new Product (either the same or an equivalent model).
The Company’s obligation to repair, replace or exchange the Product, however, shall be limited
to the amount of the original purchase price of the Product.
Table of contents
Other Pop-A-Shot Game manuals
Popular Game manuals by other brands

Barbie
Barbie Barbie BW68 instruction manual

Tiger Electronics
Tiger Electronics Baseball Electronic LCD Game 7-741 instruction manual

Vonset
Vonset TALKING CHESS MASTER 3 quick start guide

Jennison Entertainment Technologies
Jennison Entertainment Technologies Kahuna's Big Wave Service manual

Hasbro
Hasbro Poppin' Bedbugs Pinball 06102 instruction manual

Disney
Disney Disney Princess owner's manual