Port A Cool PACJS250 User manual

PORTACOOL
JETSTREAM
OWNER’S
MANUAL
PACJS240, PACJS250,
PACJS260, PACJS270

For setup, KUUL
®
evaporative media should appear wet before
starting the fan. Check the water gauge to monitor water level in
tank. The water adjustment valve on each portable evaporative
completely to the right before use. Turn to the left to increase
environments.
2 4
5
1 3
QUICK SETUP

SAFETY
OPERATION WARNINGS
SAFE OPERATION
1) Not for use by children
2) Not for use by persons with reduced physical, sensory, or mental capabilities
3) Not for use by persons who have not reviewed the owner’s manual and familiarized themselves with the operation of the cooler
• Read the cooler’s instructions, owner’s manual and labels before
operating.
• Do not operate evaporative cooler unless all media is securely
in place.
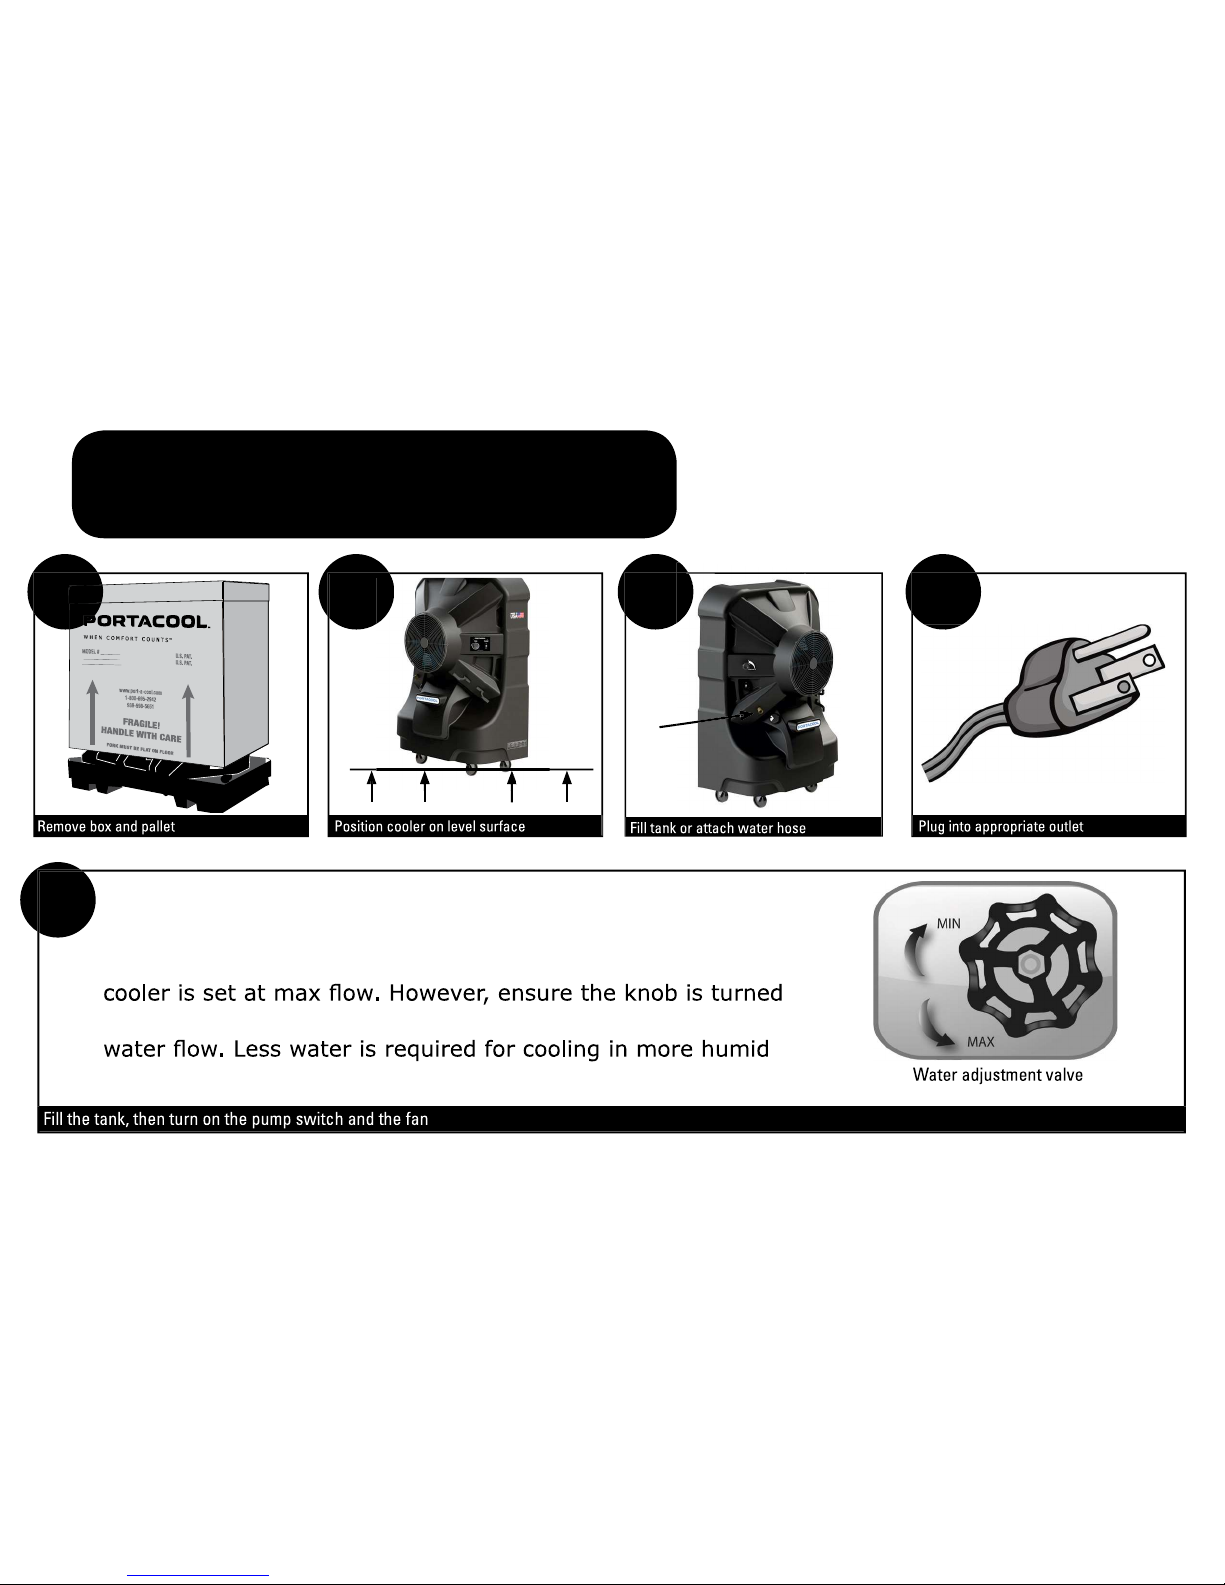
35 feet), ensure that the pump is continuously running in
order to saturate and wet KUUL® evaporative media.
• Never wash the cooler’s housing with a garden hose; water
may harm the motor or electrical system.
• Remove the plug from the electrical receptacle by pulling on
the plug and not the cord.
• Test the GFCI/GLCI receptacle or breaker monthly to ensure it
is functioning properly.
• Do not operate any cooler with a damaged cord or plug.
• If the cord or plug become damaged in any way, entire cord should
be replaced.
be made using authorized Portacool Replacement Parts.
• Do not run cord under carpeting. Do not cover cord with throw
rugs, runners or similar coverings. Arrange cord away from
• Always unplug the electric cord to the evaporative cooler
before performing inspections or repairs.
• Plug into outlet of appropriate current and voltage capacity.
• Do not step on or roll over power cord with heavy or sharp
objects.
• The use of extension cords with your cooler is not recommended.
- Use properly grounded 14 AWG or greater for PACJS240-260.
- Use properly grounded 12 AWG or greater for PACJS270.
- Extension cord must not exceed 50 feet in length; and
- Extension cord must be properly grounded.
replacement parts.
• If the cooler is damaged or malfunctions, do not continue to
operate it. Refer to the warranty, troubleshooting or FAQ
sections of this Owner’s Manual, Technical
@ .com.

OVERVIEW

OVERVIEW

OVERVIEW

OVERVIEW

PLACEMENT
1) Make sure there is a clear, unobstructed path in front of the evaporative cooler to provide maximum airflow.
2) If the evaporative cooler is positioned on a raised platform, ensure the platform is stable, well constructed, and will not allow the
cooler to tip over and that it allows for the full weight of the evaporative cooler including a tank full of water. The cooler must be
level and in the upright position. The casters should also be locked to prevent the cooler from moving.
with media facing the wall. This allows the unrestricted flow of warm air to the KUUL
®
evaporative media side of the cooler. When
using multiple coolers in close proximity, be sure to aim each evaporative cooler so the air flows complement each other to achieve
maximum cooling capacity.
STARTING THE PUMP AND ADJUSTING THE WATER FLOW
Once the tank is full of water, moving the pump switch to the “ON” position on the control panel will turn on the pump. When initially turning on
the pump, the level in the water tank will drop suddenly and restart the flow of supply water. This is a normal condition, as the cooling media
New KUUL
®
It is important to ensure that the water flow to the media is properly adjusted when first starting the water flow in the evaporative cooler.
leave the media saturated with water, but not flooded. Media should appear wet. When properly adjusted, one or two dry streaks will appear
across surface of the KUUL
®
evaporative media.
When turning the evaporative cooler off at the end of the day or week, the pump should be turned off about 15 minutes before the fan to allow
the KUUL
®
evaporative media to dry.
STARTING THE PORTACOOL EVAPORATIVE COOLER
START UP

1)
Keep the evaporative cooler clean to ensure peak operating performance.
DAILY MAINTENANCE
The pump should be turned off approximately
15 minutes
before the fan is turned off. This will allow the KUUL
®
evaporative media
to dry out and extend the life of the media. This also helps control the growth of mildew, mold, bacteria, and other odor-causing
elements.
WEEKLY MAINTENANCE
The cooler should be shut down and the tank should be drained once a week. Closing the water adjustment valve and removing
the drain plug will accomplish this. Once the tank is drained and the power disconnected, the KUUL
®
evaporative media may be
removed to allow cleaning of the tank. Dust may collect in the tank over time. Replace media in correct airflow direction, referring
to the label on the media.
STORAGE
1) Drain all water from the tank and wipe clean, ensuring the KUUL
®
evaporative media and tank are completely dry.
3) Cover the evaporative cooler completely to prevent dust build-up and store in a dry area. This also helps to prevent damage to
the KUUL
®
evaporative media. Optional dust covers are available from your distributor or at www.portacoolparts.com.
MAINTENANCE
additional parts can be found at www.wholesale-pricing.com

TROUBLESHOOT
1. Check power
A. Reset breaker*
B. Reset GFCI*
2. Replace motor
3. Replace relay
1. Open windows or doors
2. Check water distribution system
A. Clean or replace evaporative media
B. Check water level
C. Make sure evap cooler is level, clean spray bar
D. Clean or replace pump
E. Check for leaks and correct
2. Replace media
3. Turn on pump before starting fan
1. Check and tighten where needed
2. Inspect and adjust, or replace fan blade
1. Make sure media is properly positioned in the
frames and evaporative cooler is level
off) or discontinue use until outdoor humidity drops
3. Tighten connection or replace hose
1. No electrical power to cooler
A. Circuit breaker tripped
B. GFCI tripped
2. Motor overheated and/or frozen
A. KUUL evaporative media plugged
B. Dry streaks on KUUL evaporative media
C. Large dry spots on KUUL evaporative media
D. Pump not working
E. Loose water connections
1. Drain bushing/cap not tight
1. Stale or stagnant water in tank
2. Media mildewed or clogged
3. Media not wetted before cooler is turned on
1. Loose parts
2. Fan blade rubbing shroud
1. Too much water delivered to evaporative media
2. Outdoor humidity is too high or it is raining
3. Leaking hose
Evaporative cooler fails to start or
deliver air
Evaporative cooler starts but air delivery
Water draining from evaporative cooler
Musty or unpleasant odor
Knocking, shaking, or rattling sounds
Water droplets in the discharge air
stream
Turn off all power to the cooler before attempting to troubleshoot any of the following symptoms. For problems not
listed, please contact customer support.
*I

NEW FEATURES
GFCI / ELCI
The Portacool Jetstream™ series utilizes a GFCI or ELCI to protect the user from excessive leakage current. These devices are
intended to trip at very low leakage currents. If a trip occurs, reset the device to see if there have been some voltage surge in the
system.
1) PACJS240, PACJS250, PACJS260 use a GFCI integra
l to the power cord
LIQUID LEVEL INDICATOR / PUMP SHUTOFF
pump once the water reaches a certain threshold. When this occurs, a red neon light on the control panel will illuminate to draw
attention to the low water level condition and alert the user that the pump has shut off. This light may cycle on and off for a few
minutes to draw attention to the low water condition as it tries to exhaust the remaining water.
additional parts can be found at www.wholesale-pricing.com

WARRANTY
TECHNICAL SUPPORT
Please have serial number and model number of cooler available.
WARRANTY AND REPLACEMENT PARTS
PORTACOOL™ EVAPORATIVE COOLER LIMITED WARRANTY
workmanship.
Notwithstanding anything herein to the contrary, Portacool warrants its Jetstream 240, 250, 260 and 270 housings for the full lifetime of the
product to the extent they are found, upon examination by factory-authorized personnel, to be defective in material or workmanship. The Lifetime
Warranty on product housings is void if the housing is found upon examination by Portacool to have been misused, abused or otherwise tampered
applicable time periods described above, the same may be repaired or replaced at the option of Portacool.
warranty must be borne by the purchaser.
product has not been appropriately registered by its original purchaser; or v) the customer cannot show proof of purchase as the product’s original
owner.

PORTACOOL PROTECT
Portacool, LLC is proud to provide world-class service and support. Portacool Protect™ brings together our
commitment to service and support in the form of best-in-class warranties, service programs, technical
support and live customer service to provide our customers with an ownership experience that is second
to none.
For complete warranty information and limitations, please see Warranty page. Beyond these aspects of Portacool
more than 25 years, we have built our business on service and support. We look forward to speaking with you.
3

KEY PARTS
240 250 260 270
MOTOR
PARMTRJ2400A
PARMTRJ2500A
PARMTRJ2600A
PARMTRJ2700A
PUMP
PARPMPJ2400A
PARPMPJ2500A
PARPMPJ2600A
PARPMPJ2700A
MEDIA
PARKULJ24000
PARKULJ25000
PARKULJ26000
PARKULJ27000
CASTERS
PARCSTJ240F0
PARCSTJ250F0
PARCSTJ260F0
PARCSTJ270F0
CONTROLS
PARCTLJ24000
PARCTLJ25000
PARCTLJ26000
PARCTLJ27000
HOW TO REPLACE KUUL
EVAPORATIVE MEDIA
additional parts can be found at www.wholesale-pricing.com

FAQ
A. None. Portacool Jetstream coolers are ready to use right out of the box.
A. Drain the cooler, dry out the evaporative media, cover the evaporative
cooler, and store in a dry place.
A. The KUUL
®
evaporative media, located in the back of your evaporative
cooler, has never been wet before. The first time it is wet, the evaporative
media will emit an odor that lasts approximately one to three weeks. Keep
the evaporative cooler in an open area until the odor goes away or put a
capful of laundry softener directly in the tank. After approximately two weeks
of operation, the odor should disappear.
A. First, make sure the water source and electricity source are connected
and working. Second, check to see if the KUUL
®
evaporative media is damp.
If not, adjust the water flow with the water adjustment valve. Third, make
sure there is water in the tank. It should be allowed to fill before you turn the
pump on.
coolers will reduce the temperature in almost any environment, making it
more pleasant.
®
use, KUUL
®
evaporative media typically lasts up to five years.
A. Misting systems spray a shower of water into the air that will collect on
process of evaporation to produce cooler air, but do not produce a mist.
A. Replacement parts may be purchased online at www.portacoolparts.com or
from any Portacool distributor.You may also contact Portacool Parts/Technical
Support department for additional assistance.
A. An increase in humidity of approximately two to five percent is produced,
depending on the temperature and humidity of the environment. This
increase is not noticeable in a ventilated area where the air produced by the
cooler is exhausted.
A. With no direct water source available, the water will evaporate in a filled
tank within two to 10 hours of operation, depending on the water capacity
of the evaporative cooler, ambient conditions, temperature, and humidity. A
water source for refilling the tank is recommended by the manufacturer.
A. The model number can be found on a metal plate on the outside of the
cooler. Model numbers begin with the letters “PAC.” Serial numbers are all-
digits.
A. Our Tech Support staff is available

CUSTOMER SERVICE CONTACT
Portacool, LLC • Manufacturer of Portacool™
portable evaporative coolers and
KUUL® evaporative cooling media
MANR0008
www.wholesale-pricing.com
This manual suits for next models
7
Table of contents
Other Port A Cool Accessories manuals
Popular Accessories manuals by other brands

Swoffer Instruments
Swoffer Instruments 2100-STDX Operation and maintenance manual

Clearaudio
Clearaudio Satisfy Kardan user manual

Mammut
Mammut Airbag Technology 3.0 user manual

Bresser
Bresser A-solar Pioneer manual

Bomet
Bomet Gemma S290 owner's manual

Extron electronics
Extron electronics RWM 2 installation guide