POSTPROCESS RADOR User manual

RADOR QuickStart Guide
Automated Surface Finish Machine
PostProcess Technologies, Inc. • www.postprocess.com • REV C

Copyright
Conventions
Copyright © 2018 by PostProcess Technologies Inc. “POSTPROCESS”. All rights reserved. The information
disclosed herein is proprietary information owned by POSTPROCESS. This information shall be used solely and
exclusively by employees and customers of POSTPROCESS as documentation for the safe operation of
processing equipment provided by said company. The information herein shall be used by or disclosed to others
only for this purpose.
Published: February 2018
Disclaimer: The content of this guide is subject to change without prior notice. Please contact POSTPROCESS
for the most current information. Items marked with an asterisk * have been identied as likely to be updated.
Picture on front cover is for illustrative purposes only and does not reect actual dimensions.
WARNING
CAUTION
NOTE
Draws attention to an operating procedure, practice, or condition, etc., that may result in injury or death if not
carefully observed or followed.
Draws attention to an operating procedure, practice, or condition, etc., that may result in damage to equipment if
not carefully observed or followed.
Draws attention to an operating procedure, practice, or condition, etc., that must be emphasized or provides
information to simplify procedures and tasks.
Any time a button is referenced the following formatting will be used.
Buttons – References to a button that can be pressed or activated by an operator will be BOLD AND
CAPITALIZED.
PostProcess Technologies, Inc. • www.postprocess.com • REV C | page 1

Table of Contents
1 OPERATION.........................................................................................................................................................................
1.1 Connecting Power to the RADOR...................................................................................................................
1.1.1 Powering Up the RADOR....................................................................................................................
1.1.2 Emergency Stop Button......................................................................................................................
1.2 Automatic Operation – Setup/Start...............................................................................................................
1.3 Maintenance Operations..................................................................................................................................
1.3.1 Media Maintenance.............................................................................................................................
1.3.2 Liquids Maintenance...........................................................................................................................
2 TROUBLESHOOTING.........................................................................................................................................................
2.1 Thereisadecreaseinwater/detergentow,ortheowhasstopped...................................................
2.2 The spray nozzles are not operating properly..............................................................................................
2.3 Leakage...............................................................................................................................................................
2.4 Liquid build-up in the envelope chamber......................................................................................................
2.5 The RADOR is not stationary...........................................................................................................................
2.6 WherecanIndtheRADOR Serial Number?...............................................................................................
3 POINT OF CONTACT..........................................................................................................................................................
4 REVISION HISTORY..........................................................................................................................................................
5
5
5
6
6
7
7
7
8
8
8
8
8
8
9
9
10
PostProcess Technologies, Inc. • www.postprocess.com • REV C | page 2
List of Figures
Figure 1. Location of Master Power Switch...................................................................................................................
Figure 2. Power and Emergency Stop Buttons.............................................................................................................
Figure 3. Detergent Chamber............................................................................................................................................
Figure 4. Abrasive / Polishing Media...............................................................................................................................
Figure 5. Reservoir and Drain Bucket..............................................................................................................................
Figure 6. Casters with Ratchet.........................................................................................................................................
5
5
6
7
7
8

Warnings
Failure to adhere to any of the warnings below could void the warranty. Read thoroughly before operating the
machine. If the machine appears to be malfunctioning in any way, immediately PUSH the EMERGENCY STOP
button and refer to the Troubleshooting section of this guide on page 8. If the issue is not able to be resolved,
call POSTPROCESS for additional support.
• Do not operate the unit without proper grounding.
• Donotallowalcohol,gasolineorotherammablesolutionsnearthemachine.Doingsocouldcausea
reorexplosion.
• Do not touch the detergent with bare skin. Use nitrile gloves, laboratory-style eyeglasses and other
necessary personal protective equipment when performing any operations including removing parts
where skin could come into contact with the detergent.
• Do not attempt to disassemble or repair the machine.
• Keeptheentirepowercordsuspendedaboveoorsurface.
PostProcess Technologies, Inc. • www.postprocess.com • REV C | page 3
Warnings, Cautions and Notes
Cautions
• Connect the unit only to 60 hz single-phase 120v power.
• Use only POSTPROCESS detergents and media. Do not add any other liquid solutions or abrasive media
to the machine.
• Donotoperatethemachinewithoutsufcientdetergentinthetank.
Ventilation
PostProcessTechnologiesdetergentsarespecicallyformulatedchemistryformaximized3Dprintedsupport
removalefciency.Itisrecommendedthattheequipmentbelocatedinawellventilatedroom.Specic
ventilation requirements can vary widely due to size of the install room, existing ventilation (positive or negative)
and differences in individual sensitivities to airborne scents or fragrances. For more information on the safe use
of POSTPROCESSdetergentsrefertotheSDSforthespecicdetergentused.
Electrical Safety
Caution should be used whenever working with industrial-powered equipment. If there is an emergency
situation, it is important to note that hitting the EMERGENCY STOP button does not turn off power to the RADOR
.
It turns off the RADOR’s operating cycle only. To shut off power to the RADOR, turn off the MASTER POWER
SWITCH,located on the right side panel of the RADOR. (For a visual of the switch location, see Figure 1.
Location of MASTER POWER SWITCH)
NOTE
The EMERGENCY STOP button should only be used in actual emergency situations. For any other situation
requiring the machine to be powered down, use the MASTER POWER SWITCH.

PostProcess Technologies, Inc. • www.postprocess.com • REV C | page 4
Warnings, Cautions and Notes
Overview
This QuickStart Guide is intended to explain the basic setup and operation of the RADOR Surface Finish machine.
Read this guide thoroughly before operating the RADOR to ensure safe and efcient operation.If a question is
not answered in this guide, contact POSTPROCESS for additional support.
The
RADOR
applies patent-pending technology, including optimized energy with vertical motion in combination
with
proprietary,eco-friendlyconsumablemediatoachievethedesiredsurfacenishon3Dprintedpartsorcomponents.
The RADORisidealfornishingsmallpartsbecauseofitsrectangularenvelopecapacity.TheRADOR, like all of
oursurfacenishingproducts,hasbeendesignedandmanufacturedwithnoise-reductionfeaturesand
functionality to reduce excess noise in your production environment.
While the RADOR is robust, care should be used during operation. When accessing the chamber, gently open
andclosetheenvelopeaccessdoor.Becarefulwhenextractingnishedpartstolimittheamountofconsumable
media that is lost during the part removal process. Ensure no heavy materials are stored above the RADOR that
may fall and damage it.
Detergent Safety
As noted in the safety warning, it is important that operators do not come into contact with any form of detergent
with bare or uncovered skin.
• When working with or near detergents, always wear nitrile gloves.
• Wear laboratory-style protective glasses.
• If bare skin comes in contact with detergent, thoroughly wash the
body part with soap and warm, clean water.
• It is recommended that an eyewash station is near the RADOR
and any detergent storage areas.

PostProcess Technologies, Inc. • www.postprocess.com • REV C | page 5
1. OPERATION
1.1 Connecting Power to the RADOR
The RADOR is delivered with an industrial power cord. Use only the power cord supplied by POSTPROCESS with
the RADOR. Connect the RADOR only to 60 hz single-phase 120v power.
The MASTER POWER SWITCH is located on the lower left rear panel of the RADOR. Before connecting or
disconnecting the RADOR to power, ensure the MASTER POWER SWITCH is in the bottom “O” or OFF position
(refer to Figure 1. Location of Master Power Switch).
When the power cord is connected to the RADOR and plugged into a 60 hz single-phase 120v power outlet, press
the POWER switch to the “I” or ON position. The RADOR is now ready to be powered up.
WARNING
Do not place the power cord in a location where it could come into contact with water or other liquid substances.
Itisrecommendedtokeeptheentirepowercordsuspendedabovetheoorsurface.
Figure 1. Location of Master Power Switch Figure 2. Power and Emergency Stop Buttons
1.1.1 Powering Up the RADOR
The POWER button for the RADOR is located to the left of the right side access panel, below the handle. To power
up (or down) the RADOR, press the POWER button. If the POWERbuttonisashing,theRADOR is on and ready
for use. The POWER button will be continuously lit when the RADOR is running. (refer to Figure 2. Power and
Emergency Stop Buttons).

PostProcess Technologies, Inc. • www.postprocess.com • REV C | page 6
1. OPERATION
1.1.2 Emergency Stop Button
Opposite the POWER button, beneath the right-side access panel is the large EMERGENCY STOP button (shown
in Figure 2. Power and Emergency Stop button).
1.2 Automatic Operation - Setup/Start
The RADORisdesignedtobefullyautomaticandconguredforany3Dprinttechnology.Thetypeofabrasive
/
polishing media and the necessary concentration of POLYGONE 3™ (PG3) detergent is predetermined for each
customer’s
specicoperation.
The left side of the RADORhousestheenvelope,sized213/4”x9”x13”andislledwithabrasive/polishing
mediacarefullyselectedtomaximizeaspecicoperationalneed.Alongtherearoftheenvelope,theRADOR has
threespraynozzlesthatinjectuidsintothesurfacenishingprocess.
Beneath the right-side panel is where an operator can access the detergent chamber to add more PG3 and water
as per the designated recipe provided for the application. For more information about maintaining liquid levels
for the RADOR, please see the Maintenance section of this Quick Start Guide.
CAUTION
If the RADOR appears to be malfunctioning in any way, immediately PUSH the EMERGENCY STOP button and
refer to the Troubleshooting section of this QuickStart Guide.
If the issue is not able to be resolved, contact POSTPROCESS support.
Figure 3. Detergent Chamber
NOTE
WheneveranoperatorisllinguptheRADORwithwaterandPG3,nitrileglovesshouldbeworn,anditishighly
recommended that a funnel be used to avoid spillage.
Tobeginthenishingcycle,press
the POWER button to ON.

PostProcess Technologies, Inc. • www.postprocess.com • REV C | page 7
1. OPERATION
1.3 Maintenance Operations
1.3.1 Media Maintenance
1.3.2 Liquids Maintenance
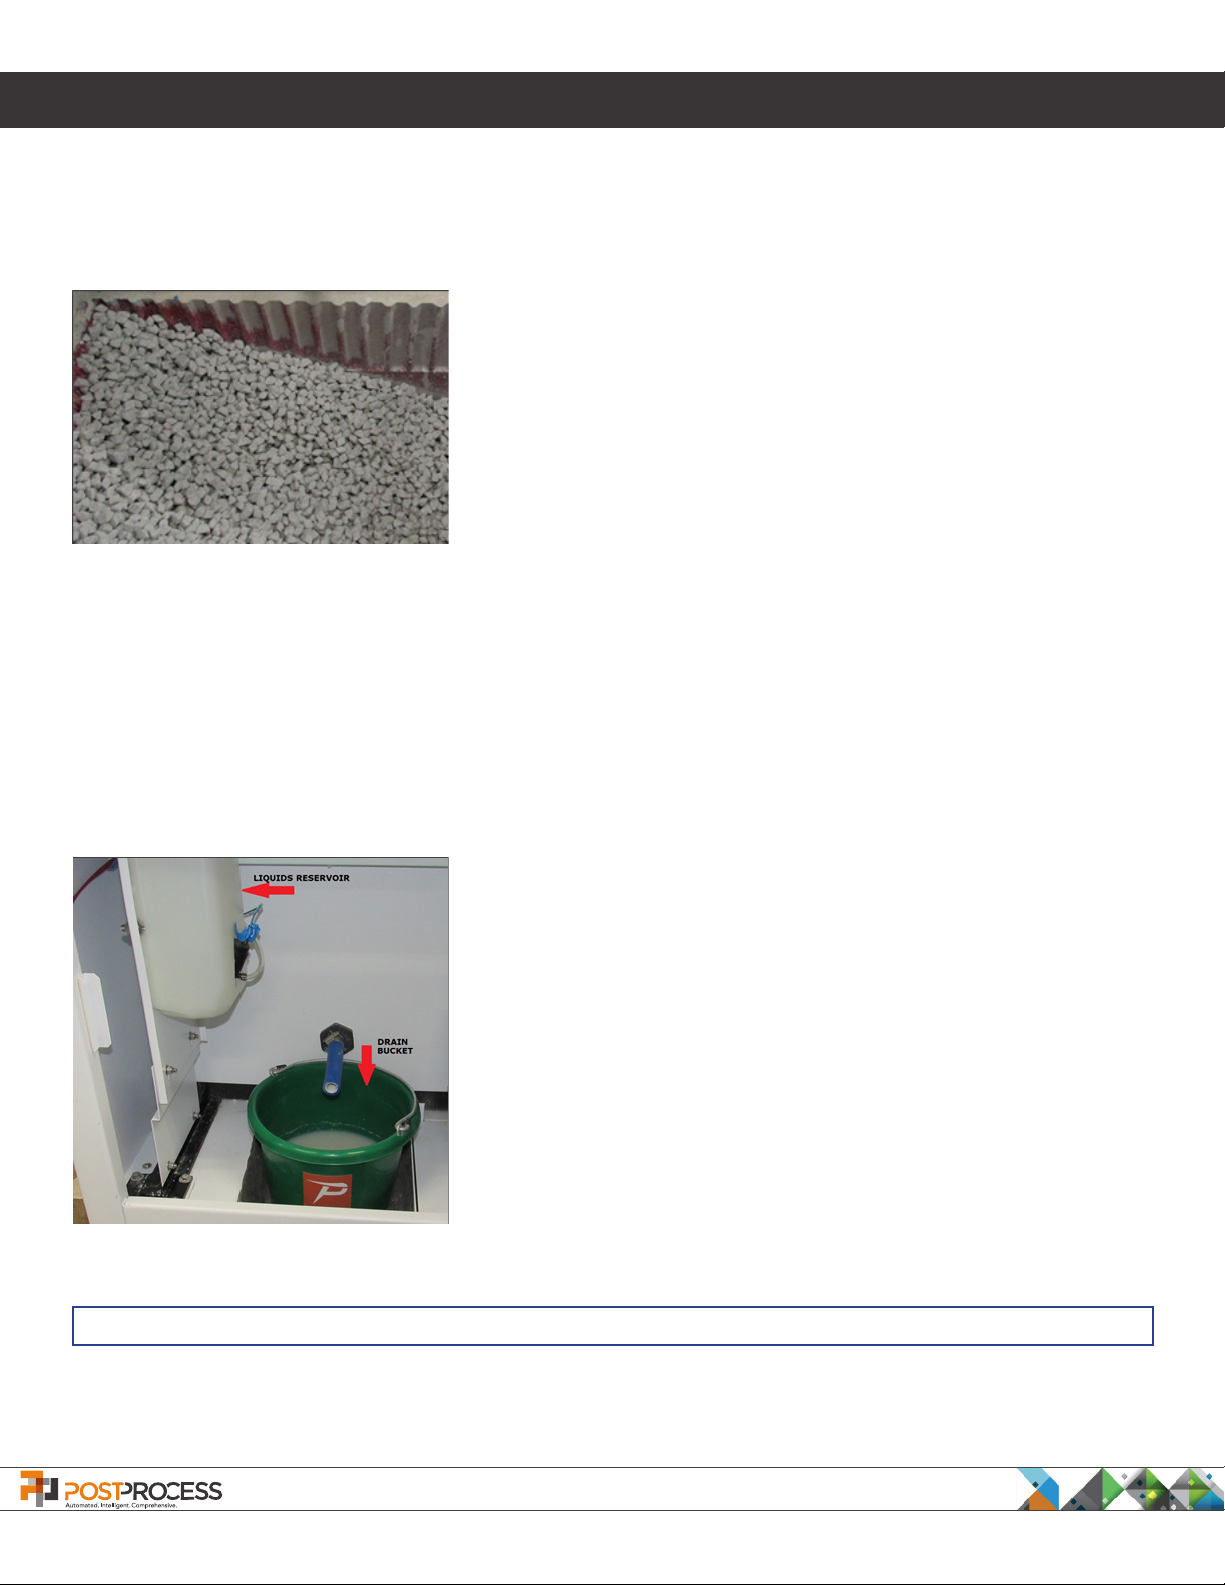
As shown in Figure 4. Abrasive / Polishing Media, the
RADOR
has
achamberthatislledwithspeciallyformulatedabrasiveorpolishing
media.Duringthesurfacenishingoperation,theprintedpartis
immersed in this media and the combination of agitation, the abrasive
and polishing qualities of the media, and the patented PG3 liquids all
actonthepartuntilthedesirednishinglevelisachieved.Themedia
has a useful life based on the application it is being used in and the
amount of processing that is occurring.
Once the media has degraded to one-third of its original size, it is
time to change out the media.
To change the media, carefully scoop out all of the media particles, and dispose of them according to local
regulations. Next, with a damp cloth and mild cleaning solution, clean out the envelope and wipe down the spray
nozzles to remove any sediment build-up. Also, wipe down the grate that covers the drain inside the chamber
withaplasticbristlebrush.Finally,rellthechamberwithfreshmediasuppliedbyPOSTPROCESS. NEVER use
media other than POSTPROCESS supplied abrasive and polishing media or risk damaging the machine.
The appropriate ratio of PG3 to water is designated for each
customer application but most typically the ratio is 99 parts of
water to 1 part of PG3. The RADOR has a 1.5-gallon tank, so the
correctformulawouldbe2oz.ofPG3andlltheremainderof
the tank with fresh water. The operator using the RADOR should
always ensure that the correct levels of liquid are being utilized
duringthenishingprocess.Behindtheright-sidepanel(belowthe
PG3 access opening) is the liquids tank and the RADOR drain bucket,
as shown in Figure 5. Reservoir and Drain Bucket.
The Liquids Reservoir is translucent allowing the operator to see
how
much liquid remains in the tank. It is important to note that
whenever
the tank is empty, the correct recipe of PG3 and water
should
be added to the reservoir before operation. Never run the
RADOR
without liquids.
Figure 4. Abrasive / Polishing
Media
Figure 5. Reservoir and
Drain Bucket
NOTE
WhenthereservoirisrelledwithPG3andwater,thedrainbucketshouldbeemptied.Ifitisnotemptiedevery
timeliquidisaddedtotheRADOR,thedrainbucketcanoverow.

PostProcess Technologies, Inc. • www.postprocess.com • REV C | page 8
2. TROUBLESHOOTING
2.1 There is a decrease in water/detergent ow, or the ow has stopped.
Step 1) Check the Liquid Reservoir to ensure there is liquid in the tank.
Step 2)
Inspect the
RADOR
spray nozzles. Clear away any buildup or blockages with a wet cloth and mild
detergent.
2.2 The spray nozzles are not operating properly.
Whenthespraynozzlesarenotworkingproperlyitisprobablyduetosedimentbuildupfromthesurfacenishing
process. Check the spray nozzles for excess buildup and clean them with a light detergent and a soft cloth to
remove the debris that has built up around the discharge area.
2.3 Leakage
During manufacturing, all the
RADOR
plumbingxtureswereafxedandsealedusingconstructiongrade
materials. If any of the plumbing connections, pipes, or tubes begin to leak, shut down the
RADOR
and contact
PostProcess Support for further instruction.
2.4 Liquid build-up in the envelope chamber
The
RADOR
is designed to allow liquids to spray into the envelope to moisten the abrasive / polishing media and
enhancethesurfacenishingprocess.Theenvelopecontainsadrainthatallowsexcessliquidstodripoutofthe
envelope and into the drain bucket as described in the 1.3.2 Liquids Maintenance section of this guide. If
excessive sediment and materials have clogged the grate, it may cause the liquids to remain in the chamber. If
this occurs, empty all of the media out of the envelope, clean the envelope and the drain to clear away any build
up.
2.5 The RADOR is not stationary
The
RADOR
was designed with special casters with an integral foot that can be adjusted and locked into place. To
prevent unwanted
movement, pull out the metal ratchet on each caster, adjust them to engage the foot and lock
the casters into place by pushing in the ratchet. (See Figure 6. Casters with Ratchet)
Most instances where the RADOR is not performing to expectations can be easily resolved by simple
troubleshooting procedures. Below is a list of issues that may arise during post-processing operations.
Figure 6. Casters with Ratchet

PostProcess Technologies, Inc. • www.postprocess.com • REV C | page 9
2. TROUBLESHOOTING
2.6 Where can I nd the RADOR Serial Number?
The serial number can be found on the left rear panel of the machine and will resemble the ID plate as shown
below.
3. POINT OF CONTACT
For Questions and Support for the RADOR, please contact PostProcess Technologies:
2495 Main Street, Suite 615
Buffalo, NY 14214 USA
+1 866 430 5354
suppor[email protected]

PostProcess Technologies, Inc. • www.postprocess.com • REV C | page 10
4. REVISION HISTORY
Revision History
List of Changes
Approved By Approval DateWritten By
A
REV
Tech Writer
(BG)
Project Eng (PP)
Eng Mgr (MF)
3/2/2018
Original Release
B
C
Marketing
(ML)
Marketing
(ML)
Project Eng (PP)
Eng Mgr (MF)
Project Eng (PP)
Eng Mgr (MF)
5/2/2018
6/27/2018
Machine Name Update, Rendering
update
Envelope Dimension Revision
Table of contents
Other POSTPROCESS Industrial Equipment manuals
Popular Industrial Equipment manuals by other brands

Scheppach
Scheppach Kity MB 25 Original manual

Emerson
Emerson AVENTICS NL1 operating instructions

Montanari
Montanari M93ES Installation, use and maintenance

Nexen
Nexen AIR CHAMP DPC-9T user manual

KYOKUTOH
KYOKUTOH KIKK Series Teaching Guide Instruction Manual

WATSON INDUSTRIES
WATSON INDUSTRIES DMS-SGP02 owner's manual