manuals.online logo
Brands
  1. Home
  2. •
  3. Brands
  4. •
  5. potenza
  6. •
  7. Engine
  8. •
  9. potenza 60 User manual

potenza 60 User manual

Thank you for purchasing your Potenza 60 brushless outrunner motor. It has been
designed, developed, and extensively tested to provide the best combination of
power, performance, and user-friendliness in its class.
FEATURES
 Equivalent to 60-sized glow motor for 6-12 pound (2.7-5.4kg) aircraft
 Ideal for 3D aircraft up to 9-pounds (4.1kg) in weight
 Designed for up to 6S LiPo and 1800 watts of power
 Powerful, quiet, lightweight operation
 Factory-installed 4.0mm bullet connectors
 Includes X-mount, bolt-on prop adapter, and mounting hardware
 External rotor design -- 7mm prop shaft can be easily reversed for alternative
mounting and applications.
 Slotted, 14-pole design
 High-quality construction with (4) ball bearings and hardened steel motor shaft
SPECIFICATIONS
REPLACEMENT/OPTIONAL PARTS
TM
Potenza 60 Brushless Outrunner Motor, 470Kv
FPZM1060A | User Guide
SPECIAL LANGUAGE DEFINITIONS
The following terms are used throughout the product literature to
indicate various levels of potential harm when operating this product:
NOTICE: Procedures, which if not properly followed, create a
possibility of physical property damage AND a little or no possibility of
injury.
CAUTION: Procedures, which if not properly followed, create the
probability of physical property damage AND a possibility of serious
injury.
WARNING: Procedures, which if not properly followed, create the
probability of property damage, collateral damage, and serious injury
OR create a high probability of serious injury.
ATTENTION
Read the ENTIRE instruction manual to become familiar with the features
of the product before operating. Failure to assemble or operate the
product correctly can result in damage to the product, personal property,
and cause serious or fatal injury.
All instructions, warranties and other collateral documents are subject to
change at the sole discretion of Flex Innovations, Inc. For up-to-date
product literature, please visit our website at www.exinnovations.com
and click on the support tab for this product.
UNDERSTANDING ELECTRIC MOTORS
In order to get the most out of your motor, it is helpful to understand a few
basic principles about how they run. The most important of these is the
knowledge of Kv. Kv a measurement that states the number of revolutions per
minute that an electric motor will rotate per volt applied (RPM/volt) with NO
load applied to the motor.
For example, a 1000Kv motor that is connected to a 12v power supply will try to
spin 12,000 RPM (1000Kv x 12v) with no load.When a load, in our case a
propeller, is applied to the motor, it will still try to turn at the same RPM. The
diameter and pitch of a propeller dictate the load imposed on the motor, and
the larger the diameter and/or higher the pitch, the more load that propeller
will impart on the motor. When load increases, so does current; conversely,
when load decreases the current follows. It is highly recommended that a watt
meter be used to determine proper propeller sizing.
Every motor has a maximum current value. There are many factors which
decide this, including motor design and motor cooling. Taking these factors
into consideration, a maximum propeller size for a given setup can be
determined. Use of an oversized propeller will cause the motor to spin at a
much lower RPM than it was designed to, and the motor will draw more current
to run at its design RPM. Not only can current values for the motor be
exceeded, but excess current generates excess heat which can damage internal
components in the motor.
Kv is a constant value, meanining that it will not change as input voltage
changes. If a motor turning a certain-sized propeller on a 4S battery is
connected to a 5S battery with the same propeller, the motor will try to turn
that propeller the the higher RPM. Because this is a higher load than before,
current will increase, therefore, if a higher voltage battery is installed in an
aircraft, the propeller will have to be reduced in diameter and/or pitch to
accomodate the new load factors.
OPERATING THE MOTOR
1. This brushless motor requires a sensorless brushless electronic speed control
(ESC). Failure to use the correct ESC may result in damage to the motor
and/or ESC itself.
2. If applicable, solder the (3) included female bullet connectors to the output
wires of your ESC. Do not allow the input connectors to make contact when
power is applied to the motor. Ensure all input connections are insulated.
3. The (3) motor wires can be connected in any order to the ESC output wires. If
the motor is turning reverse than the direction desired, the connection of
any TWO wires may be reversed.
4. Once the battery is connected to the ESC, remain well clear of the motor and
propeller. The motor shaft of the motor will rotate at very high rpm and can
cause serious injury.
5. Do not apply an input voltage or current that exceeds the maximum
specication for your motor.
6. Do not allow water or moisture to enter the motor, as it can cause
permanent damage to the motor and possibly short out the attached ESC.
7. Do not cut the wires from the motor. The wires are part of the windings and
cannot be reattached by soldering.
8. Allow the motor to cool after each ight. Ensure that your model has
adequate air circulation during operation. Overheating the motor is NOT
covered under any warranty.
9. Never attempt to use a damaged motor
WARNING
This product is not intended for use by children under 14 years without
direct adult supervision.
Continuous Current 75A (with proper cooling)
Max Burst Current 90A (<15 seconds with proper cooling)
Continuous Power 1800 Watts
Input Voltage 22.2v nominal (6S LiPo)
Motor Can Diameter 50.0 mm
Motor Can Length 61.0 mm
Shaft Diameter 7.0 mm (0.28 in)
Weight 427g (15.0 oz)
RPM/Volt (Kv) 470
No-Load Amperage (Io) 2.1A
Resistance (Ri) 0.02 Ω
15x8-17x7 electric
Recommended ESC 80A Brushless
Propeller Range
FPZM1060A3 60 Motor Shaft w/Collar
FPZM1060A2 60 Motor X-Mount w/Screws
FPZM1060A1 60 Motor Bolt-on Prop Adapter
FPZM1060A4 7mm Collet Prop Adapter
Notice: Proper cooling airow is required. The maximum operating
temperature for this motor is 220°F (104°C). Maximum burst current is
rated at 90A and can be sustained for 15 seconds. Decrease the throttle
after ying at or near max burst current to allow the motor to properly
cool and prevent overheating.
LIMITED WARRANTY
Warranty Coverage - Flex Innovations, Inc. and its authorized resellers (“Flex”)
warrant to the original purchaser that the product purchased (the “Product”) it
will be free from defects in materials and workmanship at the date of purchase.
Outside of Coverage - This warranty is not transferable and does not cover: (i)
Products with more than 45 days after purchased date; (ii) Damage due to acts
of God, accident, misuse, abuse, negligence,commercial use, or due to
improper use, installation, operation or maintenance; (iii) Modication of or to
any part of the Product; (iv) Product not compliant with applicable technical
regulations; (v) Shipping damage; (vi) Cosmetic damage
OTHER THAN THE EXPRESS WARRANTY ABOVE, FLEX MAKES NO OTHER
WARRANTY OR REPRESENTATION, AND HEREBY DISCLAIMS ANY AND ALL
IMPLIED WARRANTIES, INCLUDING, WITHOUT LIMITATION, THE IMPLIED
WARRANTIES OF NONINFRINGEMENT, MERCHANTABILITY AND FITNESS FOR A
PARTICULAR PURPOSE. THE PURCHASER ACKNOWLEDGES THAT THEY ALONE
HAVE DETERMINED THAT THE PRODUCT WILL SUITABLY MEET THE REQUIRE-
MENTS OF THE PURCHASER’S INTENDED USE.
Purchaser’s Solution - Flex’s sole obligation and purchaser’s sole and
exclusive remedy shall be that Flex will, at its option, either (i) service, or (ii)
replace, any Product determined by Flex to be defective. Flex reserves the right
to inspect any and all Product(s) involved in a warranty claim. Service or
replacement decisions are at the sole discretion of Flex. Proof of purchase is
required for all warranty claims. SERVICE OR REPLACEMENT AS PROVIDED
UNDER THIS WARRANTY IS THE PURCHASER’S SOLE AND EXCLUSIVE
REMEDY.
Limitation of Liability - FLEX SHALL NOT BE LIABLE FOR SPECIAL, INDIRECT,
INCIDENTAL OR CONSEQUENTIAL DAMAGES, LOSS OF PROFITS OR PRODUC-
TION OR COMMERCIAL LOSS IN ANY WAY, REGARDLESS OF WHETHER SUCH
CLAIM IS BASED IN CONTRACT, WARRANTY, TORT, NEGLIGENCE, STRICT
LIABILITY OR ANY OTHER THEORY OF LIABILITY, EVEN IF FLEX HAS BEEN
ADVISED OF THE POSSIBILITY OF SUCH DAMAGES.
Further, in no event shall the liability of Flex exceed the individual price of the
Product on which liability is asserted. As Flex has no control over use, setup,
assembly, modication or misuse, no liability shall be assumed nor accepted for
any resulting damage or injury. By the act of use, setup or assembly, the user
accepts all resulting liability. If you as the purchaser or user are not prepared to
accept the liability associated with the use of the Product, purchaser is advised
to return the Product immediately in new and unused condition to the place of
purchase.
Law - These terms are governed by Florida law (without regard to conict of
law principals). This warranty gives you specic legal rights, and you may also
have other rights which vary from state to state. FLEX RESERVES THE RIGHT
TO MODIFY THIS WARRANTY AT ANY TIME WITHOUT PRIOR NOTICE.
Questions & Assistance - For customer support in your region, visit:
http://www.exinnovations.com/index.php/reseller-sub
Inspection or Services - If this Product needs to be inspected or serviced and
is compliant in the region you live and use the Product in, please contact your
regional Flex authorized reseller. Pack the Product securely using a shipping
carton. Please note that original boxes needs to be included, but are not
designed to withstand the rigors of shipping without additional protection.
Ship via a carrier that provides tracking and insurance for lost or damaged
parcels, as Flex is not responsible for merchandise until it arrives and is
accepted at our facility.
Warranty Requirements - For Warranty consideration, you must include
your original sales receipt verifying the proof of purchase date. Provided
warranty conditions have been met, your Product will be replaced free of
charge. Shipping charges are as follow: to Flex by customer, Flex out it is by
Flex. Service or replacement decisions are at the sole discretion of Flex.
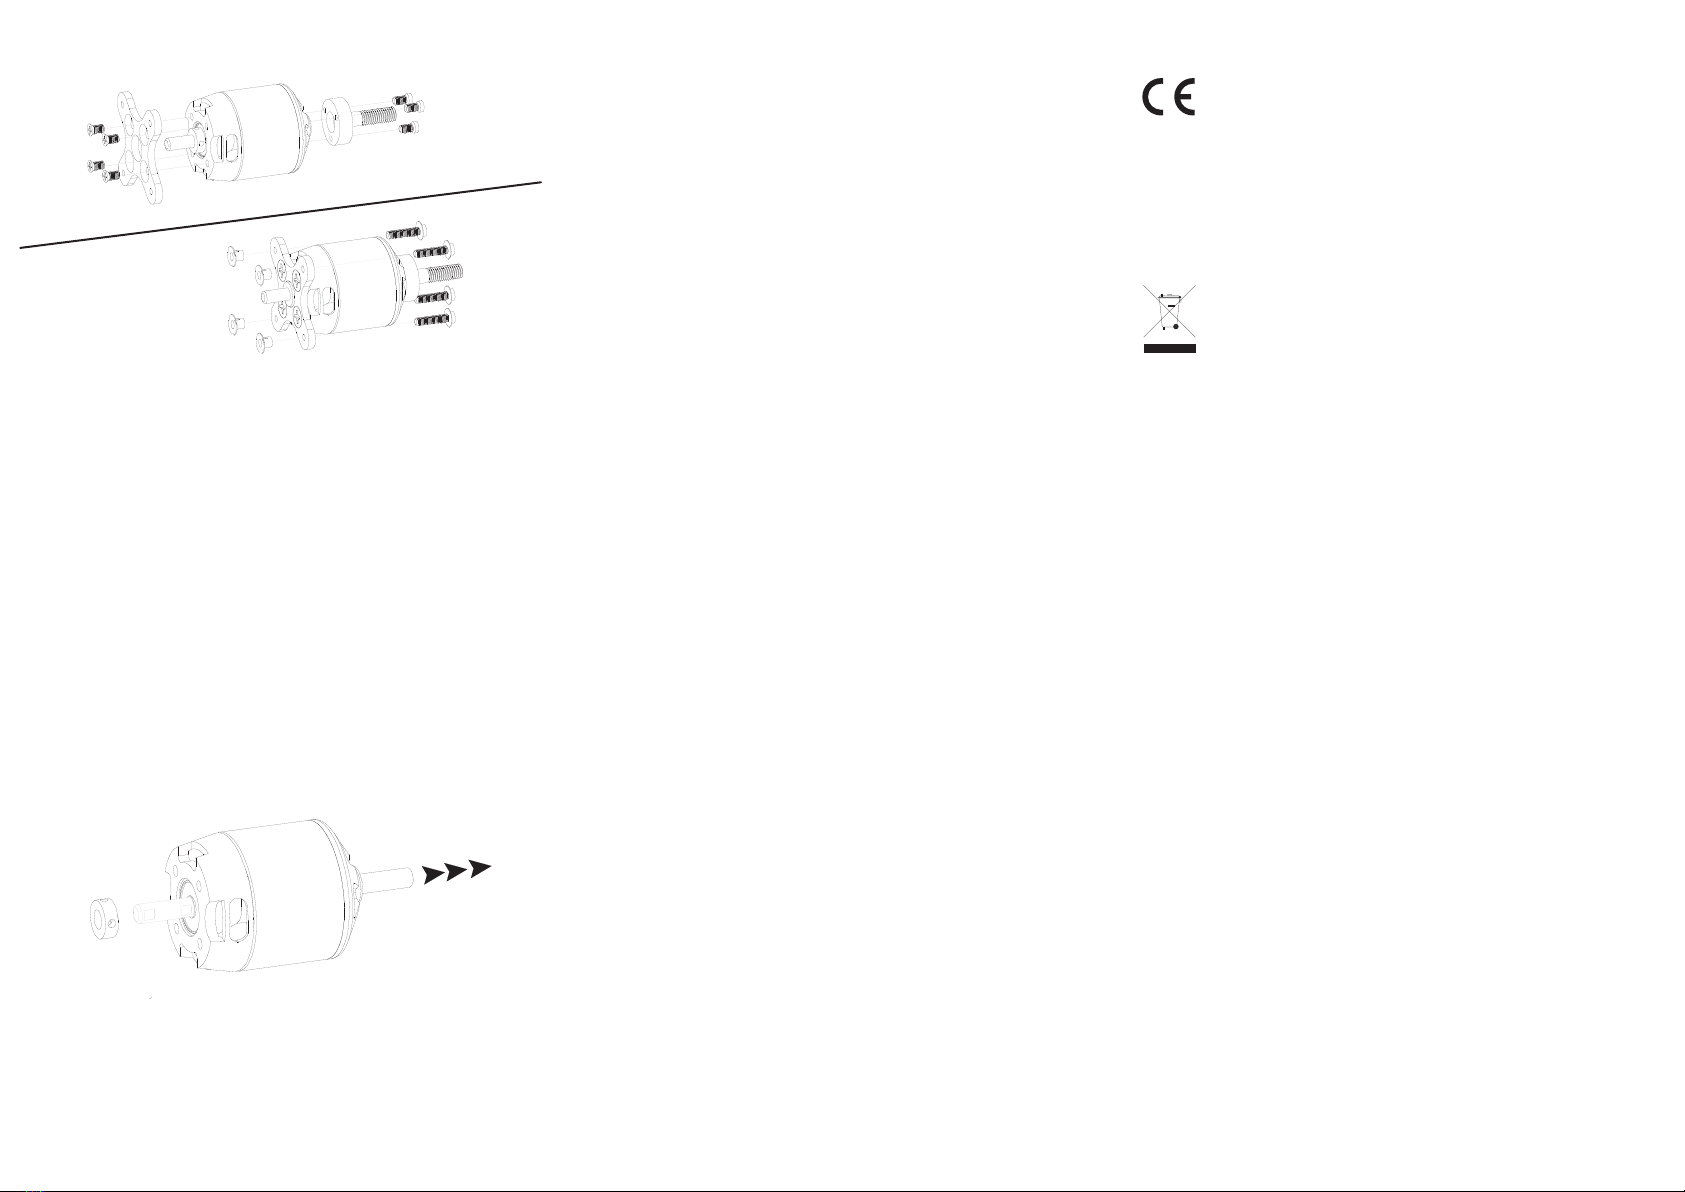
MOTOR MOUNTING USING X-MOUNT
The most common installation of brushless outrunner motors is to install the
X-mount on the rear of the motor and attach this mount to the rewall. Other
options exist for mounting motors including mounting in reverse directly to the
nose ring or using standos. Please consult the directions with your model to
ensure proper motor mounting and conguration. DO NOT install the X-mount
onto the motor until the rewall has been prepared for the motor mount.
1. Trial-t the aluminum X-mount on the model’s rewall and mark the
locations for the four screw holes and shaft (if applicable).
2. Using the appropriate size drill bit, drill out the four holes for the mounting
screws, and enlarge them properly for blind nut installation.
3. Install the (4) blind nuts on the rear side of the rewall. Run medium CA
around the perimeter of the blind nuts, but ensure that no adhesive enters
the threaded shank.
4. Attach the X-mount to the motor using (4) countersunk screws and a small
amount of blue threadlocker.
5. Attach the motor assembly to the rewall with the included socket head cap
screws and at washers.
6. Once satised with the nal assembly of the motor, apply blue threadlocker
to all mounting screws EXCEPT the prop nut.
CHANGING SHAFT POSITION
1. Loosen the set screws on the shaft collar and remove the collar from the shaft.
2. Loosen the set screw on the ange of the motor can (the rotating
portion of the motor)
3. Carefully push the shaft through the motor. A small hammer may be
required to lightly tap the shaft.
4. Reinstall the shaft collar against the main bearing, apply blue threadlocker to
the set screws and tighten them
5. Apply blue threadlocker and tighten the screw on the ange of the motor can.
COMPLIANCE INFORMATION FOR THE EUROPEAN UNION
Declaration of Conformity (In accordance with ISO/IEC 17050-1)
Product(s): Potenza 60 470Kv Motor
Item Number(s): FPZM1060A
The object of declaration described above is in conformity with the requirements of the
specications listed below, following the provisions of the EMC Directive 2004/108/EC.
EN55022:2010 + AC:2011
EN55024:2010
Instructions for disposal of WEEE by users in the European Union
This product must not be disposed of with other waste. Instead, it is the
user’s responsibility to dispose of their waste equipment by handing it over
to a designated collections point for the recycling of waste and electronic
equipment. The sepearate collection and recycling of your waste equipment
at the time of disposal will help to conserve natural resources and ensure
that it is recycled in a manner that protects human health and the
environment. For more information about where to drop o your waste
equipment for recycling, please contact your local city oce, your household
waste disposal service or where you purchased the product.

This manual suits for next models

1

Popular Engine manuals by other brands

Sirius Satellite Radio SEM11 installation guide

Sirius Satellite Radio

Sirius Satellite Radio SEM11 installation guide

Kohler Command CV17 Service manual

Kohler

Kohler Command CV17 Service manual

WÄRTSILÄ RT-flex50-D Maintenance manual

WÄRTSILÄ

WÄRTSILÄ RT-flex50-D Maintenance manual

Homa HRS Series Original instruction manual

Homa

Homa HRS Series Original instruction manual

DELTA DORE TYMOOV RP Series manual

DELTA DORE

DELTA DORE TYMOOV RP Series manual

GAS GAS EC FSE 400 Workshop manual

GAS GAS

GAS GAS EC FSE 400 Workshop manual

Selve SE Pro Series Operating	 instruction

Selve

Selve SE Pro Series Operating instruction

Indmar 5.7L MPI Operator's manual

Indmar

Indmar 5.7L MPI Operator's manual

WEG WECM Installation, operation and maintenance manual

WEG

WEG WECM Installation, operation and maintenance manual

Briggs & Stratton 400000 Intek Operator's manual

Briggs & Stratton

Briggs & Stratton 400000 Intek Operator's manual

LONCIN G250F Service manual

LONCIN

LONCIN G250F Service manual

Oriental motor BMU Series quick start guide

Oriental motor

Oriental motor BMU Series quick start guide

Vanguard 61A000 Operator's manual

Vanguard

Vanguard 61A000 Operator's manual

Oriental motor K II Series operating manual

Oriental motor

Oriental motor K II Series operating manual

Nidec Leroy-Somer IMfinity LC Series manual

Nidec

Nidec Leroy-Somer IMfinity LC Series manual

Graco Premier 240176 instructions

Graco

Graco Premier 240176 instructions

BRP ROTAX 125 MAX DD2 evo Installation instructions and operators manual

BRP

BRP ROTAX 125 MAX DD2 evo Installation instructions and operators manual

ZIEHL-ABEGG ZAtop SM250.80D Assembly instructions

ZIEHL-ABEGG

ZIEHL-ABEGG ZAtop SM250.80D Assembly instructions

manuals.online logo
manuals.online logoBrands
  • About & Mission
  • Contact us
  • Privacy Policy
  • Terms and Conditions

Copyright 2025 Manuals.Online. All Rights Reserved.