Poulan Pro PPB1000E User manual

/
•1-800-554-6723
www.poulan-pro.com
Instruction Manual
Manual de Instrucciones
Manuel d'lnstructions
PPBIOOOE /
WARNING:
Read and follow all Safety Rules and Operating Instructions before
using this product. Failure to do so can result in serious injury.
ADVERTENOIA:
Lea el manual de instrucciones y siga todas las advertencias e
instrucciones de seguridad. El no hacerlo puede resultar en le-
siones graves.
AVERTISSEMENT:
Lire le manuel d'instructions et bien respecter tousles avertisse-
ments et toutes les instructions de s6curite. Tout defaut de le
faire pourrait entraTner des blessures graves.
Poulan PRO
1030 Stevens Creek Road
Augusta, GA30907
545133458 9/18/06

DANGER! This lawn edger
can be dangerous! Careless or
improper use can cause
serious or even fatal injury.
Read and understand the
instruction manual before
using the lawn edger.
Always wear appropriate ear protection, eye protection and head protection.
,="=WARNING: When using gardening
appliances, basic safety precautions must al-
ways be followed to reduce the risk of fire and
serious injury, Read and follow all instructions.
This power unit can be dangerous! Operator
is responsible for following instructions and
warnings on unit and in manual, Read entire
instruction manual before using unit! Be thor-
oughly familiar with the controls and the prop-
er use of the unit, Restrict the use of this unit
to persons who have read, understand and
will follow the instructions and warnings on
the unit and in the manual. Never allow chil-
dren to operate this unit.
_FETY INFORMATION
_ ON THE UNIT
OPERATOR SAFETY
_DANGER: RISK OF CUT, KEEP
HANDS AND FEET AWAY FROM BLADE
AND CUTTING AREA. Do not attempt to
clear away cut material or hold material to be
cut when the blade is in motion. Make sure
powerhead is stopped and spark plug wire is
disconnected (or powerhead is disconnected
from power source) when removing jammed
materialfromthecutting blade. Donor grabor
hold attachment by the cutting blade.
•Dress properly. Always wear safety glasses
or similar eye protection when operating, or
performing maintenance on your unit (safety
glasses are available). Eye protection should
be marked Z87.
• Always wear face or dust mask if operation is
dusty.
• Always wear heavy, long pants, long sleeves,
boots, and gloves.
• Always wear foot protection. Do not go bare-
foot or wear sandals.
• Secure hair above shoulder length. Secure
or remove loose clothing or clothing with
loosely hanging ties. straps, tassels, etc.
They can be caught in moving parts.
• Being fully covered also helps protect you
from debris and pieces of toxic plants thrown
by spinning blade.
• Stay alert. Do not operate when you are tired,
ill. upset, or under the influence of alcohol,
drugs, or medication. Watch what you are do-
ing; use common sense.
• Wear hearing protection.
• Never start or run inside a closed room or
building. Breathing exhaust fumes can kill.
• Keep handles free of oil and fuel.
• Only operate unit with handlebar installed.
• Keep hands and feet away from cutting area.
• Never direct discharge of material toward by-
standers nor allow anyone near the area of
operation. Use care in directing discharge to
avoid glass enclosures, automobiles, and the
like.
FUEL SAFETY (for gas powerheads)
• Mix and pour fuel outdoors.
• Keep away from sparks or flames.
• Use a coetainer approved for fuel.
• Do not smoke or allow smoking near fuel or
the powerhead,
• Avoid spilling fuel or oil. Wipe up eli fuet spills
before starting the powerhead,
• Move at least 10 feet (3 meters) away from
fueling site before starting powerhead engine,
• Stop engine and allow to cool before remov-
ing fuel cap.
• Remove fuet cap slowly,
ELECTRICAL SAFETY (for electric
powerheads)
'4(_,WARNING: Avoidadangerousenvi-
ronment.To reduce the risk of electrical shock,
do not use in rain, in damp or wet locations, or
around swimming pools, hot tubs, etc. Do not
expose to snow, rain, or water to avoid the pos-
sibility of electrical shock. Do not use on wet
surfaces. Do not handle extension cord plug or
unit with wet hands.
• Use only a voltage supply as shown on the
nameplate of the unit.
• Avoid dangerous situations. Do not use in
presence of flammable liquids or gases to
avoid creating a fire or explosion and/or
causing damage to unit.
• Avoid dangerous environments. Do notuse
in unventilated areas or where dust or ex-
plosive vapors can build up.
• To reduce the risk of electric shock, the
powerhead may have a polarized plug (one
2

bladeiswiderthantheother);ifso,itwillre-
quiretheuseofapolarizedextensioncord.
Theapplianceplugwillfitintoapolarized
extensioncordonlyoneway.Iftheplug
doesnotfitfullyintotheextensioncord,re-
versetheplug.Iftheplugstilldoesnotfit,
obtainacorrectpolarizedextensioncord.
Apolarizedextensioncordwillrequirethe
useofapolarizedwalloutlet.Thisplugwill
fitintothepolarizedwailoutletonlyone
way.Ifplugdoesnotfitfullyintothewall
outlet,reversetheplug.Ifitstiltdoesnotfit,
contactaqualifiedelectriciantoinstallthe
properwalloutlet.Donotchangetheequip-
mentplug,extensioncordreceptacle,or
extensioncordpluginanyway.
•To reduce risk of electrical shock, use ex-
tension cords specifically marked as suit-
able for outdoor appliances having electri-
cal rating not less than the rating of unit.
Cord must be marked with suffix "W-A" (in
Canada "W'). Make sure your extension
cord is in good condition. Inspect extension
cord before use and replace if damaged. Do
not use a damaged cord. Cord insulation
must be intact with no cracks or deteriora-
tion. Plug connectors must beundamaged.
The extension cord used to reach the pow-
er source must be heavy enough to carry
current from the power source the full length
of the extension cord to the unit. An under-
sized extension cord wilt cause a drop in
line voltage resulting in loss of power and
overheating. If in doubt, use the next heavi-
er gauge. The lower the gauge number, the
heavier the cord.
• Do not use multiple cords.
• Do not abuse cord. Never carry the unit by
the extension cord or yank extension cord
to disconnect unit. To unplug, grasp the
plug, not the cord. Do not use cord as a han-
dle, close a door on cord, or pull cord
around sharp edges or corners. Do not ex-
pose cords to heat, oil, or water.
• Keep the extension cord clear ofoperator and
obstacles at all times. Tie cord to cord retain-
er and connect to recessed plug as shown
in this manual to prevent damage to unit
and/or extension cord and to reduce the
possibility of the extension cord discon-
necting from the unit during operation.
• Do not attempt to repair unit. inspect the insu-
lation and connectors on the powerhead and
extension cord before each use. If there is
any damage, do not use until damage is re-
paired by your authorized service dealer.
• Do not use the powerhead if the switch
does not turn the unit on and off properly.
Have the unit repaired by your authorized
service dealer.
• Do not use with damaged cord or plug. If
powerhead is not working as it should, has
been dropped, damaged, left outdoors, or
dropped into water, return it to your autho-
rized service dealer for repair.
• Avoid unintentional starting ofthe unit. Nev-
er carry unit with your finger on the switch.
Be sure the switch is in the OFF position
and never touch the switch when connect-
ing extension cord.
• Unplug the unit from the power source when
not in use, before servicing, and when chang-
ing accessories and/or attachments.
• Avoid any body contact with any grounded
conductor, such as metal fences, or pipes,
to avoid the possibility of electric shock.
• Ground Fault Circuit Interrupter (GFCI)
protection should be provided on the circuit
or outlet to be used for the powerhead. Re-
ceptacles are available having built-in
GFCI protection and may be used for this
measure of safety.
UNIT/MAINTENANCE SAFETY
'_ WARNING: Disconnectpowerhead
spark plug (or disconnect powerhead from
power source) before performing mainte-
nance.
• inspect entire unit before each use. Replace
damaged parts. Check for fuel leaks. Make
sure all fasteners are in place and securely
fastened.
• Maintain unit according to recommended pro-
cedures.
• Throw away blades that are bent, warped,
cracked, broken, or damaged in any other
way. Replace parts that are cracked, chipped,
or damaged before using the unit.
• Use only recommended Poulan PRO parts
and accessories. Never use wire, wire
rope, string, flailing devices, etc.
• Be sure blade stops turning when engine
idles (see CARBURETOR ADJUST-
MENTS section of powerhead manual).
• Remove the blade before making carburetor
adjustments. Hold the unit by hand. Do not
make carburetor adjustments from the blade
side of the unit.
• Keep others away when making carburetor
adjustments.
• Never start the unit with the clutch housing re-
moved. The clutch can fly off and cause seri-
ous injury.
• Have all maintenance and service not ex-
plained in this manual performed by an autho-
rized service dealer.
• If blade strikes a foreign object, follow these
steps: stop unit and disconnect spark plug
wire (or disconnect from power source), in-
spect for damage, and repair any damage be-
fore resuming operation of the unit.
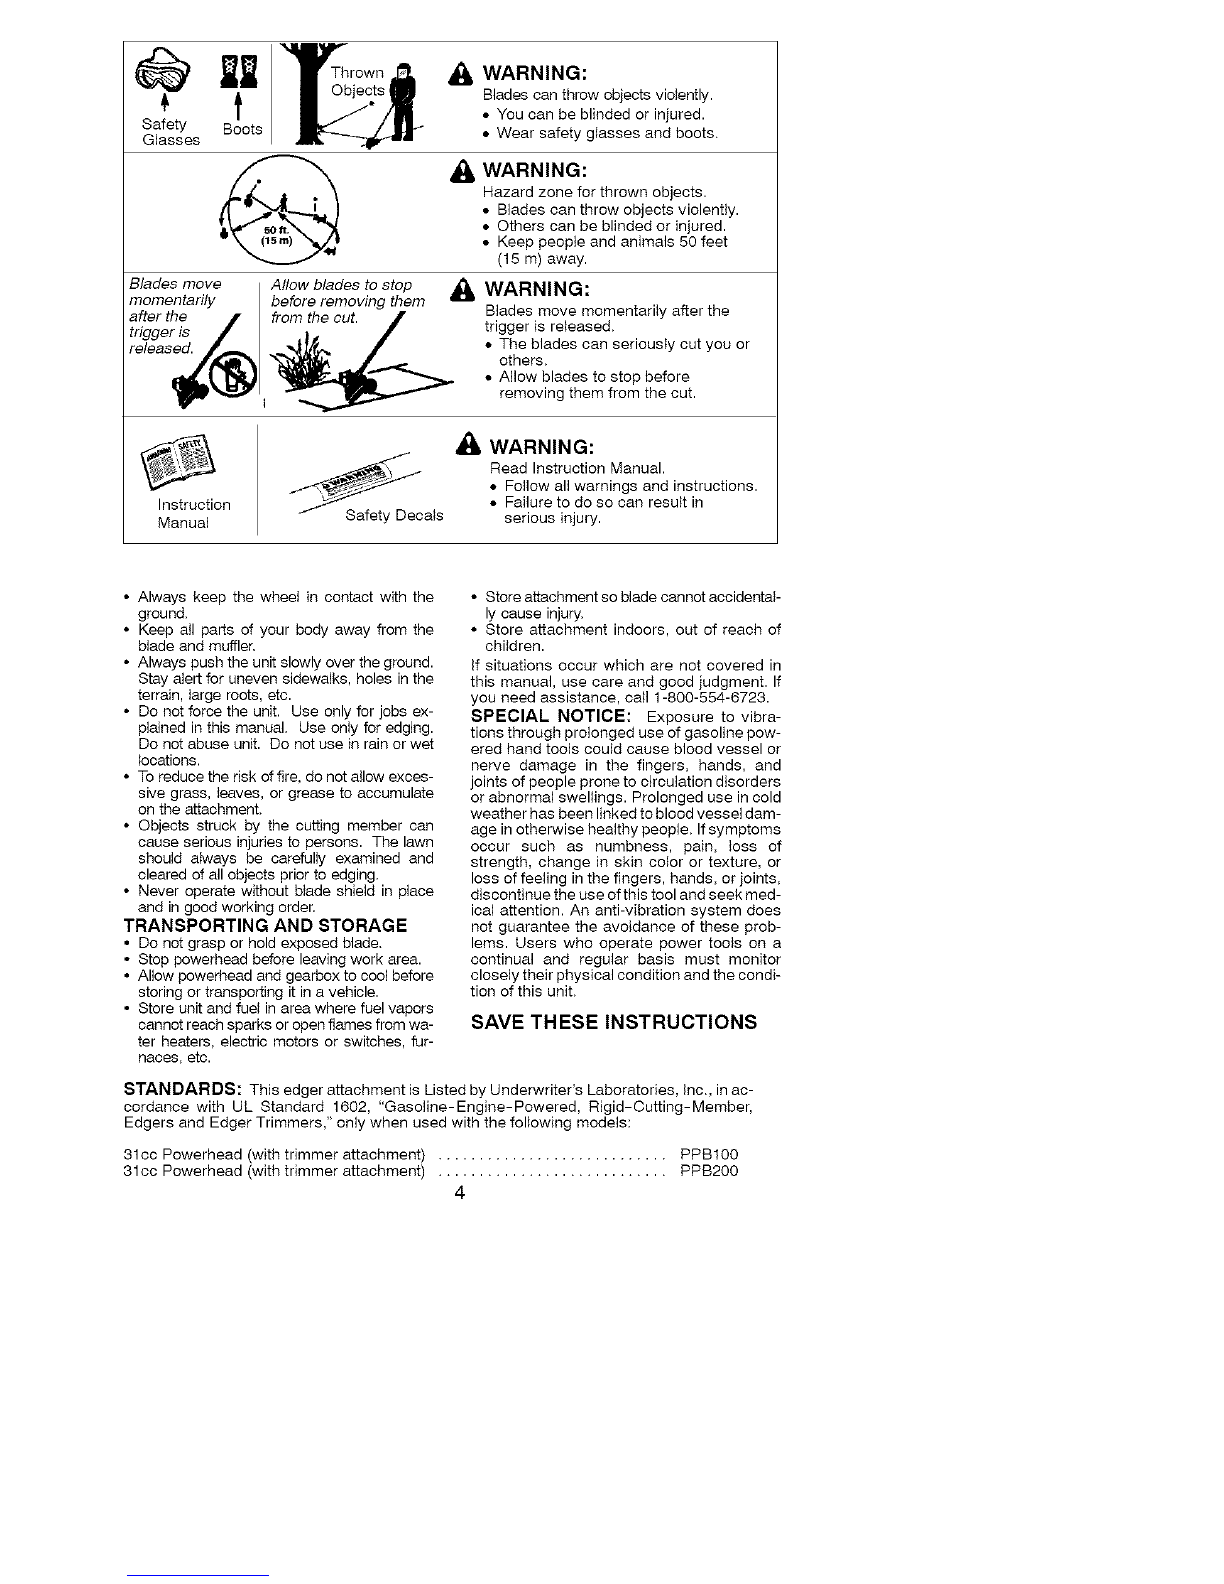
EDGING SAFETY
_,WARNING: Inspect the area to be
edged before each use. Remove objects
(rocks, broken glass, nails, wire, string, etc.)
which can be thrown by the blade or can wrap
around the shaft.
• Keep others including children, animals, by-
standers, and helpers at least 50 feet (15 me-
ters) away, Stop the unit immediately if you
are approached.
• Hold the unit firmly with both hands.
• Keep firm footing and balance. Do not over-
reach or stand on unstable surfaces.

t
Safety Boots
Glasses
Blades move
momentarily
after the
trigger is
&
Allow blades to stop _IL
before removing them u
WARNING:
Blades can throw objects violently.
•You can be blinded or injured.
• Wear safety glasses and boots.
_, WARNING:
Hazard zone for thrown objects.
• Blades can throw objects violently.
• Others can be blinded or injured.
• Keep people and animals 50 feet
(15 m) away.
WARNING:
Blades move momentarily after the
trigger is released.
• The blades can seriously cut you or
others.
• Allow blades to stop before
removing them from the cut.
Instruction
Manual
f
f Safety Decals
_, WARNING:
Read Instruction Manual.
• Follow all warnings and instructions.
• Failure to do so can result in
serious injury.
•Always keep the wheet in contact with the
ground,
• Keep all parts of your body away from the
blade and muffler,
• Always push the unit slowly over the ground.
Stay alert for uneven sidewalks, holes in the
terrain, large roots, etc.
• Do not force the unit. Use only for jobs ex-
plained in this manual, Use only for edging.
Do not abuse unit. Do not use in rain or wet
_ocations.
• To reduce the risk of fire, do not allow exces-
sive grass, leaves, or grease to accumulate
on the attachment,
• Objects struck by the cutting member can
cause serious injuries to persons. The lawn
should always be carefully examined and
cleared of all objects prior to edging,
• Never operate without blade shield in place
and in good working order,
TRANSPORTING AND STORAGE
• Do not grasp or hold exposed blade.
• Stop powerheed before leaving work area.
• Allow powerheed and gearbox to cool before
storing or transporting it in a vehicle.
• Store unit and fuel in area where fuel vapors
cannot reach sparks or open flames from wa-
ter heaters, electric motors or switches, fur-
Races, etc.
• Store attachment so blade cannot accidentaF
ly cause injury,
• Store attachment indoors, out of reach of
chitdren.
if situations occur which are not covered in
this manual, use care and good judgment. If
you need assistance, call 1-800-554-6723.
SPECIAL NOTICE: Exposure to vibra-
tions through prolonged use of gasoline pow-
ered hand tools could cause blood vessel or
nerve damage in the fingers, hands, and
joints of people prone to circulation disorders
or abnormal swellings. Prolonged use in cold
weather has been linked to blood vessel dam-
age in otherwise healthy people. If symptoms
occur such as numbness, pain, loss of
strength, change in skin coior or texture, or
loss of feeling in the fingers, hands, or joints,
discontinue the use of this tool and seek med-
ical attention. An anti-vibration system does
not guarantee the avoidance of these prob-
lems. Users who operate power tools on a
continual and regular basis must monitor
closely their physical condition and the condi-
tion of this unit,
SAVE THESE INSTRUCTIONS
STANDARDS: This edger attachment is Listed by Underwriter's Laboratories, Inc., in ac-
cordance with UL Standard 1602, "Gasoline-Engine-Powered, Rigid-Cutting-Member,
Edgers and Edger Trimmers," only when used with the following models:
31cc Powerhead (with trimmer attachment) ............................ PPB100
31cc Powerhead (with trimmer attachment) ............................ PPB200
4

4_I_WAI-{I_III_I_: If received assemb}ed,
repeat all steps to ensure your unit is properly
assembled and all fasteners are secure.
Examh3e parts for damage. Do not use dam-
aged parts.
NOTE: if you need assistance or find parts
missing or damaged, call 1-800-554-6723.
TOOLS REQUIRED
• Hex wrench (provided)
HANDLEBAR ASSEMBLY
A(_DANGER: RISK OF CUT. To avoid
serious injury, the barrier portion of the han-
dlebar must be h_stalled as shown on the up-
per shaft of the powerhead to provide a barrier
between operator and the sph_ning blade. At-
tach handlebar mounting bracket above ar-
row on safety warning decal on the upper
shaft (powerhead end of unit). Ensure han-
dlebar is positioned on mounting bracket at
the end of the arrow on the handlebar decal.
NOTE: Two mounting brackets are included
with this attachment. Both brackets are pro-
vided to adapt this attachment for use with pow-
erheads that have either a 1" (2.5 cm) diameter
or a 7/8" (2.2 sin) diameter upper shaft. The
correct bracket must be used to ensure that the
handlebar is mounted securely to the upper
shaft before use.
Handlebar _ f._- Screw
1. Place the mounting bracket over the upper
shaft above the arrow on the safety label.
Be sure to use the correct mounting brack-
etfor eitherthe 1" (2.5cm) or7/8" (2.2cm)
diameter upper shaft.
2. Position one of the bracket covers under
the upper shaft and align the mounting
bracket and the bracket cover screw
holes, insert two screws into the screw
holes,
3. Secure the mounting bracket by tightening
the screws with the hex wrench,
4. Locate the decal on the handlebar. This
decal includes an arrow, Position the han-
dlebar with the mounting bracket at the
end of the arrow.
5. Position the second bracket cover over
the handlebar. Align the mounting bracket
and the bracket cover screw holes. Again
make sure the handlebar is at the end of
the arrow.
6. insert two screws and hand tighten only,
Be sure the handlebar is installed cor-
rectly; then, tighten each screw securely
with the hex wrench.
NOTE: Adjustments can be made by loos-
ening the bracket cover screws and moving
the mounting bracket or handlebar up or down
the shaft. Be sure the handlebar is installed
correctly; then, retighten each screw secure-
ly with the hex wrench.
Bracket Cover
Mountin_
Bracket ;
i

KNOW YOUR EDGER ATTACHMENT
READ THIS iNSTRUCTiON MANUALAND SAFETY RULES BEFORE OPERATING YOUR EDG-
ER AT!-ACHMEN_R Compare the illustrations with your attachment to familiarize yoursetf with the
location of the various controls and adjustments. Save this manual for future reference.
Depth Adjustment Knob
Wheel
Shaft
J
Hanger j
Blade Shield
Gearbox
BLADE
The BLADE is designed to cut sod,
Edger Blade
DEPTH ADJUSTMENT KNOB
The DEPTH ADJUSTMENT KNOB is used
to adjust the wheel for blade cutting depth.
OPERATING THE COUPLER
Your powerhead is equipped with a coupIer
which enables optional attachments to be
installed. The optional attachments are:
MODEL:
Cultivator .................. PPB2000T
Blower .................... PPB3000B
Pruner .................... PPB5000P
Brushcutter* ............... PPB4000C
*not designed for use with electric powerheads
WARNING: Always disconnect pow-
erhead spark plug (or disconnect powerhead
from power source) before removing or instal-
ling attachments.
REMOVING ATTACHMENT
CAUTION: Whee removing or installing at-
tachments, place the powerhead and attach-
ment on a flat surface for stability.
1. Loosen the coupler by turning the knob
counterclockwise. Upper Shaft
Coupler
Lower \ .OOSEN
Attachment
2. Press and hold the IocMng/release button.
Locking/Release
Button
/D
cup er _ Upper Shaft
Lower Attachment
3. While securely holding the upper shaft.
pull the attachment straight out of the cou-
pler.
INSTALLING ATTACHMENT
1. Removethe shaft cap from the attachment
(if present) and discard.
2. Position locking/release button of attach-
ment into guide recess of upper shaft cou-
pler.
3. Push the attachment into the coupler until
the locking/release button snaps into the
primary hole.
4. Before using the unit. tighten the knob se-
curely by turning clockwise.
Couple r Primary Hole
Guide Recess
TIGHTEN Knob
Upper Locking/ Attachment
Shaft Release
Button

_IWARNING: Make sure the locking/
release button is locked in the primary hole
and the knob is securely tightened before op-
erating the unit, Using the wrong hole could
lead to serious injury or damage to the unit.
Secondary Hole
Locking/Release
Button in Primary Hole
INSTALLING ATTACHMENT
HANGER
An attachment banger is provided for storage
when attachment is not in use.
To install hanger on attachment:
1. Remove the shaft cap from the attachment
(if present) and discard.
2. Press and hold the locking/release button.
3. Push hanger onto the attachment until the
locking/release button snaps into the hole.
OPERATING POSITION
ALWAYS WEAR: _'_eEyeProtection
Long Pants _
Heavy Shoes I(ll
When operating unit, stand as shown and
check for the following:
• Wear eye protection and heavy clothing.
• Keep right arm slightly bent with right hand
hoiding the trigger handle of powerhead.
• Keep left arm extended with left hand hold-
ing the handlebar.
• Keep unit below waist level.
• Adjust edger wheel for proper cut depth.
WARNING: Never attempt to adjust
the edger wheet when the unit is in operation.
Always stop the powerhead, wait until the
blade stops turning, and disconnect the spark
plug (or disconnect powerhead from power
source) before making adjustments.
EDGING
As you become familiar with use of your edger
attachment, you will be able to determine your
own operating pace. Conditions such as
depth of cut and material being cut will regu-
late the speed and time required for your edg-
ing job.
•Allow the engine to warm up before you begin
edging.
• Increase the engine speed before placing the
blade in the cut. For best results, run the en-
gine at full throttle while cutting.
• Always work going away from people and
solid objects such as walls, large stones,
trees, automobiles, etc.
• Be careful when edging near trees or valuable
plants. The high speed metal blade may cut
roots and cause damage to the plants.
• If the blade stalls, immediately move the unit
back slightly to allow the blade to restart. Ifthe
blade continues to stall, stop the engine, dis-
connect the spark plug, and inspect for block-
age or damage.
Ag&WARNING: Keep the blade area
clean. Always release the throttle trigger,
move the powerhead ON/OFF switch to the
OFF position, disconnect the spark plug (or
disconnect powerhead from power source),
and make sure the blade has completely
stopped turning before cleaning.
SETTING THE EDGING DEPTH
_, WARNING: Never attempt to adjust
the cut depth when the engine is running. Al-
ways release the throttle trigger, wait until the
blade stops turning, move the powerhead
ON/OFF switch to the OFF position, and dis-
connect spark plug (or disconnect from pow-
er source) before making adjustments.
Depth
Knob "_
1. Loosen the depth adjustment knob.
2. Slide the wheel to the desired position.
• Raising the wheel will increase the cut-
ting depth.
• Lowering the wheel will decrease the
cutting depth.
3. Tighten the depth adjustment knob se-
curely.

_ WARNING: Alwaysstopunitanddis-
connect spark plug wire (or disconnect pow-
erhead from power source) before performing
maintenance.
CHECK FOR DAMAGED OR
WORN PARTS
Contact an authorized service dealer for re-
placement of damaged or worn parts,
• Blade Shield - Discontinue use of edger if
blade shield is damaged,
CHECK FOR LOOSE
FASTENERS AND PARTS
• Blade nut
• Fasteners
INSPECT AND CLEAN UNIT AND
DECALS
• After each use, inspect compIete unit for
loose or damaged parts. Clean the unit and
decals using a damp cloth with a mild deter-
gent.
• Wipe off unit with a clean dry cloth.
BLADE REPLACEMENT
BLADE MAINTENANCE
'_,WARNING: The blade wilt continue
to spin after the engine stops or after the
throttle trigger has been released. To avoid
serious injury, make sure the blade has
stopped coasting and disconnect the spark
plug (or disconnect powerhead from power
source) before performing work on the blade.
WARNING: Alwaysreplaceablade
that is bent. warped, cracked, broken, or
damaged in any other way. Never attempt to
straighten and reuse a damaged blade. Use
only specified replacement blade. Wear pro-
tective gloves when handling or performing
maintenance on the blade to help avoid h_jury.
• The blade is reversible. When the cutting
edge on one side becomes worn, turn the
blade over (see BLADE REPLACEMENT
in the SERVICE AND ADJUSTMENTS
section).
• Check blade for flatness periodically. Lay
the blade on a flat surface to inspect for flat-
ness. Throw away a blade that is not flat.
A
m_,WARNING: The blade will continue to
spin after the engine stops or after the throttle
trigger has been released. To avoid serious
injury, make sure the blade has stopped
coasting and disconnect the spark plug (or
disconnect powerhead from power source)
before performing work on the blade.
WARNING: Wear protective gloves
when handling or performing maintenance on
the blade to avoid injury. The blade is sharp and
can cut you even when it is not moving.
1. To remove the blade, align hole in the dust
cup with the hole in the side of the gearbox
by rotating the blade.
2. insert a small screwdriver into aligned
holes. This will keep the shaft from turning
while loosening the blade nut.
Screwdriv_
3. While holding the screwdriver in position,
remove blade nut by turning clockwise.
4. Remove both washers, and the blade from
the blade shaft.
Blade shield
Blade
Washers
Blade
Shaft
5. Install new blade onto blade shaft.
6. Reinstall both washers and blade nut
(counterclockwise).
7. Tighten blade nut firmly with a wrench
while holding screwdriver in position.
8. Remove the screwdriver.
9. Turn blade by hand. If the blade binds
against the shield, or appears to be un-
even, the blade is not centered, and you
must reinstall.

d_I_W/._I-iNIN_: Perform the following
steps after each use:
• Allow attachment and gearbox to cool be-
fore storing or transporting.
• Store attachment with blade shield in place.
Position attachment so that any sharp ob-
ject cannot accidentally cause injury.
• Store the attachment in a dry, well venti-
lated area out of the reach of children.
SEASONAL STORAGE
Prepare attachment for storage at end of sea-
son or ifit will not be used for 30 days or more.
If your edger attachment is to be stored for a
period of time:
• Clean the entire attachment.
• inspect the blade shield area and clean any
dirt, grass, leaves, or debris that has col-
lected, inspect the blade and blade shield; re-
place a blade that is beet, warped, cracked,
broken or damaged in any other way.
• Lightly oil external metal surfaces.
• Apply a coating of oil to the entire surface of
the blade; wrap it in heavy paper or cloth.
• Check entire attachment for loose screws
or nuts. Reptace any damaged, worn or
broken parts.
• At the beginning of the next season, use
only fresh fuel having the proper gasoline to
oil ratio.
Poulan PRO warrants to the original pur-
chaser that each new Poulan PRO brand
gasoiine tool or attachment is free from de-
fects in material and workmanship and
agrees to repair or replace under this war-
ranty any defective gasoline product or at-
tachment as follows from the original date of
purchase.
2 YEARS- Parts and Labor, when used for
household purposes.
90 DAYS -Parts and Labor, when used for
commercial, professional, or income produc-
ing purposes,
30 DAYS - Parts and Labor, if used for rental
purposes,
This warranty is not transferable and does not
cover damage or liability caused by improper
handling, improper maintenance, or the use
of accessories and/or attachments not spe-
cifically recommended by Poulan PRO for
this tool. Additionally, this warranty does not
cover tune-ups, spark plugs, filters, cutting
line, or rotating head parts that will wear and
require replacement with reasonable use dur-
ing the warranty period. This warranty does
not cover predeiivery setup or normal adjust-
ments explained in the instruction manual.
THIS WARRANTY GIVES YOU SPECIFIC
LEGAL RIGHTS, AND YOU MAY HAVE
OTHER RIGHTS WHICH VARY FROM
STATE TO STATE.NO CLAIMS FOR CON-
SEQUENTIAL OR OTHER DAMAGES WILL
BE ALLOWED, AND THERE ARE NO
OTHER EXPRESS WARRANTIES EX-
CEPT THOSE EXPRESSLY STIPULATED
HEREIN.
SOME STATES DO NOT ALLOW LIMITA-
TIONS ON HOW LONG AN IMPLIED WAR-
RANTY LASTS OR THE EXCLUSION OR
LIMITATIONS OF INCIDENTAL OR CON-
SEQUENTIAL DAMAGES, SO THE ABOVE
LIMITATIONS OR EXCLUSION MAY NOT
APPLY TO YOU.
The policy of Poulan PRO is to continuously
improve its products, Therefore, Poulan
PRO reserves the right to change, modify, or
discontinue models, designs, specifications,
and accessories of all products at any time
without notice or obligation to any purchaser.

PELIGRO: iEsta cortadora
de bordes puede ser peligrosa! U
El uso descuidado o indebido de
esta herramienta puede causar
graves o aOn heridas fatales!
Lea y comprenda el
manual de instruc-
ciones antes de usar la
cortadora de bordes.
Use siempre la proteccion de oidos apropiada, la proteccion de ojos y la
protecci6n de la cabeza.
_ ADVERTENClA: Atusarcualquier
herramienta de fuerza de jardineria, deber&n
observarse precauciones b&sicas de seguirdad
en todo momento para reducir el riesgo de in-
cendio y graves heridas. Lea y cumpla con to-
das tas instrucciones.
iEeta herramienta de fuerza puede set peligre-
ea! Cabe al usuado le responsabilidad de cum-
pIir con todas las advertencias einstrucciones.
iLea el manual de instrucciones en su totalidad
antes de usar el aparato! Este completamente
familiarizado con los controles y con el uso cor-
recto de1aparato. Limite el uso de este aparato
a aquellas personas que hayan leido y com-
prendido, y que vayan a obedecer, todas las ad-
vertencias e instrucciones tanto en el aparato
como en el manual. No permita nunca a los
ni[fios que usen este aparato.
_ INFORMACION
DE SEGURIDAD
DEL APARATO
SEGURIDAD DEL OPERADOR
PELIGRO: RIESGO DE CORTADU-
RA - MANTENGA LAS MANOS Y LOS PIES
ALEJADOS DE LAS CUCHILLA Y DEL
AREA DE CORTE. No intente remover el
material o sostenga el material a ser cortado
mientras las cuchilias se encuentren en movi-
miento. Aseg0rese que la cuchilia y el motor
del cabeza se haya detenido y/o desconecte
el aparato de la corriente electrica antes de
remover el material que se haya atascado en
la cuchilla de corte. No sostenga ni agarre el
aparato por la cuchilia de corte.
• Vistase apropiadamente. Siempre use ante-
ojos de seguridad o similar proteccion para
los ojos cuando use o de mantenimiento a
este aparato (anteojos de seguridad est&n
disponibles). La protecci6n para los ojos
debe ser marcada con Z87.
• Siempreutilizemascarillaparalacaraomas-
carilla a prueba de polvo si se va a trabajar en
condiciones donde hay polvo.
•Siempre utilize pantalones pesados y lar-
gos, mangas largas, botas y guantes.
•Siempre utilize protecci6n para los pies. No
trabaje descalzo ni en sandalias.
•Mantenga el cabello por encima de los hom-
bros, atandolo para tal efecto si es necesario.
No use ropa suelta ni ropa con corbatas, tiras,
borlas, etc. que cuelgan libremente. Pueden
enredarse en las piezas en movimiento.
• Si est&. completament tapado, estara m&.s
protegido de los escombros y pedazos de
plantas t6xicos arrojados por la cuchilta gi-
rante.
• Mantengase alerta. No haga uso del aparato
estando cansado, enfermo, trastomado o
bajo la influencia del alcohol, de drogas o de
remedios. Vigile bien _o que esta haciendo;
use del sentido com0n.
• Use proteccion de oidos.
• Nunca ponga et aparato en marcha ni Io deje
en marcha dentro de un recinto cerrado. Re-
spirar los vapores del combustible Io puede
matar.
• Mantenga las manijas libres de aceite y de
combustible.
• Use 0nicamente el aparato cuando el mango
es instalado.
• Mantenga los pies alejados del area de corte.
• No intente remover el material ya cortado ni
tampoco sostener el material que se va a
cortar mientras el motor se eneuentre en
marcha o cuando la pieza que hace el corte
se encuentre en movimiento.
• Nunca dirija la descarga del material hacia
espectadores, ni permita que nadie se en-
cuentre cerca del &.tea de trabajo. Trabaje
con sumo cuidado al dirigir la descarga de
material para evita cristales, autom6viles, y
cosas de tal naturaleza.
SEGURIDAD CON EL COMBUS-
TIBLE (para cabezas de motor a
gasolina)
• Mezcle y vierta el combustible al aire libre.
• Mantengalo alejado de las chispas y de las
llamas.
• Use recipiente aprobado para el combustible.
• No fume ni permita que se fume cerca del
combustible ni dei aparato ni mientras este
este en uso.
• Evite derramar et combustible o et aceite.
Limpie todo el combustible derramado.
10

• Alejese a por Iomenos 3 metros (10 pies) del
lugar de abastecimiento antes de poner en
marcha el motor.
• Pare el motor y permita que se enfrie el apa-
rato antes de retirar la tapa del tanque.
• Remueva la tapa de1tanque de combustible
tentamente.
SEGURIDAD ELECTRICA (para ca-
bezas de motor etectricos)
_ADVERTENCIA: Evite ambientes
peligrosos, No use su aparato en lugares
h0medos o mojados ni cerca de piscinas, de
los hidromasajes, etc. No exponga el aparato
a la nieve, a la Iluvia ni al agua para evitar la
posibilidad de choque electrico. No use en su-
perficies mojadas. No toque el enchufe del
cable de extensi6n ni el del aparato con las
manos mojadas.
•Use exclusivamente el voltaje que consta en
ta placa del aparato.
• Evite situaciones peligrosas. No use el
aparato en presencia de liquidos ni gases
inflamables, para evitar incendios, explo-
siones y/o da(fios al aparato.
• Evite ambientes peligrosos. No use su apara-
to en Areas poeo ventiladas donde haya alta
concentraci6n de polvo o vapores explosi-
VOS,
• Para reducir el riesgo de choque electrico, eel
cabeza de motor puede tener un enchufe po-
tarizado (una aleta es mas ancha que la otra).
Este enchufe entrara solamente en una sola
posici6n en un enchufe polarizado del cable
de extension. AsegOrese de tener un cable
de extensi6n polarizado. A su vez, el enchufe
polarizado del cable de extensi6n potarizado.
A su vez, el enchufe polarizado det cable de
extensi6n entrar#t en el tomacorriente de una
sola form& Si el enchufe no entra completa-
mente en el tomacorriente, invierta el en-
chufe. Si todavia no entra, contacte un eiectri-
cista autorizado para que instale el
tomacorriente apropiado. No cambie el en-
chufe, recept#tculo del cable de extension o
cable de extension en ninguna forma.
• Para reducir et riesgo de choque etectrico,
use cables de extension especificamente
marcados como aptos para usar con apara-
tos de uso exterior y que tengan una ctasifi-
cacion el6ctrica no menor que la clasificaci6n
del aparato. El cable debe venir marcado con
el sufijo "W-A" ("W" en Canad_t). AsegOrese
que el cable de extensi6n se encuentre en
buenas condiciones. Siesta da(_ado, c#tmbie-
lo. Los cables de extensi6n demasiado finos
causaran una baja en el voltaje de linea, pro-
vocando baja de potencia y exceso de calen-
tamiento. En caso de dud& use un cable de
clasificacion m#ts alta. Cuanto mas bajo es el
nQmero de clasificaci6n m#ts grueso sera el
sable.
• No utilice mas de uno los cables de exten-
si6n.
• No abuse del cord6n. Nunca maneje el apa-
rato por el cable de extensi6n o tire del mismo
para desconectar el aparato. Para desconec-
tar, sujete et enchufe, no el cable. No use el
cable como mango, no cierre las puertas con-
tra el cable, ni tire del cable si este esta apoy-
ado contra un borde filoso. Apague todos los
controles y permita que el motor se detenga
antes de desconectar el aparato del recurso
de energia. No exponga el cable al calor,
aceite o agua.
• Mantenga el cable de extensi6n alejado del
usuario y de obet#tculos en todo momento.
Asegure el cable de extensi6n con el segui-
dor del cable al conectar con el enchufe
embutido segOn Io demostrado en este
manual para prevenir da[fio a el aparato y/o
cable de extensi6n y para reducir el riesgo
de que el cable de extensi6n se desconecte
del aparato durante et uso.
• No intente reparar el aparato. Inspeccione el
aislante y los conectores en el aparato yen el
cable de extension antes de cada uso. Si en-
cuentra algOn da[_o, no Iouse hasta no ser re-
parado por su distribuidor autorizado del ser-
vicio.
• No use el cabeza de motor si el interruptor no
Io enciende o apaga como corresponde.
H#tgalo reparar en un distribuidor autorizado
det servicio.
• No use el cabeza de motor con el cable o el
enchufe dafiados. Si el cabeza de motor no
est#tfuncionando como debe, si se ha caido,
se ha dafiado, dejado a la interperie o dejado
caer at agua, devueIvalo a su distribuidor au-
torizado del servicio para ser reparado.
• Evite los arranques no intencionales del
motor. AI Ilevar el aparato de un tado a otto,
nunca ponga el dedo en el interruptor.
AsegOrese de que el interruptor este en la
posicion OFF y nunca que toca el interrup-
tor al conectar el cable de extensi6n.
• Desconecte el aparato del recurso de en-
ergia cuando no se encuentre en uso,
antes de efectuar servicio, y al cambiar ac-
oesorios.
• Para evitar la posibilidad de choque electri-
co, evite el contacto del cuerpo con el con-
ductor a tierra, como Io son el metal, las
oeroas o tuberias.
• Debe proveerse Interruptor de Fallas en el
Circuito a Tierra (Ground Fault Circuit Inter-
ruptor- GFCI) en el circuito o en el tomacor-
riente usado con este aparato. Hay tomacor-
rientes disponibies con protecci6n GFCI
incorporada y estos pueden ser usados para
cumplir con esta medida de seguridad.
SEGURIDAD DEL APARATO
'_ ADVERTENCIA: Desconecte la
bujia (o desconecte aparato de la corriente
eIectrica) antes de hacer cualquier manten-
imiento.
• Inspeccione el aparato totalmente antes de
cada uso. Cambie tas piezas dafiadas. Veri-
fique que no haya perdidas de combustible.
Aseg0rese que todos los fijadores esten en
su lugar correspondiente y bien fijos.
• Haga el mantenimiento del aparato segt_n los
procedimientos recomendados.
• Deseche toda cuchilta dobtada, torcida, res-
quebrajada, quebrada o da[_ada de cualquier
otto modo. Cambie todas las piezas resque-
brajadas, descantilladas o da[_adas antes de
usar el aparato.
11

Las cuchillas pueden
_e arrojar objetos al aire
ADVERTENCIA:
Objetos arrojados al aire de forma vio-
lenta.
•Usted puede perder la vista o acci-
dentarse.
• Use gafas de seguridad y botas.
._ ADVERTENCIA:
Zona de peligro de objetos arrojados al aire.
• Las cuchillas pueden arrojar objetos al aire
violentamente.
• Otras personas pueden perder la vista o acci-
dentarse.
• Mantenga a personas y animales por Io menos
15 metros (50 pies) atejados de la zona de tra-
bajo.
Las cuchilla Permita que las cuchil-
giran momentane- Ila se detengan antes
amente despues Ide remover las de la
de soltar el I zona que se esta
gatillo. _ _
_Etiquetas de
Manual de seguddad
instrucciones
ADVERTENCIA:
Las cuchillas permanecen girando
momentAneamente despues de soltar
el gatillo.
• Las cuchillas pueden causar serias
cortaduras a usted o a otras perso-
nas.
• Permita que las cuchillas se deten-
gan antes de removerlas de la zona
de corte.
ADVERTENCIA:
Lea el manual de instrucciones.
• Siga todas las advertencias e
instrucciones.
• De Io contrado, accidentes de gra-
vedad podrian ocurrir.
•Use Onicamente las piezas y accesorios
recomendados de ta marca Poulan PRO.
Nunca utilice alambre, cable, soga, hilo,
dispositivos desgranadores, etc.
• AsegQrese que la cuchilla se detenga por
completo cuando el motor esta en marcha
lenta (vea los AJUSTES AL CARBURA-
DOR en el manual de instrucciones de ca-
beza de motor).
• Retire la cuchilla del aparato antes de hacer
los ajustes al carburador. Sostenga el apa-
rato con la mano. No haga ajustes al carbu-
rador desde el 1ado de la cuchilla.
• Mantenga alajadas alas demAs personas
siempre que este haciendo ajustes al car-
burador.
• Nunca ponga el aparato en marcha sin ten-
er la caja de cambios instalada. El embra-
que puede salir volando y causar graves
heridas.
• Todo mantenimiento y servicio no explicados
en este manual deberan ser efectuados por
un distribuidor autorizado del servicio.
• Si el aparato choca con un objeto extra[_o,
siga el siguiente procedimiento: detenga el
motor, desconecte la bujia (o desconecte ca-
beza de motor de la corriente etectrica), in-
speccione los daSos, y repare cualquier daSo
antes de continuar la operacion.
SECURIDAD AL CORTAR BORDES
_k ADVERTENCIA: Inspeccione el
Area a ser corada antes de cada uso. Retire
los objetos (piedras, vicrio roto, clavos,
alambre, hilo, etc.) que puedan ser arrojados
por la cuchilla o que puedan enroscarse en el
eje.
• Mantenga a los demas, inclusive a Ios ni6os,
los animales, los espectadores y los asis-
tentes fuera de la ona de peligro de 15 metros
(50 pies). Pare el aparato immediatamente si
alguien se le acerca.
• Sostenga e1 aparato firmemente con las dos
manes,
• Mantenga el balance. No se extienda dema-
siado o se pare en superficies inestables.
• Mantenga siempre las rueda en contacto con
el suelo.
• Mantenga todas las partes de su cuerpo ale-
jadas de la cuchilla y del silenciador.
• Siempre empuje etaparato lentamente sobre
el terreno. Cuidese constantemente contra
las aceras desnivetadas, hoyos en el terreno,
raices grandes, etc.
• Use el aparato exclusivamente para los fines
descritos en este manual. Use Linicamente
para bordear. No abuse el aparato. No use
bajo la Iluvia ni en lugares que se encuentren
mejades.
12

• Para reducir el riesgo de incendio, no permita
la acumulaci6n excesiva de cesped, hojas o
grasa en el aooesorio.
• Los objetos go_peados por la cortadora
podrian causar accidentes graves a perso-
nas. Se debera examinar cuidadosamente
el cesped y aclarar todos los objetos antes
de oomenzar a bordear o oortar.
• Nunca use aparato sin los protector en su
lugar y en buenas condiciones de trabajo.
TRANSPORTE Y ALMACENADO
• No sostenga el cuchilla expuesta.
• Pare le cabeza de motor antes de dejar el
&rea de trabajo.
• Deje enfriar el cabeza de motor y el caja de
engranajes antes de guarda6o o de trans-
porta6o en un vehiculo.
• Guarde et aparato y el combustible en un
lugar donde los vapores del combustible no
puedan Iiegar hasta conde haya chispas o
llamas abiertas provenientes de termotan-
ques, motores o interruptores electricos,
calefactores centrales, etc.
• Guarde el aparato de modo que la cuchilla no
pueda causar heridas accidentatmente.
• Guarde el aparato dentro, fuera dei alcance
de los nifios.
Si acontencen situaciones no tratadas en este
manual, tenga cuidado y use de buen criterio. Si
necesita ayuda, Ilame al distnbuidor autorizado
del servicio al 1-800-554-6723.
AVISO ESPECIAL: El estar expuesto alas
vibraciones a traves del uso prolongado de her-
ramientas de fuerza a gasolina, puede causar
dalqos a _osvases sanguineos o a Ios nervios
de los dedos, las manos y las coyunturas a
aquellas personal propensas a los trastornos de
la circulaci6n o a las hinchazones anormaIes. El
uso prolongado en climas frios ha sido asocia-
do con dafios a los vasos sanguineos a perso-
nas que por otra parte se encuentran en perfec-
to estado de salud. Si ocurriera sintomas tales
come el entumecimiento, el color, la falta de
sentido en los dedos, las manos o en las coyun-
turas, pare de usar esta m&.quina de inmediato y
procure atenci6n medica. Los sistemas de anti-
vibracion no garantizan que se evitan tales pro-
blemas. Los usuarios que hacen uso continuo y
prolongado de las herramientas de fuerza de-
ben fiscalizar atl_etamente su estado fisico y el
estado del aparato.
GUARDE ESTAS INSTRUCCIONES
CRITERIOS: Este accesorio del cortadora de bordes est&. Enlistado per Underwriter's
Laboratories, Inc., de acuerdo con la Norma UL 1602, "Motores a Gasolina, Miembro Rigido
del Corte, Cortadoras de Bordes y Recortadoras de Bordes," solamente cuando esta utiliza-
do con los modelos siguientes:
Cabeza de motor de 31cc (con el accesorio del cortadora) ................... PPB1OO
Cabeza de motor de 31cc (con el accesorio del cortadora) ................... PPB2OO
ADVERTENCIA: Si recibio et apara-
to ya armado, repita redes los pasos para ase-
gurarse de que se Io haya armado correcta-
mente y de que todos los fijadores esten bien
ajustados.
Examine las piezas para verificar que no
haya dairies. No use piezas daffiadas.
AVISO: Si necesita ayuda, si faltan piezas
o si hay piezas daf_adas, Ilame al nt_mero
1-800-554-6723.
HERRAMIENTAS NECESARIAS
• Un Ilave hexagonal (provista) se requiere
para et montaje.
INSTALLATION DEL MANGO
PELIGRO: RIESGO DE CORTADU-
RA. Para evitar graves heridas, la parte del
mango en forma de barrera debe ser instala-
da en el eje superior de la cabeza del motor/
eje superior con el fin de mantener la distan-
cia entre el operador y la cuchilla durante el
giro de esta. Instale el soporte del mango
sobre la fiecha de la etiqueta de seguridad del
eje superior (extreme a la cabeza del motor
de su aparato). Asegure que el mango esta
situado en el soporte dei mango en el extremo
de la flecha en la etiqueta de seguridad adher-
ida al mango.
AVlSO: Dos soportes del mango se incluye
con este acoesorio. Estos soportes se pro-
porcionan para adaptar este accesorio para
el uso con las cabezas de motor/eje superior
que tienen 1 pulgada (2,5 cm) o 7/8 de puiga-
da (2,2 cm) de di_.metro del eje superior. El
soporte correcto se debe utilizar para asegu-
rarse de que el mango esta montado con se-
guridad al eje superior antes del uso.
Mango -_ f._J Tornillo
Tapa del
Soporte _.j_p orte
del Mango ,; -
i
1. Coloque el soporte del mango en la parte
superior sobre la flecha en la etiqueta de
seguridad. Asegure de que usted utilice el
soporte de mango correcto para el de 1
pulgada (2,5 cm) o 7/8 de pulgada (2,2 em)
de di&metro del eje superior.
2. Coloque una de las tapas del soporte de-
bajo det eje superior y alinee los huecos
del tornillo del soporte del mango y de la
tapa del soporte. Inserte dos tornillos en
los huecos del tornillo.
13

3.Asegureelsoportedelmangoapretando
lostornillosconlatlavehexagonal.
4.Localizelaetiquetaadheridaalmango.
Estaetiquetacontieneunaflecha.
Coloqueelmangoenelsoportedelmango
enelextremodeestaflecha.
5.Cotoquelasegundatapade1soporte
sobreelmango.Alineeloshuecosde1tor-
niHodelasoportedelmangoydelatapa
delsoporte.AsegOresedequeelmango
quedesituadaenelextremodelaflecha.
6.Introduzcadostornillosyaprieteamano.
AsegOresedequeelmangoquedeinsta-
ladocorrectamente,despuesacontinua-
ci6n,aprietefirmementecadaunodelos
tornillosconlaIlavehexagonal.
AVISO: Los ajustes pueden ser hechos
aflojando los tornillos del soporte y moviendo
et soporte de montaje o el mango por encima
o por debajo de1eje. Este seguro que el man-
go est#t instalado correctamente; entonces,
vuelva a apretar cada tornillo con seguridad
con la llave hexagonal.
CONOZCA EL CORTADORA DE BORDES ACCESORIO
LEA ESTE MANUAL DE INSTRUCCIONES Y LAS REGLAS DE SEGURIDAD ANTES DE
COMENZAR A USAR ESTE CORTADORA DE BORDES ACCESORIO. Compare ias ilustra-
clones con su aparato para familiadzarse con la ubicaci6n de los diversos controles y ajustes.
Guarde este manual para uso futuro.
Perilla de Ajuste
de Profundidad
Rueda
Eje
Suspensor
Protector del Cuchilla
Caja de Engranajes
Cuchilla
CUCHILLA
La CUCHILLA ha sido dise_ada para cortar
cesped.
PERILLA DE AJUSTE DE PROFUN-
DIDAD
La PERILLA DE AJUSTE DE PROFUNDI-
DAD se utiliza para ajustar la rueda para reg-
ular la profundidad de corte de la cuchilla.
OPERACION DEL ACOPLADOR
Este modelo esta equipado con un acoplador,
el cual permite la instalaci6n de accesorios
opcionales. Los accesorios opcionales son:
MODELO:
Cultivador .................. PPB2000T
Propulsor de Aire ............ PPB3000B
Cortadora de Ramas ......... PPB5000P
Cortadora de Malezas* ....... PPB4000C
*no diseSado para e} uso con cabezas de motor
electrico
_ADVERTENCIA: Siempre desco-
necte la bujia de la cabeza de motor (o desco-
necte cabeza de motor de la corriente electri-
ca) antes de retirar o instalar los accesorios.
COMO REMOVER EL ACCESORIO
PRECAUCION: AI retirar o instalar las ac-
cesorios, ponga el cabezade motor y el acce-
sorio en una superficie plana para estabili-
dad.
1. Afloje el acopiador dando vuelta a la perilla
a Ia izquierda.
Acoplador
\
Accesorio
Inferior
APRIETA
CFLOJE
Perilla
14

2. Oprima y sostenga el bot6n de conexi6n/
desconexi6n.
Bot6n de Conexi6n/
Desconexion
2
/Acoplad or,,,,._._ " Eje Superior
Aecesorio Inferior
3. Mientras sostiene el eje superior con fir-
meza, quite el accesorio inferior del aco-
plador en forma recta.
INSTALACION DEL ACCESORIO
1. Retire la tapa de eje del accesorio (si pres-
ente) y deseche.
2. Coloque el boton de conexi6n/desconex-
i6n de1accesorio inferior en el agujero de
la guia del acoplador de1 eje superior.
3. Empuje el accesorio inferior en el acopla-
dor hasta que el boton de conexion/desco-
nexi6n se encaje en el primer agujero.
4. Antes de usar el aparato, apriete la periila
firmemente dando vuelta a la derecha.
Acoplador Primer Agujero de
Agujero la Guia
Eje Boton de Accesorio
Superior Conexion/ Inferior
Desconexi6n
AADVERTENCIA: Antes de operar
este aparato, asegOrese de que el bot6n de
coeexion/desconexi6n este asegurado en el
primer agujero y ia perilla este bien ajustada
antes de operar el aparato. Usar el agujero in-
correcto podria causar graves heridas o daffos
a et aparato.
Agujero
Secundado
Bot6n de
en el Primer Agujero
INSTACALION DEL SUSPENSOR
Una suspensor de la accesorio se proporcio-
na para el almacenaje cuando la acoesorio no
se esta utitizando.
Para instalar la suspension en la accesorio:
1. Retire la tapa de eje del accesorio (si pres-
ente) y deseche.
2. Presione y sostenga et bot6n de conexiAn/
desconexi6n.
3. Empuje la suspensor sobre la accesorio
hasta que el bot6n de conexiAn/
desconexi6n se encaja en el hueco.
POSICION DE USO
SiEMPRE US_
Pantoiones ;_
Largos "_t _
Zapatos Ill
Gruesos"_
Proteccion
para los Ojos
Cuando de operar el aparato, parese como
se vea en la figura y verifique Io siguiente:
•Usando anteojos de seguridad y ropa gruesa
como protecciAn.
• Mantenga brazo derecho ligeramente dobla-
do, y la mano derecha sostiene el mango del
gatillo ace_erador del cabeza de motor.
• Maetenga el brazo izquierdo extendido con
la mano izquierda sostenga el mango.
• Mantenga el aparato debajo del nivel de la
cietura.
• Ajuste rueda del cortadora de bordes para Io-
grar una profundidad de corte correcta.
_& ADVERTENCIA: Nunoa intente
ajustar ia rueda con el aparato en funciona-
miento. Siempre pare el motor, asegLirese de
que la cuchilla se haya detenido por comple-
to, y desconecta la bujia (o desconecte apa-
rato de la corriente electrica) antes de hacer
ajustes.
PARA CORTAR BORDES
A medida que se familiarice con el aparato, ud.
pordria determina y su propio ritmo de trabajo.
Los factores tales come la profundidad del corte
y el material que se esta cortando afectaran la
velocidad y el tiempo requeridos para hacer un
trabajo en particular.
• Permita que el motor se caliente Antes de
empezar a oortar.
• Aumente las revoluciones antes de colocar la
cuchi]ia en el corte. Para obtener los mejores
resultados, corte con el motor acelerado a
fondo.
• Trabaje siempre alejAndose de la genre y
de los abjetos sAlidos tales como los pare-
dones, las rocas grandes, los Arboles, los
automoviles, etc.
• Tenga cuidado ai cortar cerca de los
Arboies o de plantas vaiiosas. La cuchilla
metAlica de aita velocidad puede cortar las
raices y daf_ar las piantas.
• Si la cuchilla se para, haga retroceder in-
mediatemente el aparato para permitir que
la cuchilia vuelva a firar. Si la cuchilla sigue
detenida, pare el motor, desconecte la bujia
e inspeccione el aparato para detectar blo-
queo o daSo.
'_L,ADVERTENCIA: Mantenga limpia
Area de ia cuchilla. Pare el motor, aseg0rese de
que la cuchilla se haya detenido por completo y
desconecte la bujia (o desconecte aparato de la
corriente electrica) antes de limpiar.
15

AJUSTE DE PROFUNDIDAD
_ ADVERTENCIA: Nunca intente
ajustar la profundidad con et motor en funcio-
namiento. Suelte siempre el gatillo acelera-
dor, espere hasta que la cuchilla deje de girar,
ponga el interruptor O N/O PF de la cabeza del
motor en posici6n OFF y desconecte la bujia
(o desconecte aparato aparato de la corriente
electrica) antes de hacer ajustes.
1. Afloje la perilla de ajuste de profundidad.
Perilla de Ajuste
de Profundidad
2. Deslice la rueda hasta la posici6n deseada.
• Enlevar la rueda aumenta la profundidad
de corte.
• Bajar la rueda disminuye la profundidad
de corte.
3. Apriete la perilla de ajuste con firmeza.
_l_ ADVERTENCIA: siempreapague
el aparato y desconecte la bujia (o desco-
necte aparato de la corriente electrica) antes
de hacer cua_quier mantenimiento.
VERIFIQUE QUE NO HAY.& PIEZAS
DANADAS NI GASTADAS
Entre en contacto con el distribuidor autoriza-
do del servicio para el rempiazo de piezas
da_fiadas o desgastadas.
• Protector para la cuchilia - Deje de usar el ac-
cesorio si el protector para la cuchilla esta
daY,ado.
VERIFIQUE QUE NO HAYA FIJA-
DORES SUELTOS NI OTRAS PIE-
ZAS SU ELTAS
• Tuerca de la cuchiila
• Fijadores
INSPECClONE Y MMPIE EL
APARATO Y LAS PLACAS
• Despuesdequecadauso, inspec- cionela
aparato completa para saber si hay piezas
fiojas o da(fiados. Limpie el aparato y sus
placas usando u trapo hLimedo con
detergente suave.
• Seque el aparato con un trapo limpio y
seoo.
CAMBIO DE LA CUCHILLA
MANTENIMIENTO DE LA CUCHILLA
_ ADVERTENCIA: La cuchilla sigue
girando despues de que el motor para y des-
pues de que se suelte el gatillo. Para evitar
graves heridas, asegLirese de que la cuchilla
se haya detenido completamente y desco-
necte la bujia (o desconecte aparato de la
corriente electrica) antes de hacer ningt3n tra-
gajo con la cuchilla.
_L, ADVERTENCIA: Cambiosiempre
lacuchillasi est#.doblada, otroforma. Nunca
intente enderezar y volver a usar una cuchilla
daSada. Use Linicamente la cuchilla de re-
puesto especificada. Use guantes protec-
tores al tocar u at hacer mantenimiento a la
cuchilla para evitar heridas.
• La cuchilla es reversible. Cuando el filo se
baya gastado de un lado, ievierta lacuchilla
(vea CAMBIO DE LA CUCHILLA en la sec-
ci6n SERVICIO Y AJUSTES).
• Peri6dicamente verifique que la cuchilla
este perfectamente recta. Apoye la cuchiF
la en una superficie plana e inspeccionela.
Descarte la cuchiila si no esta perfecta-
mente plana,
_ADVERTENCIA: Lacuchillasigue
girando despues de que et motor para y des-
pues de que se suelte el gatillo. Para evitar
graves heridas, asegOrese de que la cuchilla
se haya detenido completamente y desco-
necte la bujia (o desconecte aparato de la
corriente electrica) antes de hacer ningOn tra-
gajo con la cuchilla.
AI_ADVERTENCIA: use guantesde
protecci6n al tocar o al hacer mantenimiento
a la cuchilla para evitar heridas. La cuchilla
es muy filosa y corta aL_eno estando en movi-
miento.
1. Gire lacuchilia para hacer coincidir el orifi-
cio del taza para el polvo con el orificio la-
teral del caja de engranajes,
2. Introduzca un destornillador peque[_o por
los orificios confrontados, Esto previene
que el eje gire mientras usted afioje la tuer-
ca de la cuchilla.
oestor ado
16

3. Manteniendo el destomillador en su posi-
ci6n, remueva la tuerca de la cuchiIla dando
vuelta a ta derecha.
4. Remueva ambas arandelas y la cuchilla
de la eje.
Protector del
cuchlla _ Cuchilla
Arandelas
5. Coloque la cuchilla nueva en el eje.
6. Reinstale ambas arandelas y tuerca dan-
do vuelta a la izquierda.
7. Manteniendo el destornillador en su
posici6n, apriete la tuerca firmemente
usando una llave.
8. Remueva el destoreiHador.
9. Gire la cuchilla de mano. Si la cuchilla se
aproxima a la protector o parece girar
irregularmente, significa que no est&.
centrada y ser#t necesario reinstalarla.
Eje Tuerca del
cuchilla
,tA
rmADVERTENClA: Realice los si-
guientes pasos despues de cada uso:
•Deje enfriar el motor y el caja de engranajes
antes de guardarlo o de transportarlo.
• AImacene el aparato con todos los protec-
tor del cuchiila en su lugar correspondiente.
Posicione al aparato de modo que la cuchil-
la no pueda herir accidentaimente.
• AImacene el aparato en un &.rea seca, bien
ventilada y fuera del alcance de los ni_os.
ESTAClONAL ALMACENAJE
Prepare el aparato para almacenarlo al final
de la temporada o si no lo va a usar por m&s
de 30 dias.
Si se almacene su accesorio por un periodo
del tiempo:
• LJmpie et aparato en su totalidad.
• Inspeccione el Area de1 protector y limpie
toda la tierra, el hierba, las hojas y los es-
combros que ha acumulado. Inspeccione
la cuchiHa y el protector; cambie la cuchilla
siesta doblada, torcida, resquebrajada,
quebrada o da[fiada de cualquier otro modo.
• Apfique una leve capa de aceite a las su-
perficies metaiicas exteriores.
• Aplique una capa de aceite a la superficie
entera de la cuchilla; envuelvalo en papel
grueso o tela.
• Examine el aparato en su totalidad para
verificar que no haya tornillos ni tuercas
sueltos. Cambie toda pieza da[fiada, gasta-
do o quebrada.
• AI comienzo de la pr6xima temporada, uti-
lice soiamente combustible fresco mezcla-
do en proporcion con el aceite.
17

Poulan PRO garantiza al comprador original
que cada herramienta nueva a gasolina y ac-
cesorio nuevo marca Poulan PRO ser_. _ibre
de defectos de materiales y de mano de obra
y que se oompromete a reparar o reemplazar,
bajo las condiciones de esta garantia, todo
producto y accesorio a gasolina fefectuoso
como se detalla a continuaci6n, a partir de la
fecha de compra original:
2 ANOS - Piezas y Mano de Obra, cuando
usado para fines domesticos.
90 DIAS - Piezas y Mano de Obra, si usado
para fines comerciales o profesionales o para
fines lucrativos.
30 DIAS - Piezas y Mano de Obra, si usado
para prop6sitios de alquiler.
Esta garantia snoes transferible y no cubre
da_os ni responsabilidad civil debidos a man-
ejo indebido, mantenimiento incorrecto no al
uso de accesorios y/o juejos de piezas adi-
cionales no recomendados especificzmente
por Poulan PRO para esta herramienta. AsF
mismo, esta garantia no cubre afinaciones,
bujias, filtros, sogas de arrangue, resortes de
arrangue, linea de corte, ni las piezas del ca-
bezal rotativo que se desgastan y requieren
reemplazo por el uso razonable durante el
periodo de vigencia de la garantia. Esta ga-
rantia no cubre preparacion de pre-entrega
ni ajustes normales explicados en el manual
de instrucciones.
ESTA GARANTIA CONFIERE DERECHOS
JURIDICOS ESPECIFICOS AL COMPRA-
DOR, QUE PUEDE TENER OTROS DERE-
CHOS QUE VARIAN ENTRE ESTADOS.
NO SE ADMITIRAN RECLAMOS POR DA-
NOS OONSECUENTES NI POR OTROS
DANOS NI SE APLIOARA NINGUNA OTRA
GARANTIA EXPRESA ADEMAS DE
AQUELLAS EXPRESAMENTE ESPiPULA-
DAS EN LA PRESENTE.
ALGUNOS ESTADOS NO PERMITEN LIMI-
TACIONES DEL PERIODO DE VlEGENCIA
DE GARANTIAS IMPLIOITAS, NO LA EX-
CLUSION DE DANOS OONSECUENTES O
iNCIDENTALES, NI SU LIMITACION, DE
MODO QUE LA EXCLUSION Y LAS LIMiTA-
CLONES ANTERIORES PUEDEN NO TEN-
ER VALIDEZ EN SU OASO.
Es norma de Poulan PRO mejorar sus pro-
ductos continuamente. Por Io tanto, Poulan
PRO se reserva el derecho de cambiar, mo-
dificar o descontinuar modelos, diseSos, es-
pecificaciones y accesorios de todos los pro-
ductos en cualquier momento sin previo
aviso no responsabilidad para con ningOn
comprador.
18

DANGER: cede coupe-
bordure peut @tredangereuse!
Uemploi n@gligeant ou impropre
peut causer des blessures
graves ou m6mes fatales. D Lisez et comprenez le
manuel d'instructions
avant d'utiliser la coupe-
bordure.
Portez toujours la protection de I'oufe appropriee, la protection des yeux et
la protection de t&te.
AAVERTISSEMENT: Lorsquevous
employez n'imperte quel appareil de jardinage, il
faudra toujours respecter des precautions fon-
damentales de securite afin de reduire le risque
d'incendie et de blessures graves. Lisez et ob-
servez routes les instructions.
Cet appareil a moteur peut devenir danger-
eux! L'utilisateur a la responsabilite d'observ-
er toutes les instructions et avertissements.
Lisez ie manuel dqnstructions completement
avant d'utiliser I'appareil! Familiadsez-vous
profondement avec les contr6ies et avec Furl-
lisation correcte de i'appareiL Limitez I'utflisa-
tion de cet appareil aux persoenes qui ont lu.
qui comprennent et que peuvent bien respect-
er ies instructions et avertissements qui se
trouvent dans ie manuel et sur I'appareil. Ne
permettez jamais que les enfants utilisent cet
appareil.
_ INFORMATION DE
_ SECURITE SUR
L'APPAREIL
SECURITE DE L'UTILISATEUR
_DANGER: RISQUE DE COUPURE.
TENEZ TOUJOL)RS LES MAINS ET LES
PIEDS ELOIGNEES DE LA LAME ET DE
L'ENDROIT DE LA COUPE. Pendant que le
moteur tourne ou quand le lame de coupe est en
mouvement, n'essayez d'eniever aucun mate-
riau coupe ni de tenir du materiau & couper.
Avant d'enlever du materiau pris dans le lame de
coupe, assurez-vous que la bougie est debran-
chee (ou cet appareil est debraechee de ia
source de courant). Ne saisissez pas ou ne ten-
ez jamais ia lame hue.
• Equipez-vous bien. Quand vous utilisez ou
entretenez votre appareil, portez toujours
des lunettes de securite ou une protection
des yeux similaire 0unettes de securite dis-
ponibles). La protection des yeux devriez
marquee Z87.
• Pour les travaux poussiereux, portez tou-
jours un masque.
• Portez toujours des pantalons longs et
epais, des manches longues, des bottes et
des gants.
• Toujours protection de pieds d'usure. Ne
travaillez pas pieds nus et ne portez pas de
sandales.
• Attachez-vous les cheveux pour qu'iis ne
depassent pas les epautes. Attachez ou
enlevez tousles v&tements amples et les bi-
joux ou les v&tements qui ont des attaches,
des bretelles, des pompons, etc. qui pen-
dent. IIs peuvent se prendre dans les
pieces mobiles.
• Si vous &tes bien couvert(e), ceta vous aid-
era & vous proteger centre les debris et
brins de plantes toxiques qui sent projetes
par le fil qui tourne.
• Soyez vigilant(e). N'utilisez pas I'appareil
quand vous 6tes fatigue, malade ou sous in-
fluence de I'alcool, des drogues ou des
medicaments. Portez attention & ce vous
faites et faites preuve de bon sens.
• Portez un protecteur de I'ouie.
• Ne mettez pas I'appareil en marche ni laissez
pas tourner le moteur darts un endroit ferm&
Respirer la vapeur d'essence peut vous tuer.
• Conservez les poignee libres d'huile et de
carburant.
• Utilisez toujours I'appareil avec la poignee-
guidon install&
• Tenez toujours les mains et les pieds eloig-
nes de I'endroit de la coupe.
• Ne dirigez jamais les materiaux projetes
vers des tiers et ne permittez a.personne de
s'approcher de I'aire de coupe. Evitez que
les debris projetes frappent du verre, des
autos, etc.
SI_CURITI_ DU CARBURANT (pour
moteurs &essence)
• M_lez et versez le carburant dehors.
• Eloignez-vous des etincelles et des
flammes.
• Employez un recipient approuve pour I'ess-
ence.
• Ne fumez pas et ne permettez que per-
sonne fume pres du carburant ni pendant
I'utilisation de I'appareiL
• Evitez de renverser Ie carburant ou le huile.
Essuyez tout les deversements de carbu-
rant.
• Eloignez-vous au moins de 3 metres (10
pieds) de I'endroit de ravitaillage avant de
mettre le moteur en marche.
19

• Arr6tez le moteur et laissez I'appareil se re-
froidir avant d'enlever le capuchon du reser-
voir de carburant.
• Enlevez le capuchon de remplissage lente-
ment.
SECURITI_ I_LECTRIQUE (pour mo-
teurs electrique)
_AVERTISSEMENT: Evitezles mi-
lieux qui presentent un danger. Pour r_,duire te
risque de choc electrique, n'utiiisez jamais votre
appareil darts des endroits mouilles ou humides,
ou a.proximite de piscines, de baignoires, etc.
N'utilisez jamais votre apparel1 sous la ptuie,
dans la neige ou dans I'eau. N'utilisez pas I'ap-
pareil sur les surfaces humides. Ne touchez ja-
mais les prises de votre raHonge ou de votre ap-
pareil avec des mains mouillees.
•N'utilisez qu'une source de courant du volt-
age indique sur la plaque d'identification de
t'appareil.
• Evitez les situations dangereuses. Pour eviter
les dsques d'incendie ou d'explosion et/ou de
dommages & I'appareil, ne I'utilisez pas en
pr_,sence de gaz ou liquides inflammables.
• Evitez les milieux qui presentent un danger,
N'utilisez pas votre appareil dans des endroits
non ventiles, oQ i] peut y avoir des accumula-
tions de poussieres ou de vapeurs explosives.
• Pour reduire le risque de secousses electri-
ques, cet appareil &une prise polarisee (une
fiche est plus Iarge que I'autre) et exige I'uti-
lisation d'un rallonge polarisee, Cette prise
ne peut se brancher que d'un seule facon. Si
la prise de I'appareil n'entre pas bien dans la
prise de la rallonge, retournez-la. Si elle ne
se branche toujours pas bien, procurez-
vous une rallonge & prise polarisee. Une ral-
longe polarisee exige d'6tre branchee darts
une prise murale polarisee et ne se bran-
chera que d'une seule fa9on dans cette der-
niere. Si elle n'entre pas bien dans la prise
murale, retournez-la. Si elle ne se branche
toujours pas bien, demandez & un electri-
cien qualifie d'installer la prise murale qui
convient. Ne modifiez en rien la prise de
t'appareil, la prise femelle, nile prise m&le de
la rallonge.
• Pour reduire le risque de secousses electri-
ques, n'utilisez que des rallonges electri-
ques sp_,cialement identifiees comme con-
venant aux appareils d'exterieur et dont le
voltage electrique n'est pas inferieur a celui
de I'appareil. Le fil dolt porter les lettre "W".
Assurez-vous quevotre rallonge est en bon
_,tat. Inspectez-la avant de l'utiliser et rem-
placez-la si elle est endommagee. N'utili-
sez jamais avec une rallonge endomma-
gee. Le rallonge dolt avoir un isolement en
bon etat, sans craquelures ni det6rioration.
Les fiches de connexion doivent 6tre en bon
_,tat. Une raltonge de calibre trop bas fera
baisser le courant, ce qui causera une perte
de puissance et un surchauffement. En cas
de doute, utilisez le calibre sup_,rieur sui-
vant. Plus le chiffre de calibre du fil est bas,
plus grande est sa capacit&
• N'utilisez jamais de rallonge multiple.
• Ne transportez jamais I'appareil en le prenant
par le fil electrique. Ne tirez jamais sur le fil
pour le debrancher, Pour debrancher votre
appareil, tirez sur la fiche, et pas sur la rat-
Ionge. N'utilisez jamais ta rallonge comme
poignee, ne fermez jamais une porte sur la raF
Ionge ou ne tirez jamais la railonge sur des
ar&tes ou des coins coupants. N'exposez pas
les rallonges a.la chaleur, t'huile, ni reau.
• Tenez toujours la rallonge eloignee de I'utili-
sateur et des obstacles. Pour eviter que lefil
se debranche de I'appareil et pour eviter des
dommages possibles & I'appareit due au
mouvement de prise, servez-vous du rete-
nue de corde.
• N'essayez pas de reparer I'appareiL Inspec-
tez I'isolement et tes raccords de I'appareil et
de la raIIongeavant chaque usage. S'ils sont
endommages, n'utilisez pas t'appareil avant
de le faire reparer par un distributeur autorise
de service.
• N'utilisez pas I'appareil si I'interrupteur ne le
met pas en route/he I'arr6te pas bien. Les re-
parations de I'interrupteur doivent 6tre faites
par votre distributeur autorise de service.
• N'utilisez jamais avec une prise ou une raF
Ionge endommagee. Si votre appareil ne
fonctionne pas bien, est tombe, a ete endom-
magi,, a ete laiss6 dehors ou est tomb6 dans
I'eau, envoyez-le a un distributeur autorise de
service afin qu'il te repare.
• Evitez les demarrages accidentels. Ne laissez
jamais votre doigt sur I'interrupteur quand
vous transportez I'appareil. Avant de brancher
I'appareiL assurez-vous que I'interrupteur est
en position d'arr&t et ne touche jamais le inter-
ruptor,
• D_,branchez I'appareil de la source de courant
quand etle n'est pas utilisez, avant de faire tout
entretien et quand vous changez des acces-
soires.
• Pour eviter les secousses electriques, evi-
tez tout contact du corps avec tout conduc-
teur a.la terre, tel que les tuyaux en metal ou
les cl6tures en fil metallique.
• Un disjoncteur & prise double devrait &tre
instaHe sur te circuit ou la prise a utiliser pour
cet appareil. Des prises a DPD incorpore
sont disponibtes et peuvent &tre utilisees.
SI_CURITI_ DE L'APPAREIL ET
DANS LE ENTRETIEN
_1_AVERTISSEMENT: Debranchez
toujours la bougie (ou debranchez te source
de courant) quand vous faites le maintien.
• inspectez I'appareii et changez les pieces
endommagees ou branlantes avant chaque
utilisation de I'appareE Reparez toute fuite
de carburant avant d'utiliser rappareE As-
surez-vous que toutes les raccords est en
place et serres fermement.
• Entretenez I'appareil selon les methodes
recommandees,
• Jetez toute lame tordue, deformee, craque-
lee, brisee ou autrement endommagee.
Avant d'utiliser I'appareil, remplacez toute
piece qui est ebrechee, brisee ou endom-
magee.
20
Other manuals for PPB1000E
2
Table of contents
Languages:
Other Poulan Pro Edger manuals