Power Fist 8825788 User manual

V4.0 8825788
Please read and understand all instructions before use. Retain this manual for future reference.
User Manual
350 lb 24V Electric
Flat Deck

- 1 -
Warning
Caution
・ When you feel any abnormality, please turn off immediately the power .
・
In useing this product, please be conscious of the safety of the surroundings.
・ Do not ride on the carrier.
・ Do not attempt to discompose the wheels and controllers .
* May cause electric shock, fire or malfunction.
・ Do not leave this product in the rain for a long time.
* May cause electric shock or malfunction.
・ The battery is only for this product. Please consult with your dealer when
replacing it with a new one.
・
The AC/DC charger is for this product only . Do not use the charger expect
for this product. When using the charger, please fully insert the plug into
an AC outlet.
・ Do not discompose the battery nor put it into a fire or heat it.
・
When the fluid leaking from the battery by any chance adheres to your body,
Should the fluid come into contact with your eyes, please rinse with clean
water and go to a doctor for further treatment.
・ In the case of disposing the battery, please follow local regulation.
・ Despite noted in Caution, serious consequence may nevertheless occure
depends on the situation under which the machine is used.
Please read carefully this manual and use this product correctly in
accordance with the instructions written herein.
・ When not useing the electric power drive, please turn off the switch .
*May extend the operating time of the battery.
・
This product is an electric apparatus. Although certain waterproof measure
is processed, please do not use this product in the water.
・ The battery discharges by itself. Please charge the battery once every
three month even when the unite is not in use.
・
When an abnormality, such as smoking and smelling, is found by any chance,
please turn off the power immediately.
・ Please dispose this product in accordance with local ordinances.
・ In the case of disposing the battery, please follow local regulation.

Product Specifications
- 2 -
■ Size︓56.7in(L)×21.7in(W)×26.8in(H)
■ Weight︓88lbs(with battery,pallet)
■ Max.Load capacity︓440lbs
■ Max.Climbing angle︓Slope 12°(Max.Load capacity︓440lbs)
■ Carrier area︓27.5in ~ 35.4in(L)×20.9in ~ 25.2in(W)
■ Carrier hight︓17.3in
■ Handle hight︓25.6in ~ 33.5in
■ Frame︓Low carbon steel Carrier plate:Aluminum alloy
■ Surface treatment︓Powdered baking finish
■ Front tire︓4.80/4.00-8 (Pneumatic tire)
■ Power switch key (3pcs.)
■ Grip throttle speed adjustment (0 position automatic retractable)
■ Forward/backward︓Forward/backward drive-shift switch
■ Speed︓High-speed/Low-speed switchable
〔High speed setting〕 3.6mi/h (Forward)・ 1.2mi/h(Backward)
〔Low speed setting〕 1.9mi/h (Forward)・ 0.8mi/h(Backward)
■ Motor︓Wheel motor 250W / RPM:80/min
(Overcurrent protection circuit)
■ Brake system︓Disc brake / Brake lever with stopper
■ Battery indicator
■ Battery︓
DC24V,12A Electrolyte lead storage battery (Encapsulated type)
■ Rapid charging function︓ (charging time︓8hours)
■ Charger︓(input) 100V ~ 240V/50 ~ 60Hz (output) DC29V 1.7A
■ Operating temperature range︓32°F ~ 104°F
■ Qty per 20ʼ /40ʼ M Container(pcs):140/280
■ Made in China

■Handle(Right)
・ Throttle grip
・ Power switch
・ Drive/Rear switch
・ Battery indication
■Handle(Right)
Name of all parts
■Handle(Left)
■Controler
・ Brake lever
・ Brake Lock
- 3 -
■
Handle frame
■Charging connector
■Stand unit
■Hexagon socket
head screw for
adjusting the handle
angle
■Stand unit
■Main frame
■Front wheel
■Front wheel
■
Carrier Frame(Left)
■Carrier frame(Right)
■Carrier frame(Rear)
■Brake disc
■Brake caliper
■Carrier plate
■Handle(Left)
■Battery
■Carrier frame
fixed bolt
■
Carrier frame (Front)

- 4 -
How to assemble
At the time of factory shipment, all parts (except a steering
handle, stand unit)
are installed in this product.
<Procedure to Assemble>
(1)You open a packing box, and please confirm contents.
[Contents]
Main body assy ,carrier frame(4pcs.) ,steering handle with stand
(1pcs.),hexagon socket screws for the steering handle fixation(4pcs.)
hexagon socket screws for the carrier frame(2pcs.),Resin screws for
the carrier frame(6pcs.) ,battery (1pcs.),battery charger set(1pcs.)
(2)Harness is connected to the steering handle frame. Please take it out
not to pull harness. And you insert it in a steering handle frame, and
fix it with
hexagon socket screws
for the steering handle fixation.
(3)You cause steering handle flame and fix it with a bolt attached to the
fixed part of the main body.
(4)
Please adjust the angle(height)of the handle frame with the loosened
hexagonnal hole bolts(4pcs.)for adjusting the handle angle and tighten the
bolts tightly.
(5)
You insert the carrier frames in the carrier frame insertion pipe of the
main body. And you make right and left equivalence and fix it with a screw
for the carrier frame fixation well.
(9)Please full charge of battery.
(10) It is in condition to be able to use it.
Main frame
Carrier(Right/Left/Front)
Carrier(Rear)
Battery
Steering handle(with stand)
①
You turn a power key. Battery indication turns on.
② You confirm drive / rear switch.
③
Do not change Drive/ Rear sift switch during
driving.
Perform the reshuffling of the drive / rear sift
switch after a stop by all means.
When you changed drive / rear sift switch during
driving, a safety device stops.
(note) Please confirm where of the drive / rear
a switch is in by all means before moving it.
(note)
The speed of the truck of the controller box.
You can choose high / low speed with a switch.
④
You grasp a brake lever and take off a stopper
and cancel rock.
⑤
A motor works when you turn a speed adjustment
grip and a front wheel is driven.
A speed adjustment grip returns to 0 when
you separate a hand, and a motor power supply
is cut and a front wheel stops.
⑥ Brakes work when you grasp a brake lever.
The motor power is in a condition that you
was cut in the state that grasped a brake lever.
⑦ When you are electric and are not driven,
please cut a power key by all means.
⑧
When you do not use it at time to be separated
from a truck, you pull a key by all means and
lock a brake lever with a stopper, and please
be far after confirming that brakes work.
(please keep the spare key in the other place.)
(1)How to operate
How to operate & Attention for use -1
- 5-
High/Low Speed switch
Controler box
Brake lever
Brake lever stopper
Power switch
Battery indicator
Speed controller
Forward/backward drive-shift switch
⑨
The adjustment of brakes, please coordinate
the wire length of the caliper part.
Please coordinate the fine adjustment with
the adjustment screw of the brake lever part.
Please talk about the adjustment of brakes
caliper and the brake disc with the store.
Brakes caliper
Brake Disc
Fne adjustment scree
How to operate & Attention for use -2
- 6-
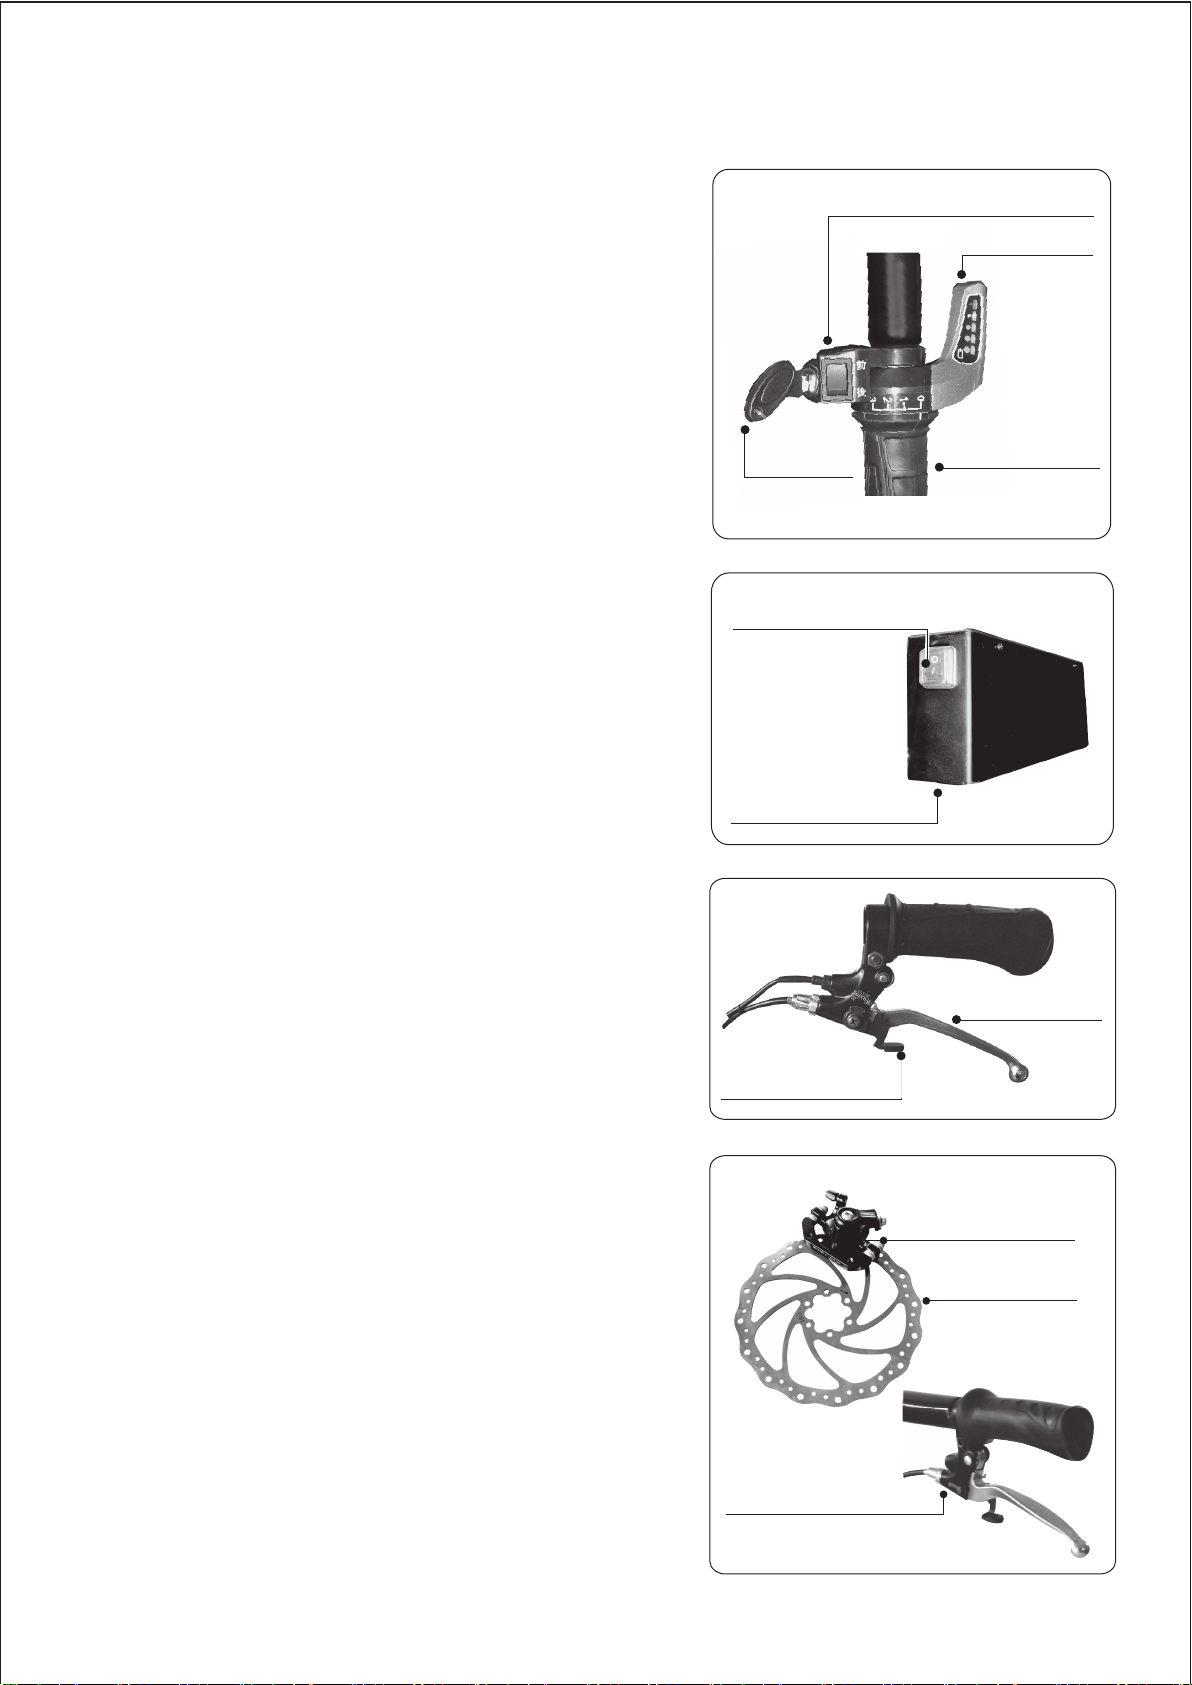
⑩ Please put the load on the central location
of the carrier.
(note)
When load is partial, a truck may turn
over in a tilt.
(note)
When you expand the carrier frames and
use it, please be careful about the deflection
to the carrier of the load in particular.
⑪
The carrier frames can magnify front and left
and right .
Please fix the carrier frame with a fixed bolt
well from the lower part.
(note)
The carrier frame inserts it in an outlet
surely, and please fix it with a fixed bolt
well.When a fixed volt relaxes, a carrier
frame falls out, and baggage might drop.
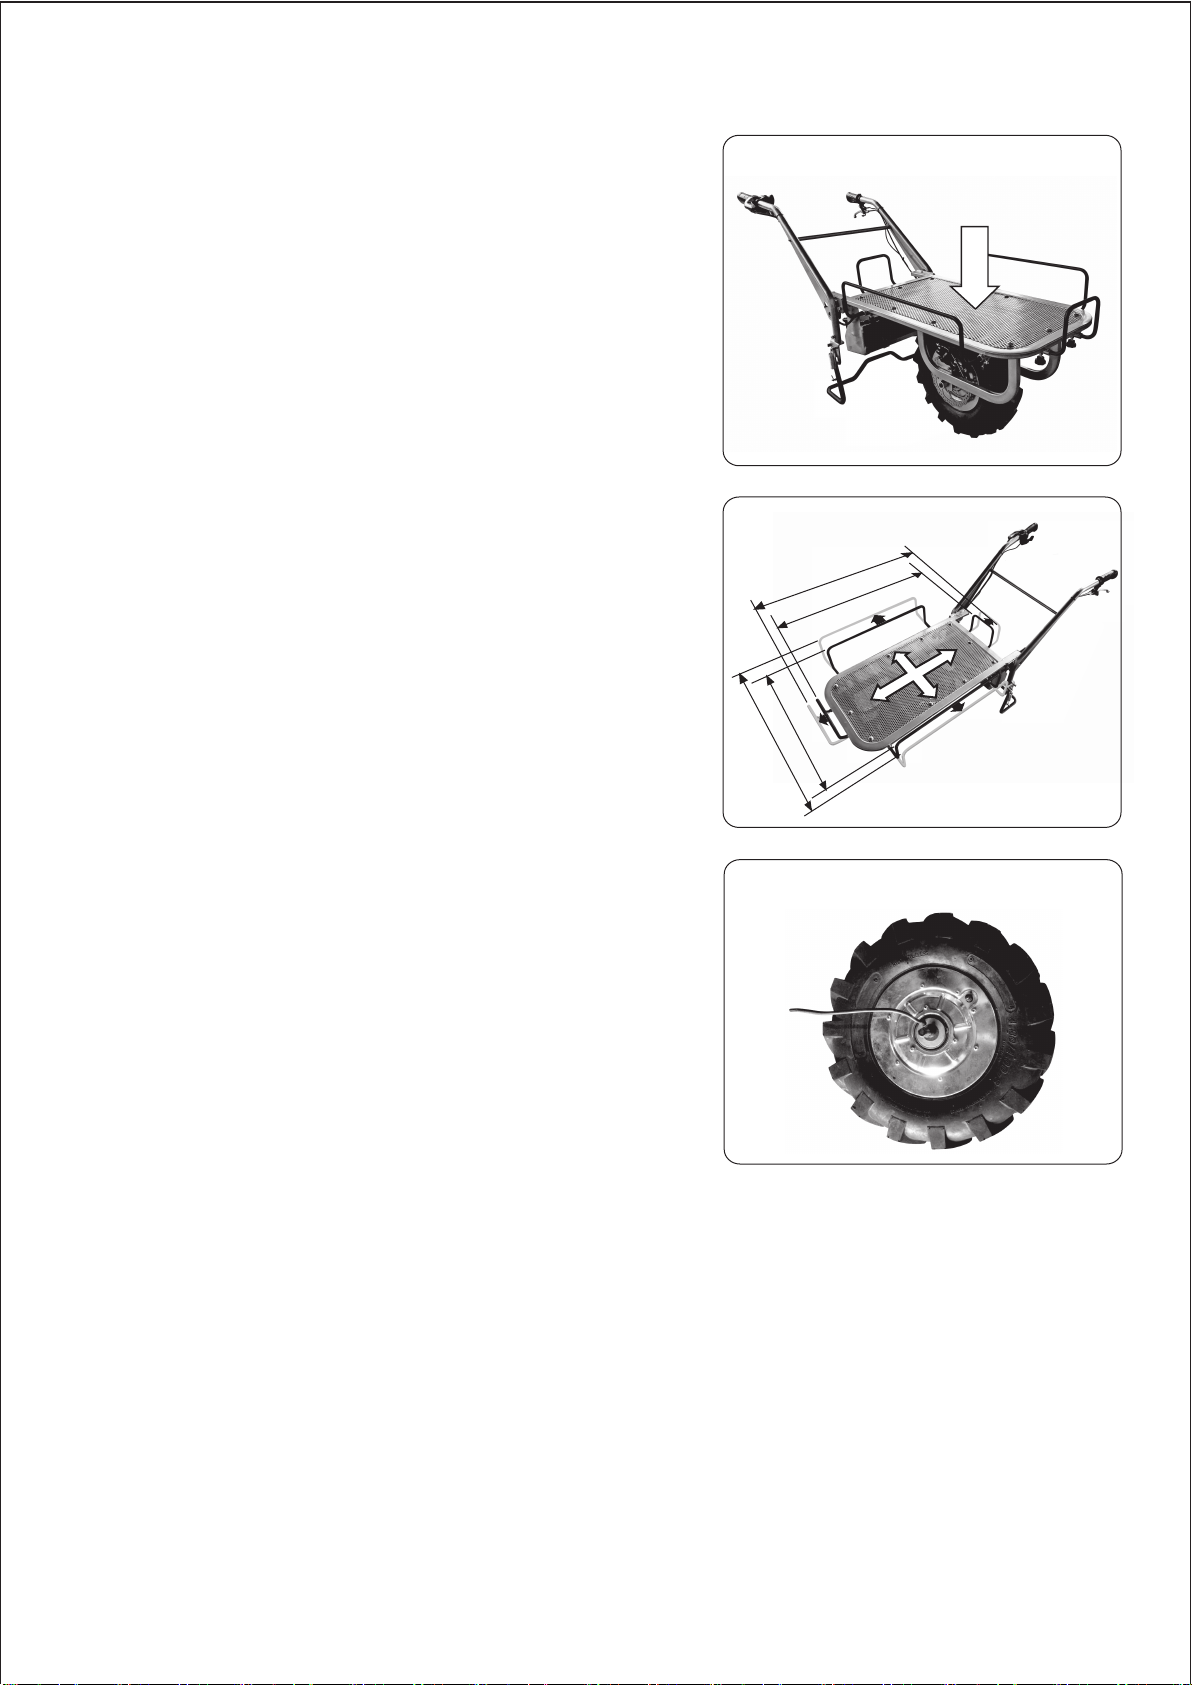
⑫
A front wheel is 4.80/4.00-8 (Pneumatic tire)
Please use the air pressure of the tire in the
range of 250kPa - 300kPa.
Please talk about the repair of the flat with
the store.
Rag tire (No tube)
90cm
77cm
53cm
64cm
Carrier
Carrier frame
In the center
of the carrier
(2) About the use of battery,
the battery charger
Charge method of battery Charge method of battery
①
Power supply by the outlet plug of the battery charger
②
You insert 3 pole socket cords of the battery charger in
a connector for the charge of the truck body.
(please insert it surely to the root.)
③
A charge lamp becomes the red lighting during charge.
When charge is completed, it becomes the green lighting.
・ When a charge lamp does not turn on during
charge and abnormal fever is seen in a battery
charger, you outrun the outlet plug of the
battery charger promptly, and please cancel
charge even if you pass more than 12 hours
when there is not it if with charge completion.
・ Please perform the charge indoor of good 0-40
degrees Celsius of the ventilation.
How to operate & Attention for use -3
- 7 -
Battery Charger
3 pole socket cords
Lamp during the charge
AC outlet plug
Battery case
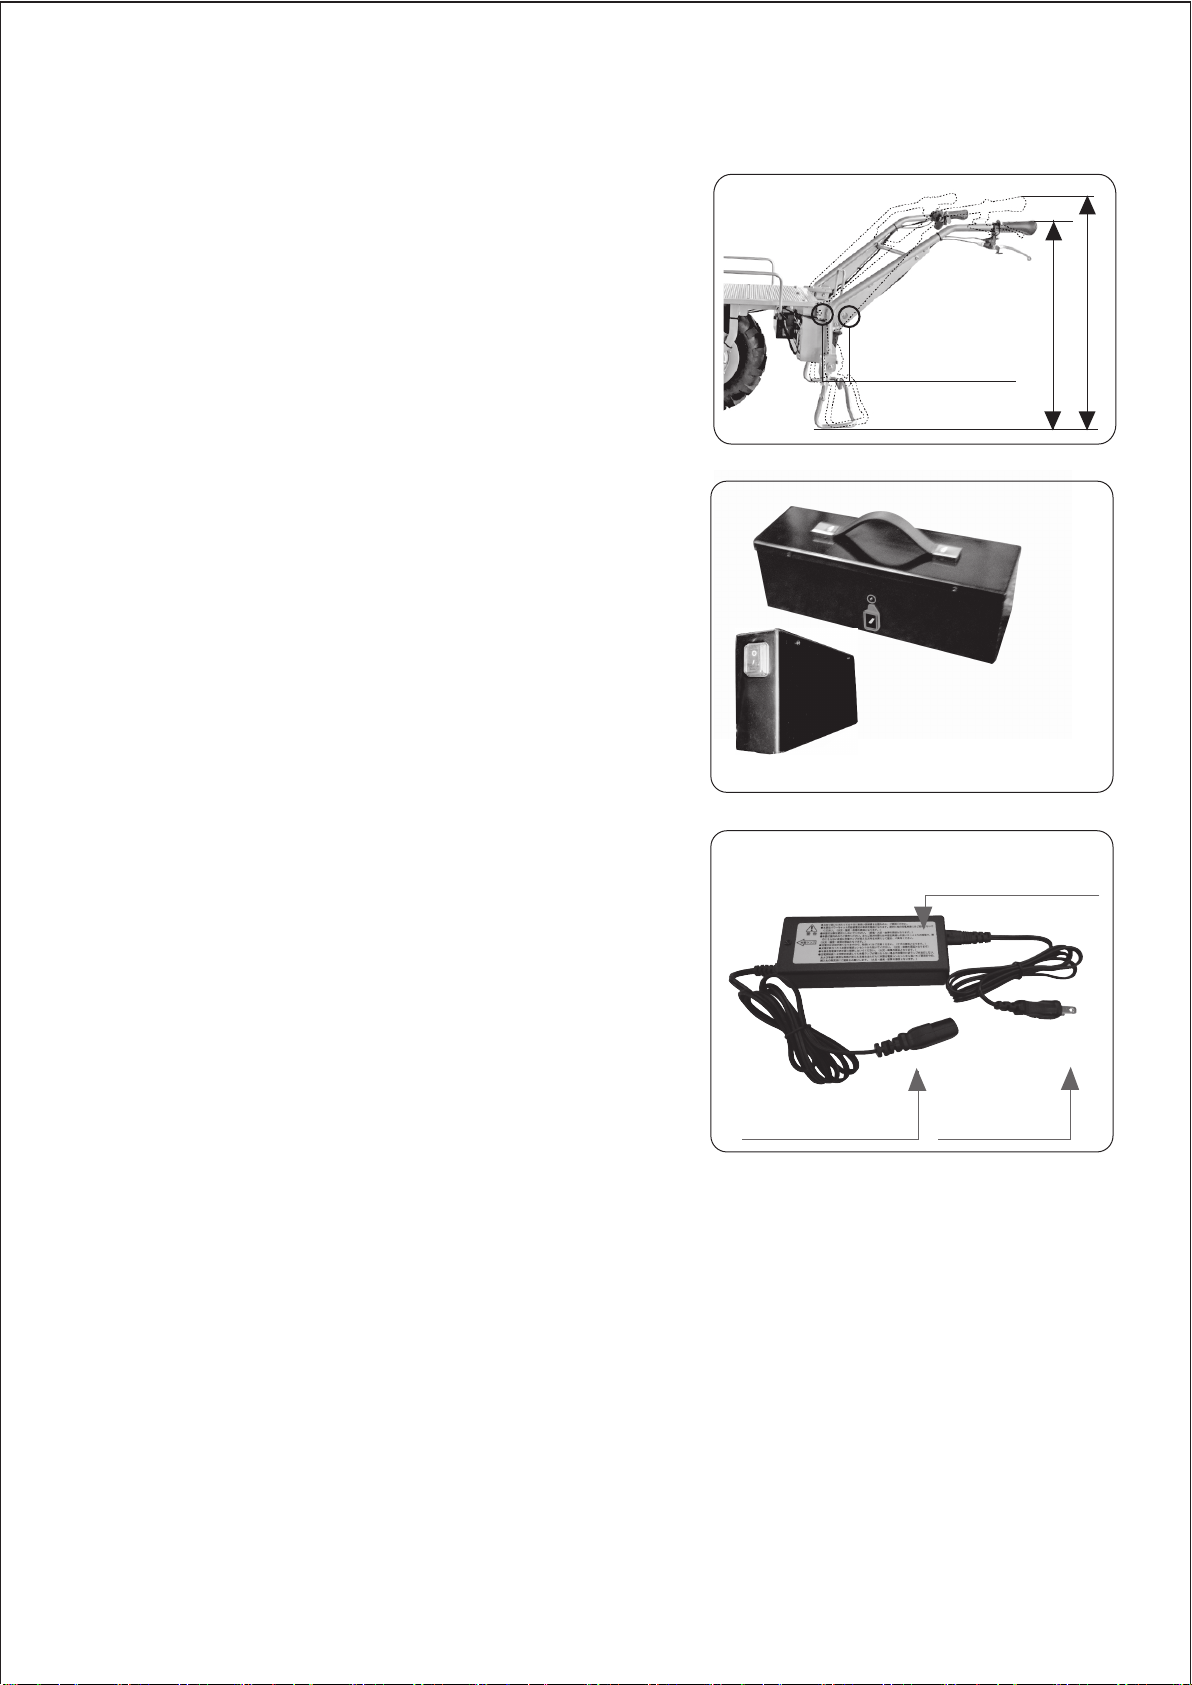
Adjust with
these 2 bolts
Controler
To a power supply
Rotary handle
53cm
64cm
⑬ The height of the handle can be adjusted
between 53cm and 64cm. Loosen the 2
hexagon socket head and change the handle
angle.
◇ You charge it before use, and the state of
the full charge, please.
◇
Please perform the charge with the exclusive
battery charger of accessories.
(note)
The battery discharges electricity naturally.
Even, when not in use, please charge once for
two months.
You charge it by deterioration of the battery
performance normally, and the thing that the
voltage of the battery descended too much may
not discharge electricity.

MF-050-01
MF-050-02
ZH001-4006
ZH001-4007
ZH001-4003
MF050-06
ZH001-1001-2
ZH001-003
ZH001-4004-1
MF-050-03
MF-050-04
ZH001-7000
ZH001-6000
ZH001-1100
ZH001-4008
MF-050-05
MF-050-05
1
2
1
1
1
2
1
1
1
2
2
1
1
1
6
4
2
Main frame
Handle
Throttle unit(with power switch/battery Indicator)
Drive/Rear switch
(with resincover)
Brake lever unit(with lock)
Stand unit
Front wheel assy(with brake disc)
Brake caliper
Brake wire
Carrier frame(Front)・(Rear)
Carrier frame(Right)・(Left)
Controller unit
Battery
Battery charger
Resin fixation bolt for carrier frame(M8)
Fixation hexagon bolt for handle
Fixation hexagon bolt for rear carrier frame
Component name / Part No.
- 8-
< Part name>
< Article number> < Amount>

- 10-
MEMO
Table of contents
Other Power Fist Industrial Equipment manuals


Popular Industrial Equipment manuals by other brands


SMC Networks
SMC Networks C G5 N Series Operation manual

Dover
Dover DESTACO ROBOHAND DLB Series Service manual

ABB
ABB HT613159 Operation manual

Zoeller
Zoeller MEDIUM X2 operating manual

RINGSPANN
RINGSPANN FRS Series Installation, Lubrication, Maintenance Instructions

Moeller
Moeller DILM65-XRL installation instructions


