Power Master 1KVA User manual


0
CONTENTS:
1. GENERAL SAFETY PRECAUTIONS…………………………………….2-3
2. ELECTRICAL SAFETY PRECAUTIONS…………………………………3-4
3. SAFETY STICKERS AND EXPLANATIONS………………………….....4-5
4. SPECIFICATIONS…………………………………………………………….6
5. COMPONENTS……………………………………………………………......7
6. PRE OPERATION CHECKS………………………………………… …..8-11
7. OPERATING PROCEEDURES…………………………………………12-17
8. WATTAGE INFORMATION……………………………………………….....18
9. MAINTENANCE SCHEDULE……………………………………………19-21
10.HOW-TO MAINTENANCE …………………………………………….....22-24
11.TRANSPORTING AND STORAGE………………………………………24-25
12.TROUBLE SHOOTING……………………………………………………26-27
13.WIRING DIAGRAM…………………………………………………….…..28-29

1
IMPORTANT:
Thank you for purchasing a Power Master Gasoline Generating Set (hereinafter referred to as
the “generator”).
This manual will assist you in operating and maintaining your generator. This manual is the
latest version. With the continuous improvement and upgrading of this product, the
manufacturer reserves the right to modify this manual without notice. The manufacturer shall
assume no liability for incorrect information contained in this manual.
This manual is an integral part of the generator. When the generator is transferred to others,
this manual should be handed over to the new owner.
Some important information in this manual will be indicated in the following way ,please see
below). The users should pay special attention to these instructions.
The range of POWER MASTER GENERATORS is safe and reliable, but
incorrect use of these products may cause personal injury and or damage
to your machine. Please read this manual thoroughly before operation as
this product is required to operate strictly in accordance with this manual.
IMPORTANTNOTICES:
PLEASE PAY SPECIAL ATTENTION TO STATEMENTS PRECEDED BY
THE FOLLOWING WORDS:
Danger
DANGER
This indicates a hazardous situation, which, if not avoided, will result in death or
serious injury.
Warning
WARNING:
This indicates a hazardous situation, which, if not avoided, could result in death
or serious injury.
Caution
CAUTION:
This indicates a hazardous situation, which, if not avoided, could result in injury.

2
1. GENERAL SAFETYPRECAUTIONS:
Danger
Warning
Caution
1.1. A “LAYMAN” and or “CHILDREN” may
not recognize the possible dangers of
operating a generator. We recommend that
only competent persons should operate the
generator.
1.2. Fuel is combustible and easily ignited.
Do not refuel during operation.
1.3. Do not refuel whilst smoking or near
naked flames. Do not overfill or spill fuel. If
this happens clean the fuel on and around
the generator properly before operating.
1.4. Only use the specified fuel when
operating the generator
1.5. Some parts of the internal-combustion
engine are hot and might cause burns. Pay
attention to the warning signs on the
generating set.
1.6. Engine exhaust gases are toxic. Do not
operate the generator in an unventilated
room. When installed in a ventilated room,
additional requirements for fire and
explosion protection must be observed.
1.7. Regularly check that the bolts and nuts
are properly tightened as they may become
lose due to vibration of the generator whilst
in use.
1.8. Before using the generator ensure that
you have checked the periodic maintenance
schedule in the operator’s manual.
1.9. Pay attention to the wiring or extension
cords from the generator to the connected
device. If the wire is under the generator or
in contact with a vibrating part, it may break
and possibly cause a fire, generator burnout,
or electric shock hazard. Replace damaged
or worn cords immediately.
1.10. Do not operate in rain, wet or damp
conditions, or with wet hands. The operator
may suffer severe electric shock if the
generator is wet.
1.11. If wet, wipe and dry it well before
starting. Do not pour water directly over the
generator, nor was hit with water.
1.12. Be extremely careful that all necessary
electrical grounding procedures are followed
during each and every use. Failure to do so
can be fatal.
1.13. Do not connect the generator to a
commercial power line. Connecting to a
commercial power line may short circuit the
generator. We strongly recommend the use
of a Transfer Switch for connecting to a
domestic circuit.
1.14. Do not smoke when handling the
battery. The battery emits flammable
hydrogen gas, which can explode if exposed
to cigarettes and or naked flames. Keep the
area well-ventilated and keep naked flames/
sparks away when handling the battery.
1.15. Keep children and all bystanders at a
safe distance from the genertor whislt in use.

3
1.16. It is absolutely essential that you know
and understand the safe and proper use of
the power tool or appliance that you intend
to connect to the generator. All operators
must read, understand and follow the tool/
appliance operators maunal. The tool and
appliance applications and limitations must
be understood. Keep all instruction manuals
and in a safe place for future reference.
1.17. Always switch off the circuit breaker on
the generator when not in use.
2. ELECTRICALSAFETYINFORMATION:
2.1. Electrical equipment including cable, cords and plug connection must not be defective.
Please check before using.
2.2. Do not plug the generator directly into a wall socket-outlet.
2.3. The generator should not be connected to other sources such as the power company
supply mains. In special cases where stand-by connection to existing electrical systems
or integration therewith is intended, note that it is a legal requirement that such
connections or integration may only be performed by a competent person.
2.4. Protection against electrical shock depends on circuit-breakers that are specially
matched to the generator. If a circuit breaker requires replacement, it shall be replaced
by a circuit breaker that has identical ratings and performance characteristics.
2.5. Due to high mechanical stresses only tough rubber-sheathed flexible cable should be
used.
2.6. If the generator is of CLASS II construction then earthing of the generator is not required.
2.7. Cord Extension Sets:
2.7.1. A 1mm2 flexible cable can draw a maximum of 10A provided that the cable is not
longer than 25m.
2.7.2. A 1.5mm2 flexible cable can draw a maximum of 10a provided that the cable is not
longer than 35m
2.7.3. A 1.5mm2 flexible cable can draw a maximum of 16a provided that the cable is not
longer than 20m
2.7.4. A 2.5mm2 flexible cable can draw a maximum of 10a provided the cable is not
longer than 65m
2.7.5. A 2.5mm2 flexible cable can draw a maximum of 16a provided that the cable is not
longer than 45m
2.7.6. A 4mm2 flexible cable can draw a maximum of 10a provided that the cable is not
longer than 100m

4
2.7.7. A 4mm2 flexible cable can draw a maximum of 16a provided that the cable is not
longer than 65m
2.8. DROP IN ELECTRIC EXTENSION CORDS:
When a long electric extension cord is used to connect an appliance or tool to the generator, a
certain amount of voltage drop or loss occurs in the extension cord which reduces the effective
voltage available for the appliance or tool.
The chart below has been prepared to illustrate the approximate voltage loss when an extension
cord of 300 feet (approx.100 meters) is used to connect an appliance or tool tothe generator.
Nominal
cross
section
A.W.G.
Allowable
current
No. of
strands/
strands
dia.
Resistance
Current Amp.
mm2
No.
A
No./mm
/100m
1A
3A
5A
8A
10A
12A
15A
Voltage drop
0.75
18
7
30/0.18
2.477
2.5V
8V
12.5V
1.27
16
12
50/0.16
1.486
1.5V
5V
7.5V
12V
15V
18V
2
14
17
37/0.26
0.952
1V
3V
5V
8V
10V
12V
15V
3.5
12 to10
23
45/0.32
0.517
1.5V
2.5V
4V
5V
6.5V
7.5V
5.5
10 to 8
35
70/0.32
0.332
1V
2V
2.5v
3.5V
4V
5V
3. SAFETYSTICKERSAND EXPLANATIONS:

5

6
4. SPECIFICATIONS:
Item
1KVA
2.2KVA
2.8KVA
5.5KVA
6.5KVA
7.5KVA
ENGINE
ENGINE MODEL
SR156F
SR170F
SR170FE
SR188F/E
SR190F/E
SR192F/E
ENGINE TYPE
OHV, 25 tilt, Single Cylinder, Forced Air Cooling, 4-Stroke
BORE STROKE (MM)
56X40
70X54
70X54
88X64
90X66
92X57
DISPLACEMENT (ML)
98
208
208
389
420
445
LUBRICATING TYPE
SAE 10W –30W/40/S
IGNITION SYSTEM
T.C.L.
GENERATOR SPECIFICATION
STARTING SYSTEM
Recoil Start
Electric Start
RATED VOLTAGE (V)
230V
RATED FREQUENCY
(Hz)
50
RATED OUTPUT (KW)
0.85
2
2.5
5
6
7
RATED CURRENT (A)
3.7
8.7
10.7
21.7
26
30
MAXIMUM OUTPUT
(KW)
1
2.2
2.8
5.5
6.5
7.5
POWER FACTOR
(COS)
1
PHASE
Single
FUEL TANK
CAPACITY(L)
6
15
15
25
25
25
OIL CAPACITY(L)
0.35
0.6
0.6
1.1
FUEL LOAD
CONSUMPTION(L/H)
1.2
1.7
1.7
3.1
3.5
3.5
FUEL LOAD
CONTINUOUS RUN
TIME(H)
8
9
9
8
7
7
NOISE LEVEL {Db(A)}
≤ 92
≤94
≤94
≤96
≤96
≤96
REGULATING
SYSTEM
Advanced Automatic Voltage Regulator(AVR)
PACKAGE
DIMESNIONS
(L*W*H)(mm)
475X385X440
605X460X465
605X460X465
715X640x595
715X640X585
CONTAINER
LOADING QTY
(20/40/40H)
360/720/864
225/475/475
225/485/485
108/216/216
108/216/216
N.W(Kg)
27
41
47
78
81
87
G.W(Kg)
29
44
49
81
84
90
Specifications are subject to changewithout notice.
ELECTRIC START MODEL:
7
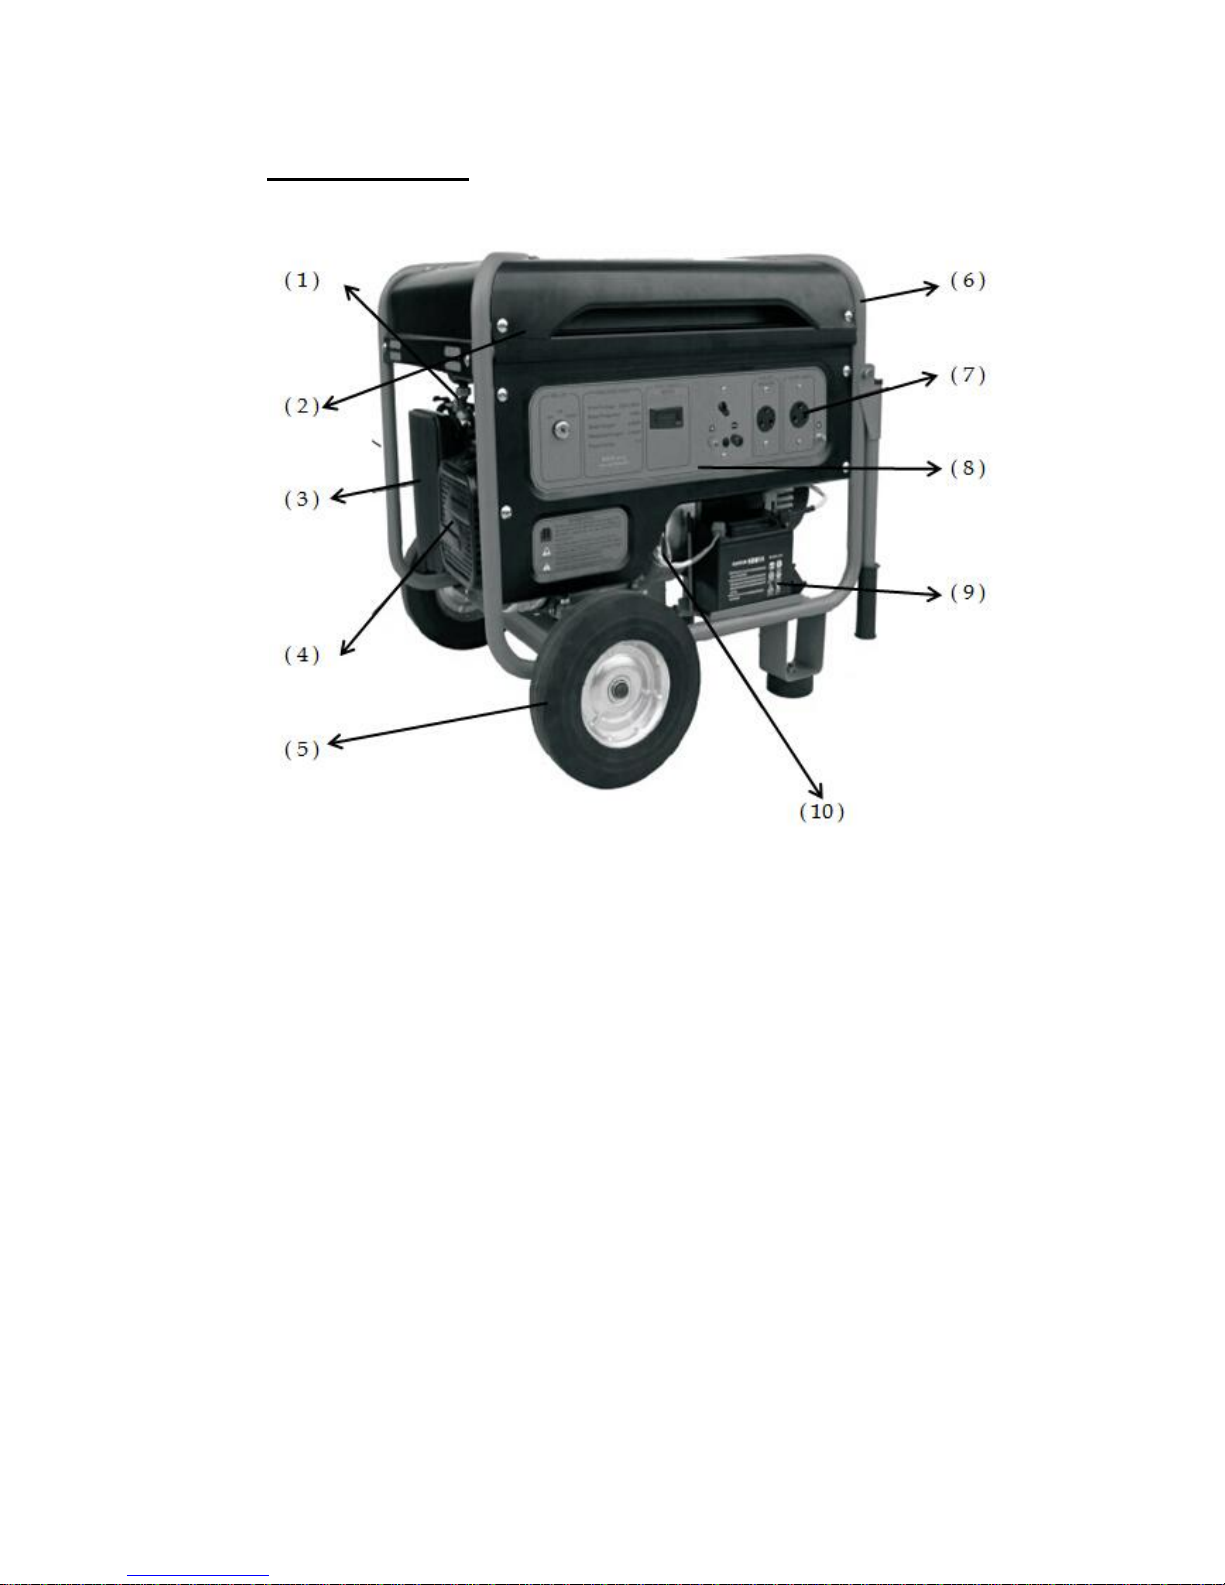
5. COMPONENTS:
(1) FUEL COCK
(2) FUEL TANK COVER
(3) AIR CLEANER
(4) RECOIL STARTER
(5) TOLLEY WHEEL
(6) FRAME
(7) SOCKET
(8) CONTRAL PANEL
(9) BATTERY
(10) OIL DIPSTICK

8
6. PRE-OPERATIONCHECKS:
6.1. CHECKINGTHE ENGINE OIL:
6.1.1. Ensure that the generator is on a flat and level surface before adding oil.
6.1.2. Remove the oil cap and check the level of the oil
6.1.3. Add oil to the generator if the oil is below the indicator line
6.1.4. Always ensure that your engine oil is clean.
6.2. OIL CAPACTIY FOR THE VARIOUS GENERATOR MODELS:
6.2.1. 1KVA - 0.35L
6.2.2. 2.2KVA - 0.6L
6.2.3. 2.8KVA - 0.6L
6.2.4. 5.5KVA - 1.1L
6.2.5. 6.5KVA - 1.1L
6.2.6. 7.5KVA - 1.1L
6.3. RECOMMENDED ENGINE OIL:
6.3.1. Only use 4-stroke automotive oil (API or
SE) alternatively you can use a higher
grade (SG, SH or SJ). SAE 10W -30 or
10W-40 is recommended for general
all-temperature use. If single viscosity oil is
used, select the appropriate viscosity for
the average temperature in your area
9
6.4. CHECKINGTHE ENGINE FUEL:
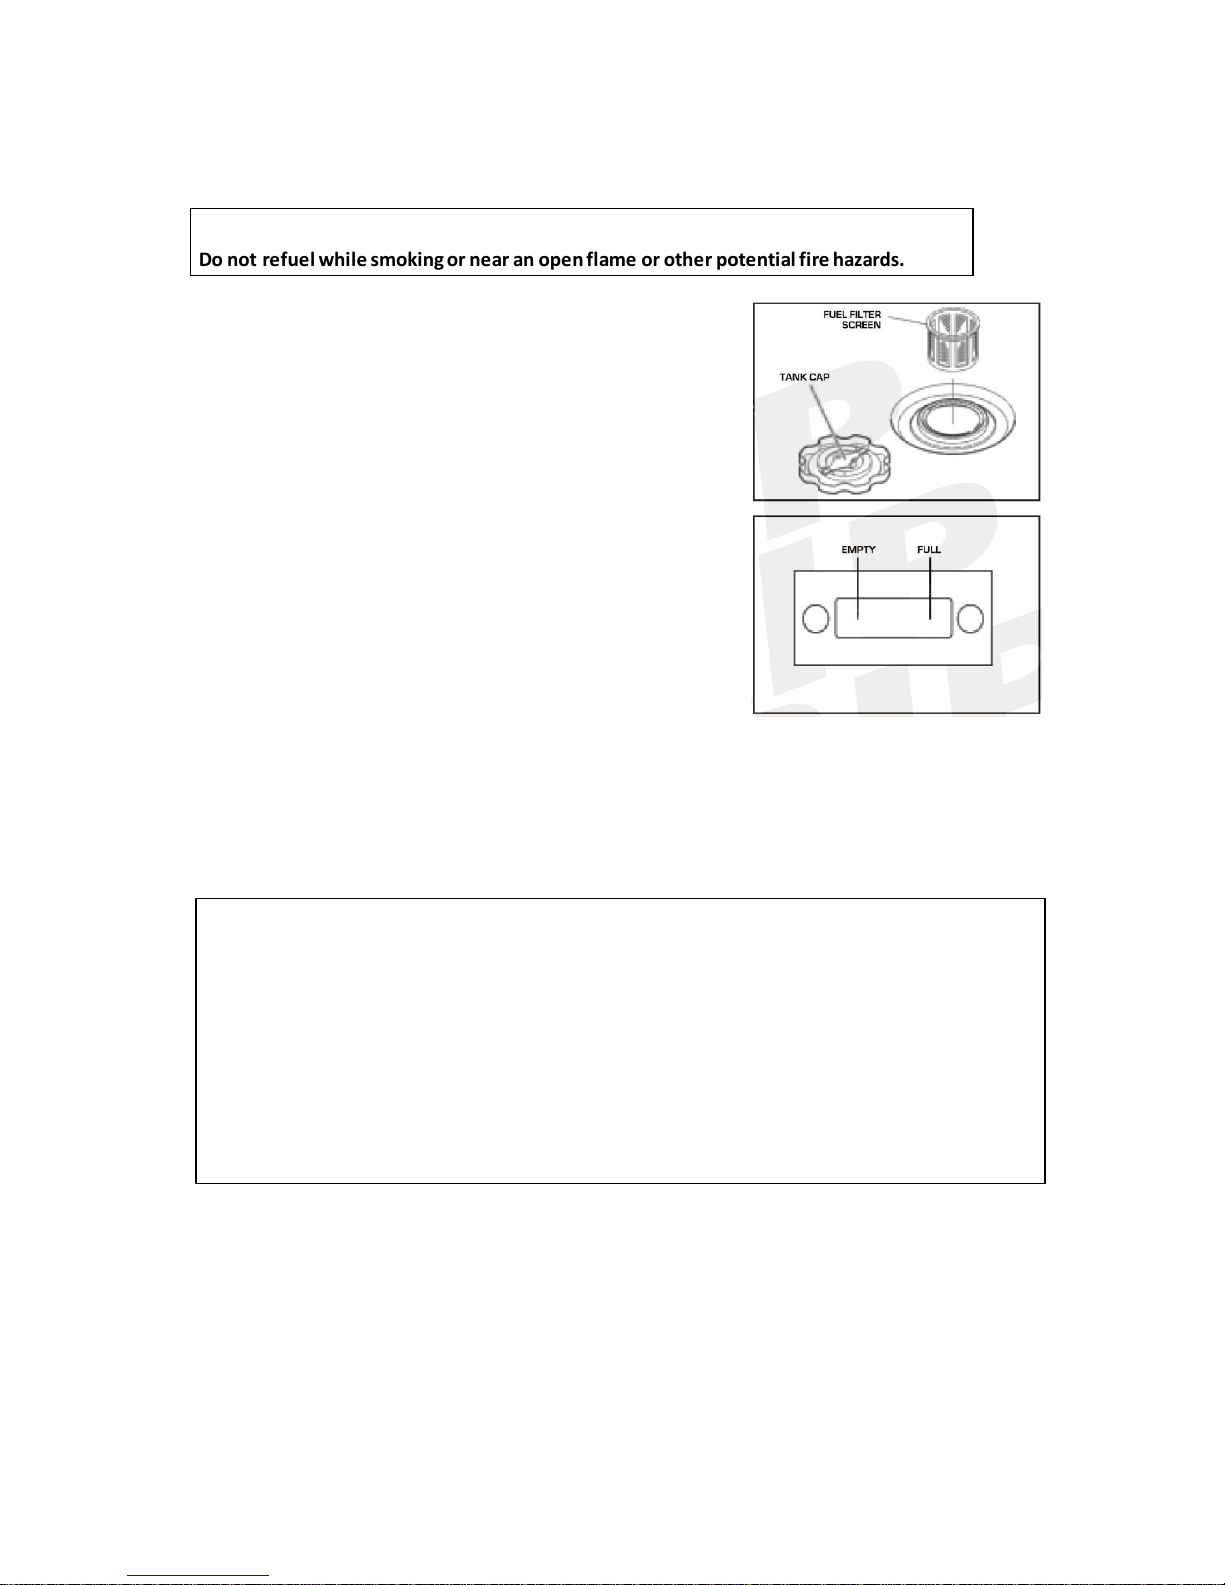
Do not refuel while smoking or near an open flame or other potential fire hazards.
6.4.1. Use the fuel gauge to check the fuel level.
6.4.2. If the fuel level is too low, only refuel with
unleaded fuel
6.4.3. Ensure that you use the fuel filter screen on the
fuel filter
6.5. FUEL CAPACITY FOR THE VARIOUS
GENERATOR MODELS:
6.5.1. 1KVA –6L
6.5.2. 2.2KVA - 15L
6.5.3. 2.8KVA –15L
6.5.4. 5.5KVA –25L
6.5.5. 6.5KVA –25L
6.5.6. 7.5KVA –25L
6.6. CHECKINGCOMPONENT PARTS:
Before starting the generator please check the following::
6.6.1. Check for any fuel leaking from any part of the generator.
6.6.2. Check that all the nuts and bolts are securely tightened on the generator.
WARNING:
Make sure you review each warning in order to prevent fire hazards. Do not refill the fuel tank whilst
the engine is running or hot. Please ensure that the fuel cock is closed before refueling. Be careful
not to contaminate the fuel with any dust, dirt, water or other foreign liquids/objects. Please lean all
spilt fuel thoroughly before starting the generator.
Ensure that the generator is clear from any open flames. Do not smoke whist refueling the
generator.
WARNING:

10
6.6.3. Check for any visible damaged components on the generator.
6.6.4. Check that the generator is not resting on or adjacent to any electrical wiring.
6.7. CHECK THE GENERATOR SURROUNDINGS:
6.8. BATTERY INSTALLATION (ELECTRIC STARTER MODEL)
The recommended battery capacity is 12V -24AH.
WARNING:
Make sure you review each warning in order to prevent fire hazards. Keep the surrounding area
clear of flammables or other hazardous materials. Keep the generator at least 3 feet (1 meter)
away from all buildings and or other structures. Only operate the generator in a dry, well-ventilated
area. Keep the exhaust pipe clear of all foreign objects. Keep the generator away from open
flames. Do not smoke in close proximity to the generator. Keep the generator on a flat and level
surface.
Do not attempt to block the generator air vents with any paper or other material/objects.
WARNING
Follow the instructions very carefully failing to do so may result in injury and or death. Only use
the recommended battery capacity. Ensure that the KEY/SWITCH is in the “STOP” position prior
to connecting or disconnecting the battery. Always check to ensure that the terminals are
connected correctly. Positive (+) Cable to Positive (+) Terminal, Negative (-) Cable to Negative
(-) terminal.
RED CABLE: Positive (+) Terminal BLACK CABLE: Negative (-) Terminal
Please note that the generator will not start if the connection of the battery is done incorrectly.
Ensure that you securely tighten the nuts and bolts on the battery terminals. Disconnect the
battery cables from the terminals when charging the battery. Please note that when charging the
battery we recommend a “TRICKLE/SLOW” charge. This will pro long the life of the battery.

11
6.9. GROUNDING THE GENERATOR:
6.9.1. When grounding the generator connect the grounding lug of the generator to the
grounding spike.
6.9.2. If such grounding conductor or ground electrode is unavailable, connect the
grounding lug of the generator to the grounding terminal of the electric tool or
appliance.

12
7. OPERATINGPROCEDURES:
7.1. STARTING THE GENERATOR ENGINE:
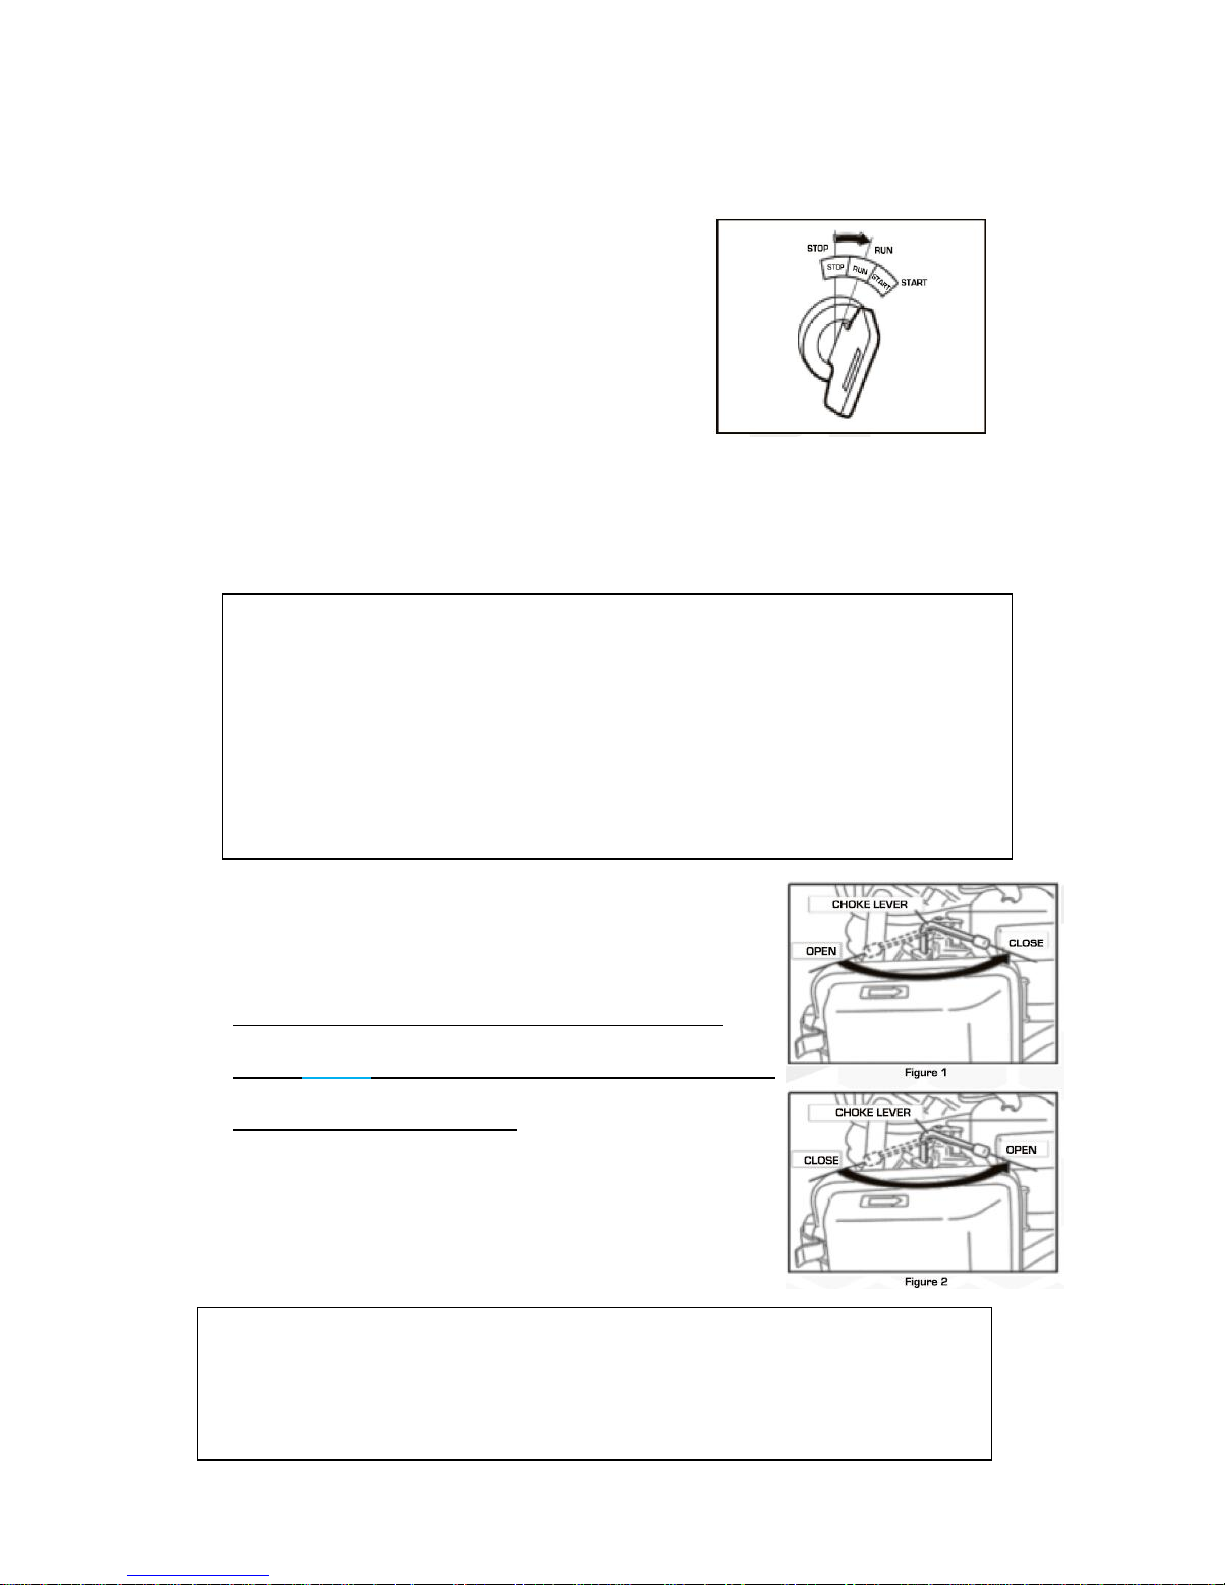
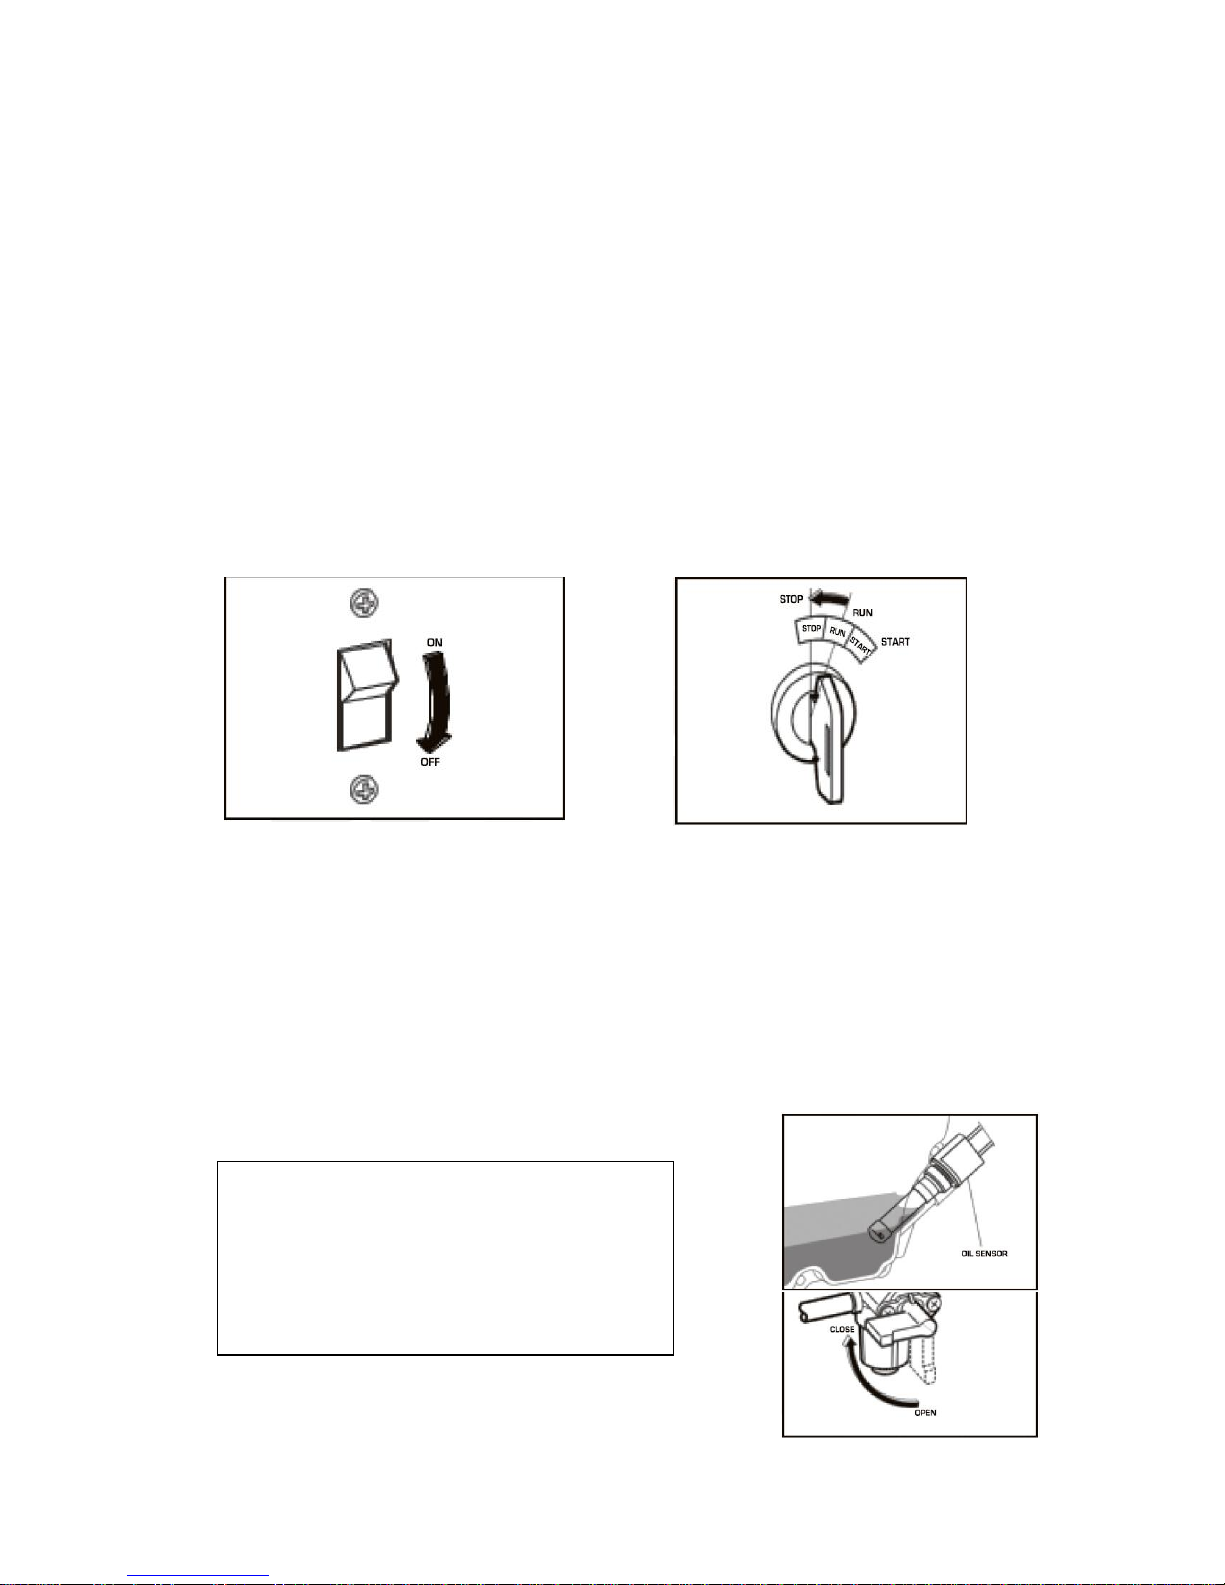
7.1.1. Turn the engine “KEY” to the “ON/START” position.
(For manual start
Generators there will be a Switch and not a Key).
7.1.2. Turn the circuit breaker to the “OFF” position.
7.1.3. Open the fuel cock.
7.1.4. Turn the choke lever to “CLOSED” position if the generator engine is cold.
7.1.5. For manual start machines pull the recoil starter until resistance is felt.
7.1.6. This is the “compression” point. Return the handle to its original position, and then
pull swiftly.
7.1.7. If the generator engine fails to start after several attempts, repeat above the
procedures with the choke knob returned to the “OPEN” position.
7.1.8. Do not pull the rope of the recoil starter out completely.
7.1.9. After starting the generator allow the starter handle to return to its original position
whilst still holding on to the handle.
For the 1KVA generator model please refer to Figure 1.
For the 2.2KVA, 2.8KVA, 5.5KVA, 6.5KVA, 7.5KVA generator models please refer to
Figure 2.
CAUTION
Every time before starting the generator please
ensure that you check the oil level
13
7.10. For Electric/Key Start Machines insert the key in
to the ignition and turn the key
clockwise to the “RUN” position.
7.11. Then turn the key 1 (one) turn further in a
clockwise position to the “START” position.
This will engage the starter motor and this will start the generator.
NOTE: If you are starting the generator for the first time we recommend that you use the
recoil starter.
7.12. After the engine has started, please return the choke lever
to the “OPEN” position.
For the 1KVA generator model please refer to Figure 1.
For the 2.2KVA, 2.8KVA, 5.5KVA, 6.5KVA, 7.5KVA generator
models please refer to Figure 2.
7.13. Always let the generator engine warm up sufficiently
7.2. USING ELECTRIC POWER:
CAUTION:
Do not attempt to run the starter motor for more than 5 seconds continuously. If the
generator engine fails to start, return the key to the “RUN” position and wait about 10
seconds before attempting to start it again. Do not turn the key switch to the “START”
position when the generator engine is running as this could damage the starter motor. When
attempting to start the generator engine using the recoil starter ensure that the key is in the
“ON” position before pulling the recoil starter handle.
WARNING:
Make sure that the appliance is switched OFF before connecting it to the generator.
Do not move the generator while it is running.

14
7.2.1. AC APPLICATION:
7.2.2. Check the volt meter for sufficient voltage.
7.2.3. This generator is properly tested and adjusted and set at the factory.
7.2.4. If the generator does not produce the specified voltage please contact GENTECH
INDUSTRIES, the OFFICIAL SERVICE AGENTS COUNTRYWIDE for all models
of POWER MASTER GENRATORS.
7.2.5. Turn off the switch (es) of the electrical appliance(s) before connecting to the
generator.
7.2.6. Insert the plug(s) of the electrical appliance(s) into the
receptacle.
7.2.7. Check the amperage of the receptacles used making
reference to the TABLE on page 4 and be careful not to
take a current exceeding the specified amperage.
7.2.8. Check that the total wattage of all appliances that is being
connected to the generator does not exceed the rated
output of the generator.
7.2.9. Turn on the appliance switch.
NOTE: If the circuit breaker “TRIPS” during operation the
generator is overloaded or the appliance is defective. Stop the
generator immediately and check the appliance and /or generator
for overloading.
15
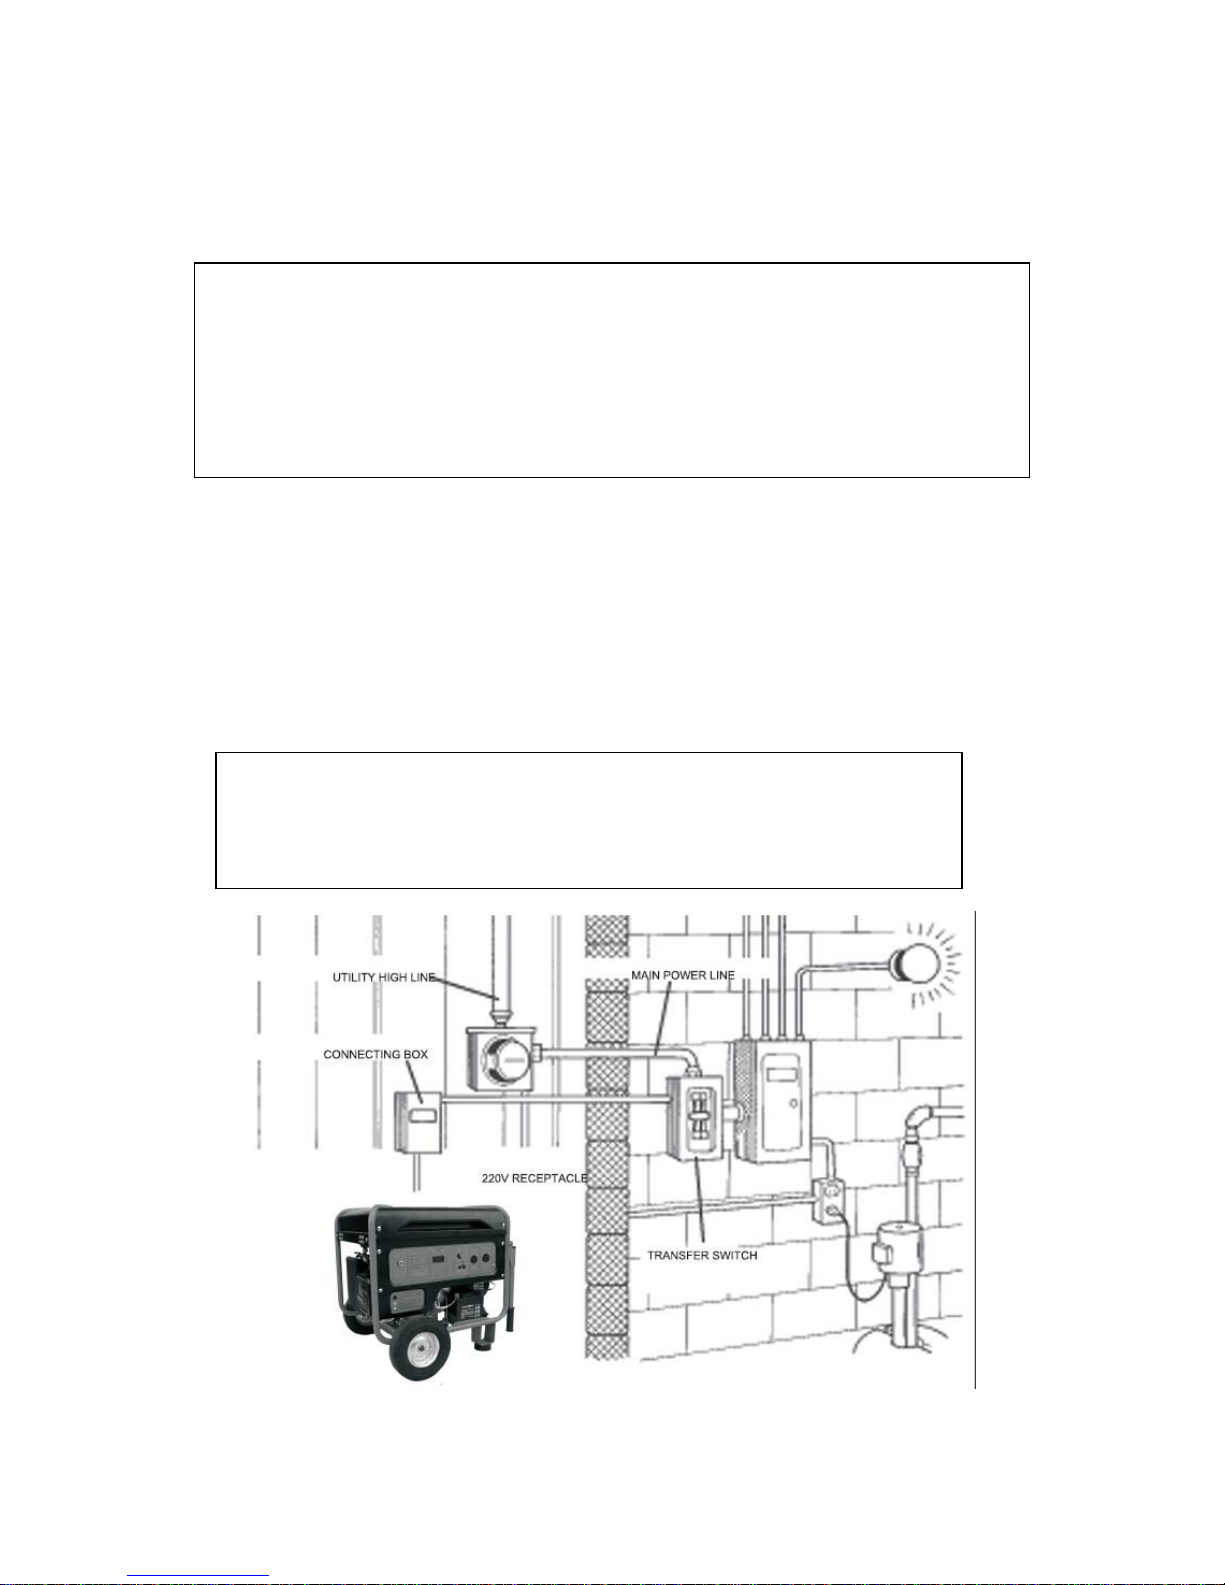
7.3. CONNECTINGTO DOMESTIC CIRCUITS (HOUSE WIRING)
7.3.1. When connecting the generator to the house wiring the generator output power must be
taken from the 220V receptacle.
7.3.2. A transfer switch must be installed to transfer the load from the commercial power
source to the generator. This switch is necessary to prevent accidents caused by the
recovery from power outages. Use a transfer switch of the correct capacity. Install the
transfer switch between the meter and the fuse or AC Breaker Box.
WARNING:
If a generator is to be connected to residential or commercial power lines for stand-by power
during power outage- all connections must be made by a competent person/ licensed electrician.
Connection failure, or improper connection, may result in death, personal injury, damage to the
generator, damage to the appliances, damage to the building’s wiring, or even result in a fire.
CAUTION:
If the neutral wire of the house wiring is earthed, be sure to earth the ground terminal of
the generator. An electric shock may result if this procedure is not followed.

16
7.4. CHARGING THE BATTERY:
NOTE: It may be necessary to charge the battery
directly after purchase. It is recommended to fully
charge the battery with a battery charger on the first
charge on a slow/trickle charge.
7.4.1. DC APPLICATION:
7.4.1.1. Connect the positive (red) terminal on the generator to the positive (+) terminal on the
battery.
7.4.1.2. Connect the negative (black) terminal on the generator to the negative(-) terminal on
battery.
7.4.1.3. Use the recoil starter to start the generator the battery will then begin to charge as the
generator runs.
Note: Both AC and DC outputs can be used at the same time providing that the total output
is within the rated output of the generator.
7.4.2. BATTERY CHARGER:
7.4.2.1. Disconnect the battery cables before/during charging the battery
7.4.2.2. Ensure that the battery charger is connected correctly.
7.4.2.3. Please note that we recommend a trickle/ slow charge.
7.4.2.4. Once the battery is fully charged reconnect the battery to the generator (see page 9).
7.4.3. SAFETY PRECAUTIONS WHILE CHARGING:
7.4.3.1. An explosive hydrogen gas is discharged through vent holes in the battery during the
charging process.
7.4.3.2. Electrolyte fluid can burn your eyes and clothing. Be extremely careful and avoid
contact. If contact occurs wash the affected area immediately with large quantities of
water or milk and consult a doctor for treatment.
7.4.3.3. When charging a large capacity battery or totally discharging a battery excessive
current may force the DC breaker to turn off. In such cases use a battery charger to
charge a large battery with an AC output.
17
7.4.3.4. Battery defects may cause the DC breaker to turn off. Check the battery before
replacing the DC breaker.
7.5. STOPPING THE GENERATOR:
7.5.1. Turn off the power switch of the electric equipment and unplug the cord from the
receptacle of the generator.
7.5.2. Turn the circuit breaker to the “OFF” position.
7.5.3. Allow the engine to cool down for about three minutes with no load prior to switching it
off.
7.5.4. For recoil starter models turn the switch to the “OFF” position
7.5.5. Electric starter models turn the key to the “STOP” position.
7.5.6. Close the fuel cock.
7.6. OIL SENSOR:
7.6.1. The oil sensor detects a drop in the oil level in the crank case and automatically stops
the engine when oil level drops below a predetermined level.
7.6.2. When engine has stops automatically switch off the generator’s circuit breaker and
check the oil level. Refill with engine oil to the upper level as instructed on page 6, and
then restart the engine.
7.6.3. If the engine does not start please re check the oil level.
CAUTION:
Do not remove the OIL SENSOR PROBE when
refilling with oil. Remove the oil filler cap on the
opposite side of carburetor.

18
8. WATTAGEINFORMATION:
8.1.Some appliances need a “surge” of energy when starting. This is commonly known as a
“LAGGING” Load.
8.2.This means that the amount of electrical power needed to start the appliance may exceed
the amount needed to maintain its use.
8.3.Electrical appliances and tools normally come with a label indicating voltage, cycles/Hz,
amperage (amps) and electrical power needed to run the appliance or tool.
8.4.Check with your nearest branch with questions regarding power surges of certain
appliances or power tools.
8.5.Electrical loads such as incandescent lamps and hot plates require the same wattage to
start as is needed to maintain their use. This is commonly known as a “LEADING” Load
8.6.Loads such as fluorescent lamps require1.5 to 2 times the indicated wattage during
start-up.
8.7.Electrical motors require a large starting current. Power requirements depend on the type
of motor and its use. Once enough “power” is attained to start the motor, the appliance will
require only +-50% of the wattage in order to continue running.
8.8.Most electrical tools require 1.5 to 3 times their wattage for running under load during use.
Loads such as submersible pumps and air compressors require a very large force to start.
They need 3 to 5 times the normal running wattage in order to start.
NOTE: PLEASE REFER TO THE CONSUMPTION CHART AND LOAD
CALCULATOR IN THE QUICK REFERENCE GUIDE BOOKLET.
This manual suits for next models
5
Table of contents
Other Power Master Portable Generator manuals


