PowerBox Systems Sensor V3 User manual

Instruction Manual
SEnsor
V3

2PowerBox-Systems − World Leaders in RC Power Supply Systems
Dear customer,
congratulations on your decision to purchase the PowerBox Sensor V3 from
our range. We wish you many hours of pleasure and success with the PowerBox
Sensor V3!
PRODUCT DESCRIPTION
The PowerBox Sensor V3 is the third generation of the PowerBox Sensor, which
is well-known throughout the world. For almost twenty years the PowerBox
Sensor has represented the standard for small to medium-sized models thanks to
its compact format and versatility.
By using the latest components we have been able to reduce the size of the Sensor
V3 signicantly. For example, the case is now exactly half as deep (11 mm compa-
red with 22 mm). Nevertheless, the Sensor V3 still ts neatly in the aperture used
by its predecessor.
The introduction of a top-quality aluminium case, machined and anodised, has
brought a substantial increase in the unit’s cooling efciency, with the result that
the maximum continuous current capacity of the PowerBox Sensor V3 is around
35 % higher. In fact, the peak load capacity is twice as high: the Sensor V3 can
handle more than 20 A for several seconds!
The Sensor V3 offers two user-selectable output voltages: for normal servos it can
be set to a regulated 6.0 V, while a regulated 7.8 V is available for HV servos– pro-
vided that the batteries supply the higher input voltage required.

www.powerbox-systems.com 3
Power to the unit can be drawn from four different battery types: LiPo, LiIon, LiFePo,
NiMH. Ultra-bright RGB LEDs are tted to indicate battery voltage; they light up in
various colours to display the charge status of the batteries.
CORE users also benet from one special additional feature: both battery voltages
can be displayed directly on the transmitter by means of telemetry.
FEATURES
+ High-performance battery backer
+ Ultra-light unit, compact format
+ Double regulated output voltage
+ Redundant switch and regulator circuitry
+ User-selectable output voltage: 6.0 V or 7.8 V
+ Separate RGB LED voltage indicators for each battery
+ Telemetry support for CORE systems
+ Supports 4 different battery types: 2s LiPo, 2s LiIon, 2s LiFePo and 5s NiMH
+ Regulator monitoring
+ Suppression of servo feedback currents

4PowerBox-Systems − World Leaders in RC Power Supply Systems
1. FEATURES AND CONNECTIONS
2. INSTALLING AND CONNECTING THE BATTERIES
The PowerBox Sensor V3 should be installed in the model in a position where
vibration levels are low. Solid GRP fuselage sides in a power model should be tted
with an internal 3 – 4 mm thick plywood plate to minimise vibration, and to provide
‘meat’ for the retaining screws.
Connect the two batteries of your choice – with correct polarity – to the battery
inputs. You can use either two 2s LiPo or LiIon, two 2s LiFePo or two 5s NiMH
batteries. We recommend the use of PowerPak 2.5x2 Pro batteries, which are par-
ticularly safe and simple to handle thanks to their integral charge circuitry.
Push-button Battery sockets
(MPX or JR)
RGB LED
voltage and status
indicators
Receiver
outputs

www.powerbox-systems.com 5
Note regarding home-assembled battery packs: connecting a battery to the
unit with reversed polarity will immediately destroy the internal linear regulators!
The backer’s outputs can be connected differently depending on the type of recei-
ver used. The outputs of the Sensor V3 are present as two-core and three-core
leads. For all systems except the CORE the two outputs can be considered to be
identical.
If your receiver only has one battery input, simply connect one of the Sensor V3’s
outputs to the receiver’s battery input, and the other to any vacant servo output
socket. If there is no servo output available, a Y-lead can be connected to a servo
output socket, to which the Sensor V3 and the servo are connected.
If you are using CORE receivers please note that the three-core lead must be
connected to the receiver’s P²BUS input, otherwise the battery telemetry data will
not be sent to the transmitter.
Important: always connect the two-core lead to a vacant servo output - not the
Fasttrack output! The power supply lead from the P²BUS and Fasttrack connec-
tors to the connected servos may not be sufcient for all the servos connected
to the system!

6PowerBox-Systems − World Leaders in RC Power Supply Systems
3. SWITCHING ON AND OFF
In contrast to its predecessor, the Sensor V3 only has one button, and this simpli-
es the procedure for switching on and off. As with other PowerBox devices with a
single button, the sequence is as follows:
Hold the button pressed in for one or two seconds until the LEDs light up violet.
Now release the button for a moment before pressing it again briey; this conrms
the switching process.
Once switched on, the battery backer can only be switched off again using the
button. Intermittent contacts or breaks while in use will not cause the PowerBox to
switch off. The last switched status is always stored.
4. SETTING THE BATTERY DISPLAY
It is essential to set the correct battery type to ensure that the LED battery indi-
cators work correctly. The rst step is to switch the PowerBox on, then hold the
button pressed in again.
After about ve seconds the LEDs will go out, and a sequence of different colours
begins. Each colour corresponds to a particular battery type. Simply release the
button when the colour matching your battery type is displayed. The battery type
is now stored.
LiPo LiIon LiFe NiMh

www.powerbox-systems.com 7
80 – 100 % 60 – 80 % 40 – 60 % 20 – 40 % 0 – 20 %
Note regarding the LED display: the battery indicators do not follow battery voltage
in a linear fashion. We have tested and measured various currently available bat-
tery types, and produced an average discharge curve from this information; this
discharge curve is used as the basis for a percentage indication of battery state.
The LED indicators correspond to the battery status as follows:
5. SETTING THE OUTPUT VOLTAGE
The PowerBox Sensor V3 can be set to either of two output voltages: 6.0 V for
conventional servos, and 7.8 V for HV servos. If you opt for the higher setting,
please ensure that all the components connected to the system are approved for
high-voltage use.
The advantage of regulating the voltage at 7.8 V, instead of simply allowing the
full battery voltage to pass through, is that it suppresses the high battery voltage
present just after charging. The voltage remains stable right from the outset, which
means that servo speed and power are constant for a longer period.
If you wish to change the output voltage, hold the button pressed in while you
connect one of the batteries. The LED will initially light up green, then switch to red
after three seconds. Release the button when the colour is correct for your required
output voltage: green = 6.0 V, red = 7.8 V.
The LED now ashes white to conrm that the set-up process is complete.
Repeat the exact procedure with the second battery connection.

8PowerBox-Systems − World Leaders in RC Power Supply Systems
Notes on regulator performance:
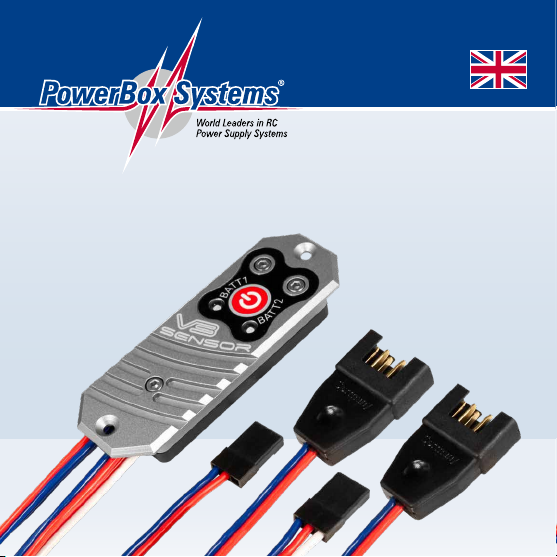
The maximum current which the PowerBox Sensor V3 can supply varies accor-
ding to external factors such as battery type and the selected output voltage, and it
is also signicantly affected by cooling efciency. Ideally the battery backer would
be installed on the outside of the model, or inside in such a position that at least
some airow is present for cooling. In particular when the Sensor V3 is used with
LiPo or LiIon cells, and the output voltage is set to 6.0 V, the number of servos
connected to the system should not be excessive. At the same time please bear in
mind that not all servos are equal: eight small wing servos draw less current than
ve 30 kg types.
At the 7.8 V setting the backer does not have to work hard to regulate the voltage
and disperse energy, and this increases the performance of the PowerBox Sensor
V3 substantially. The same applies to the 6.0 V output voltage setting if LiFePo or
NiMH batteries are used, since the input voltage at the Sensor V3 is already lower.
If you are not sure whether the PowerBox Sensor V3 has sufcient capacity for the
requirements of your system, move all the servos continuously - with the model on
the ground – for about thirty seconds. If the Sensor V3 becomes hot to the touch
(more than 60°C), rst check that the servos, pushrods and linkages are in good
order. If you nd no problems, then you should use the PowerBox Source instead,
as it is better suited to heavy-duty work.

www.powerbox-systems.com 9
6. REGULATOR ERRORS
The unit constantly monitors the operation of the voltage regulators. If the output
voltage strays outside the correct value, the LEDs indicate this by lighting up violet
and ashing rapidly. Regulator errors typically occur when a battery is connected
with reversed polarity.
If this should happen, please contact our Service department!
7. SPECIFICATION
Operating voltage: 4,0 V – 9,0 V
Power supply: 2s LiPo, 2s LiIon, 2s LiFePo, 5s NiMh
Current drain, operating 30 mA
Current drain, stand-by: 10 μA
Peak current capacity: 2 x 10 A
Drop-out voltage: 0,25 V
Output voltage: 6,0 V/ 7,8 V stabilised
Supported telemetry system: P²BUS
Dimensions: 65 x 26 x 11 mm
Weight: 30 g
Temperature range: -30 °C to +105 °C

10 PowerBox-Systems − World Leaders in RC Power Supply Systems
8. DIMENSIONS

www.powerbox-systems.com 11
9. SET CONTENTS
- PowerBox Sensor V3
- 2x retaining screws
- Operating instructions in English and German
10. SERVICE NOTE
We make every effort to provide a good service to our customers, and have now
established a Support Forum which covers all queries relating to our products. This
helps us considerably, as we no longer have to answer frequently asked questions
again and again. At the same time it gives you the opportunity to obtain assistance
all round the clock, and even at weekends. The answers come from the PowerBox
team, which guarantees that the answers are correct.
Please use the Support Forum before you contact us by telephone.
You will nd the forum at the following address:
www.forum.powerbox-systems.com

12 PowerBox-Systems − World Leaders in RC Power Supply Systems
SERVICE ADDRESS
PowerBox-Systems GmbH
Ludwig-Auer-Straße 5
D-86609 Donauwoerth
Germany
11. GUARANTEE CONDITIONS
At PowerBox-Systems we insist on the highest possible quality standards in the
development and manufacture of our products. They are guaranteed “Made in
Germany”!
That is why we are able to grant a 24 month guarantee on our PowerBox Sensor
V3 from the initial date of purchase. The guarantee covers proven material faults,
which will be corrected by us at no charge to you. As a precautionary measure, we
are obliged to point out that we reserve the right to replace the unit if we deem the
repair to be economically unviable.
Repairs which our Service department carries out for you do not extend the original
guarantee period.
The guarantee does not cover damage caused by incorrect usage, e.g. reverse po-
larity, excessive vibration, excessive voltage, damp, fuel, and short-circuits. The same
applies to defects due to severe wear.
We accept no liability for transit damage
or loss of your shipment. If you wish to
make a claim under guarantee, please
send the device to the following address,
together with proof of purchase and a de-
scription of the defect:

www.powerbox-systems.com 13
12. LIABILITY EXCLUSION
We are not in a position to ensure that you observe our instructions regarding instal-
lation of the PowerBox Sensor V3, full the recommended conditions when using
the unit, or maintain the entire radio control system competently.
For this reason we deny liability for loss, damage or costs which arise due to the
use or operation of the PowerBox Sensor V3, or which are connected with such
use in any way. Regardless of the legal arguments employed, our obligation to pay
compensation is limited to the invoice total of our products which were involved in
the event, insofar as this is deemed legally permissible.
We wish you every success with your new PowerBox Sensor V3.
Donauwoerth, December 2020

PowerBox-Systems GmbH
Ludwig-Auer-Straße 5
D-86609 Donauwoerth
Germany
+49-906-99 99 9-200
+49-906-99 99 9-209
www.powerbox-systems.com
12/2020
Table of contents
Other PowerBox Systems Accessories manuals
Popular Accessories manuals by other brands

Hama
Hama Wireless Laser Presenter Operating instruction

ARC'TERYX
ARC'TERYX AR-385a user manual

PCB Piezotronics
PCB Piezotronics 4115K-11A Installation and operating manual

iMuto
iMuto Taurus X6S user manual

Dometic
Dometic REVO ZIP 200 Installation and operating manual

Orbit baby
Orbit baby helix plus instruction manual