manuals.online logo
Brands
  1. Home
  2. •
  3. Brands
  4. •
  5. Powercore
  6. •
  7. Indoor Furnishing
  8. •
  9. Powercore Desk User manual

Powercore Desk User manual

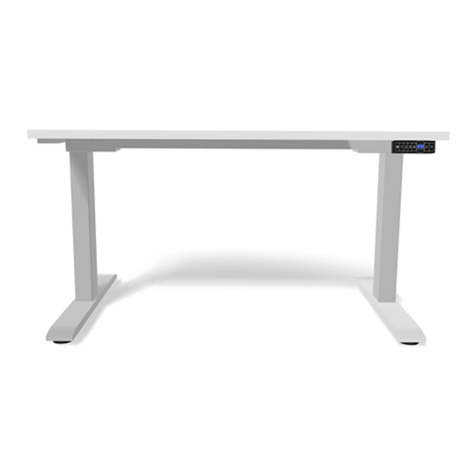
Powercore Desk
Resetting your desk
Powercore desks need to be reset after assembly and
prior to use. Follow these steps:
1. Press and hold down both the up arrows and down
arrows simultaneously for 7 full seconds until the
desk starts moving down.
2. Keep the buttons pressed all the way to the bottom.
(The screen will show E00 just before it reaches the
bottom).
3. When it reaches the bottom it will “beep” and reset.
When it “beeps” you can release the buttons and it
should show the height of the desk. The desk is ready
to go.
If the screen shows E00 and doesn’t beep, the reset
hasn’t been completed properly so you need to repeat
the process.
When the desk goes to it’s lowest level it is because the
sensors are telling the controller that the desk is possibly
uneven and needs to be leveled at it’s bottom height.
Manually adjusting the height
Simply press the “up” or “down” arrows to go to your
required height.
Setting automatic height adjustment
If you want to use the memory function to automatically
move to preset heights, follow these steps:
1. Move the desk to the height you want to assign a
preset memory number to.
2. Press “M” and hold it down until the screen
starts lashing. Release the “M’ button and select
the number you want to allocate that height to
(1,2,3 or 4).
3. When the P- (number allocated) shows on the
screen you have successfully allocated that preset
(1,2,3 or 4) to the height.
4. Move the desk to another height level and repeat
the process until you have allocated all the
presets to a height level.
To move the desk to a preset height level just press
the number (1,2,3 or 4) and release. The desk will
move to that preset height.
You can overwrite these settings any time by
repeating the process and re-allocating the preset
number to a dierent height.
Error messages
If the handset on the desk shows an error message
(E - “number”) it is a good chance the desk just
needs a reset. Follow the instructions at the top of
this page.
If the error message persists (despite the reset):
email stuart@powercore.nz with the error
message and I’ll get in contact to help you. Most
solutions are pretty simple.
Here’s the low down on your desk and how to set it up.
Watch the assembly video: vimeo.com/371500148
Enjoy your desk
and your mobility
powercore.nz
Powercore_assembly instructions_Desk_A4.indd 1Powercore_assembly instructions_Desk_A4.indd 1 11/05/22 2:23 PM11/05/22 2:23 PM
ST4. 8*25 screw
2PCS
ST4. 8*25 screw
2PCS
ST4. 8*19 screw 2PCS
ST4. 8*25 screw 2PCS
ST3. 5*19 screw 2PCS
Parts and tools list
8
9
7
6
5
4
1
10
11
12
13
Lifting System 1 set
Qty QtyName Name
2
8
Feet
M6*14 Screw
2Bracket
M6*10 Screw 8
Support Beam 1
12
4mm Hex Spanner 1
M6*12 Screw
Rubber Cushion 6
6
Plastic Pad
ST4.8*25 Screw 6
ST3.5*19 Screw
ST4.8*19 Screw 2
2
3
2
4mm hex spanner
4mm hex spanner
Loosen the M6*10 screw on
the beam with the 4mm
hexagon wrench then adjust
the length of the beam
according to the width of the
tops you are fitting. Fix the
beam length in place with
the M6*10 screw. It will now
be fixed at that length.
Attach legs to the beam using 8 of M6*12 screws.
4mm hex spanner
M6*12 screw 8PCS
Attach brackets to beam using 4 of M6*12 screws, and then fit
the rubber cushion and plastic pad to the brackets and beam.
Attach feet to the legs using 8 of M6*14 screws.
4mm hex spanner
Fix table top to the frame with 6 of
ST4. 8*25 screws, then fix the control box
to the underside of the table top with 2 of
ST4. 8*19 screws. Lastly fix the handset to
the front edge with 2 of ST3. 5*19 screws.
Connect the control box to the handset and the two motors (the
motors will go in either slot). Connect the power cable, plug it in and
you are ready to roll.
M6*14 screw 8PCS
M6*12 screw 4PCS
Plastic pad 6PCS
Rubber cushion 6PCS
Assembly instructions
12
3 4
56
78910
11 12 13
1
2
3
4
56
By the way, we pack one extra screw (of each type) in case
you lose one when unpacking. Don’t panic when you see
you have an extra one.
Powercore_assembly instructions_Desk_A4.indd 2Powercore_assembly instructions_Desk_A4.indd 2 11/05/22 2:23 PM11/05/22 2:23 PM

Other Powercore Indoor Furnishing manuals

Powercore PLUS Desk User manual

Powercore

Powercore PLUS Desk User manual

Powercore Laptop Desk User manual

Powercore

Powercore Laptop Desk User manual

Popular Indoor Furnishing manuals by other brands

Regency LWMS3015 Assembly instructions

Regency

Regency LWMS3015 Assembly instructions

Furniture of America CM7751C Assembly instructions

Furniture of America

Furniture of America CM7751C Assembly instructions

Safavieh Furniture Estella CNS5731 manual

Safavieh Furniture

Safavieh Furniture Estella CNS5731 manual

PLACES OF STYLE Ovalfuss Assembly instruction

PLACES OF STYLE

PLACES OF STYLE Ovalfuss Assembly instruction

Trasman 1138 Bo1 Assembly manual

Trasman

Trasman 1138 Bo1 Assembly manual

Costway JV10856 manual

Costway

Costway JV10856 manual

moss DESIGN Caisson Credenza Assembly instructions

moss DESIGN

moss DESIGN Caisson Credenza Assembly instructions

Aquaglide FULL DECK 15.0 owner's manual

Aquaglide

Aquaglide FULL DECK 15.0 owner's manual

AREBOS AR-HE-SW30 user manual

AREBOS

AREBOS AR-HE-SW30 user manual

Till-Hilft Fulda 87005.330 Assembly instructions

Till-Hilft

Till-Hilft Fulda 87005.330 Assembly instructions

Twoey Outside 2010 quick start guide

Twoey Outside

Twoey Outside 2010 quick start guide

Hettich Easys 200 operating instructions

Hettich

Hettich Easys 200 operating instructions

The bedboss RELAX 404 Series owner's manual

The bedboss

The bedboss RELAX 404 Series owner's manual

Oeseder Möbelindustrie Bern 991 720 Assembly instructions

Oeseder Möbelindustrie

Oeseder Möbelindustrie Bern 991 720 Assembly instructions

Costway HW68469 user manual

Costway

Costway HW68469 user manual

Next ALIX A27743 Assembly instructions

Next

Next ALIX A27743 Assembly instructions

BROSA Hans Assembly guide

BROSA

BROSA Hans Assembly guide

Prodigg MINIKA PBA015T-FUR installation manual

Prodigg

Prodigg MINIKA PBA015T-FUR installation manual

manuals.online logo
manuals.online logoBrands
  • About & Mission
  • Contact us
  • Privacy Policy
  • Terms and Conditions

Copyright 2025 Manuals.Online. All Rights Reserved.