PowerKites Beamer IV User manual

INVENTO GmbH
Klein Feldhus 1
D-26180 Rastede
Service: +49 4402 926244
Email: [email protected]
Internet: www.invento-hq.com
US Distribution by:
HQ Kites & Designs U.S.A., INC.
317 Great Bridge Blvd., Suite C
Chesapeake, VA 23320
Toll free: (888) 318-3600
Email: [email protected]
Internet: www.hq-kites-usa.com
Harness Powerkites.de
M Art. Nr. 120565m
L Art. Nr. 120565l
XL Art. Nr. 120565xl
HQ Quad Handles Ultra
Art. Nr. 120534
HQ Quad Handles Ultra Kite Killer
Art. Nr. 12053401
Safety Control Bar
50 cm/20“ Art. Nr. 120520
60 cm/24“ Art. Nr. 120521

Deutsch EnglishFrançaisEspañol
Owners Manual
Produktinformationen
Mode d’emploi
Información de producto
www.powerkites.de

2
HQ BEAMER
Bedienungsanleitung
Wir beglückwünschen Sie zum Kauf einer
HQ BEAMER. Dieses Sportgerät wird Ihnen viel
Spaß bereiten. Allerdings sollten Sie vorher
diese Anleitung gründlich lesen und auf jeden
Fall die Sicherheitshinweise beachten.
Die HQ BEAMER wurden für den Einsatz als
Zugschirme entwickelt. Der Umgang mit ihnen
erfordert Umsicht und Übung – und manchmal
auch Mut. Geschwindigkeit, Zugkraft und
Manövrierfähigkeit können selbst erfahrene
Piloten überraschen, solange sie mit dem
Drachen nicht vertraut sind.
HQ BEAMER
operating instructions
Congratulations on your purchase of an
HQ BEAMER. These kites create excitement
and hours of fun for the user. However, you
should first read these instructions completely
and always respect the safety information.
HQ developed the BEAMER to be used as para-
foils. Handling requires discretion and practice
and occasionally courage. The speed, pulling
force and maneuverability can surprise even the
most experienced pilots if they are not familiar
with the kite.
English
Deutsch
Mode d’emploi
BEAMER HQ
Vous venez d’acheter une BEAMER HQ et
nous vous en félicitons. Cet engin de sport
vous procurera beaucoup de plaisir. Avant
l’utilisation, vous devez lire attentivement ce
mode d’emploi et absolument respecter les
consignes de sécurité.
Les BEAMER sont spécialement conçues comme
ailes de traction. Leur pilotage exige prudence,
contrôle... et parfois aussi un
gros cœur. La
vitesse, la maniabilité et la traction
développée
peut surprendre même des pilotes avertis,
tant qu’ils ne sont pas habitués au cerf-volant.
Français
Instrucciones de manejo de
HQ BEAMER
Le felicitamos por la compra de su HQ
BEAMER. Este artículo deportivo le deparará
muchas horas de disfrute. No obstante,
antes de utilizarlo debe leer a fondo estas
instrucciones y tener siempre en cuenta
las instrucciones de seguridad.
Los BEAMER han sido desarrollados para su
uso como parapentes de tracción.
Su manejo requiere precaución y práctica, en
ocasiones también audacia. La velocidad, la
fuerza de tracción y la maniobrabilidad pueden
sorprender incluso a los pilotos experimenta-
dos si no están familiarizados con la cometa.
Español
Graphics: Alex Hesse
Copyright by INVENTO ´03

English
3
1. Make sure that you always have your kite
under control, that it is always in good con-
dition, that it is properly assembled, that
the lines are in good condition and carefully
connected to the kite and handles or straps.
2. Never fly your kite over the given
windspeed. You will overstrain the material
and can easily lose control of the kite, which
could endanger bystanders.
3. Never fly your kite on busy fields or
beaches, or in nature protection areas. By-
standers often have no idea how dangerous
a falling kite can be!
4. Onlookers should stand behind the pilot for
maximum safety!
5. Keep your distance from other sport kite
pilots. Lines under tension can cut each
other as they are as sharp as knives!
6. Never fly in places where others may be an-
noyed or feel threatened by your kiteflying.
7. Never fly in thunderstorms or when a storm
is brewing. Never fly near high voltage ca-
bles, busy roads or airfields. This presents a
danger to life and limb!
8. There are different permitted line lengthes.
If in doubt, ask your local authorities.
9. Never fly in national preserved areas.
10. Do not leave any waste line or bits of rods
or other waste at the flying ground. This
helps to protect the environment, avoids
trouble and protects the good reputation of
the kite pilots.
Flying traction kites and the related sports,
for example, buggying, are among extreme
sports and should be participated in with
the appropriate respect. Inappropriate use of
the material can lead to serious or even fatal
injuries!
This makes it all the more important that you
read and follow the operating instructions and
the safety rules!
The Table on page 51 conTains informaTion
on wind range, recommended line and Tech-
nical daTa.
Safety Rules
Please ensure that your private liability in-
surance provides you with sufcient
cove-
rage for kite ying or power kiting!

English
4
Knots for harness line
4-line handle
Coated line loops
Brake lines
Power lines
Coated line
loops
Power line
connection
point
Main bridle
Air inlet
openings
Leading
edge
Braking
bridle
Trailing
edge
Brake lines
connection
points
Securing the
brake lines for
use when fly-
ing with 4-line
handles
Brake line
Braking
bridle
Main bridle
Airfoil/
Rip

English
5
Setting up and connecting
the lines
Laying out the Foil
Lay your BEAMER on the ground so
that the bridle lines are at the top and the inlet
openings are facing away from the wind.
To secure the foil, place some sand, smooth
stones or filled sacks on the trailing edge.
Lay out the main bridle and braking bridle lines
without letting them twist in the wind.
The flying lines provided are already connected
when delivered so that the BEAMER can
become airborne as quickly as possible.
Even so, when laying out the lines, allow
sufficient time. Wind the line up and move
toward the wind away from the kite.
Important! Always ensure that there is a
clear path for the quad-liner (see figure on
previous page).
The lines are stored on separate winders.
To prevent twists in the lines, wind them up in
Winding up on a winder. Winding up on handles-
Foil secured on the ground with sand.
eights figure of eights. Alternatively simply use
the 4-line handles to wind up the lines without
disconnecting the lines from the bars and the
foil. To do this, hold the pair of handles in one
hand and wind the four fly lines together
around the other end of the handles, always
moving in the same direction. When unwin-
ding, hold the bars at the end with one hand
without touching the lines and unwind the
lines so they are laid out in a single specified
direction. To prevent twists in the lines, wind
tightly and unwind in the opposite direction.

English
6
Always lay out the flying lines
from the foil opposite to the wind.
Use lark’s head knots to secure the lines to
the foil bridle and the handles (see drawing),
which form loops on the ends of each flying
line. Pull the lark’s head knots tight on the bridle
or handle line and stop the knots at the
connection points.
When hooking up the lines, ensure that the
flying lines are correctly secured to the bridle
and the handles and make absolutely
certain that the left and right side and the
power lines (thicker) and brake lines (thinner)
have not been switched.
Lark’s head knot
Securing the foil
A knot leader allows for the foil to be adjusted
at different connection points on the braking
bridle. The bridle is adjusted so that the third
knot provided for good control via the brake
if the flying lines are the same length (see figure
on page 4).
Once the foil is set up and the lines are con-
nected, secure it to the ground stake. To do this,
wind the brake line around the ground stake
direct on the handles so that the foil remains
flat on the ground while braked. Alternatively,
you can use the extra loops on the lower end of
some 4-line handles.
The 4-line handle
Power line
Brake line
Connection
points
Brake leader
line
Securing option
for harness line
Loop for
securing to the
ground stake
Kitekiller
Wind
Attaching lines
Power leader
line

English
7
Start
Launch and land
here if there
is a lot of wind
Zenith
Power zone
The possible flight area of a kite
or parafoil is called the wind window.
The wind provides the greatest pulling force
at the center of the wind window. The pull
drops off at the edges. The park and initial po-
sition for use is located directly above the pilot
in the zenith.
When launching, the foil is flown from the
ground in the center of the wind window up
into the zenith. The foil almost reaches its
maximum pulling force during this flight into
the zenith. Therefore, before launching, check
that the lines are laid correctly according to the
wind direction and that the foil size was chosen
correctly for the wind strength.
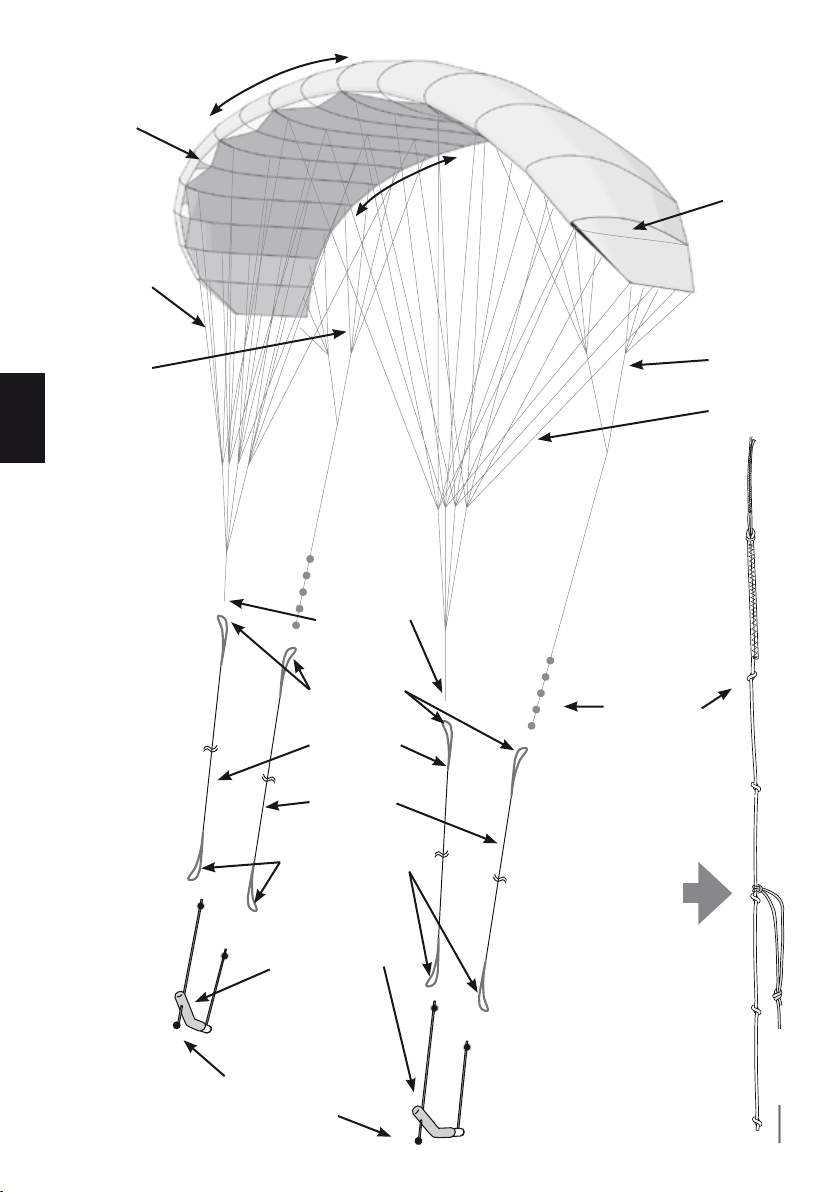
To control the foil, pull on one handle in the
desired direction. If you pull on the right handle,
then the foil makes a right curve. If you pull on
the left handle, the foil makes a left curve. If
you hold the handles level to each other, the foil
remains on a straight flight path.
If you tip a handle while pulling it, the action
is intensified. Thus, the lower end of the handle
is pulled toward the pilot, which shortens the
brake line. By combining pulling and tipping,
the kite can be controlled well and fly in all
desired directions.
Flying and using
the lower Lines
The safety system (kite killer) makes it possible
for you to release the handles in dangerous
situations without losing your kite. HQ recom-
mended to try out this function several times so
your reflexes will be formed, and you will gain
confidence with this maneuver
We recommend the use of this system!
In order to use it, fasten the left and right strap
around the respective wrist. Do not fasten it
too loosely, in order to prevent slipping over the
hand. Now you can release the handles during
the flight. The system will activate the brake lines
and depower the kite. Then the kite will land.
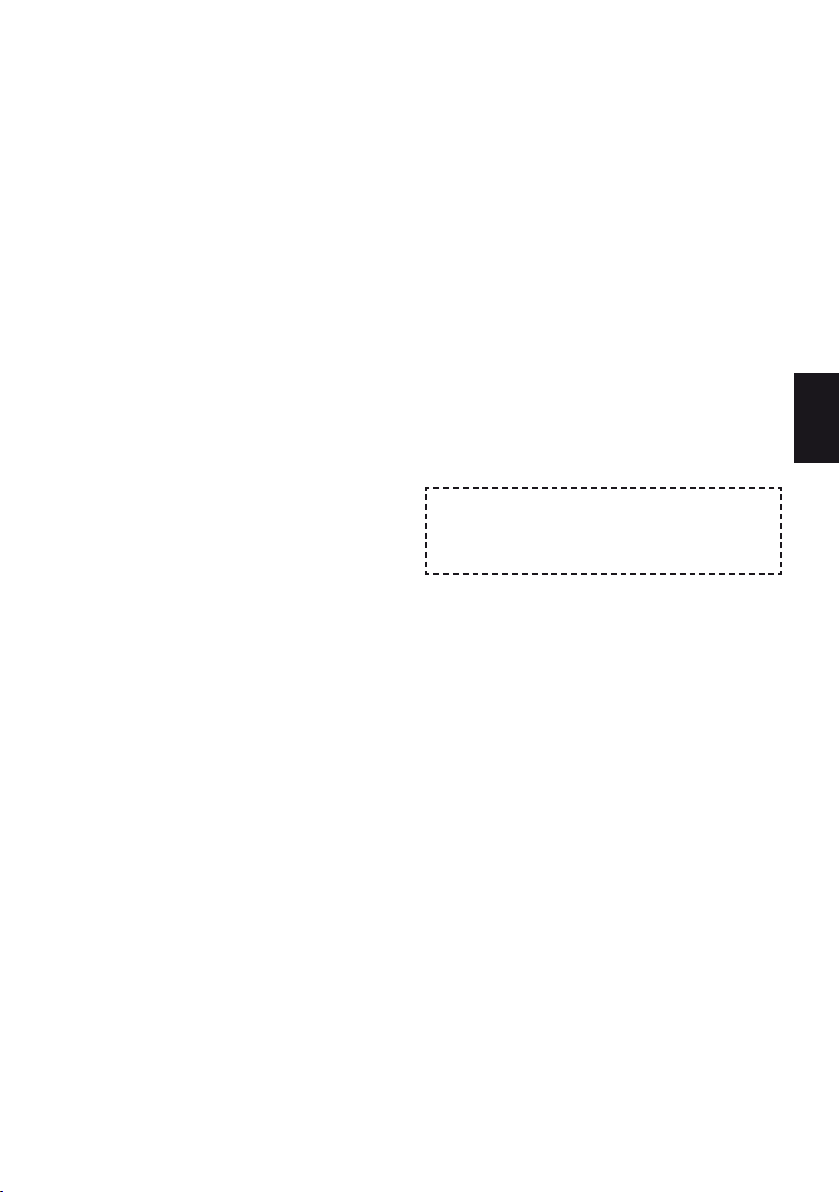
The safety system
kite-killer
The handles are held at their upper ends,
directly below where the power lines feed in.
The brake lines (below) hang through
loosely. To launch the foil, pull on both handles
simultaneously. If the wind is light to moderate,
take a step backwards and pull hard. The foil
lifts from the ground and flies directly upward
into the zenith. Correct deviations in the flight
path by controlling the kite (see section on
controlling)
The foil can carefully be launched on the side
edge of the wind window if there is a strong
wind for the selected foil size. To do this, a helper
should secure the foil. The build-up of foil pull
is significantly less, which means a safer launch
and less stress on the material.
Wind
Larks Head
Knot

English
8
Landing
Both brake lines are pulled if both handles
are tipped down toward the pilot. At a specific
point, the lift current on the foil is interrupted
and it begins to fly backwards. You can land the
foil this way. This also works in the middle of
the wind window so that the foil assumes the
initial position prior to launching and can be
secured to a ground stake.
Landing in high winds
The foil can also be landed on the side edge
of the wind window if there is a strong wind for
the selected foil size. The pull is not as strong
on the edge. If the foil wants to break out, incre-
ase the pull on the corresponding brake line.
Once the kite is on the ground, grab below
the handle to the brake connection line with one
hand while holding the upper handle ends with
the other hand and place the handles around
a ground stake. For safety reasons, weigh down
the trailing edge of the foil just like in setup.
Adjusting
Not all lines are the same. Thus, the foil
must be adjusted based on the line length and
the wind relationships. You can adjust a foil
by changing the length difference between the
upper flight lines and the lower brake lines.
Use the lark’s head knots in the lines at the
connection points (knots) of the braking bridle
and the handles to do this. Adjust the foil
such that the brake lines hang loosely and do
not pull on the trailing edge when the kite is
at a standstill, but so that you can land the kite
when you pull both brake lines for the foil.
Precision adjustment is a matter of experience
and preference.
Tips
Never let the foil hit the ground with the air
inlet openings first. There can be immense
internal pressure that the chambers cannot
withstand, which could damage the profiles.
Never steer the foil into people or objects,
such as fences, cars or similar items. This could
result in injuries to people and damage to
objects or the foil.
Maintain the equipment in perfect condition. A
wet foil should be washed with clean water and
thoroughly dried before packing away.
Watch out for sharp-edged objects, shells
and fences and do not lay the foil down on
such items.
Before using the foil for kite sailing or as a
pulling unit for a buggy, skis, snowboard or
mountain board, first ensure that you can
handle the foil properly and safely.

English
9
Launching Landing
Flying a right curve Flying a left curve
Tight right turn Tight left turn

English
10
Basics of kite sailing with
a buggy
Controlling the buggy
You steer the buggy using your feet and the
foot rests on the front wheel bracket. The foil
is used as a flexible sail in which the part of the
wind window located in the travel direction is
used for forward propulsion. You steer the bug-
gy on the desired course to the wind like in
other types of sailing sports. In doing this, the
pull build-up of the foil for propulsion is more
important for decisions when steering the buggy.
Starting and stopping
The foil must always be controlled in the
zenith when getting into the buggy. Based on
experience, it is often useful to practice
controlling the foil using simple maneuvers only
by feel without looking. This provides safety
and you can prevent being pulled forward over
the buggy or backwards stumbling over the
buggy from an uncontrolled foil.
The buggy is aligned in the driving direction
cross to the wind (half wind course) and you sit
down while the foil is in the zenith.
To start moving, steer the foil in the driving
direction on the side of the wind window and
use the pull to set the buggy in motion.
To accelerate the buggy, gently steer the foil
this direction for the first meters and then
immediately switch back to the desired course.
If the buggy does not move or only moves slow-
ly, steer the foil from above through the wind
window to the edge of the wind window and
then right back to the top to attain more
propulsion.
Caution: Do not fly the foil too far to the side
or back. Otherwise, the pull will be too great on
the side or the buggy will move backwards.
To yield to the pulling force of the foil, steer
the buggy a little in the pulling direction (with
the wind). Once travel begins, hold the
buggy at a half wind course. The foil is at the
edge of the wind window. Steer down more
to accelerate the kite or fly it up more to slow
it down.
To brake the foil, fly up and steer the buggy
on a course more against the wind. If you drive
this maneuver hard, the buggy will easily begin
to drift causing the buggy to quickly lose speed.
You may then introduce a neck turn (see this
section) by steering sharply with the wind,
causing the rear wheels to skid. Under certain
circumstances, you may need to countersteer
with the front wheel.
There are situations in which you must stop
the buggy quickly. In these scenarios, never
brake by putting your feet on the ground. You
could be hurt by doing this.
In the event that you find yourself in a ha-
zardous situation, let go off the foil to prevent
a collision or crash. A foil flying through the
air causes little damage. By contrast, tight lines
can cause cuts.
Wind
Travel direction
Half wind
course

English
11
Half wind course and neck turn
To practice, it is best to drive the buggy on a
half wind course. You always return to the same
starting point this way. The half wind course
is the simplest course in which you can move
forward with a relatively small foil (under-po-
wered) for the wind.
At the first buggy turn (neck turn), fly the
foil upward into the zenith and drive the buggy
toward the foil tightly around the curve until
you have returned to the half wind course in the
other direction. Do not make the radius of
the neck turn too big. Otherwise you will lose
the pull in the foil and it could fold together.
This maneuver is called a neck turn and is
typical in buggying. In a neck turn, the pilot
turns with his back through the wind.
You put the kite in the zenith and then turn
the buggy in a tight turn to the foil. Only
lower the foil back down once you are going the
other direction.
The turn, in which the front wheel turns
through the wind, is unusual, yet difficult to
maneuver in buggying. There is a risk of
being pulled backwards by the foil.
Different courses
to the wind
Course on the wind
The on-wind course is a slower and rather
difficult course in the beginning. You must use
this course to reach a destination against the
wind, referred to as crossing. The pulling force
of the foil is relatively strong and works on the
side so that the buggy tends to drift.
Course on the half wind
The half wind course is the most important to
you and the most used course.
With this course, you travel cross to the wind
and return to the starting point in the opposite
direction of the course. The angle between the
wind and the course is 90.
Course on the free wind
The free wind course is the fastest. You travel
at an angle to the wind and quickly move from
the starting point. To return to the starting
point, you must cross on the wind.
Course in front of the wind
The forwind course seems to leave the wind
behind because you are traveling in the exact
direction of the wind. This is a difficult course
to drive because the foil has a tendency to
break the current.
Instead of traveling on a true forwind course,
it is better to change the course. To return to
the starting point, you must cross the wind
here, too.

English
12
Courses in buggying
In front of the
wind difficult
Free wind
fast course
Half wind
practice course
On the wind
cross course
Free wind
fast course
Half wind
practice course
On the wind
cross course
wind
wind
Dropping
faster
Lifting
slower
Dropping
faster
Lifting
slower

English
13
Where can you
drive buggies
There are many areas suitable for driving
buggies. The easiest is to use areas already
prepared for buggying. Before the first trip,
you should become informed about the area.
There are simple questions to ask:
tWhere can I park and where
can I set up equipment?
tWhat rules are there for the users?
tAre there areas where I cannot drive (pro-
tected natural zones, riding trails, swimming
zones, paragliding areas) or are there time
limitations (swimming season, day times,
breeding times)?
In the national parakarting association and
paragliding club areas, drivers are required to
have liability insurance (supplement to private
liability insurance, available for free from
some insurance providers), a buggy number
(to be mounted on the sides and back of
he buggy) and possibly a license exam (availa-
ble from parakarting schools or the national
association).
Of course, there are also many local driving
options such as fields, closed paths and
parking lots. When using these areas, check
for electrical power lines and other dangerous
obstacles and get permission from the owner /
landlord.
If you encounter other parakarters or paragli-
ders, the international right-of-way rules from
Class 8 apply pursuant to FISLY.
This means the person on the right has right-of-
way! Both pilots must attempt to prevent
a collision. Evasive maneuvers must be done
on time and with determination. If two
buggies are driving toward one another, both
should move to the right so that there is
sufficient space between them.
The national parakarting
associations are:
Germany:
GPA – German Parakart Association Kitesailing
www.gpa.de
France:
F.C.V. – Federation Francaise de Char a Voile
www.ffcv.org
England:
PKA – Parakart Association
www.pka-online.org.uk
USA:
AKA – American Kitefliers Association
www.aka.kite.org
Denmark:
DPK – Danish Parakart Association
www.parakart.dk
Netherlands:
BCH – Buggy Club Holland
www.buggyclubholland.com
Switzerland:
SKA – Swiss Kitesailing Association
www.kitesailingworld.ch
Italy:
AIAT – Italian Association of Powerkiting

English
14
Requirements for
buggying
tWear a helmet, sturdy shoes and suitable
clothing.
tHave private liability insurance that covers
buggying – parakart class 8.
tAvoid all risks to people, animals and the
environment.
tWatch out for onlookers and passers-by
because they do not know the hazards
posed by tight fly lines.
tDo not drive near protected natural areas
and riding trails because animals can panic.
tDo not drive in the dunes because these
serve to protect the coast as well as bree-
ding grounds.
tObserve notices where buggying is
prohibited.
tDo not drive in the direct vicinity of electric
power lines, streets or railroad tracks.
tDo not drive if there is thunder or threate-
ning weather or fog.
tOnly fly in wind strengths in which you can
control the foil.
tInspect the foil and the buggy before each
trip.
tTo avoid cut wounds, do not grab tight
flying lines.
tDo not travel alone if possible.
tFor longer trips, register at the beginning
and indicate the time you expect to return.
tDo not leave behind trash or cause damage
when driving.

Deutsch
15
1. Stellen Sie sicher, dass Sie stets die
Kontrolle über Ihren Drachen haben, dass
er stets in Ordnung ist, dass er korrekt
aufgebaut ist, dass sich die Leinen in einem
guten Zustand befinden und sorgfältig mit
Drachen und Griffen verbunden sind.
2. Fliegen Sie Ihren Drachen niemals über
den angegebenen Windbereich hinaus. Sie
überfordern das Material und können leicht
die Kontrolle über den Drachen verlieren
und so Passanten gefährden.
3. Fliegen Sie Ihren Drachen niemals auf über-
füllten Wiesen oder Stränden! Passanten
wissen oft nicht, wie gefährlich ein herab-
stürzender Drachen sein kann!
4. Zuschauer stehen am sichersten hinter
dem Piloten!
5. Halten Sie Abstand zu anderen Lenk-
drachenfliegern. Gespannte Schnüre
durchschneiden sich gegenseitig und sind
messerscharf!
6. Fliegen Sie nie dort, wo sich Dritte durch
den Drachen belästigt oder bedroht fühlen!
7. Fliegen Sie niemals im Gewitter oder
aufkommendem Unwetter! Lebensge-
fahr! Fliegen Sie niemals in der Nähe von
Hochspannungsleitungen, stark befahrenen
Straßen oder Flugplätzen.
8. Die zulässige Schnurlänge beträgt in
Deutschland 100 m, in einigen Großstädten
nur 60 m. Erkundigen Sie sich im Zweifels-
fall bei Ihrer Gemeinde!
9. Fliegen Sie niemals in Naturschutzgebieten.
10. Lassen Sie keine Schnur- oder Stabreste
oder Abfall auf dem Flugfeld zurück. Sie
helfen so, die Umwelt zu schützen,
vermeiden Ärger und erhalten den guten
Ruf der Drachenflieger.
Das Fliegen von Powerdrachen und damit
zusammenhängende Sportarten, z.B. das
Buggyfahren, gehören zu den Extremsportarten
und sollten mit angemessenem Respekt aus-
geübt werden. Unsachgemäßer Gebrauch des
Materials kann zu schweren oder sogar töd-
lichen Verletzungen führen!
Umsomehr ist es wichtig, dass Sie diese Bedie-
nungsanleitung und die Sicherheitsregeln lesen
und beachten!
angaben zum windbereich, empfohlene
leinen und Technische daTen finden sie in
den Tabellen auf seiTe 51.
Sicherheitshinweise
Bitte sorgen Sie mit Ihrer Privat-Haft-
pflichtversicherung für ausreichenden
Versicherungsschutz beim Powerkiten

Deutsch
16
Knoten für Harness Line
Vierleinergriff
gemantelte
Leinenschlaufen
Bremsleinen
Powerleinen
gemantelte
Leinen-
schlaufen
Powerleinen
Anknüpfpunkte
Haupt-
waage
Lufteintritts-
öffnungen
Leitkante
Brems-
waage
Schlepp-
kante
Bremsleinen
Anknüpf-
punkte
Befestigung der
Bremsleinen
zum Fliegen mit
Vierleinergriffen
Bremsleine
Brems-
waage
Hauptwaage
Profil/
Rippe

Deutsch
17
Aufbauen und Anleinen
Schirm auslegen
Die Beamer auf den Boden legen, so dass
sich die Waageleinen oben und die Eintrittsöff-
nungen in windabgewandter Richtung befinden.
Zum Sichern des Schirms auf die Schleppkante
etwas Sand, abgerundete Steine oder gefüllte
Säckchen legen. Die Schnüre der Hauptwaage
und der Bremswaage frei ohne Verdrehungen
in den Wind auslegen.
Die mitgelieferten Flugleinen sind im Auslie-
ferungszustand bereits fertig angeleint, damit
Sie die Beamer möglichst schnell in die Luft
bekommen. Nichtsdestotrotz sollten Sie sich
beim Auslegen der Leinen genug Zeit lassen.
Wickeln Sie die Leinen ab und bewegen Sie sich
dabei in Richtung des Windes vom Drachen
weg. Wichtig! Achten Sie immer auf einen
freien Verlauf der vier Leinen (siehe Grafik auf
vorhergehender Seite).
Die Leinen werden auf separaten Windern auf-
bewahrt. Durch das Aufwickeln in Achten wird
ein Verdrehen der Schnüre vermieden. Alterna-
tiv können auch einfach die Vierleinergriffe zum
Aufwickeln auf Winder Aufwickeln auf Griffen
Die Schleppkante des Schirms mit Sand beschweren
Aufwickeln verwendet werden, ohne die Schüre
von Griffen und Schirm zu lösen. Dabei das
Griffpaar mit einer Hand festhalten und die vier
Flugschnüre zusammen um das andere Ende
der Griffe in einer gleich bleibenden Richtung
wickeln. Beim Abwickeln die Griffe wieder mit
der einen Hand am Ende ohne Schnüre halten
und mit der anderen in der eindeutig vorgege-
benen Abwickelrichtung auslegen.
Ein Verdrehen der Leinen wird durch eine
konsequente Auf- und die entgegengesetzte
Abwickelrichtung ausgeschlossen

Deutsch
18
Die Flugschnüre immer vom Schirm in direkte
Richtung gegen den Wind auslegen.
Zum Befestigen der Schnüre an der Waage
des Schirms und an den Griffen einen Bucht-
knoten (siehe Skizze) verwenden, der mit den
Schlaufen am Ende jeder Flugschnur gebildet
wird. An der Waage- oder Griffschnur zieht
sich der Buchtknoten fest und stoppt dadurch
an deren Knoten, den sogenannten Anknüpf-
punkten.
Beim Anleinen unbedingt auf das richtige
Befestigen der Flugschnüre an der Waage und
den Griffen achten und keinesfalls die linke
und rechte Seite bzw. Powerleinen (dicker) und
Bremsleinen (dünner) verwechseln.
Buchtknoten
Schirm sichern
Eine Knotenleiter an der Bremswaage
ermöglicht die Trimmung des Schirms über
verschiedene Anknüpfpunkte. Die Waage
ist so getrimmt, dass bei gleichlangen Fluglei-
nen der dritte Knoten eine gute Ansteuerung
des Schirms über die Bremse gewährleistet.
(siehe Abbildung auf Seite 16).
Man sollte den aufgebauten und angeleinten
Schirm an einem Bodenanker sichern. Dafür
wickelt man die Bremsleine direkt an den Grif-
fen um den Bodenanker, so dass der Schirm
angebremst am Boden liegen bleibt. Oder man
nutzt dazu die spezielle Schlaufen am unteren
Ende mancher Vierleinergriffe.
Der Vierleinergriff
Powerleine
Brems-
leine
Anknüpf-
punkte Anknüpf-
tampen
Befestigungsmöglichkeit
für Harnessline
Schlaufe zur
Sicherung am
Bodenanker
Kitekiller
Wind
Schnüre anleinen

Deutsch
19
Start
hier Starten
und Landen bei
viel Wind
Zenit
Powerzone
Der mögliche Flugbereich eines Drachens oder
Zugschirms wird Windfenster genannt.
In der Mitte des Windfensters gibt der Wind
dem Schirm die größte Zugkraft. Zum Rand hin
nimmt der Zug ab. Die Park- und Ausgangs-
stellung für den Einsatz befindet sich direkt
über dem Piloten im Zenit.
Beim Start wird der Schirm vom Boden
mittig durch das Windfenster in den Zenit ge-
flogen. Bei diesem Flug in den Zenit entwickelt
der Schirm beinahe seine größten Zugkräfte,
daher vor dem Start prüfen, ob die Schnüre
entsprechend der Windrichtung korrekt aus-
gelegt sind und die Schirmgröße entsprechend
der Windstärke gewählt wurde.
Die Griffe werden an ihrem oberen Ende, direkt
unter der Aufnahme der Powerleine, gehalten.
Die Bremsleinen (unten) hängen locker durch.
Durch einen gleichzeitigen Zug an beiden
Griffen wird der Schirm gestartet. Bei schwachem
bis mäßigem Wind einen Schritt zurück gehen
und beherzt ziehen. Der Schirm steigt vom
Boden auf und wird gerade nach oben in den
Zenit geflogen. Abweichungen in der Flugbahn
durch Steuern korrigieren.
Bei für die gewählte Schirmgröße starkem Wind
kann der Schirm vorsichtig am seitlichen
Windfensterrand gestartet werden. Ein Helfer
sollte den Schirm hier sichern. Die Zugentwick-
lung des Schirmes ist dort wesentlich geringer,
was einen sichereren Start und eine Entlastung
des Materials bedeutet.
Das Sicherheitssystem (Kite-Killer) ermöglicht
das Loslassen der Handles in Gefahren-
situationen, ohne den Drachen dabei zu ver-
lieren.
HQ empfielt, diese Funktion auszupro-
bieren, um die Reflexe zu trainieren und sich
beim Fliegen im Vertrauen auf diese Funktion
sicherer zu fühlen.
Wir empfehlen, dieses System zu benutzen!
Um es zu benutzen, befestigen Sie den linken
und rechten Kite-Killer um das entsprechende
Handgelenk. Befestigen Sie es nicht zu locker,
um das Abrutschen der Schlaufen zu verhin-
dern. Nun können Sie die Griffe während des
Fluges loslassen. Das System wird die Brems-
leinen betätigen und den Drachen drucklos
landen.
Sicherheitssystem
Kite-Killer
Wind
Bucht-
knoten
Table of contents
Languages:
Other PowerKites Aircraft manuals
Popular Aircraft manuals by other brands

Tecnam
Tecnam P2002 JF Maintenance manual

Vulcanair
Vulcanair V1 series Service bulletin

RAM Outdoor Decor
RAM Outdoor Decor Tiki Bamboo Bar Product Info and Assembly Instructions

Cabrinha Kites
Cabrinha Kites Contra 2005 manual

Jabiru
Jabiru J170-C Pilot operating handbook

SusiAir
SusiAir L410 UVP-E20 STANDARD OPERATING PROCEDURES