Powermat PM-AEW-2500 User manual

ORIGINAL INSTRUCTIONS
USER MANUAL
Electric Aerator / Scarifier 2in1
PM-AEW-2500

2
Table of Contents
SYMBOLS WARNING / INFORMATION .............................................. ........................................... 3
PURPOSE OF THE DEVICE ................................................ .................................................. ............... 4
SAFETY RULES ................................................ .................................................. .................... 4
Before working .............................................. .................................................. ........... 4
Proper use ................................................ .................................................. ...................... 4
Electrical safety ................................................ .................................................. ............. 5
DESCRIPTION OF THE DEVICE ............................................... .................................................. .................. 5
ASSEMBLY ................................................. .................................................. ............................................... 6
TECHNICAL DATA ................................................ .................................................. ................................ 7
SETTING THE DEPTH OF WORK ............................................... .................................................. .......... 7
GETTING STARTED ................................................ .................................................. ........................ 7
Thermal protection. .................................................. .................................................. .............. 7
Scarification ................................................. .................................................. ................................ 8
Reversing blades ................................................ .................................................. ............................. 8
Changing the operating shaft ............................................... .................................................. .................... 9
Aeration ................................................. .................................................. ........................................... 9
MAINTENANCE AND STORAGE. .................................................. .................................................. 9
CHART OF ................................................ .................................................. ................................. 10
REMOVAL OF USED ............................................... .................................................. ....... 11
COMPANY INFORMATION ................................................ .................................................. ............................ 11
DECLARATION OF CONFORMITY ................................................ .................................................. .................... 11

3
SYMBOLS OS TRZEGAWCZE / INFORMATION SYMBOLS OS TRZEGAWCZE / INFORMATION
ATTENTION: Before using the device please read the instruction manual and safety ATTENTION: Before using the device please read the instruction manual and safety
instructions. Keep these instructions.
ATTENTION: Do not expose to rain or other precipitation. ATTENTION: Do not expose to rain or other precipitation.
ATTENTION: Disconnect the device from the mains before carrying out maintenance and ATTENTION: Disconnect the device from the mains before carrying out maintenance and
cleaning.
ATTENTION: In the case of entanglement or damage to the cable to pull the plug from the wall ATTENTION: In the case of entanglement or damage to the cable to pull the plug from the wall
outlet.
ATTENTION: Keep a safe distance from bystanders during operation.ATTENTION: Keep a safe distance from bystanders during operation.
ATTENTION: On the discarded items during operation. ATTENTION: On the discarded items during operation.
ATTENTION: Keep hands and feet away from rotating parts. ATTENTION: Keep hands and feet away from rotating parts.
ATTENTION: Due to the possibility of injury during use and keep careful use gloves. ATTENTION: Due to the possibility of injury during use and keep careful use gloves.
ATTENTION: Should be used with earphones and goggles. ATTENTION: Should be used with earphones and goggles.
Protection class II

4
PURPOSE OF THE DEVICE
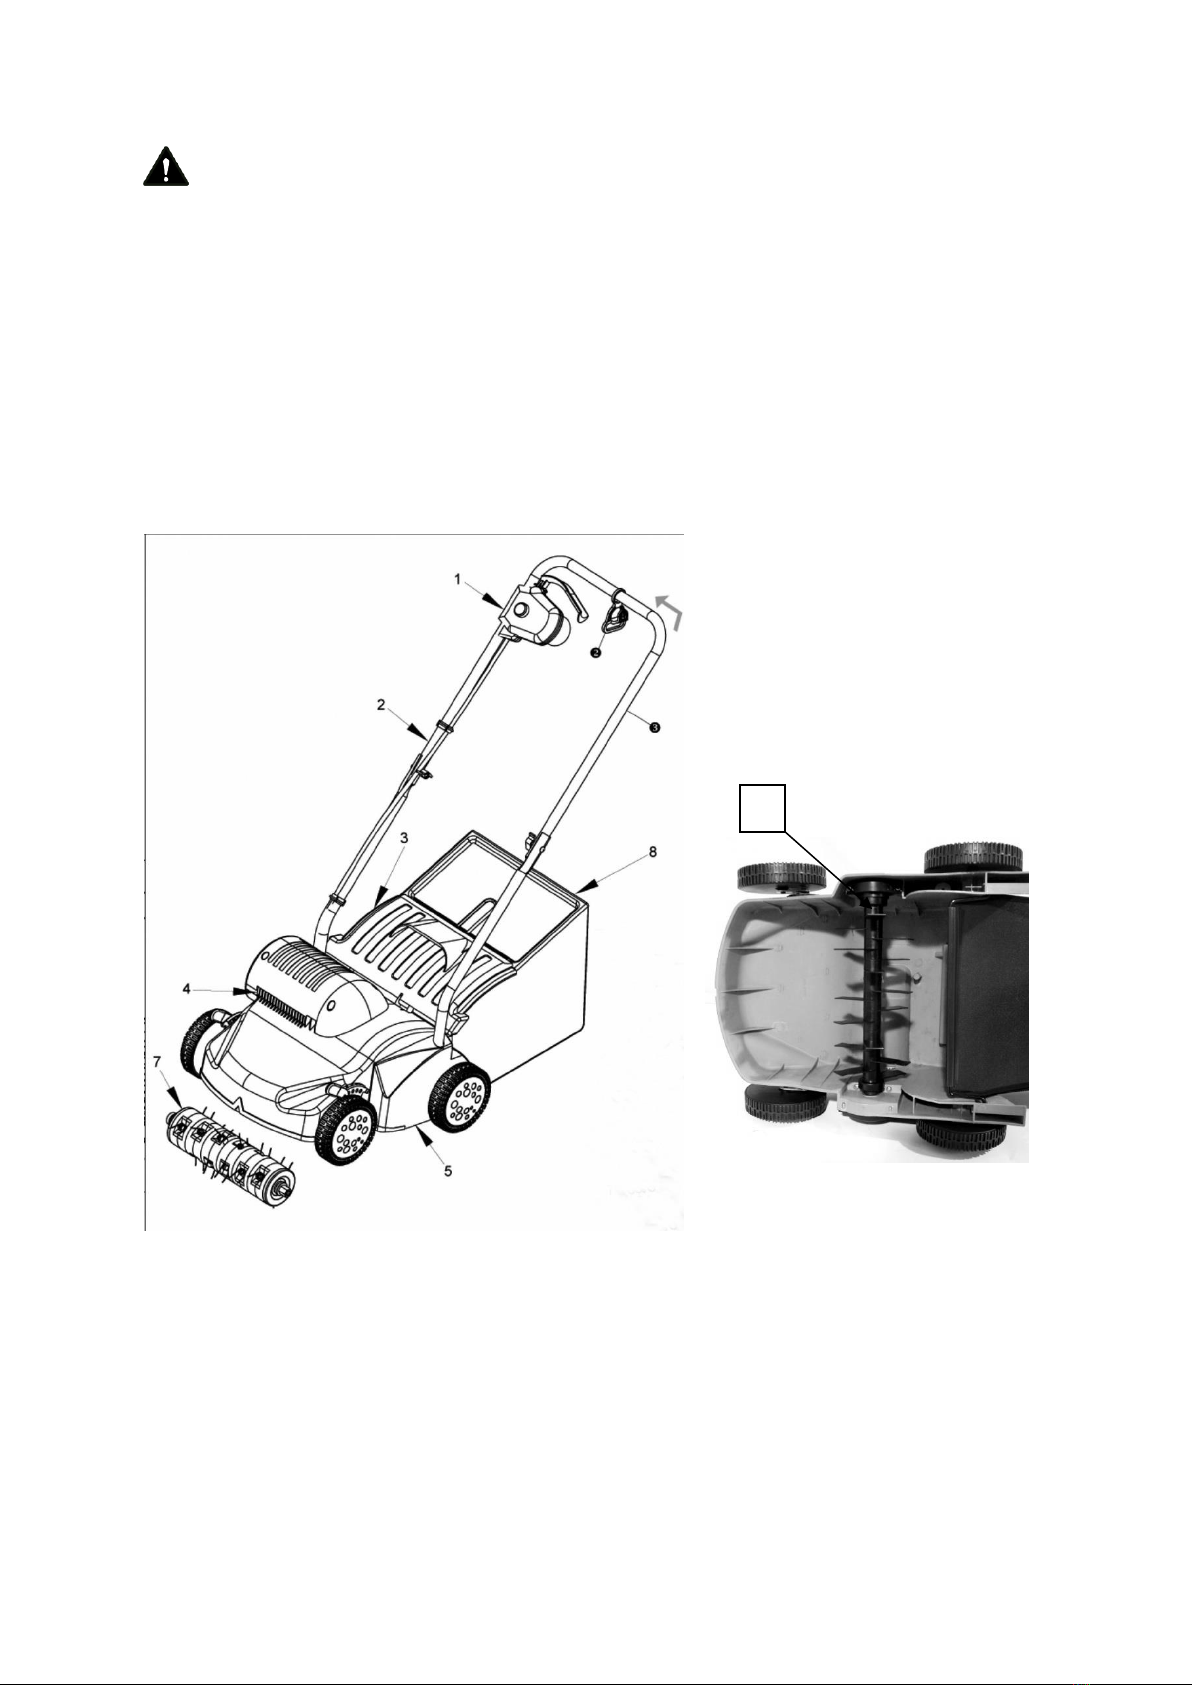
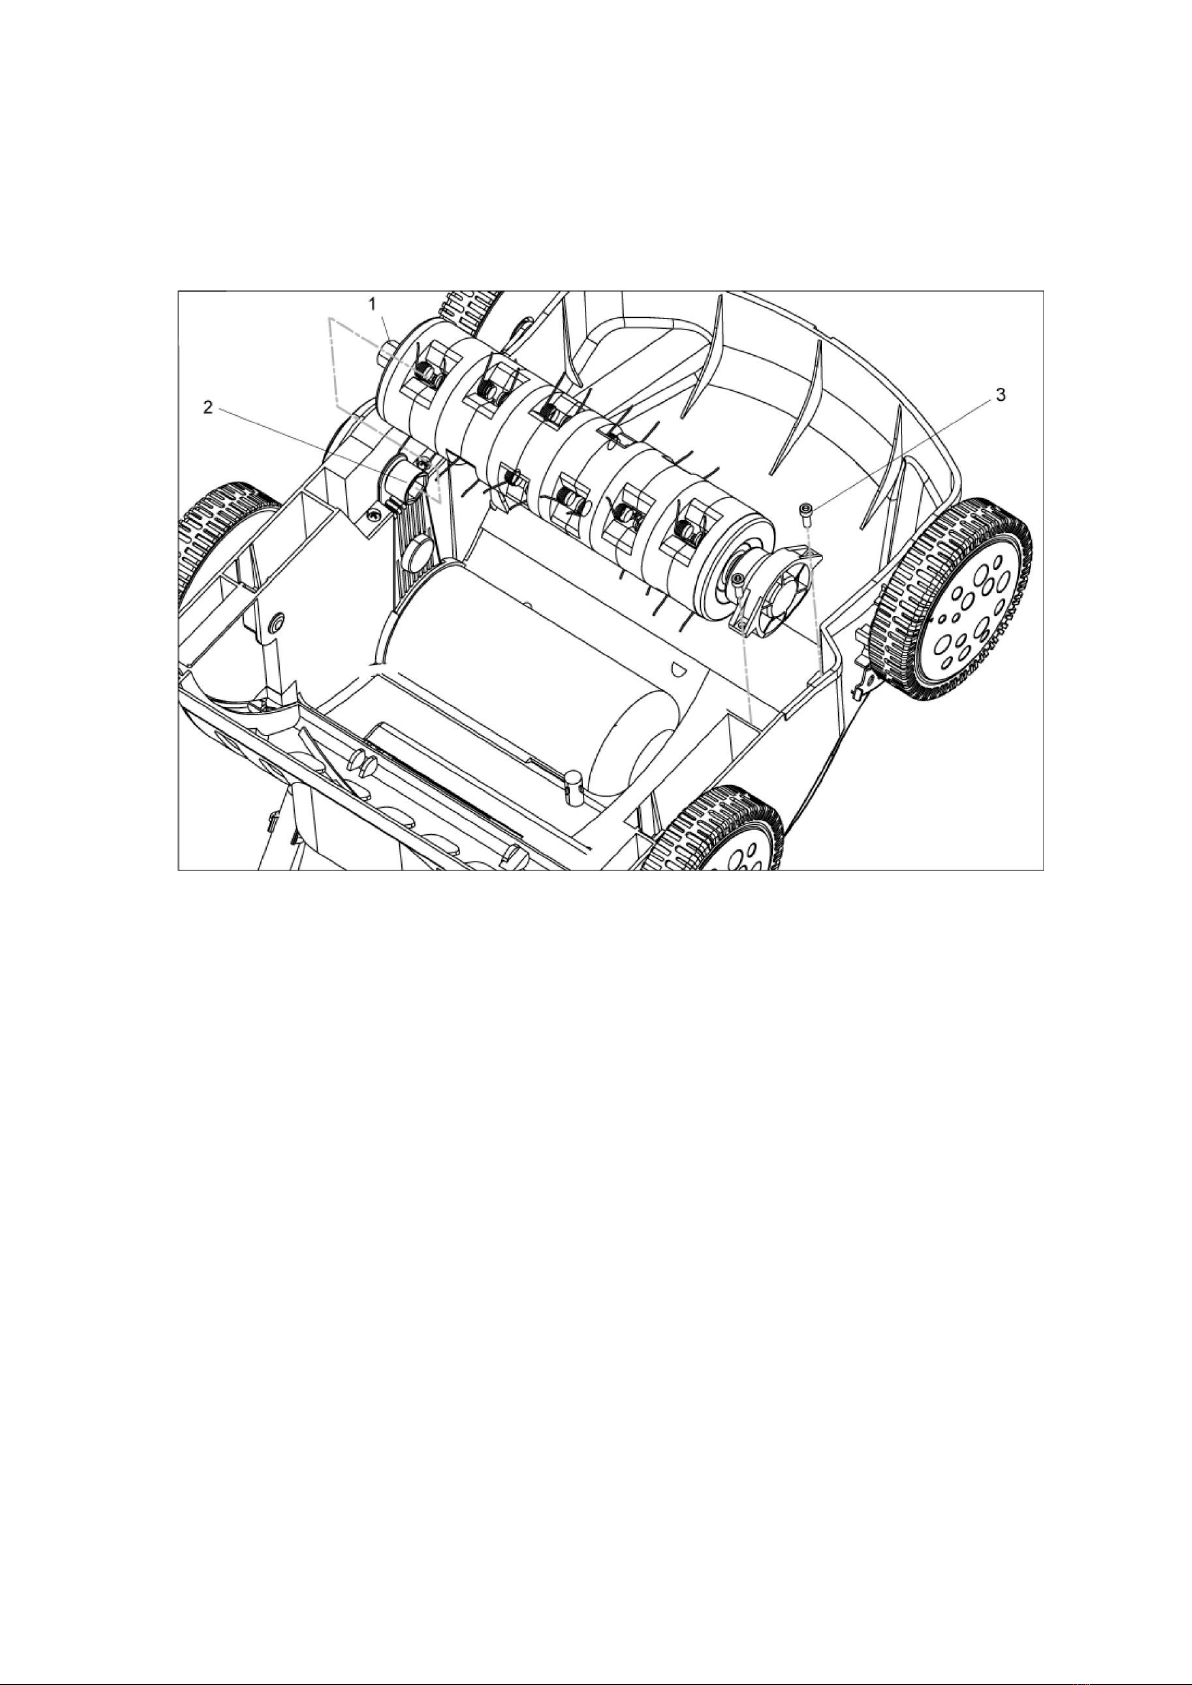
Depending on the intended use of the device can be used as an aerator or scarifier. Scarifier using a roller pulled by a
substrate moss and weeds together with roots and the substrate is loosened. As a result, the lawn can better take
nutrients and be cleaned. We recommend wertykulować lawn in spring (April) and autumn (October). By roller to the
top surface of the lawn aerator is collected, whereby the water can better flow and oxygen consumption is facilitated.
The work carried out by the aerator needs during the whole period of grass growth.
SAFETY RULES
1. Carefully read the instructions and follow the instructions indicated. 1. Carefully read the instructions and follow the instructions indicated.
2. Never use the device in the rain. 2. Never use the device in the rain.
3. When in use, keep special care. 3. When in use, keep special care.
4. Bystanders should not approach the machine during operation. 4. Bystanders should not approach the machine during operation.
5. Do not go near the feet and hands to the blades and moving parts. 5. Do not go near the feet and hands to the blades and moving parts.
6. Do not use the machine if the power cord is damaged. 6. Do not use the machine if the power cord is damaged.
7. During operation, always wear safety glasses and protective clothing. 7. During operation, always wear safety glasses and protective clothing.
8. Disconnect the device from the mains before carrying out maintenance and cleaning. 8. Disconnect the device from the mains before carrying out maintenance and cleaning.
9. During maintenance, wear protective gloves. 9. During maintenance, wear protective gloves.
Before working
1. Make sure the device is properly assembled.1. Make sure the device is properly assembled.
2. Check that the device is not damaged. If you notice any damage, contact2. Check that the device is not damaged. If you notice any damage, contact
service.
3. Make sure that the workplace is not the stones and other elements.3. Make sure that the workplace is not the stones and other elements.
4. Work only in well-lit areas.4. Work only in well-lit areas.
5. Wear suitable protective clothing and protective boots.5. Wear suitable protective clothing and protective boots.
6. Make sure that the cutting blades can rotate freely.6. Make sure that the cutting blades can rotate freely.
proper use
1. Those unfamiliar with the instructions, a person under the influence of alcohol, children can not 1. Those unfamiliar with the instructions, a person under the influence of alcohol, children can not
use the device.
2. Use the machine only for work in accordance with its intended purpose.2. Use the machine only for work in accordance with its intended purpose.
3. Children and bystanders should keep a safe distance from the workplace.3. Children and bystanders should keep a safe distance from the workplace.
4. Use the device only with mounted basket.4. Use the device only with mounted basket.
5. Before connecting the device to the mains make sure that the network parameters correspond 5. Before connecting the device to the mains make sure that the network parameters correspond
of the nameplate.
6. Working keep a stable position.6. Working keep a stable position.
7. Be careful during operation does not damage the power cord.7. Be careful during operation does not damage the power cord.
8. Before emptying the trash off the device.8. Before emptying the trash off the device.
9. If you notice that the unit raided a stone or some other object, unplug the machine and check that it has not
been damaged.
10. If you turn the device to vibrate abnormally, switch it off and check it 10. If you turn the device to vibrate abnormally, switch it off and check it
Broken.

5
Attention! After switching off the cutting blades can move even for a moment. Attention! After switching off the cutting blades can move even for a moment.
electrical Safety
1. Never operate the device Pass the power cord.1. Never operate the device Pass the power cord.
2. Never use the device during rain and high humidity.2. Never use the device during rain and high humidity.
3. Do not leave your device on overnight open spaces.3. Do not leave your device on overnight open spaces.
4. Do not operate the device if the grass is wet.4. Do not operate the device if the grass is wet.
5. Before starting the machine check the condition of the power cable if the cable is damaged 5. Before starting the machine check the condition of the power cable if the cable is damaged
repair it before you start.
6. Use only extension cords rated to operate in open spaces.6. Use only extension cords rated to operate in open spaces.
DESCRIPTION OF THE DEVICE
1. safety switch 1. safety switch
2. guide
3. Cover the outlet
4. Vents 4. Vents
5. Housing
6. Shaft scarifying 6. Shaft scarifying
7. shaft for aeration
8. Grass catcher
6

6
ASSEMBLY
•Insert the lower part of the frame in the holes in the housing (Fig. 1)
•Put the cable guide on the upper part of the frame.
•Connect the upper part to the lower frame by means of bolts and nuts (Fig. 2).
•Rotate the device and block the lower part of the frame by screwing the screws (Fig. 3).
•Increase the outlet cover and secure the basket ().
Fig. 1
Fig. 2
Fig. 3
Fig. 4

7
TECHNICAL DATA
Power 230V / 50Hz
Power 2500W
sales 2500rpm
Working width 320mm
The scope of work of the aerator depth - 4 to 10 mm
The scope of work scarifier depth - 10 to 4 mm
Rear Bag Capacity 35l
Net weight 10,5kg
The sound pressure level L pAThe sound pressure level L pA 82 dB (A)
Sound power level L wASound power level L wA 102 dB (A)
SETTING THE DEPTH OF WORK
Attention! Never change the amount of work, if the device is turned on and the drum rotates. Attention! Never change the amount of work, if the device is turned on and the drum rotates.
• The working depth can be changed by levers located on the front wheels.
• Each wheel can be set in one of five positions.
• To change the height of the pull lever to one side and then move it forward or backwards, and lock
it. Both wheels should be set to the same height.
POSITION AERATOR Verticutter
1 (Rear) 10mm 4mm
2 6.5mm 0,5mm
3 3,0mm -3,0mm
4 -0,5mm -6.5mm
5 -4,0mm - 10mm
GETTING STARTED
Attention! Do not operate the device if it is in the high grass or on hard surfaces. Attention! Do not operate the device if it is in the high grass or on hard surfaces.
1. Press the lock AND and pull the lever B up. 1. Press the lock AND and pull the lever B up. 1. Press the lock AND and pull the lever B up. 1. Press the lock AND and pull the lever B up. 1. Press the lock AND and pull the lever B up. 1. Press the lock AND and pull the lever B up.
2. holding the lever B release the lock AND.2. holding the lever B release the lock AND.2. holding the lever B release the lock AND.2. holding the lever B release the lock AND.2. holding the lever B release the lock AND.
3. To turn off the device, release lever B.3. To turn off the device, release lever B.3. To turn off the device, release lever B.
Thermal protection.
If the machine locks up, or if the motor is overloaded the thermal
protection system automatically turns off the engine. Before restarting
the machine, wait until the engine has cooled down (about 15min).
AND
B

8
scarification
1. Adjust the working height depending on the state of the grass and the lawn. 1. Adjust the working height depending on the state of the grass and the lawn.
2. Tilt the aerator so that the front wheels are in the air. 2. Tilt the aerator so that the front wheels are in the air.
3. Turn on the device. 3. Turn on the device.
4. Move the device slowly across the lawn in simple stripes. 4. Move the device slowly across the lawn in simple stripes.
5. Be careful not to pass on the power cord. 5. Be careful not to pass on the power cord.
6. When the grass catcher is full turn it off and empty the Trash. 6. When the grass catcher is full turn it off and empty the Trash.
Attention! Before replacing the blades and maintenance disconnect the device and replace gloves. Attention! Before replacing the blades and maintenance disconnect the device and replace gloves.
Worn blades may adversely affect the performance of the machine and cause the engine to overheat. Before each
operation check that the blades are sharpened properly, if necessary, sharpen them. The blades are designed to be
able to work two parties.
Reversing blades
1. Remove the two hex bolts ( 1) using an Allen key. 1. Remove the two hex bolts ( 1) using an Allen key. 1. Remove the two hex bolts ( 1) using an Allen key. 1. Remove the two hex bolts ( 1) using an Allen key.
2. Remove the roller blades. 2. Remove the roller blades.
3. Unscrew the nut ( 2) Remove the cap ( 3) collar ( 4) blade ( 5) spacer ( 6).3. Unscrew the nut ( 2) Remove the cap ( 3) collar ( 4) blade ( 5) spacer ( 6).3. Unscrew the nut ( 2) Remove the cap ( 3) collar ( 4) blade ( 5) spacer ( 6).3. Unscrew the nut ( 2) Remove the cap ( 3) collar ( 4) blade ( 5) spacer ( 6).3. Unscrew the nut ( 2) Remove the cap ( 3) collar ( 4) blade ( 5) spacer ( 6).3. Unscrew the nut ( 2) Remove the cap ( 3) collar ( 4) blade ( 5) spacer ( 6).3. Unscrew the nut ( 2) Remove the cap ( 3) collar ( 4) blade ( 5) spacer ( 6).3. Unscrew the nut ( 2) Remove the cap ( 3) collar ( 4) blade ( 5) spacer ( 6).3. Unscrew the nut ( 2) Remove the cap ( 3) collar ( 4) blade ( 5) spacer ( 6).3. Unscrew the nut ( 2) Remove the cap ( 3) collar ( 4) blade ( 5) spacer ( 6).3. Unscrew the nut ( 2) Remove the cap ( 3) collar ( 4) blade ( 5) spacer ( 6).
4. Turn the cutting blade or create a new shaft and then reassemble in the reverse order 4. Turn the cutting blade or create a new shaft and then reassemble in the reverse order
sequence as described in the preceding paragraphs. sequence as described in the preceding paragraphs.

9
Changing the operating shaft
1. Wear protective gloves. 1. Wear protective gloves.
2. Wrap the two hex bolts ( 3) and remove the roller. 2. Wrap the two hex bolts ( 3) and remove the roller. 2. Wrap the two hex bolts ( 3) and remove the roller. 2. Wrap the two hex bolts ( 3) and remove the roller.
3. Insert the new shaft from the hexagonal screws ( 1) the opening in the housing ( 2). 3. Insert the new shaft from the hexagonal screws ( 1) the opening in the housing ( 2). 3. Insert the new shaft from the hexagonal screws ( 1) the opening in the housing ( 2). 3. Insert the new shaft from the hexagonal screws ( 1) the opening in the housing ( 2). 3. Insert the new shaft from the hexagonal screws ( 1) the opening in the housing ( 2).
aeration
Before aeration Mow the lawn at a height of about 4cm.
To keep your lawn in top condition aeration carrying every 4-6 weeks.
MAINTENANCE AND STORAGE.
•Lubricant: cutting blades, a seat of the shaft in the housing, a spring cover for the outlet.
•Always clean the device after work from the remnants of grass and earth.
•After work, empty the grass catcher.
• The device should be stored in a clean, dry place, out of reach of children.
• Prior to long term storage coat the metal portion of the device layer of oil to prevent corrosion.

10
CHART PARTS

11
REMOVAL OF USED
End of life do not dispose of this product by normal household waste, but take it to a
collection point and recycling of electrical and electronic equipment. This is indicated by the
symbol on the product,
user manual or packaging. Thanks
re-use, material utilization or other forms of old appliances, you make an important
contribution to protecting our environment.
COMPANY DETAILS
PH Powermat TMK Bijak Sp. General Partnership Ul.
Defenders of the Gdansk Post 97 42-400 Zawiercie
DECLARATION OF CONFORMITY
Table of contents
Other Powermat Lawn And Garden Equipment manuals
Popular Lawn And Garden Equipment manuals by other brands

LuxenHome
LuxenHome WHPL1273 instruction manual

Smartpond
Smartpond WGK200 installation instructions

FLORABEST
FLORABEST FBC 7 A1 operating instructions

Yard Works
Yard Works 2-outlet Water Timerwith Digital Display Quick manual

AQUAJOE
AQUAJOE FIBERJACKET AJFJH100-58-MAX manual

Ditch Witch
Ditch Witch VP30 Operator's manual

FMI
FMI OUTLAND LIVING 4Pack Series owner's manual

Liberty Garden
Liberty Garden 880 instruction manual

Kemo
Kemo FG022 manual

Echo
Echo GRASS/WEED TRIMMER BRUSHCUTTER and CLEARING... Safety manual

Gardena
Gardena 1815 operating instructions

Afriso EURO-INDEX
Afriso EURO-INDEX FloCo-Top-1K operating instructions