Powertow 35 EZ User manual

MODEL 35 / 40 EZ
KEY EZ
THUNDERVOLT
Advanced Assembly
OWNER'S MANUAL
REV 2-25-05

Powertow 35/40/KeyEZ/Thundervolt
40EZ - Key EZ - 12 Volt DC Cordless
Things to know:
Keep your carton and packing in the event there is any shipping damage to your unit.
Read this instruction manual thoroughly before attempting to move your aircraft.
Your unit will need Oil & Gas - before test running the unit.
Thank you for choosing a Powertow, for your hangaring needs.
Customer Service is # 1 with our company. If you have any questions
or comments on your unit, please call us at 800-635-5565
PPOOWWEERRTTOOWW

Powertow 35/40/KeyEZ/Thundervolt
ADVANCED ASSEMBLY
Tools Needed For Assembly:
1/2” Wrench
1/2” Socket Wrench
7/16” Wrench
7/16” Socket Wrench
Phillips Screwdriver
Side Cutter (optional) for cutting tie wraps
Assembly Package Includes:
1 - 5/32” Allen Wrench
1 - 1/4” Allen Wrench
1 - 1/4” x 3/4” Hex Cap Screw - Clutch Cable
1 - 1/4” Nylon Lock Nut - Clutch Cable
2 - 1/4” Star Push Nuts - Shift Rod
2 - 5/16” x 2 1/4” Hex Cap Screws - Handle
1 - 3/8” x 2” Tapered Head Bolt Handle
2 - 5/16” Flat Washers - Handle
2 - 5/16” Split Lock Washers - Handle
4 - Extra Set Screws - spares
2 - 10/24 x 1/2” Self-Tappers - Gas Units Only
1 - Lanyard Cable
4 - Plastic Tie Wraps
1 - Owners Manual
Page 1

Powertow 35/40/KeyEZ/Thundervolt
POWERTOW MODEL 35/40 EZ / Key EZ
GAS OR ELECTRIC
PARTS LIST
CLUTCH HANDLE
#110
LANYARD HANDLE
#130
LANYARD CABLE
#131
TRANSMISSION
#300
CHAIN GUARD
#251
DRIVE CHAIN
#250
SPRING
#260
ADAPTORS
go here
BEECH #701
STANDARD #702
SMALL #703
CESSNA #704
PIPER #705
SCOTT #706
FRAME EXTENSION
PLANE WITH WHEELPANTS #700
GAS THROTTLE
#303
SHIFT HANDLE
#120
5 HP GAS ENGINE
#350 OR
6 HP GAS ENGINE
#400
TIRE ONLY
#100
TIRE/WHEEL/AXLE/SPROCKET
#101
Page 2
CLUTCH ADJUSTOR CABLE
#111

Powertow 35/40/KeyEZ/Thundervolt
POWERTOW MODEL 35/40 EZ / Key EZ
GAS OR ELECTRIC
PARTS LIST
BELT GUIDES
#201 GAS
#202 ELECTRIC
BELT #200
Replacement Belt
Gates Green 6837
7” PULLEY
#301
SNOWCHAINS
FOR DRIVE WHEEL #910 Page 3
STAND LEGS
#900
GAS ENGINE PULLEY
#302
IDLER ARM
#140
IDLER ARM PULLEY
#141
PILLOW BLOCKS
#102

Powertow 35/40/KeyEZ/Thundervolt
Page 4
DETAILED ASSEMBLY DIAGRAMS
Handle Assembly
Diagram #1
Remove and discard bolts that
secure the stand legs for shipment
A - Attach the two 5/16” x 2 1/4” bolts
through split lock washer, 5/16” flat washer,
frame handle, plate and then into threaded
stand legs or frame caster wheels.
B - Top handle bolt - 3/8” x 2” tapered bolt
goes directly into threaded hole.
Diagram#1
A
B
Clutch Cable
Diagram #3
Secure the clutch cable at lower handle
by removing the self-tapper and re-
attach through the cable clamp.
CLUTCH CABLE
CABLE CLAMP
10/24 X 1/2” SELF-TAPPER
BOTTOM VIEW
LOWER HANDLE
BELT GUIDES A&B
SIZE: 2 5/16” X 2 CAPS
CLUTCH CABLE RUNS
UNDERNEATH BELT
Clutch Cable
Diagram #2
Bring the clutch cable from under the frame,
allowing it to hang freely along the bottom side
of the handle. Bolt U-Clip to clutch handle with
1/4" x 3/4” bolt and 1/4" lock nut.
Route all cables under the handle.
CLUTCH HANDLE
"U" CLIP
TURNBUCKLE
A
DJUSTER
CLUTCH CABLE
TOP VIEW
Diagram#2
Diagram#3

Powertow 35/40/KeyEZ/Thundervolt
Z-SWAG D
B
AC
Transmission Shift Rod - Diagram #4
Feed the tagged end of the shift rod down through the plastic keeper (C) on the handle.
Keep the plastic keeper in the down position. The top end of the rod goes into the shift
handle (A) and bottom into the transmission shifter. Secure with the star push nuts at both
ends of the rod. Do not push these star push nuts on too tightly. It's better to have a little
play. A- Shift Handle B- Shift Rod
C- Plastic Keeper D- Eye Bolt
Swing Arm Lanyard Cable - Diagram #4
Place the Z-Swag end of the lanyard cable into the lanyard handle.
Hook the other end into the eye bolt.
Plastic Tie Wraps
Place the tie wraps, starting at the bottom of the handle working your way up, so that all the
cables are under the handle and out of the way. Do not tighten to the point that the cables
will not move freely. Don’t worry; we have enclosed extras in case of a mistake.
DETAILED ASSEMBLY DIAGRAMS
Diagram #4
Page 5

Powertow 35/40/KeyEZ/Thundervolt
Page 6
ELECTRICAL CONNECTION - Place black battery cable lug onto negative (-) battery
terminal and tighten bolt to secure. Place red battery cable lug onto positive (+) battery
terminal and tighten bolt to secure. Route yellow/green wire pair with switch attached
along Powertow handle and mount switch in hole provided in upper handle. Connect
spade end of wires to spade located on switch. Secure yellow/green wires to handle
shaft with nylon tie wraps provided. Keep wire ties clear of moving parts. Securely
tighten all battery connections. Charge battery overnight, before first use. Automatic
Charger should be left plugged in when not in use.
Powertow (12 Volt Thundervolt)
FFoorrFFuuttuurreeRReeffeerreennccee
aannddAAddjjuussttmmeennttss
Figure A - From Rear Motor View Figure B - From Front Tire View
Step 1 Before placing battery in the tray connect spring to the battery tray see figure B
Step 2 Place Battery in the tray. Position hold-down clamp as shown in figure A
Step 3 Attach spring to hole in top of hold-down clamp by pulling up spring
with pliers.
ThunderVolt Battery Hold-Down Clamp Instructions
Refer to Diagrams 5 & 6 and instructions on facing page

Powertow 35/40/KeyEZ/Thundervolt
Page 7
Complete the Gasoline Engine Setup - Install throttle quadrant in holes on the left
hand side of upper handle using two 10/24” x 1/2” self-tappers.
Oil - The engine is shipped dry. Buy a quart of automotive viscosity 10W-30 motor oil. Don’t grab
a can of 50W aircraft oil that has been sitting around or this winter you won’t get the thing pulled
over, let alone started. It will hold 2/3 of a quart when full. Your oil may be supplied with unit.
Fuel - You can run 100 low lead aviation fuel. It burns off the cylinder head quicker and you
won’t have to store gasoline just for the Powertow.
Powertow Gas Units
ENGINE
OR
MOTOR
TRANSMISSION
ALL PULLEYS
DIAGRAM #5
PULLEY ALIGNMENT
FFoorrFFuuttuurreeRReeffeerreennccee
aannddAAddjjuussttmmeennttss
Pulley - Refer to Diagram #5
Place a straight edge on the bottom surfaces of the motor pulley, transmission and idler pulley,
visually check to assure pulleys are aligned/parallel. Refer to Diagram #5.
Belt - Refer to Diagram #6
Install belt around the two drive pulleys, between belt guides, exactly as shown in diagram 3.
It is important that these pulleys are in exact alignment or the power belt will jump off of the
pulleys during operation. CLUTCH CABLE
CABLE CLAMP
SELF-TAPPER
BOTTOM VIEW
Diagram #6
A&B BELT GUIDES
CLUTCH CABLE RUNS
UNDERNEATH BELT

Powertow 35/40/KeyEZ/Thundervolt
Page 8
ADAPTER-LANYARD ADJUSTMENT
Swing Arm Set Screws
Center Line
Planenose wheel
StationaryArm
LanyardCable
LanyardAdjustment
Adaptor
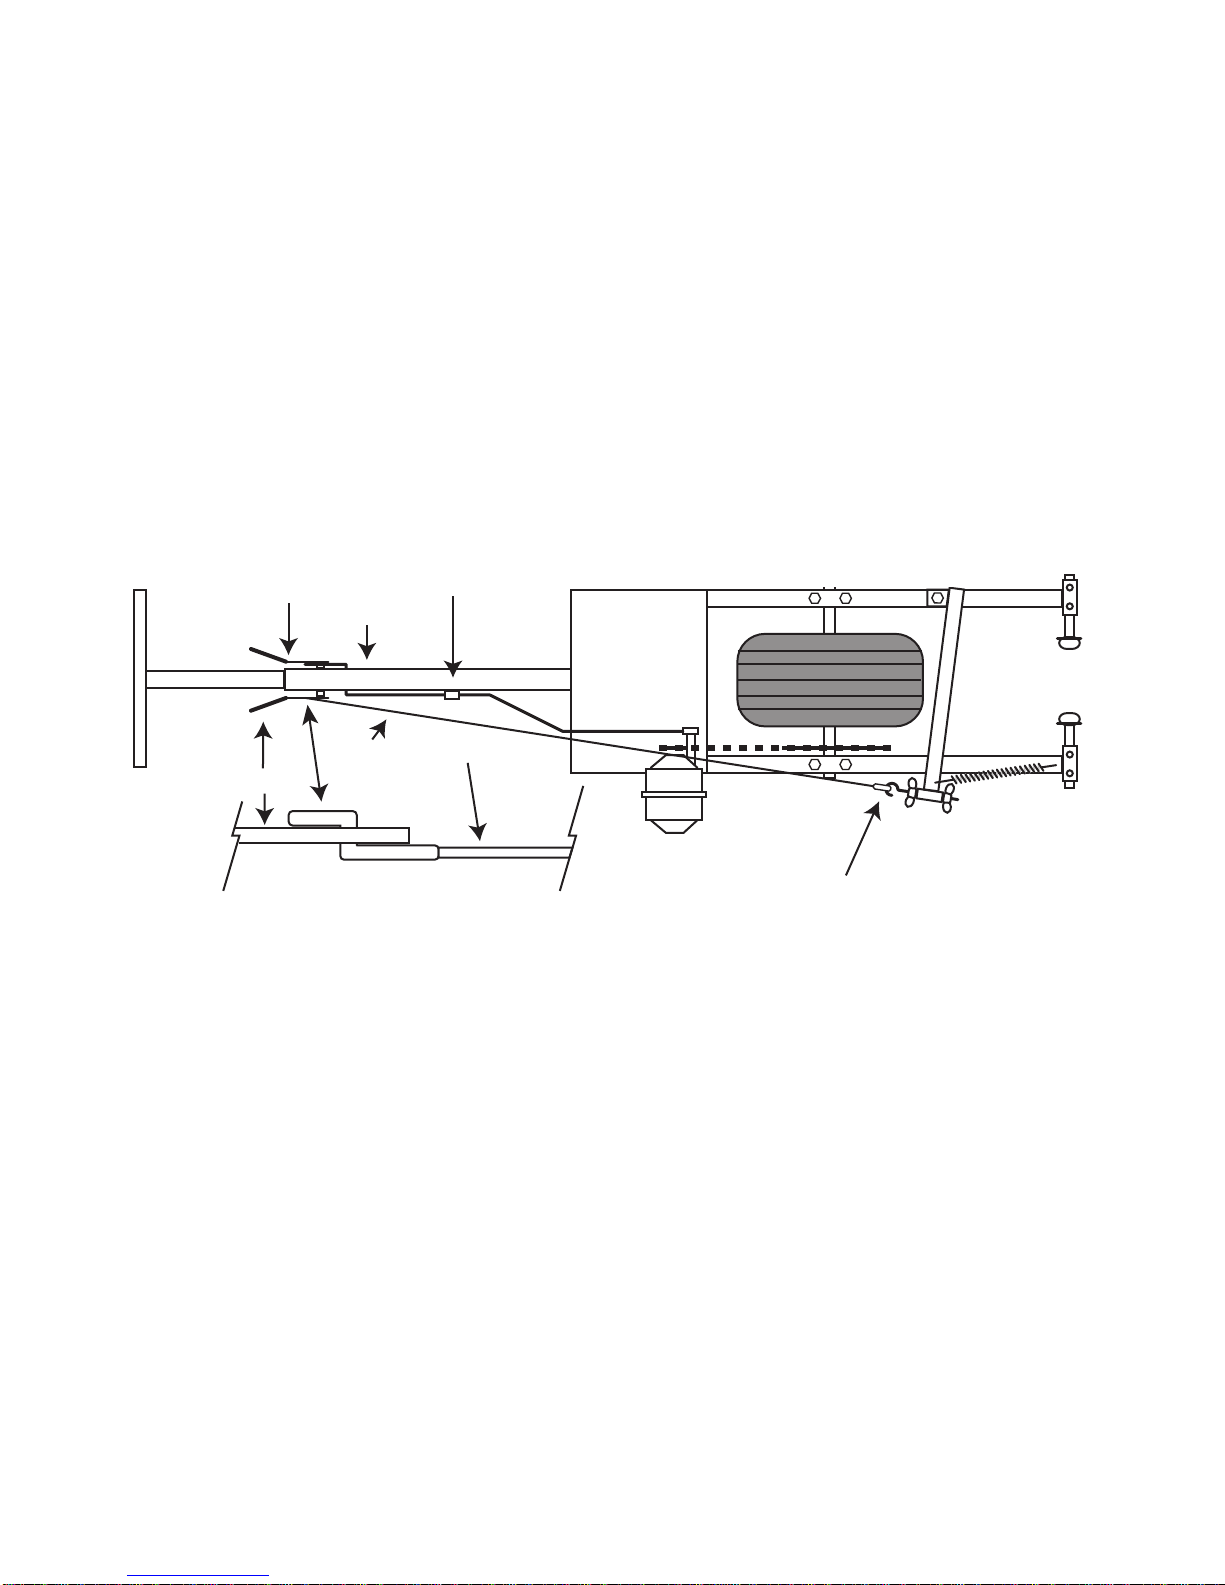
With the swing arm positioned parallel to the stationary arm, the adaptor set screws loose and
the adaptors fully retracted, move the machine up to the aircraft nose wheel so that the
Powertow tire and aircraft nose tire are in line. Slide in adaptors evenly on each side snug.
Tighten the stationary side adaptor. Next loosen the swing arm adaptor 1/16” of an inch
and tighten down. This will allow the lanyard cable to lock down without undo pressure.
Too tight and the adaptors will pop off or the z-swag will break.
IMPORTANT! - The swing arm and the stationary arm should always be parallel when the
lanyard lever is in the locked position. BEFORE MOVING THE AIRCRAFT, TRY OUT THE
POWERTOW UNDER POWER BY ITSELF TO GET USED TO THE CLUTCHING CONTROL.
Note: Without aircraft attached, unit may creep when clutch is released.
EZ HOOK-UP: Open the lanyard handle, move unit up to the aircraft at a slight angle from the
right side to engage the stationary adaptor. By using the stationary arm adaptor, as a pivot to
lift the wheel, you can swing the machine to your left far enough to engage the hookup, while
pulling the lanyard lever into the down and locked position. (It may be necessary to shift the
machine left and right and/or up and down to get the lanyard lever completely down and the
swing arm adaptor to fully seat.)
IF THE ADAPTORS SLIP OFF OR OUT OF POSITION - Check that the stationary arm and
swing arm are parallel and that both adaptor set screws are tight on each of the adaptors.
IF THE SWING ARM OPENS UNDER LOAD - check that the arms are parallel and that the
lanyard lever goes past center to the down lock position. Loosen cable at eyebolt slighty. Make
smaller turns.

Powertow 35/40/KeyEZ/Thundervolt
Operating Instructions
Please take a few minutes to read! Maybe even re-read them.
Five minutes of reading is worth it to avoid damage to your beautiful bird.
Try the Powertow out in the open, before attaching it to your plane.
TRANSMISSION / Hookup: The transmission has three positions, Forward - Neutral - Reverse.
Neutral is the center detent. Roll the machine up to the plane in neutral and hook up to aircraft.
(Review EZ Hook-Up on previous page) Always start the unit in neutral.
GAS UNITS: Move throttle control to the chock position to start the engine and return to run after
starting. Move throttle control back approximately 2/3 for best torque when running.
ELECTRIC UNITS - Turn on motor.
HANGARING AIRCRAFT: Move the shift rod in the direction you want to go.
IF SHIFT ROD DOES NOT FALL INTO GEAR - ENGAGE CLUTCH HANDLE MOMENTARILY.
To move the airplane, squeeze the clutch handle slowly. A slight down pressure on the Powertow
handle, and away you go. Release clutch to stop drive.
Releasing: When you release the clutch handle, the drive belt should disengage completely, there
should be no creeping when attached to aircraft. (If there is, refer back to set-up instructions).
A slight creep is okay when unit is not hooked to aircraft. Run the unit out in the open for a few
minutes to break in a new belt. You can also stop by lifting the Powertow handle up.
STEERING: Steering is accomplished by lifting and shifting the Powertow handle left or right just
like a hand towbar. In the case of a heavy plane, especially with cold tires, a rocking technique,
with power applied, and using down handle pressure at the right time will get the plane rolling.
TIPS: To get a heavy plane over door rails or ledges, a moderate amount of speed is necessary so
that the momentum of aircraft mass will help carry it over the rail. Building up a long tapered ramp
in front of a ledge will also help. Icy surfaces are naturally a traction problem. A bit of sand spread
around will help, snow chains are available.Wing walk for the Powertow drive tire is great for
traction on smooth painted hangar floors.
Now here's a good tip. Get up kind of early on Saturday morning, and get out to the airport
before the rest of the hangar bums get there. Pull your plane out of the hangar, by hand for the last
time, and get it out on the apron well away from all hard objects. Go through the above procedures
until you really have it down. By the time those guys show up, you will have become super
proficient and will be able to put on one hell-of-a-show. Always anchor chock blocks at the rear of
your main wheel position in the hangar to prevent inadvertent travel through the rear of your
hangar.
LAST TIP: If you really want to get smart, re-read this stuff after you have actually used the
machine a few times - it will be more meaningful.
Page 9

Powertow 35/40/KeyEZ/Thundervolt
THE LOCALIZER APPROACH TO HANGARING
This approach was designed specifically for the hangaring of aircraft by
one person where there is little space between wingtips and hangar door
opening. The minimums for this approach are down to 12" clearance at each
wingtip. Place the aircraft partially into the hangar, equal distance for each
wingtip from hangar door. Facing the aircraft in the same direction as it will be
hangared, mark the hangar floor indicating the exact centerline of the right main
gear tire only.
Pull the aircraft out and paint a single stripe on the centerline of the right
main only, starting approximately 10' out from hangar door and back as far as
main wheel would normally go. Only this single point of alignment needs to be
checked progressively when hangaring the aircraft to ensure clearance.
Rear main wheel chock blocks should always be anchored in position on
hangar floor to prevent inadvertent travel through rear of hangar.
MAINTENANCE RECORDS & NOTES

Powertow 35/40/KeyEZ/Thundervolt
Clutch andTransmission Schematic
Engine
Pulley
Belt
Tightener
Transmission
Pulley
Engaged
The Powertow uses a back side idler pulley to control the speed by tightening the pulley against the belt.
The clutch handle is located at the top of the Powertow handle. When squeezed, it engages the pulley and
movement begins. When handle is released the pulley moves away from the belt and movement stops.
Belt guides are installed for proper belt disengagement.
Engine
Pulley
Belt
Tightener
Transmission
Pulley
Released
Quicksilver Transmission Model 3500
Under proper operating conditions, the Quick Silver Transmission can be shifted by using only a fingertip
pressure on the shift lever. However, when a transmission is subject to even partial load from the engine,
the engaging lugs of the clutch collar and gears are forced together. Under this condition, the force required
to shift is multiplied. If enough force is applied, it may cause breakage of the shifter mechanism.
ADEQUATE DECLUTCHING - The transmission must be relieved of any load before shifting. The one
exception to this is in operating the clutch handle briefly, as a hunting action to permit the clutch collar lugs
and gear cavities to line up and mesh fully. If shift rod does not fall into gear easily,
engage clutch handle momentarily.This will allow the gears to fall into place
without binding the transmission.
LUBRICATION -
Quick Silver transmissions are
lubricated at the factory with special,
high quality grease. Under normal
operation, factory lubrication is
adequate for the life of the
transmission. Replenishment
is not necessary unless
the unit is disassembled.
Page 12

Powertow 35/40/KeyEZ/Thundervolt
GENERALWARRANTY AND CONDITIONS
NORTHWEST MANUFACTURING,INC
900 AIRPORT WAY • SANDPOINT • IDAHO 83864
208-263-6632 FAX: 208-263-3633
e-mail: sales@powertow.com
Homepage: www.powertow.com
All equipment manufacturedby NORTHWEST MFG.,INC.is soldona
satisfactionguaranteedbasis. Ifat any time,within30 days ofsale,youare not
satisfiedyoucanreturnthe unit. The Powertow must be inoriginal shape and in
the original packaging only. Ship freight prepaidonlyand uponreceipt ofthe unit
we will immediatelyissue a refund inthe amount ofthe full purchase price,
excluding freight,providing the unit is receivedinnew original condition.
Call for authorizationnumber for return.
Gasoline engines are warrantedonlyby the engine manufacturer. Engine
warrantyincludedwithunit. Engine parts must be obtainedfrom engine dealers.
Refer to "Small Engine Services"inlocal yellow page directory.
All other parts are warrantedby NORTHWEST MFG.,INC.,ona PARTS ONLY
basis for a periodof90days from date ofpurchase.
Adding any unauthorized third party attachments or accessories to any
Powertow, voids all warranty and claims of responsibility by Powertow, or
Northwest Mfg, its parent company. Any damage to tow or aircraft is the
responsibility of the aircraft owner and accessory manufacturer.
Thank you for buying POWERTOW .
™
™

Powertow 35/40/KeyEZ/Thundervolt
TRANSMISSION LEAKING GREASE -
CHAIN IS TOO LOOSE - - - - - - - - - - -
CHAIN BREAKS - - - - - - - - - - - - - - - -
BELT SLIPPAGE WHEN CLUTCH IS
FULLY ENGAGED -
BELT SLIPS OFF PULLEY
THIS IS VERY IMPORTANT - - - - - - - -
DRIVES WHEN NOT SQUEEZED - - - -
UNIT HAS POOR TRACTION - - - - - - -
GAS UNIT: ENGINE SURGES - - - - - -
ENGINE IS HARD TO START - - - - - - -
ENGINE WILL NOT START IN COLD - -
WEATHER
POWERTOW TROUBLESHOOTING
In hot weather, transmission grease will separate and a slight
leakage is normal. It is packed with a solid lubricant. It is not
necessary to add grease.
Pillow blocks are slotted. Loosen and pull tire/axle evenly
back.This will take up chain slack. Tighten and run adjuster
bolt up against pillow block on bottom of frame to hold
secure..
Chain is too loose. Check sprocket alignment.
Shorten Clutch Cable by adjusting turnbuckle at handle.
Adjust cable so clutch is fully engaged with approximately
1" of space remaining between clutch handle and machine
handle grip. Need new belt. See clutch cable this page.
Check to make sure motor, transmission and idler pulleys are
in line. Belt is inside belt guides. Idler pulley needs to contact
belt in the middle of the pulley, not on the edge. Adjust idler
pulley handle.
Lengthen cable at turnbuckle. Check belt guides, make sure
belt is inside belt guides.
Check that tire air pressure is within 10-12 PSI range.
Make sure key is still in 7” pulley on bottom of machine.
See engine manual.
See engine manual. Check unit for gas. Use choke on engine
and on handle.
Check viscosity of engine oil. See engine manual.

Powertow 35/40/KeyEZ/Thundervolt
USE EXTREME CAUTION WHEN
OPERATING ANY POWER EQUIPMENT!
1. Do not operate this machine until you have read and
understand all instructions for proper use.
2. Do not operate unit when not running smoothly.
3. Keep hands and feet out from under towing equipment.
4. Operate in well ventilated area.
5. Do not leave a running machine unattended.
6. Do not operate electric unit in wet conditions or if cords are frayed.
7. Do not start engine when unit is in gear.
8. Hangar storage area should include anchored chocks to
control inadvertent movement of planes into hangar walls.
9. Do not change gearing to increase speed.
10. Do not move planes up any inclines...flat surface only.
11. Do not attach any device to activate throttle when both hands -
are not on throttle control.
12. Do not run engine without checking oil level.
13. Do not spill gasoline on hot engine.
14. Do not smoke when filling tank with gasoline.
15. Use caution when operating machine on icy / slippery surfaces.
16. Do not move planes in excess of speed that cannot be easily
stopped... there is no braking device on the unit.
17. Do routine maintenance to insure proper operation of unit.
18. Do not use unit if the Powertow engine is not running smoothly.
We hope you enjoy this Northwest Manufacturing product.
It was designed and built to give many years of reliable
service with proper use and routine maintenance.
This manual suits for next models
1
Table of contents