PPG Semco 1088 Operating instructions

® 1088 CE mixer
Operating instructions and troubleshooting guide
2
Table of contents
1 - Requirements & ratings ……………………………………………………………………………….. 3
2 - Machine description …………………………………………………………….……………………… 4
3 –Safety instructions………………………………………………………………………………………. 5
4 - Safety features…………………………………………………………………………………………… 6
5 –Set-Up …………..………………………………………………………………………………………. 6
6 –Lay-out …………………………………………………………………………………………………… 7
7 –Operation ………………………………………….………………………………………………….…. 8-9
8 –Maintenance ………………………………………………………..……………………………………. 10
9 –Trouble-shooting………………………………………………………………………………………… 15
10 –Spare Parts ……………………………………………………………………………………………… 21
11 –Calibration Procedure………………………………………………………………………………… 23
12 –Appendix ………………………………………………………………………………………………… 27
Notice
This document is based on information available at the time of publication. While PPG, has
made every effort to provide current and accurate information, this manual will cover all
contingencies regarding installation, startup, operation, and maintenance based on data
collected during factory acceptance testing and production simulation runs by PPG.
PPG assumes no responsibility for third-party or original equipment manufacturer (OEM)
documentation used for this publication or included as supplemental information that is to be
used as an internally controlled document.
This publication may not be reproduced by any means or distributed, in whole or in part, without
the express written consent of PPG.

® 1088 CE mixer
Operating instructions and troubleshooting guide
3
1. Requirements & Ratings
1.1 Semco®Model 1088 CE Mixer is not to be used in explosive environments.
1.2
!
Compressed Air, no oil, moisture, or dust particles. Use the quick-
disconnect fitting to attach your air supply hose. Turn manual valve to ‘ON’
position.
1.3 Pressure min/max: 75 psi (5 bar) –95 psi (7 bar). It is recommended that a
regulator/filter be used at the machine location to ensure clean, dry air is supplied.
1.4 Air rate required: Min. 3 CFM
1.5 Length x width: 380 mm x 300 mm
1.6 Height min/max: 775/975 mm
1.7 Max. working stroke: 250 mm
1.8 Max. motor speed: approx. 150 rpm
1.9 Max. torque at driver: 29 Nm
1.10 Cartridge outer diameter: 43 mm
1.11 Recommended set-up height: normal workbench height
1.12 Weight: approx. (35 kg) –75 lbs.

® 1088 CE mixer
Operating instructions and troubleshooting guide
4
2. Description
The Semco®1088CE Mixer was developed for mixing of two-component cartridges holding
2.5 oz., 6 oz. and 8 oz. cartridges with 6” or 8” dasher rods.
The cartridges are ready for use directly after the mixing operation with Semco®1088CE mixer.
The mixer ensures that the result of the mixture is uniform. During operation, the mixer injects
the accelerator and strokes up and down so the components are evenly distributed in the
cartridge. Rotation of the dasher rod, including the dasher, is affected by an air-operated motor.
The cartridge is inserted into an easy-to-operate slide plate assembly, and it is fixed securely by
the cap assembly during the mixing operation. The cylinder in the cap assembly ensures that
uniform pressure is exerted on the plunger during the mixing process, preventing any air from
entering the cartridge during mixing.
By utilizing the Semkit®package ruler on the left hand side of the Semco®1088 CE mixer,
operators are able to identify what size cartridge and dasher rod length they have. With this
information, the machine can be adjusted to the correct setting utilizing the Semkit configuration
switch on the right hand side of the machine. The stroke motion is adjusted automatically to the
cartridge size and fill level. Any differences in fill level, and/or tolerances between cartridges are
detected and adjusted automatically by the Semco®1088 CE Mixer. Manual adjustment of the
mixing stroke or pre-selection of the mixing time is not necessary. The duration of the mixing
operation is determined by the number of strokes performed.
The Semco®1088 CE mixer can be used with a high degree of flexibility for various products. Its
easy operation minimizes any operating errors. Together with the automatic stroke adjustment
and automatic mixing time, the mixer contributes towards a consistently high quality mixing
results. Its high strength construction, dual-guided piston, reliability, and fully pneumatic control
system enable the Semco®1088 CE mixer to have long intervals between maintenance and a
long service life.

® 1088 CE mixer
Operating instructions and troubleshooting guide
5
3. Safety instructions
3.1 Before operating mixer, read manual and all safety instructions.
3.2 General laws and regulations concerning safety and accident prevention must also be
used when operating any machinery.
3.3 Only trained and authorized personnel shall operate and service this machine.
3.4 Never operate machine without safety guards in place.
3.5 To maintain the warranty of the machine, an external air filter and trap is required.
3.6 Follow all instructions in this manual.
3.7 Wear approved industrial safety glasses and gloves.
3.8 Do not wear long hair, rings, watches, jewelry, or other loose items that could become
caught in moving parts.
3.9 Keep all parts of your body away from moving parts. (belts, gears, etc.)
3.10 Do not attempt to bypass safety measures by placing hands, arms, legs, or any other
body parts around or through the safety enclosure when safety devices are activated
closed.
3.11 Use proper point of operation safeguarding.
3.12 Prior to servicing the machine, isolate all hazardous energy from the machine (electrical
power, compressed air, etc.) also perform standard lockout/tag-out procedure.
3.13 Prior to performing service on commercial items, refer to the appropriate commercial
item maintenance instruction sheet.
3.14 Do not trigger safety devices to stop the machine. The safety devices are not intended to
be used as the stop button.
3.15 Take special caution when opening the machine. The machine may not stop immediately
when a safety device is triggered.
3.16 If an emergency arises and the machine must be stopped immediately, press the stop
button located on the front of the machine.

® 1088 CE mixer
Operating instructions and troubleshooting guide
6
4. Safety features
4.1 There are two primary safety features on this machine: machine safety guard door and stop
push button.
4.2 The guard door is intended to prevent entry into the machine operating area while the
machine is in operation. The mixer may not stop immediately when door is opened.
Therefore caution must be taken before opening up the machine.
4.3 The stop button is located on the front of the machine. This button is to be used when an
emergency arises and the machine needs to be stopped immediately.
5. Set-up
5.1 Make sure the mixer is placed on a firm level surface to withstand the weight of the
machine. Check the working surface area and operation area.
5.2 Prior to use, verify mixer is in good and safe operational condition. Do not operate mixer
if safety guards, operating parts, or components are damaged or missing.
5.3 Never operate mixer without a cartridge.
5.4 Never release a cartridge when the mixer is in operation.
5.5 Always place cap assembly onto its holder when mixer is not in use or between cartridge
cycles.
5.6
!
When mixing dangerous or hazardous contents, please follow the safety
precautions for handling and processing the product specified by the manufacturer or
supplier.
5.7 If necessary, the Semco®1088 CE mixer can be mounted to a flat surface using bolts
and mounting holes drilled through the base plate.
5.8 NOTE: After a long period of storage or initial use, the compressed air motor may not
start immediately when the start button is pressed. In this case, the spindle made have
to be manually turned several revolutions in a counter-clockwise direction. Afterwards,
press start button to begin mixing.

® 1088 CE mixer
Operating instructions and troubleshooting guide
7
6. Lay-out

® 1088 CE mixer
Operating instructions and troubleshooting guide
8
7. Operation
7.1 Open safety guard door.
7.2 If machine is holding a cartridge from
previous cycle, release the dasher rod from
the spindle drive pins and move the
cartridge holder upwards. Twist the cap
assembly clockwise to release, lift up and
remove cartridge from holder.
7.3 New cartridge - Adjust to size. Use the
Semkit®package ruler to determine
cartridge size and rod length. Sizes: 2.5 oz-
6” rod, 6 oz-6” rod, 2.5 oz-8” rod, 6 oz-8”
rod, 8 oz-8” rod. To determine the size,
extend the dasher rod on the Semkit®
packages all the way to the top of the
cartridge and measure the length against
the Semkit® package ruler. Use Semkit®
configuration switch to select the
configuration of rod and cartridge. The
machine will automatically adjust to the
selected configuration. See Appendix 1 for
Semkit®package diagram (barrier and
injection style).
7.4 For barrier style Semkit®packages,
remove tape surrounding cartridge before
loading into mixer.
7.5 Properly seat the cartridge. Insert the
cartridge in the cap assembly and align the
dasher rod drive holes on to the spindle
drive pins. Twisting the spindle counter-
clockwise will help engage the pins to
the dasher rod prior to start.
7.6 Hold dasher rod at drive pin and press
“Cartridge holder up” button until cartridge
holder moves up to travel limit.

® 1088 CE mixer
Operating instructions and troubleshooting guide
9
7. Operation (cont.)
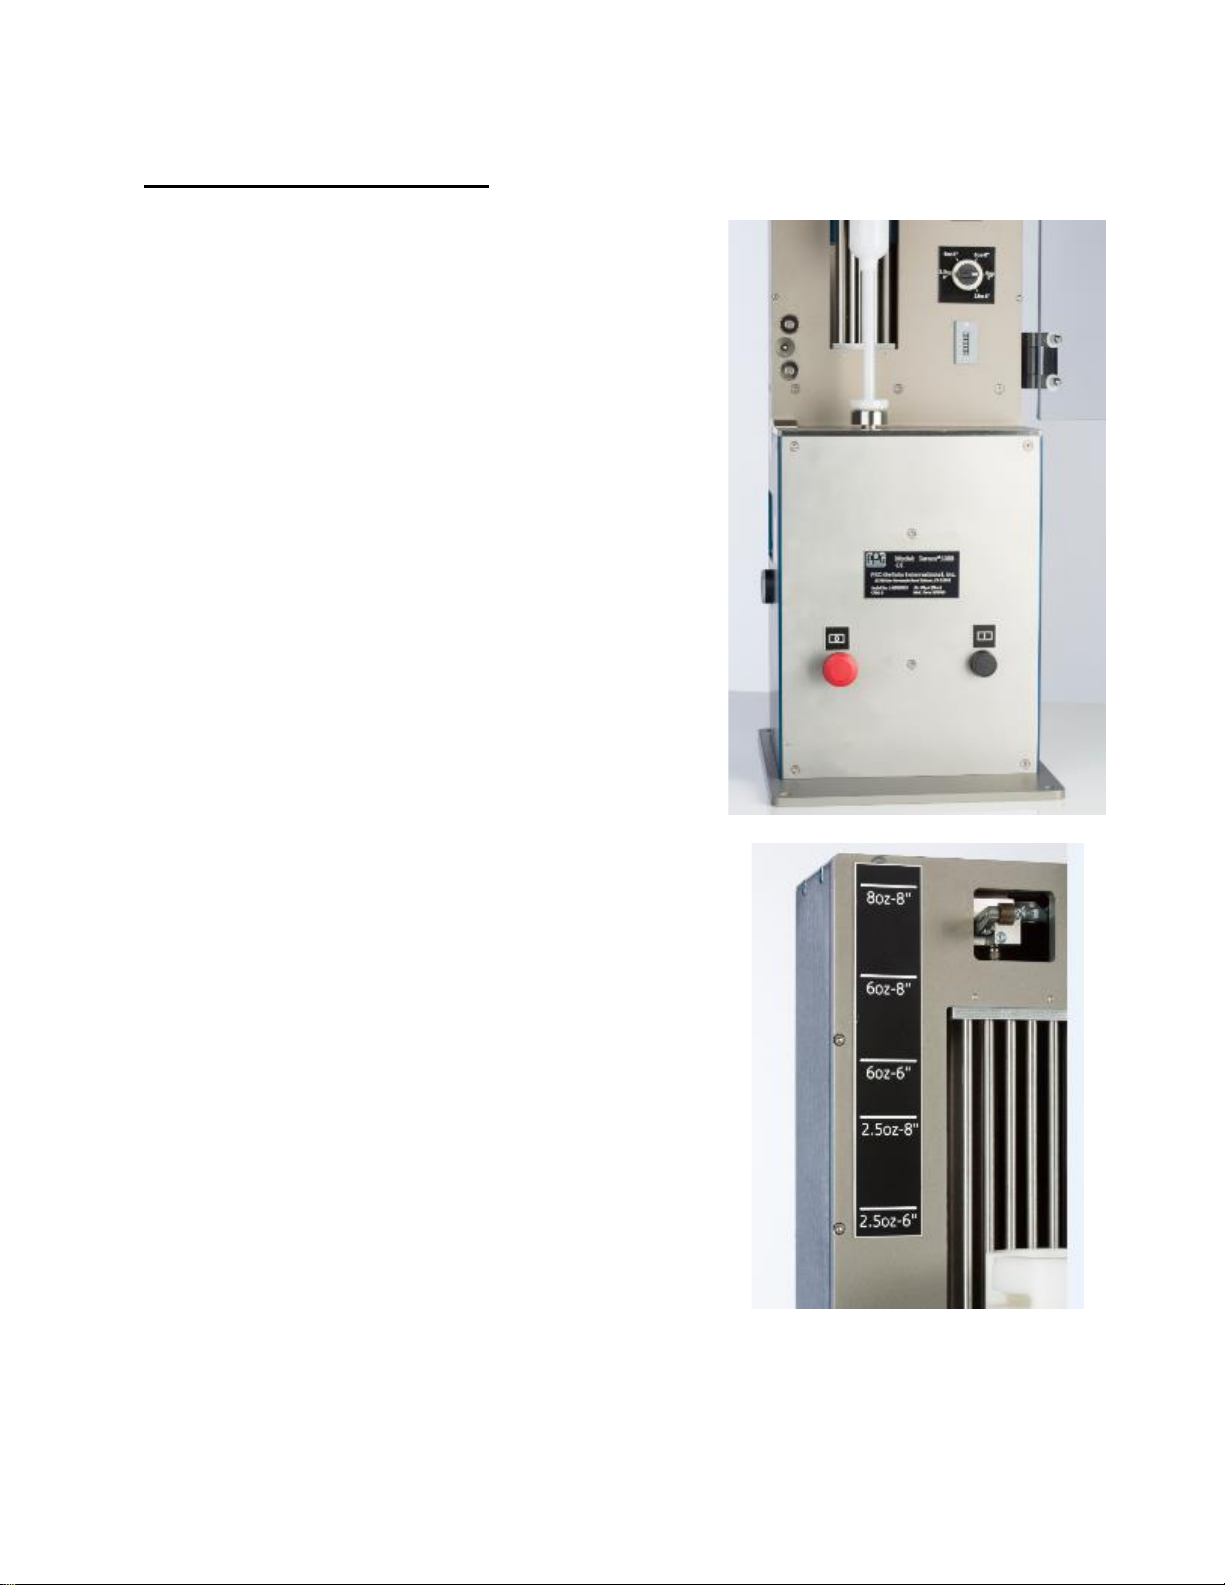
7.7 Insert cap assembly. Affix the cap assembly into the
slide plate assembly. Press down and twist firmly
counter-clockwise to lock in place. Make sure the red
indicator lines (this line can also be black) are aligned
for properly seating the cartridge. You may need to
adjust the height of the cylinder by pressing the stroke
up button. This allows you to seat the cartridge pusher
either below or above the roller valve (toggle) limit
switch (depending on the size of the cartridge).
Check the roller valve (toggle) limit switch on top of the
machine to make sure it’s not depressed or jammed in
any way.
7.8 Read the bag of the Semkit® package and identify how
many strokes are required (this will be referenced
under ‘Hand-mix’ but this process is acceptable for
mixing on the Semkit®1088CE mixer). Set the double-
stroke preset counter.
7.9 Presetting Counter. Hold the white button down on the
counter to change the stroke count. On cycle counter
select desired number of up/down strokes. Lower
display is for preset number.
If the machine door is opened during operation or if the
stop button is pressed, the stroke count will return to zero.
The machine will not restart from where it was interrupted.
7.10 Before starting each mixing cycle, make sure the
cartridge is clamped into the cartridge holder and the
dasher rod is inserted to the drive pins.
7.11 Close safety door.
7.12 Never start the mixing operation without a cartridge
properly seated on the driving pins.
7.13 Start by pressing “Start” push button (colored black) to
begin operation.
7.14 Mixing will perform entire sequence without operator’s
intervention. Wait until machine switches off
automatically.
7.15 Cycle is complete
7.15 Operation Complete
7.16 Removing Cartridge. Simply follow steps 7.1 & 7.2
When pressing the emergency stop or opening the door
during operation, the system will remove the energy by
dumping all air in the system.

® 1088 CE mixer
Operating instructions and troubleshooting guide
10
8. Maintenance
!
Before carrying out any maintenance work, repairs, or cleaning, release the air from the
mixer by opening the main valve. This is done by turning the on/off valve to the off position.
Also, disconnect mixer from the compressed air supply.
Some preventative maintenance activities will require the removal of the rear or front panels.
Listed below are instructions.
Removing the rear panel –The rear panel
is attached by 10 Allen wrench bolts.
1. Using Allen wrench, remove all 10
bolts from the rear panel.
2. When maintenance work is
completed, re-install the bolts.
3. Do not overtighten bolts.
Removing the front panel –The front
panel is attached by 4 Allen Wrench
bolts.
1. Remove the four screws (McMaster
92125A210) using a 3mm Metric
Allen wrench on the front lower
panel of the mixer.
2. Remove the lever on the start &
stop switches (on the inside panel)
from the lock position to unlock
which will release the door panel
from the switches.
3. Reattach the start and stop buttons
to the door panel and lock them in
place. Put door panel back on and
screw in the four screws in the
corners of the front panel back on
the machine. Do not overtighten.

® 1088 CE mixer
Operating instructions and troubleshooting guide
11
Preventative maintenance
Daily
1. Complete a quick visual inspection of the unit to ensure surfaces are clear from dust,
sealants/adhesives, other liquids, etc. Use a clean cloth to clear machine surfaces. If debris
remain, use a solvent approved by your location and clean cloth to clear surfaces and use solvent
sparingly.
oIn particular, check the spindle to ensure the item is clean and clear of any residual
sealant/adhesive. If not clean, apply isopropyl alcohol (IPA) to a clean cloth to remove
sealant/adhesive.
o
!
Harsh solvents like acetone, paint thinners, isocynate, and MEK should not be
used.
2. Inspect injection rod –
With machine in off
position, pull up the
injection rod and
inspect surface for
contamination. Clean
with cloth as needed.
Pull injection up Wipe rod with cloth
3. Ensure start/stop buttons work –If not, check the Trouble shooting section 11.
4. Inspect hose that connects to the cap assembly and assure there is no damage, such as a kinked
hose, which will affect the performance of the machine.
5. Listen for air leaks when the mixer is turned off. If an air leak is heard, contact your maintenance
department or refer to the Troubleshooting section 11.
6. The filter /regulator should be checked on at least a weekly basis, more often if usage is heavy.
This will ensure the longevity of the mixer.
7. Check cartridge
pusher pins for
tightness. Turn
clockwise using flat
head screw driver.
Cartridge pins on the cartridge pusher

® 1088 CE mixer
Operating instructions and troubleshooting guide
12
Preventative maintenance
!
Turn OFF/ON Switch to OFF and disconnect compressed air supply prior to opening any
mixer panels. Work should be done in non-hazardous area.
Quarterly (monthly for heavy usage)
Main guide shafts - The main guide shafts and
bushings should be inspected for damage and
clean from sealant material. This will reduce the
amount of the dust/grease that may accrue on
the surface and help to ensure smooth
operation of the unit.
1. Remove rear panel.
2. Clean shafts and bushings with dry cloth as
needed. If the shafts are coated with
sealant or other contaminant, use IPA with
cloth to clean surfaces.
3. Reinstall rear panel and bolts.
4. Do not overtighten bolts.
Lubricate air motor - The Semco®1088 CE
mixer is designed with a motor that does not
require constant lubrication. However, with
heavy usage it would be prudent to lubricate the
motor on a monthly basis.
1. Remove front panel.
2. Identify the hose going into the air motor
labeled as 1a and depress the Push-In
fitting to release the hose.
3. Once the hose has been released from the
air motor, insert 4-5 drops of standard 3-in-1
oil into the hose and re-insert the hose into
the air motor.
4. Re-install front panel.

® 1088 CE mixer
Operating instructions and troubleshooting guide
13
Preventative maintenance
!
Turn OFF/ON Switch to OFF and disconnect compressed air supply prior to opening any
mixer panels. Work should be done in non-hazardous area.
Quarterly (monthly for heavy usage)
Inspect air motor muffler
1. Remove front panel.
2. Remove muffler assembly on bottom
of motor using 17mm Wrench and
turning counter-clockwise.
3. Note that plastic ring is on top of the
metal muffler. Using cloth with IPA
wipe down the inner shaft and inside
the metal muffler. Inspect for
contamination.
4. Re-install front panel.
!
Do not turn set screw at the
end of the shaft, this will affect the
rpm of the mixer. After cleaning, re-
calibration of the spindle rpm may be
required.
Inspect under spindle and clean
Remove engagement spindle
1. Use thin 19 mm wrench to hold the
rotating bearing underneath the
engagement spindle in place.
2. Hold on to spindle with an adjustable
wrench as shown. (If there are no
flat areas on the spindle, use
screwdriver between the
engagement pins to loosen.)
3. Turn adjustable wrench counter.
clockwise to loosen and remove.
Wipe area with clean cloth. IPA solvent
is OK.

® 1088 CE mixer
Operating instructions and troubleshooting guide
14
Preventative maintenance
Annual
In addition to the monthly PM activities listed above, the Semco®1088 CE mixer is calibrated to
function at the optimal rate to completely mix all sizes of Semkit® packages. The mixer’s timed
functions should be checked at least on an annual basis to ensure consistent operation. The
factory settings are as follows:
oSpindle rpm (the rotations of the dasher rod per minute): 150 +/- 5
oStroke cycles (up and down cycles, using water filled 6oz-8” cartridge kit): 20 +/- 1
cycles/min.
oToggle switch: 30 +/- 5 degrees from horizontal
Please refer to the Calibration section 11 for verifying current settings or making adjustments, if needed
.

® 1088 CE mixer
Operating instructions and troubleshooting guide
15
9. Trouble-shooting
Issue: After closing the door and pressing ‘Start’ the mixer does
not start
1. Check the air line and ensure it is ‘on’ and hooked up to the mixer properly.
2. Check the air supply switch and ensure it is in the ‘on’position.
Air supply switch in the ‘Off’ position
Air supply switch in the ‘On’ position
3. Ensure that the safety door pin is properly engaging the safety switch when the front door is
closed. The switch is circled below:

® 1088 CE mixer
Operating instructions and troubleshooting guide
16
4. Ensure cycle counter dial is set to a number GREATER than ‘0’. To set, press down white
button and then press in corresponding back buttons.
5. If none of these actions resolve the issue, please contact your local Application Support
Center (ASC) for technical support.
Issue: Machine starts operating, but stalls in the ‘UP’ position.
1. Check to make sure you have the proper configuration of the Semkit®package you are
trying to mix. Utilize the Semkit®package ruler on the left hand side of the machine by
pulling the dasher rod of the Semkit®all the way to the top of the cartridge and placing on
the door ramp to identify the proper type of Semkit®package. Then, turn the Semkit®
package configuration switch accordingly.
2. Ensure that the safety door pin is properly engaging the safety switch when the front door is
closed.
Stroke Counter is set to 60 is this
example

® 1088 CE mixer
Operating instructions and troubleshooting guide
17
3. Cartridge dasher rod (on Semkit®package) may be over threaded. If the dasher rod can’t
be easily unthreaded from the cartridge, this may be the problem. Continue with another
cartridge and restart mixer.
4. Sensor locations on the main cylinder may have moved or sensor has failed. See
Calibration procedure section 11.
5. If none of these actions resolve the issue, please contact your local Application Support
Center (ASC) for technical support.
Issue: Machine starts operating, but stalls in the ‘DOWN’ position.
1. Check to make sure you have the proper configuration of the Semkit®package you are
trying to mix. Utilize the Semkit®package ruler on the left hand side of the machine by
pulling the dasher rod of the Semkit®all the way to the top of the cartridge and placing on
the door ramp to identify the proper type of Semkit®package. Then, turn the Semkit®
package configuration switch accordingly.
2. Ensure the cap assembly has been put into the cartridge holder properly. The cap
assembly is in the correct position when you see the red line on the cap assembly in line
with the red line on the cartridge holder (pictured below). If you do not see the red/black
line, then the cap assembly is in the incorrect position.

® 1088 CE mixer
Operating instructions and troubleshooting guide
18
Issue: Machine starts operating, but stalls in the ‘DOWN’ position.
1. Verify the cartridge pusher is installed completely into the cartridge holder. If the pusher is
not fully twisted into the locked/closed position, the toggle arms will not make contact with
the toggle sensor. See pictures below:
Cartridge pusher is not turned completely into cartridge holder (left). The
pin needs to make contact to the edge of the slot. The toggle arm on the
cartridge pusher does not make contact with the toggle sensor (right)
while in the down stroke cycle.
2. Toggle sensor is not loose or out of position. It should be 30 degrees from horizontal
position. If the toggle arm is loose or has fallen to a more horizontal position, use 2.5 mm
Allen wrench to re-position and tighten the bolt. Adjusting the sensor higher will reduce
chance for stalling, but may mix the plunger end of the cartridge less. (See Calibration-
toggle switch in Section 11.)
3. Verify the toggle sensor is not loose or out of position. It should be 30 degrees from
horizontal position. If the toggle arm is loose or has fallen to a more horizontal position, use
2.5 mm Allen wrench to re-position and tighten the bolt. Adjusting the sensor higher will
reduce chance for stalling, but may mix the plunger end of the cartridge less. (See
Calibration-toggle switch in Section 11.)
4. Remove the cartridge pusher assembly and check for debris inside cartridge (behind
plunger). This may be preventing the mixer from completing the down stroke properly.

® 1088 CE mixer
Operating instructions and troubleshooting guide
19
Issue: Material is not mixed properly on the plunger end.
1. Check to make sure you have the proper Semkit®package configuration selected for the
package you are trying to mix. Utilize the Semkit®package ruler on the left hand side of the
machine by pulling the dasher rod of the Semkit®package all the way to the top of the
cartridge and placing on the door ramp to identify the proper Semkit®package. Then, turn
the Semkit®package configuration switch accordingly.
2. Review the cap assembly hose
(McMaster 50315K68) and make sure
it’s not tangled, kinked, or otherwise
damaged.
3. Review the flags on the back of the cap assembly and ensure they are not bent, broken, or
otherwise damaged.
4. Verify the toggle sensor is not loose or out of position. It should be 30 degrees from
horizontal position. If the toggle arm is loose or has fallen to a more horizontal position, use
2.5 mm Allen wrench to re-position and tighten the bolt. Adjusting the sensor higher will
reduce chance for stalling, but may mix the plunger end of the cartridge less.

® 1088 CE mixer
Operating instructions and troubleshooting guide
20
Issue: Material is not mixed properly on the dome side of cartridge
1. Check to make sure you have the proper Semkit®package configuration selected for the
Semkit®you are trying to mix. Utilize the Semkit®package ruler on the left hand side of the
machine by pulling the dasher rod of the Semkit®package all the way to the top of the
cartridge and placing on the door ramp to identify the proper Semkit®package type. Then,
turn the Semkit®package configuration switch accordingly.
2. Sensor locations on the main cylinder may be have moved or sensor has failed. See
Calibration section 11.
3. If none of these actions resolve the issue, please contact your local Application Support
Center (ASC) for technical support.
Issue: No injection of catalyst or incomplete injection of catalyst
1. Check top of the spindle to make sure it is clear of
debris which may be preventing the cylinder from
injecting the catalyst.
2. Manually pull injection cylinder up and wipe any
excess debris that may exist on the rod (compressed
air must be disconnected). See Preventative
maintenance section 8.
Issue: Mixing engagement spindle does not rotate when start
button pushed or has a delayed start.
1. Verify air pressure supplied to the mixer
is 75-95 psi.
2. Ensure that the safety door pin is
properly engaging the safety switch
when the front door is closed.
3. Manually turn the spindle 2-3 turns
counter-clockwise.
4. Clean air motor muffler (See
Preventative maintenance section 8).
Spindle does not turn
Other manuals for Semco 1088
1
Table of contents
Popular Laboratory Equipment manuals by other brands

caron
caron 7350-25 instructions

Agilent Technologies
Agilent Technologies 1290 infinity user manual

Endress+Hauser
Endress+Hauser Analytik Jena Biometra TRIO installation instructions

FLUXANA
FLUXANA VITRIOX GAS Series user manual

MRC
MRC SI-600 Operation manual

Teledyne
Teledyne FALCON GC Operation and maintenance manual