Pratica Forza Express CPFE608 User manual
INSTALLATION AND
OPERATION MANUAL
CPFE608


SUMMARY
1 WARRANTY __________________________________________________ 3
2 SAFETY INSTRUCTIONS _________________________________________ 6
3 INSTALLATION ________________________________________________ 9
4 FORZA EXPRESS TECHNOLOGY
________________________________
___ 10
5 OPERATION _________________________________________________ 11
6 CLEANING __________________________________________________ 17
7 CONCLUSION ________________________________________________ 19
EN

02
LETTER TO CUSTOMERS
Práca Inc. are proud to become part of your day-to-day lives with our products. By
purchasing Práca's appliances, you will have a partner that always will be aenve
to your needs and interested in keeping customers sasfied.
We are available to serve you at any me, whether it is to hear your ideas, cricisms,
suggesons, or solve a problem.
Count on us!
Our Mission
Bring quality and producvity to the food preparaon environment.
Our Commitment
ŸAlways knowing and meeng the needs of our customers.
ŸOffering reliable, high-performance, and energy-efficient products.
ŸAlways looking for improvements of processes, products and cost to offer more
value to our customers every single day.
ŸTreat our customers with complete honesty and respect.
ŸPráca Inc. donates a poron of our profit to charitable causes.
EN

03
1 WARRANTY TERM
1.1 Terms and detailing
a)
b)
c)
d)
e)
f)
g)
h)
Our products have a legal warranty of three months and contractual warranty
of nine months (one year in total) from purchase invoice issuance date and
applies only to the first purchaser. If for any reason the purchase invoice
cannot be found, the equipment manufacture date contained in the indicave
label will be considered as the start date of enforceability of this warranty. The
following will be covered under warranty.
Regardless of the actual installaon or use of the equipment, the warranty
period is started per the date of issuance of the purchase invoice.
For delivery and installaon of the equipment, Práca will send, at no cost to
the customer, an authorized technician to the site where the appliance will be
installed (or the customer can call a technician of their choice, if preferable).
If new visits are needed to complete the delivery/installaon of the product
due to the lack of adequate, electrical, or exhaust related condions, the costs
of such visits shall be the customer's responsibility.
For the appliance's installaon, the customer must provide all condions
required (water, light, gas, grounding and exhaust if needed) in the installaon
blueprint. The customer will also be responsible for transporng the
equipment to the installaon site.
The warranty only covers manufacturing and component failures.
The warranty will cover maintenance, adjustments or replacement of
defecve parts. It is the responsibility of the customer or technician to return
the defecve parts to Práca Inc. for analysis.
Warranty service calls will not jusfy the extent of the warranty, returns or
exchanges of the equipment, or any other type of claim.
INSTALLATION AND OPERATION MANUAL
EN

04
1.2 Warranty Exclusions
a)
b)
c)
d)
e)
f)
g)
h)
i)
j)
The customer should thoroughly inspect the equipment upon delivery and
contact the carrier in case of shipping damage arising from transport. At the
me of installaon, the technician should find the equipment in its original
packaging (fully preserved).
Irregularies in building installaon systems.
Please use the Installaon and Operaon Manual that are included with the
product.
Failure to observe the installaon details per the Installaon and Operaon
Manual, such as: uneven floors, installing the oven next to equipment that
exude fat, heat or solid parcles, lack of air circulaon, etc.
Any damage and defects resulng from inappropriate cleaning that causes
damages to the components will not be covered under warranty. For example,
pouring water inside the electric panel, etc.
Changes performed by unauthorized technicians in the original condions of
installaon such as electrical distribuon, installaon locaon, etc.
Use of aggressive or abrasive products that are unsuitable for cleaning which
may tarnish, wear, scratch or damage accessories or equipment components.
Damage and operaonal failures arising from unfiltered water with great
calcium content or electrical supply with voltage oscillaon or noise/
interference in power line.
Occurrences from electrical discharges arising from acts of nature or voltage
peaks caused by generators or supply companies.
Damage to the equipment or its accessories because of accidents, abuse,
improper operaon, improper handling or Installaon as described by the
Operaon Manual included with this product.
EN

05
1.3 Notes and Recommendaons
EQUIPMENT IDENTIFICATION
(Fill in to make technical support calls easier)
MODEL
VOLTAGE
SERIAL NUMBER
RESELLER
INVOICE
NUMBER PURCHASE DATE
Repair aempts by unauthorized third pares or use of non-OEM parts and
components, regardless of the damage or defects.
Wear and tear components are excluded from the warranty such as lights,
seals, belts, bearings, chains, tarps, glass, plascs, etc.
The operator can use the Installaon and Operaon Manual as a guide.
Make sure that the electric and exhaust systems are made and installed by a
qualified company or technician.
Before contacng technical assistance, check the manual for troubleshoong
ps that can be solved without a technician.
The wear and tear of the unit is not covered by warranty. To ensure
producvity and increase the life of the product, it is essenal to perform the
daily cleaning and a prevenve maintenance regularly.
You can call our technical assistance to provide feedback, offer suggesons, or
get assistance troubleshoong during normal business hours at: +1 214 299-
7726.
k)
l)
a)
b)
c)
d)
e)
INSTALLATION AND OPERATION MANUAL
EN

06
When carrying out the daily cleaning, please use personal protecve
equipment such as protecve gloves, apron, mask and goggles.
The appliance MUST be grounded.
The oven must have a dedicated outlet.
Do allow the power cord or the plug to get wet.
Keep the power cord away from heated surfaces.
If the power cord is damaged, it must be immediately replaced by an
authorized technician to avoid shock hazard.
Only qualified personnel should open the equipment panel.
Do not use plasc utensils.
Do not allow food residue or other debris to accumulate on the surface of the
door and hinge to avoid damaging the appliance.
Do not use the appliance if it is damaged. The oven's door should always close
properly.
Fully sealed packages should not be heated in the oven as they can explode.
Use this appliance only for the funcons described in this manual.
Do not allow children to use or operate this appliance.
Do not cover or block any air vents on unit.
Do not use the appliance outdoors or without coverage.
Do not use this product near water such as near the kitchen sink, in a wet
basement, or near a swimming pool.
Do not use a water jet for cleaning. Please see cleaning instrucons for proper
cleaning.
2 SAFETY INSTRUCTIONS
· Read the manual carefully before installing the appliance.
·
·
Goggles
Apron
Protecve Mask
Protecve Gloves
·
·
·
·
·
·
·
·
·
·
·
·
·
·
·
EN
07
Remove all contents located inside the oven cavity.
If the product catches fire inside the cook cavity, close the door immediately
and turn the unit off or unplug it. The power can also be turned off at the
circuit breaker.
Do not use the cavity of the appliance for storage.
Always wear thermal gloves or use holders or tongs to remove the food from
inside the equipment to avoid burns.
The appliance is not intended for use by persons (including children) with
reduced physical, sensory or mental capabilies, or that have not been
properly trained to operate the unit.
The oven should be cleaned daily and any food remains should be removed.
Failure to maintain the oven in a clean condion could lead to deterioraon of
the surface that could adversely affect the life of the appliance and possibly
result in the loss of warranty.
CAUTION
If the door or door seal is damaged, the oven must not be operated unl they
are repaired by a qualified person.
If smoke is observed, unplug the appliance and keep the door closed.
Do not heat baby food as the contents can get very hot.
To avoid burns, do not use containers with liquids or kitchen
products that become liquids by heang up to boiling point. This
marking must be mounted aer installaon at 5.25in (1.6m)
above floor level.
·
·
·
·
·
·
·
·
·
·
·
INSTALLATION AND OPERATION MANUAL
EN
08
3 INSTALLATION
The installaon of our products must be done with care to avoid problems or
damage to the equipment and guarantee its opmal performance.
This appliance must be installed by an authorized technician.
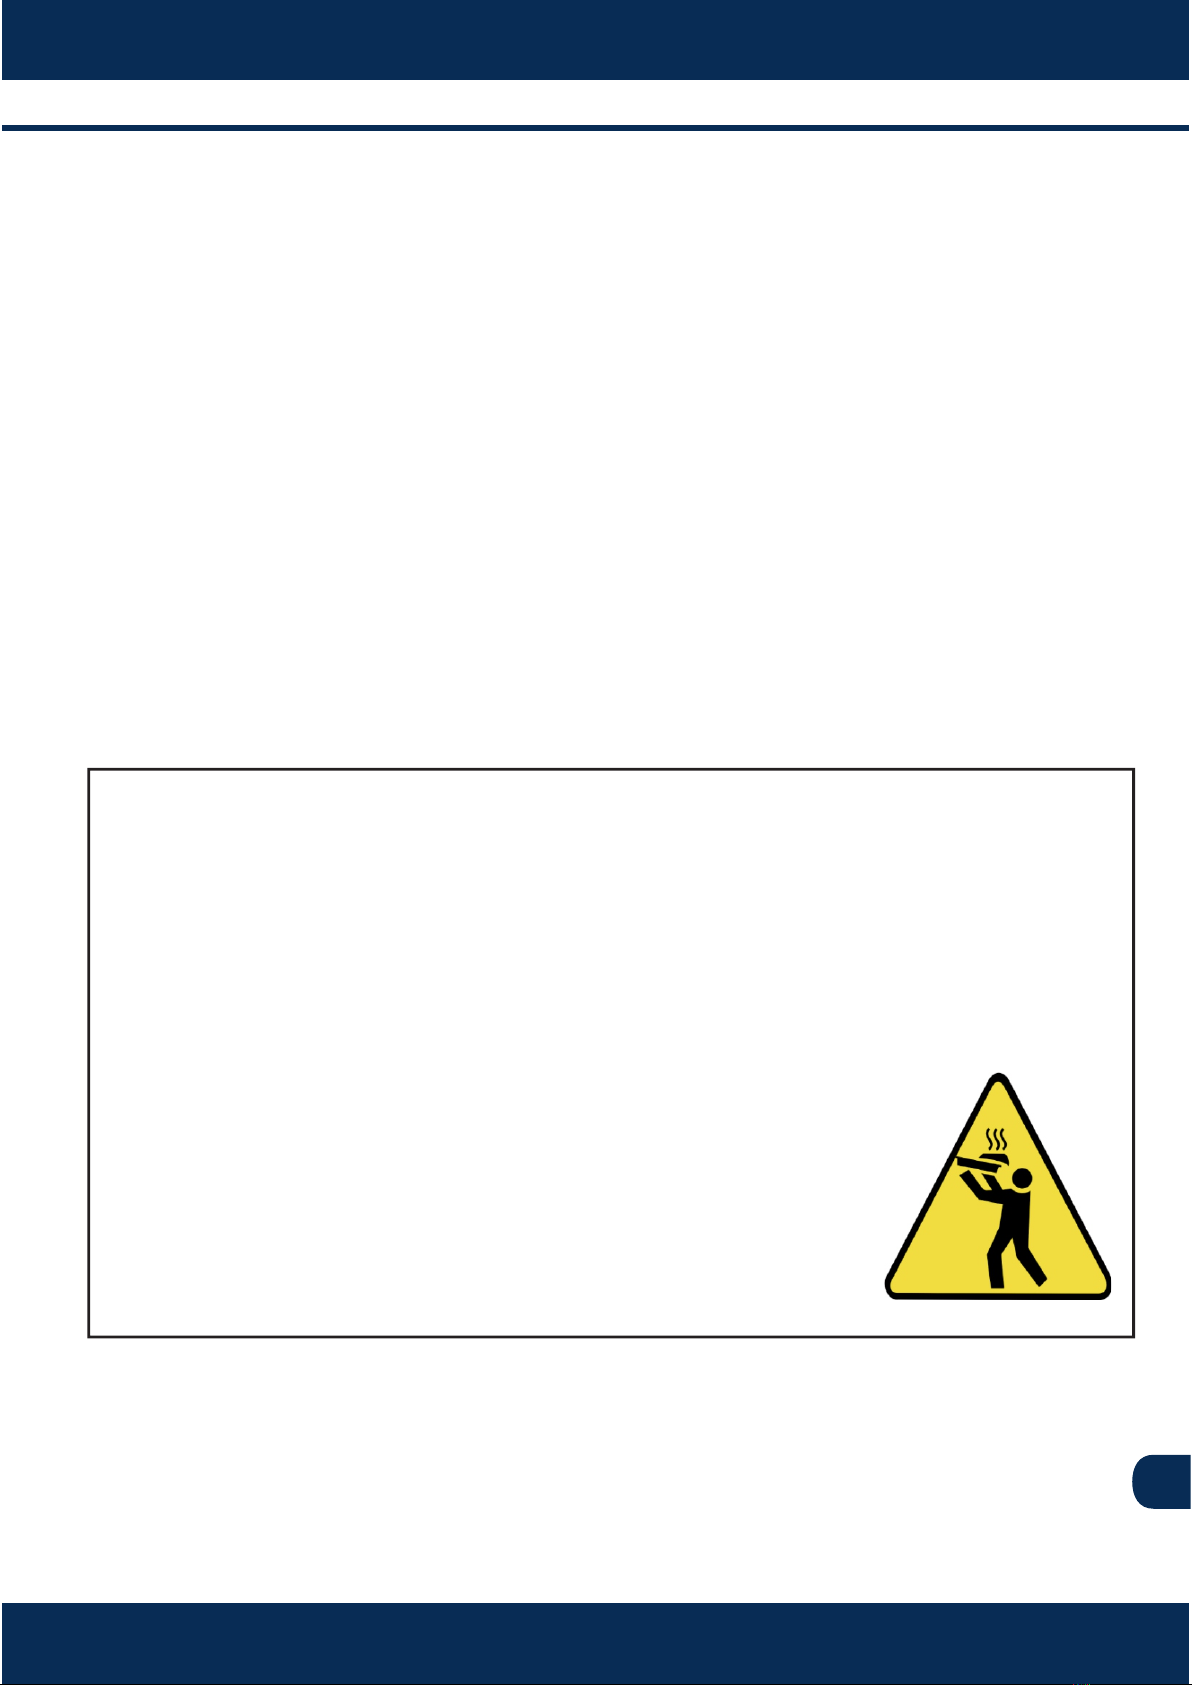
3.1 Dimensions
3.2 General Instrucons
The oven must be installed on a surface or counter that supports its weight 0f
approximately 143lb (65 Kg).
Do not block the air inlets or outlets of the unit.
The oven must not be posioned near stoves, deep fryers, hot plates and
other equipment that releases fat, fumes and heat. The venlaon, electrical
panel and motor vents must be far from these heat sources to prevent
damage to the electrical system of the appliance.
The oven must be installed in a leveled and well venlated area.
The installaon of the equipment in a non-suitable place can result in the loss
of warranty.
Chamber Dimension
Capacity
Height
Width
Depth
21 Liters
5 ³⁄" - 146 mm
15 ¹⁄" - 394 mm
14 ¹⁄" - 362 mm
·
·
·
·
·
27 ⁄"
(700 mm)
11 ⁄"
(292 mm)
40"
(1015 mm)
1 ⁄"
(40 mm)
3 ⁄"
(80 mm)
30 ⁄"
(766 mm)
21 ⁄"
(544 mm)
1 ⁄"
(40 mm) 21"
(532 mm)
21 ⁄"
(536 mm)
25 ⁄"
(636 mm)
17 ⁄"
(441 mm)
EN
09
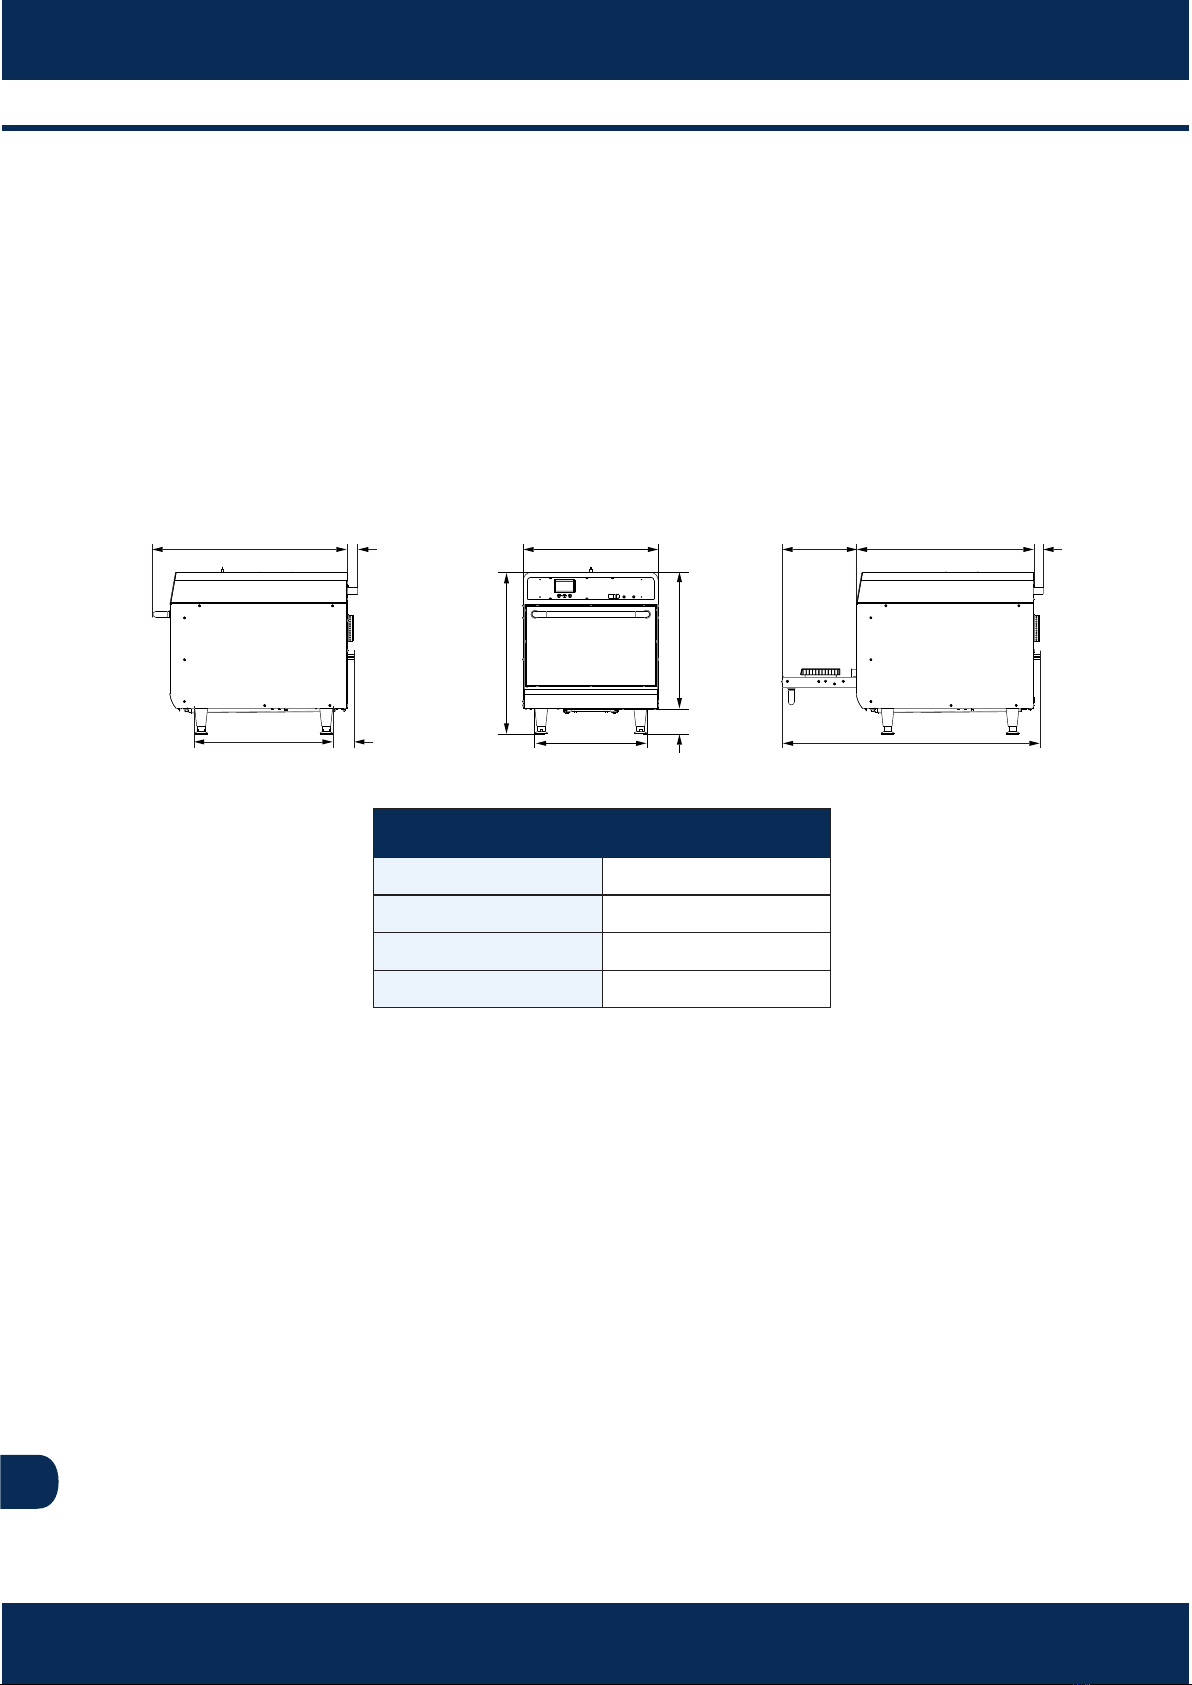
3.3 Electric Power
Make sure that the electrical characteriscs of building electric network
follow the technical specificaons of the oven which can be found on the
idenficaon plate located on the back panel and in the electrical table
below.
Use a dedicated outlet for the oven, that must be located at least 6 (1.8
meter) away from the right sides of the oven.
INSTALLATION AND OPERATION MANUAL
6
(1.8m)
Maximum
Distance
Air Inlet
Circuit Breaker
EN
NEMA
6-30
3x10AWG
30
5.6
7.2
60
Single
208
240
USA
Power
(kW)
Circuit
Breaker
(A) Cable Socket
Region Voltage
(V) Phases Freq.
(Hz)
NEMA
6-30
3x10AWG
30
5.6
7.2
60
Single
208
240
Canada
10
The oven MUST be properly grounded. In the event of damage due to
improper grounding to third pares and/or to the equipment, the will be held
responsible and will characterized as negligence due to the non-compliance
with the standards.
There is an equipotenal point on the rear panel of the oven.
·
·
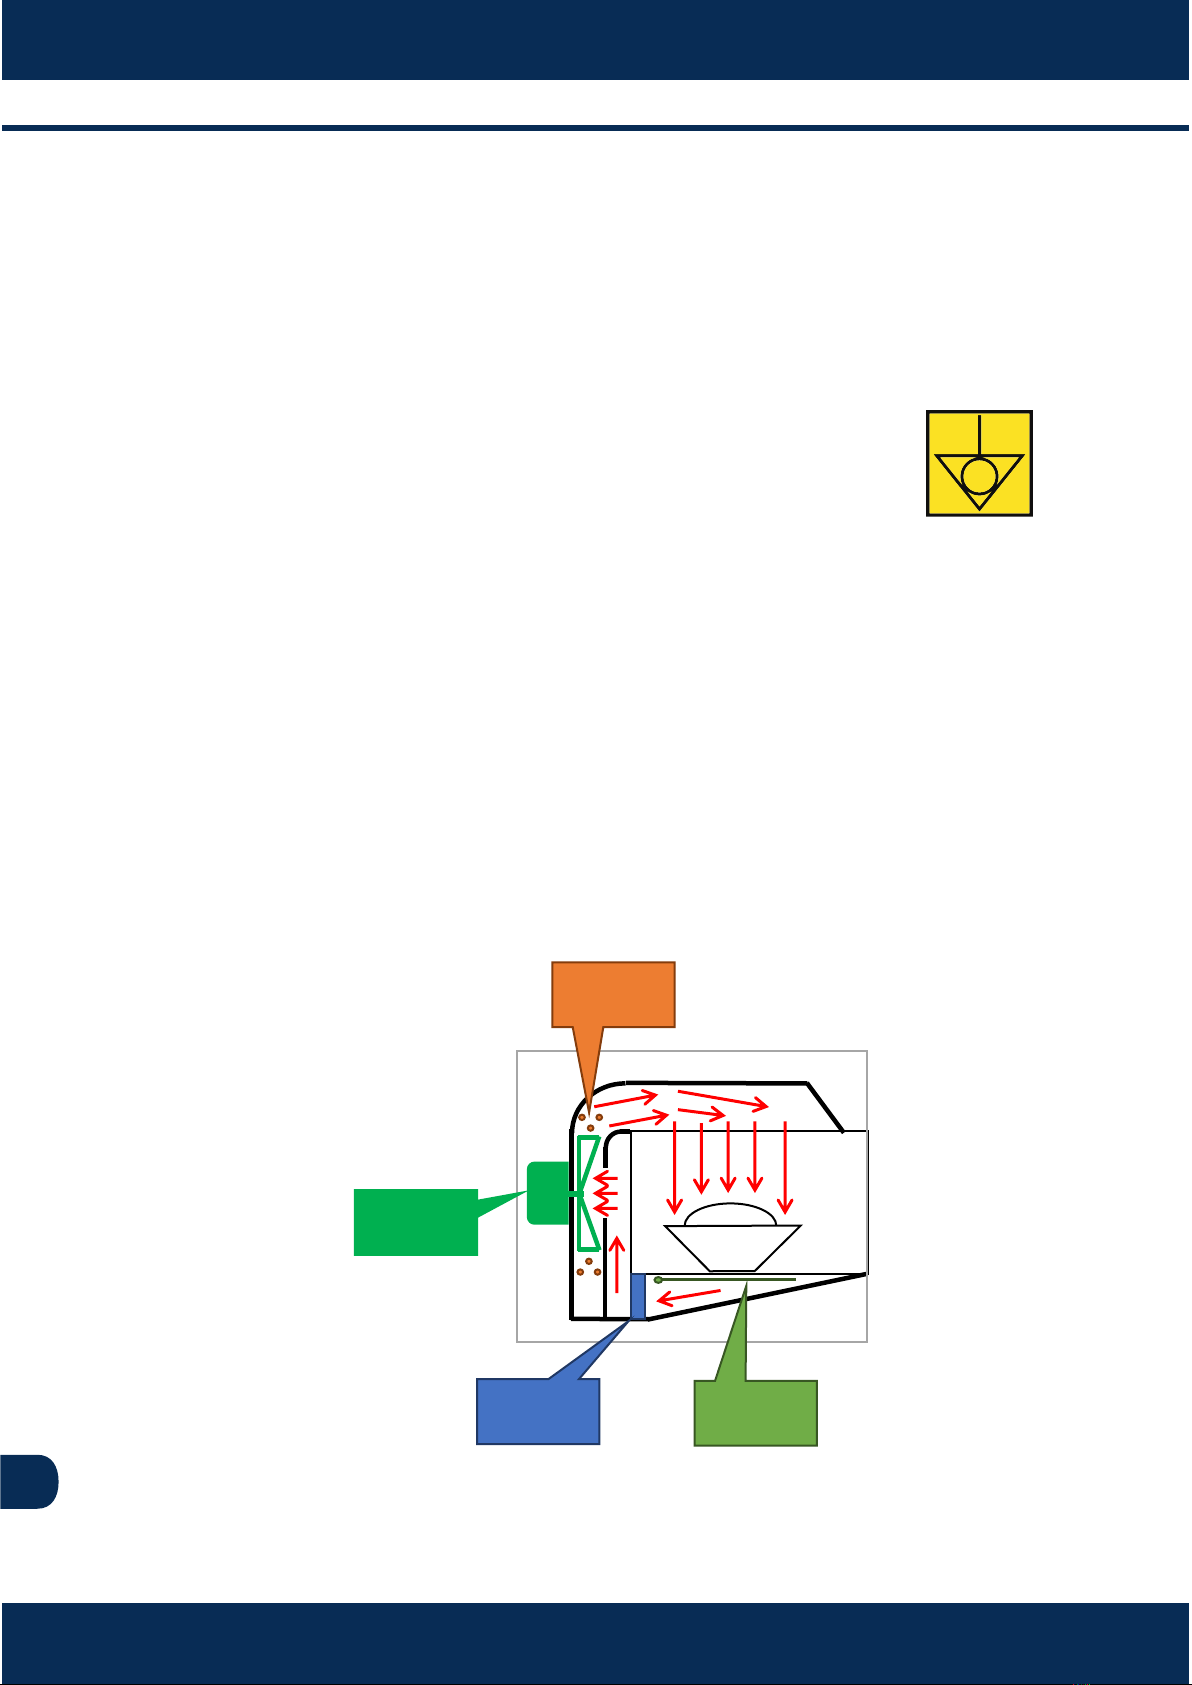
4 FORZA EXPRESS TECHNOLOGY
The Forza Express oven uses high-speed forced air convecon to heat forced
food more quickly than the convenonal methods.
The figure below illustrates the steps involving the technology:
d
b
a
c
Internal heang elements transfer thermal energy to the circulang air.
The blower motor circulates air at high speed and envelops the food.
The circulang air goes through the catalyst where the grease-laden vapors
are broken down.
The boom heater helps the heat transfer within the chamber.
a)
b)
c)
d)
·Note: The equipment has an interconnect connector for other equipment. This
connector is intended to keep several devices with the same electrical potential. Not
necessarily the grounding of a local connection. This connector on the rear of the
device is identified by the symbol on the right:
EN
11
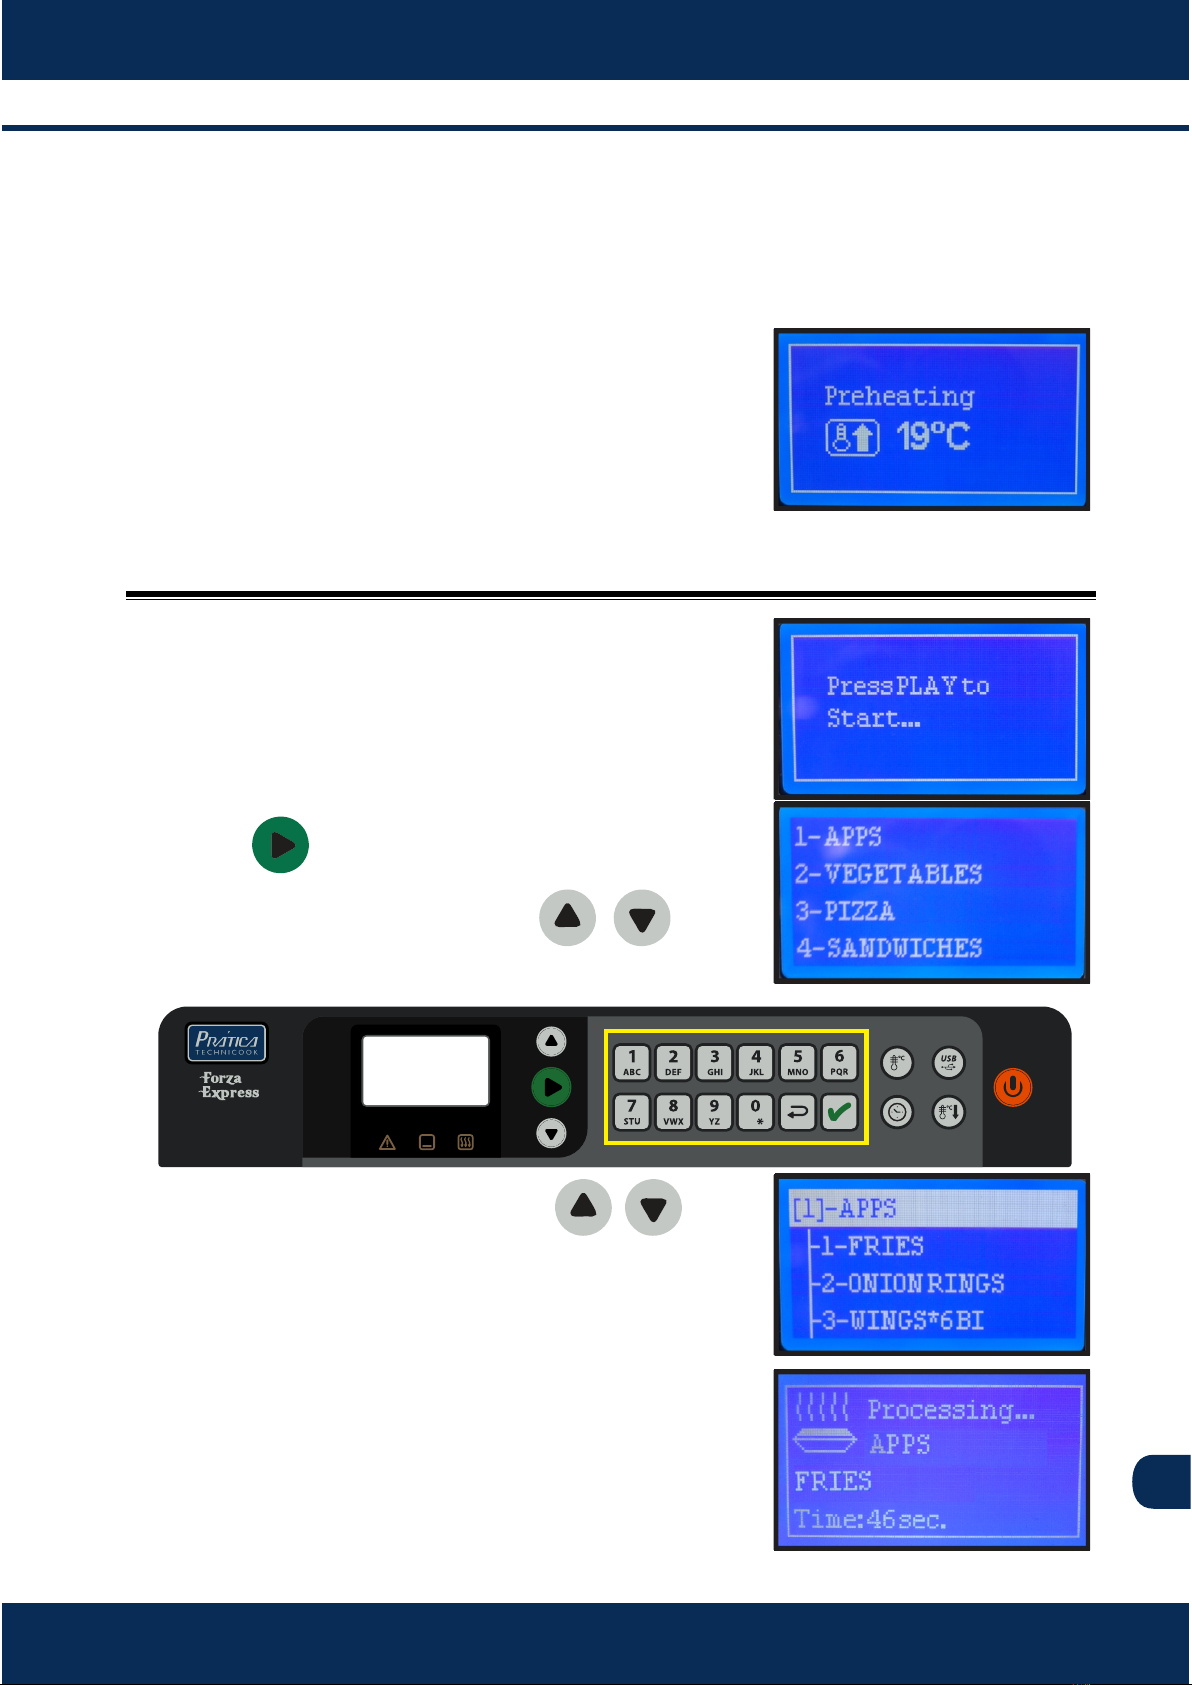
5 OPERATION
5.1- Preheang
5.2- Play recipes
When you turn the oven on - the following
message will appear:
When 608°F is reached, a message will appear
in the display showing that there will is 5 minutes
le to the end of preheang process.
Switch on the oven and wait unl the following
message appears.
Press to display the group’s screen;
To select a group, use the keys / or type
the number of the group.
To start a recipe, use the arrows / or type
the recipe’s number using the alphanumeric
keyboard.
During the process, the display will show the
cooking me, group and the recipe’s name.
At the end of the cooking, the alarm will sound
and the message «Ready» will appear.
a)
b)
a)
b)
c)
d)
e)
f)
INSTALLATION AND OPERATION MANUAL
EN

12
The «Cook More» funcon will be enable to
use aer the end of preparaon, with the
door opened.
Close the door and press:
More 10 seconds
More 20 seconds
More 30 seconds
This opon will be avaliable for 10 seconds aer
the door is closed.
While in the group’s menu, press to allow the
edion funcon, as shown:
With arrows / or alphanumeric panel,
select which group edit.
Enter the password (123 - standard) using the
alphanumeric keyboard and press to enter
the edion mode.
Press to edit group’s name or create a new
group.
to erase or backspace.
to 0(zero) or ‘_’ and ‘*’ symbols.
up to to numbers and leers .
Aer changes, press to save.
5.3- Creang and eding groups.
g)
a)
b)
c)
d)
EN
13
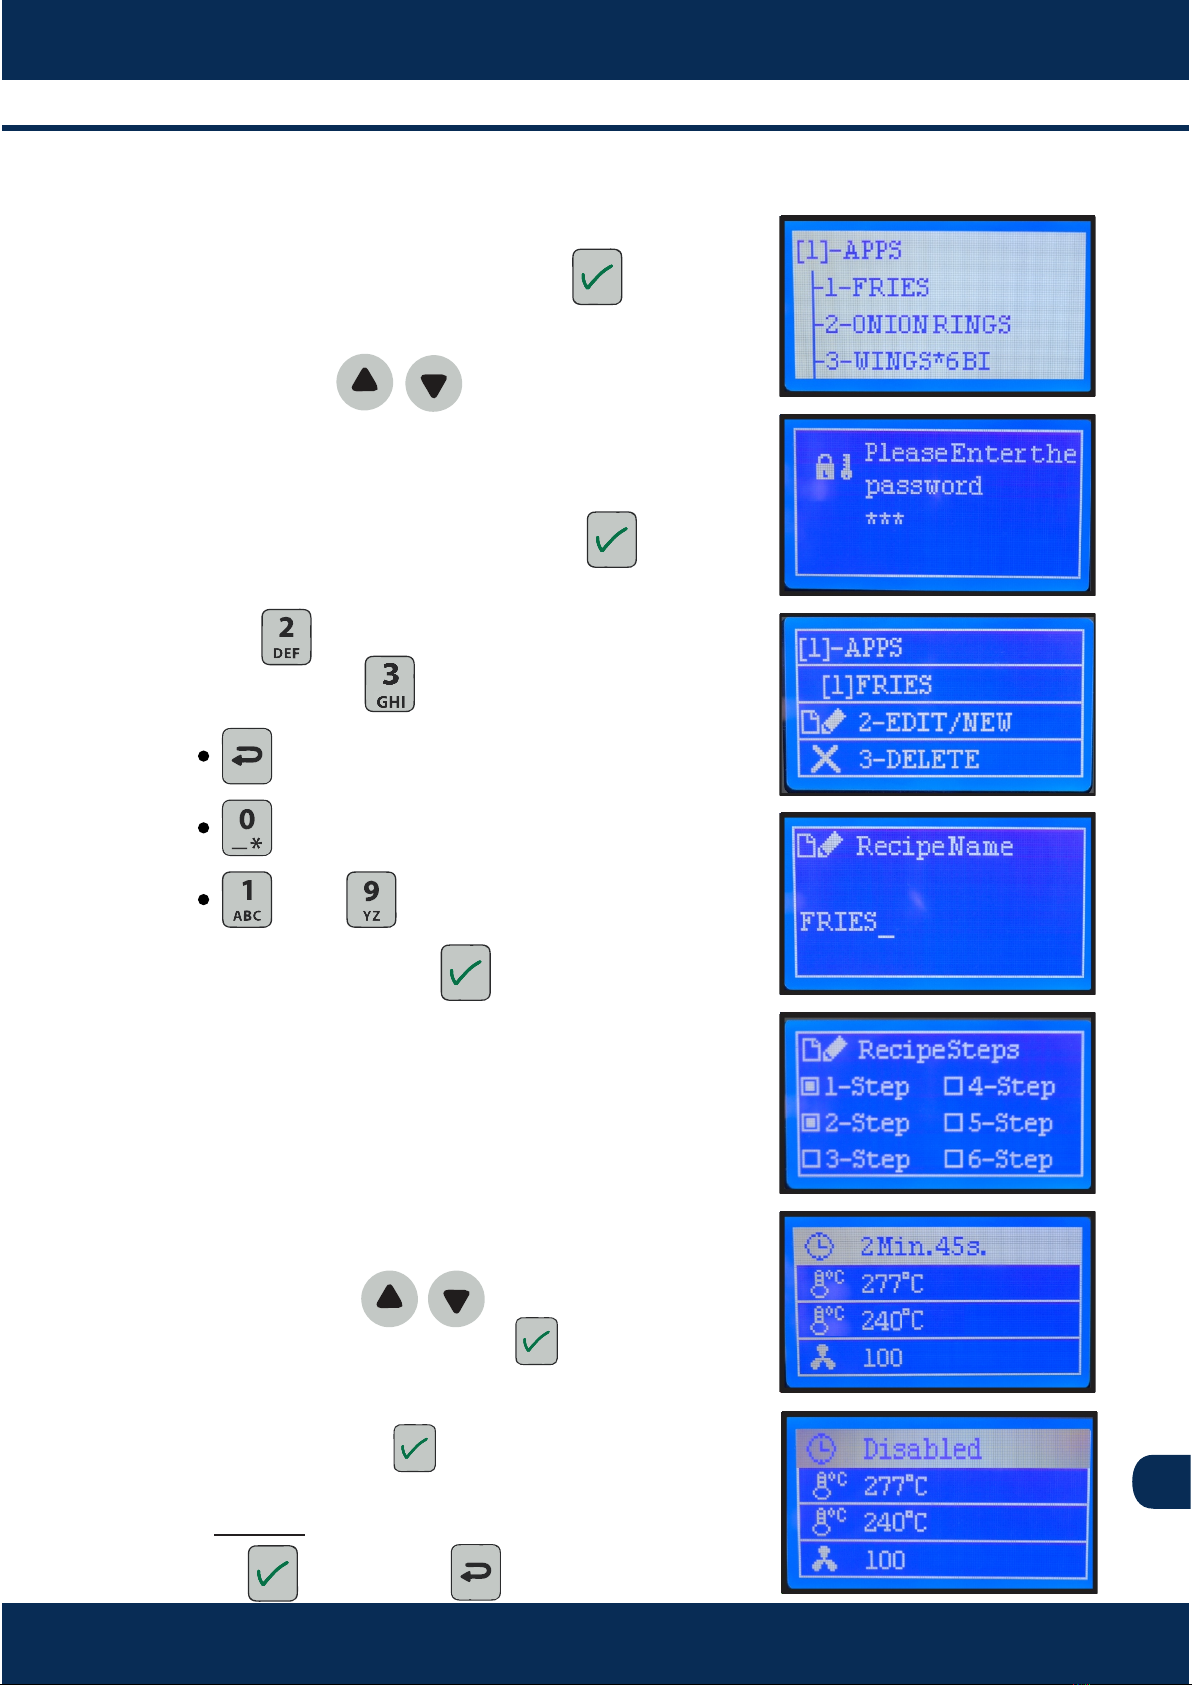
5.4- Creang, eding and deleng recipes.
While in the recipe’s menu, press to allow the
edion funcon.
With arrows / or alphanumeric panel,
select which recipe edit.
Enter the password (123 - standard) using the
alphanumeric keyboard and press to enter
the edion mode.
Press to edit recipe’s name or create a new
recipe or press to delete the recipe.
to erase or backspace.
to 0(zero) or ‘_’ and ‘*’ symbols.
up to to numbers and leers .
Aer changes, press to save and edit steps.
Each recipe supports up to 6 steps. Use the
alphanumeric keypad to select the step to be
added or edited.
The following parameter sengs will appear:
me, chamber temperature, inferior resistance
and hot air speed.
Use the arrows / to navigate through and
choose the parameter. Press to edit.
Set the parameter value with the alphanumeric
keypad and press to confirm and save.
To DELETE a step, set the me value to zero.
Press to save, and to go back.
a)
b)
c)
d)
e)
f)
g)
h)
i)
j)
INSTALLATION AND OPERATION MANUAL
EN
14
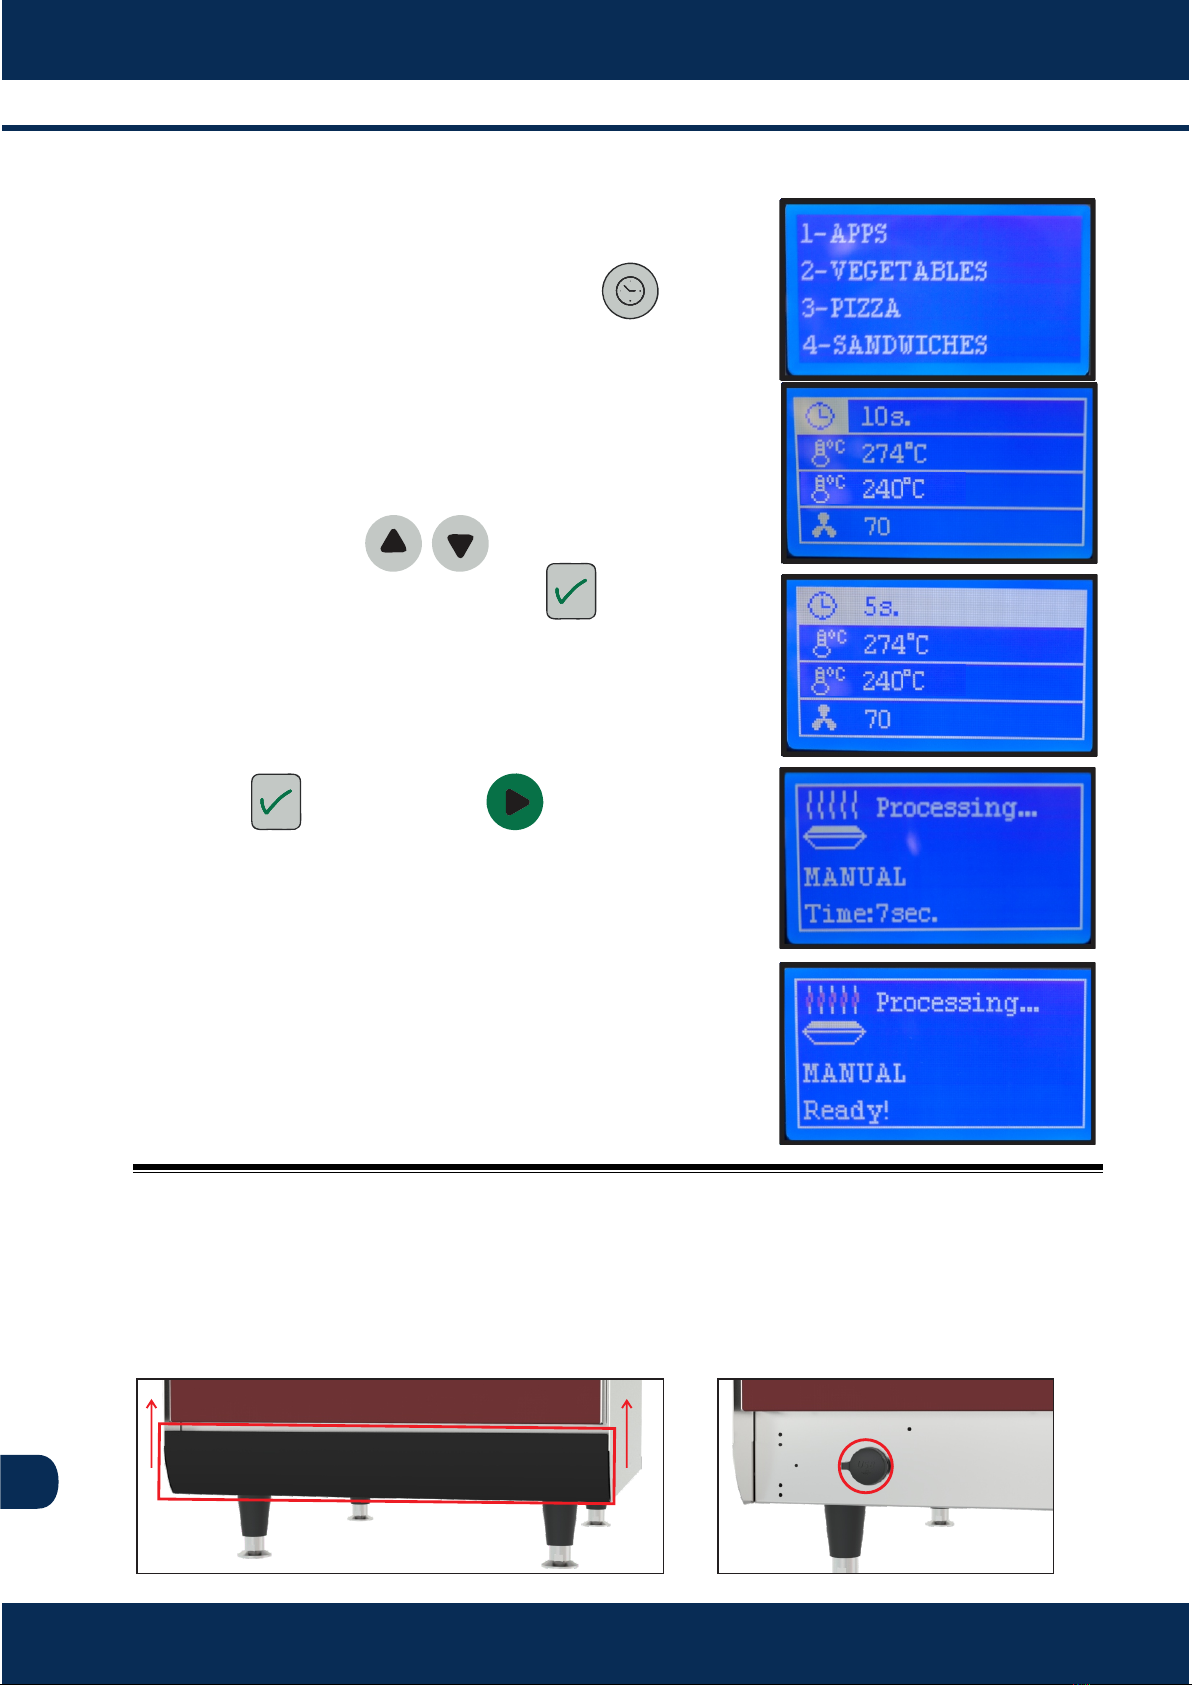
5.5- Manual mode.
5.6- Imporng and exporng funcon.
a)
b)
c)
d)
e)
f)
g)
a)
While in the recipe’s menu, press to enter
the manual mode.
The following will appear: me, chamber
temperature, inferior resistance and hot air
speed.
Use the arrows / to navigate through and
choose the parameter, press to select and
edit.
Set the parameter value with the alphanumeric
keypad.
Press to confirm and to start.
During the process, the display will show only the
cooking me.
At the end of the cooking, the alarm will sound
and the message «Ready» will appear.
To access the USB connector, li the protector and pull to remove it.
Do the opposite process to replace.
EN
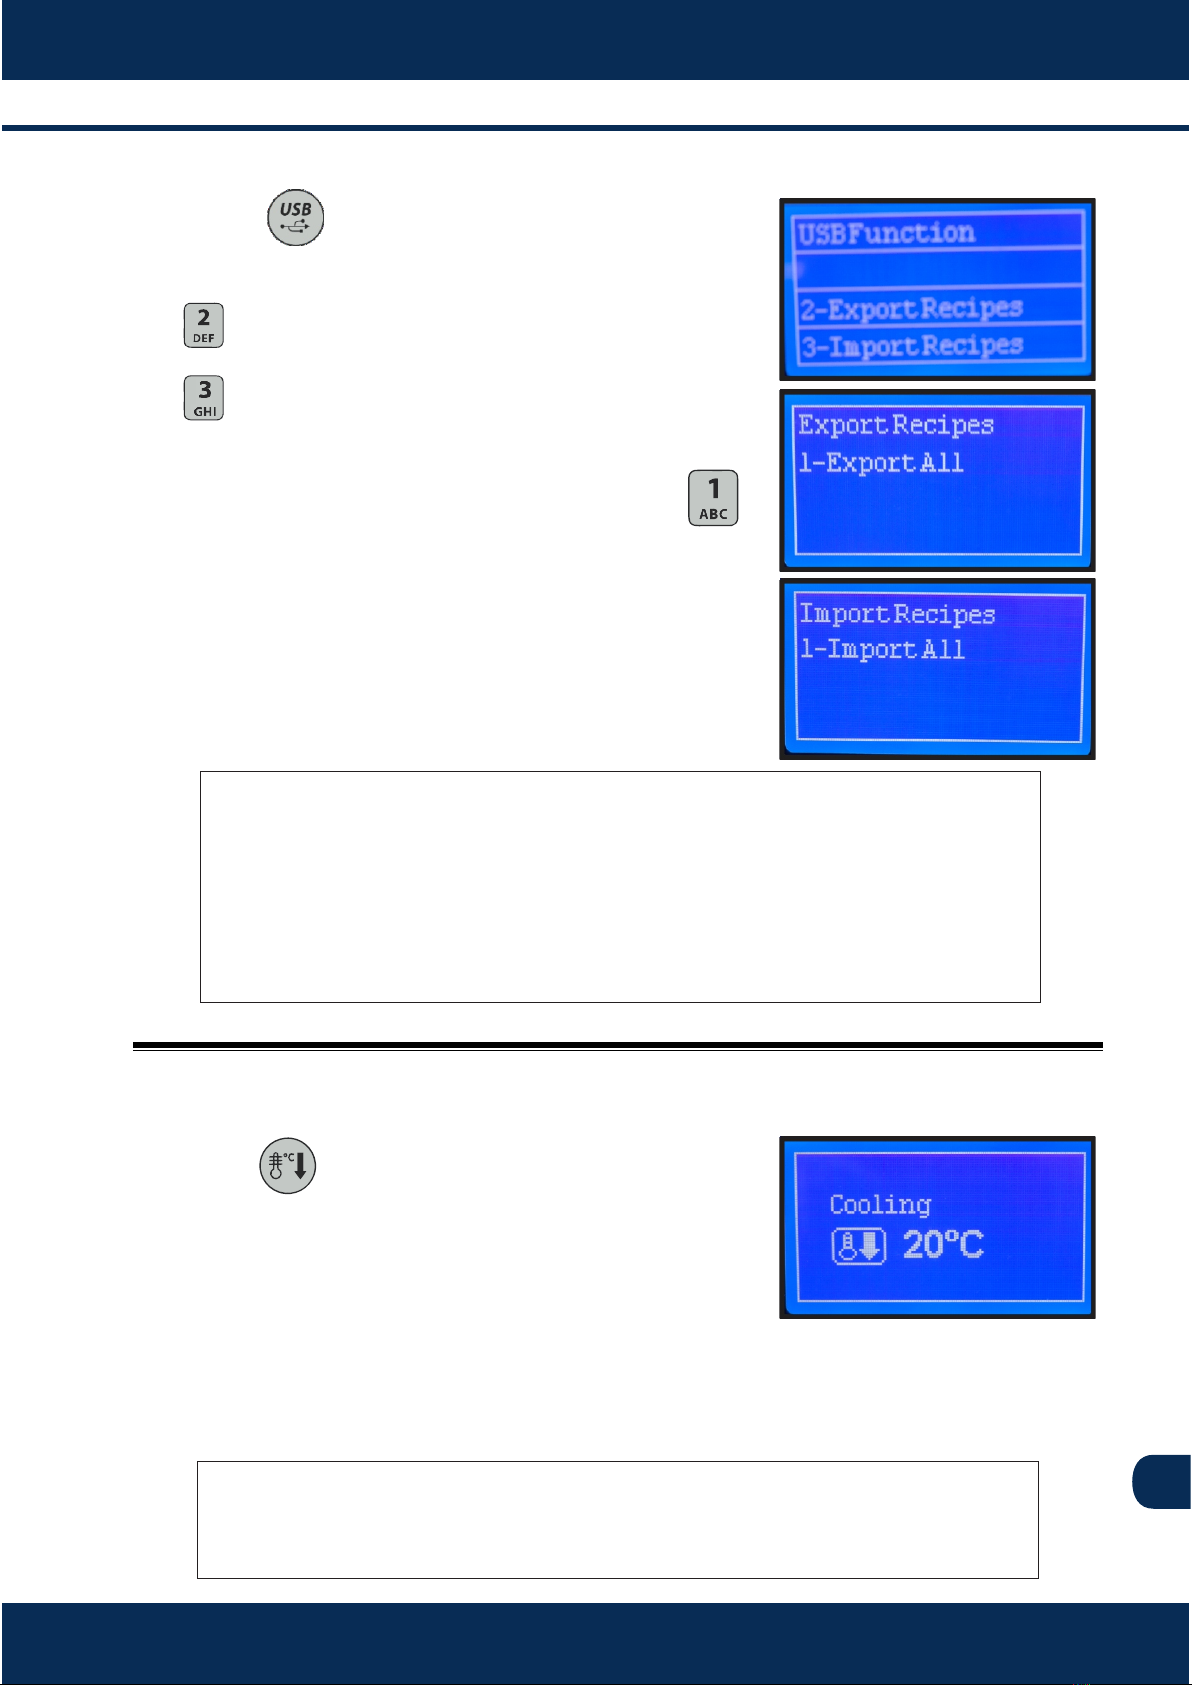
5.7 Cooling the oven.
15
Press . Using the alphanumeric keyboard,
press 2 or 3 Export or Import recipes:
2 - Export Recipes - The recipes are copied from
the oven to the Flash Drive.
3 - Import Recipes - The recipes are copied from
the Flash Drive to the oven.
Using the alphanumeric keyboard, press to
export/import all recipes from the oven to Flash
Drive.
Wait unl the message: ‘Operaon Completed’.
Press and open the equipment’s door. The
display will indicate that coooling is in progress.
Wait unl the desire temperature is reached. The
cooling funcon can be torner on at any me.
The oven automacally shuts off aer reaching
the temperature of 65°C, without the need for
operator monitoring.
a)
b)
c)
a)
b)
IMPORTANT
When the IMPORT command is executed, all the oven’s recipes
are replaced
When the EXPORT command is executed, all the Flash Drive’s
recipes are replaced.
INSTALLATION AND OPERATION MANUAL
ATTENTION
During the cooling process, tha fan remains on even with the
door open.
EN
16
a)
b)
c)
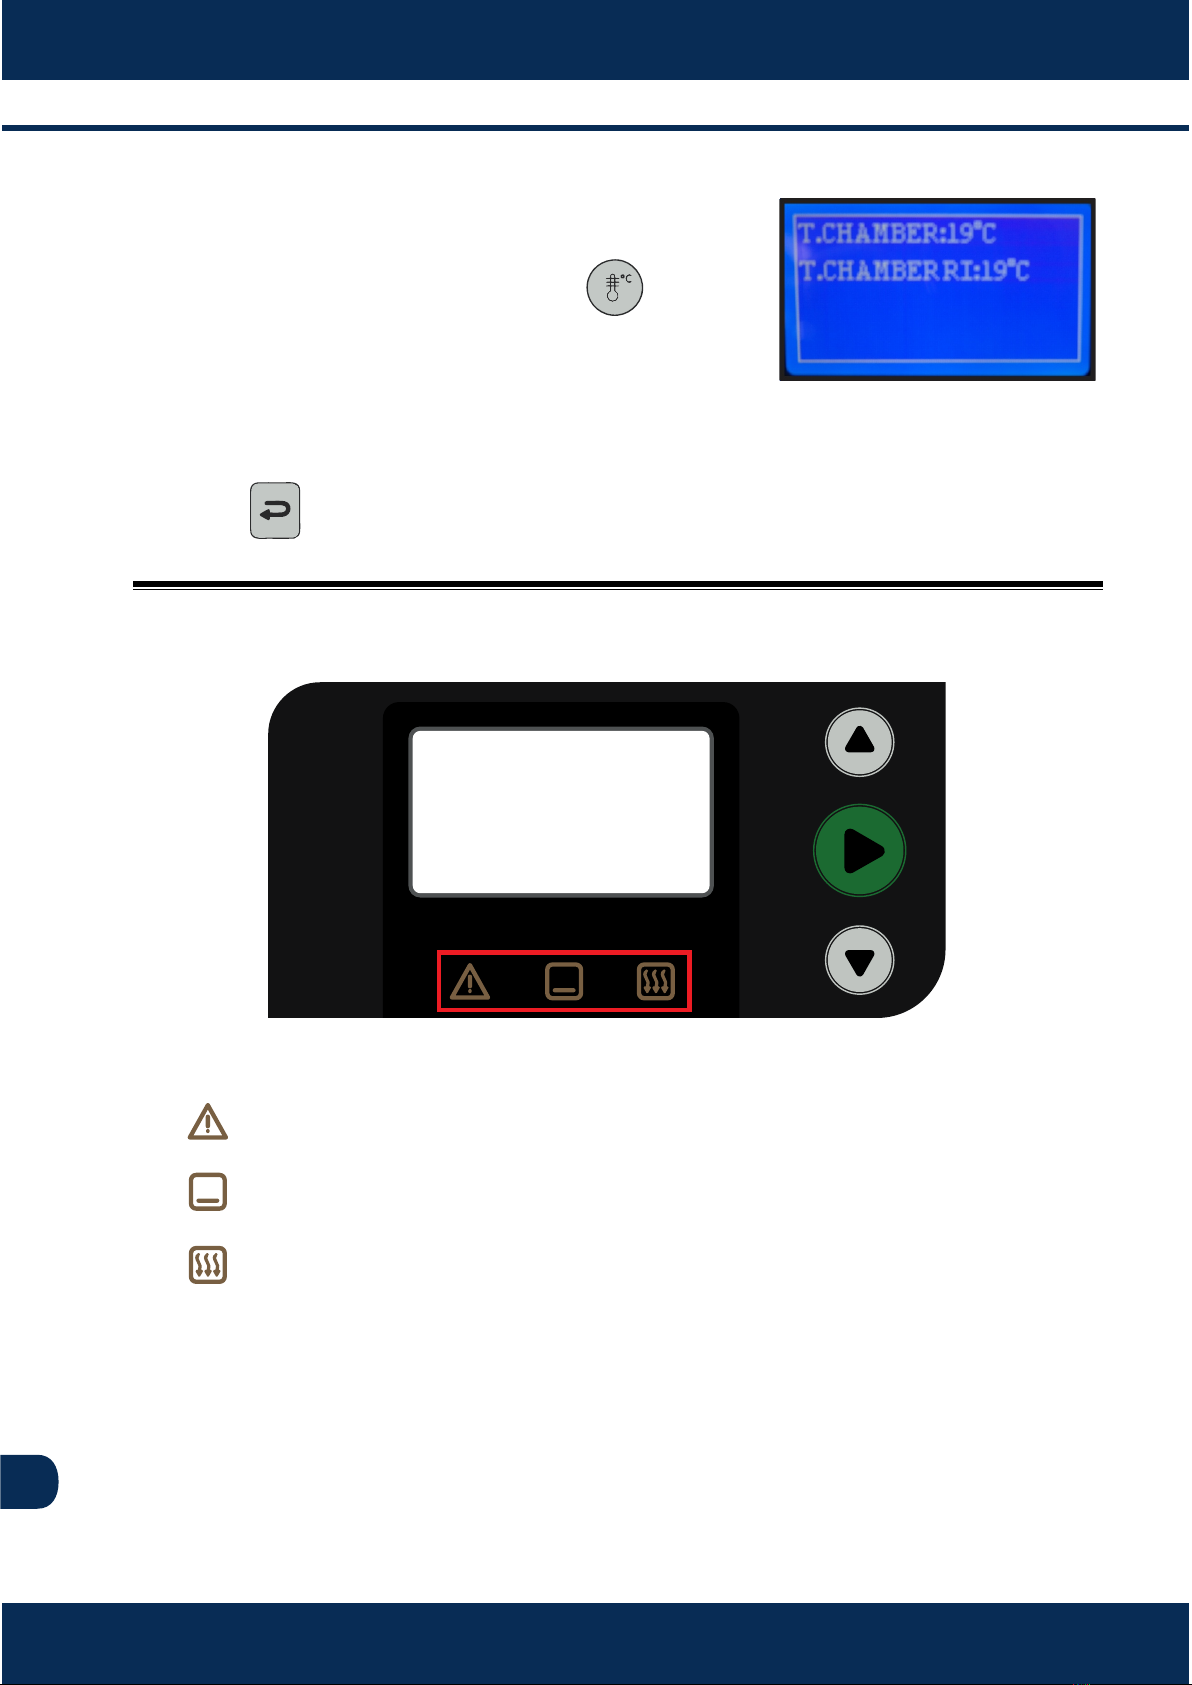
5.8- Temperature inspecon
While in the recipe’s menu, press to inspect
the temperature mode.
The following sengs will appear: Chamber
temperature and inferior resistors temperature.
Press to go back to the recipe’s screen.
5.9- LEDs Informaon.
There are three LEDs under the oven’s screen to inform the status:
: There is a system failure, please contact an authorized technician.
: Boom IR Element is on.
: Impinged Air is on.
a)
b)
c)
EN
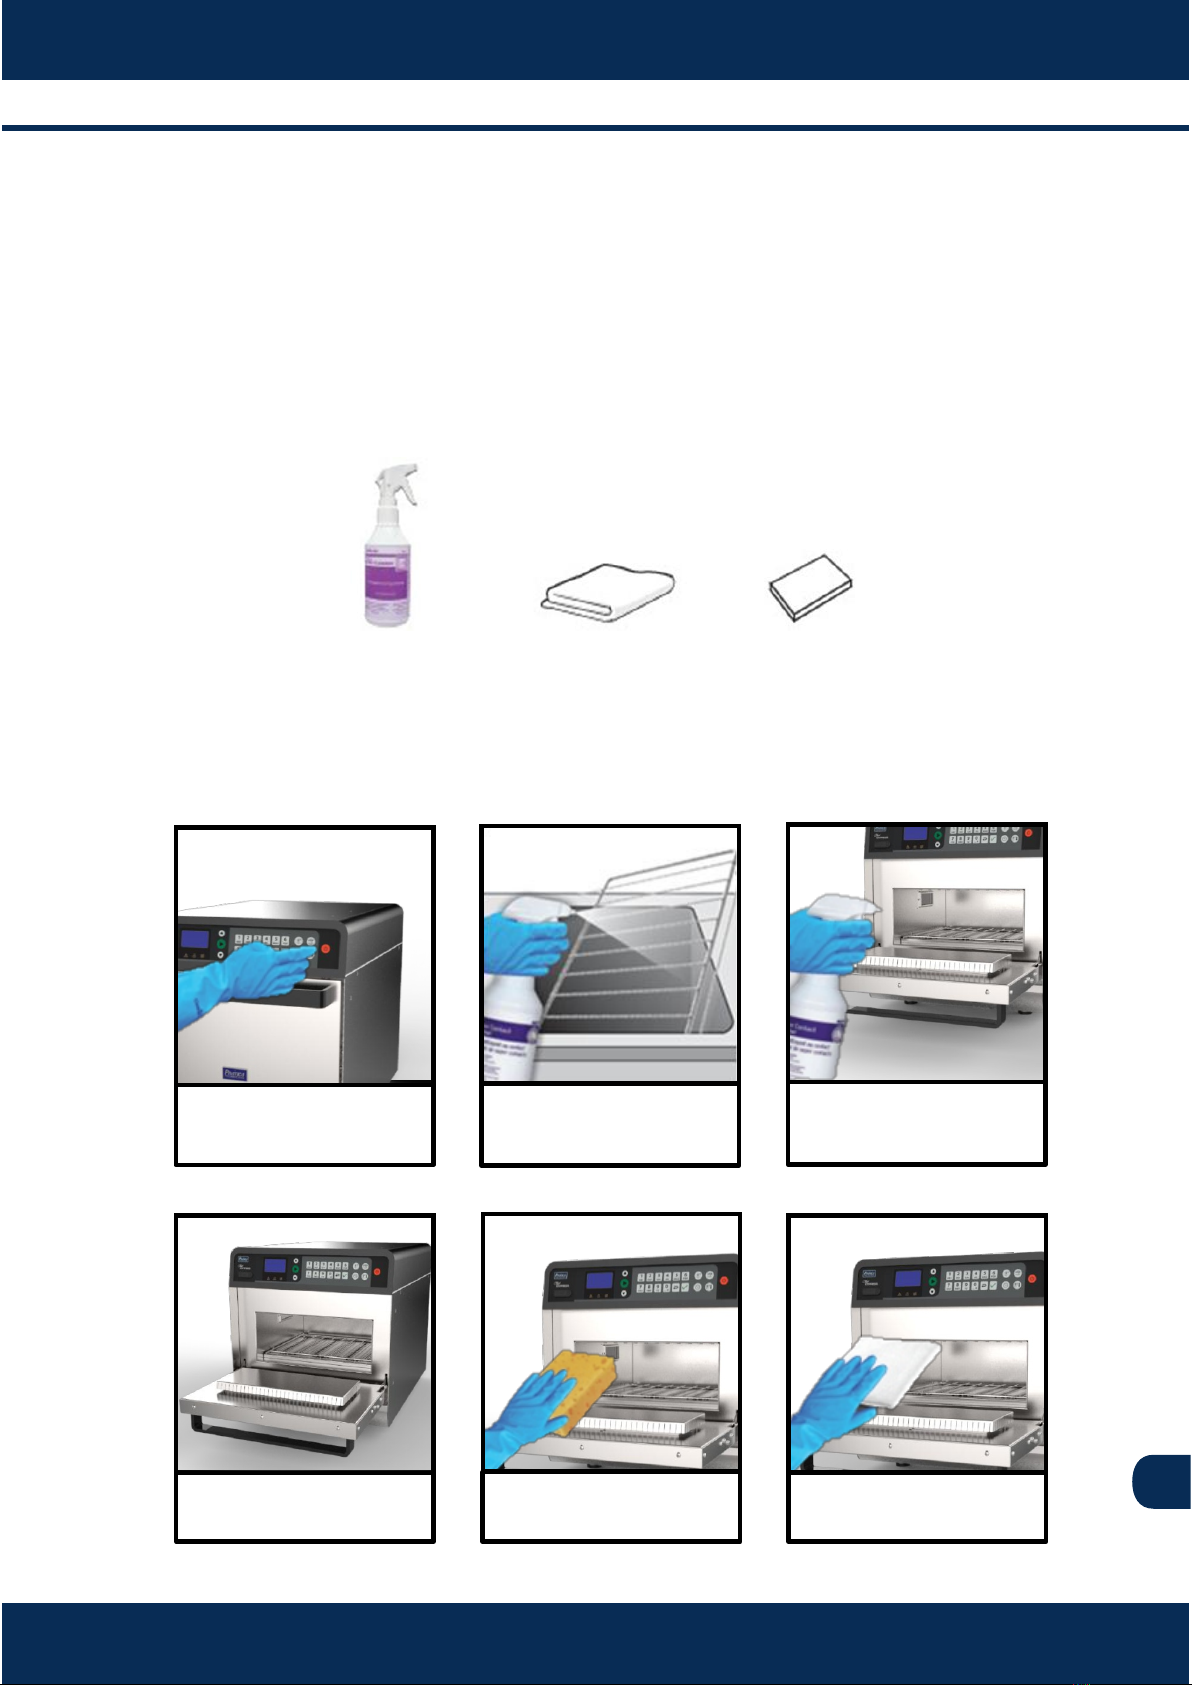
6 CLEANING INSTRUCTIONS
6.1 Daily cleaning
The Kay Oven Cleaner is ready for use and efficient for the internal and
external cleaning of the Forza Express oven.
The product is safe for handling, non-corrosive, being approved and
recommended by Práca.
Kay Oven Cleaner Cloth An-abrasive sponge
Procedure
Turn off the oven
1
Apply in the oven at
194/356 ⁰F
3
Apply the Kay Oven
Cleaner on the grids
2
4 6
5
Leave the product applied
in place for 5 to 10 minutes
Rub using the
antiabrasive sponge.
Wipe the oven with
a wet cloth.
17
EN
9
NOTE
The Kay Oven Cleaner can be purchased through Ecolab distributors.
78
Dry it with paper
towels.
Rub the grids and
holders.
Reassemble the
oven.
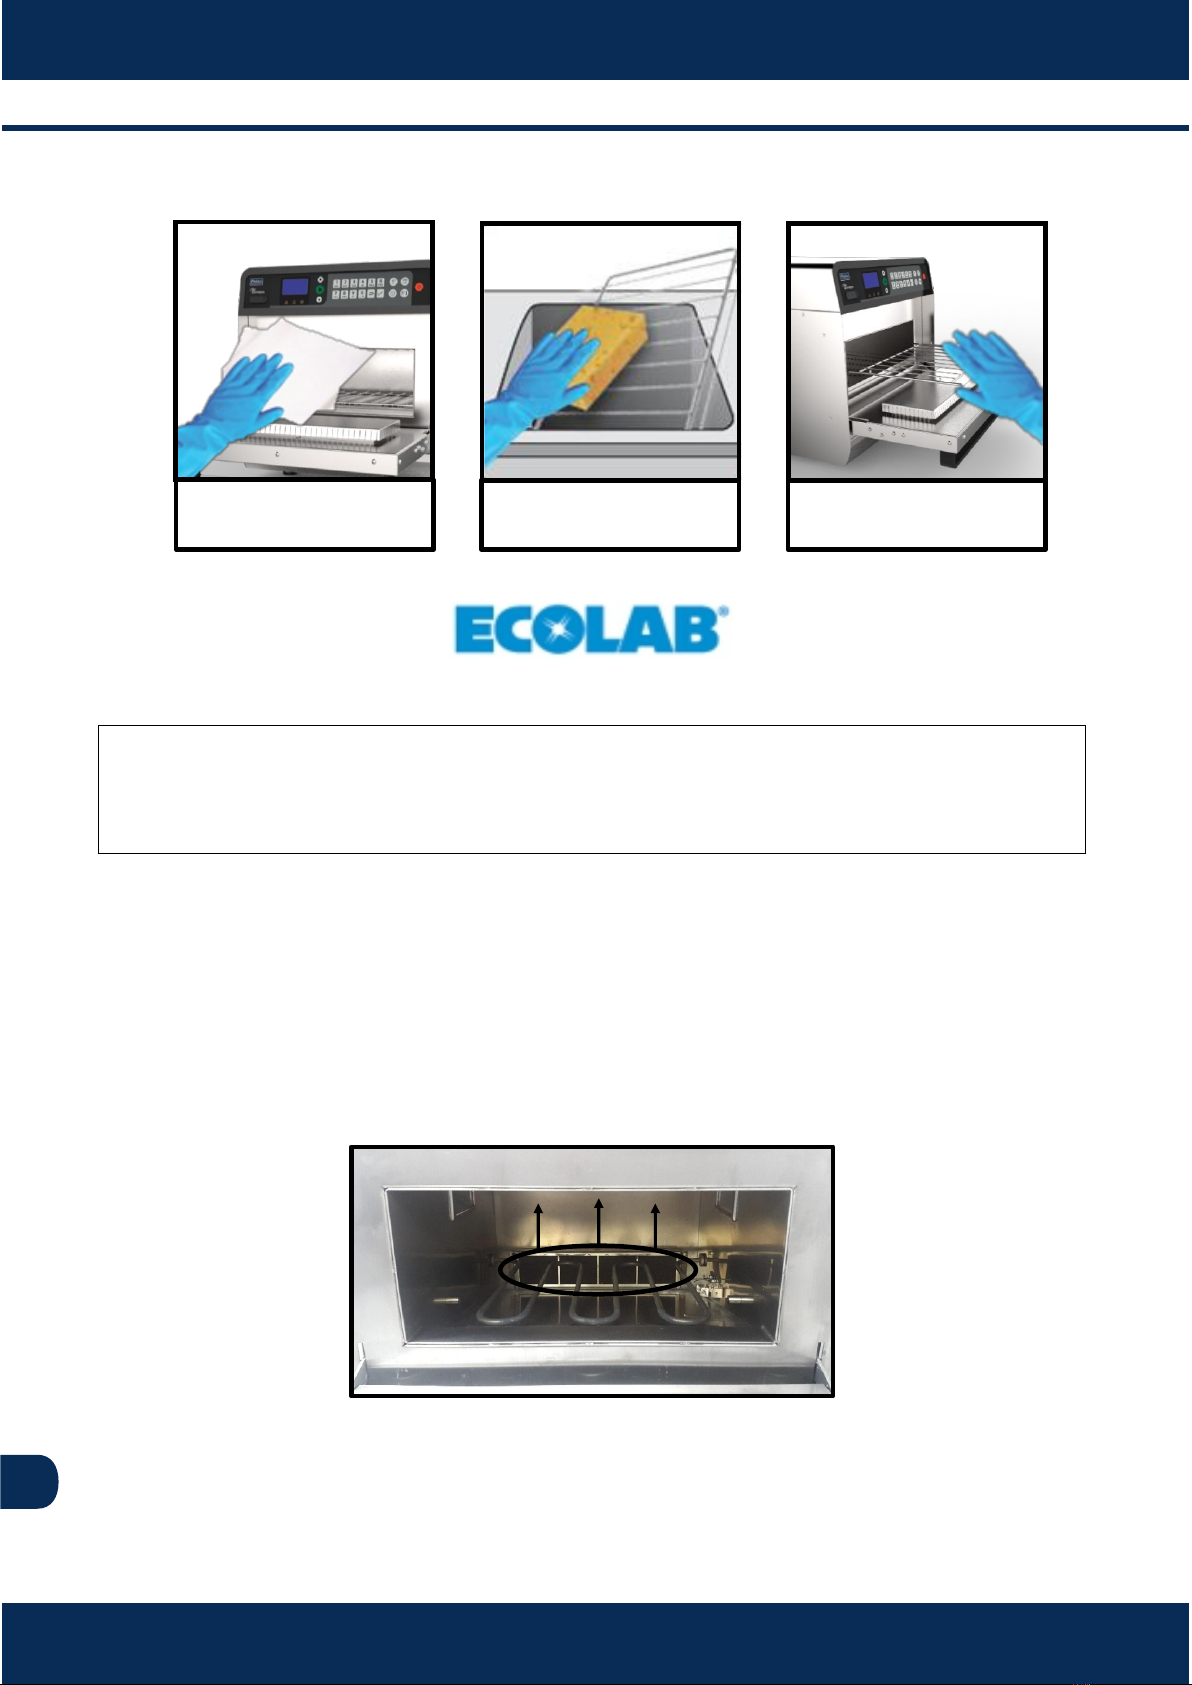
6.2 Cleaning the Catalyc Converter
To access the catalyc converter, remove the baking stone, the rack, and the
boom jet-plate from the oven. Then remove the catalytic through a vercal
movement upwards, as shown in the following image.
Soak the catalyc converter in warm water with neutral detergent. Aer 15
minutes, rinse it thoroughly and put the catalyc converter back in the oven.
INSTALLATION AND OPERATION MANUAL
18
EN
Table of contents
Languages:
Other Pratica Commercial Food Equipment manuals


Popular Commercial Food Equipment manuals by other brands


Diamond
Diamond AL1TB/H2-R2 Installation, Operating and Maintenance Instruction

Salva
Salva IVERPAN FC-18 User instructions

Allure
Allure Melanger JR6t Operator's manual

saro
saro FKT 935 operating instructions

Hussmann
Hussmann Rear Roll-in Dairy Installation & operation manual

Cornelius
Cornelius IDC PRO 255 Service manual

Moduline
Moduline HSH E Series Service manual

MINERVA OMEGA
MINERVA OMEGA DERBY 270 operating instructions

Diamond
Diamond OPTIMA 700 Installation, use and maintenance instructions

Diamond
Diamond G9/PLCA4 operating instructions

Cuppone
Cuppone BERNINI BRN 280 Installation

Arneg
Arneg Atlanta Direction for Installation and Use