praxtour PraxFit User manual

User manual
PraxFit
&
PraxSpin

With PraxFit route lms can easily be linked to new
or existing equipment, e.g. hometrainers, cardio-
or spinbikes or coaching-equipment with power
assist. All equipment provided with pedals is
suitable for PraxFit. A sensor is mounted on a pedal
and the ANT + receiver is inserted into the computer.
Operation on the screen; how simple do you want
it? Based on the pedal rotation speed the lm is set
in motion and the user is encouraged to ride in a
beautiful realistic environment that is being played.
Index
Explanation PraxFit and PraxSpin 2
Installation 3
How to use PraxFit 4
How to use PraxSpin 5
PraxFit: change PraxFit into PraxSpin 6
PraxSpin: change PraxSpin into PraxFit 7
PraxSpin: change time duration
of the route lm 8
Duplicate the route on a 2nd screen
(Multiscreen) 9
Questions and answers 10
Remote control / Internet connection 11
The scenic route lms, which are played on a large
screen, can be used interactively in group training.
This adds an extra dimension to this training and it
will be different, better, more beautiful and however!
PraxSpin plays your movie in a time pre-set by the
instructor, which allows any route to be completed
within te duration of the lesson. Distance, time,
gradients and cadence are displayed on the screen.
When the gradients increase, just shift up and
reduce the RPM.
2
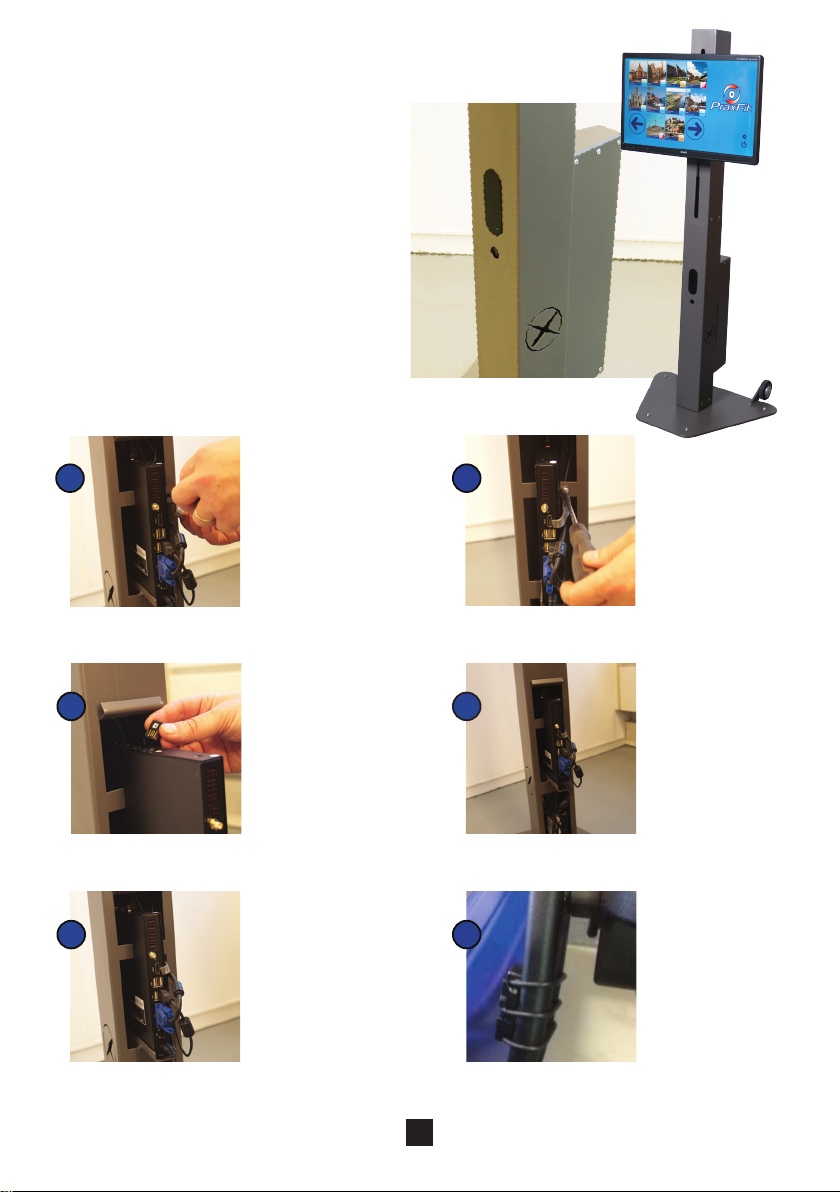
Installation
PraxFit / PraxSpin bestaat uit:
1. Console including touch monitor,
2. Compact computer
3. Cadence sensor and Ant +
USB stick,
4. Socket,
5. Manuals PraxFit / PraxSpin,
Cadence Sensor and USB Stick.
Remove the safety hood and use a screwdriver
to loosen up the sealing strip. Now carefully
move the computer out of the console.
Place sealing strip to the carriage and secure
strip with the screwdriver to prevent theft.
Computer integrated into the console.
Insert the USB Ant + stick into the USB port
of the computer.
Place the socket into the console and connect
the computer’s and touch monitor’s plug.
Insert the cables (VGA, USB and
power adapter) into the computer.
Attach the cadence sensor to the inside of
the crank. Use the matching compnonents.
3
3 6
2 5
1 4
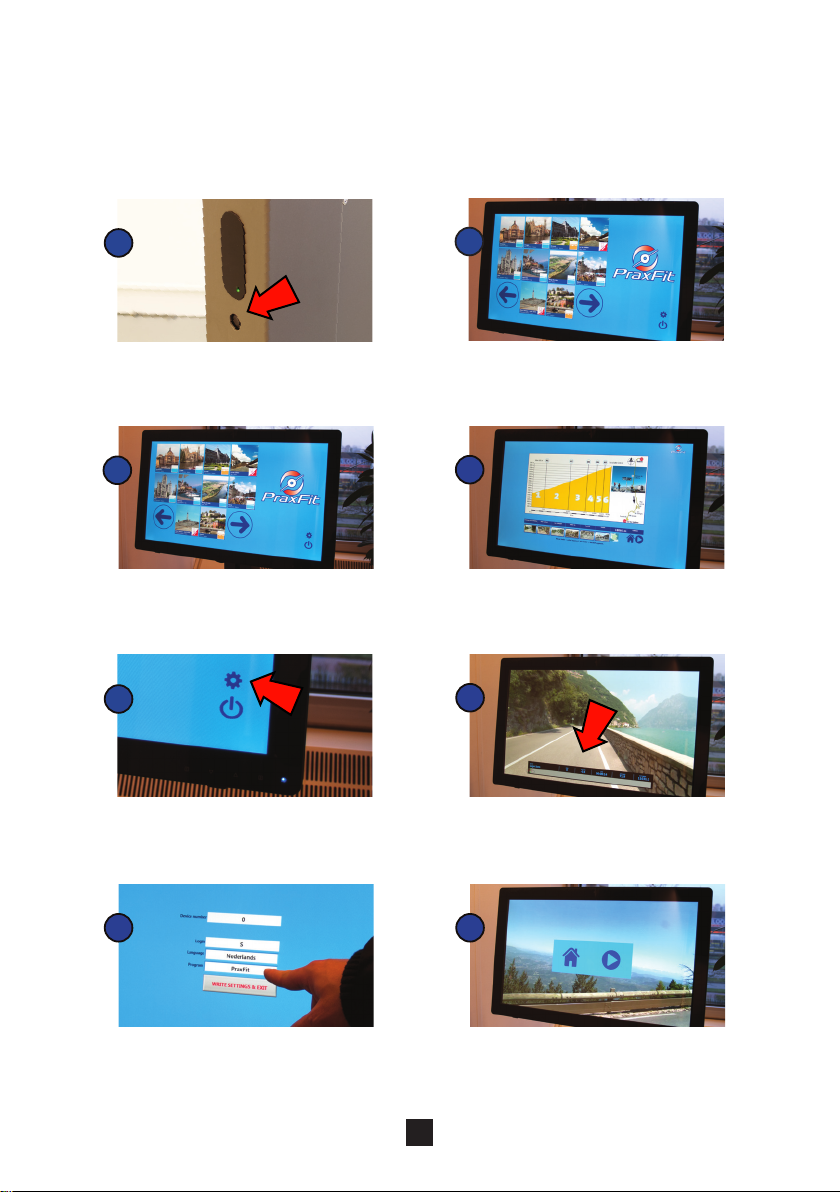
How to use PraxFit
With PraxFit route lms can easily be linked to new or existing equipment. Based on the speed of the bottom
bracket, the lm is set in motion and the user is encouraged to move in a scenic environment that is being
played.
Press the start button on the computer. Back on start screen, tap a route. The
arrows select the next page with movies, if
available.
The start screen appears.
Device number at rst start up is 0. At rst
connection must be made. Connection
occurs automatically by pedaling, within
maximum 5 minutes. The distance between
sensor and Ant + receiver is max. 3 meters.
Tapping house icon is back to the previous
screen. Tapping arrow is continuing the
route.
The route appears incl. graphics and
length. Tapping the house icon is a step
back. Tapping the arrow starts the lm.
Check the settings. Start of the route incl. parameters RPM,
Slope, Time, Distance, Distance to end. By
pedaling RPM is displayed (this may take
a few seconds). By stopping pedaling the
movie stops.
4
3
6
2
5
1
7
84
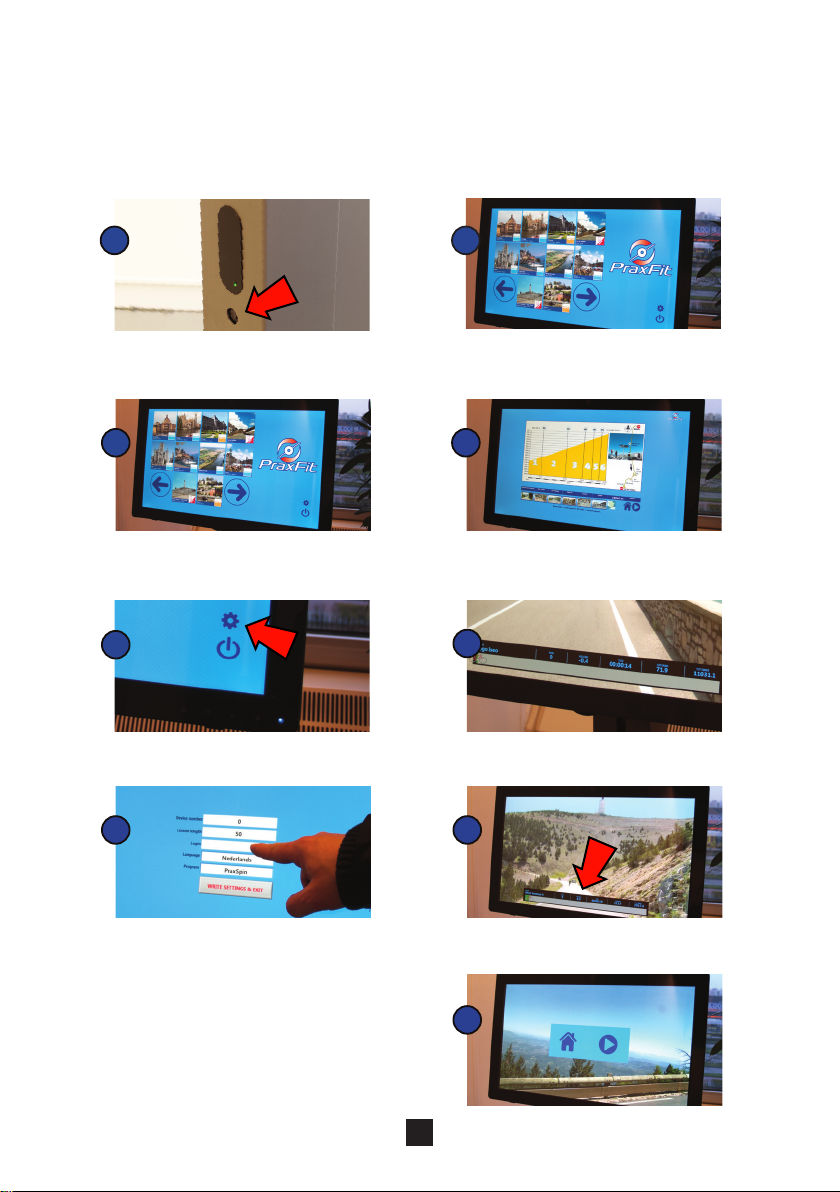
How to use PraxSpin
Use the scenic route lms interactively in e.g. group training. With PraxSpin the movie plays in a preset
time. Thus each route can be completed within a group lesson. With display of “RPM”, “Slope”, “Time”,
“Distance” and “Distance to end” the instructor can make the lesson even more realistic or the user
experience a motivating workout.
Press the start button on the computer. Back on start screen, tap a route. The arrows
select the next page with movies, if available.
The start screen appears.
Device number at rst start up is 0. At rst
connection must be made. Connection
occurs automatically by pedaling, within
maximum 5 minutes. The distance between
sensor and Garmin Ant + receiver is max.
3 meters.
Lesson Length, here set at 50 (minutes) can
be adjusted by tapping here. A keyboard will
appear and the length can be changed to
e.g. 40 or 60 minutes. Conrm by tapping
“Write settings and exit ‘
Ending the route by tapping the taskbar.
Tapping house icon is back to the previous
screen. Tapping arrow is continuing the route.
The route appears incl. graphics and length.
Tapping the house icon is a step back. Tip-
ping the arrow starts the lm.
Check the settings. Start of the route incl. parameters RPM,
Slope, Time, Distance, Distance to end.
5
3
62
5
1
7
8
9
4

PraxFit: change PraxFit into PraxSpin
When changing the setting from PraxFit to PraxSpin, the lm is played based on (congurable) time dura-
tion, instead of rotation of the pedals (pedaling). The logo installation is maintained.
Touching gear.
Tap PraxFit and switch with the [S] or [C]
to change to the program of choice.
Conrm the program by pressing the button
[WRITE SETTINGS & EXIT].
Touching Login.
By purchasing a 2-in-1 software package: rst you press
[SHIFT] and then press [S] to switch between PraxFit
en PraxSpin. Then Accept.
Or with a 3-in-1 software package use the [SHIFT]
and [C] button to switch between Cruise, PraxFit en
PraxSpin. Then Accept.
6
3
4
2
5
1

Touching gear.
Tap PraxSpin and switch with the [S] or [C]
to change to the program of choice.
Conrm the program by pressing the button
[WRITE SETTINGS & EXIT].
Touching Login.
By purchasing a 2-in-1 software package: rst you press
[SHIFT] and then press [S] to switch between PraxSpin en
PraxFit. Then Accept.
Or with a 3-in-1 software package use the [SHIFT] and [C]
button to switch between Cruise, PraxFit en PraxSpin. Then
Accept.
PraxSpin: change PraxSpin into PraxFit
When changing the setting PraxSpin into PraxFit the lm is played based on velocity of the crank rotation
(pedaling) instead of time duration. The installed logo is maintained.
7
3
4
2
5
1

PraxSpin: change time duration of route lm
In the specied time duration, the selected route lm plays completely. This can be linked to the time duration
of group lesson. The duration can be adjusted as desired:
Duration in minutes and indicate ‘Accept’ by
tapping. In this variant, the length of 50 is
changed into a 60 minutes lesson.
Touching “Write Settings & Exit’’.
Touching Lesson length.
Touching gear.
8
3
2
1

Duplicate the route on a 2nd screen (Multiscreen)
Tap on Duplicate.
To be used in e.g. a group lesson.
Connect a USB keyboard to the USB port at
the side of the computer.
Enter simultaneously Windows ag and
character P.
3
2
1
9

Questions and answers
RPM does not show?
1. Installation may take some time, max. 5 minutes pedaling before the RPM comes in. At daily
start-up of the computer it may always take some time before the sensor is found. Give it time.
2. If, after ve minutes, the RPM still does not show, then check that the sensor is attached to the
crank.
3. If this is the case, then shut down your computer and remove the Ant+ sensor from the
computer and then stick it back into the computer. Reboot and perform point 1.
4. If no improvement, reset the cadence sensor: remove its battery and install it back again after
10 seconds.
5. If point 2 offers no solution, perhaps the battery of the cadence sensor must be replaced. The
LED ashes red after two revolutions when the battery is almost empty. An explanation how to
replace the battery, see the Garmin manual.
Software malfunction or update
1. Restart the system;
2. The system provides remote control. This means that after connecting the PraxFit / PraxSpin
to the Internet, Praxtour can take over the computer. Please contact us prior to. See next for
explanation.
10

Remote control / Connect to the internet
Wired connection
1. Connect a networkcable to the computer and the router which holds the internet connection.
2. Reboot the computer.
3. The Remote Control functionality is now active.
4. Contact Praxtour for maintenance.
Wireless connection
Words between brackets {} are the keywords which are to be switched to the values according to your
wireless network.
1. Connect a keyboard to the computer.
2. Press the keys Ctrl + Alt + Del
3. Click on the Start Task Manager option
4. Click in the Task Manager on the File option
5. Click on the New task option
6. Type in cmd
7. Press Enter
8. Then type in:
netsh wlan set hostednetwork mode=allow ssid=”{networkname}”
key=”{passphrase}”
9. Press Enter
10. A connection is made.
11. Reboot the computer.
12. The Remote Control functionality is now active.
13. Contact Praxtour for maintenance.
11

PraxFit & PraxSpin are a product of:
Praxtour B.V.
T. +31 (0) 6 223 95 162
www.praxtour.com
info@praxtour.com
This manual suits for next models
1
Table of contents
Other praxtour Fitness Equipment manuals


