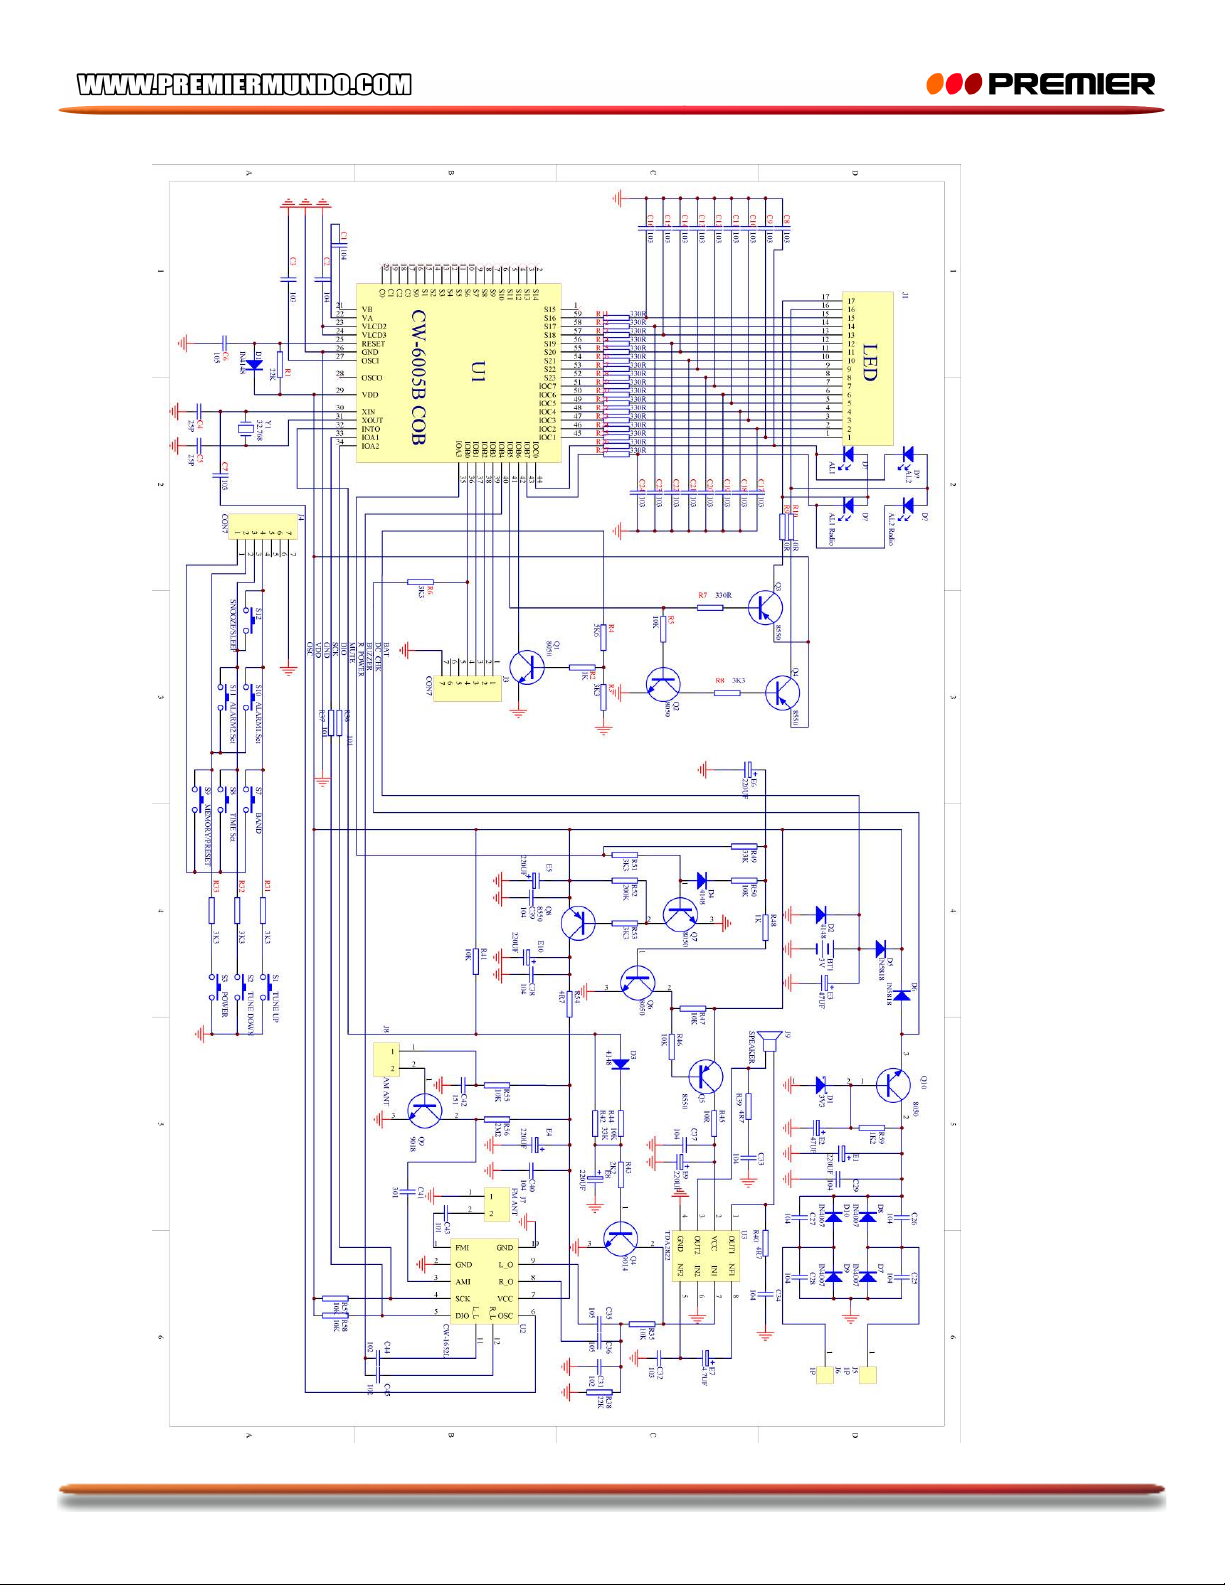
Premier RR-4708 User manual

MANUAL DE INSTRUCCIONES
RADIO C/ALARMA
RR-4708
ESTIMADO CLIENTE
Con el fin de que obtenga el mayor desempeño de su producto, por favor lea este manual de
instrucciones cuidadosamente antes de comenzar a utilizarlo, y guárdelo para su futura referencia.

P-1
PRECAUCIÓN
RIESGO DE CHOQUE
ELÉCTRICO , NO ABRA
Precaución: Para reducir el riesgo de choque eléctrico, no
retire la cubierta, no hay partes manipulables por el usuario al
interior de la unidad. Refiera todo mantenimiento o
intervención técnica a personal técnico calificado.
Este símbolo indica la existencia de voltaje peligroso al
interior de esta unidad, que constituye un riesgo de choque
eléctrico.
Este símbolo indica que hay importantes instrucciones de
operación y mantenimiento en la literatura que acompaña a
esta unidad.
LÍNEAS DE SERVICIO AL CLIENTE PREMIER
Venezuela:
0800 – ELECTRIC (353-2874)
Panamá:
300-5185
Sitio Web:
www.premiermundo.com
E-mail:
NOTA
Nos reservamos el derecho de modificar las especificaciones, características y/u operación de esta
unidad sin previo aviso, con el fin de continuar las mejoras y desarrollo del mismo.

P-2
DESCRIPCIÓN DE LA UNIDAD
CONECTAR LA UNIDAD A LA FUENTE DE POTENCIA
Cambie el selector de voltaje en el adaptador AC/DC al voltaje disponible en el área donde será usada
la unidad. Luego conecte la unidad a un tomacorriente.
Antes de encender la unidad, asegúrese que el voltaje del área corresponde con el voltaje que aparece
en la placa de la unidad.
BATERÍA DE RESPALDO
Inserte 2 baterías AA “UM-3” en el compartimiento de la batería de respaldo de la unidad. Asegúrese
que la polaridad de las baterías es la correcta (+ y -)
En caso de fallas en la energía o de interrumpirse el funcionamiento de la potencia AC, el tiempo actual,
los ajustes de la alarma y las estaciones radiales almacenadas son conservadas en la memoria de la
unidad gracias a la función de batería de respaldo.
1. Fuente
2. Reloj / Memoria
3. AL2 / VOL-
4. AL1 / VOL+
5. Minutos / Sintonización <
6. Hora /Sintonización >
7. Repetir / Apagar alarma
8. Indicador PM
9. Indicador de timbre Alarma 1
10.Indicador de Radio Alarma 1
11. Indicador de timbre Alarma 2
12. Indicador de Radio Alarma 2
13. Pantalla LED
14. Parlante
15. Antena FM
16. Conector DC
17. Compartimiento de batería de
respaldo

P-3
AJUSTE DEL RELOJ
1. Con la unidad en modo de Reloj, presione y sostenga el botón Reloj / Memoria, el reloj empezara a
parpadear en la pantalla LED.
2. Presione el botón Hora para ajustar la hora.
3. Presione el botón Minutos para ajustar los minutos
4. Cuando el tiempo actual ha sido seleccionado, presione el botón Reloj / Memoria de nuevo para
confirmar.
AJUSTAR LA ALARMA
1. Con la unidad en modo de Reloj, presione los botones AL1 ó AL2. El tiempo de alarma empezara a
parpadear en la pantalla de la unidad.
2. Presione el botón Hora para ajustar la hora.
3. Presione el botón Minutos para ajustar los minutos
4. Cuando la hora correcta ha sido seleccionada, presione los botones AL1 ó AL2 para confirmar
5. Presione los botones AL1 ó AL2 para seleccionar el modo de sonido de la alarma, Timbre o Estación
radial actual. Cuando elija el modo de sonido deseado deje de presionar los botones. Después de 5
segundos el modo de sonido de la alarma será guardado en la memoria
FUNCIÓN REPETIR ALARMA
1. Cuando la alarma se active, esta puede ser suspendida por un periodo de 9 minutos si presiona este
boton, luego sonara de nuevamente.
2. Este procedimiento puede repetirse por 1 hora.
APAGAR LA ALARMA
Cuando la alarma se active, presione el botón Fuente para apagarla
ESCUCHAR RADIO AM/FM
1. Presione el botón Fuente para seleccionar las bandas AM ó FM
2. Presione los botones Sintonizar < ó Sintonizar > para sintonizar las estaciones radiales
3. Presione y sostenga los botones Sintonizar < ó Sintonizar > para sintonizar las estaciones radiales
de manera automática.
4. Para apagar la radio, presione y sostenga el botón Fuente.
ANTENA
FM: Para una mejor recepción en FM, extienda completamente la antena de la unidad.
AM: Para una mejor recepción en AM, gire la unidad, ya que esta tiene una antena incorporada.
GUARDAR UNA ESTACIÓN RADIAL EN LA MEMORIA
1. Sintonice la radio en la estación deseada
2. Presione y sostenga el botón Reloj / Memoria. La pantalla LED de la unidad mostrara “PXX”
indicando que la estación radial fue guardada en la memoria de la unidad.
3. Pueden ser guardadas hasta 10 estaciones en AM y en FM.

P-4
ESCUCHAR UNA ESTACIÓN RADIAL GUARDADA
1. Presione el botón Fuente para seleccionar la banda AM ó FM
2. Presione el botón Reloj / Memoria para seleccionar la estación radial guardada.
DORMIR CON MUSICA
Esta función le permite escuchar música mientras se esta quedando dormido.
1. Presione el botón Repetir / Apagar alarma. La pantalla de la unidad mostrara el tiempo
preestablecido de 90 minutos.
2. Presione el botón Repetir / Apagar alarma de nuevo para ajustar el tiempo del temporizador de
apagado deseado.
3. Después que el tiempo preestablecido se ha cumplido, la unidad se apagara automáticamente.
ESPECIFICACIONES
Rango de frecuencia: AM 540 - 1600 KHz
AM 540 - 1600 KHz
Fuente de potencia: AC 110 ~ 60Hz / 220V ~ 50 Hz
Adaptador: DC 6V ~ 200mA
Potencia de salida: 0.3 V
Batería de respaldo: Baterias DC3V (2 x um3) (No Incluidas)

P-5
DIAGRAMA DE CIRCUITOS

INSTRUCTION MANUAL
RADIO W/ALARM CLOCK
RR-4708
DEAR CUSTOMER
In order to achieve the best performance of your product, please read this instruction manual carefully
before using, and keep it for future reference.

P-1
CAUTION
RISK OF ELECTRIC
SHOCK, DO NOT
OPEN
Caution: To reduce the risk of electric shock do not open
this device, there are not serviceable parts for customers.
Please refer any maintenance or repair to qualified
personnel.
This sign means the existence of dangerous voltage at
the inside of the unit, which states a risk of electric shock.
This sign means that there are important instructions of
operation and handling in the manual that comes with this
device.
PREMIER CUSTOMER SERVICE
Venezuela:
0800 – ELECTRIC (353-2874)
Panama:
300-5185
Website
www.premiermundo.com
E-mail:
NOTE
This unit may be submitted to changes in specifications, characteristics and/or operation without prior
notice to the user, in order to continue improving and developing its technology.

P-2
1
SOURCE Button
11
ALARM 2 Buzzer Indicator
2
CLK/MEM Button
12
ALARM 2 Radio Indicator
3
AL2 / VOL- Button
13
LED Display
4
AL1 / VOL+ Button
14
Speaker
5
MIN / TUNING < Button
15
FM Wire Antenna
6
HOUR / TUNING > Button
16
DC Jack
7
SNOOZE / SLEEP Button
17
Back-Up Battery Compartment
8
PM Indicator
9
ALARM 1 Buzzer Indicator
10
ALARM 1 Radio Indicator

P-3
CONNECTING THE UNIT TO POWER
Switch the voltage selector on the AC/DC adaptor to the voltage of the electricity supply in your area.
Plug one end of the AC adaptor into the DC power Input, and then plug the other end into AC wall outlet.
Before switching on the unit, make sure that the voltage of your electricity supply is the same as that
indicated on the rating plate.
BATTERY BACKUP
Insert 2 pieces UM-3 ‘AA’ size battery into the back-up battery compartment. Be sure to observe the
proper polarity (the "+" and "-" signs) as indicated inside the battery compartment.
In case of power failure or interrupted AC power, the current time and alarm time settings, the stored
radio stations are preserved in the memory of the unit by means of battery back-up function.
SETTING THE CLOCK
1. With the unit in CLOCK mode, press and hold the CLK/MEM button for about 1 second, the time will
begin to flash on the LED display.
2. Press the HOUR button to adjust the hour.
3. Press the MIN button to adjust the minute.
4. When the correct time is selected, press the CLK/MEM button again to confirm.
SETTING THE ALARMS
1. With the unit in CLOCK mode, press the AL1 or AL2 button. The ALARM time will begin to flash on
the LED display.
2. Press the HOUR button to adjust the alarm hour.
3. Press the MIN button to adjust the alarm minute.
4. When the correct time is selected, press the AL1 or AL2 button to confirm.
5. Press the AL1 or AL2 button again to select the alarm sound mode - buzzer or currently set radio
station. The alarm buzzer or radio indicator will flash, when the desired alarm sound mode is
reached, stop pressing the AL1 or AL2 button, and after about.5 second, the alarm sound mode will
stored to the memory.
SNOOZE FUNCTION
1. Whenever the alarm activates, it can be temporarily suspended for a short period of 9 minutes by
pressing the SNOOZE/SLEEP button once.
2. The buzzer or radio will then automatically activate again after the 9 minutes SNOOZE period has
ended.
3. This procedure can be repeated for up to approximately one hour.
TURN OFF THE ALARM
When the Alarm activate, press the SOURCE button to turn off the Alarm.

P-4
LISTENING TO THE AM/FM RADIO
1. Press the SOURCE button to select AM or FM band
2. Press the TUN < or TUN > buttons step by step to tune to the desired radio stations.
3. Press and hold the TUN < or TUN > buttons for approx. 1 second, it will start to search the next radio
station in the direction of the search. The search operation simply finds stations with strong signals.
Stations with weak reception can only be tuned in manually.
4. To turn off the radio, press and hold the SOURCE button for approx. 1 second.
ANTENNA
For best reception, fully extend the FM wire antenna to receive FM stations. For AM reception, the unit
has a built-in antenna, turn the whole unit for best reception.
SAVING A RADIO STATION TO THE MEMORY
1. Tune the radio to the desired station.
2. Press and hold the CLK/MEM button for approx.. 1 second, the LED display will show ‘PXX’ (where
‘XX’ is the memory station number), it will store this radio station in the memory.
3. Up to 10 AM and 10 FM radio stations can be stored in the memory.
TO LISTEN TO A SAVED RADIO STATION
1. Press the SOURCE button to select AM or FM band.
2. Press the CLK/MEM button to select the stored radio station.
SLEEP TO MUSIC FUNCTION
1. This function allows you to listen to the radio while you fall asleep.
2. Press the SNOOZE/SLEEP button, the display will show the default sleep time of 90 minutes and the
SLEEP indicator will start to flash.
3. Press the SLEEP button again to adjust the desired sleep time.
4. Now you can enjoy listening to the radio for the pre-set period of sleep time.
5. After this pre-set time has elapsed, the unit will switch off automatically.
SPECIFICATIONS
Frequency Range: AM 540 - 1600 KHz
AM 540 - 1600 KHz
Power Supply: AC 110 ~ 60Hz / 220V ~ 50 Hz
Adaptor DC 6V ~ 200mA
Output Power 0.3 W
Back-Up Battery: DC3V (2 x um3) batteries (Batteries not included)
Specifications are subject to change without prior notice.

P-5
Table of contents
Languages: