Premier MP-0956-1 User manual

MANUAL DE INSTRUCCIONES
REPRODUCTOR DE MP3
MP-0956-1 / MP-0957-2/ MP-0958-5 /MP-0959-1G
R
ESTIMADO CLIENTE
Felicitaciones por su compra!
Por favor lea cuidadosamente este manual, y guardelo para su futura referencia.

WWW.PREMIERMUNDO.COM
CONTENIDO
PRECUACIONES
1. CARACTER STICAS
2. DESCRIPCION DELA UNIDAD
2.1.PANTALLA
2.2.BOTONES
2.3.OPERACION BASICA
3. USO DELOS CONTROLES
3.1.DEFINICION DE LOSBOTONES
3.2.DEFINICION DE LASPULSACIONES
4. REPRODUCCION DEMUSICA
4.1.OPERACIONES SIMPLES
4.2.VISUALIZ ACION SINCRONIZADA DELAS LETRASDELTEMA
4.3.UTILIZACION DE LOSARCHIVOS DE LETRAS
4.4.UBICACION DE LOSARCHIVOS DE LETRAS
5. GRABACION DEVOZ
5.1.GRABACION EN ELMODO "RECORDING MODE"
5.2.SELECCION DELTIPO DE GRABACION
5.3.RERODUCCION DEARCHIVOS GRABADOS
6. CONVERSION DEARCHIVOS
6.1.CONVERSION DEARCHIVOS DEFORMATOACT A FORMATO
WAV
7. RADIO FM
8. CONFIGURACION DELSISTEMA
8.1.ENTRAR ALMENU DE CONFIGURACION
8.2.PARAMETROS
8.3.INSTUCCIOES DE USO
9. UTILIZACION DELDISCO USB
10. ACTUALIZACIONDEL REPRODUCTOR
11. OTRASCONFIGURACIONES
12. BORRADO DEARCHIVOS (SUBMENUSTOP)
13. RECOMENDACIONES
13. 1.FUNCION DEZONA PRIVADA
PROBLEMAS Y SOLUCIONES
ESPECIFICACIONES
PRECAUCIONES
1.No use esteaparato en ambientes demasiado calientes, humedos
o polvorientos.
2.Evite golpear impactarel equipo con cuerpos solidos.
3.Recargue la bater a cuando:
El s mbolode nivel de la bater a este vac o:" ".
El equipo seapaga automaticamente o si se apaga al poco ratode
haberlo encendido.
No funcionan losbotones.
4.No use elequipo en ambientes demasiado secos para evitar la
estatica.
5.No desconecte elreproductor de la computadora mientras
este formateando, cargandoo descargando archivos ya que
podr a producirseun error en el programa.
6.Si esta usandoel reproductor como una unidad de disco,
asegurese de hacercopias de seguridad de sus archivos, ya que
cualquier error podra danarlos y la compan a no asumira ninguna
responsabilidad al respecto.(Puede usar el equipo sin bater as
mientras este conectadoa la computadora, con el fin de evitar
fallas debido acortes repentinos de energ a mientras se este
formateando, cargando odescargando archivos).
7.El indicador dememoria del reproductor indica la cantidad de
memoria utilizada. Habitualmenteexiste una diferencia de hasta
10MB entre elcalculo de memoria realizado por la computadora y
el equipo (dependiendodel modelo).
1. CARACTERISTICAS
Diseno moderno yatractivo.
Perfil largo y disenoergonomico que lohace agradable al contacto
con la mano.
Compatible con variosformatos de audio.
MP1, MP2, MP3,WMA, WMV,ASF, WAV, etc.
Firmware actualizable.
Con el finde mejorar la funcionalidad del reproductor, el software
de actualizacion puede descargarsedesde nuestro sitioen Internet.
Radio FM estereo
La radio incorporadacuenta con la funcion de busqueda automa
tica y manualde radioemisoras y dispone de una memoria para
almacenar hasta 40estaciones (20 en cada formato).
Disco USB
Puede usar elreproductor como un disco extra ble para su PCy
grabar archivos demanera normal, accediendo a la unidad de
"Disco extra ble"ubicado en "Mi PC". Los usuarios de sistemas
operativos Windows 2000o superior no necesitan instalar el
controlador.
Zona privada
Mediante los programasque se incluyen con el reproductor,
puede dividir eldisco en dos zonas: una publica y otra privada.
Esta ultima seraencriptada de tal manera que su informacion
quedara protegida.
Grabacion / Repeticion
Puede guardar los archivosde audio devoz en formatoACT oWAV
despues de grabarlosa traves del microfono. Tambien es posible
de ejecutar comparacionestotales o parciales y repeticiones
digitales sobre unafrase dada.
Siete tipos deecualizacion
Natural, Rock, Pop,Clasica, Soft, Jazz y DBB.
Siete colores defondo
Puede elegir entresiete colores para el fondo de la pantalla.
Varios modosde reproduccion
Normal, cantante, album,repetir el album, reproduccion aleatoria
y busqueda.
Hora de apagado
Puede configurar lahora de apagado y el tiempo de apagado
automatico para ahorrarenerg a.
Menu animado
Menus completamente animadosacompanando los caracteres
para que disfrutemucho mas de su equipo.
2.2. BOTONES
HANG-RING
PLAY/STOP
FASTFORWARD
(UPWARD)
MODE
(MIDDLE)
FASTBACKWARD
(DOWNWARD)
USB
VOL- VOL+
HOLD
EARPHONE
HANG-RING
EARPHONE
USB
VOL-
VOL+
HOLD
FASTFORWARD
(UPWARD)
MODE
(MIDDLE)
FASTBACKWARD
(DOWNWARD)
USB: Conecte ala computadora mediante el cable USB.
2. DESCRIPCION DELA UNIDAD
2.1 PANTALLA
2.3. OPERACION BASICA
INGRESANDO AL MENU
Presione el boton MENU para ingresar al menu. Cadamenu
(ingrese haciendo unapulsacion larga sobre el boton MENU) esta
dividido en submenus(ingrese presionando el boton MENU), tanto
en el modode reproduccion como estando la reproduccion detenida.
Pagina 1
Pagina 3
Pagina 2
Pagina 4

WWW.PREMIERMUNDO.COM
NAVEGACION (BROWSE)
Navegue y seleccionearchivos y opciones del menu.
Avance oretroceda rapidamente losarchivos en reproduccion.
INGRESAR ALAS DISTINTASFUNCIONES DEL MENU
PRINCIPAL
Estando en elmenu principal (ingrese haciendo una pulsacion
larga sobre elboton MENU)
MODO MUSICA
MODO DE GRABACION
MODO DE REPRODUCCION
MODO FM
CONFIGURACION DE SISTEMA
MODO USB DURANTELA CONEXION CON LA COMPUTADORA
AJUSTAR ELVOLUMEN
Presione el boton VOL+ para aumentar el volumen y el boton
VOL - paradisminuir el volumen.
ENCENDER / APAGAR
Estando el reproductorapagado, haga una pulsacion larga sobre
el boton paraencenderlo.
Estando el reproductor encendido, hagauna pulsacion largasobre
el boton paraapagarlo.
REPRODUCIR O DETENERLA REPRODUCCION: SALIRDEL
SUBMENU
Estando en el modo dereproduccion, presione elboton para
salir delsubmenu e iniciarla reproduccion.
Estando en elmodo de reproduccion, presione el boton para
detener la reproduccion.
GRABAR / PAUSAR
Presione el boton para pausar lagrabacion. Haga unapulsacion
larga sobre esteboton para detener la grabacion.
3. USO DELOS CONTROLES
3.1. DEFINICION DE LOS BOTONES
1. : Encender/ Reproducir / Detener
2.VOL+, VOL -: Ajustarel volumen
3.Boton MODE:
a) Presione elboton MODE (adelante) para saltar a la siguiente
pista o avanzara velocidad.
B) Presione elboton MODE (atras) para saltar a la pista anterioro
retroceder a velocidad.
4.HOLD : Bloquealos botones para evitar que sean presiona-
dos accidentalmente.
5.USB :Puerto USB.
6.AUD FONOS: Salidaestandar para aud fonos.
3.2. DEFINICION DELAS PULSACIONES
Existen cuatro tiposde pulsaciones sobre los botones: pulsacion
larga, pulsacion corta,mantener presionado y presionar.
Exepto que seespecifique lo contrario, el metodo de pulsac on
primario es "presionar".
Pulsacion corta: Presioneel boton para que la accion se produzca
de inmediato.
Pulsacion larga: Mantengapresionado el boton durante mas de
1.2 segundos paraque la accion se realice.
Presionar: Presione elboton. La accion se realizara cuando libere
el boton presionado.
Mantener presionado: Laaccion se desarrollara mientras mante-
nga presionado elboton, por ejemplo, para adelantar o retroceder.
4. REPRODUCCION DEMUSICA
4.1. OPERACIONES BASICAS
1. Conecte losaud fonos.
2. haga unapulsacion larga sobre el boton para entrar al modo
Musica y acontinuacion presione el boton para iniciar la
reproduccion.
3. Cambiar de pista:Presione el boton MODE para cambiara la pista
anterior y presioneel boton NEXTpara cambiar ala siguiente pista.
4. Volumen:Presione el boton VOL+ para aumentarel volumen y el
boton VOL -para disminuir elvolumen.
4.2.VISUALIZACION SINCRONIZADA DE LAS LETRASDEL
TEMA
Este reproductor escompatible con los archivos de letra "*.LRC"
los que lepermite ver las letras de las canciones de manera
sincronizada durante lareproduccion.
4.3. USO DELOS ARCHIVOD DE LETRAS
Asegurese queel archivo de letra tenga el mismo nombre queel
archivo de musica.Por ejemplo:
El archivo demusica se llama: Karen Carpenter-Yesterday.mp3.
El archivo deletra debe llamarse: Karen Carpenter-Yesterday.lrc.
4.4. COMO SABERSI HAYUN ARCHIVO DE LETRA
Si el archivode musica corresponde con un archivo de letra, el
icono ubicado enla esquina superior izquierda de la pantalla
cambiara por elsiguiente:
Si se encuentraun archivo de letra:
5. GRABACION DEVOZ
Asegurese que labater a este bien cargada antes de grabar.
El reproductor puedealmacenar hasta 99 archivos en cada carpeta.
5.1. GRABACION ENEL MODO "RECORDINGMODE"
1. Ingrese almenu principal.
2. Presione elboton NEXT paraelegir el modode grabacion.
3. Presione elboton MODE paraentrar al modo de grabacion.
La pantalla mostraralo siguiente:
Pagina 5
Pagina 7
Pagina 6
Pagina 8

WWW.PREMIERMUNDO.COM
4. Presione elboton para iniciar la grabacion.
El archivo grabadose almacenara en la carpeta actual ubicada en
el submenu "Recordingstop" del directorio principal del disco.
Si el mensaje"Full space" aparece en la pantalla, significa que la
memoria esta llena yno podra grabarmas archivos hastaque borre
algunos.
Si el mensaje"Full directory" aparece en la pantalla, significa que
ya ha almacenado99 archivos en el directorio y debera elegir otro.
5.2. ELEGIR ELMODO DE GRABACION
1. Ingrese ala interfase de grabacion.
2. Presione elboton MODE paraentrar al submenu de grabacion.
3. Presione elboton NEXT paraelegir un modode grabacion en el
submenu "Recording type".Presione el boton MODE para entrar
a la interfasedel modo de grabacion.
4. Presione elboton NEXT paraelegir el modode grabacion
apropiado y presioneMODE para confirmar.
TIPOS DE GRABACION
Quality Recording: formatoWav de altacalidad.
Long time recording:formato Act, calidad estandar.
Quality sound control:formato Wav (lagrabacion se detendra
automaticamente cuando nohaya sonido)
Long time soundcontrol: formato Act.
5.Presione el boton para iniciar lagrabacion.
5.3. REPRODUCCION DEARCHIVOS GRABADOS
1. Ingrese almenu principal.
2. Presione elboton AVANZAR paraelegir la opcion"Play mode".
3. Presione elboton MODE paraingresar al menu.
4. Presione elboton para iniciar la reproduccion.
5.Seleccion de archivograbado
Presione el boton RETROCEDER para saltar al anterior archivo.
Presione el boton AVANZAR para saltaral siguiente archivo.
6.Control de volumen
Presione el boton VOL+ para aumentar el volumen y el boton
VOL - paradisminuir el volumen.
6. CONVERTIR FORMATO DE ARCHIVO
6.1. CONVERTIR ARCHIVOSACT AWAV
Para convertir archivosen formato ACT a WAV, use elprograma
utilitario que seincluye en el CD de instalacion del reproductor.
1.Ejecute el programa"Sound Converter" y haga clic en el boton
"Open".
2.Elija los archivosACT quedesee convertir.
3.Haga clic en elboton "Convert" parainiciar la conversiona formato
WAV.
Ademas de poderconvertir archivos en formato ACT a WAV, el
reproductor puede reproducirarchivos WAV y MP3.
7. RADIO FM
1. Ingrese almenu principal.
2. Presione elboton AVANZAR paraelegir la opcion"FM Mode".
3. Presione elboton MODE paraentrar al modo "FM Mode".
4. Busqueda automatica
Mantenga presionado porunos segundos el boton AVANZAR o
RETROCEDER hasta queel reproductor comience a buscar
radioemisoras avanzando oretrocediendo 100KHz en el dial. Una
vez localizada unasenal, la busqueda se detendra. Para detener
la busqueda, presioneel boton AVANZARo RETROCEDER.
5.Afinador de sintona
Presione el botonRETROCEDER: retrocedera 100Khz en el dial.
Presione el botonAVANZAR: avanzara 100Khzen el dial.
6.Almacenar radioemisoras enla memoria
Presione el boton MODE para entrar al submenu FM.
Vuelva a presionar elboton MODE paraalmacenar la radioemisora.
7.Escuchar una radioemisoraalmacenada
Si hay masde una radioemisora almacenadas en la memoria,
presione el boton para cambiar ala siguiente frecuencia
almacenada de manerasecuencial.
8.Grabacion interna
Pued e grabar la senal deradio mientras sintonizauna radioemisora.
Presione el boton MODE para entrar al submenu FMy elijaun tipo
de grabacion entre"Quality recordint" o "Long time recording". En
Pagina 9
Pagina 11
Pagina 10
Pagina 12

WWW.PREMIERMUNDO.COM
Ese momento seiniciara la grabacion de la senal de radio. Para
detener la grabacion,presione el boton MODE.
9.Control de volumen
Presione el boton VOL+ para aumentar el volumen y el boton
VOL - paradisminuir el volumen.
Puede almacenar hasta20 radioemisoras tanto en la seccion
"common frequency" comoen la seccion "Japanese frequency".
Para borrar radioemisorasde la memoria, refierase a la seccion
"Borrar archivos" enla pagina 22.
8. CONFIGURACION DELSISTEMA
8.1. INGRESAR AL MENU DECONFIGURACION
En este menupuede configurar varias opciones del sistema.
1. Ingrese almenu principal.
2. Presione el boton AVANZAR para elegirla opcion "System setting".
3. Presione elboton MODE paraingresar al menu.
8.2. PARAMETROS
Recording time Ajusta la fechay hora de los archivos grabados
Background lighting
time
Cantidad de segundosque deben transcurrir
sin que seejecute ninguna accion antes de
que se activeel fondo de pantalla.
Background light mode Le permite elegirel color delfondo de pantalla.
Language options Para cambiar elidioma.
Shutdown setting
Cantidad de segundosque deben transcurrir
antes de queel equipo se apague
automaticamente.
Repeting setting Para configurar eltipo de repeticion.
Contrast Para ajustar elcontraste de la pantalla.
Online mode Para configurar laopcion de "zona privada" del
disco.
Storage status
Firmware version Mustra la versiondel Firmware del reproductor.
Firmware scalation Mustra la versiondel Firmware del reproductor.
Exit Para salir delmenu de configuracion.
Para ver elestado de la memoria.
8.3. INSTRUCCIONES DEUSO
CONFIGURACION DEL TIEMPODE GRABACION
"RECORDING TIME"
1. Interfase dela configuracion del sistema
2. Presione elboton MODE paraentrar a la interfase de tiempode
grabacion.
3. Presione elboton VOL+ paracambiar el valor de los anos(el
boton VOL -disminuye el valor).Los campos de"ano / mes / d a"
empezaran a parpadear.
4. Presione elboton AVANZAR paraaumentar el valor de los nu
mero (use elboton RETROCEDER para disminuir el valor).
5. Alterminar de ajustar los valores, presione el boton MODEpara
confirmar y salirdel menu.
CONFIGURACION DEL TIEMPODE LA PANTALLA DE FONDO
(BACKGROUND LIGHTING)
1) Interfase dela configuracion
del sistema
2) Presione el boton AVANZAR
para elegir la opcion "Background
lighting time"
3) Presione elboton MODE paa
entrar al menudel fondo de
pantalla.
4) Presione elboton AVANZAR o
RETROCEDER para ajustarla
hora.
5) Alterminar la configuracion,
presione el botonMODE para
confirmar y salirdel menu.
CONFIGURACION DEL IDIOMA
Para instrucciones de operacion refierase ala seccion "Cofiguracion
del tiempo delfondo de pantalla".
CONFIGURACION DE APAGADO
Para instrucciones de operacion refierase ala seccion "Cofiguracion
del tiempo delfondo de pantalla".
"Power saving mode"le permite configurar el tiempo en segundos
que debe transcurrirsin que ninguna accion se realice antes de que
el equipo seapague automaticamente.
El d gito"0" significa que esta funcion esta desactivada.
"Sleep mode" lepermite configurar el tiempo en minutos que debe
transcurrir antes deque el equipo se apague automaticamente. El
tiempo de apagadose borrara. Si es necesario, vuelva a configuarar
esta opcion.
CONFIGURACION DE REPETICIONES
Para las instrucciones,refierase a la seccion "Efectos de sonido".
"Manual mode": Elijaesta opcion para que la repeticion no se pause
automaticamente luego dela repeticion de un segmento y salo se
pueda pausar formamanual.
"Automatic mode": Elijaesta opcion para que la repeticion se pause
automaticamente luego dela repeticion de un segmento (Usado
para la lecturaen ingles, sin musica).
CONTRASTE
Para ins trucciones de operacion refierase a laseccion "Cofiguracion
del tiempo delfondo de pantalla".
MODO ONLINE
Para las instrucciones,refierase a la seccion "Efectos de sonido".
Algunos sistemas operativos(versiones anteriores Windows2000
SP4) no permiterusar dos letras para asignar un mismo disco, por
lo tanto, parausar la funcion de "zona privada" debe elegir eldisco
con la letraque le haya sido asignado, como "Single common disk"
o "Single encrypteddisk". As podra ver eldisco que elijaen la
computadora.
ESTADO DEALMACENAMIENTO
El valor numericorepresenta la capacida total de la memoria y el
porcentaje es representala cantidad de espacio utilizado.
VERSION DEL FIRMWARE
Le muestra laversion del Firmware instalado en el reproductor.
ACTUALIZACION DEL FIRMWARE
Este menu lepermite actualizar el Firmware. Ingrese a este menu
antes de realizarla actualizacion.
CONSEJOS
Presione el boton MODE para configurar los tems. Seguidamente
presione el boton para salir de la interfase. Esta funcion esta
disponible en todoslos menus.
9. USO DELDISCO USB
Este dispositivo puede ser usadocomo un discoUSB estandar.Es
compatible con lossistemas operativos Windows98 (debe instalar
el controlador), Windows2000 o superior (sin necesidad de instalar
el controlador), MacOS 10.3 o superior yLinux RedHat 8.0o superior.
El equ ipo dispone de un microgenerador, por loque no esnecesario
el uso debater as mientras esta conectado al puerto USB. Estando
en el modode espera, presione el boton MODE para volver almenu
principal y elegirel modo de operacion.
Pagina 13
Pagina 15
Pagina 14
Pagina 16

WWW.PREMIERMUNDO.COM
Este equipo soportael modo "En suspenso".
Una vez conectadoa la computadora, dispone de tres modos:
1) Modo deespera
2) Durante la descarga de archivos
3) Durante lacarga de archivos
10. ACTUALIZACION DEL REPRODUCTOR
Puede usar el software includo con elreproductor para actualizar
o mantener elFirmware.
1. Ingrese almenu principal.
2. Presione elboton NEXT paraelegir "System setting".
3. Presione elboton MODE paraentrar al menu "System setting".
4. Presione elboton NEXT paraelegir "Firmware escalation"o
presione el botonMODE.
5. Conecte elreproductor a la computadora.
6. Ejecute elprograma "MP3 Player Update" desde la PC y hagaclic
en "Select thenew version of firmware file".
7. Elija elnuevo Firmware (que se encuentra en el CD deinstalacion
inclu do conel equipo, o que puede descargar del website dela
compan a).
8. Haga clicen el boton "Beging upgrading". La actualizacion se
iniciara.
9. Si laactualizacion ha sido exitosa, la pantalla mostrara lo
siguiente:
La actualizacion delFirmware mejora y optimiza el rendimiento
del reproductor.Si no actualiza el Firmware podra seguir usando
el reproductor demanera normal.
La actualizacion delFirmware, realizada de manera incorrecta,
puede provocar fallasde funcionamiento del reproductor. Antes
de actualizar elFirmware, lea las instrucciones detenidamente.
Esta operacion debeser realizada por personas calificadas para
tal efecto.
El Firmware deeste producto no sirve para otros equipos ni
viceversa.
11. OTRAS CONFIGURACIONES
CAMBIAR DE DIRECTORIO(Submenu Stop)
Puede elegir distintosdirectorios para almacenar los archivos,
de tal maneraque pueda organizarlos en distintas categor as. Este
reproductor soporta hastanueve niveles de subdirectorios.
1) Submenu "Stop" (Este ejemplo
es tomado del modo reproduccion,
pero se aplica al modo grabacion)
2) Presione elboton MODE para
entrar al submenu.
3) Presione elboton MODE para
entrar al directorio.
4) Use losbotones AVANZAR o
RETROCEDER para elegirel
contenido del directorio.
5) Presione elboton MODE para confirmar y salir del directorio.
NOTA: Cualquier directorio puedeser usado paraalmacenar archivos
de musica oarchivo grabados de voz y no es necesario colocarlos
en directorios diferentes.
La opcion "DeleteAll" eliminara todos los archivos del directorio
actual. Por ejemplo,si elije esta opcion en el modo de reproduccion,
se eliminaran todoslos archivos de musica, pero no seran borrados
los archivos degrabacion de voz.
La interfase paraeliminar radioemisoras FM es mas sencilla y solo
debe realizar elpaso numero 3 para eliminar una radioemisora.
Para eliminar losarchivos de la computadora, desconecte el cable
USB solo despuesde haber realizado la extraccion del dispositivo
12. BORRAR ARCHIVOS (Submenu Stop)
Tantoen el modode reproduccion como en el modo FM, puede
eliminar los archivoso las estaciones de radio almacenadas en la
memoria.
1) Menu "Stop"(No en el modo
FM)
2) Presione elboton MODE para
entrar al submenu.
3) Use losbotones AVANZAR o
RETROCEDER para elegir
"A singlefile" (un archivo) o
"All files" (todoslos archivos).
4) Presione elboton MODE para
entrar al menu"Delete".
5) Presione elboton AVANZAR
para cambiar laopcion "No" a
"Yes".
6) Presione el boton MODE para
confirmar y borrar lo seleccionado.
Pagina 17
Pagina 19
Pagina 18
Pagina 20

WWW.PREMIERMUNDO.COM
de manera segura,de otra forma, los archivos no se eliminaran
completamente.
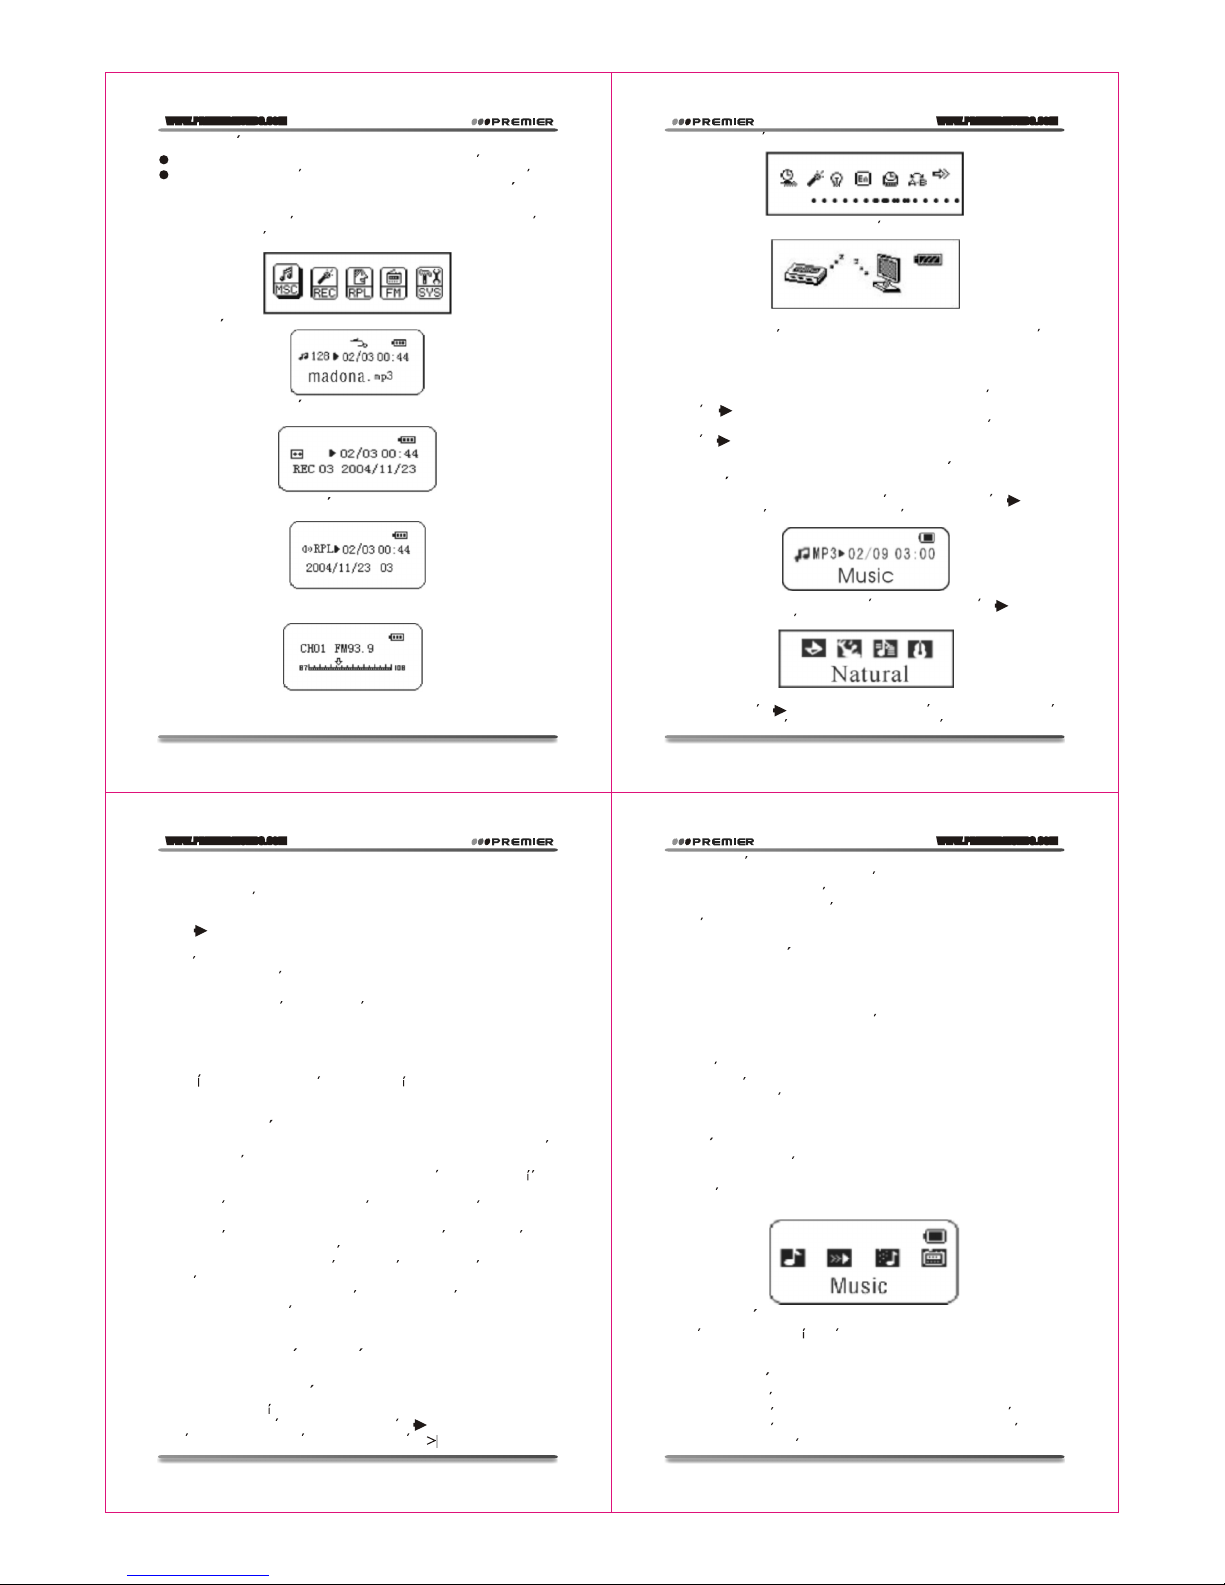
MODO DE REPRODUCCION(Submenu Play)
En este menupuede elegir distintos modos de reproduccion, por
ejemplo, repeticion yreproduccion aleatoria.
La primera opcionen este menu es "Play mode". Elija esta opcion
para reproducir losarchivos de manera normal.
REPETICIONES (Repeat)
VELOCIDAD DE REPRODUCCION(Submenu Play)
Puede elegir distintasvelocidades de reproduccion(mas lento omas
rapido), sin queel sonido cambie. (Solo para archivos MP3).
1. Ingrese almodo de reproduccion:
2. Presione elboton MODE paraingresar al submenu "Play".
3. Presione elboton AVANZAR paraelegir el tem "Play speed".
4. Presione elboton MODE paraentrar al menu "Play spedd".
5. Presione elboton AVANZAR paraaumentar la velocidadde
reproduccion o elboton RETROCEDER para disminuirla.
NOTA: El cambio develocidad de reproduccion afectara a todos los
archivos que sereproduzcan en adelante, hasta que vuelva a
cambiar esta configuracion.
Normal
Despues de habersereproducido todos los archivos
de un directorio,se iniciara la reproduccion de los
archivos del directoriosiguiente, hasta que todos los
archivos hayan sidoreproducidos.
Repeat one Repite el mismotema.
Folder Reproduce todos losarchivos de un directorio.
Repeat folder Repite todos los archivos de un directorio.
Repeat all Repite todos losarchivos de musica.
REPRODUCCION ALEATORIA (Shuffle)
Random Reproduce los archivosde un directorio en orden
aleatorio.
INTRO
Intro
Reproduce los primeros 10 segundos de cada archivo
en el directorio.
MODO DE REPETICION(Submenu Play)
Presione el botonREC/A-B para entrar al menu.
Siga las siguientesinstrucciones
REPETICION A-B
1.Ingrese al modode reproduccion de musica o grabaciones.
2.Presione el boton MODE para ingresar al submenu "Play".
3.Presione el boton AVANZAR para elegir "Repeat mode".
4.Presione el boton MODE para ingresar al menu "Repeatmode".
5.Presione el boton AVANZARpara definir el punto "A" delsegmento
a repetir.El icono "B" parpadeara en la pantalla esperando la
confirmacion del punto"B".
6.Presione el boton AVANZAR para definir el punto "B". El icono
dejara de parpadeary se iniciara la repeticion del segmente
delimitado entre lospuntos "A" y "B" y se detendra despues de
haber repetido elnumero de veces determinado. Para redefinir el
punto "A", presioneel boton RETROCEDER. Para determinar el
numero de repeticionesrefierase a la siguiente seccion de este
manual.
Use los botonesVOL+ o VOL- durante las repeticiones para
variar la velocidadde reproduccion.
FUNCION DE SEGUIMIEN TO (No disponibledurante la reproduccion)
1) Inicie larepeticion A-B 2) Presione elboton AVANZAR
para entrar almenu
3) El iconode repeticion " "
cambiara a " " y seiniciara la
grabacion de voz.La duracion de
la grabacion seraigual al
segmento A- B.
4) Una vezalcanzado el tiempo
de grabacion seiniciara la
reproduccion de lagrabacion. El
icono cambiara a" ". Presione
el boton AVANZARpara activar
la funcion decomparacion.
En este estado,Presione el boton RETROCEDER para volveral
modo de repeticionA-B.
1) Una vez que ingrese a la funcion
de comparacion el icono cambiara
a " " y se reproducira el archivo
original.
2) Una vezreproducido el archivo
original, el iconocambiara a " "
y se reproducirala grabacion de
la voz.
Para volver almodo "Seguimiento", presioneel boton RETROCEDER.
Para salir delmodo de repeticion, presione el boton MODE.
NUMERO DE REPETICIONES(Submenu Play)
Para instruccion es de operacion refierase ala seccion "Cofiguracion
del tiempo delfondo de pantalla". El numero de repeticiones
determina el numerode veces que el segmento A-B sera repetido.
INTERVALO DEREPETICION (Submenu Play)
Para instruccion es de operacion refierasea la seccion"Cofiguracion
del tiempo delfondo de pantalla". En este menu puede definir el
espacio de tiempoentre una y otra repeticion (en segundos).
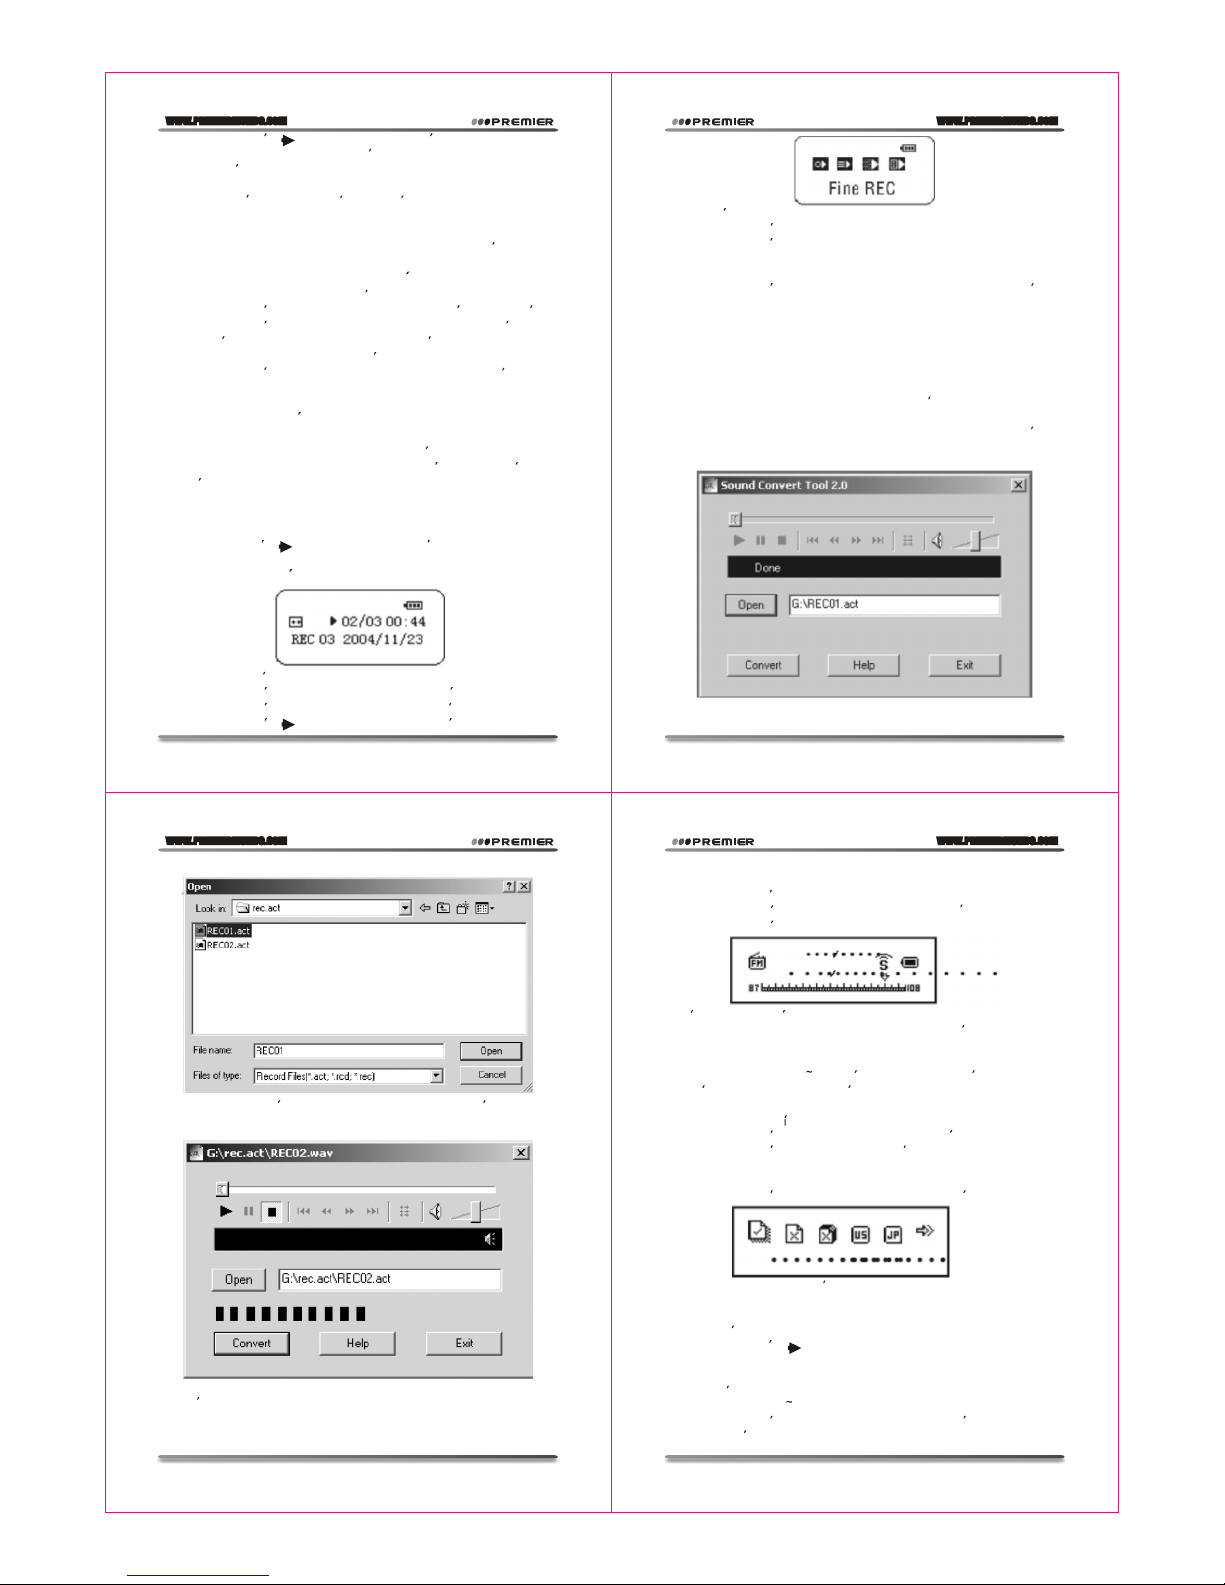
13. RECOMENDACIONES
ZONA PRIVADA
La mayor ade los reproductores MP3 son usados para compartir
informacion; sin embargo,es posible que no desee mostrar cierta
informacion a terceros,lo cual le obligar a a borrar previamente sus
archivos personales. Lafuncion de "Zona Privada" ("Private space")
con que cuentaeste reproductor es la solucion perfecta a este
inconveniente.
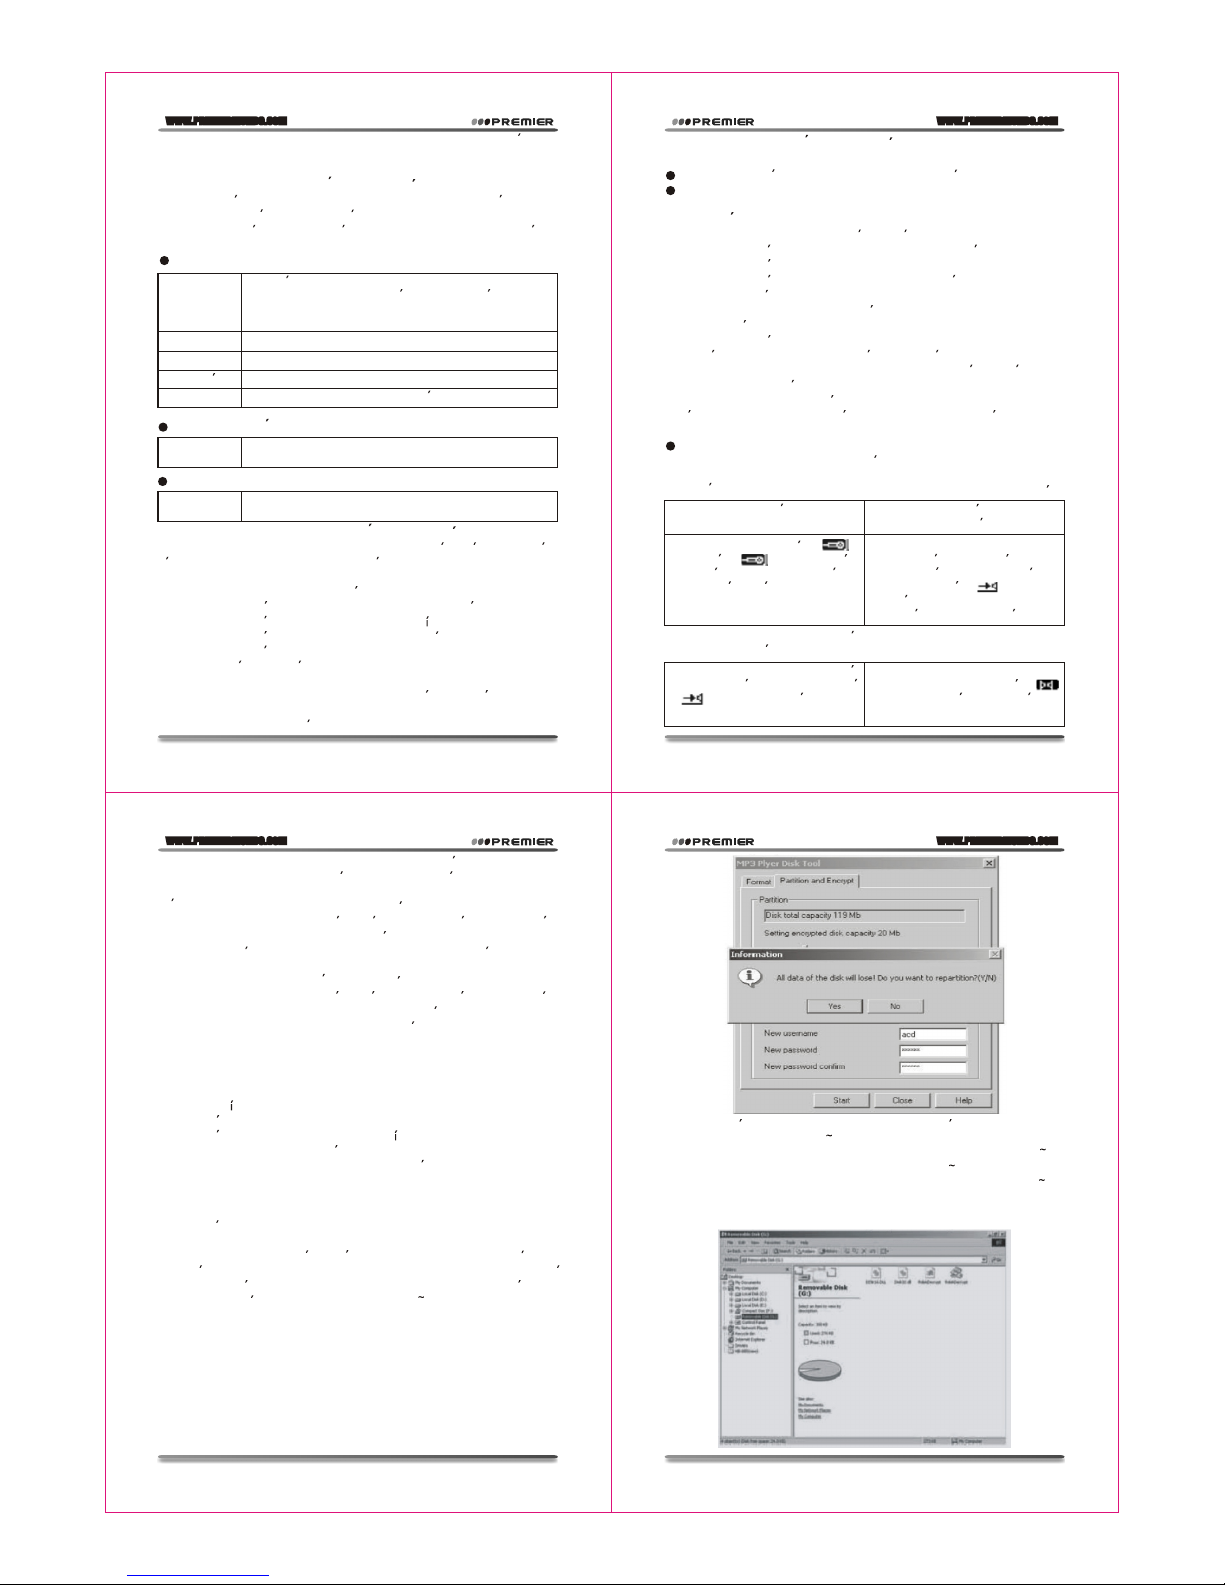
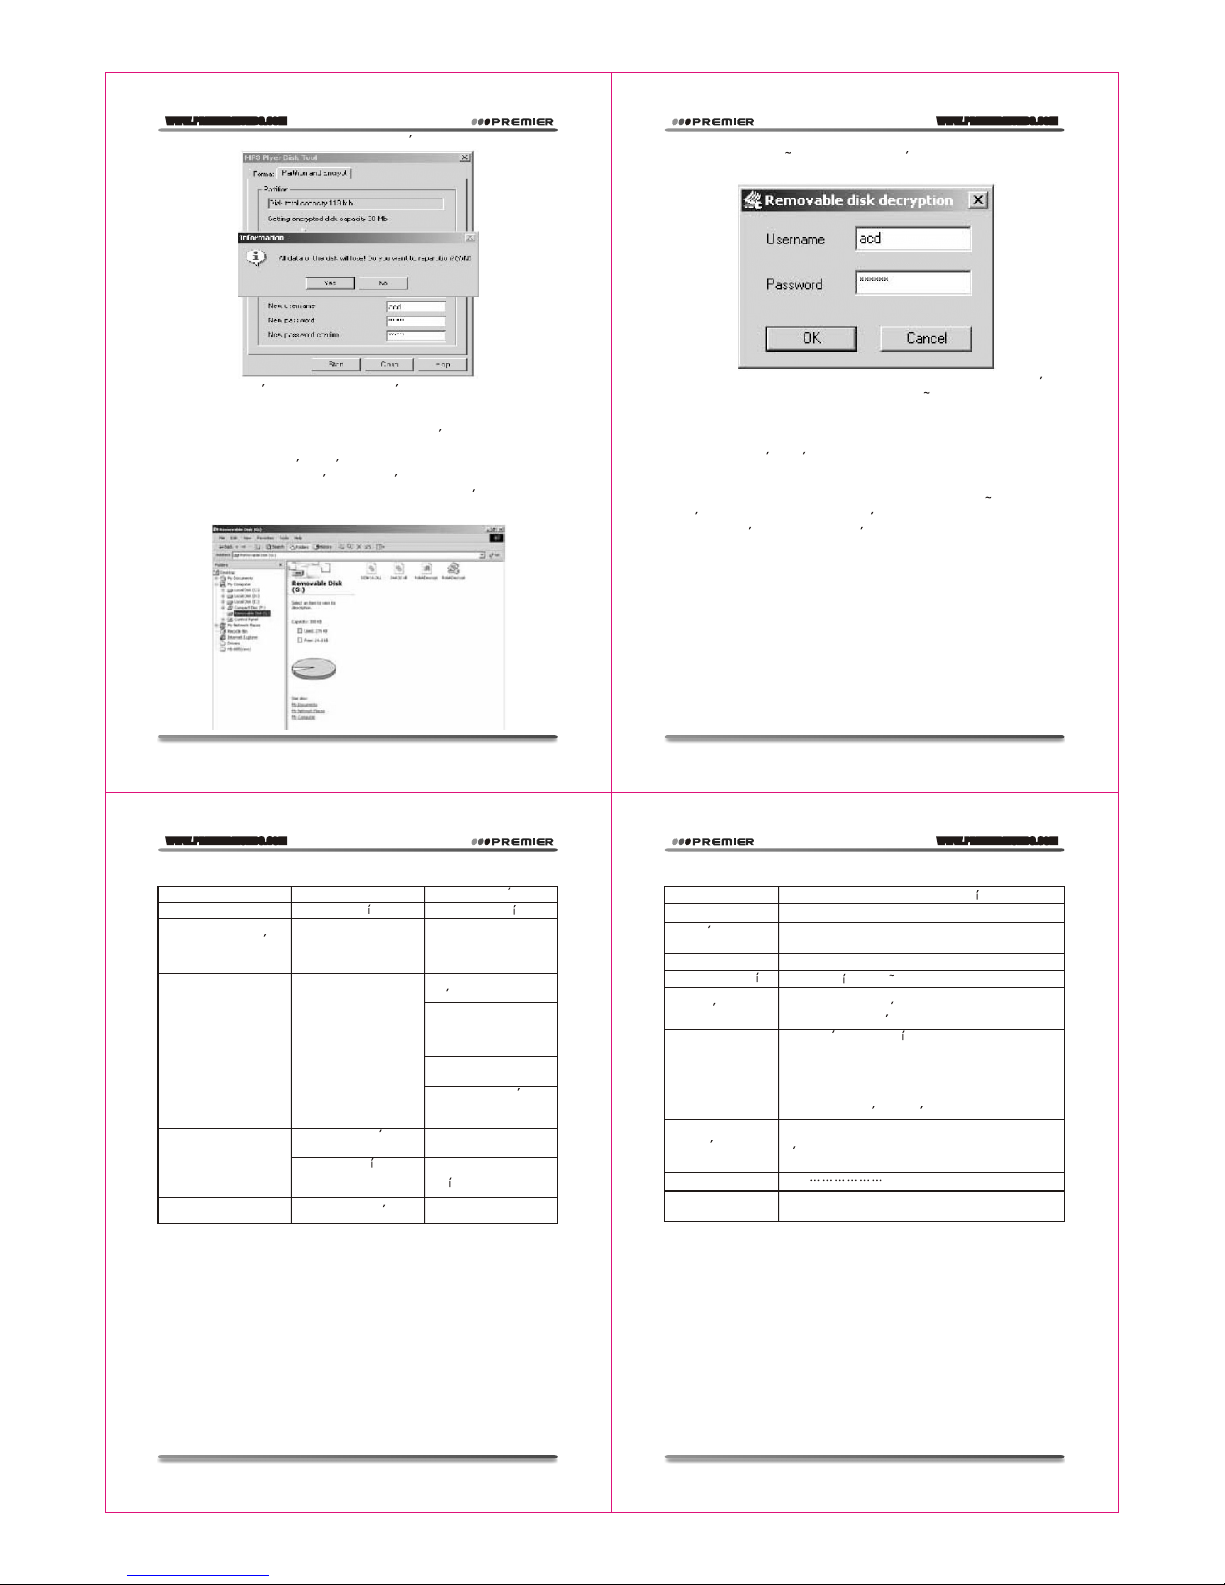
Puede dividir eldisco USB en dos particiones y proteger una de
ellas (vera dosunidades de disco con letras diferentes en la
computadora. Los usuariosde Windows 2000 deben tener instalado
el SP4, deotra manera solo vera una unidad de disco ydebera elegir
la opcion "Singlecommon disk" o "Single encrypted disk" en el menu
de configuracion delsistema) . De esta manera, su informacion
privada quedara protegidapor una contrasena.
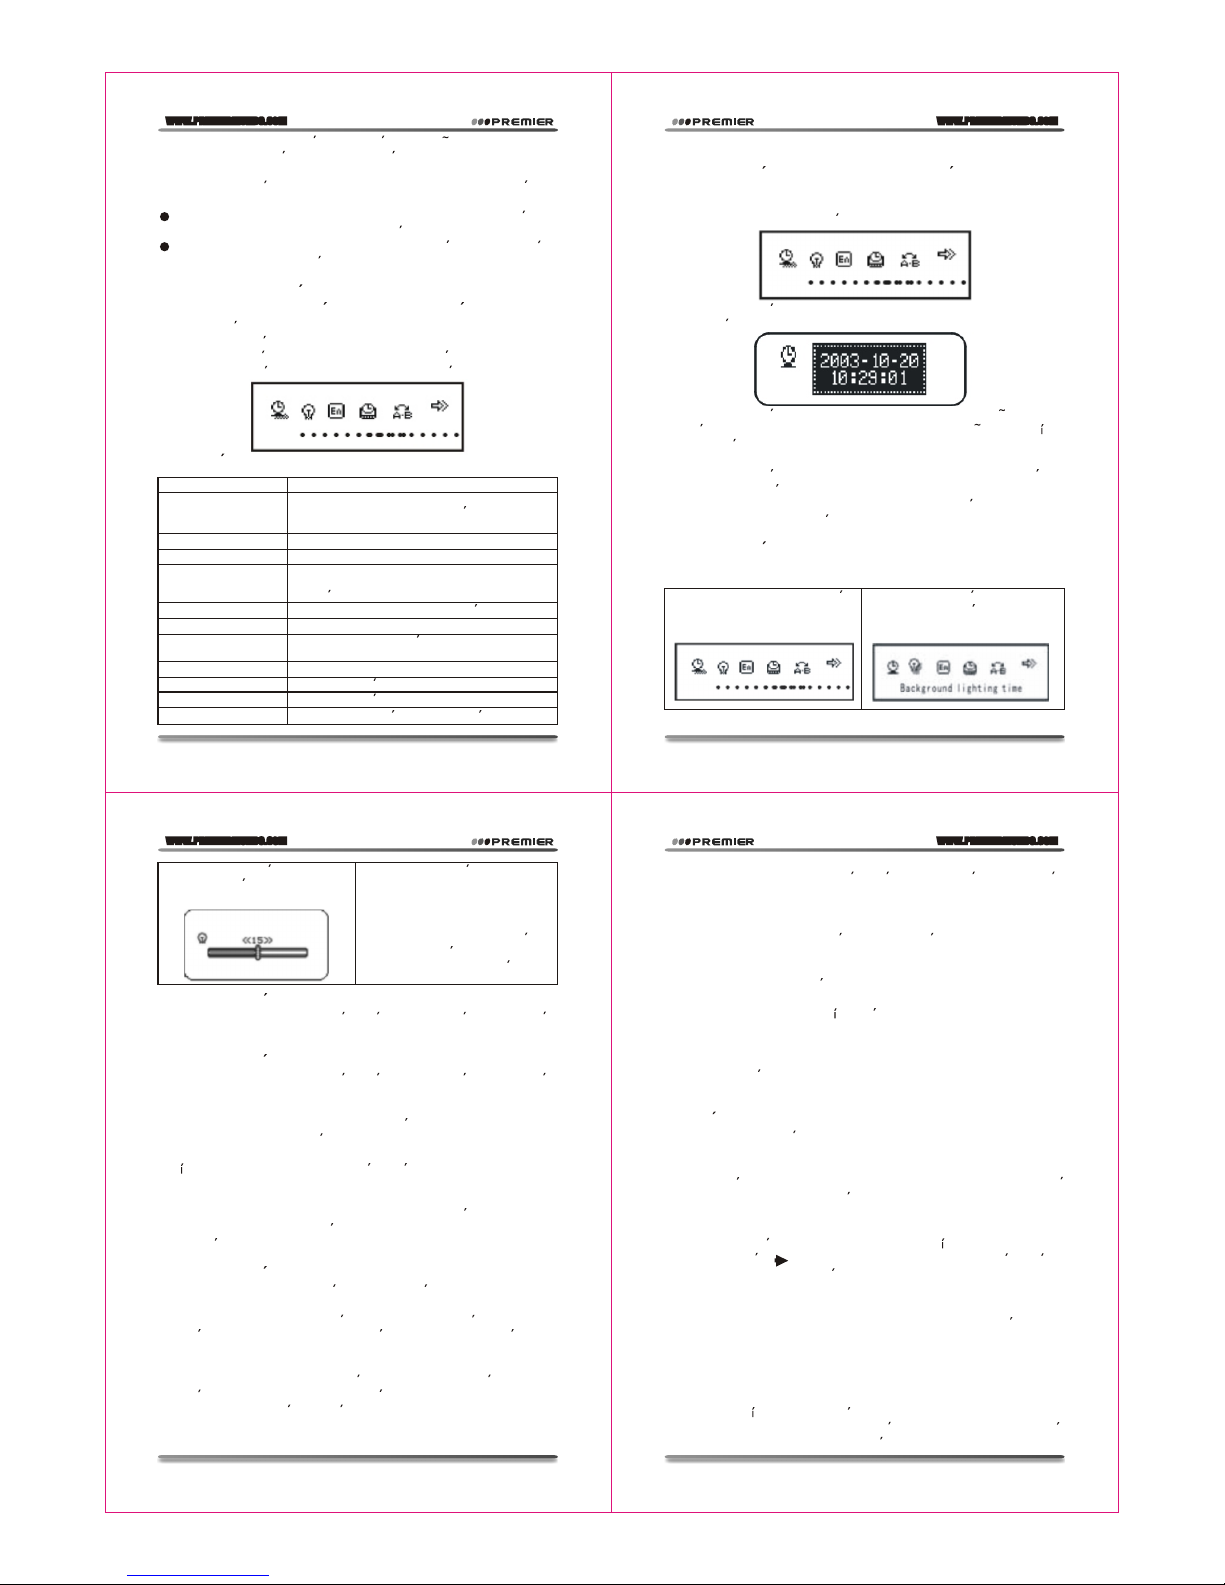
1. Conecte elreproductor a la computadora.
2. Ejecute elprograma "Disk Tool" que seincluye con el CD del
reproductor.
3. Encontrara la utilidadde formateo. Elija la opcion "Partitioning and
encryption". Elija eltamano que desee para el disco privado.
Introduzca un nombrede usuario (User name) y una contrasena
(New passwor d). Vuelva aingresar la contrasenapara confirmarla
(New password conpassword). Vuelva aingresar la contrasena
para confirmarla (Newpassword confirmation) y haga clic en
"Start" para iniciarel particionamiento.
Pagina 21
Pagina 23
Pagina 22
Pagina 24

WWW.PREMIERMUNDO.COM
4. Una vezconcluido el proceso, aparecera la siguiente pantalla:
5.Presione el boton"OK". Se le solicitara reiniciar la computadora.
Confirme para reiniciar.
6.Una vez reiniciadala computadora encontrara dos unidades de
disco. (Los usuariosde sistemas operativos anteriores a
Windows 2000SP4 soloveran un disco). Haga clic sobre el disco
privado (el segundo).En el encontrara tres archivos. Dos de ellos
ocultos y eltercero es un archivo ejecutable, que solo ocupan
300K de espacio.
7.Inicie el archivo"RdiskDecrypt.exe" e ingrese su nombre de
usuario y contrasena enel cuadro dedialogo para accederal disco
y poder copiararchivos en el.
8.Cada vez queconecte el reproductor a la computadora debera
ingresar su nombrede usuario y contrasena para tener acceso al
disco.
NOTA: Al particionarel disco o al volver a juntar las particiones,
toda la informacionsera borrada. Antes de proceder, haga unacopia
de seguridad detodos sus archivos.
CUIDADO: No olvide sunombre de usuario y contrasena, ya que no
podra usar eldisco privado y tendra que juntar las particiones, con
lo cual perderatoda su informacion.
PROBLEMAS Y SOLUCIONES
Dimensiones y peso 31mm x 0mm x7mm / 25g (sinbater as)
Pantalla Matriz (128 x32) LCD. Fondo de 7 colores o sencillo.
Conexion a la
computadora
USB 1.1 dealta velocidad.
(Lectura: 1000Kb; escritura:750Kb)
Memoria EMS Memoria Flash: 128M
Fuente de energ a
Grabacion
Frecuencia de rastreo8KHz
Formato de grabacion WAV (32Kbps)ACT (8Kbps)
Tiempo de grabacion:35H (ACT,Flash 128M)
MP3
Salida maxima de audfonos (L)10mW + (R)
10MW (32 Ohm)
Flujo de bitMP3: 5Kbps a320Kbps
Flujo de bitWMA: 5Kbps 192Kbps
Respuesta de frecuencia:20Hz a 20KHz
SNR: 90dB
Nivel de distorsion:No mas de0.05%
FM inalambrico
Rango de frecuencia:76MHz
96MHz / 87MHz/ 108MHz
Numero de canalesde memoria 20+ 20
SNR 45dB
Formato de audio MP1 [T9]
ESPECIFICACIONES TECNICAS
PROBLEMA CAUSA SOLUCION
El equipo noenciende No hay energ a Cambie la bater a
No se puedeapagar el
equipo cuando esta
conectado a la
computadora
Desconecte el
reproductor de la
computadora para poder
apagarlo.
No puedo descargarlos
archivos
Verifique que elsistema
de la computadoraes
compatible con el
reproductor.
Formatee el reproductor
y vuelva a intentar.
No hay sonido Hay unos audfonos
conectados a la
computadora.
Conecte bien los
aud fonos [T8]
Verifique que elsistema
este bien instalado.
Revise la conexion entre
el reproductor y la
computadora.
El volumen estamuy
bajo Suba el volumen.
No se puedegrabar La memoria esta llena Elimine algunos
archivos
1.5V. Bateras tamano AAA.
Sistemas operativos
compatibles
Windows 98SE/ME/2K/XP
Pagina 25
Pagina 27
Pagina 26
Pagina 28

R
INSTRUCTION MANUAL
PRODUCT NAME
MP-0956-1
DEAR CUSTOMER
Congratulations for yourpurchase!
Please read thismanual carefully,and keep itfor future reference.

WWW.PREMIERMUNDO.COM
Pagina 1
Pagina 3
Pagina 2
Pagina 4
Pronouncement items
Function summarization
Get to knowthe musical player
Outward appearance andkeystroke
Screen display signal
Electricity quantity display
Basic function operation
Keystroke operation definition
Keystroke action definition
Play music
Operation program
Sound-effect mode
Sound record
Record in recordingmode
Choose recording types
Play recording documents
Transform ACT recording filesinto WAV
Use FM radioset(optional)
System setting
How to getin
Each parameter itemsynopsis
Detailed applying directions
Electron documentation
Use telephone bookfunction
Telephonebook file setup and edit
Telephoneintroduction and educe
Catalogue
3
3
4
4
4
5
5
7
7
7
7
7
8
9
9
10
10
10
12
13
13
14
14
16
17
17
20
This Mp3 playerrepresents a new generation of MP3 players, sup-
porting MP1, MP2,MP3, WMA, WMV, ASF, WAV and other music
file formats. its excellent sound effect, high reliability andgraceful
appearance match wellwith each other. It canbe called thefirst-class
works. We whole-heartedly wish that it could bring you super
enjoyment of thedigital time.
Pronouncement items
Thank you foryour purchase.
Please read this manual carefully before using your newplayer.
Contents in this manual may change possibly for betterservice.
We have the right to make changesto this manual without notice.
Function summarization
Exquisite pronouncement design,fashionable anti-rubbing nanom-
eter lens decorations.
Support many kindsof audio frequency patterns, such as MP1,Mp2,
MP3,WMA,WMV,ASF,WAV and othermusical formats.
Firmware upgrade function,offer latest upgradesoftware download
in the website, realize this machine's expansion of thefunction
upgrade.
FM stereo receiving,the function of strong automatic or manual
searching radio station, let you receivethe programmed easily.
Telephonebooks function, Facility shortcut, Let's youraddress
list in side.
Electron documentation superlong letter note function you canhold
not read article copy move HD.
Without drivingU-disk function, noneed of managing program, it
can pass on data, no need of install driverin WIN 2000 system or
over it.
"Unusual degree space"diskmode, using the subsidiary tools, you
can divide the disk of this machine into twodisks and encipher one
of them, hide thespace ,and preventthis part fromseeing and reading,
so as to hide the secret.
Backlight display inblue with time setting.
You can record through the microphone andsave them asthe voice
documents of WAVand ATC mode.
Section or contrast re-reading, realizing thetrue digital re-reading
function.
Seven timbre balanceware, natural, rock, popular, classical, soft,
jazz, and DBB.
Several playing mode,common mode, single -song cycle, catalogue
playing, catalogue cycle, total cycle, stochastic playing and
skimming playing.
Fixed time shutting-off you canset the sleepingand electricity-
saving mode so as to use it more conveniently.
With thefull and audiovisual animation menu with corresponding
words, you can use it with high proficiency.
Get to know the musical player
Outward appearance andkeystroke
Screen display signal
Use USB disk
Upgrade the player
Other settings
Choose different catalogues(stop sub-menu)
Delete documents (stopsub-menu)
Playing mode (playsub-menu)
Playing speed (playsub-menu)
Re-reading mode (playsub-menu)
Re-reading times (playsub-menu)
Re-reading interval (playsub-menu)
Key recommendation
USB drive install
Difficulties
Follow accessory
Technical criterion
20
21
23
23
24
25
25
26
27
27
27
30
31
31
32

WWW.PREMIERMUNDO.COM
Pagina 5
Pagina 7
Pagina 6
Pagina 8
Basic function operation
Enter the menu
Youcan enter all kinds of menusthrough pressing the MODE key.
The menu isdivided into themain menu (long time press themode key
to enter when is stopping), the playing sub-menu (shorttime press) and
the sub-menu inthe stop situation (press the key for a shorttime)
Browsing operation
Choose the skimmingsongs and themenu items.
Fast forward andfast backward whileplaying.
Entry distinctness featuresmode
From the main menu you will enter different functionmode.
Main menu: (long press mode button)
Musical mode:
Recording mode:
Sound mode:
FM mode (Optional):
Volume adjustment
Press the VOL-key for a short time to turn down thevolume and the
VOL+ key fora time toturn up the volume.
Turn on/ Turnoff
Press the PLAY key fora long time to turn on or turn offthe mp3
player
System setting:
Enter the USBmode through theconnection with PC:
Keystroke operation
Keystroke operation definition
- Express Forward; - Express Backward; - Play/Pause
1."Play/Pause": Power ON/PLAY/STOP/OFF.
2."Mode": General confirmation button.
3."VOL+": Increase volume. Speed up.
4."VOL-": Decrease volume. Speed down.
5."Forward": Next one. Fast Forward. Next
6."Backward": Previous one. Fast Backward. Last
7."USB": USB plug.
8."Earphone jack": Standard earphone connector.
9."HOLD" Press lock key.
10. "REC": Come into recording mode.
Keystroke action definition
Keystroke action comprise short press long press press single
press four genushandle means.
Back expect in particular explain all belong toshort press.
Short press: press once Keystroke. Atonce become effective.
Long press: press once Keystroke. Excess 1.2 second don't leave
go of justgo into effect,and that justonce.
Single: press once keystroke. Asfar as leave go of time moment
just go intoeffect.
Press: Press once keystroke unto leave goesof process. Business
take definite frequencytime after timegoes into effect.For example :
"next last".
Play music
Operation program
1 Connect to the headphone and plug the headphone jackinto the
4 Control the volume
VOL+: increase thevolume
VOL-: decrease thevolume
Sound-effect mode:
1 While playing themusic
2. Press the Mode Key fora short timeto enter thesub-menu of
playing.
3. Push the key to choose.
4.Press the Mode Key for a short time toenter the choice menu of
Sound-effect mode andchoose the menu
Item about Sound-effectmode.
Sound effect modechoose:
5. All the Sound-effect illustration(EQ):
Natural
Rock
Pop
Classical
Soft
Jazz
DBB
Mp3 player's headphonejack. Now youhave succeeded inconnection.
2 Press the PLAY key fora long time to start up the player andenter
the musical mode. Then you shouldpress the PLAY key fora short
time to play the music.
3 Choose the music
: Choose theprevious song
: Choose thenext song
Play/Pause
In the Music mode press the "Play/Pause" button toplayback the
music.
Record/stay (short control).Stop record (long control)
Record status. Short press Play. Stop record.
Electricity quantity display
This mp3 player employs the control of nine-level electricityquantity.
When the electricityquantity is 1.5V, the displayshows .
With thetime up, the display of the electricity quantity willreduce.
When the battery isalmost used up,the battery modewill change into
blank . You should changethe battery in time.

WWW.PREMIERMUNDO.COM
Pagina 9
Pagina 11
Pagina 10
Pagina 12
2. Push tochoose the recording mode.
3. Press theMode Key for a short time to enter therecording mode.
4. Press thePlay Key for a short time to start recording.
Recorded file canbe saved either in the root directory or inthe
sub-directory.
If you getthe message "Disk full" on the screen, that meansthere
is not enoughspace to save the recorded file, you should deletethe file
to get thespace.
If you getthe message "Directory full" on the screen, that means
that the recordedfiles quantity exceeded 99, you should save the reco-
rded file toanother directory.
Record process respond"Play" key.
4. Push to choose the suitable Recording Typeand Press theMode
Key for a short time to confirm the chosentype.
Recording Type
High-grade record.wav format.Timbre good.
Long time record.actformat. Timbrecommonly.
High-grade voice control.Wav format. (Voice control
record. Doesn't voice)
Long time voicecontrol. act format.
5. Press the Play Key to start recording.
Play recording documents
1.Enter the main menu.
2. Push to choose playing mode.
3. Press the Mode Key to enter the PlayingMode Interface.
4. Re-press the Play Key to start playing
5. Choose record documents.
Last key: choosefront singleton recordfile
Next key: choosesingleton record file
6. Command volume
VOL+: enhance volume
VOL-: reduce volume
Transform ACT recording filesinto WAV
The ACTformat recorded in this player canbe converted into WAV
format through theadditional installing program.
1.Run "Sound Converter" program , and click "Open"button..
2. Choose theACT filethat will beconverted.
3. Click "Convert"button, and it will be converted into WAVfile.
Besides the function of converting the ACT intoWAV,this tool can
play WAVand MP3 files.
Use FM radioset (Optional)
1. Enter themain menu
2. Push theNEXT Key tochoose the "ReceivingMode"
3. Press theMode Key fora short time to enter the "Receiving Mode".
4. Automatic Searching
Press the "Last/Next" button for 2seconds (long time press), the
player will autosearch for thenext Radio station with the 100KHz
increment forward orbackward, it willnot stop until the a clear radio
station has beenfound. If youwant to cancel theauto search, just press
the "Last/Next" buttonagain.
5. Fine Tuning
Push the Last Key: single step backward for 100KHz
Push the Next Key: single step forward for 100KHz.
6. Save thesearched frequency
Press the Mode Key for ashort time to enter the FMsub-menu and
Choose recording types
1. In recordingstopping interface
2. Press theMode Key for a short time to enter therecording sub-
menu:
3. Push ,choose Recording Type Sub-menu itemPress the Mode
Key for a short time to enter this item.
Record type choose interface:
6. Push the key to chooseand press theMode key to confirm.
Sound record
Record please insures have enough Battery.
Display sustains every list file save.
Record in recordingmode
1. Enter main menu:

WWW.PREMIERMUNDO.COM
Pagina 13
Pagina 15
Pagina 14
Pagina 16
re- press the Mode Key fora short time to save thisbroadcasting
station.
7. Receive thesaved broadcasting station
If there is one or moresaved broadcasting station, you canpress the
Play key fora short timeto receive backward in sequence.
8. Inner recordingfunction
Youcan record theprograms you like while listening to the
broadcasting station programsPress the ModeKey for a short time to
enter FM sub-menuto choose highquality recording or long time
recording and youcan record thepresent program in the recording file.
Press the ModeKey for ashort time to quit recording.
9. Control thevolume:
VOL+: increase thevolume
VOL-: decrease thevolume
: You can save up to 20radio stations in your MP3 player.
: Todelete the radiostation please refers to the section Delete file
below.
System setting
How to getin
Youcan set thesystem parameter here and each item will change
with the upgradeof the firmware.
1. Enter themain menu
2. Push tochoose the systemsetting.
3. Push theMode Key fora short time to enter the system setting
Each parameter itemsynopsis
(Record Time) Sets the date and time ofthe recorded files.
(Back Light) Setsthe timing of the backlight.
(Back Light Mode) Sets backlight color
(Language) Sets thelanguage
(Power off) Setsthe time of the auto-power off.
(Replay Mode) Sets the Replay mode.
(Contrast) Sets theContrast of your LCD
(Online Mode) Setsthe function of the MP3 removable disk
(Memory Info) Checks capacity of the flash memory
(Firmware Version)Displays the date of the current firmwareversion
(Firmware Update) Usethis setting for the firmware update
(Exit) Exit thesubmenu
Detailed applying directions
Recording time Setting
1. System settingInterface
2. Press theMode Key for a short time to enter thetime recording
interface.
Recording Time:
3.Press "VOL+" (VOL-)to select the date and time.
4.Press the buttonto increase or press to decrease.
5.Having finished adjustingthe time, Press the "Mode" button to
confirm.
"Backlight time" enactment
Language choice's Setting
Operation systems consult" sound effect mode"enactment
Shut down Setting
Please refer to theoperation method onthe time settingin poor light.
The Electricity -savingMode means: You can setsuch a time(unit:
second). In the state ofstopping, it iscalculated from nokeystroke. The
mp3 player isshut down automaticallyto save the electricity when the
time is up.The number 0means this functionis shut down.
Sleeping Mode means: Youcan set sucha time (unit: second) In no
matter what state,it is calculatedfrom no keystroke. The mp3 player
is shut downautomatically when thetime is up and this is used for
listening to musicbefore sleeping. Caution:The Sleeping Modeis
valid only onceafter setting .Theset time will be cleared automatica-
lly after shuttingdown. If youneed that function, set it again please.
Re-reading Setting
Refer to the operation about Sound-effect Mode.
The Manual Modemeans: A-Bre-reading cannot punctuate autom-
atically. Onlythe synthetic setting can do it.The AutomaticMode
means thatA-B re-reading cando it automatically. (It is used for
EnglishReading in thestate of nomusic.)
1.System Setting Interface 2. Push tochoose the
"backlight time".
3. Press theMode Key fora short
time to enterthe time interfacein
backlight
4. Push / to regulate the
time.
5. Afterthat please pressthe Mode
Key to make sure to quit.
Contrast Regulation
Refer to the tine setting in the poor light.
Online mode
Refer to the setting of Sound-effect Mode.
Some operation systems (the edition before Windows 2K SP4)can't
support the USBdisk with twodrive letters. So now you need choose
to use whichdisk (single commondisk or single encrypted disk) after
using the functionof unusual degreespace. The chosendisk will be
displayed after connectingto the computer.
Memory State
The numbers heremeans the total capacity of the disk and the
percentage shows thespace rate thatis used.
Firmware Edition
Youcan see thepresent Firmware Edition in the player.
Firmware Upgrade
It is the interface for upgrading the Firmware. Enterthis interface
before firmware upgrade.
Press the Mode Key for a short time aftersetting the itemsand you
can press thePlay Key for a short time to quit themenu. The PlayKey,
which has thefunction of quitting the menu, is valid to allthe menus.
Electron documentation
Enter main menu,Push Next keychoose electron documentation.
Press Mode keyenter next menu:
Choose catalogue: chooseremove disk rootdirectory.
Press Mode key enter "choose catalogue"interface. Pass pressnext
and last chooseyou need read file catalogue, press Mode key exit
Last menu. Ifyou need read file in the remove disk rootdirectory.
Follow desuetude choosecatalogue.

WWW.PREMIERMUNDO.COM
Pagina 17
Pagina 19
Pagina 18
Pagina 20
Choose file consult"choose catalogue mode" enactment.
Push Next keychoose "file read". Press Mode notarizes, you can
read you choose file, in the read time. Pass press Next key or Last key
make time thumb.
Use telephone bookfunction
How to lookuptelephone message
Enter main menu: Push Next key choose telephone, pressMode key
enter telephone book,Embody menu as follows:
1.Browse TEL
2.Import Tel File
3.Export Tel File
4.Exit
Push NEXT keychoose "Browse TEL",press MODE key enter:
Push NEXT keychoose you need lookup object. PressMODE key
exit interface.
Browse TEL, Browse importplaying telephone bookfile, and inside
include Name, E-mail,Mobile telephone, QQ,Telephone, FAX, and
communication tool note.(Thereunto must storageimport telephone
book can enterthis function, whensystem read anything telephone
book file, systemdestined to hint:without file, press MODE key exit.)
Import tell file:Use the functionyou can hold user at the computer
making finer telephonebook file importupdate display.
Export tell file: Use this functioncan hold notes in the disk teleph-
one book datumexport and createfile. User in the computer can use
furnish tool aimat Process edit.
Telephone bookfile set up and edit
Edit telephone bookfile
The disk setup telephone book file can through follow accessory
install program saddlebagset up.
1.Move "Telbook_Ch"program. Push "open" key.
3.Push save key, disk willappear one file name is "TELBOOK" file.
Here telephone book file already set up.
2.According to dialog box clew inputcorrespond message, Push"Add"
key again. Here system will hold you infilling individualmessage
record in list. If you need add individual message,repeat handle
will do.
Telephone bookedit
If you input error message, youcan use hereinafter handle enter
modification.
1.Push you need modification individual message ubietyregister cote.
Here individual message will appear this cote having registeritem.
2.In the individualmessage modification, Push "Add" key, system
will clew:
3.Push "yes" thisitem already modification. This is notecote will
appear one and the same name two piece note,and message
homology.
If modification isname, the will add one piece differ name's note,
hereinbefore handle followNaught.
Telephone introductionand educe
Introduction telephone book
Use this function hold user in computer facturetelephone book file
introduction renewal tilldisk, Idiographic stepas follows:
Use afford telephoneedit tool Telbook.exe facture telephonebook
datum save make Telbook.bin file.
Plug into USBline, would Telbook.bin file to copy disk root
directory.
Open disk entertelephone book functionand enter introduction
telephone book option.
Notarize anon shalljust copy introductionTelbook.bin file
thereinto content introductioninsert disk.
Educe telephone book
Use this function can hold depositedin disk telephone book educe
and make file,use on the computer Can use afford tool aimat Process
edit,
Idiographic step asfollows:
Open disk entertelephone book function and enter educe telephone
book option.
Notarize anon shalldisk inside telephone book datum educe.
Plug into USBline, In the root directory can locateTelbook.bin file
namely educe telephone bookfile, copy anon,user can aimat Process
edit.
Use USB disk
This MP3 playercan be used as a USBdisk. There isno need to
install any driver(with exception of Windows 98) under Windows
2000/XP,Mac OS 10.3or above, Linux Reseat 8.0 or above.
The MP3 player can usethe USB portpower, so whenit is connected
to the PCthe battery isnot used. Ifyou want toplayback the musicwhen
MP3 player isconnected to the computer, during the"wait mode" press
the "Mode" button,and then you will enter the main menu.
After connection with the PC has been established,there are three
kinds of MP3modes, which are shown on the screen in thefollowing
way:

WWW.PREMIERMUNDO.COM
Pagina 21
Pagina 23
Pagina 22
Pagina 24
1.Waiting Situation 2. In theprocess of downloading
the data
Upgrade the player
YourMP3 player canbe updated use the utility software supplied
with it. To upgrade the MP3 player firmwareplease, follow the steps
below:
1. Enter mainmenu
2. Push the to choose the system setting.
3. Press theMode Key for a short time to enter thesystem setting.
4. Push the to choose the firmware upgrade.
5. Connect theplayer to PC.
6. Run theupgrading tool of PC "MP3 Player Update", then clickthe
button " Choosing the new edition hard files".
3. Sending thedata
7. Choose thenew firmware program (You can find itin the CD of the
computer or download it in the seller's website)
8. Click thebutton "Starting to upgrade"; the system will begin the
upgrade.
9. If youhave done the upgrade successfully, the player will hints the
following:
Firmware upgrade isthe function for promoting and optimizing
the player.If you don'tuse it, the common run of the player itselfwill
not be affected.
Firmware update usedin a wrong way might damage your MP3
player! Before updatingplease, read the instruction carefully. Make
sure that theuploaded file does correspond to your model of theMP3
player. Theperson performing update is supposed tohave some
experience in workingwith computers.
The firmware upgrade softwareof this playercannot apply toother
players, vice versa.
Other settings
Choose different catalogues(stop sub-menu)
It is possible to use a differentdirectory rather thanthe root directory
for the recordingor music playback.The MP3 playercan support up
to 9 directories,which the MP3can use to playback files in there. To
do that please,follow the stepsbelow
1.In the stoppinginterface (the
example here isthe Music Mode,
recording and playingcan choose
the directory)
2. Press ModeKey to enterthe
stopping sub-menu.
3. Re-press theMode Key toenter
the directory choiceinterface.
4. Push the or the to
choose in thedirectory.
5. Mode Keyto confirm thechosen directory.
Caution: Youcan set thecorresponding individual directory. About
Music Mode, RecordingMode and PlayingMode. That meansthese
three modes arenot in thesame directory.
Delete documents (stopsub-menu)
In music mode expand. Sound mode, and FM modeall can delete
comparatively file andkeep broadcasting station.
The choice "DeleteAll" will delete all the files in theselected
directory for thechosen mode (e.g. if the MP3 is in the"Music mode"
it will deleteall the musicfiles, but notthe other ones,such as recorded
files)
In FM Radio you can deletethe pre-saved radio station in a similar
fashion.
1. In thestopping interface.
(FM naught stopinterphase)
2. Press ModeKey to enterthe
stopping sub-menu
3. Push the or the and
choose the singlefile or allfiles
in the menu
4. Press ModeKey for ashort time
to enter Deletinginterface
5. Push the to change "NO"
to "YES".
6. Push theMode Key toconfirm
and then beginto delete.

If you preferto delete the files from your PC when MP3is conne-
cted to theUSB port, make sure you use the Safely RemoveDevice
wizard of Windows before you unplug the MP3 player from theUSB
port. Otherwise somedata might get corrupted.
Playing Mode (Playingthe sub-menu)
When playing musicand recorded files, different play modescan
be selected. (Suchas repeat, shuffle,etc.)
The first option in Play Submenu isPlay Mode. Theplayer will play
files according tothe mode selected.
Playing speed (playsub-menu)
You canchoose different playingspeed (Becoming quickeror slower)
when playing themusic (only forMP3 formats) and recording files.
But the toneand sound willnot change.
1 During the music playing.
2. Press the Mode Key for a short time to enterthe playing sub-menu.
3. Push the to choose theitem of playingspeed menu.
4. Press the Mode Keyfor a shorttime to enterthe menu ofthe choice
of playing speed.
5. Push the to accelerate theplaying, push theLast Key to slow
down the playing.
Normal
Repeat One Repeat playing onesingle song
Folder Play all themusic in the playing folder.
Repeat Folder Repeat play file insidehaving music.
Repeat All
REPEAT
SHUFFLE
Random
INTRO
Intro
Nonce list songplays done with. Carry over play after
one list music,unto play done with having file stop.
Repeat playing the musicin the directory
Play the musicin the present folder randomly
Play the firstten seconds of all the music in the
present folder insequence.
Caution: Tempo Rateset is suitable to each musicfiles till it is
changed
Re-reading Mode (Playingthe sub-menu)
Get into through playing the sub-menu.
A-B Re-reading
1. AtMusic Mode orVoice Mode
2. Press theMode Key fora short time to enter the play sub-menu.
3. Push the to select "replay".
4. Press theMode Key fora short time to enter the re-reading mode
Push the to confirm the starting point -A.
Push the to confirm the starting point -B.
5. Press the key, confirmthe A, in the picture appearance B, wait
confirm the B.
6. Press the key, confirmsthe B.
The re-reading signA-B is firm. The mp3player begins to play
repeatedly between thepoint ofA andB. Reaching the set times, it
will quit theRe-reading Mode. You can pressthe to re-confirmthe
point Ain this mode.(About the playingtimes, you should refer to the
re-reading times inthe next chapter.)
In the re-readingmode: Repeat mode.Youcan press VOL+ or
VOL- to setthe playing speeddirectly.
The function ofreading along (the voice mode do not
have this function)
Push the tocome back to the A-B re-reading state at this time.
The contrast function(thevoice mode donot have this
function )
1. The mp3player is re-reading
the A-B.
2. Push the to enter the
re-reading mode.
4. When thetime is up, it plays the
original voice, andthe sign
changes into .Youcan push
the to enterthe contrast
function at thistime.
3. The re-readingsign A-B is
changed into thereading alone
sign . Themp3 player begins
to record theusers' voices. The
time length isthe re-reading time
of the formerA-B.
Push the tocome back tothe state of the re-reading function
now.
In above these three states, you can press theMode Key for a short
time to quitre-reading mode.
Re-reading times (playsub-menu)
Refer to the time setting of background light.
The re-reading timesdetermine to quit after how many times of the
A-B re-reading.
Re-reading interval (playsub-menu)
Refer to the time setting of background light.
The re-reading interval determines how longthe halt timeis between
this playing andthe previous one(unit: Second).
Key recommendation
Unusual Degree SpaceFunction
With the supplied utility you can divide theMP3 player into two
sections (public andencrypted). Under Windows 2000 SP4 and above
you will see2 disks inthis case. Under older operating systems only
one removable diskwill be seenon your computer. If you still want to
see the other, you should enter the "SYS"menu of your MP3 player
and select "Multi Drive" for "Online Mode".To encryptthe MP3 player
please, follow thesteps below:
1. Connect theplayer with thecomputer.
1. Entering thecontrast function,
the re-reading signshows as ,
the original voiceis played at
this time.
2. Afterthat, the signis changed
into . Thereading along
voice of theusers is played.
2. Run theinstalling program kitin this mp3 player MP3 Player Disk
Tool.
3. First youwill see formattedtool, choose "division and encrypting "
item please. Choosea suitable capacityfor the encrypted disk andpick
up the use r name or pa ssword . Input the username in "NewUser Name"
and input thepassword in "New Password ". Input the same password
in "New PasswordConfirmation". Click the"Start" button, and then
the division begins.
WWW.PREMIERMUNDO.COM
Pagina 25
Pagina 27
Pagina 26
Pagina 28

WWW.PREMIERMUNDO.COM
Pagina 29
Pagina 31
Pagina 30
Pagina 32
4. The divisionfinishes, the hints are the following.
5. The computerhints new startup after "Confirmation", andconfirms
this process.
6. You can see two drive lettersafter startup (You can onlysee one
drive letter in theedition before Windows 2k Sp4). Youwill see three
files, two of them are hidden, and one isexecuted file after clicking
the encrypted disk. The space ofthe disk is only 300K.
7. Run theexecuted file "RdiskDecrypt.exe"and input the user name
and the password in the dialog box. If correct,the disk can be entered
and you can copy files into it.
8. Connecting themp3 player with the computer each time, you should
input the user name and the password to enterthe encrypted disk.
Note: If you wantto encrypt the disk in the way described above,
please, first backupyour files, all the data will be lost afterthe
encryption.
Warning: Don't forget yourpassword and the user name;
otherwise you won'tbe able to use your disk. In case thepassword is
lost, you can only format the disk toregain the access,but then allyour
files will belost.
USB drive install
Install
Caution:
1. At FM radiogram state, don't join USB.
2. At WINDOWS98 system. Maybeappear join USB fixture cannot
up to snuffhandle or disk symbol not revealphenomena: here, please
open install diskfile straight doubleclick setup.exe press clue on
install instanter OK.
Difficulty question
Download of
music files fails.
No Power Check whether thebattery have beeninserted
properly.Check whetherthe player is turned ON.
No sound isheard
from headphone.
Check whether Volume is set "0" and connectthe
headphone plugs firmly.
Check whether theheadphone plug isdirty.
Corrupted MP3 maymake a staticnoise and the
sound may cutoff. Make surethat the musicfiles
are not corrupted.
Characters in LCM
are corrupted
Check whether theright language hasbeen
selected.
FM Reception is
poor.
Adjust the positionof the headphoneand player.
Turn offthe power ofother electric devices near
the player.
The headphone maybe used asthe antenna.
Check whether USBcable is damagedand is
connected properly
Check whether driveris installed correctly.
Check whether theplayer's memory isfull.
Technology specification
Follow accessory
USB line one
Headphone one
Direction one
Installation CD one
AAABattery one
Appearance Size
Weight
Screen Lattice
Join the computer
CPU Flashing Memory
Power Supply
Recording Record format
Record time
MP3 WMA
WMV ASF
MP3 bit rate
WMA, WMV, ASF bitrate
Frequency response
Signal to Noise ratio
Distortion
FM radio Optional Channel Number
The biggest output power
of the headphone
SNR
Music formats
supported
Temperature range
Language support
Operating system
96mm 30mm 22mm
30g(Without the battery)
(96*26) LCD Screen bluecolor background
128M-256M-512M
10 hours
Rate 8KHz
WAV(32K bps) ACT(8K bps)
35 hours(ACT 128M Flash)
Earphone max power
(L)10mW+(R)10mW(32Ohm)
8K bps - 320Kbps
5K bps - 384Kbps
20Hz- 20KHz
85dB
0.05%
The range of receiving
frequency
76MHz - 90MHz /
87MHz - 108MHz
20 20
(L)10mW+(R)10mW
(32Ohm)
45dB
MP1 MP2 MP3 WMA WMV ASF WAV
-5 ~ +40 Degree
Windows98/SE/ME/2K/XP Mac OS 10 Linux 2.4.2
Remark: Mp3 player designand spec may change without notice.
MP3.1CD-696A
Full Speed USB1.1 Readspeed (MAX): 1000K byte/s
Write speed (MAX):800k byte/s
Simplified Chinese Simplified English Complex
Chinese Complex English German French rank eight
country language.
Table of contents
Languages:
Other Premier MP3 Player manuals