Prentke Romich Company BTS User manual


B
Bl
lu
ue
et
to
oo
ot
th
h
S
Sw
wi
it
tc
ch
h
2
PRC Bluetooth Switch, PRC Bluetooth Adapter, SpringBoard Lite, Vantage Lite and ECO-14 are trademarks of Prentke
Romich Company.
Bluetooth Wireless Technology is a registered trademark of Bluetooth SIG, Inc. The Bluetooth word mark and logos are
owned by Bluetooth SIG, Inc. Other trademarks and trade names are those of their respective owners.
Bluetooth QD ID B013848
Digital photographs courtesy of Douglas Miller.
Electronic Interference Information
This device complies with Part 15 of the FCC Rules. Operation is subject to two conditions: (1) this device may not cause
harmful interference, and (2) this device must accept any interference received, including interference that may cause
undesired operation.
Warning!
Changes or modifications to this product which are not authorized by
Prentke Romich Company could exceed FCC limits and negate your
authority to use this product.
This equipment has been tested and found to comply with the limits for a Class B digital device, pursuant to Part 15 of the
FCC Rules. These limits are designed to provide reasonable protection against harmful interference in a residential
installation. This equipment generates, uses and can radiate radio frequency energy and, if not installed and used in
accordance with the instructions, may cause harmful interference to radio communications. However, there is no guarantee
that interference will not occur in a particular installation. You can determine whether this product is causing interference in
your radio or television by turning this product off. If the interference stops, it was probably caused by this product or one of
its accessories. You can attempt to correct the interference by using one or more of the following measures:
Turn the television or radio antenna until the interference stops.
Move this product to one side or the other of the television or radio.
Move this product farther away form the television or radio.
Plug this product into an outlet that is on a different circuit from the television or radio; that is, this product should be
controlled by different circuit breakers/fuses from the television or radio.
If necessary, contact a Prentke Romich Company service technician for assistance.
This Class B digital apparatus meets all requirements of the Canadian Interference-Causing Equipment Regulations. Cet
appareil numérique de la classe B respect toutes les exigences du Règlement sur le matériel brouiller du Canada.
CE ENVIRONMENTAL INFORMATION: Use: 0o - 45oC; Storage: (-20o) - 50oC; 95% maximum relative humidity @ ambient
temperatures less than 40oC.
Warning!
When operating this device in a medical environment, do not use with
any product that is not medically approved.
Any mounts used should be fitted by a qualified person. Failure to
install the mounting system according to the manufacturer's
instructions may result in an injury to the user.
©Prentke Romich Company 2008. All rights reserved.
Under copyright laws this manual may not be copied, in whole or in part, without the written consent of the Prentke Romich
Company.
PRC • 1022 Heyl Rd. • Wooster, OH 44691 • Tel: 800-262-1984 • Fax: 330-263-4829 • info@prentrom.com•
www.prentrom.com
Liberator • Liberator House • Minerva Business Park • Lynch Wood, Peterborough, Cambridgeshire • PE2 6FT UK • Fax +44
1733 391939 • l[email protected] •www.pri-liberator.com
14646v1.05

B
Bl
lu
ue
et
to
oo
ot
th
h
S
Sw
wi
it
tc
ch
h
3
Charge the Bluetooth
Switch battery
before using it the
first time!
Go to page 7 for charging information.
Go to page 10 for battery LED information.

B
Bl
lu
ue
et
to
oo
ot
th
h
S
Sw
wi
it
tc
ch
h
4
In the Box
You will also receive a piece of Dual-Lock to use with the mounting plate if
you want to attach it to a different surface.
Accessories you can use with the BTS
Bluetooth Wireless
Switch
(BTS)
BTS Charger
(USA only)
BTS Mounting Plate
and mounting screws
USB Cable
Bluetooth Wireless
Adapter
PRC Dual Switch
and connector
cable

B
Bl
lu
ue
et
to
oo
ot
th
h
S
Sw
wi
it
tc
ch
h
5
Table of Contents
In the Box.........................................................................................4
Table of Contents .............................................................................5
Charging the Battery ........................................................................7
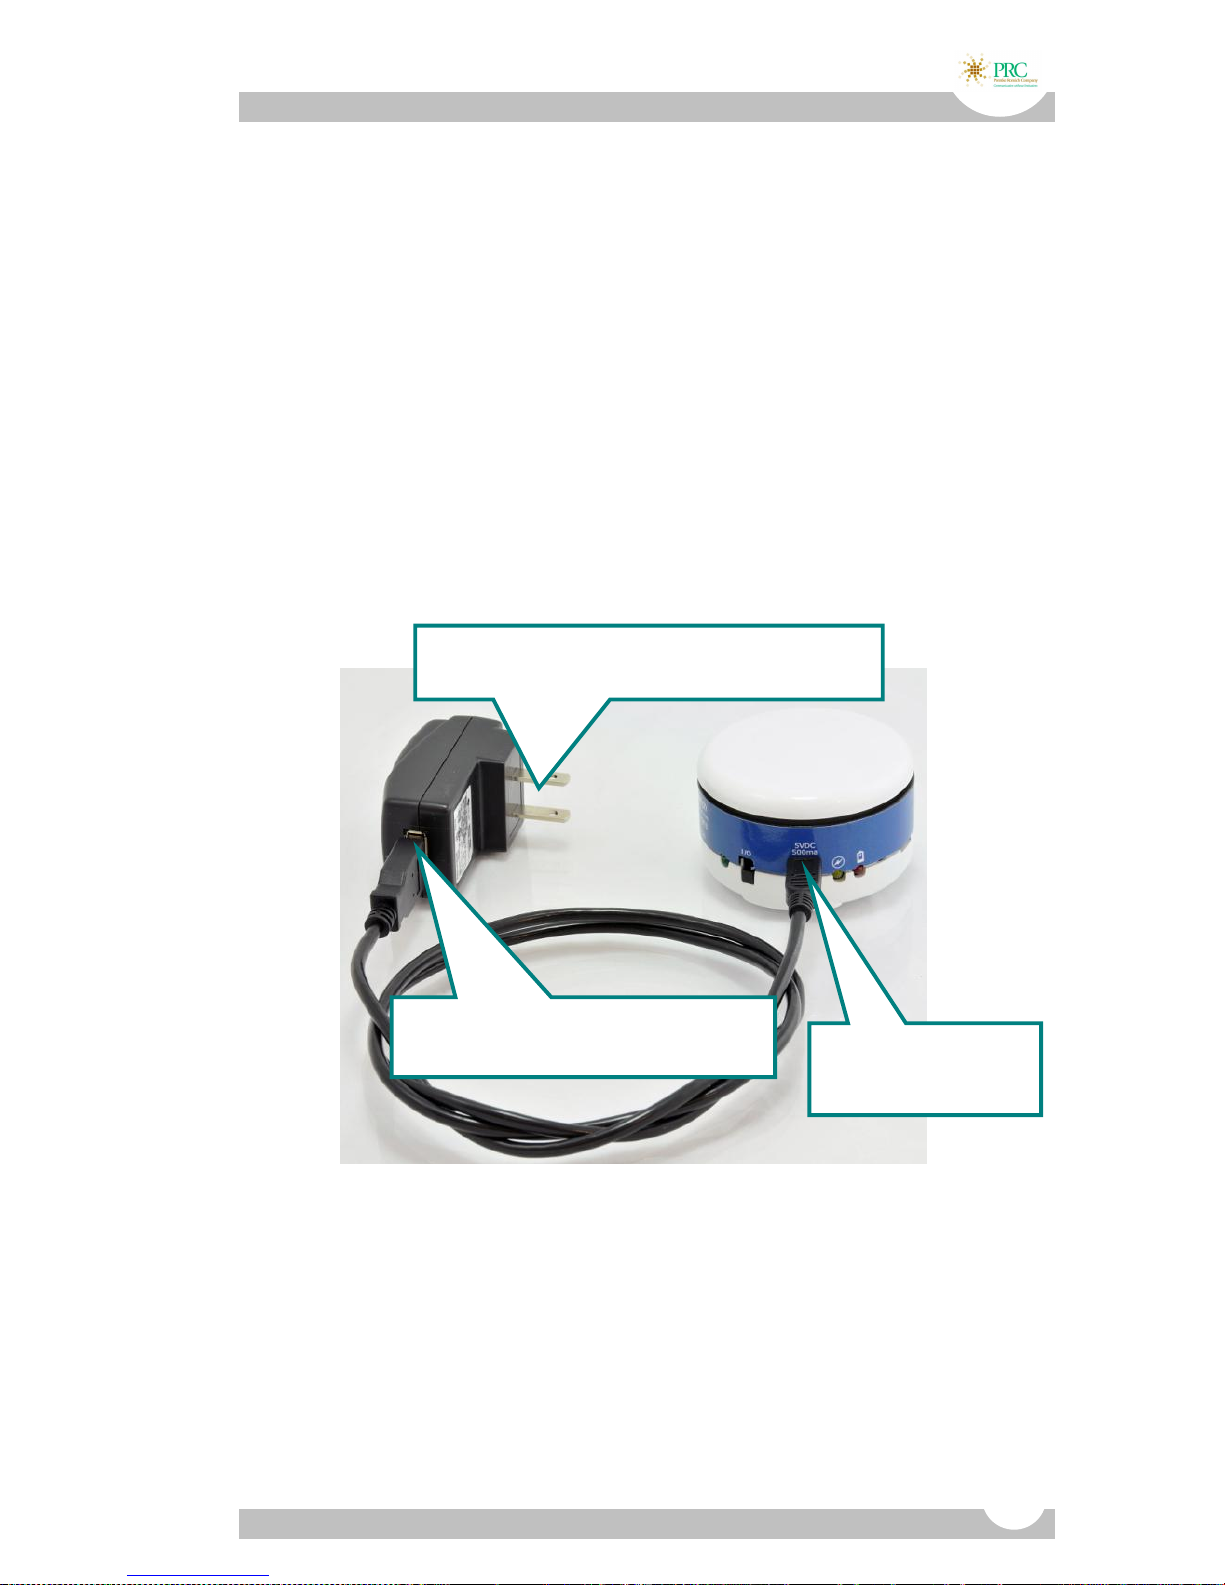
BTS, Charger (USA only) and USB Cable .............................................. 7
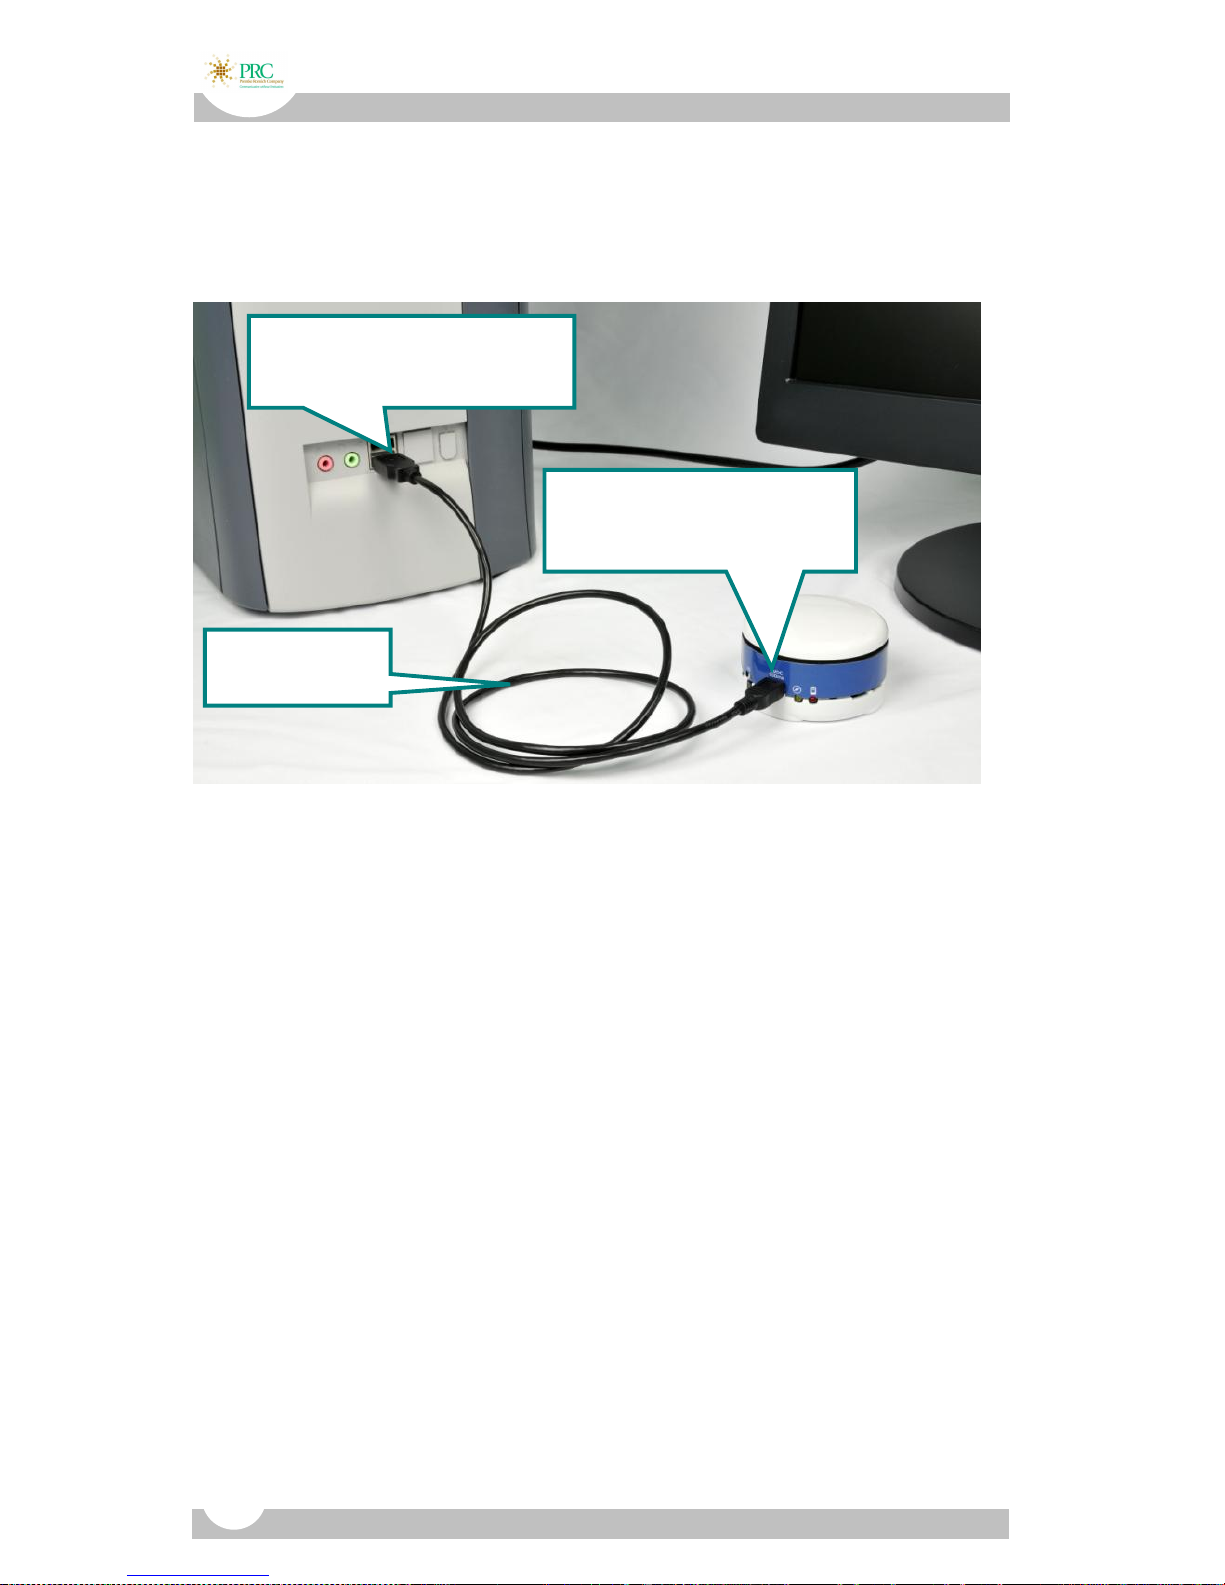
BTS, USB Cable and Computer.............................................................8
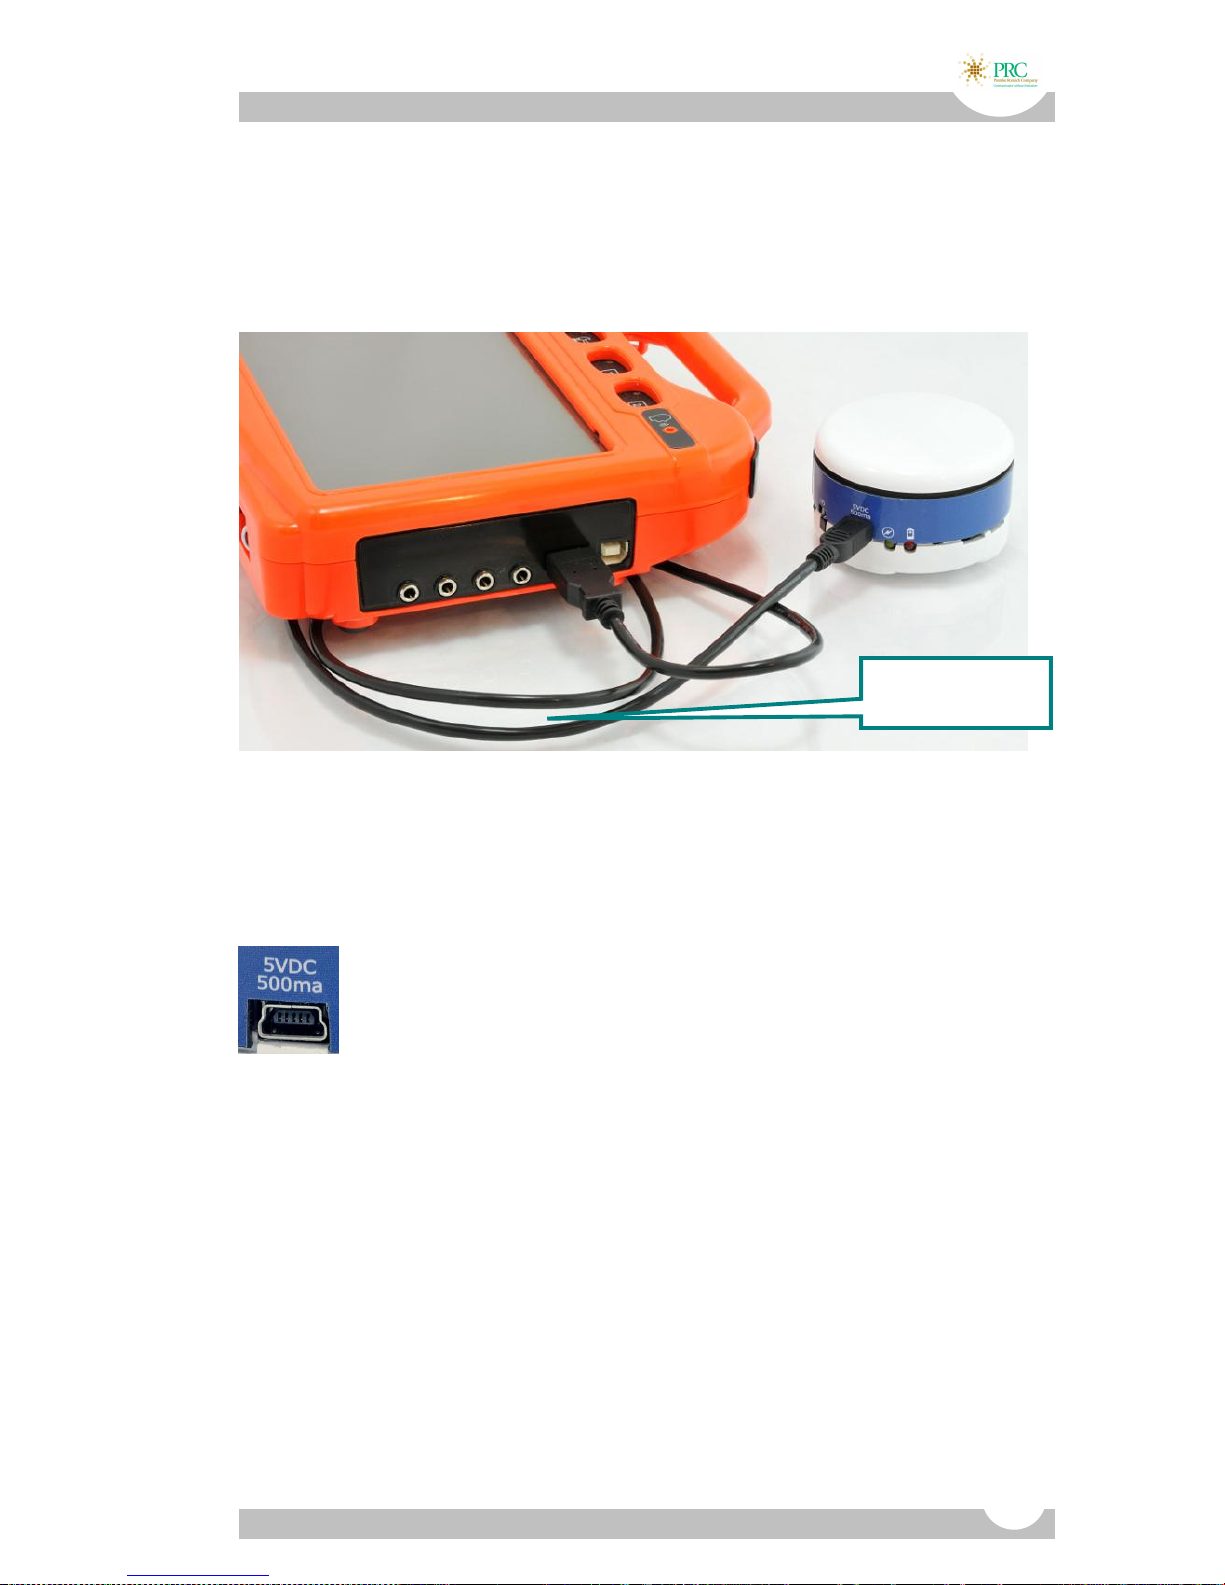
BTS, USB Cable and AAC Device ..........................................................9
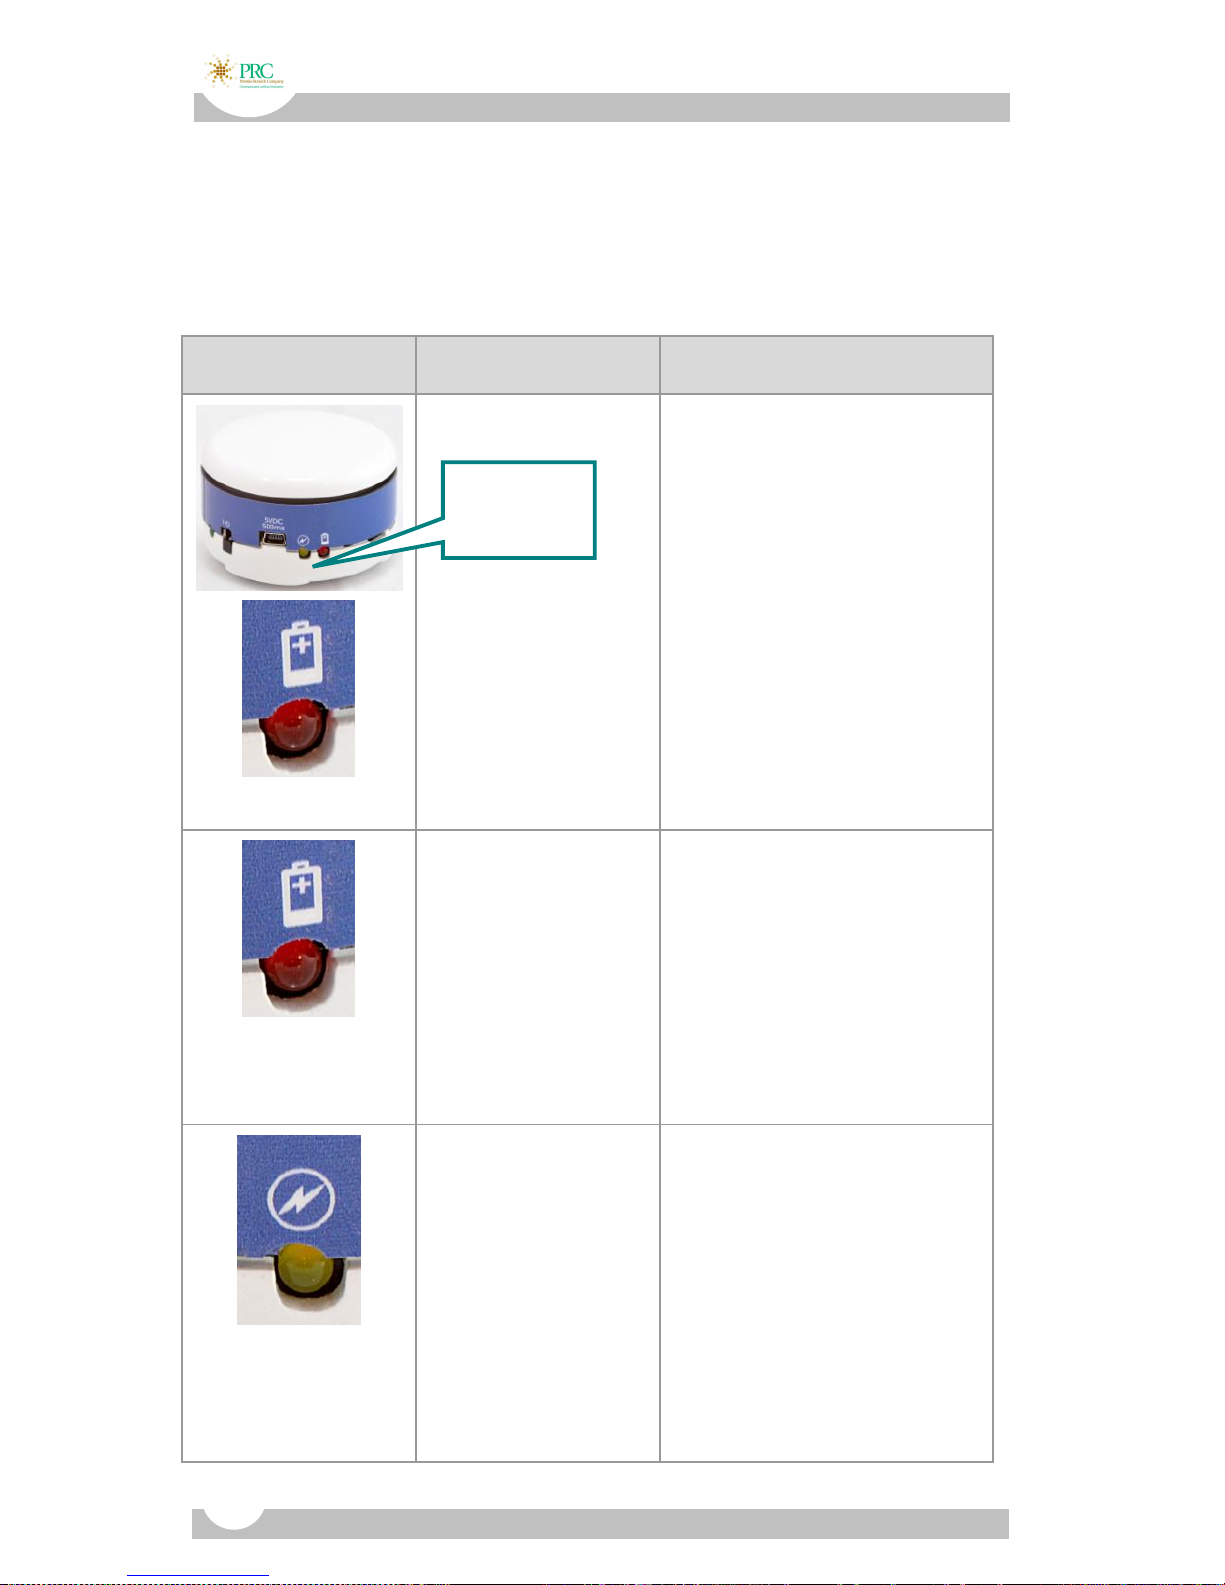
Battery LED Information................................................................. 10
The BTS Mounting Plate ................................................................. 12
The BTS Label –What the Icons Mean.............................................. 14
Switch Mode Settings ..................................................................... 17
Use the BTS with a PRC Communication Device ............................... 19
1-Switch Scanning.............................................................................. 20
2-Switch Scanning .............................................................................24
Computer Access with the BTS and the Bluetooth Adapter ...............28
Computer Access –Mouse Mode .......................................................29
Computer Access –Keyboard 1, 2, 3 Mode ......................................... 30
Computer Access –Keyboard Mode ENTER, F11, F12..................... 31
Using the BTS with the Bluetooth Adapter......................................... 32
Bluetooth Basics.............................................................................36
The Pairing Procedure........................................................................ 36
Troubleshooting .............................................................................38
If You Lose a Connection.................................................................... 38
Un-Pairing.......................................................................................... 40

B
Bl
lu
ue
et
to
oo
ot
th
h
S
Sw
wi
it
tc
ch
h
6

B
Bl
lu
ue
et
to
oo
ot
th
h
S
Sw
wi
it
tc
ch
h
7
Charging the Battery
Turn the BTS OFF and charge the battery before using the
BTS for the first time
A full charge will take approximately 7 hours.
The battery will last several days between charges.
There are 3 ways to charge the BTS:
BTS, Charger (USA only) and USB Cable
Plug the larger end of the USB cable unto the charger
adapter. Plug the smaller end into the connector labeled
5VDS 500ma on the BTS. Plug the charger adapter into a
working electrical outlet. Eventually a yellow LED on the BTS
will light. When the light goes out, the battery is charged.
Plug USB cable in here.
Plug into electrical wall outlet
Plug USB
cable in here

B
Bl
lu
ue
et
to
oo
ot
th
h
S
Sw
wi
it
tc
ch
h
8
BTS, USB Cable and Computer
Plug the larger end of the USB cable into the USB port on
your computer. Plug the smaller end into the connector
labeled SVDS 500ma on the BTS.
Your computer must be ON.
Eventually a yellow LED on the BTS will light. When the light
goes out, the battery is charged.
Plug in large end of
USB cable USB port
Plug in small end of
USB cable here
USB cable

B
Bl
lu
ue
et
to
oo
ot
th
h
S
Sw
wi
it
tc
ch
h
9
BTS, USB Cable and AAC Device
Plug the larger end of the USB cable into the USB port on
your AAC device. Plug the smaller end into the USB connector
on your Bluetooth Switch.
Eventually a yellow LED on the BTS will light. When the light
goes out, the battery is charged.
USB cable

B
Bl
lu
ue
et
to
oo
ot
th
h
S
Sw
wi
it
tc
ch
h
10
Battery LED Information
ICON
LED COLOR
MEANING
LOW BATTERY
Steady red
Low battery
Charge the battery soon
DEAD BATTERY
Flashing red light
for several seconds,
then LED goes out.
When flashing:
battery is dying
When no longer lit:
Battery is dead and BTS will
not work.
Charge now.
CHARGING
Steady yellow
Battery charging
Yellow LED is visible at
some point during charging,
but not always immediately.
When LED is no longer lit,
charging is complete
Battery
LEDs

B
Bl
lu
ue
et
to
oo
ot
th
h
S
Sw
wi
it
tc
ch
h
11

B
Bl
lu
ue
et
to
oo
ot
th
h
S
Sw
wi
it
tc
ch
h
12
The BTS Mounting Plate
The mounting plate allows you to use the BTS with the PRC
Switch Mounting Kit for table or wheelchair. There is also a
piece of Dual-Lock which you can use to attach the plate to
other surfaces.
Attach the mounting plate to the bottom of the BTS with the
three screws which are included.
Mounting
Plate
Bottom of Bluetooth switch
Mounting screws
Rubber gasket is on every
switch, but not shown in
some of these pictures.

B
Bl
lu
ue
et
to
oo
ot
th
h
S
Sw
wi
it
tc
ch
h
13

B
Bl
lu
ue
et
to
oo
ot
th
h
S
Sw
wi
it
tc
ch
h
14
The BTS Label –What the
Icons Mean
Part
Description
I/O = ON/OFF
Turns the BTS ON or OFF. Slide UP for ON and
DOWN for OFF.
When ON, the green LED will light for 1-3
seconds while the switch powers up, then it will
go off.
5VDC
500ma
When you are connecting the USB cable to an
AAC device or a computer for charging
purposes the small end of the USB cable goes
in here.
I/O = ON/OFF
USB cable
goes here

B
Bl
lu
ue
et
to
oo
ot
th
h
S
Sw
wi
it
tc
ch
h
15
Battery Charging
At some point during charging, the yellow LED
will light to indicate charging. When it goes
out, the battery is charged.
Switch Modes
The way you set the small switches inside these
two holes tells the BTS how you will use it.
The modes are: Switch Mode; Mouse Mode;
Keyboard 123 (PASS) or Keyboard Enter; F11
and F12 (for WiViK)
Move the mode switches with a sturdy
toothpick or a straightened paper clip. See
pages 17-15 for Switch Mode Settings.
External Switch
Connector
Plug a Dual Switch in here. To use a mono
switch you must have a stereo-to-mono
adapter.
Charging LED
Dual Switch
connector
Switch Mode switches

B
Bl
lu
ue
et
to
oo
ot
th
h
S
Sw
wi
it
tc
ch
h
16
PAIR Button
When you press the PAIR button, the green
LED next to the I/O icon will flash.
When the BTS is paired, the green LED will
light steadily.
Pair button

B
Bl
lu
ue
et
to
oo
ot
th
h
S
Sw
wi
it
tc
ch
h
17
Switch Mode Settings
The Bluetooth Switch is set up at the factory to work with a
PRC AAC device. You do not have to change Switch modes.
To use the Bluetooth Switch with a computer you must
change Switch Mode Settings on the BTS.
You must also have the PRC Bluetooth Adapter.
To change the settings, turn the BTS OFF and use a sturdy
toothpick or a straightened paper clip to slide the Mode
switches.
Go to the next page for the Switch Mode chart.
The slide
switches for
different
modes are
inside these
two openings

B
Bl
lu
ue
et
to
oo
ot
th
h
S
Sw
wi
it
tc
ch
h
18
Turn the Bluetooth Switch OFF before you change
modes!
SETTINGS
GRAPHIC OF
SETTING
USE
Switch Mode
Left switch to LEFT
Right switch to
LEFT
Use switch for 1 or 2- switch
scanning with a PRC AAC
device.
This is the default setting.
You may need an external
switch.
Mouse Mode
Left switch to
LEFT
Right switch to
RIGHT
Mouse Mode
Use switch as a computer
mouse.
Must use with PRC
Bluetooth Adapter and
external switch
Keyboard 1, 2, 3
Mode
Left switch to
RIGHT
Right switch to
RIGHT
Keyboard 1, 2, 3 Mode
Use switch to emulate 1, 2 &
3 keys on a keyboard for
switch access to PRC PASS.
Must use with PRC
Bluetooth Adapter & an
external switch.
Keyboard ENTER,
F11, F12 Mode
Left switch to
RIGHT
Right switch to
LEFT
Keyboard ENTER, F11, F12
Mode
Use switch to emulate
ENTER, F11 & F12 keys for
keyboard access to the
WiViK program.
Must use with PRC
Bluetooth Adapter and
external switch.

B
Bl
lu
ue
et
to
oo
ot
th
h
S
Sw
wi
it
tc
ch
h
19
Use the BTS with a PRC
Communication Device
1-Switch scanning with the SpringBoard Lite, Vantage Lite
or ECO-14
In order for the BTS to work with a communication device,
the device must have a PRC Bluetooth Module installed in it.
The PRC ECO™-14 and Vantage™ Lite have a built-in
Bluetooth module.
The PRC SpringBoard™Lite has an optional Bluetooth
Module you can purchase and plug into the SpringBoard Lite.
The Bluetooth Switch comes set up for 1-switch and 2-switch
scanning with an AAC device. You do not have to change
Switch Modes on the BTS.

B
Bl
lu
ue
et
to
oo
ot
th
h
S
Sw
wi
it
tc
ch
h
20
1-Switch Scanning
Select
Do This
Turn the BTS ON by sliding the I/O
switch up
The green LED will light for a
few seconds, then go out.
Turn the AAC device ON.
Go to the AAC Toolbox.
Select the ACCESS METHOD MENU.
Table of contents