Presco AG PD-CLSB-CD00 User manual

Presco AG
Zürcherstrasse 70 -CH 8104 Weiningen Tel. + 41 44 750 63 63 Fax + 41 44 750 63 66
Manual_BattCal_englisch.doc/PO/KF/01-04-02 1/6
Battery-PD-Calibrator
Type PD-CLSB-CD00
Instruction Manual
Table of contents
1 Precautions
1.1 Safety
1.2 Safety precautions
1.3 Impaired Safety Precautions
2. Introduction
2.1 Function Principle
3. Technical Data
3.1 Ordering Information
4. Operation
5. Service

Presco AG
Manual_BattCal_englisch.doc/PO/KF/01-04-02 2/6
1 Precautions
1.1 Safety
The instrument described in this manual is designed to be used by properly trained
personnel only. Adjustment, maintenance and repair of the exposed equipment should
only be carried out by qualified personnel aware of the hazards involved.
1.2 Safety precautions
For correct and safe use of this instrument it is essential that both operation and service
personnel follow generally accepted safety procedures in addition to the safety
precautions specified in the manual. Specific warning and caution statements, where they
apply, will be found throughout the manual. Safety is the responsibility of the user.
Warning!
This Instrument is an electronic system foreseen and
designed for low voltage operation. The whole equipment is
generally used in high voltage environment and therefore all
instructions and precautions that apply for such operations
have to be considered working with the measuring
instrument.
High Voltage
Danger of Life
1.3 Impaired safety precautions
Whenever it is likely that safety protection has been impaired, the instrument must be
made inoperative and be secured against any unintended operation. Safety protection is
likely to be impaired if, for example, the instrument fails to perform the intended
measurements or shows visible damage.

Presco AG
Manual_BattCal_englisch.doc/PO/KF/01-04-02 3/6
2. Introduction
2.1 Function Principle
The calibrator is made basically from a voltage step-generator (Us) and a capacitance (Cc):
If Cc<< Ct, the injected charge on the terminal of the test object Ctis:
q U C
s c
.
The rise time (10%) of the step voltage must be lower than 100 s.
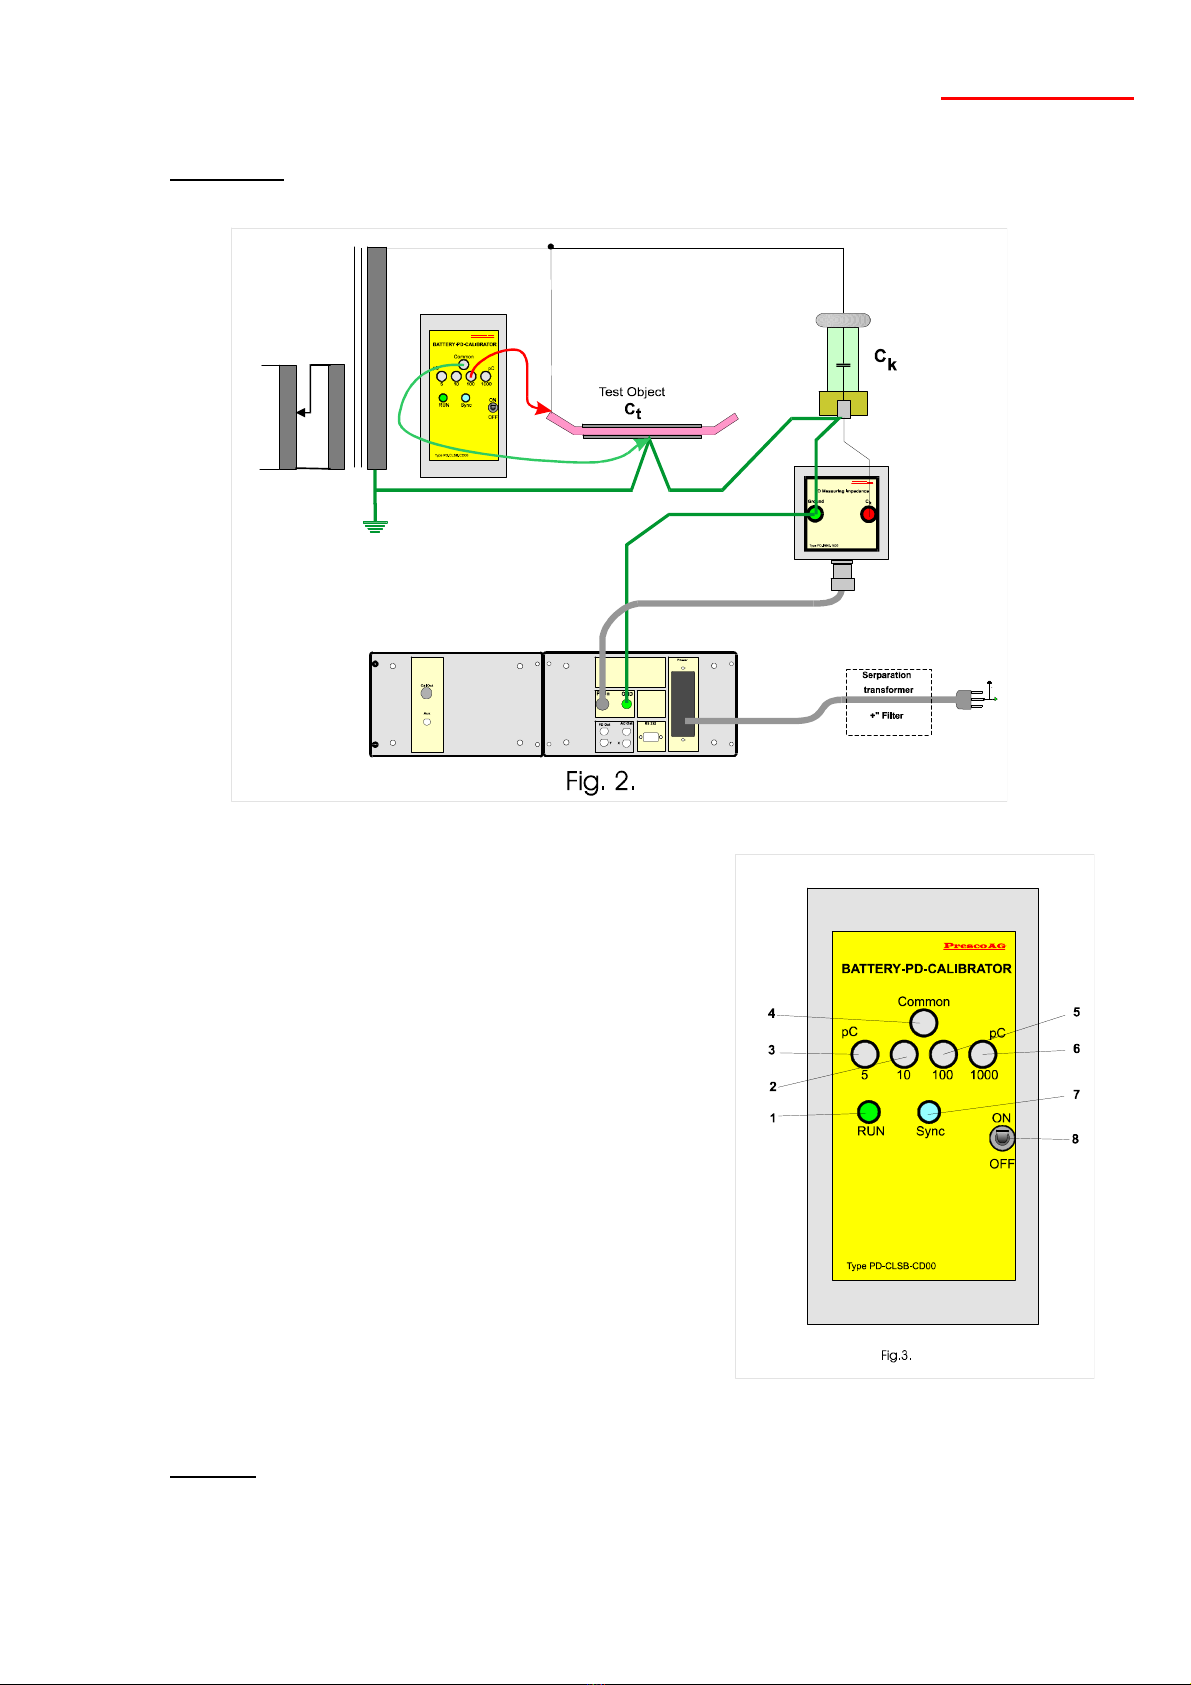
The next figure shows the structure of the calibrator.
Fig.. 2
A 9 V battery delivers the necessary power. A stabiliser produces 7.07 V and a light-
synchronised generator delivers the step voltage. Different capacitor units serve for the injection
of charges between 5 pC and 1000 pC.
The „Run Control“ light displays the state of the battery. If the voltage of the battery is lower
than 8.3 volt, the light extinguishes.

Presco AG
Manual_BattCal_englisch.doc/PO/KF/01-04-02 4/6
3. Technical Data
charge values 5 - 10 - 100 - 1000 pC
output capacitance < 150 pF
rise time < 60 ns
power supply 9 V battery type 6LR61
battery life > 20 hours of continuous operation
synchronisation optical pick-up of power frequency from
nearby lamps
uncertainty ± 3%
supplied with calibration certificate
Dimensions approx. 160 x 85 x 35 mm
Weight approx. 0.3 kg
reference conditions
temperature 23° C ± 2° C
humidity, non condensing 45 ... 75%
altitude (pressure) 101.3 kPa
rated range of use
according IEC 359
temperature 5° C ... 40° C
humidity, non condensing 20 ... 95%
altitude (pressure) 70 ... 106 kPa
3.1 Ordering information
Battery-PD Calibrator Type PD-CLSB-CD00
Scope of supply :
1 Battery Calibrator incl. battery
1 Instruction manual
1 Test certificate
Presco AG
Manual_BattCal_englisch.doc/PO/KF/01-04-02 5/6
4 Operation
The measurement set-up is shown in Fig. 2.
The desired charge value must be selected from the
front connectors of the calibrator (2, 3, 5 or 6/Fig. 3.).
The selected high - output (100 pC in Fig. 2.) must be
connected to the high voltage terminal of the test object
by a short lead. The common terminal is connected to
the ground terminal of the test object.
The calibrator can be switched on by the switch 8/Fig.
3..
If the battery has enough energy the green light 1/Fig.
3. is on. If not, the battery must be exchanged.
The calibrator delivers charge pulses periodically. If the
light is too week or too intensive, or it has no
modulation in the area where you are working, the
calibrator goes in free run. The frequency will be app.
35 Hz. If there is light with modulated by 50 or 60 Hz,
the calibrator is synchronised to this frequency.
After the calibration, the calibrator must be switched off
and must be removed from the terminals of the test object. If you forget it and you give high
voltage, you kill your calibrator.
5 Service

Presco AG
Manual_BattCal_englisch.doc/PO/KF/01-04-02 6/6
Repair work and maintenance can only be done by qualified personnel of Presco AG. In
case of problems please contact the representative which delivered the instrument or
Presco AG directly.


