Presenza QL032 Assembly instructions
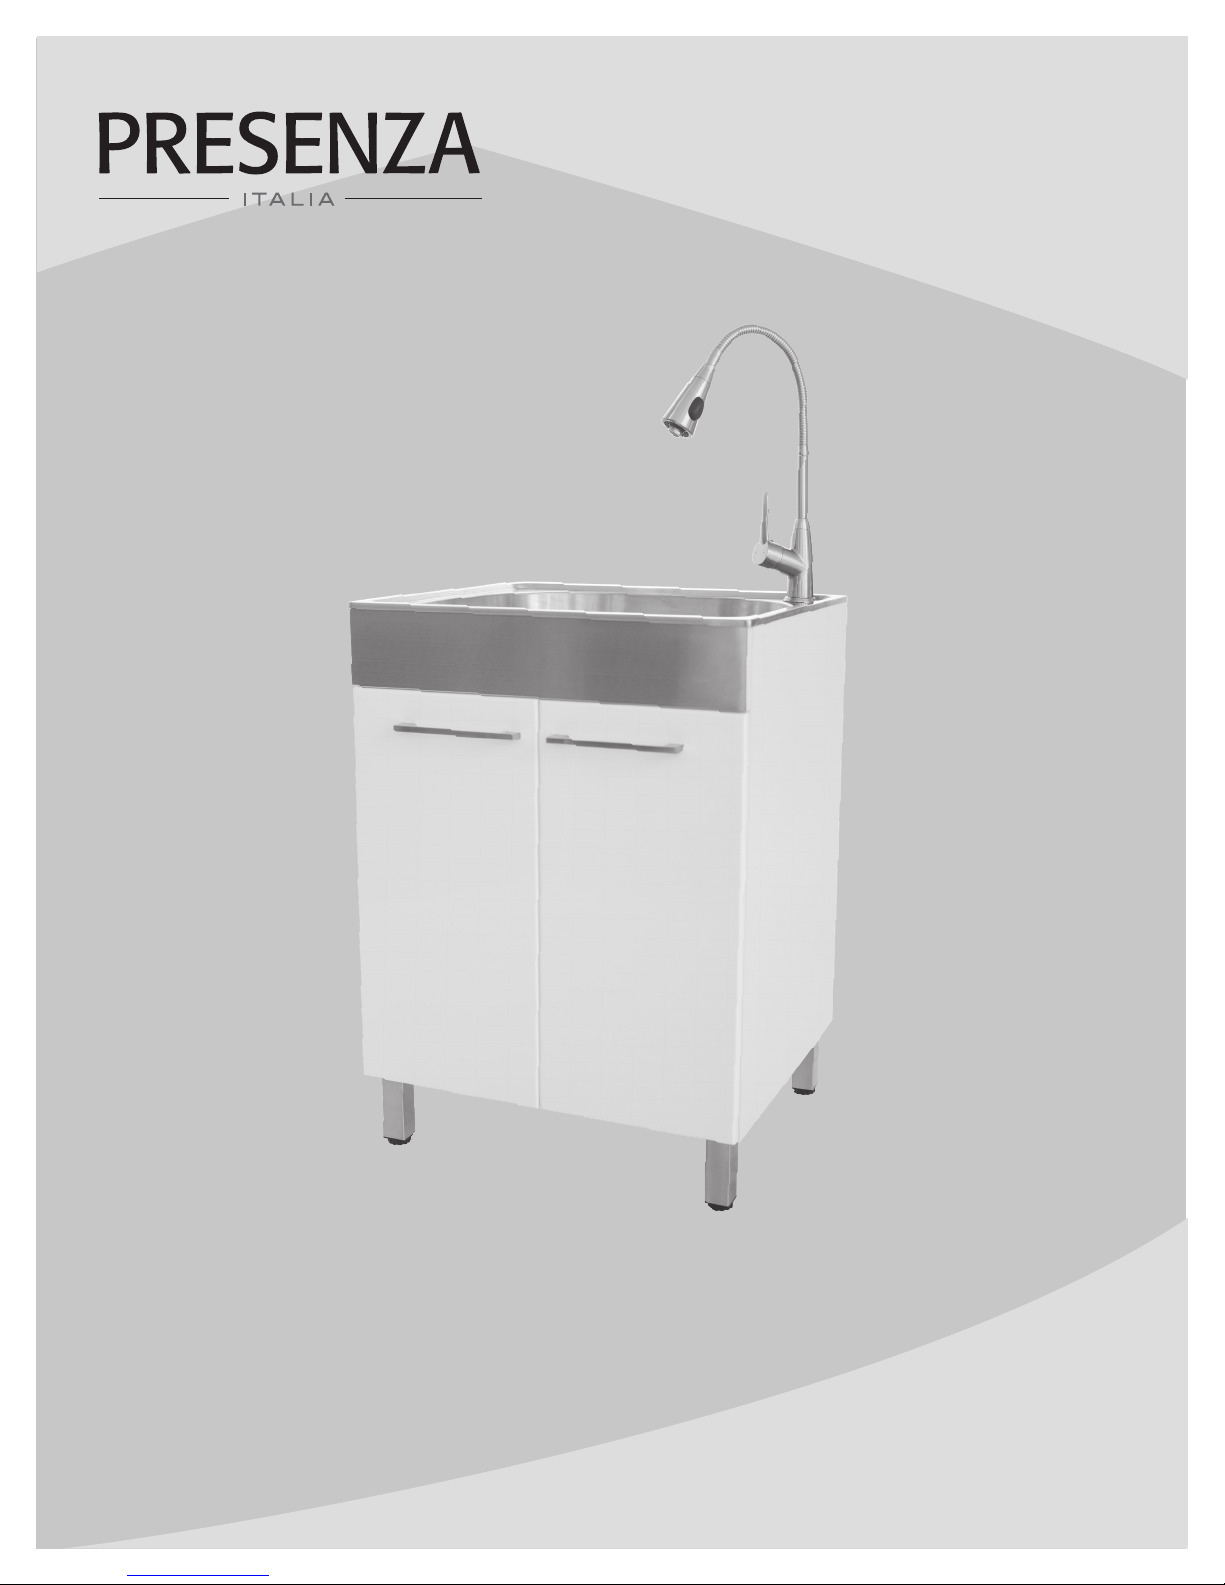
STAINLESS STEEL
UTILITY SINK WITH FAUCET
AND STORAGE CABINET
INSTALLATION GUIDE
AND USER MANUAL
Model No. QL032
2
Table of Contents
Table of Contents ...................................2
Safety Information ..................................2
Warranty
One Year Limited Warranty...........................3
Warranty Claim Procedure ...........................3
Pre-Installation
Tools/Materials Required ............................4
Parts Required ....................................4
Package Contents .................................5
Installation
Installing the Leveling Legs ..........................6
Installing the Handles ..............................7
Installing the Faucet ...............................7
Installing the Strainer ..............................8
Mounting the Utility Sink ............................9
Placement ......................................10
Supply Line .....................................10
Maintenance
Cartridge Replacement ............................10
Care and Cleaning
Utility Sink ......................................11
Cabinet.........................................11
Service Parts......................................12
Safety Information
READ AND SAVE THESE INSTRUCTIONS
1. Inspect your unit before proceeding. Once you unpack your unit,
check for chips, scratches, cracks, dents or scuff marks. If any
damage is noticed, do not install.
2. Use this unit only in the manner intended by the manufacturer. If
you have any questions, contact the manufacturer.
3. Installation work and plumbing must be done by qualied
person(s) in accordance with all applicable codes and standards.
4. Protect the entire surface during installation.
5. All holes drilled into the unit must be done from the nished
surface side with extreme care and caulked very carefully to
form a watertight barrier.
DANGER: Always wear safety goggles and gloves in order
to avoid personal injury.

3 CONGLOMKB.COM
Please contact 1-877-333-0098 for further assistance.
Warranty
ONE YEAR LIMITED WARRANTY
A thorough inspection must be made before installation and any damage must be promptly reported. We will not be liable for failures or
damage that could have been discovered or avoided by proper inspection and testing prior to installation.
Conglom Kitchen & Bath warrants this product to be free from defects in materials or workmanship for one (1) year from the date of purchase.
Proof of purchase (original sales receipt) from the original consumer purchaser must be made available to Conglom Kitchen & Bath for all
warranty claims.
This warranty is non-transferable and shall be voided if the unit is removed from its initial installation or if it is not installed following the
manufacturer’s instructions. It does not apply in the event of product damage due to the use of other than genuine Conglom Kitchen & Bath
replacement parts, (Replacement parts may be obtained by e-mail at cs@conglomkb.com or by calling 1-877-333-0098 between 8:30 am
- 5:00 pm EST) installation error, abuse, misuse or improper care and maintenance (whether performed by a plumber, contractor, service
provider or member of the purchaser’s household). The warranty excludes damage due to aggressive air or water conditions, harsh or abrasive
cleaners and/or materials.
Under no circumstance shall we be held liable for personal injury or property damage resulting from improper installation or use of this
product. We will not be held liable for inconvenience caused by loss of use of this product, costs incurred for labour or materials, removal
and installation of replacement units, or any other incidental or consequential damages. Costs relating to obtaining access for repair or
replacement are the responsibility of the user.
Our obligation shall be limited to the repair or replacement of a unit (at our discretion) that may prove, by our sole examination, to be defective
under normal use and service during the warranty period.
Any failure of this product that is not traceable to a defect in material or workmanship is not covered by this warranty. These non-warrantable
items include, but are not limited to:
- Improper installation not in accordance with manufacturer’s instructions.
- Dents and/or scratches incurred during shipping, handling, or installation.
- Change in colour or nish due to chemical usage.
- Damage caused by failure to follow care and cleaning guidelines, including damage caused by the use of abrasive cleaners.
- Alterations made to the unit by the purchaser or installer.
- Damage caused by accidental impact, re, ood, freezing, and normal wear.
- Bends and warping caused by forced connections, over-tightened ttings, and inadequate support during installation.
- This warranty does not extend to commercial and institutional installation or use.
WARRANTY CLAIM PROCEDURE
If a claimable defect occurs or replacement parts are needed,
please contact our customer service team at cs@conglomkb.com or 1-877-333-
0098 (Service available in English and French, Monday - Friday from 8:30am - 5pm EST).
Before you make your call, please ensure that you have:
- Model number or description.
- Proof of sale.
- Details regarding the defect and/or part number.
- Name(s) and address(es) of the owner and/or installer.
4
Pre-Installation
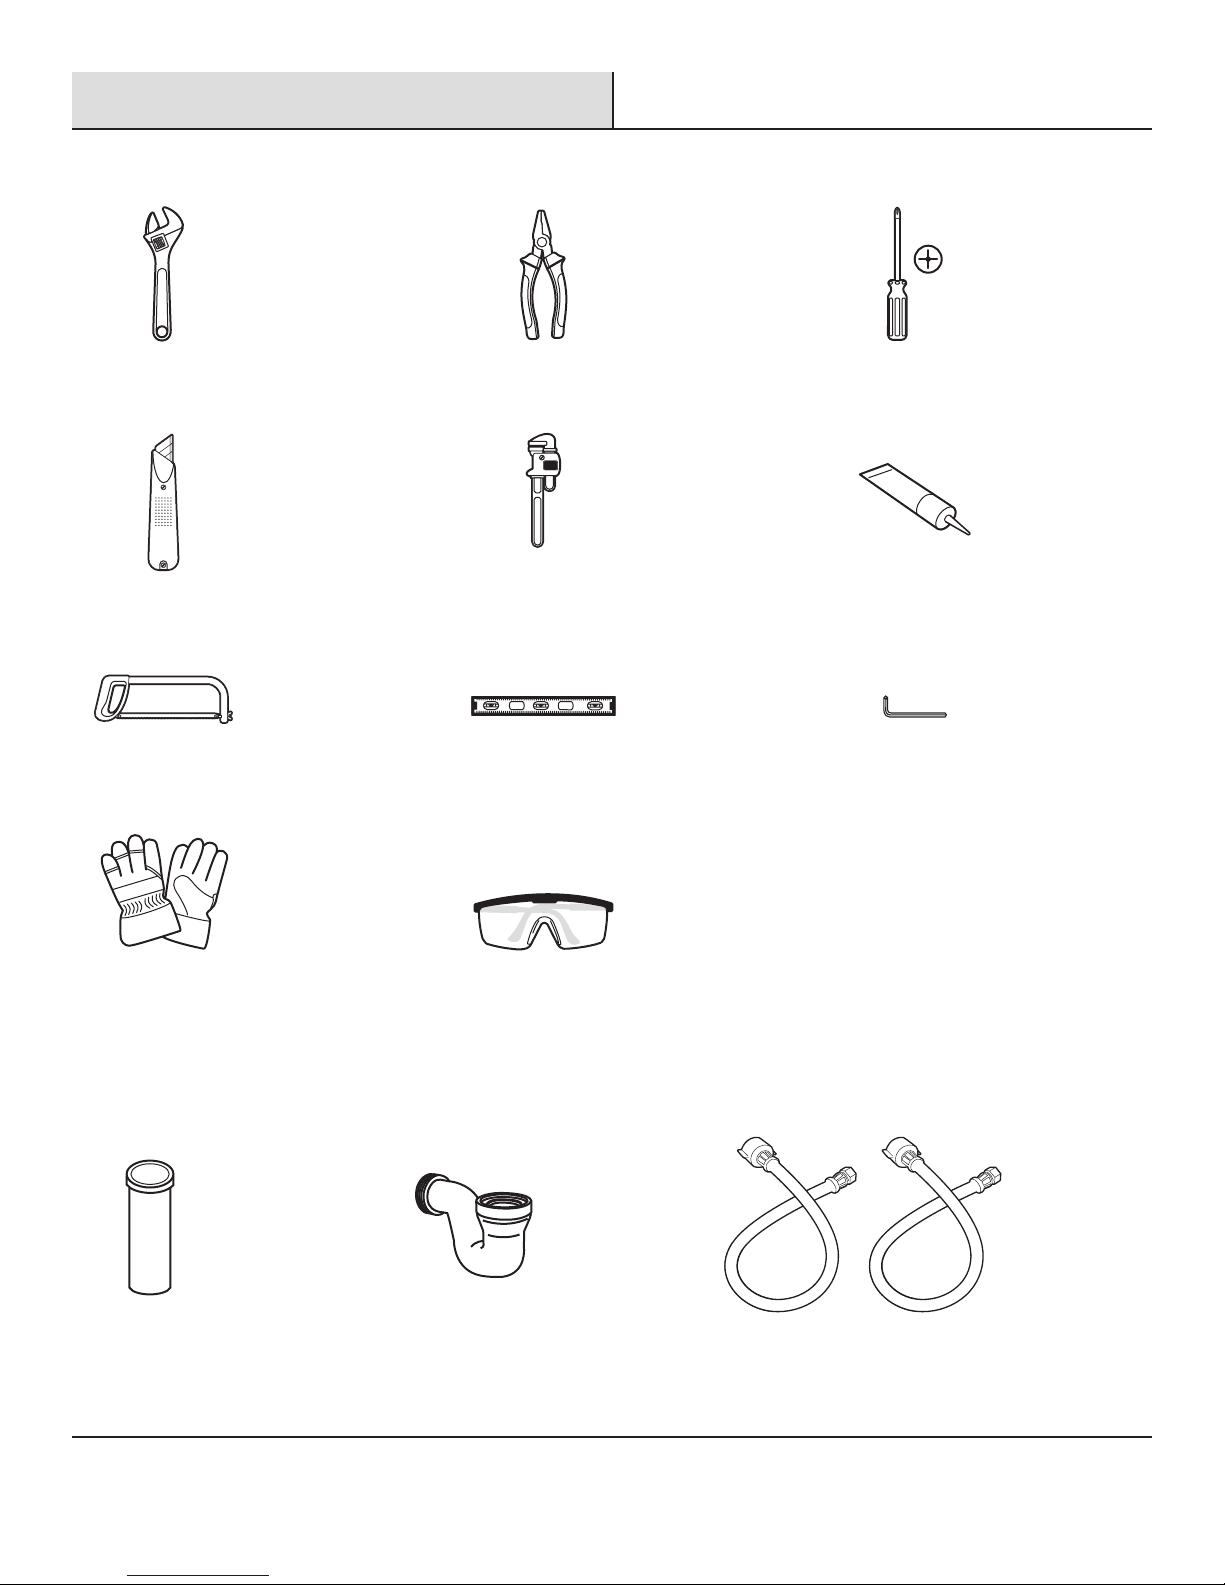
TOOLS/MATERIALS REQUIRED (NOT SUPPLIED)
Adjustable
wrench
Needle nose
pliers
Phillips
screwdriver
Utility knife Pipe wrench Sealant
Hacksaw Carpenter’s level Hex key
Safety gloves Safety goggles
PARTS REQUIRED (NOT SUPPLIED)
Tail Pipe P-Trap Supply line
5 CONGLOMKB.COM
Please contact 1-877-333-0098 for further assistance.
Pre-Installation (continued)
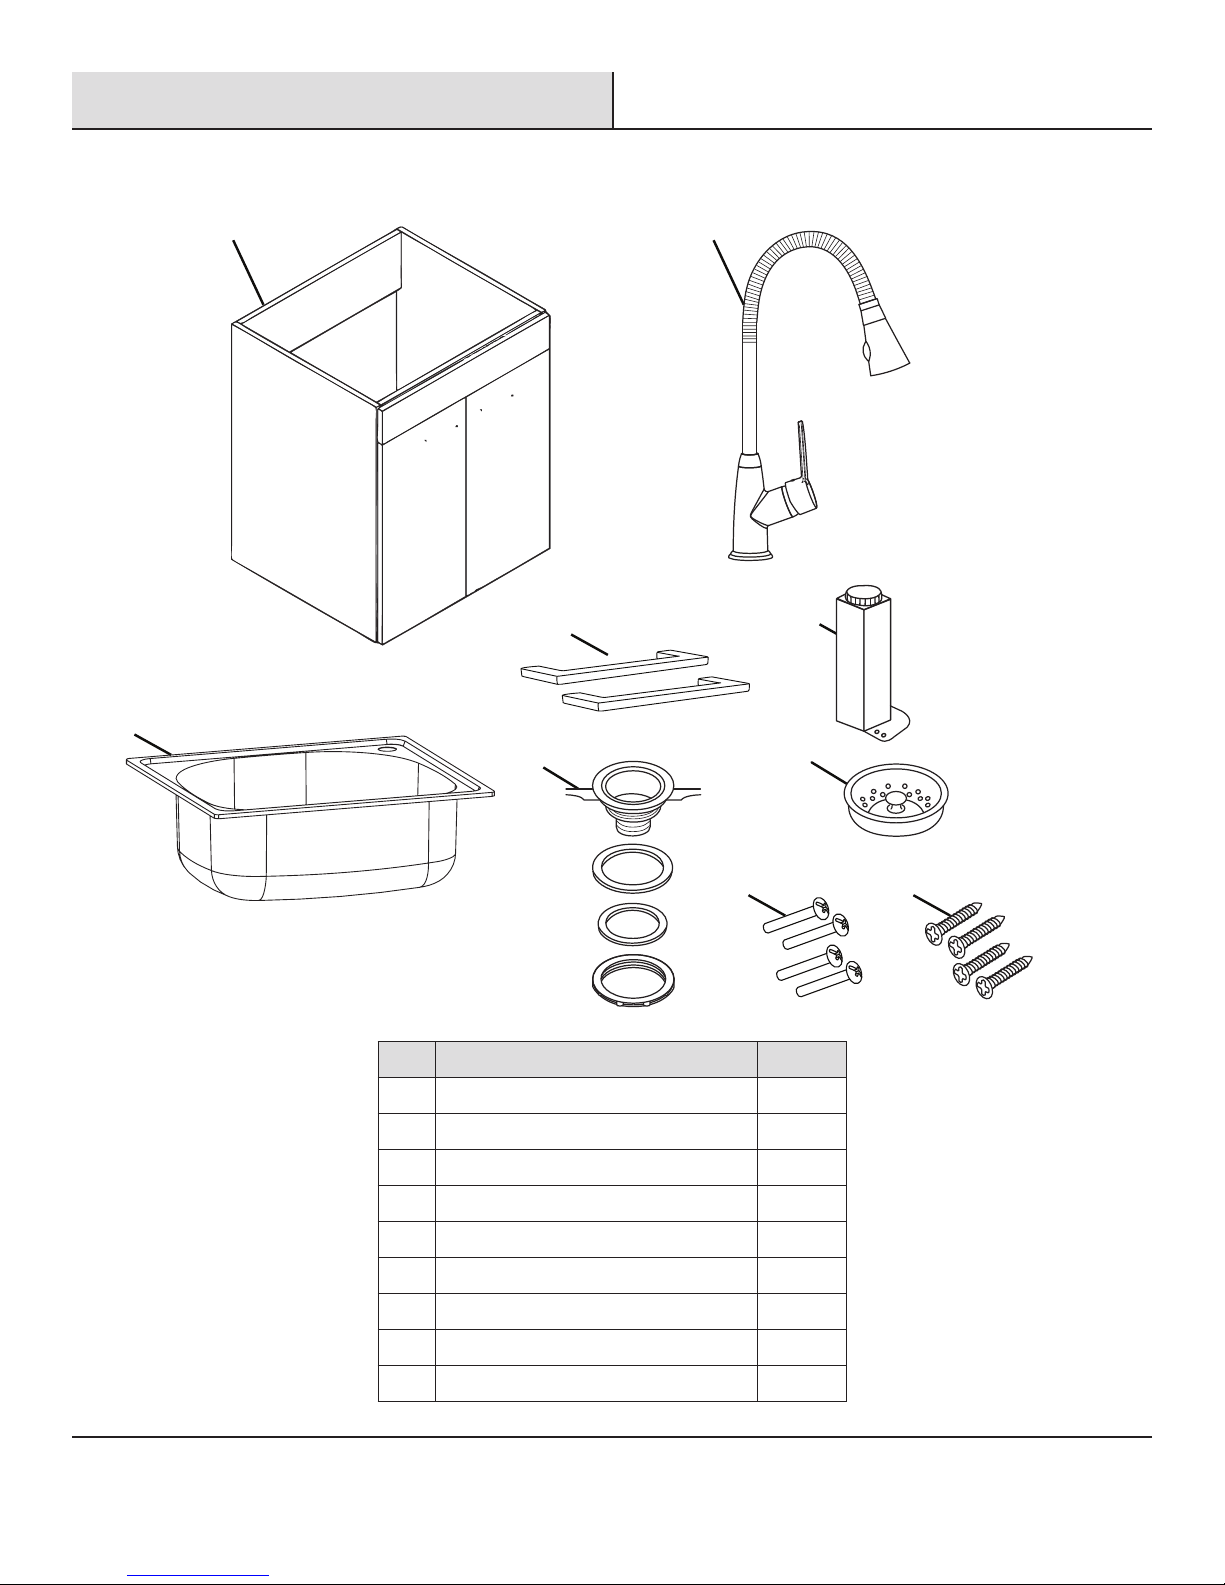
PACKAGE CONTENTS
A B
C
E
D
FG
HJ
Part Description Quantity
A Cabinet 1
B Faucet 1
C Door Handles 2
D Leveling Legs 4
E Utility Sink 1
FStrainer Assembly 1
G Strainer Basket 1
H Handle Screws 4
J Leveling Leg Screws 16

6
Installation
INSTALLING THE LEVELING LEGS
Carefully check the utility sink for damage and/or missing parts prior
to installation. If there is any damage or if you are missing parts,
do not proceed with the installation. Report damage and/or missing
parts immediately to the manufacturer. Do not dispose of packaging
before you are satised with your new utility sink.
- Remove the utility sink (E) and place it on a soft, protective
surface (Fig. 1).
- Turn the cabinet (A) upside down onto a protective surface.
- Gently put each leveling leg (D) into its proper location. Using
the four screws provided (J) per leveling leg, attach the leveling
legs (D) to the bottom of the cabinet (A).
- Gently right the cabinet (A).
- Using a carpenter’s level, turn the base of each leveling leg (D)
until the cabinet (A) is level.
WARNING: Always wear safety goggles and gloves during
installation.
CAUTION: Do not place side load on the leveling legs when
righting the cabinet as they may break.
Fig. 1
A
E
J
D
7 CONGLOMKB.COM
Please contact 1-877-333-0098 for further assistance.
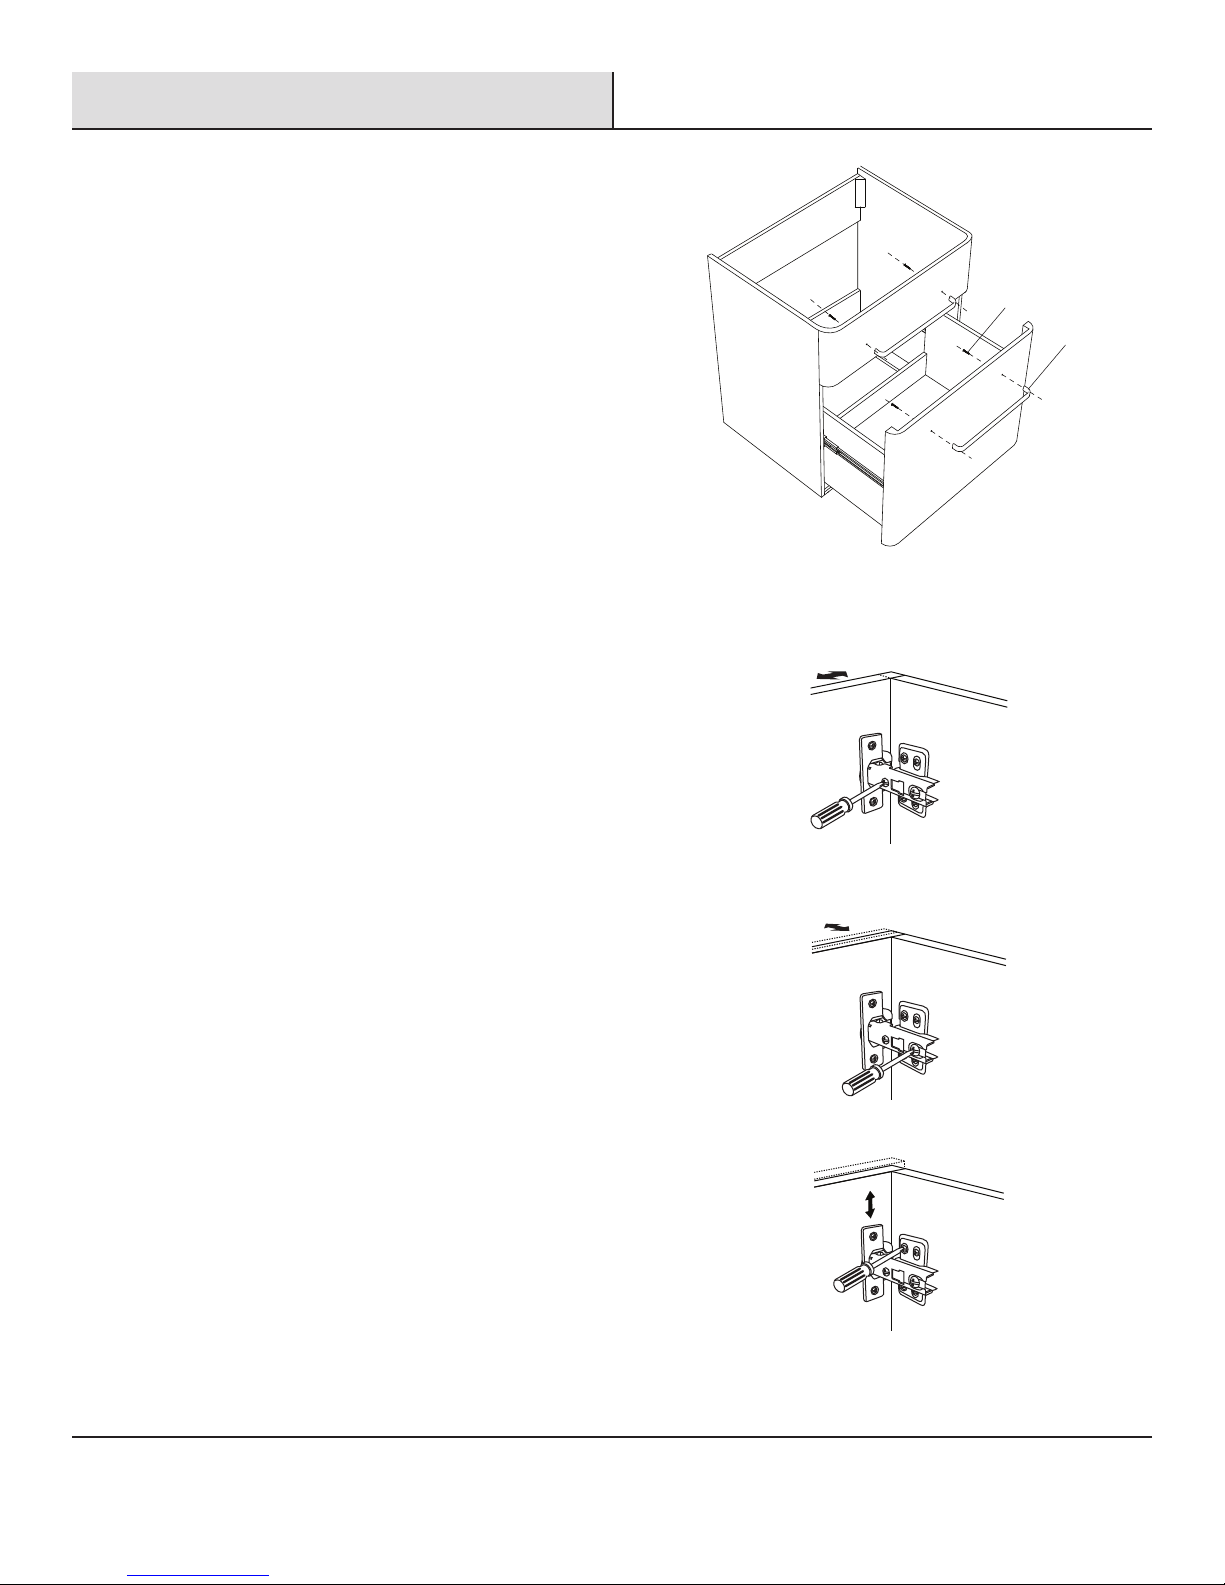
Installation (continued)
INSTALLING THE HANDLES
C
AA
- Insert two handle screws (H) into the pre-drilled holes on the door.
- Attach a door handle (C) and tighten the door handle screws (H).
- Repeat on the other door.
ADJUSTING THE DOOR POSITION
If the doors need to be repositioned, the hinges can be adjusted to ensure a
precise t with a cabinet.
1. The lateral adjustment screw adjusts the door left or right.
2. The horizontal adjustment screw adjusts the door forward or
backward.
3. The vertical adjustment screw adjusts the door up or down.
1
2
3
8
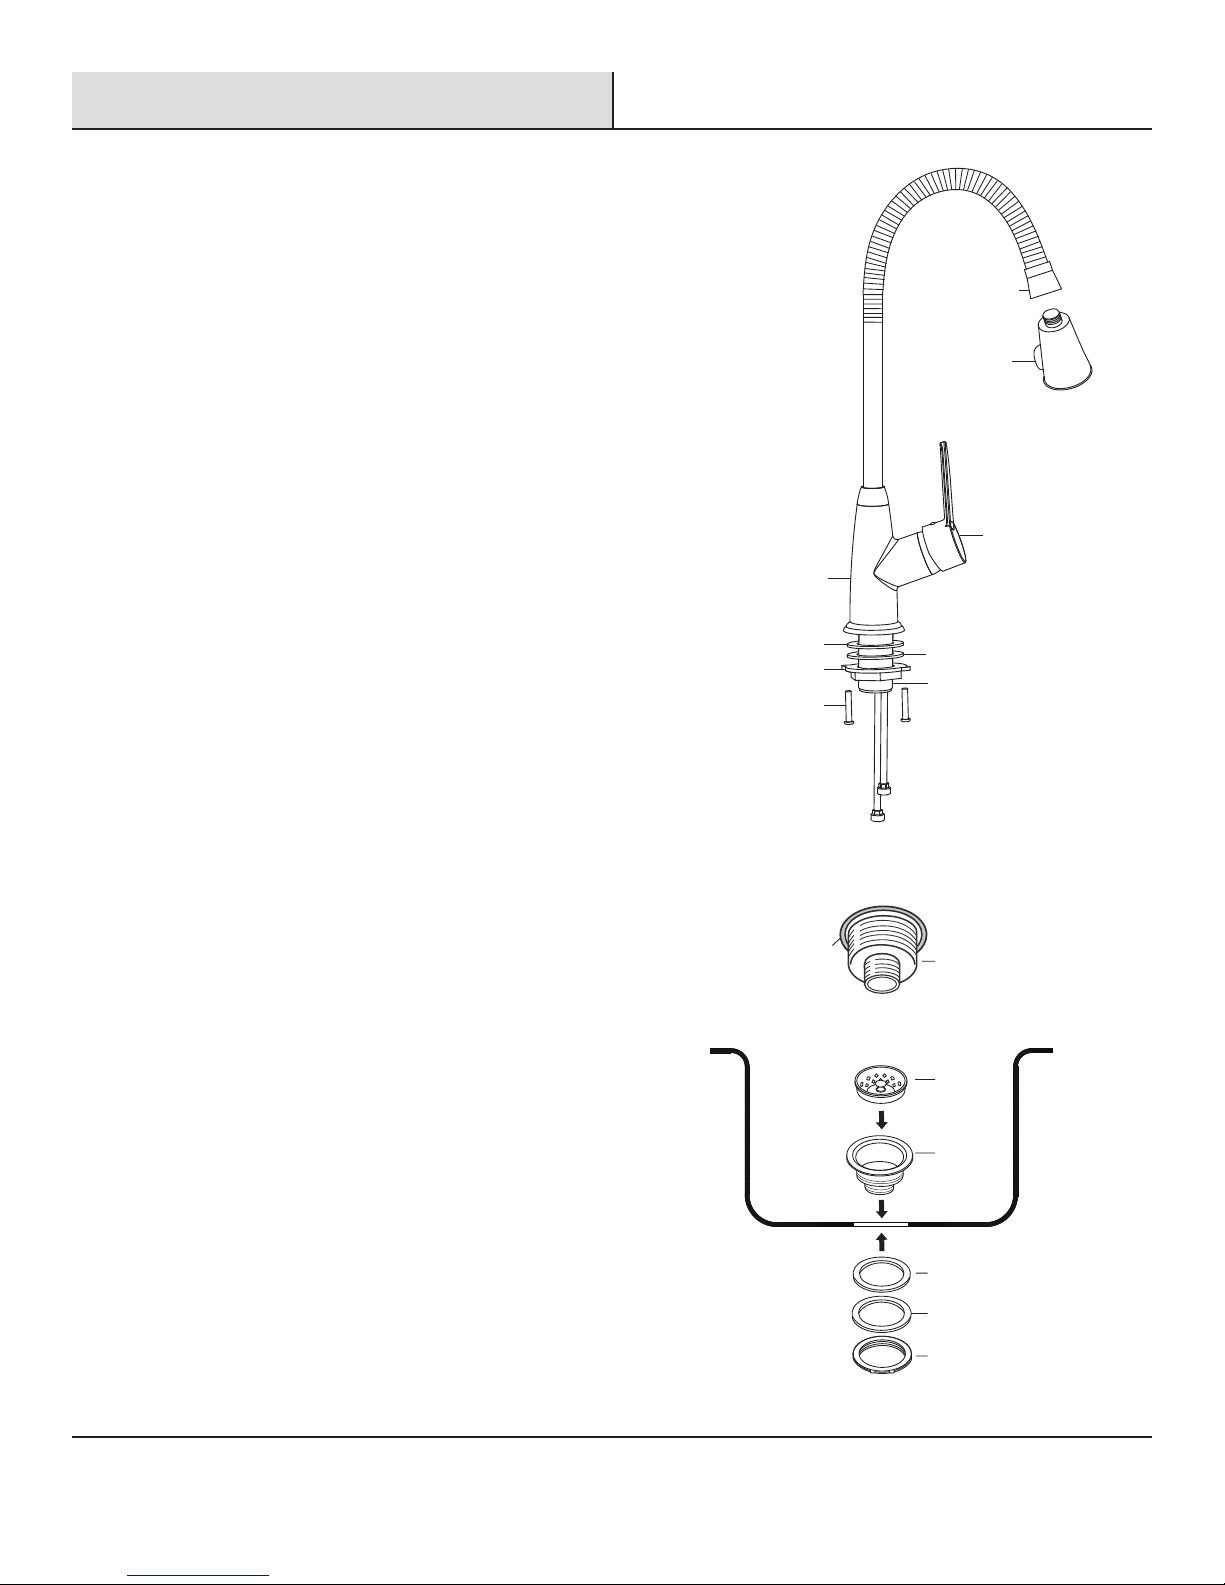
Installation (continued)
INSTALLING THE FAUCET
Sprayer
head
Gooseneck
Faucet body
Faucet handle
Gasket Washer
Threaded section
Retaining ring
Screws
1. Carefully take out all the parts of the faucet assembly (B). The faucet is
pre-assembled, except for the sprayer head.
2. Take the washer, gasket and retaining ring off of the faucet body.
3. Place the faucet body carefully through the hole in the sink (E). A
second person may be required to hold the body in place until the
faucet installation is complete.
4. From underneath, slide the washer, gasket and retaining ring over
the end of the copper pipe and up to the exposed threaded section of
the faucet. Tighten the retaining ring by hand until it is snug. Using a
wrench or pliers, tighten the assembly.
5. Gently tighten the two screws on the retaining ring. Do not over tighten.
6. Screw the sprayer head onto the gooseneck.
7. Connect the water supply lines (not supplied) to the faucet.
INSTALLING THE STRAINER
1. Apply a ring of plumber’s putty to the underside of the strainer
ange.
2. Insert the strainer body into the sink.
3. Assemble the rubber gasket, friction washer and locknut
onto the strainer body from underneath the utility sink. Hand
tighten the locknut.
4. Connect the plastic ange and tail pipe (not supplied), then
thread the connecting nut through the tail pipe and plastic
ange up to the lower threaded part of the strainer body.
Tighten the connecting nut by hand.
Strainer
basket
Strainer
body
Strainer
body
Rubber
gasket
Friction
washer
Locknut
Plumber’s putty
or sealant

9 CONGLOMKB.COM
Please contact 1-877-333-0098 for further assistance.
Installation (continued)
MOUNTING THE UTILITY SINK
1. Carefully place a bead of sealant all around the top of the
cabinet (A).
SEALANT
2. Ease the utility sink (E) into the cabinet (A). Ensure that it is
placed evenly and is centered on the cabinet. Wipe off any
excess sealant. Use masking tape to hold the basin in place
until the sealant dries.
E
A
10
Installation (continued)
PLACEMENT
Move the assembled unit to its nal location. If required, level the unit by adjusting the four leveling legs. Ensure that no rocking is
exhibited.
SUPPLY LINE
The supply lines, which connect the faucet to the household water system, are
not supplied with this unit. They need to be purchased separately. Follow the
supply line manufacturer’s instructions for proper installation.
Maintenance
CARTRIDGE REPLACEMENT
If in the future the ceramic cartridge needs to be replaced:
1. Turn off the water supply to the faucet (B).
2. Take off the plastic water temperature sign by hand, then use the
Hex key to take out the screw and pull out the handle body. The top
lever of the cartridge will be exposed.
3. Unscrew the cap and rings, making sure not to damage the
threads.
4. Pull the cartridge out of the faucet body and replace it with a new
35 mm ceramic cartridge.
5. Replace the rings, then the cap.
6. Place the handle body on the cartridge. Lock the screw back onto
the handle body and tighten it with the Hex key. Do not over tighten.
7. Put the plastic water temperature sign back into the hole, make
sure that red is on the left and blue is on the right.
8. Slowly open the water feed to the faucet to test.
Rings
Cartridge
Faucet body
Handle
body
Water temperature sign
Screw
Cap
11 CONGLOMKB.COM
Please contact 1-877-333-0098 for further assistance.
Care and Cleaning
UTILITY SINK
Your sink is manufactured with the highest grade stainless steel and will provide you many years of enjoyment with the proper care.
Do Do not
- After use, always rinse your sink with tap
water to dilute and remove deposits.
- Towel dry after use whenever possible
to prevent water spots. Should water
spots occur, clean with a mild solution of
vinegar and water followed by a thorough
rinse.
- Use liquid soap, a general household
cleaner, or a weak solution of vinegar and
water for regular cleaning.
- Only use plastic scouring pads
recommended for use in stainless steel
sinks, and only use them in the bowl of
the sink. Scrub in the direction of the
satin nish lines.
- Do not allow any food, detergent, soap or
grease to dry or sit for extended periods
of time on the surface of the sink.
- Never use abrasive cleaning products, as
they will dull and scratch the nish.
- Do not use scouting pads on the deck, as
they will dull the mirror nish.
- Never use steel wool pads, as they will
leave iron particles on the sink, which will
cause corrosion.
- Never leave steel or cast iron pans in your
sink for extended periods of time, as this
can cause corrosion.
CABINET
To maintain the surface of your cabinet, follow these tips.
Do Do not
- Remove dust and dry dirt with a soft,
damp cloth.
- Clean grease, oil, paint and ink stains with
isopropyl (rubbing alcohol). Immediately
rinse with water after stain removal.
- Do not allow your cabinet surface to
come into contact with products such as
acetone (nail polish remover), nail polish,
dry cleaning solution, lacquer thinners,
gasoline, pine oil, etc.
- Use caution when using sharp
instruments that may fall and scratch the
surface.
12
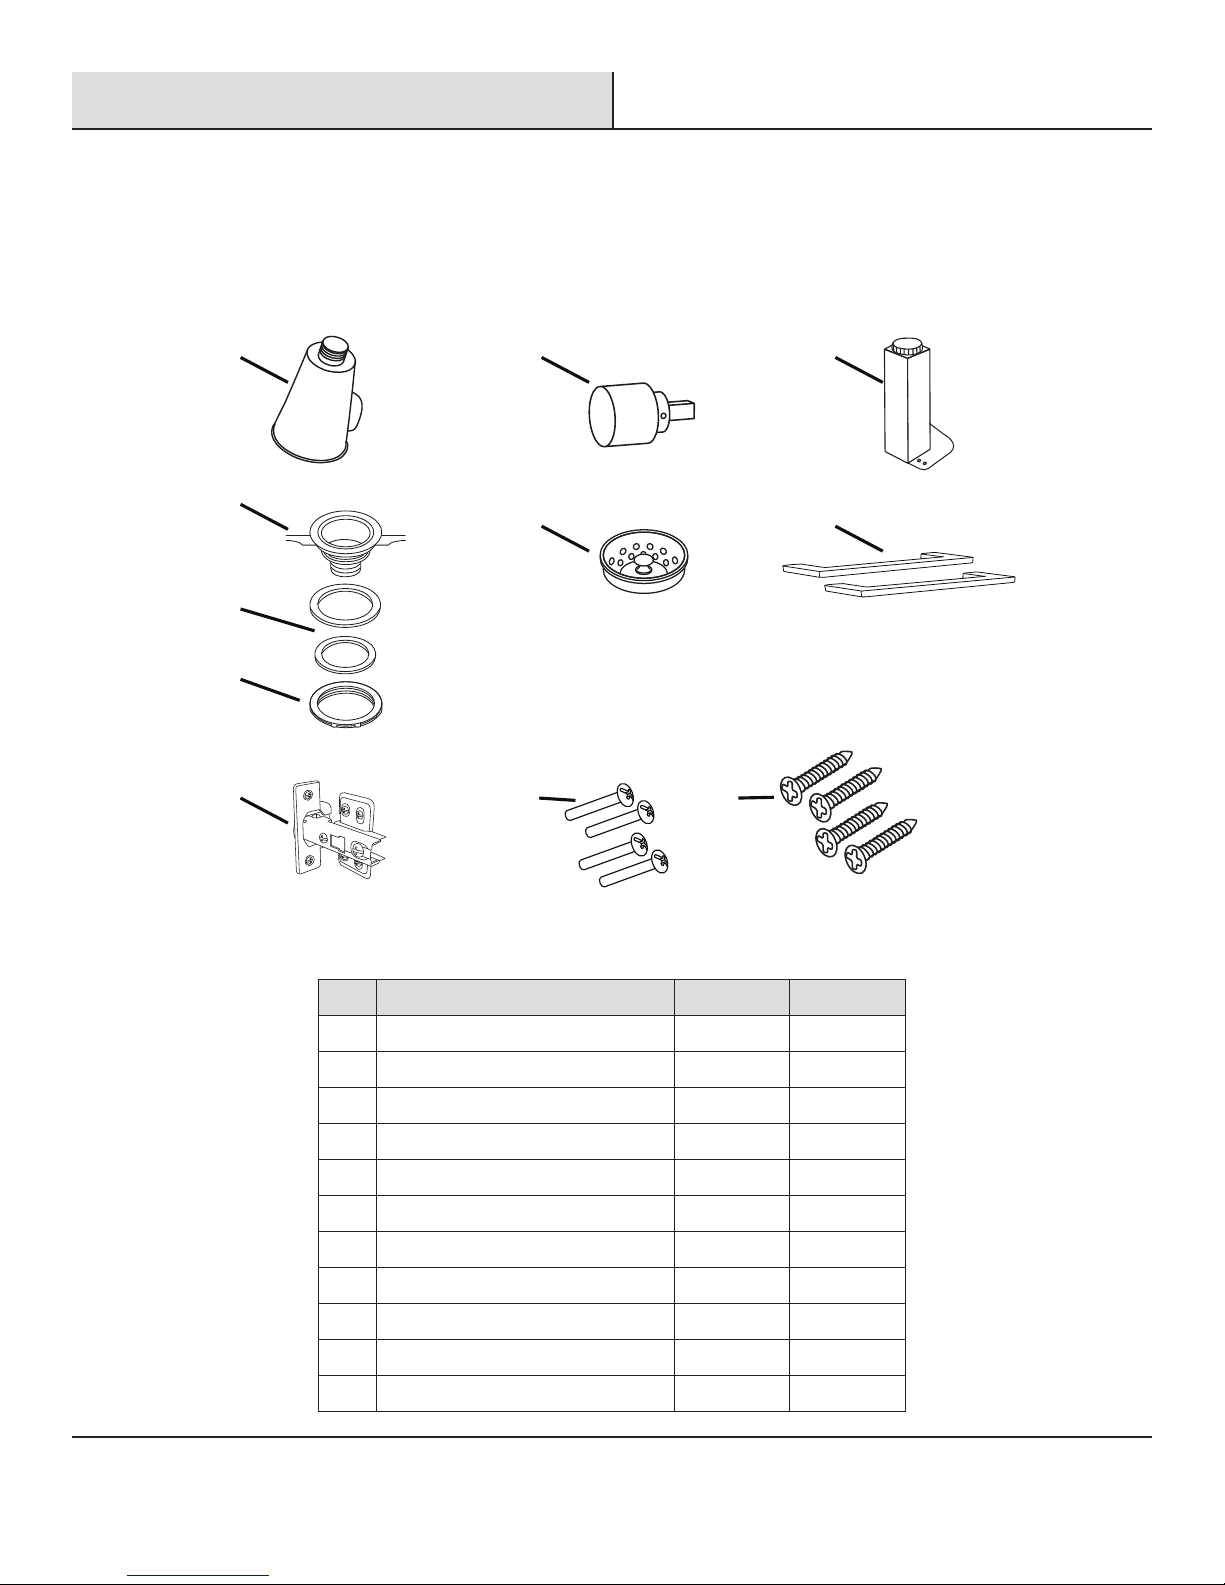
Service Parts
If you are missing parts or if you require replacement parts, please contact our customer service team at cs@conglomkb.com or 1-877-333-0098
(Service available in English and French, Monday - Friday from 8:30am - 5pm EST). Identify the required part(s) and have the
part number(s) ready.
G H
JK
A B C
D
E
F
L
Part Description Code Quantity
A Sprayer Head QHL186 1
B Ceramic Cartridge QHS121 1
C Leveling Legs QHL139 4
D Strainer Body QHS102 1
E Rubber Gasket & Friction Washer QHS103 1
F Locknut QHS104 1
G Strainer Basket QHS101 1
H Handles QHL144 2
J Hinges QHL102 4
K Handle Screws QHL104 4
L Leveling Leg Screws QHL106 16

Retain this manual for future use.
Imported by:
St-Laurent, Québec, H4S 2C3
(Service available in English and French, Monday - Friday from 8:30am - 5pm EST)
www.conglomkb.com
Made in China
Table of contents
Other Presenza Indoor Furnishing manuals

Popular Indoor Furnishing manuals by other brands


Mirjan24
Mirjan24 Combino CMBL09 Assembling Instruction

SHANGRI-LA
SHANGRI-LA MANILA ENTERTAINMENT UNIT SLMANILESWA Assembly

Renson
Renson Panovista installation instructions

realspace
realspace Chase manual

Woodstock
Woodstock Shop FoxD3640 instruction sheet

Furniture of America
Furniture of America Sion CM-AC6213 Assembly instructions

meubar
meubar STONE DR2 G4910380 Assembly instruction

Aspire
Aspire PTM638005 user manual

Ameriwood HOME
Ameriwood HOME Remington 4162872COM Instruction booklet

Lightolier
Lightolier Calculite C4AD specification

Bechara
Bechara SCALA Product Guide and Assembly Instructions

IKEA
IKEA VIDGA Assembly instructions