PRESONUS Revelator Dynamic User manual

Professional dynamic USB mic for recording
and streaming vocalists, podcasters, and
more.
Owner’s Manual

Table of Contents
Table of Contents 2
1. Overview 5
1.1 Introduction 5
1.2 What's in the box? 5
1.3 What is in your MyPreSonus account 7
1.3.1 Step 1: Register Revelator Dynamic 7
1.3.2 Step 2: Download and Install Universal Control 9
1.3.3 Step 3: Download and Install Studio One Artist (Optional) 10
1.3.4 Step 4: Download and Install Studio Magic (Optional) 12
2. Connections and Controls 14
2.1 Basic hookup 14
2.2 Standalone controls 15
2.2.1 Setting the Microphone Level 16
2.2.2 Setting Headphone level 17
2.2.3 Setting Monitor level 17
2.2.4 Selecting Presets 18
2.2.5 Attaching Revelator Dynamic to a Stand 19
2.2.6 Removing Revelator Dynamic from its yoke 19
3. Universal Control 20
3.1 The Launch Window 20
3.1.1 Launch Window Menu Items 21
3.2 Using Your Revelator Dynamic with Popular Applications 23
3.2.1 Using Revelator Dynamic for System Audio 23
3.2.2 Using Revelator Dynamic for Skype 28
3.2.3 Using Revelator Dynamic for Zoom 29
3.2.4 Using Revelator Dynamic for Google Meets 35
3.2.5 Using Revelator Dynamic for OBS 37
3.2.6 Using Revelator Dynamic on Chromebook 39
3.2.7 Using Revelator Dynamic with Zoom on Chromebook 39
3.2.8 Using Revelator Dynamic with Google Meet on Chromebook 40
3.2.9 Using Revelator Dynamic with iOS/iPadOS devices 42
3.2.10 Using Revelator Dynamic with Android devices 43
4. Presets, Fat Channel, and Voice Effects 44
4.1 Preset Management 44

4.1.1 Changing Preset Button Slots 45
4.1.2 Storing New Presets 48
4.1.3 Exporting/Importing Presets 50
4.1.4 Scenes - Save and Recall 53
5. Fat Channel and Voice Effects 54
5.1 Fat Channel and Voice FX 54
5.1.1 High Pass Filter (HPF) 54
5.1.2 Gate 55
5.1.3 Compressor (Comp) 56
5.1.4 Equalizer (EQ) 57
5.1.5 Limiter 58
5.1.6 Voice FX 59
5.2 Reverb 60
6. Mixing and Loopback Audio 62
6.1 What is Loopback Audio? 62
6.2 Mixer Controls 63
6.2.1 Microphone Channel Controls 63
6.2.2 Mixer Channel Controls 63
6.2.3 Main Output Controls and Mix Selection 64
6.3 Feedback Loops are Bad 66
7. Advanced Features and Customization Tools 67
7.1 Settings Menu 67
7.2 Advanced Fat Channel and Voice Effects Controls 68
7.2.1 High Pass Filter 70
7.2.2 Noise Gate 71
7.2.3 Compressor 72
7.2.4 Changing the Signal Chain 75
7.2.5 Equalizer 75
7.2.6 Limiter 78
7.2.7 Voice FX 78
8. Studio One Artist Quick Start 84
8.1 Installation and Authorization 84
8.2 Setting Up Studio One Artist 86
8.2.1 Configuring Audio Devices 86
8.3 Configuring MIDI Devices 87

8.4 Creating a New Song 91
Configuring Your I/O 93
10. Creating Audio and Instrument Tracks 96
10.0.1 Recording an Audio Track 97
10.0.2 Adding Virtual Instruments and Effects 97
11. Resources 100
11.1 Gain Staging 101: Begin at the Beginning 100
11.2 Microphone Tips and Tricks 101
11.2.1 Handling Noise 101
11.2.2 How Close is Too Close? 102
11.2.3 Problematic Pronunciation 102
11.2.4 Putting it All Together 103
11.3 Technical Specifications 103
12. Legal 105
13. Dinner is Served! 106
1. Overview
1.1 Introduction
Thank you for purchasing the Revelator Dynamic USB microphone! Revelator Dynamic is the perfect
microphone for recording and streaming vocalists, podcasters, and more. It’s designed to deliver pol-
ished, professional-sounding results with ease. Once you’ve registered your Revelator Dynamic at my.-
presonus.com, you’ll be able to download your drivers, a complimentary copy of Studio One Artist,
additional plug-ins, content, and more. It’s our gift to you for becoming a PreSonus customer.
We suggest you read this manual to familiarize yourself with the features and applications for your Revel-
ator Dynamic before trying to connect it to your computer. This will help you to avoid problems during
installation and use.
Throughout this manual you will find Power User Tips. These tips and tricks will help you to become a
Revelator Dynamic expert—as well as help you to better understand audio terminology, so you can get
the most from your purchase and get the best sound quality possible.
Thanks for joining the PreSonus family. We’re glad you’re here.
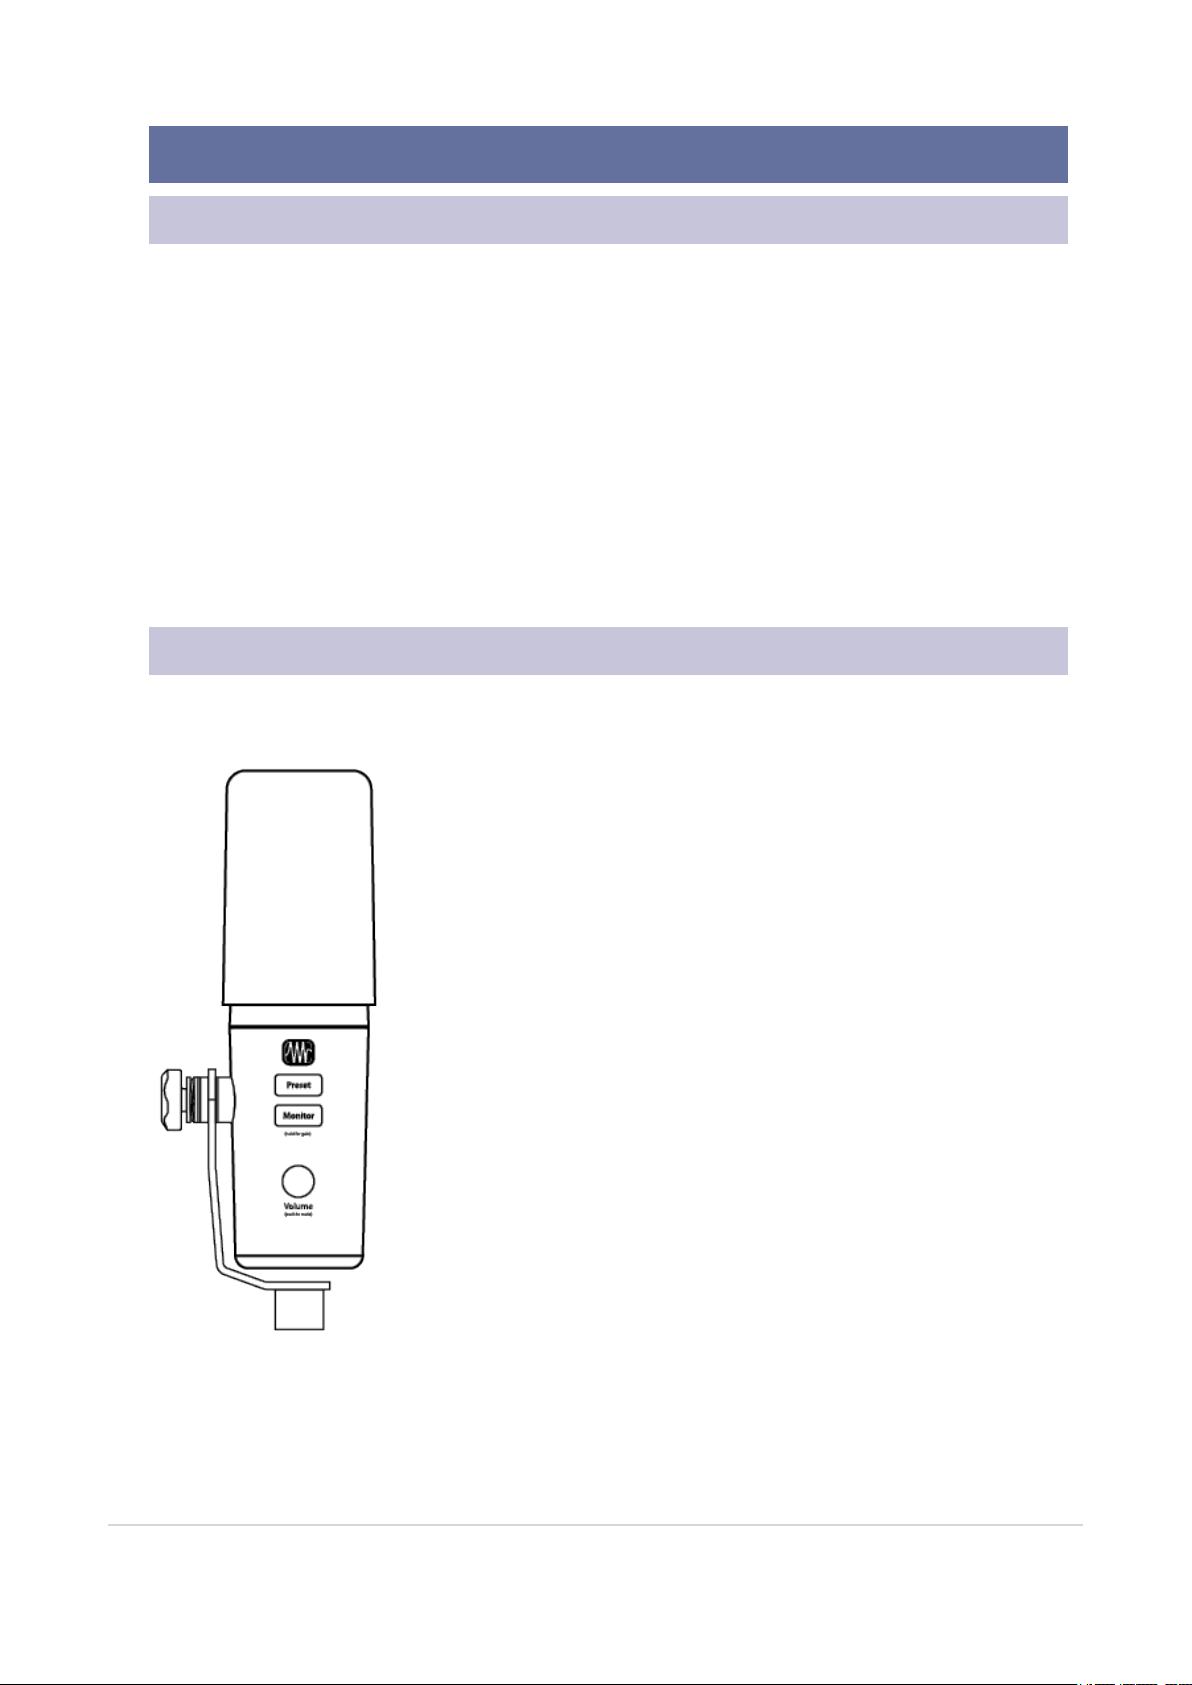
1.2 What's in the box?
Your Revelator Dynamic package contains:
Revelator Dynamic USB Microphone
1. Overview 5
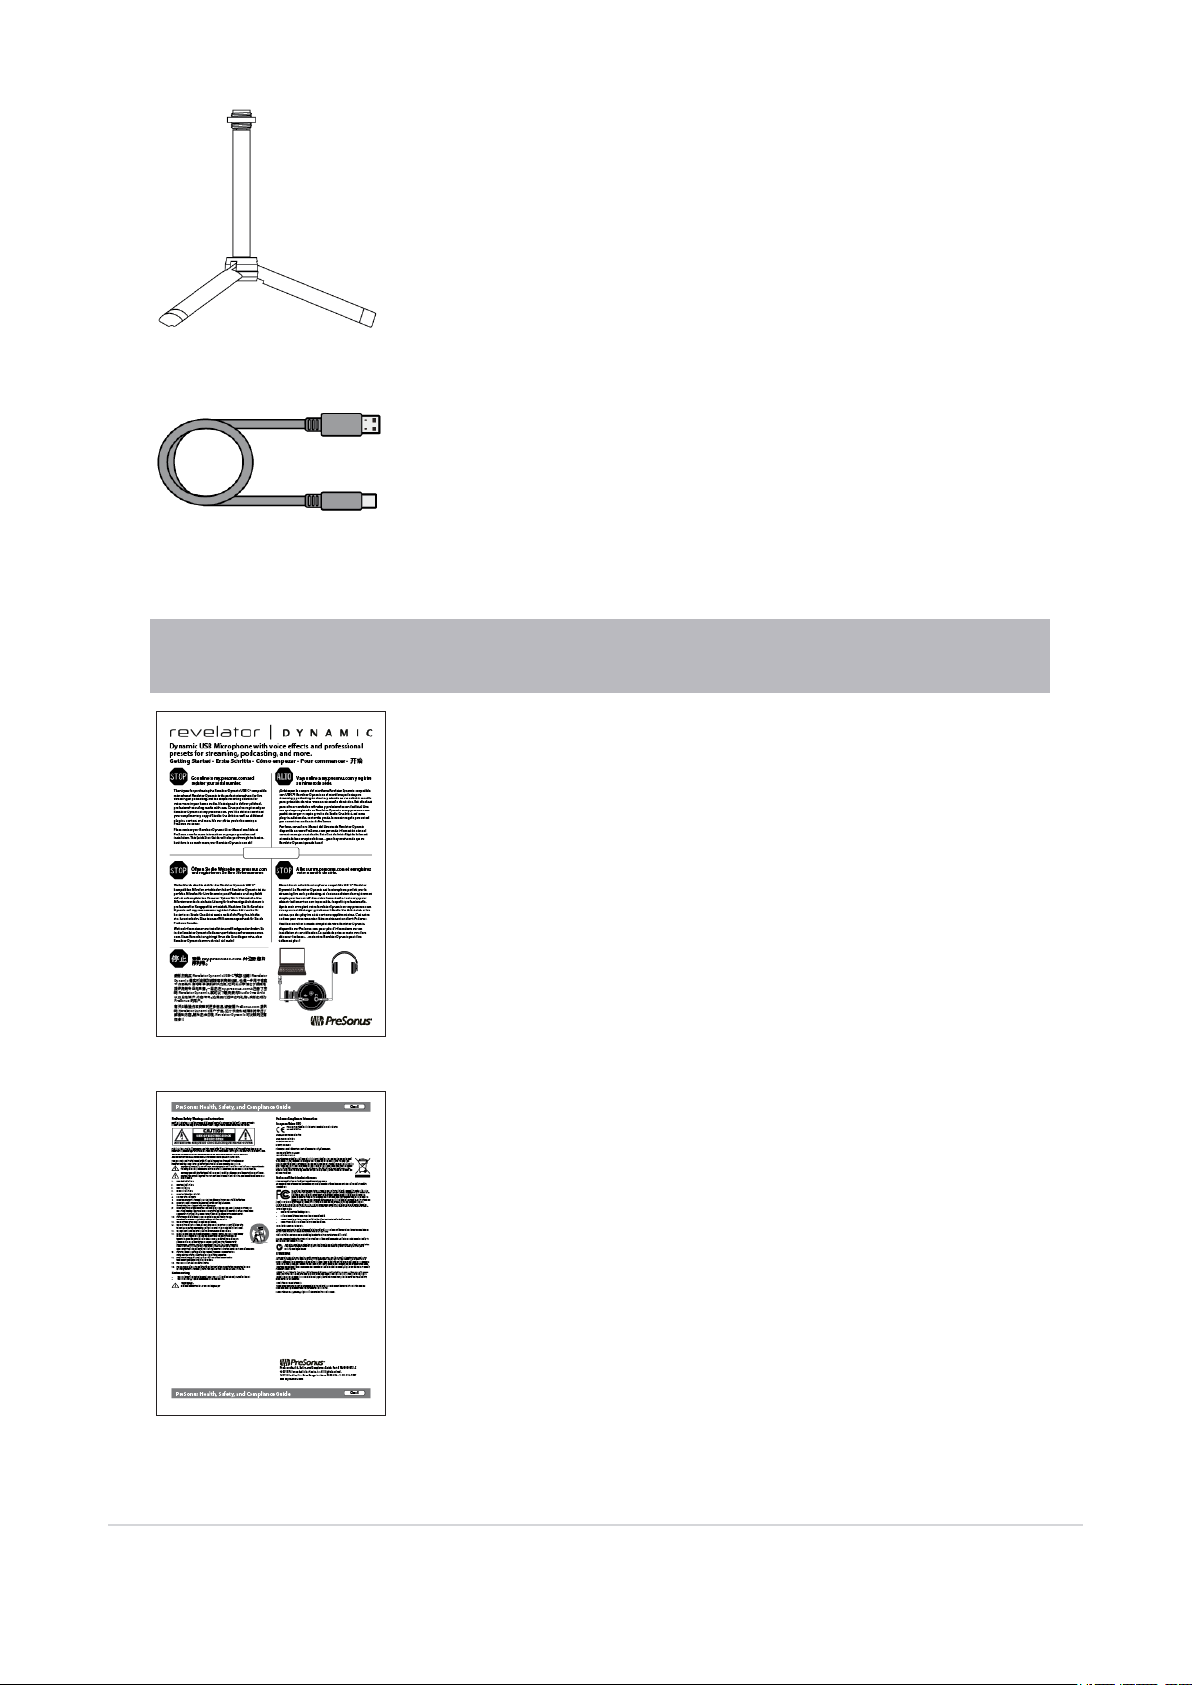
PTS-1 extendable desktop mic stand.
2M USB-C®-to-USB-A Cable. Use this to connect your Revelator Dynamic to
a USB port on your computer or a powered USB hub.
Power User Tip: If your computer only has USB-C ports, you will need to purchase a standard USB-C cable, or
use an extra one you might have handy.
Quick Start Guide. Use this as a handy reference guide to your hardware fea-
tures while you familiarize yourself with your new microphone
PreSonus Health, Safety, and Compliance Guide. Legal language to cure
your insomnia.
1.2 What's in the box? 6

1.3 What is in your MyPreSonus account
There’s more to your Revelator Dynamic than what comes in the box! Let’s take a
moment to register your Revelator Dynamic and download the digital products that
come with it. These include:
lUniversal Control. Unlock the StudioLive inside your Revelator Dynamic with Univer-
sal Control. This installation package also includes your audio driver controls that you
will need to use advanced Revelator Dynamic features.
lStudio One Artist. Studio One Artist is our award-winning recording and production software. It’s
also designed to be intuitive and easy to use, so whether you’re a seasoned professional or just start-
ing out, Studio One Artist has the tools you need to make a great recording.
lStudio Magic Bundle. Over $1000 USD worth of plug-ins, sounds, and more; Studio Magic super-
charges your Studio One Artist experience!
1.3.1 Step 1: Register Revelator Dynamic
To download your digital products, you must first create a MyPreSonus account. This account lets you
manage all your PreSonus product registrations, provides curated educational content, and is the portal
to all tech support and service inquiries. Let’s get started!
1. In your Internet browser of choice, visit my.presonus.com and click “Create Account”
Power User Tip: If you already have a MyPreSonus account, please log in
and skip to step 5.
2. Fill in the form with the required information. Make sure to verify that you are, in fact, human and
agree to our PreSonus Terms of Use. If you’d like to receive occasional emails about promotions and
new video content, check that box now as well.
1.3 What is in your MyPreSonus account 7

3. Click “Save.”
4. Click “Go to MyPreSonus” to log into your shiny new MyPreSonus account.
5. Click “Register a Product.”
1.3.1 Step 1: Register Revelator Dynamic 8
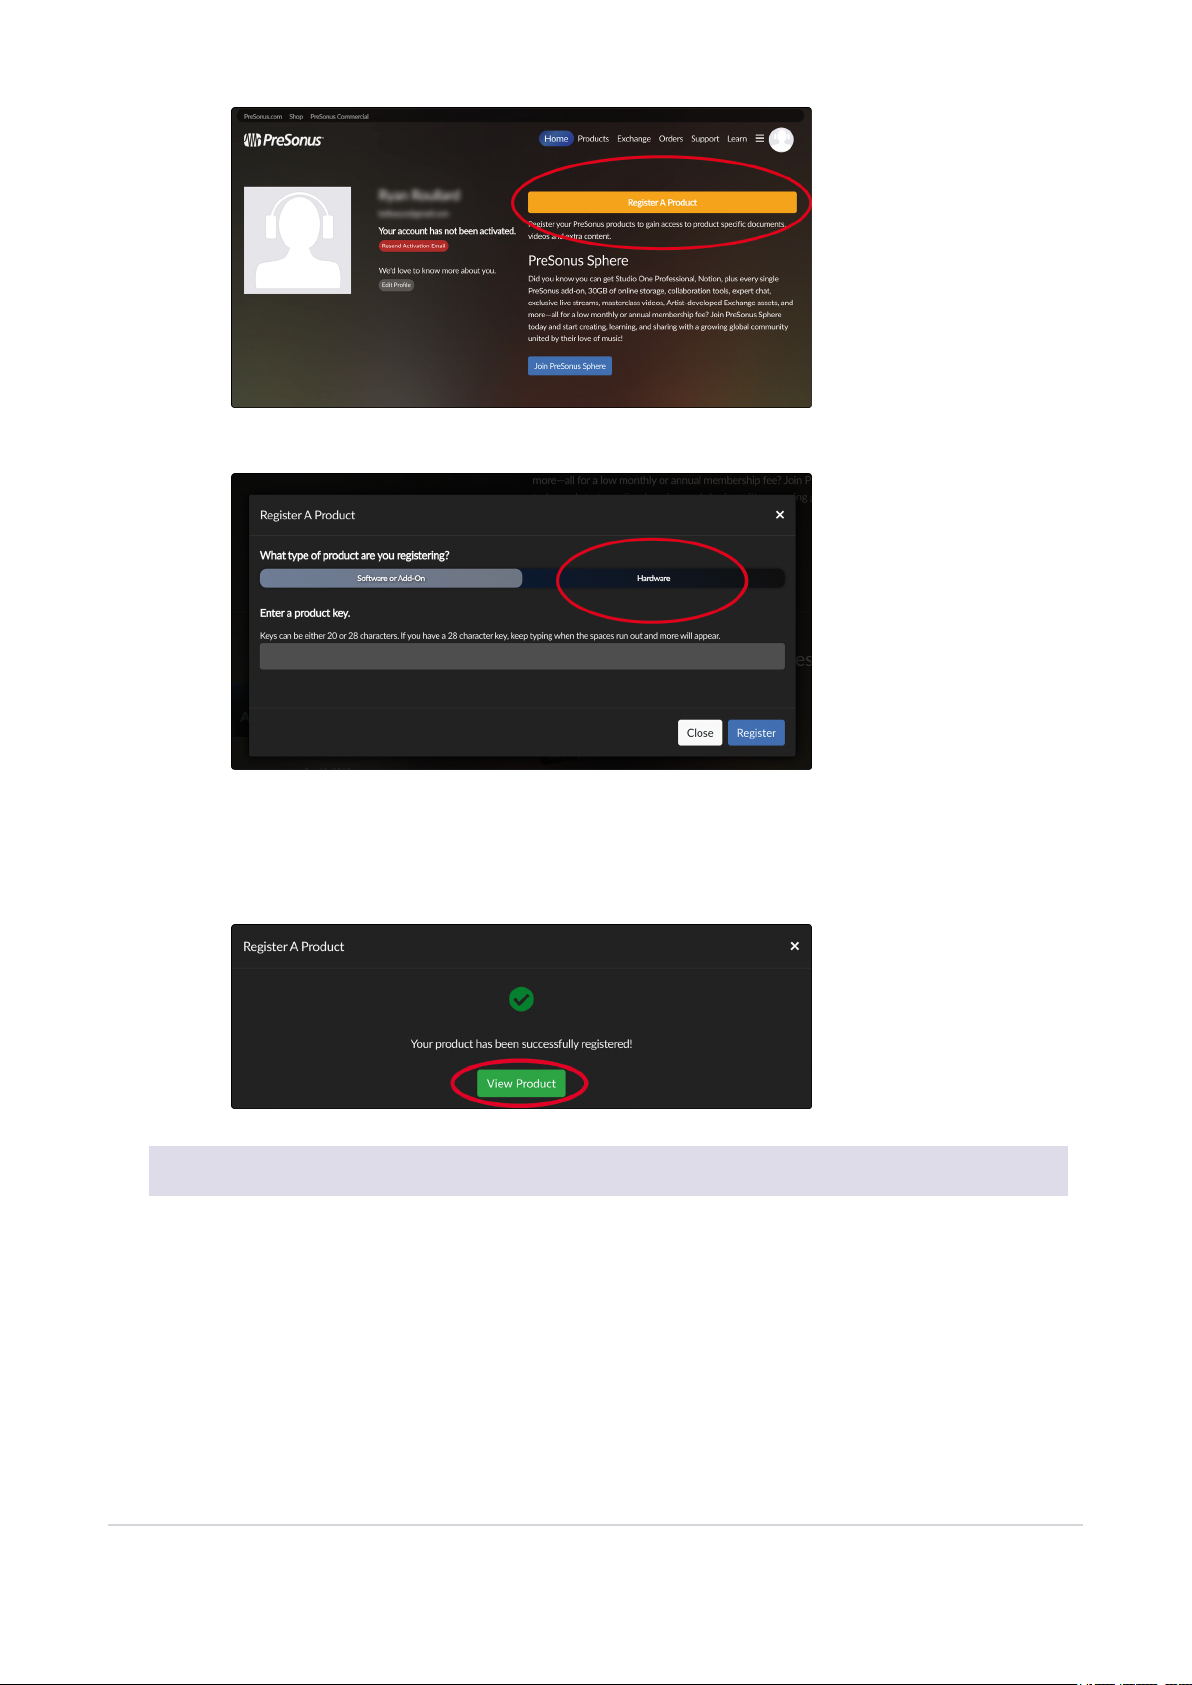
6. In the pop-up menu, click on the Hardware tab.
7. Select your purchase date and enter your Revelator Dynamic Serial Number. You can find your serial
number on the bottom of your microphone as well as on your Quick Start Guide.
8. Click Register.
9. Click View Product to download your companion software.
1.3.2 Step 2: Download and Install Universal Control
1. From the Revelator Dynamic product listing in MyPreSonus, click the “Download Universal Control”
button at the top. MyPreSonus will scan your computer and present the correct installer for your oper-
ating system.
1.3.2 Step 2: Download and Install Universal Control 9
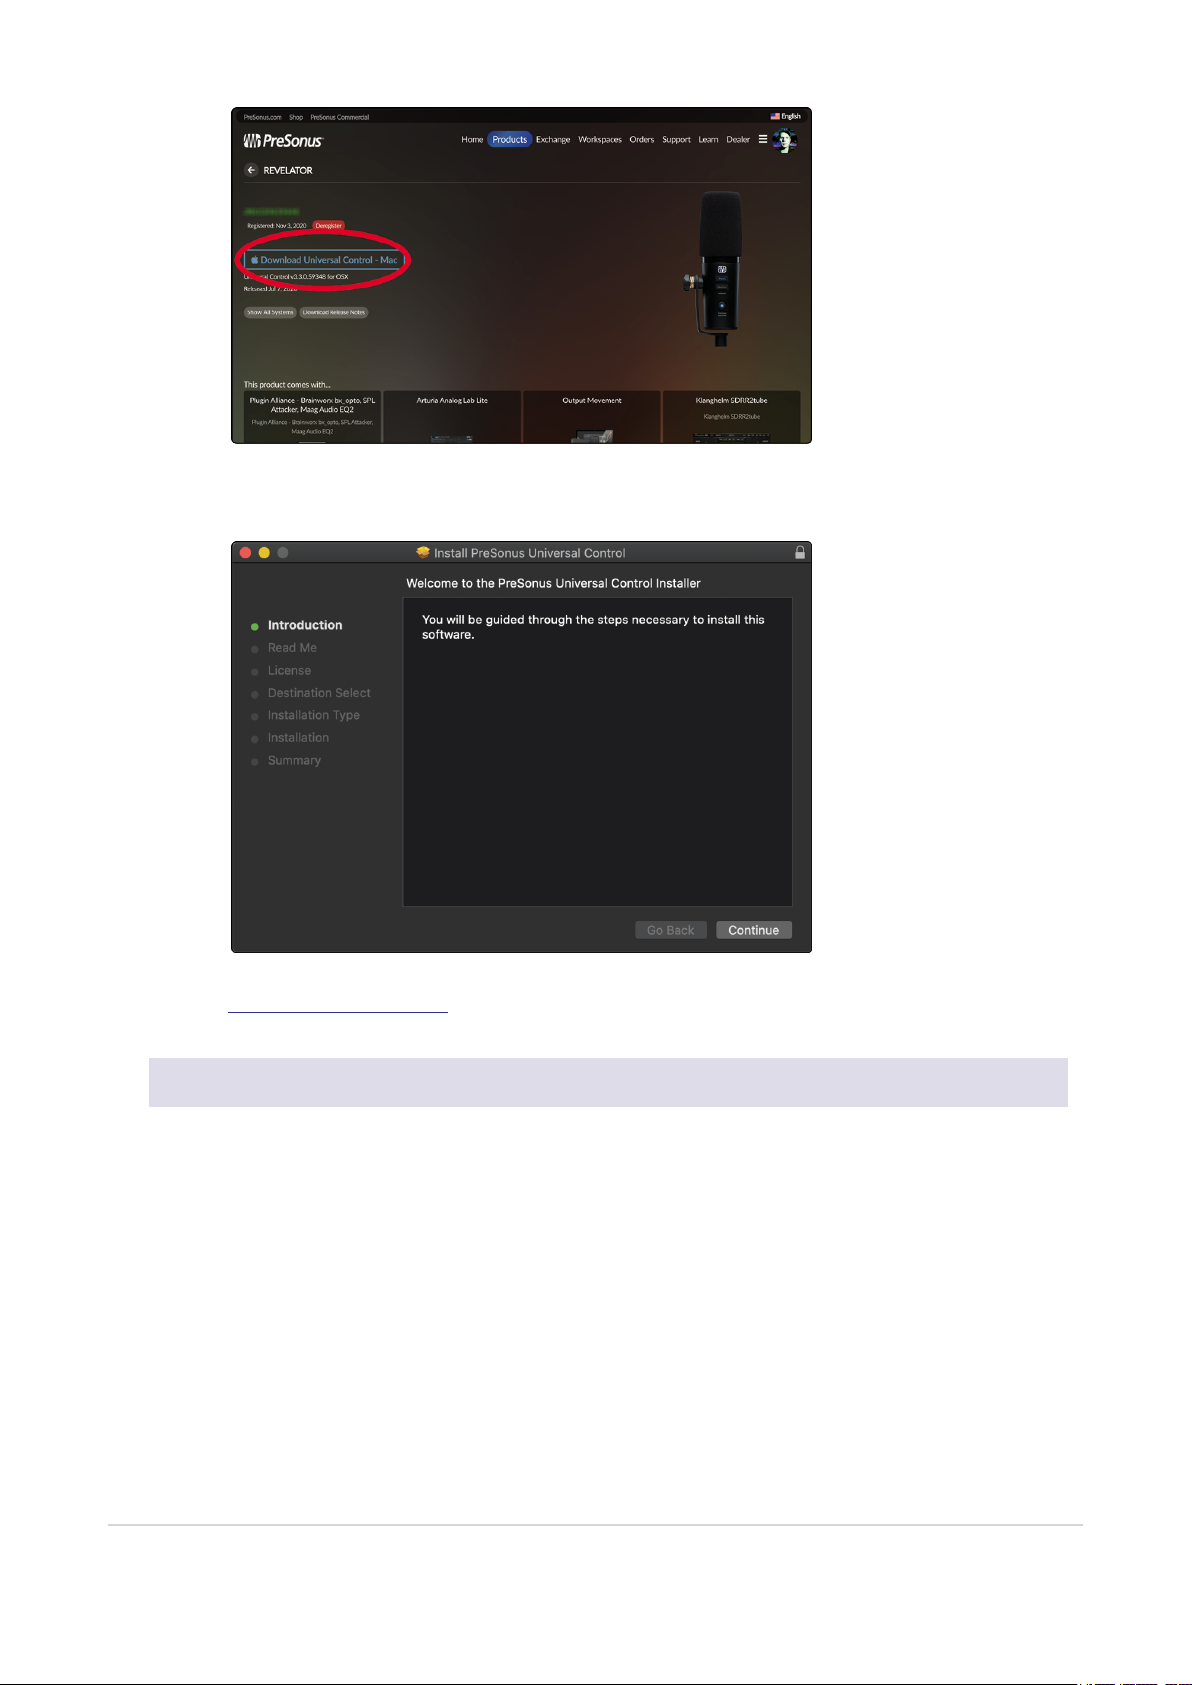
2. Locate the Universal Control installer in your Downloads folder. Double click to open it.
3. Follow the onscreen instructions to install Universal Control.
See the Universal Control section for information and use instructions for all the advanced features avail-
able in Universal Control.
1.3.3 Step 3: Download and Install Studio One Artist (Optional)
1. From the Revelator Dynamic product listing in MyPreSonus, locate Studio One Artist from the
product listing. Quick links to every digital product that comes with your Revelator Dynamic will be lis-
ted here. Click the “Download Installer” button at the bottom of the Studio One Artist listing. MyPreSo-
nus will scan your computer and present the correct installer for your operating system.
1.3.3 Step 3: Download and Install Studio One Artist (Optional) 10

2. Locate the Studio One installers in your Downloads folder. Double click to open it.
Windows: Launch the Studio One Artist installer and follow the onscreen instructions.
Mac: Drag the Studio One Artist application into the Applications folder on your Mac hard drive.
3. Locate Studio One in your Applications and launch it. When Studio One is launched for the first time
on your computer, it will communicate with your My.PreSonus account and verify your registration.
To ensure a seamless authorization process, make sure to download your installer to the computer
on which you will be using it, and be sure that your computer is connected to the Internet when you
launch the application for the first time.
1.3.3 Step 3: Download and Install Studio One Artist (Optional) 11
Power User Tip: You may be prompted to enter your My.PreSonus user account information. Clicking
“Remember Credentials” will allow you to have immediate access to any content you purchase from
shop.presonus.com.
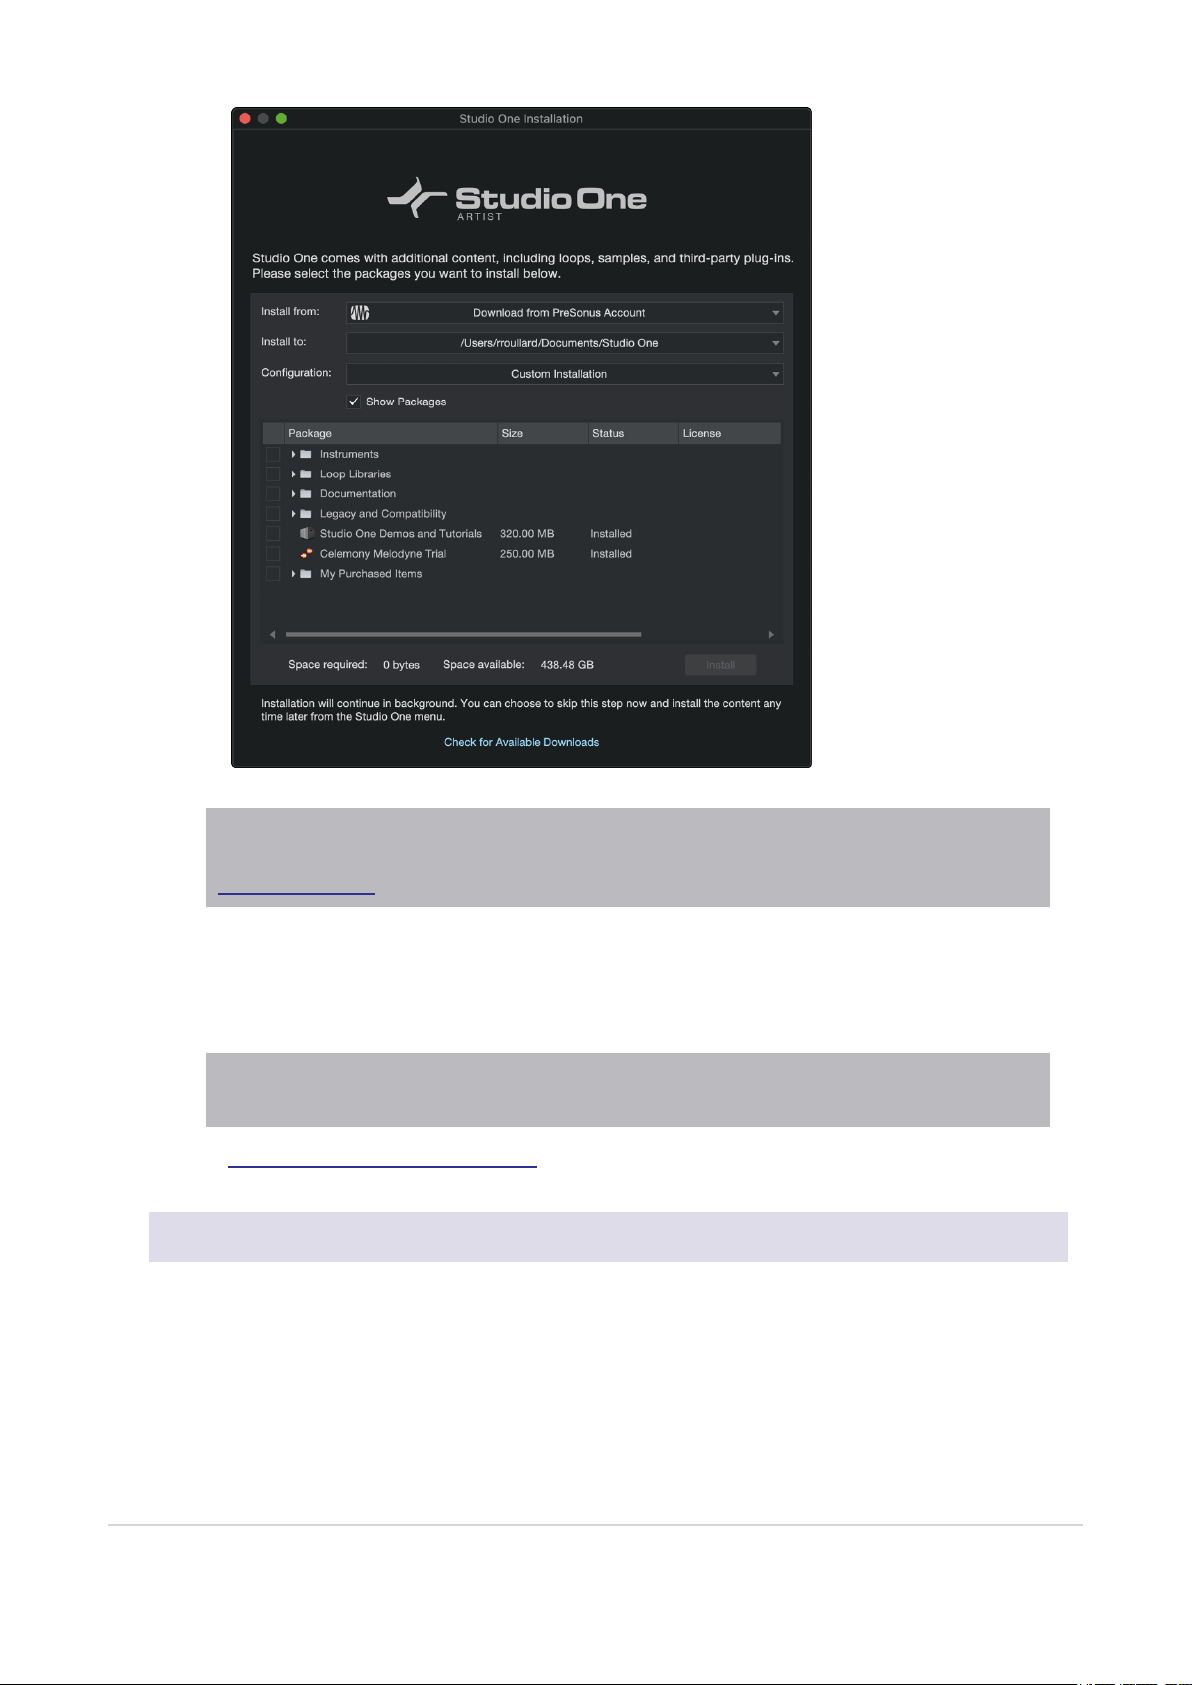
Studio One Artist comes bundled with an array of demo and tutorial materials, instruments,
loops, and samples. The first time you launch Studio One Artist, you will be prompted to install
its companion content. Select the content you wish to add and click “Install.” The content will
automatically begin to download and install from your My.PreSonus user account.
Power User Tip: To select only a portion of the available content, click on “Show Packages.” From here
you can customize your content installation.
See the Studio One Artist Quick Start Guide section for tips on getting started recording and mixing in Stu-
dio One Artist.
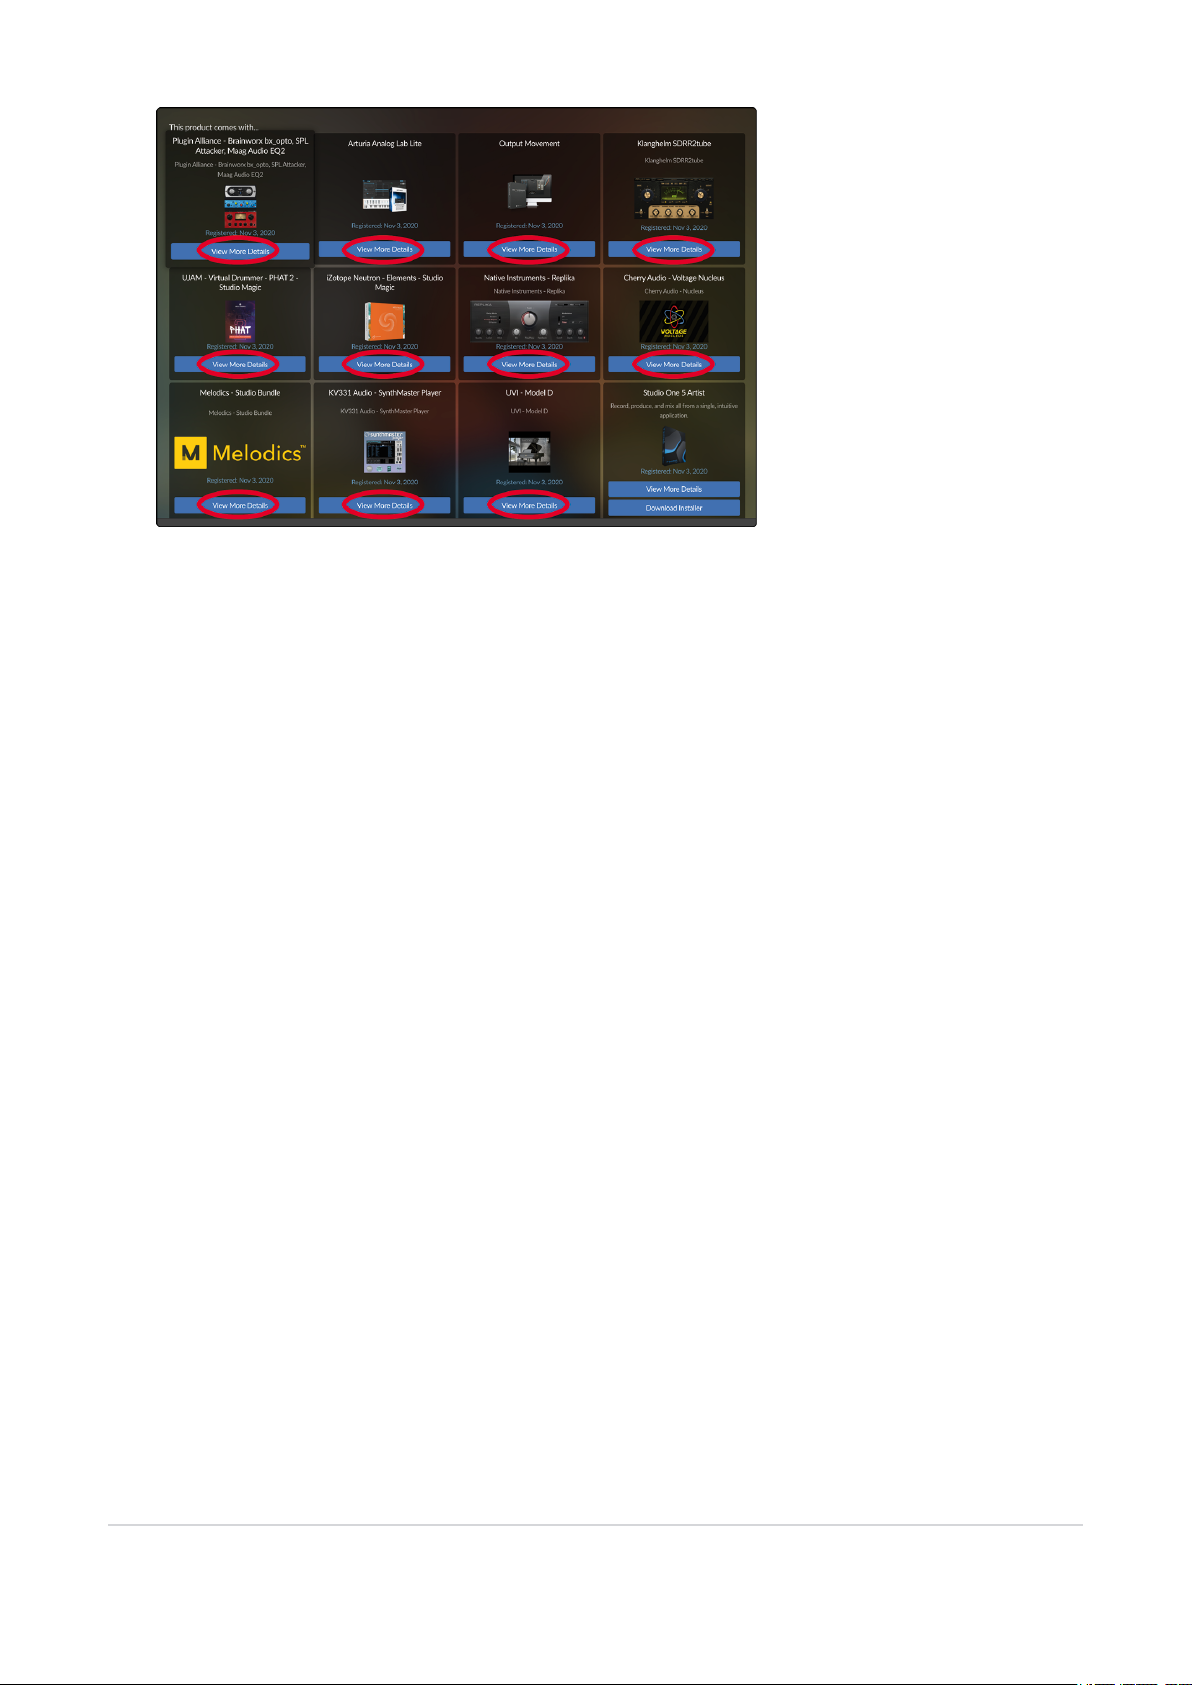
1.3.4 Step 4: Download and Install Studio Magic (Optional)
From the Revelator Dynamic product listing in MyPreSonus, you will also find a complete list with links to
all the Studio Magic products that came with your Revelator Dynamic registration. Click on the “View
More Details” button below any product you’d like to install.
1.3.4 Step 4: Download and Install Studio Magic (Optional) 12
1.3.4 Step 4: Download and Install Studio Magic (Optional) 13

2. Connections and Controls
2.1 Basic hookup
All the connections you need for your Revelator Dynamic are located on the bottom of the microphone.
USB-C® Compatible Connection. Use this port to connect your
Revelator Dynamic to your computer. While the Revelator
Dynamic’s onboard connection is USB Type C, it is fully compatible
with USB Type A 2.0 and 3.0 connections. Use the USB-C to A cable
that came with your Revelator Dynamic if your computer has a USB-
A connection rather than a USB-C connection. Please note: Revel-
ator Dynamic is backward compatible with USB 2.0 and USB 3.0
speed connections. USB 1.1 is not supported.
2. Connections and Controls 14

Headphone Output. This is the headphone connection for your Revelator Dynamic. The level is con-
trolled by the Volume knob. You can also change the mix that you are listening to from Universal Control.
See the Mixing and Loopback Audio section for details.
2.2 Standalone controls
While many of the features available for your Revelator Dynamic can be found in Universal Control,
every critical control is available right at your fingertips. Most of these settings can be changed from
Universal Control to customize your Revelator Dynamic to your application and needs.
The most important thing to remember is that the Volume control on your Revelator Dynamic can be
used to set your mic level, adjust your headphone volume, and blend your mix between your input signal
and the playback from your computer. The Quick Start Guide that came with your Revelator Dynamic can
be used as a handy reference until you get the hang of it.
2.2 Standalone controls 15

2.2.1 Setting the Microphone Level
To set your Revelator Dynamic’s input level, press and hold the Monitor button. The Volume knob will
turn green, letting you know that it is now controlling the microphone level.
Power User Tip: If your input level is too loud, the Volume knob will flash red. This means that your input signal
is “clipping,” and will begin to sound distorted. If your input signal clips, it will overload the analog-to-digital con-
verters that take the sound of your voice and convert it to 1s and 0s that the computer can understand, causing
digital distortion. Digital distortion sounds terrible, and cannot be undone if recorded. Because of this, it’s import-
ant to keep your eye on this indicator while you’re setting your levels. Check out the Resources Section for other
recording tips.
To exit this mode, simply wait five seconds or press the Monitor button again.
2.2.1 Setting the Microphone Level 16
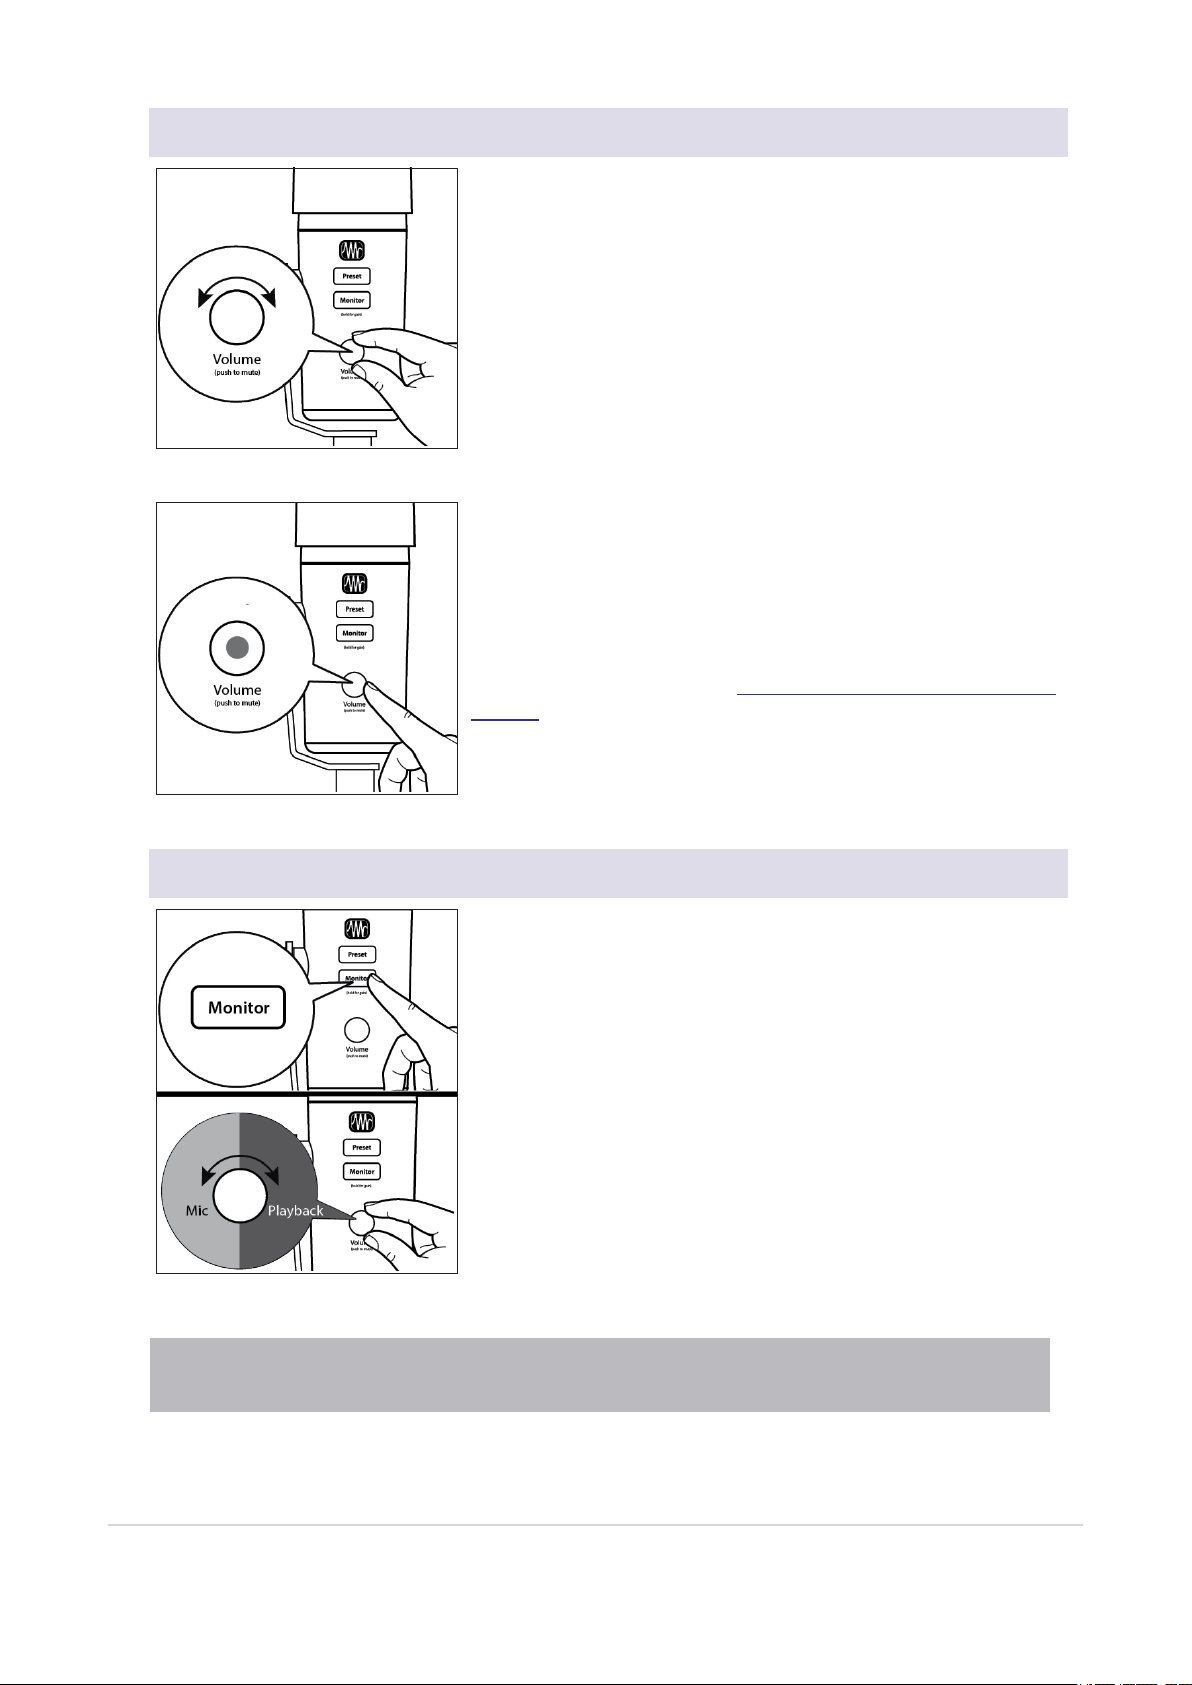
2.2.2 Setting Headphone level
By default, the Volume knob on your Revelator Dynamic controls the
output level of your headphones. While in its default state, the knob
will be unlit.
Press the knob to mute the mic. The knob will turn red while your mic
is muted. You will still be able to listen to audio from your computer
while your mic is muted.
You can also choose to mute your monitor mix instead from Univer-
sal Control. Use this option if you want to mute your headphones
completely. Note that this does not mute your microphone... so be
careful on that Zoom meeting! See the Mixing and Loopback Audio
section for instructions.
2.2.3 Setting Monitor level
Revelator Dynamic provides an easy way to create a blend between
your microphone signal and the playback from your computer. This
lets you listen to your performance in real-time without any latency
(delay).
Press the Monitor button and turn the knob to adjust the blend
between your microphone and the playback from your computer.
The knob will be blue in this mode.
Turning the knob to the left will increase the level of the input signal
relative to the playback from your computer. Turning it to the right
will increase the level of the playback from your computer relative to
the input signal.
Power User Tip: Universal Control lets you create a custom mix between your microphone, main computer
playback, and both stereo loopback audio channels. So when you’re ready to dial in your headphone mix, go to
2.2.2 Setting Headphone level 17
the Mixing and Loopback Audio section to learn more!
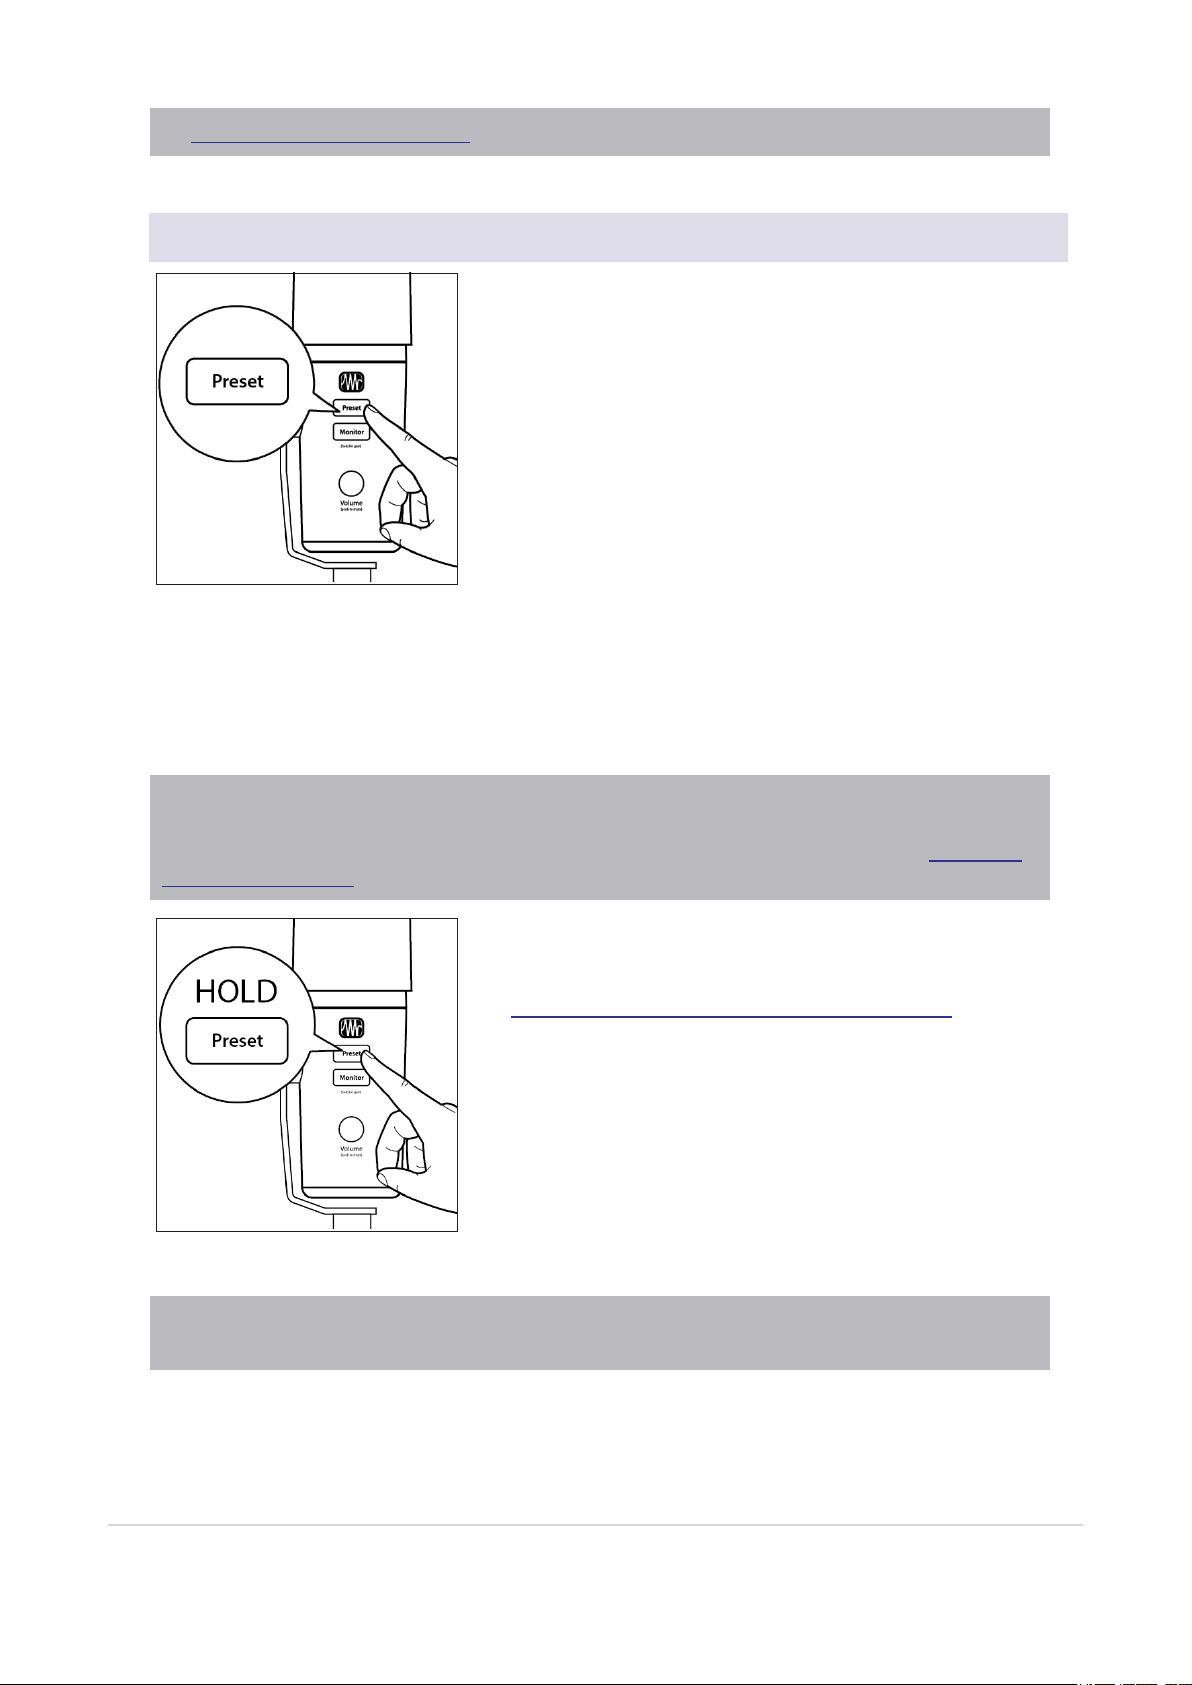
2.2.4 Selecting Presets
EQ and compression are the secret behind the professional broad-
cast studio sound we all know so well. Your Revelator Dynamic has
you covered with 8 easy-to-use, professionally-crafted processing
and effects presets. These presets are designed to give you great-
sounding results with no audio engineering experience required!
The first four presets can be accessed right from the Preset button
on your Revelator Dynamic. To cycle through them, press the Preset
button repeatedly. The button will change color to let you know
which preset is active.
1. Blue. Broadcast Basic.
2. Yellow. Broadcast Radio.
3. Green. Broadcast Light.
4. Pink. Reverb.
Power User Tip: But wait! There’s more! No really, there are a lot more. Open up Universal Control to access
the other presets. You’ll also find an additional eight preset slots to create your own. You can choose any four of
these 16 total presets to be accessible directly from the Preset button on your Revelator Dynamic. See the Pre-
sets and Scenes section for information on creating and storing presets.
By default, the sound you hear in your headphones will be the sound
that is recorded. If you’d like to use presets for monitoring purposes
only, you can open up Universal Control and change that setting.
See the Advanced Features and Customization section to learn
how.
To bypass the presets, just press and hold the Preset button. The
button will illuminate red while presets are bypassed.
Power User Tip: Bypass the presets when you want a clean sound with no effects—great for processing your
recording later, or when you want to monitor through plug-ins inside your favorite recording application.
2.2.4 Selecting Presets 18
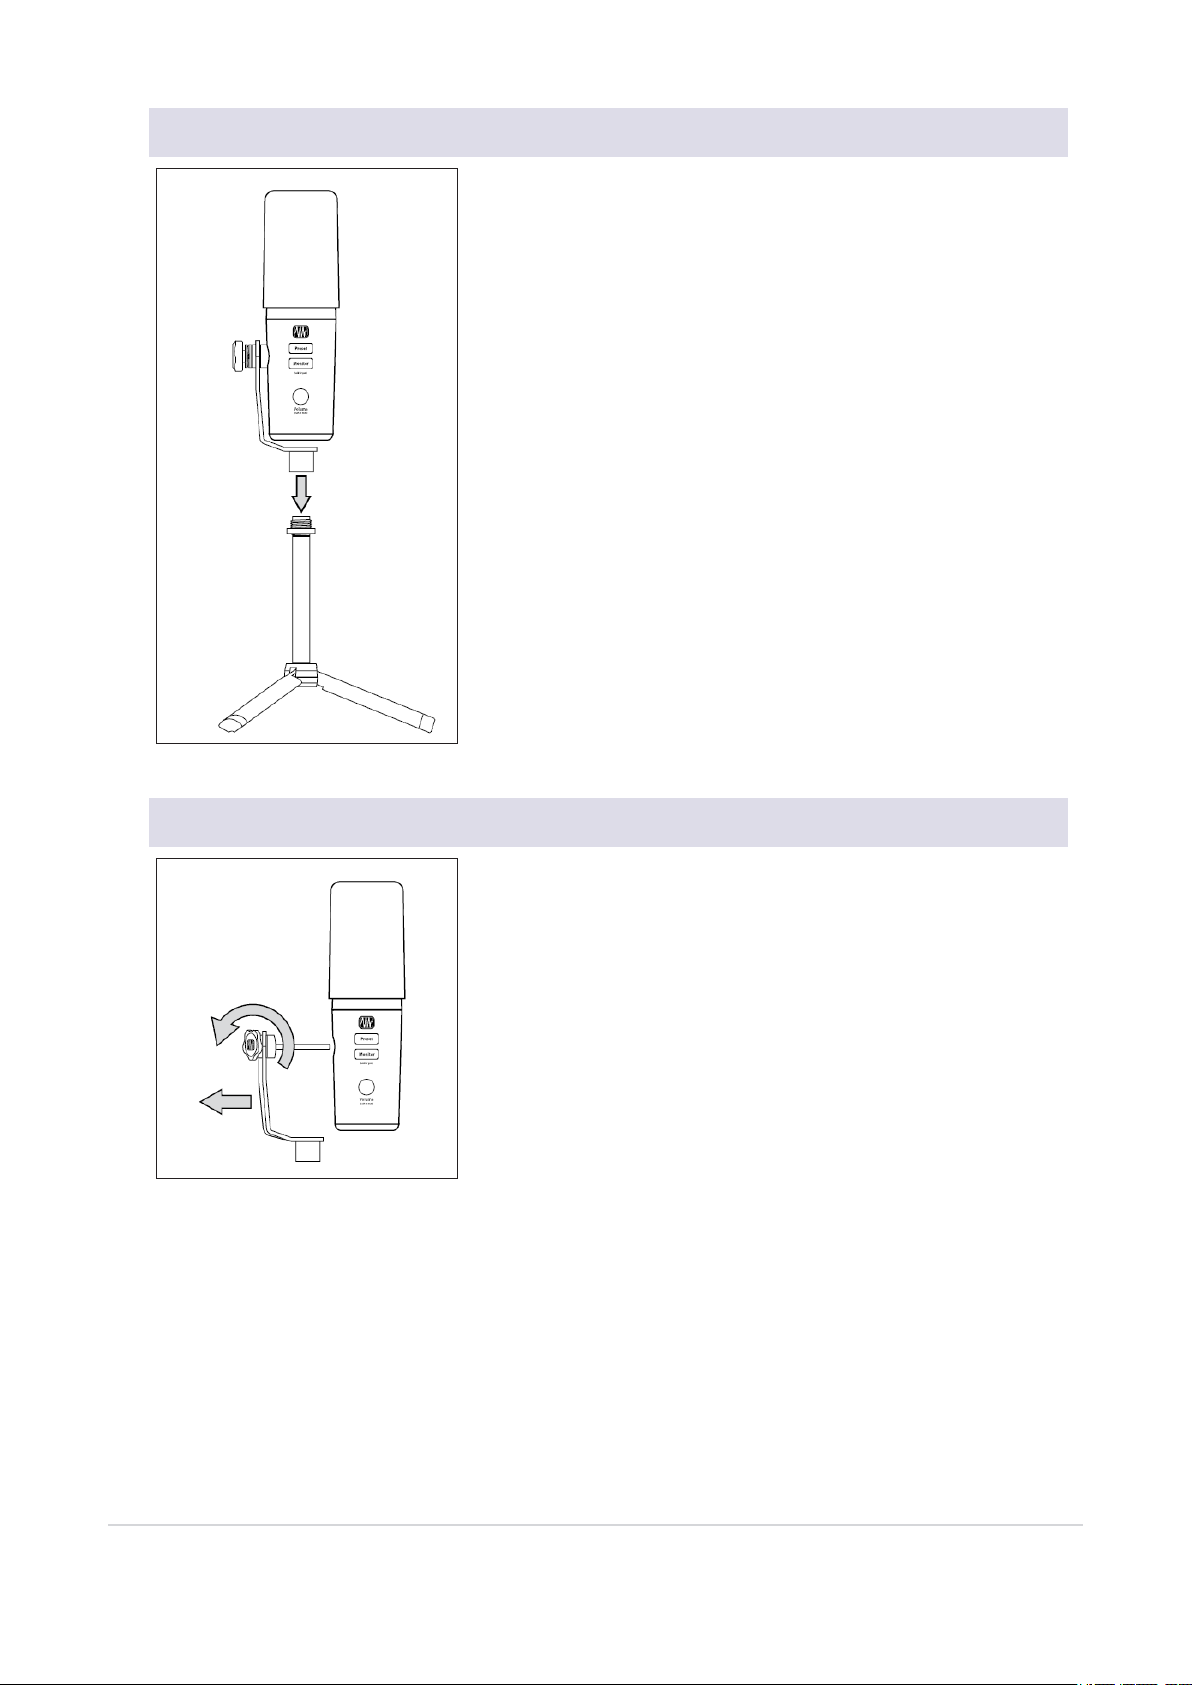
2.2.5 Attaching Revelator Dynamic to a Stand
Secure the half-yoke bottom to the threads at the top of the PTS-1
(or other) mic stand.
2.2.6 Removing Revelator Dynamic from its yoke
Revelator Dynamic can be removed from its yoke for comfortable
handheld use or for mounting to a 1/4”-20 mic stand mount.
To remove the yoke, loosen the adjuster on the left side of Revelator
Dynamic by turning it counter-clockwise until the yoke is easily slid
out of the mic.
For mounting to a stand with a 1/4”-20 mount, attach Revelator
Dynamic using the threaded port on the bottom of the mic.
2.2.5 Attaching Revelator Dynamic to a Stand 19

3. Universal Control
The Revelator Dynamic is so much more than a great-sounding USB microphone, and the secret to its
advanced features and mixing capability is unlocked with Universal Control.
Before proceeding, please make sure you have followed the instructions in the Over-
view section and have downloaded and installed Universal Control.
3.1 The Launch Window
Get ready for lift off! When Universal Control is launched, you will see the Launch window. From this win-
dow, you can manage all the driver settings for your Revelator Dynamic.
3. Universal Control 20
Table of contents
Other PRESONUS Microphone manuals


Popular Microphone manuals by other brands

Pettersson
Pettersson u256 quick start guide

Peavey
Peavey PVM 45i Specification sheet

Neumann.Berlin
Neumann.Berlin M 50 brochure

THOMSON
THOMSON M135 operating instructions

Instantel
Instantel 720A5101 instruction sheet

Signal Vehicle Products
Signal Vehicle Products LCS600 Installation and operating instructions


