PRESONUS revelator User manual

USB Microphone with StudioLive®processing inside
Owner’s Manual
www.presonus.com
®
English

Table of Contents
1 Overview — 1
1.1 Introduction — 1
1.2 What is in the Box — 1
1.3 What is in your MyPreSonus account — 2
1.3.1 Step 1: Register Revelator — 2
1.3.2 Step 2: Download and Install
Universal Control — 4
1.3.3 Step 3: Download and Install
Studio One Artist (Optional) — 5
1.3.4 Step 4: Download and Install
Studio Magic (Optional) — 6
2 Connections and Controls — 7
2.1 Basic hookup — 7
2.2 Standalone controls — 7
2.2.1 Setting the Microphone Level — 8
2.2.2 Setting Headphone level — 8
2.2.3 Setting Monitor level — 8
2.2.4 Selecting Presets — 9
3 Universal Control — 10
3.1 The Launch Window — 10
3.1.1 Launch Window Menu Items — 11
3.2 Using Your Revelator
with Popular Applications — 12
3.2.1 Using Revelator for System Audio — 13
3.2.2 Using Revelator for Skype — 16
3.2.3 Using Revelator for Zoom — 16
3.2.4 Using Revelator for Google Meets — 20
3.2.5 Using Revelator for OBS — 21
3.2.6 Using Revelator on Chromebook — 23
3.2.7 Using Revelator with Zoom
on Chromebook — 24
3.2.8 Using Revelator with Google Meet
on Chromebook — 25
3.2.9 Using Revelator with
iOS/iPadOS devices — 26
3.2.10 Using Revelator
with Android devices — 26
4 Presets, Fat Channel,
and Voice Effects — 27
4.1 Preset Management — 27
4.1.1 Changing Preset Button Slots — 28
4.1.2 Storing New Presets — 29
4.2 Fat Channel and Voice FX — 30
4.2.1 High Pass Filter (HPF) — 31
4.2.2 Gate — 31
4.2.3 Compressor (Comp) — 32
4.2.4 Equalizer (EQ) — 32
4.2.5 Limiter — 33
4.2.6 Voice FX — 34
4.3 Reverb — 34
5 Mixing and Loopback Audio — 36
5.1 What is Loopback Audio? — 36
5.2 Mixer Controls — 37
5.2.1 Microphone Channel Controls — 37
5.2.2 Mixer Channel Controls — 37
5.2.3 Main Output Controls
and Mix Selection — 38
5.3 Feedback Loops are Bad — 39
6 Advanced Features
and Customization Tools — 40
6.1 Settings Menu — 40
6.2 Advanced Fat Channel
and Voice Effects Controls — 41
6.2.1 High Pass Filter — 41
6.2.2 Noise Gate — 41
6.2.3 Compressor — 42
6.2.4 Changing the Signal Chain — 45
6.2.5 Equalizer — 45
6.2.6 Limiter — 48
6.2.7 Voice FX — 48

7 Studio One Artist
Quick Start Guide — 51
7.1 Installation and Authorization — 51
7.2 Setting Up Studio One — 52
7.2.1 Configuring Audio Devices — 53
7.2.2 Configuring MIDI Devices — 53
7.3 Creating a New Song — 57
7.3.1 Configuring Your I/O — 57
7.3.2 Creating Audio and Instrument
Tracks — 59
7.3.3 Recording an Audio Track — 60
7.3.4 Adding Virtual Instruments
and Effects — 60
8 Resources — 62
8.1 Gain Staging 101: Begin at the Beginning — 62
8.2 Microphone Tips and Tricks — 63
8.2.1 Handling Noise — 63
8.2.2 How Close is Too Close? — 64
8.2.3 Problematic Pronunciation — 64
8.2.4 Putting it All Together — 64
8.2.5 Removing Revelator from its Base — 65
8.3 Technical Specifications — 65
1
1 Overview
1.1 Introduction
Revelator
Owner’s Manual
1Overview
1.1 Introduction
Thank you for purchasing the Revelator USB microphone! Revelator is
the perfect microphone for live streaming or podcasting, and is a simple
recording solution for voice-overs in your home studio. It’s designed to
deliver polished, professional-sounding results with ease. Once you’ve
registered your Revelator at my.presonus.com, you’ll be able to download
your drivers, a complimentary copy of Studio One Artist, additional plug-ins,
content, and more. It’s our gift to you for becoming a PreSonus customer.
We suggest you read this manual to familiarize yourself with the features and
applications for your Revelator before trying to connect it to your computer.
This will help you to avoid problems during installation and use.
Throughout this manual you will find Power User Tips. These tips and
tricks will help you to become a Revelator expert—as well as help
you to better understand audio terminology, so you can get the most
from your purchase and get the best sound quality possible.
Thanks for joining the PreSonus family. We’re glad you’re here.
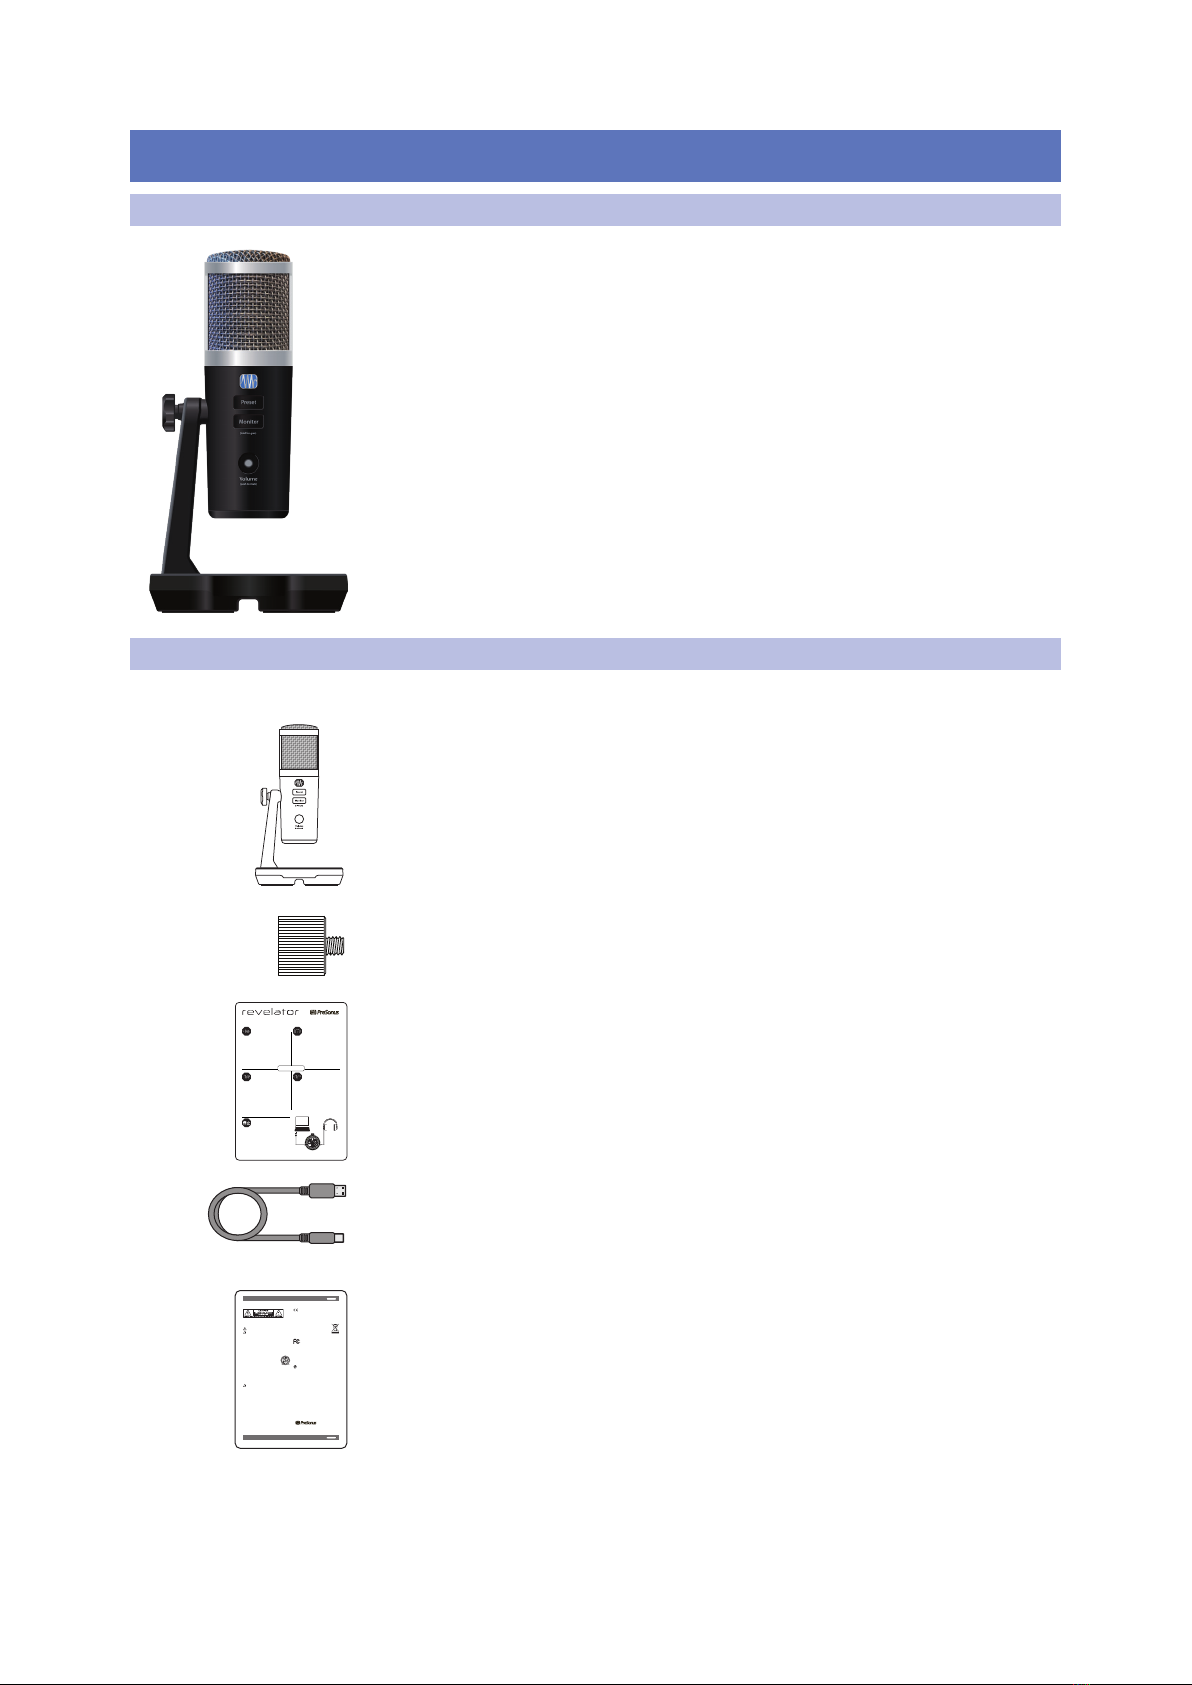
1.2 What is in the Box
Your Revelator package contains:
Revelator USB Microphone with StudioLive inside
Revelator to boom stand adapter
Quick Start Guide. Use this as a handy reference guide to your hardware features
while you familiarize yourself with your new microphone
1M USB-C-to-USB-A Cable. Use this to connect your Revelator
to a USB port on your computer or a powered USB hub.
Power User Tip: If your computer only has USB-C ports, you will need to purchase a
standard USB-C cable, or use an extra one you might have handy.
PreSonus Health, Safety, and Compliance Guide. Legal language to cure your
insomnia.
USB Microphone with StudioLive™processing inside
Getting Started • Erste Schritte • Cómo empezar • Pourcommencer • 开始
®
Goonline to my.presonus.com and
registeryour serial number.
Thankyou for purchasing the Revelator USB microphone! Revelator
isthe perfect microphone for live streaming or podcasting, and is a
simplerecording solution for voice-overs in your home studio. It’s
designedto deliver polished, professional-sounding results with ease.
Onceyou’ve registered yourR evelatorat mypresonus.com, you’ll be
ableto download your complimentary copy of Studio One Artist as
wellas additional plug-ins, content, and more. It’sour gift to you for
becominga PreSonus customer.
Pleasereview your Revelator User Manual available at PreSonus.com
formore information on proper operation and installation.This Quick
StartGuide will take you through the basics... but there is so much
moreyour Revelator can do!!
ÖnenSie die Webseite my.presonus.com
undregistrieren Sie Ihre Seriennummer.
VielenDank, dass Sie sich für das Revelator USB-Mikrofon
entschiedenhaben! Revelator ist das perfekte Mikrofon für Live-
Streamingund Podcasts und empehlt sich als unkompliziertes
Voiceover-Systemfür Ihr Heimstudio.Das M ikrofonwurde als
einfacheLösung für hochwertige Aufnahmen in professioneller
Klangqualitätentwickelt. Nachdem Sie Ihr Revelator auf my.presonus.
comregistriert haben, können Sie Ihr kostenloses Studio One Artist
sowiezusätzliche Plug-Ins, Inhalte etc. herunterladen. Dies ist unser
Willkommensgeschenkfür Sie als PreSonus Kunden.
WeitereInformationen zur Installation und Konguration nden Sie
inder Revelator Bedienungsanleitung auf www.presonus.com. Diese
Kurzanleitungbringt Ihnen die Grundlagen nahe, aber Revelator kann
nochviel, viel mehr!
登录 my.presonus.com 并注册您的
序列号。
感谢您购买 Revelator USB 话筒!Revelator 是实时流媒体或
播客的完美话筒,也是一种用于家庭工作室画外音的简单录音
解决方案。它的设计宗旨在于便捷地提供完美专业的声音 。一旦
您在mypresonus.com上注册了您的 Revelator,就可以下载
免费的Studio One Artist 以及其他插件、内容等等。这是我们送
给您的礼物,感谢您成为 PreSonus 的客户。
有关正确操作和安装的更多信息,请查看 PreSonus.com 提供
的 Revelator 用户手册。这个快速启动指南将带您了解基础内
容。随后您会发现 Revelator 可以做的还有很多!!
Allezsur my.presonus.com et enregistrez
votrenuméro de série.
Mercid’avoir acheté le microphone USB Revelator ! LeRevelator est
lemicrophone parfait pour le streaming live ou le podcasting, et c’est
unesolution d’enregistrementsimple pour les voix-o dans votre
homestudio. Il est conçu pour obtenir facilement un son impeccable,
dequalité professionnelle. Après avoir enregistrévotre Revelator
surmypresonus.com, vous pourrez télécharger gratuitement
StudioOne Artist ainsi, entre autres, que des plug-ins et du contenu
supplémentaires.C’est notrecadeau pour vous remercier d’être
maintenantun client PreSonus.
Veuillezconsulter le mode d’emploide votre Revelator, disponible sur
PreSonus.com,pour plus d’informations sur son installation et son
utilisation.Ce guide de prise en main vous fera découvrir les bases…
maisvotre Revelator peut faire tellement plus !
Vayaonline a my.presonus.com y registre
sunúmero de serie.
¡Gráciaspor la compra del micrófono Revelator USB! Revelator es
elmicrófono perfecto para streaming y podcasting en directo, y
ademáses una solución sencilla para grabación de voice-overs en su
estudiodoméstico. Está diseñado para ofrecer resultados renados y
profesionalescon facilidad. Una vez que haya registrado su Revelator
enmypresonus.com, podrá descargar su copia gratuita de Studio
OneArtist, así como plug-ins adicionales, contenido y más. Es nuestro
regalopara usted por convertirse en cliente de PreSonus.
Porfavor,consulte su Manual del Usuario de Revelator disponible en
www.PreSonus.compara más información sobre el correcto manejo
einstalación. Esta Guía de Inicio Rápido lo llevará a través de los
conceptosbásicos... ¡pero hay mucho más que su Revelator puede
hacer!
PreSonusSafety Warnings and Instructions
Electricalinformationand warning symbols for PreSonus products arelocated on the rear electrical panel of the unit
adjacenttothe electrical plug or on the bottom of the unit along with other product compliance information.
Thislightningflash with arrowheadsymbol within an equilateral triangle is intended to alert the user to the presence of non-
insulated“dangerousvoltage”withinthe product’senclosure that may be of sufficient magnitude to constitute a risk of electric shock.
WARNING:TOREDUCETHE RISK OF ELEC TRIC SHOCK, DO NOT REMOVE COVER (ORBACK) AS THERE
ARENOUSER-SERVICEABLE PARTSINSIDE. REFER SERVICING TO QUALIFIED PERSONNEL.
Theexclamationpoint within an equilateral triangle is intended to alert the user to the presence of
importantoperatingand maintenance instructions in the literatureaccompanying the appliance.
CAUTION:Toreducethe risk of electric shock, do not expose this appliance to rain and moisture. Do not expose this device
todrippingorsplashing liquids and no objec t filled with liquids,such as vases, should be placed on the device.
CAUTION:Theseserviceinstruc tions arefor use by qualified ser vice personnel only.To reduce the risk of electric shock,
donotperform any servicing other than that contained in the operation instructions. Qualified service personnel must
performrepairs.
1. Readtheseinstructions.
2. Keeptheseinstructions.
3. Heedallwarnings.
4. Followallinstructions.
5. Donotuse this device near water.
6. Cleanonlywith a dry cloth.
7. Donotblock any ventilationopenings. Install in accordance with the manufacturer’s instructions.
8. Donotinstall near any heatsources, such as radiators, heat registers, stoves,
orotherdevice (including amplifiers) that produceheat.
9. Donotdefeat the safety purpose of the polarized or grounding-typeplug. A polarized plug has two blades
andathird groundingprong. The wide blade and the third prong are provided for yoursafet y.If the provided
plugdoesnot fit into youroutlet, consult an electrician for replacement of the obsolete outlet.
10. Protect the powercord from being walked on or pinched, particularly at plugs,
conveniencereceptacles,andthe point where they exit from the device.
11. Use only attachments/accessoriesspecified by PreSonus.
12. Use only with a cart, stand, tripod,bracket, or table specified by the manufacturer or sold with
thisdevice.Use caution when movinga car t/device combinationto avoid injury from tip- over.
13. Unplug this device during lightning stormsor when unused for long periods.
14. Servicing is required when the device has been damaged in any way,such as if a power-supply
cordorplug is damaged; or liquid is spilled,or objec ts havefallen into the device; or if
thedevicehas been exposed to rainor moisture, does not operate normally, or has been
dropped.AllPreSonusproducts in the USA should be ser viced atthe PreSonus factor y
inBatonRouge, Louisiana.If your PreSonus product requires a repair, contact support@
presonus.comtoarrangefor a return authorization number. Customers outside the USA
shouldcontacttheir local distributor.Your distributor’scontact information is available at www.presonus.com.
15. Protectivegrounding(earthing) terminal. The apparatus should be connected to a
mainssocketoutlet with a protectivegrounding(earthing) connec tion.
16. Wherethe Mains plug or an appliance coupler is used as the disconnect device,
thedisconnectdevice shall remain readily operable.
17. The use of apparatusis in moderate climates.
18. Please allow 5cm aroundthe apparatus for sufficient ventilation; the ventilation should not be impeded
bycoveringtheventilation openings with items, such as newspapers, table-cloths, curtains, etc.
Rackmounting
• Useanequipment rackthat is 19-inches wide (482.6 mm) and rated for the total weight of your equipment.
• Useaminimum of (4) 10/32 threadedscrews per rack mounted device.
WARNING:
Cancerandreproductiveharm - ww w.p65warnings.ca.gov
PreSonusCompliance Information
EuropeanUnion (EU)
TheCEmark on this product indicatesthat the device is compliant with the
EUCouncilDirectives
2014/35/EULowVoltageDirective
2014/30/EUEMCDirective
2011/65/EURoHSRecast
EC1907/2006REACh
RoHSRecastDirective 2011/65/EU
REAChDirectiveEC1907/206
WEEEThissymbolon this product or its packaging indicates that this product must not be disposed of with other
waste.Instead,itis your responsibility to dispose of your waste equipment by handing it over to a designated
collectionpointfor the recycling of wasteelec trical and electronic equipment.The separate collection and recycling
ofyourwasteequipment at the time of disposal will help conserve natural resources and ensure that it is recycled
inamanner that protects human health and the environment.For more information about where you can drop
offyourwasteequipment for recycling, please contact your local city recycling office or the dealer from whom you
purchasedtheproduct.
Radioand TelevisionInterference
Ifthesesymbols are markedon the product, the device complies as follows:
AnyChangesor modificationsnot expressly approved by the party responsible for compliance could void the user’s authority to operate
theequipment.
USA:Thisequipmenthas been tested and found to comply with the limits for a Class B digital device, pursuant to
Part15of the FCCRules. Operation is subject to the following two conditions: (1) This device may not cause harmful
interference,and(2)this device must accept any interference received, including interference that may cause
undesiredoperation.Theselimits are designed to provide reasonable protection against harmful interference in a
residentialinstallation.Thisequipment generates, uses, and can radiate radio frequency energy,and, if not installed
inaccordancewiththe instructions, may cause harmful interference to radio communications. However, thereis no guarantee that
interferencewillnot occur in a particular installation. If this equipment does cause harmful interference to radioor television reception,
whichcanbe determined by turning the equipmentoff and on, the user is encouraged to tr y tocorrect the interference by one or more of
thefollowingmeasures:
• Reorientorrelocatethe receiving antenna.
• Increasetheseparationbetween the equipment and the receiver.
• Connecttheequipment intoan outlet on a circuit different from that to which the receiver is connected.
• Consultthedealeror an experienced radio/TV technician for help.
FCCRadiationExposureS tatement:
Thisequipmentcomplieswith FCC radiation exposure limits set forth for an uncontrolled environment. This equipment should be installed
andoperatedwithminimum distance 20cm between the radiator& your body.
Thistransmittermustnot be co-located or operating in conjunction with any other antenna or transmitter.
CAUTION:Changesor modifications tothis device not expressly approved by PreSonus Audio Electronics could void the user’sauthorit y to
operatetheequipmentunder FCC rules.
AustralianCompliance:Thisequipment complies with Radio communication Devices Notice 2003; or Radio communication
Labeling(ElectromagneticCompatibility)Notice 2008; or Radio communication (Compliance Labeling Electromagnetic
Radiation)LabelingNotice 2003.
ICWARNING
ICRSSwarning:This device complies with Industry Canada licence-exempt RSS standard (s). Operation is subject to the following two
conditions:(1)this device maynot cause inter ference,and (2) this device must accept any interference,including interference that may
causeundesiredoperationof the device. Under Industry Canada regulations, this radio transmitter may only operate using an antenna of a
typeandmaximum (or lesser) gain approvedfor the transmitter by Industry Canada. To reduce potential radio interference toother users,
theantennatype and its gain should be so chosen that,the equivalent isotropically radiated power (e.i.r.p.)is not more than that necessary
forsuccessfulcommunication.
Thisradiotransmitter(identify the device by certifcation number, or model number if Category II) has been approved by Industry Canada
tooperatewiththe antenna types listed below with the maximum permissible gain and required antenna impedance for each antenna
typeindicated.Antennatypes not included in this list, having a gain greater than the maximum gain indicated for that type, are strictly
prohibitedforusewith this device.
ICRadiationExposure Statement:
Thisequipmentcomplieswith IC RF radiation exposure limits set forth for an uncontrolled environment. This transmitter must not be
co-locatedoroperatingin conjunc tion with anyother antenna or transmitter.
ICES003:ThisCANICES3 (B)/NMB3(B) digital apparatus complies with Canadian ICES003.
PreSonus Health, Safety,and Compliance Guide ClassB
PreSonus Health, Safety,and Compliance Guide ClassB
®
PreSonusHealth,Safety, and Compliance Guide. Part#70-00000013-C
©2018PreSonus Audio Electronics, Inc. All Rights Reserved.
18011GrandBay Ct. • Baton Rouge, Louisiana 70809 USA • 1-225-216-7887
www.presonus.com

2
1 Overview
1.3 What is in your MyPreSonus account
Revelator
Owner’s Manual
1.3 What is in your MyPreSonus account
There’s more to your Revelator than what comes in the box! Let’s take a
moment to register your Revelator and download the digital products that
come with it. These include:
•Universal Control. Unlock the StudioLive inside your Revelator with
Universal Control. This installation package also includes your audio
driver controls that you will need to use advanced Revelator features.
•Studio One Artist. Studio One Artist is our award-winning recording
and production software. It’s also designed to be intuitive and easy
to use, so whether you’re a seasoned professional or just starting out,
Studio One Artist has the tools you need to make a great recording.
•Studio Magic Bundle. Over $1000 USD worth of plug-ins, sounds, and
more; Studio Magic supercharges your Studio One Artist experience!
1.3.1 Step 1: Register Revelator
To download your digital products, you must first create a MyPreSonus
account. This account lets you manage all your PreSonus product
registrations, provides curated educational content, and is the portal
to all tech support and service inquiries. Let’s get started!
1. In your Internet browser of choice, visit my.presonus.
com and click“Create Account”
Power User Tip: If you already have a MyPreSonus account, please log in
and skip to step 5.
2. Fill in the form with the required information. Make sure to verify
that you are, in fact, human and agree to our PreSonus Terms of
Use. If you’d like to receive occasional emails about promotions
and new video content, check that box now as well.
Other manuals for revelator
1
Table of contents
Other PRESONUS Microphone manuals


