PRESONUS Temblor T8 User manual

1 Overview 概述 —1
2 Hookup 联机 —2
3 Tutorials 教程介绍 —7
4 Resources 资料 —9
Table of Contents
目录
1.1
Introduction 简介 —1
1.2
Summary of Temblor T8 Features
特点概述
—1
2.1
What is in the Box
包装内有什么
—2
2.2
Rear-Panel Connections and Controls
后面板连接和控制
—2
2.1.1
Inputs 输入 —2
2.1.2
Outputs 输出 —2
2.1.3
Power 电源
—3
2.1.4
User Controls 用户控制
—
3
2.2
Hookup Diagrams 连接图 —4
2.2.1
Basic Setup 基本设置
—4
2.2.2
Advanced Setup 设置
—
5
2.2.3
Home Theater Setup 家庭影院设置 —6
3.1
Subwoofer Placement 低音扬声器的设置 —7
3.2
Level Calibration
水平校准 —
7
4.1
Technical Specifications 技术规格 —9
4.2
Troubleshooting 故障排除 —10
4.3
Warranty
保修
—10

1
1 Overview
1.1
Introduction
Temblor T8
Owner’s Manual
1Overview 概述
1.1 Introduction 简介
Thank you for purchasing the PreSonus ® Temblor™ T8 active studio
subwoofer. PreSonus Audio Electronics has designed the T8 utilizing
high- grade components to ensure optimum performance that will last.
感谢你购买 PreSonus Temblor T8 有源录音室超低音音箱。
PreSonus AudioElectronics 公司
在设计 T8 时,采用了高等级的组件,
以确保性能持久的最佳状态。
TheTemblorT8 is an active subwooferfeaturinga down-firing 8-inch glass-
compositedriverwith ahigh-density rubbersurroundinafront-portedcabinet.
This configurationprovides responsive,defined bass with low distortion.
The result is a natural and musical sound that enhances full-range
speakers without over shadowing them. Thevariable (50 to 130 Hz)
lowpass filter letsyoudialintheTemblorT8topairperfectlywithyourfull-
rangesystem, making it the ideal solution for2.1 and surround sound
applications.
Temblor T8 是一个有源超低音扬声器,具有一个8英寸向下射击的玻
璃复合驱动器,带有一个前端口的机箱里有一个高密度的橡胶环绕。
这种构造提供了反应灵敏、清晰度高和失真低的低音。其结果是一种
自然和动听的声音,增强了全音域扬声器,而不会使其黯然失色。可
变的(50至130 Hz)低通滤波器,让你可以将 Temblor T8 与你的全频
系统完美搭配,使它成为2.1和环绕声应用的理想解决方案。
PreSonus Audio Electronics is committed to constant product improvement,
andwevalueyoursuggestionshighly.Webelievethebest wayto achieve
ourgoal ofconstantproductimprovementisbylistening tothereal experts:
our valued customers. We encourage you to visit My.PreSonus.com with any
questions or comments regarding your PreSonusTemblorT8. We appreciate
the support you have shown us through the purchase of this product
and are confident that you will enjoy your Temblor T8!
PreSonus Audio Electronics 致力于不断改进产品,我们高度重视你的建
议。我们相信,实现我们不断改进产品目标的最佳方式是听取真正的专家
意见:我们宝贵的客户。对你的 PreSonus Temblor T8 有任何问题或意见
,我们鼓励你访问 My.PreSonus.com 官方网站。感谢你对我们产品的支持
,并相信你一定会喜欢 Temblor T8 这款音箱!
ABOUT THIS MANUAL: We suggest that you use this manual to familiarize yourself
with the features,applications, and correctconnection proceduresfor your TemblorT8
before connecting it. This will help you avoid problems during installation and setup.
关于本手册:我们建议你在连接
Temblor T8
之前,使用本手册来熟悉它的功
能、应用和正确的连接程序。这将有助于你在安装和设置过程中避免问题。

2
In addition to all the basic info you’ll need to connect and operate
your TemblorT8, this manual also providesseveraltutorials that
cover subwoofer placement, connections, and calibration.
除了连接和操作
Temblor T8
所需的所有基本信息外,本手册还
提供了几个教程,涵盖了超重低音扬声器的放置、连接和校准。
1.2 Summary of Temblor T8 Features 特点概述
•
Down-firing active subwoofer with 200 watt, Class AB amplifier
•
8-inch glass-composite woofer with high-density rubber surround
•
Frequency response: 30-200 Hz
•
Variable lowpass filter control: 50-130 Hz
•
80 Hz highpass filter (with defeat switch) for satellite connections
•
Front-ported cabinet
•
Power-down / Standby mode
•
带有200瓦AB类放大器的向下射击有源低音扬声器
•
8英寸玻璃复合低音扬声器,高密度橡胶环绕
•
频率响应:30-200Hz
•
可变的低通滤波器控制:50-130Hz
•
用于卫星连接的80Hz高通滤波器(带失效开关)
•
前置式箱体
•
断电/待机模式

3
2
Hookup
Temblor T8
2Hookup 联机
2.2 Rear-Panel Connections and Controls 后面板的连接和控制
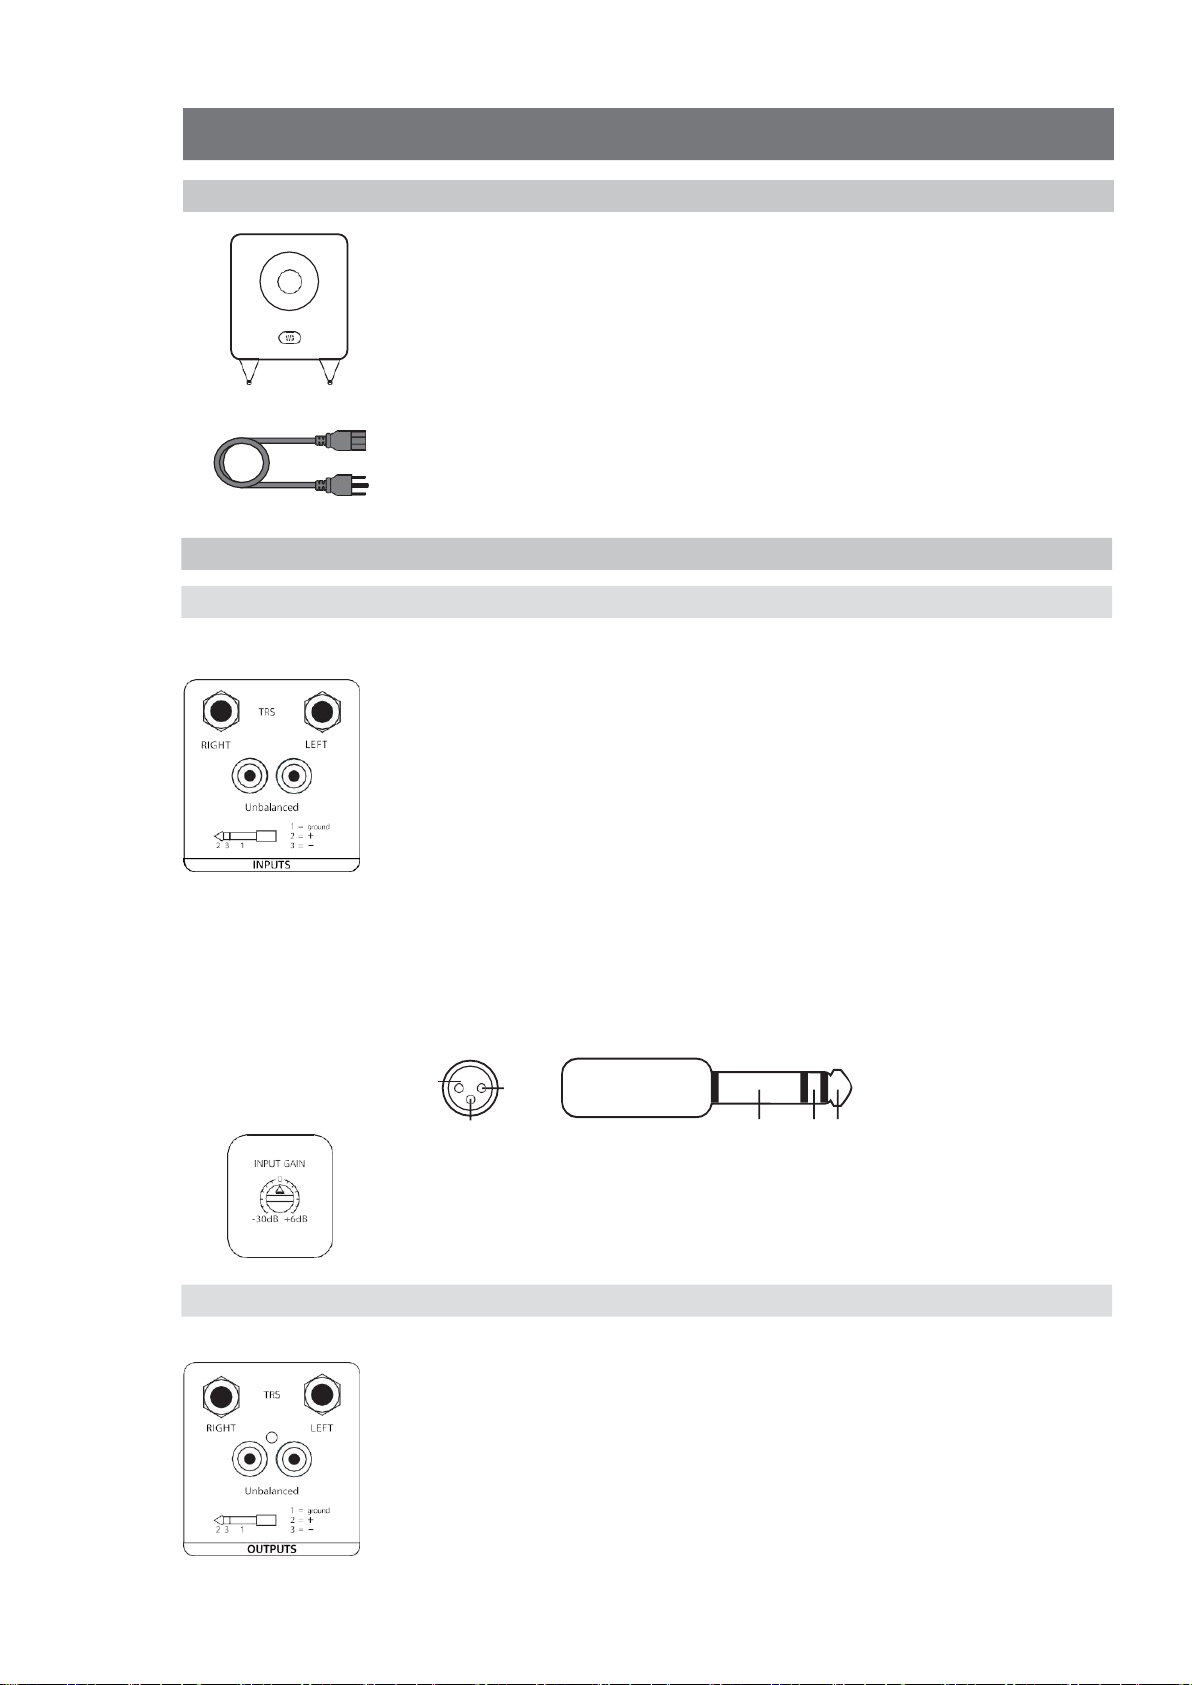
2.1.1 Inputs
2.1.2 Outputs
2.1 What is in the Box
Owner’s Manual
In addition to this manual, your Temblor T8 package contains the following:
除本手册外,你的 Temblor T8 的包装还包括以下内容:
•
(1) PreSonus TemblorT8 powered subwoofer
•
PreSonusTemblorT8 有源超重低音扬声器
•
(1) IEC power cable
•
IEC电源线
Line-level Inputs:
The Temblor T8 provides a choice of two input pairs: a pair
of balanced ¼”TRS inputs and one pair of RCA unbalanced inputs.When both
connections arein use,the RCA inputs will sumintothe TRSconnections.
Line-level Inputs:
TemblorT8提供两种输入组的选择:一对¼"TRS平衡输入和一对
RCA非平衡输入。当两个连接都在使用时,RCA输入将汇总到TRS连接。
Power User Tip: Connect both the left and right inputs if you are connecting your full-
rangemonitors to the T8’soutputs, or if you’rerunning your TemblorT8 independently
from a stereosource (such as the PreSonus Monitor Station). This will ensure that your
Temblor T8 receives the low-frequency content from both the left and right sides of a
stereo audio signal. If your audio source provides a mono or LFE output, you only need to
connect one input—either L or R.
用户提示:如果将你的全范围监听器连接到
T8
的输出,或者你从一个立体声源
(如
PreSonus
监听站)独立运行
Temblor T8
,请同时连接左和右的输入。这将确
保你的
Temblor T8
接收是来自立体声音频信号左右两边的低频内容。如果你的
音源提供一个单声道或
LFE
输出,你只需要连接一个输入
-- L
或
R
。
2 1
[+] 3
Ground
[-]
Sleeve:
Ring: Tip:
XLR
TRS
Ground
[-]
[+]
Input Gain: Sets the level of the input signal before it is amplified.
输入增益:设定输入信号在被放大之前的电平。
Outputs: The Temblor T8 provides two pairs of outputs: a pair of balanced
¼”TRS outputs and a pair of RCA unbalanced outputs.The full-range signal
connectedtothestereoinputsontheT8ispassedthroughtotheseoutputs.
Use these outputs to connect your main left and right studio monitors.
If the High Pass Filter switch is engaged, frequencies below 80 Hz are not sent from
these outputs.
Outputs: Temblor T8 提供两对输出:一对¼" TRS平衡输出和一对RCA非平衡
输出。连接到T8上的立体声输入的全音域信号,会被传递到这些输出。
如果高通滤波器开关被激活,低于80Hz的频率就不会从这些输出端发送。
2.1 What is in the Box 包装里有什么

4
2
2.2
Hookup
Hookup Diagrams
Temblor T8
Owner’sManual
2.2 Rear-Panel Connections and Controls
Owner’s Manual
2.1.3 Power 电源
IEC Power Connection: Your Temblor T8 accepts a standard IEC power cord.
IEC Power Connection:你的Temblor T8可以接受标准的IEC电源线。
Warning:Do not removethe centergrounding prong or use a separateground-lift
adapter, as this could result in electric shock.
警示:不要去掉中间的接地线或使用单独的接地线适配器,因为这可能
会导致电击。
Power Switch:
This is the On/Off switch. The power status is indicated by the
illuminated logo on the front of the cabinet.
Power Switch:
这就是开/关。电源状态由机柜前面的发光标志来显示。
Power User Tip: Your Temblor T8 features a Standby mode. When no
signal is present for longer than ten minutes,your T8 will lowerits power
consumption to less than 0.5W until signal is present again. The lighted
logo on the front of your T8 will turn white when Standby mode is active
用户提示:你的
Temblor T8
有一个待机模式。当超过
10
分钟没有信号
时,你的
T8
会将其功率消耗降低到
0.5W
以下,直到信号再次出现。
当待机模式启动时,
T8
前面的发光标志将变成白色。
ACSelectSwitch:Theinput-powervoltageissetatthefactorytocorrespondwith
the country to which it was shipped. Use this switch only if you are using your
TemblorT8 in a country that uses a different standard voltage than is used in the
country where you purchased your T8.
ACSelectSwitch:输入电源电压在出厂时就已经设置好了,与运往的国家一
致。只有当你在一个使用不同标准电压的国家使用你的 Temblor T8 时,才
使用这个开关。
2.1.4 User Controls 用户控制
Polarity: The Polarity button reverses the polarity of the input signals.
Polarity: 极性按钮可以颠倒输入信号的极性。
PowerUser Tip: Once your have connectedyour T8 to your system, try experimenting
with each setting while listening to your favoritemusic. Leavethis switch in the position
where the bass was the loudest.
用户提示:一旦你把
T8
连接到你的系统上,听最喜欢的音乐时,尝试一下每
个设置。把这个开关放在低音最响的位置。
HighPassFilter: Removesfrequencycontentbelow80Hzfromthefull-range
signalsentfrom theT8outputs.Thisisusefulifyourmain studiomonitorsdonot
have their own highpass filter.
HighPassFilter: 从T8输出的全频信号中去除80Hz以下的频率内容。如果
你的主要演播室监听器没有自己的高通滤波器,这就很有用。
Power User Tip: Leaving frequency content below 80 Hz in full-range monitors
can cancel out or reinforce the highest frequencies that are reproduced by
the TemblorT8. This can makethe bass response of the overallsystem muddy
and ill-defined. By rolling off your full-rangespeakers,you will createa more
linear frequency response between the subwooferand full-range content.
用户提示:将
80Hz
以下的频率内容留在全音域监听器中,可以抵消
或加强由
Temblor T8
再现的最高频率。这可能会使整个系统的低音响
应变得浑浊和不明确。通过对全频扬声器进行衰减,你将在低音炮和
全频内容之间创造一个更加线性的频率响应。
0

5
2
Hookup
Temblor T8
Input
LowPassFilter:This controldetermines the upper end of the frequency range
reproducedbytheTemblorT8.Ifyouhaveenabledtheonboardhighpassfilter,set
theLowPassFiltercontrolto80Hz.Otherwise,settheLowPassFiltercontroltothe
lowest frequency that your main monitors can reliably reproduce.
LowPassFilter: 这个控制决定了 Temblor T8 所再现的频率范围的上限。如
果你已经启用了板载高通滤波器,将低通滤波器控制设置为 80Hz。否则,将
低通滤波控制设置为你的主监听器,能够真实的再现最低频率。
2.2 Hookup Diagrams 连接图
2.2.1 Basic Setup 基础设置
Temblor T8
Left
ACOUST IC
TUNING
Hi
Righ
t
-6dB +6dB
Lo
w
–
+
-6dB +6dB OUTPU
T TO
RIG HT SP EAKER
Balanced
L
INPUT
TRS L line R
+
–
Balance
RCA
Unbalance
SUB
100-12V-, 50-60Hz-TIAL 250V
220-240V-, 50-60Hz-T500mAL
250V
FUS
AC
CeresActive
Speaker
Ceres Passive
Speaker

6
2
2.2
Hookup
Hookup Diagrams
Temblor T8
Owner’sManual
AudioBox
iOne
Temblor
T8
5
5
2.2 Hookup Diagrams
Owner’s Manual
2.2.2 Advanced Setup 高级设置
ErisE5 (Right) Eris E5 (Left)

7
2
Hookup
Temblor T8
2.2.3 Home Theater Setup 家庭影院设置
5
5 5
Eris E5 (Center)
ErisE5(RightFront) Eris E5 (Left Front)
Front
R L
Center Sub Out Rear
R L
Surround Preamp / Computer
Temblor T8
5 5
Eris E5 (Right Rear)
Eris E5 (Left Rear)


7
3 Tutorials
3.1
Subwoofer Placement
Temblor T8
Owner’s Manual
3Tutorials 教程指南
3.1 Subwoofer Placement 低音扬声器放置
The goal of proper subwoofer placementis to set up your system so that
your subwoofer acts as a natural extension of your full-range monitors
without boosting the overall bass response of yourroom or exaggerating
anyonefrequencyorfrequency range.Becauselowfrequencies arenot
directional—that is,humans cannot perceivethe direction from which low
frequenciesarecoming—youaren’tlimitedto placingitnearyourfull-range
monitors.However,placing your T8in the sameside of the roomas your
full-range monitors will typically provide the best listening experience.
正确放置低音扬声器的目的是设置你的系统,使你的低音扬声器作为全
频监听器的自然延伸,而不是提升房间的整体低音响应,或夸大任何一
个频率或频率范围。由于低频没有方向性,也就是说,人类无法感知低
频传来的方向,所以你并不局限于把它放在全音域监听器附近。将T8放
置在房间的同一侧作为全频监听器,通常会提供最佳的聆听体验。
A quick way to find the best location for your subwoofer is to temporarily
place it on thegroundwhere you would normally be listening to your system,
then play some music that contains a lot of bass.Walkaround the half of the
room where youhave placed your full-range monitors until youfind the spot
where the bass sounds its best. In general,you will want to avoid placing
yoursubwoofertooneartoreflectivesurfaces,likeawallorinacorneras
thiswillexaggeratethe bassenergyand makeyourT8sound“boomy.”
找到低音扬声器最佳位置的一个快速方法是将其暂时放在你平时聆听
系统的地面上,然后播放一些含有大量低音的音乐。在你放置全频监
听器的半个房间里走一圈,直到你找到低音听起来最好的地方。一般
来说,你要避免将低音扬声器放在离反射表面太近的地方,如墙壁或
角落,因为这会夸大低音能量,使你的T8听起来 "很夸张"。
Once youfind the place inthe roomwhere the bass sounds the smoothest,
place yourT8 in that spot, return to the listening position and listen to it again.
Youmayneed to adjust the location; just keep making small adjustment (a
foot or so at a time) until the bass response sounds as even as possible.
一旦在房间里你找到听起低音最顺畅的地方,就把T8放在那个地方,回到
聆听位置,再次聆听。你可能需要调整位置;只要不断进行小的调整(每
次一英尺左右),直到低音响应听起来尽可能的均匀。

2
2.2
Hookup
Hookup Diagrams
Temblor T8
Owner’sManual
8
3.2 Level Calibration
Matching the levelsof the monitors in your system with your subwoofer
is an easy extra step that will help you to achieve a consistent listening
environment.This will ensure that your subwoofer won’t be too loud with
sometypesofmusicandnotnearlyloudenoughwithothers.Youwillneedan
SPL meter and some pink noise to do this; luckily, there are many inexpensive
and free SPL meter apps for just about every type of smartphone, as well
asavarietyoffreepinknoisesamplesonlinethatwilldothejobnicely.
将你系统中的监听音箱的电平与你的低音扬声器相匹配,这是一个
简单的额外步骤,它将帮助你实现一个一致的听觉环境。这将确保
你的低音扬声器在聆听某些类型的音乐时,不会太响,而在听其他
类型的音乐时,又不够响。你将需要一个声压级计和一些粉红色噪
声来做这个。幸运的是,有许多便宜的和免费的声压计应用程序,
适用于几乎所有类型的智能手机,以及各种免费的粉红色噪声样
本,可以很好地完成工作。
Below is a brief tutorial on how to level match your monitors:
下面是一个简短的教程,介绍如何与你的监听设备进行水平匹配。
1.
Connect your monitors and Temblor T8 as shown either of the hookup diagrams
in Section2.2.
1. 按照第2.2节中的连接图,连接监听设备和 Temblor T8。
PowerUser Tip: If your system has an EQ in it, turn it off. You can EQ your
complete system to taste once the levels are evenly matched.
用户提示:如果你的系统有
EQ
,请将其关闭。一旦电平均匀匹
配,你就可以根据喜好对整个系统进行均衡调节。

9
3 Tutorials
3.2
Level Calibration
Temblor T8
Owner’s Manual
2.
Turn yourTemblorT8andyourfull-rangemonitors’inputlevelsto
their lowest setting.
将你的Temblor T8和你的全音域监听器的输入电平调到最低设置。
3.
Play pink noise through your speakers.Youshould not hear anything yet.
通过你的扬声器播放粉红色噪音。你应该还听不到任何声音。
4.
Begin slowly increasing the volume of yourleft monitor until
the acoustic level of the pink noise reaches 82 dB SPL on your
SPL meter when measured at your listening position. Turn off
your left monitor and repeat with your right monitor.
开始慢慢增加你的左边监听器的音量,直到粉红色噪音
的声级在你的监听位置测量时,达到82dB SPL。关闭左
边的监听器,用右边的监听器重复。
If you’reusing monitors that provide a single level control for
both the left and right side,like the Ceres™C3.5BT,C4.5BT or
Eris 4.5BT, play pink noise through both monitors, increase the
volume until your SPL meter reads 85 dB.
如果你使用的是为左右两边提供单一电平控制的监听器,
如Ceres™C3.5BT、C4.5BT或Eris 4.5BT,通过两个监听
器播放粉红色噪音,增加音量直到你的声压计读数为85dB。
Power User Tip: If 82 dB or 85 dB is too loud or too quiet for your room, set
the level to one that is more comfortable for your listening requirements.
Just be sure to set the same level for both the left and the right monitor.
用户提示:如果
82
分贝或
85
分贝对你的房间来说太大声或太安静,
请将电平设置为对你的听觉要求更舒适的电平。只要确保为左边和
右边的显示器设置相同的电平。
5.
Turnyourfull-range monitorsoff.IfyourT8is connected
to the Sub Outon a CeresC3.5BT or C4.5BT,set the input
volumeof your TemblorT8 to“0”and skip to Step 7.
关闭你的全音域监听。如果你的T8连接到Ceres
C3.5BT或C4.5BT的Sub Out,将Temblor T8的输入
音量设为 "0 "并跳到步骤7。
6.
BeginslowlyincreasingtheinputvolumeonyourTemblorT8until
the acoustic level of the pink noise reaches 79 dB SPL on your SPL
meter when measured at your listening position.
开始慢慢增大Temblor T8的输入音量,直到粉红色噪音的声
级在聆听位置测量时,达到声压计的79 dB SPL。
SPL:
82 dB
SPL:
79 dB

10
7.
Set the lowpass filter on your T8 to 130 Hz. This will create a frequency
overlap
between your T8 and your full-range system.
将T8的低通滤波器设置为130Hz。这将在你的T8和你的全频系统之间产
生一个频率重叠。
8.
Playpinknoisethroughyourfullsystemandexperimentwiththepolarity
switch on yourTemblorT8 to see which position providesthe best bass
response.Leavethe polarity switch where the bass is the loudest.
通过你的整个系统播放粉红色噪音,并试验Temblor T8的极性开关,
看看哪个位置能提供最佳的低音响应。把极性开关放在低音最响的
地方。
9.
Nowplay some music through your system and experiment with the
low pass filter on your T8 until you find the most natural transition
between your full-rangemonitorsandyoursubwoofer. If your full-
rangemonitorsare connected to the outputs of your T8, you may
want to try turning on the 80 Hz highpass filteron theT8 and setting
the lowpass filter to 80 Hz.
现在通过你的系统播放一些音乐,并尝试使用T8的低通滤波器,直到
你找到全频监听和超重低音扬声器之间最自然的过渡。如果你的全频
监听器连接到T8的输出,你可能想尝试打开T8的80Hz高通滤波器,并
将低通滤波器设置为80Hz。
Power User Tip: Once you have matched the levels of your full-range monitors and T8, don’t use
their volume controls to adjust the overall level; instead, use the volume on your audio device
(computer, iPad,TV, etc.).This will ensure that your speaker levels remain matched.
用户提示:一旦你匹配了全频监听器和
T8
的电平,不要使用它们的音量控制来调整整体
电平;而是使用音频设备(电脑、
iPad
、电视等)的音量。这将确保你的扬声器水平保
持匹配。

4
Resources
Temblor T8
9
4Resources 资料
4.1 Technical Specifications 技术规格
4.1 Technical Specifications Owner’sManual
INPUTS
OUTPUTS
PERFORMANCE
2- Balanced ¼”TRS
2- Unbalanced RCA
2- Balanced ¼”TRS (full range with 80 Hz HPF option)
2- Unbalanced RCA (full range with 80 Hz HPF option)
Frequency Response
30 Hz – 200 Hz
LowPassFilter Frequency 50 – 130 Hz (variable)
Signal-to-Noise Ratio
>98dB (A-weighted)
THD 0.05%
Amplifier Power
100W RMS / 200W Peak
PowerConsumption
120W
Standby Power Consumption
<0.5W
AmplifierType Class AB
Woofer
8”glass-composite withhigh-density rubber surround
USER CONTROLS
InputGainControl
-30 to +6 dB
PolaritySwitch
0° or 180°
LowPassFilterControl
50 Hz to 130 Hz
HighPassFilterSwitch
On/Off
PROTECTION
POWER
CABINET
PHYSICAL
RF interference
Output-current limiting
Over-temperature
Turn-on/off transient
Subsonic filter
External mains fuse
100-120V ~50/60 Hz or 220-240V ~50/60 Hz
Vinyl-laminated MDF
Width
10.2” (260 mm)
Depth
12.6” (320 mm)
Height 11”(280 mm)
Weight 21.2 lbs (9.6 kg)

4
Resources
Temblor T8
10
4.2 Troubleshooting
Owner’s Manual
4.2 Troubleshooting 故障排除
Nopower. Firstensure that your TemblorT8 is plugged in. If it’sconnected to a
power conditioner, verify that the powerconditioner is turned on and functioning.
If it is, yet there is still no power to the T8, contact PreSonus for a repair.
Nopower. 首先确保你的 Temblor T8 已插上电源。如果它连接到了电源调
节器上,请确认电源调节器已经打开并正常工作。如果是这样,但T8 仍然
没有电源,请联系PreSonus进行维修。
Noaudio.IfyourTemblorT8 appears to poweron but you hear no sound
whenplayingaudio(thelightsareonbutnobody’shome),firstmakesure
that the cables connected to the subwooferare working correctly. Also,
verify that the Input Level control is set to provide high enough gain.
Noaudio. 如果你的Temblor T8似乎通电了,但在播放音频时却听不
到声音(灯亮着,但家里没人),首先要确保连接到低音炮的电缆工
作正常。另外,确认输入电平控制是否设置为提供足够高的增益。
Hum.Usually,humiscausedbyagroundloop.Verifythatallaudioequipmentis
connected to the same powersource.If you arenot using a power conditioner,
we highly recommend that you add one. Not only will this help to minimize
hum, it will better protect your equipment from power surges,brownouts,etc.
Hum. 通常情况下,嗡嗡声是由接地回路引起的。确认所有的音频设备都
连接到同一个电源上。如果你没有使用电源调节器,我们强烈建议你添加
一个。这不仅有助于减少嗡嗡声,还能更好地保护你的设备免受电源浪涌、
断电等影响。
Use balanced cables when ever possible.If your audio device
doesnot offerabalancedoutput,youcanconnectittoaDI(direct-
injection)box, which will provide a ground-lift switch and a balanced
output.
尽可能地使用平衡电缆。如果你的音频设备不提供平衡输出,你可
以把它连接到一个DI(直射)盒,这将提供一个接地开关和一个平
衡输出。
Finally, make sure that your audio cables are not run near power cables,
and use cables that are the appropriate length for your application.
Using cables that are too long not only increases the risk of noise,it
increases the likelihood that the cables are coiled, which will essentially
createan antennathat picks up all kinds of audio interference.
最后,确保你的音频电缆,不要靠近电源线,使用适合你的应用长
度的电缆。使用太长的电缆不仅会增加噪音的风险,还会增加电缆
盘绕的可能性,这基本上会形成一个天线,接收各种音频干扰。
4.3 Warranty 保修
PreSonus’s warranty obligations for this hardware product
are limited to the terms set forth below:
PreSonus 对该硬件产品的保修义务仅限于以下条款。
How Consumer Law Relates To This Warranty:
消费者法与本担保的关系:
THIS WARRANTY GIVES YOU SPECIFIC LEGAL RIGHTS, AND YOU MAY HAVE OTHER
RIGHTSTHATVARYFROM STATETOSTATE(OR BY COUNTRY OR PROVINCE). OTHER
THAN AS PERMITTED BY LAW,PRESONUS DOES NOTEXCLUDE, LIMIT OR SUSPEND
OTHERRIGHTSYOUMAYHAVE,INCLUDINGTHOSETHATMAYARISE FROMTHE
NONCONFORMITY OF A SALES CONTRACT. FOR A FULL UNDERSTANDING OF YOUR
RIGHTSYOU SHOULD CONSULTTHE LAWSOF YOUR COUNTRY PROVINCE OR STATE.

4
Resources
Temblor T8
11
本保证书给予你特定的法律权利,你可能还有其他权利,这些权利因州而异(或因国家或省而
异)。除法律允许的情况外,
Presonus
不排除、限制或暂停你可能拥有的其他权利,包括那些
可能因销售合同不符合规定而产生的权利。为了充分了解你的权利,你应该咨询你所在国家省
或州的法律。
PreSonus Products And EU Statutory Warranty:
PreSonus产品和欧盟法定担保:
When you purchase PreSonus products, European Union consumer
law provides statutory warranty rights in addition to the coverage
you receive from the PreSonus limited warranty. A summary of the EU
StatutoryWarrantyand the PreSonus Limited Warrantyis below:
当你购买PreSonus产品时,除了从PreSonus有限保修中获得的
保障外,欧盟消费者法还规定了法定保修权利。以下是欧盟法定
保证和 PreSonus有限保证的摘要:
EU Consumer Law
欧盟消费者法律
PreSonus Limited Warranty
PreSonus
有限保修
Repair or Replacement
Coverage For
修理或更换的范围是
Defects present when customer
takes delivery
客户提货时存在的缺陷
Defects arising after customer takes delivery
客户收货后出现的缺陷
Warranty Period
保修期
2 years (minimum) from
original date of purchase
(unless
superseded by
PreSonus)
从原购买日期起2年(至少)
(除非被PreSonus取代)
1 year from original date of purchase (unless superseded by
PreSonus)
自原购买日期起1年(除非被PreSonus取代)
Cost of Coverage
保修的费用
Provided at no additional cost
无额外费用提供
Included at no additional cost
不包括额外费用
Who to contact to
make
a claim
联系谁进行索赔
The seller
卖方
PreSonus technical support for your region
你所在地区的PreSonus技术支持
What This Warranty Covers:
本保修所涵盖的范围:
PreSonus Audio Electronics,Inc.,(“PreSonus”)warrantsdefects inmaterialand
workmanship in PreSonus-branded products under normal use.This Limited
Warranty applies only to hardware products manufactured by or for PreSonus that
canbeidentifiedbythePreSonustrademark,tradename,orlogoaffixedtothem.
PreSonus Audio Electronics, Inc.("PreSonus")为 PreSonus品牌的产品在
正常使用下的材料和工艺缺陷提供保证。本有限保证仅适用于由PreSonus制
造或为其制造的、可通过贴有PreSonus商标、商品名称或标识识别的硬件产
品。

4
Resources
Temblor T8
12
4.3
Warranty
Owner’s Manual
Exclusions and Limitations:
不适用的情况和限制:
This warranty does not cover the following:
本保证不包括以下内容:
1.
Damage caused by accident, abuse, improper installation, failure to
followinstructions in the applicable owner’s manual or improper
operation, rental, product modification, alteration, or neglect.
由于事故、滥用、安装不当、未遵循用户手册中适用的的指示
或不当操作、租赁、产品修改、变更或疏忽而造成的损坏。
2.
Damage from improper grounding, faulty wiring (AC and signal),
faulty equipment, or connection to a voltage range outside
published specifications (see applicable owner’smanual).
由于不正确的接地,错误的布线(交流和信号),错误的设
备,或连接到公布的规格以外的电压范围(见适用的所有者
手册)而造成的损害。
3.
Damage to drivers or diaphragm assemblies found to have burnt voice
coils from over/underdriving or signalsurge from another device.
由于过度/不足的驱动或来自另一设备的信号浪涌,发现音圈烧毁的
驱动器或振膜组件的损坏.
4.
Damage occurring during shipment or improper handling.
在运输过程中发生的损坏或处理不当。
5.
Damage caused by repair or service performed by
persons not authorized by PreSonus.
由未经PreSonus授权的人员进行维修或服务所
造成的损坏。
6.
Products on which the serial number has been altered, defaced, or removed.
序列号被更改、污损或删除的产品。
7.
Products purchased from an un-authorized PreSonusdealer (products
that have transferable warranties are excluded from this provision
provided the customer and the product are registered with PreSonus).
从未经授权的PreSonus经销商处购买的产品(具有可转让保证的产品
不在此规定之列,但客户和产品必须在PreSonus注册)。
Who This Warranty Protects:
本保证所保护的对象:
This Warranty protects only the original retail purchaser of the product
(products that have transferable warranties are excluded from this provision
provided the customer and the product are registered with PreSonus).
本保证只保护产品的原始零售购买者(具有可转让保证的产品不在此规
定之列,但客户和产品必须在PreSonus注册)。

4
Resources
Temblor T8
13
How Long This Warranty Lasts:
这个保修期有多长:
TheWarrantybeginson theoriginaldateofpurchasefrom
the retail purchaser and the duration is as follows:
保修期从零售购买者的原始购买日期开始,期限如下:
1-Year Limited Warranty
1年有限保修期
Product Category
产品分类
Model
型号
Transferable
可转让
Recording Interfaces
录音接口
AudioBox iOne, AudioBox iTwo, AudioBox Stereo, AudioBox Studio, AudioBox USB,
AudioBox VSL (1818, 44, 22), FireStudio Project, FireStudio Mobile, FireStudio Mobile Studio,
Music Creation Suite
No
不适用
Pre-amplifiers
前置放大器
ADL600, ADL700, BlueTube DP V2, DigiMax D8, Eureka, RC500, StudioChannel, TubePre V2
No
不适用
StudioLive Mixers
录音室现场调音台
SL-1642, SL-2442, SL-1602, SLM16.4.2 AI, SLM24.4.2 AI, SLM32.4.2AI
No
不适用
Monitoring & Controlling
监听和控制
Eris, Central Station Plus, FaderPort, HP4, HP60, Monitor Station, Monitor Station V2,
Sceptre, Temblor
No
不适用
Signal Processing
信号处理
ACP88
No
不适用
Accessories
辅件
Covers, Dolly, PRM1 mic, Sub Pole, Breakout Cables, Power Supplies, M10 Kit
No
不适用
3-Years Limited Warranty
3年有限保修期
Product Category
产品分类
Model
型号
Transferable
可转让
Live Sound 现场音效
StudioLive AI 328, 312, 315, S18
Yes
适用
What PreSonus Will Do:
PreSonus 将会做什么:
PreSonuswill repairor replace,at our sole and absolute option, products
coveredby this warranty at no charge for labor or materials. If the product
must be shipped to PreSonus for warranty service, the customer must pay the
initial shipping charges. PreSonus will pay the return shipping charges.
PreSonus 公司将根据我们唯一的和绝对的选择,在不收取任何人工或材料
费用的情况下,修理或更换本保修范围内的产品。如果产品必须运送到
PreSonus 进行保修服务,客户必须支付首次运费。PreSonus 将支付退货
的运费。

4
Resources
Temblor T8
14
4.3
Warranty
Owner’s Manual
How to Get Warranty Service (USA):
如何获得保修服务(美国):
1.
YoumusthaveanactiveuseraccountwithPreSonusandyourhardwaremust
be on file with your account.If you do not have an account,please go to: http://
www.presonus.com/registration and complete the registration process.
你必须有一个 PreSonus 的有效的用户帐户,而且你的硬件必须在你的帐户
中存档。如果你没有账户,请到:http:// www.presonus.com/registration,
并完成注册程序。
2.
Contact our Technical Support Department at (225) 216-7887 or log a
support ticketat:http://support.presonus.com.TOAVOIDTHE POSSIBILITY
OF SENDING IN A PRODUCT THAT DOES NOT HAVE A PROBLEM, ALL SERVICE
REQUESTS SHALL BE CONFIRMED BY OUR TECH SUPPORT DEPARTMENT.
请拨打(225)216-7887, 联系我们的技术支持部门,或登录信息支持:
http://support.presonus.com。为避免发送一个没有问题产品的可能性,所
有的服务请求,应得到我们技术支持部门的确认。
3.
The return authorization number as well as shipping instructions shall
be provided after your service request is reviewed and confirmed.
在审查和确认你的服务请求后,将提供退货授权号码以及运输说明。
4.
Theproduct should be returned for service in the original product packaging.
Products may be shipped in a manufactured “flight” or “road” style cases but
PreSonus will NOT cover any shipping damage to these cases. Products that are not
shippedintheoriginalproductpackageor amanufacturedcasemaynotreceive
a warranty repair, at PreSonus’s sole discretion. Depending on the product model
and the condition of your original packaging, your product may not be returned
to you in the original packaging. The returnshipping boxmaybe a generic box
that has been fitted forthat model tested if the original gift boxis not available.
产品应以原产品包装返回进行维修。产品可以 "空运 "或"陆运 "制成的箱子运
输,但PreSonus不承担这些箱子运输的任何损失。
How to Get Warranty Service (outside of USA):
如何获得保修服务(美国以外):
1.
YoumusthaveanactiveuseraccountwithPreSonusandyourhardwaremust
be on file with your account.If you do not have an account,please go to: http://
www.presonus.com/registration and complete the registration process.
你必须有一个PreSonus的有效用户帐户,而且你的硬件必须在你的帐户中
存档。如果你没有账户,请登录 http:// www.presonus.com/registration,并
完成注册程序。
2.
Contact the Technical Support/Service Department for your region
at http://www.presonus.com/buy/international_distributors and
follow procedures provided by your PreSonus contact.
与你所在地区的技术支持/服务部门联系,
http://www.presonus.com/buy/international_distributors,并按照 PreSonus
联系人提供的程序操作。
Other manuals for Temblor T8
2
Table of contents
Other PRESONUS Subwoofer manuals

PRESONUS
PRESONUS Temblor T10 User manual

PRESONUS
PRESONUS Eris Sub8 User manual

PRESONUS
PRESONUS Eris Sub8 User manual

PRESONUS
PRESONUS CDL Sub18 User manual

PRESONUS
PRESONUS Temblor T8 User manual

PRESONUS
PRESONUS Eris Pro Sub 10 User manual

PRESONUS
PRESONUS Eris Sub 8BT User manual

PRESONUS
PRESONUS Temblor T10 User manual

PRESONUS
PRESONUS Temblor T10 User manual

PRESONUS
PRESONUS Temblor T8 User manual