PRESONUS Temblor T8 User manual
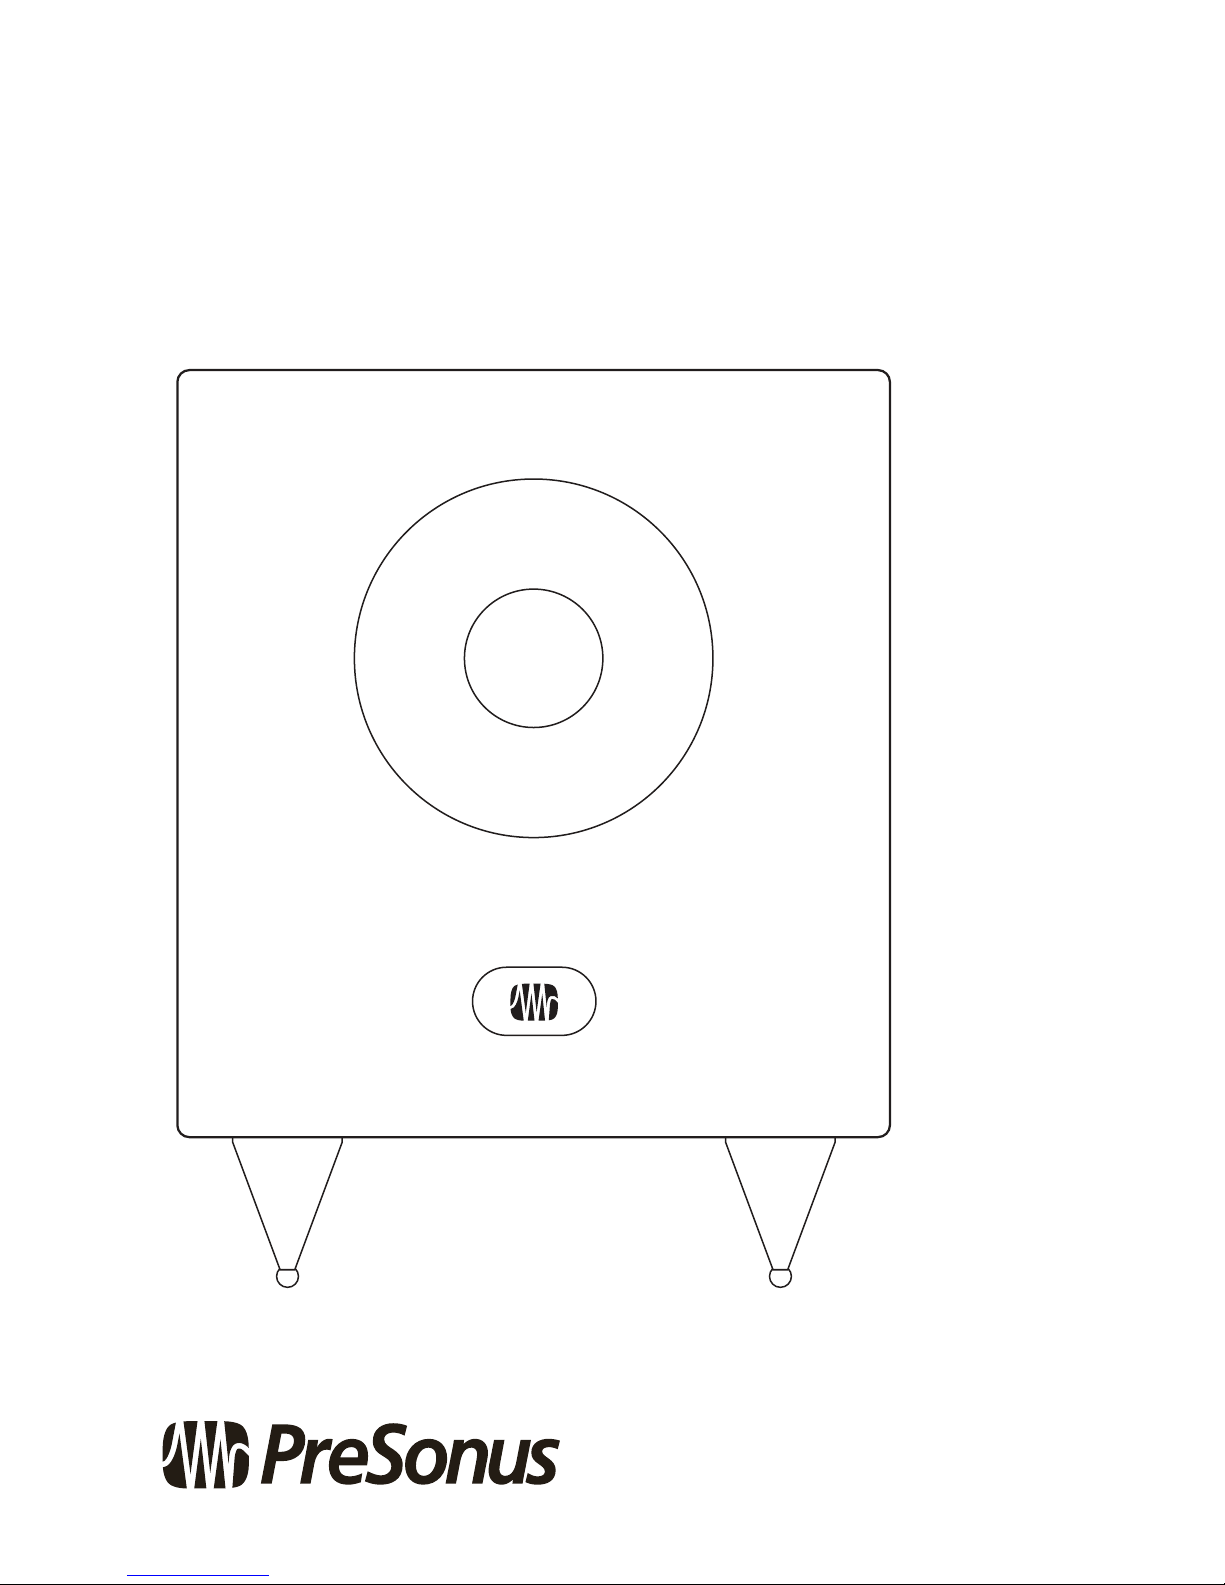
Temblor™T8
Active Studio Subwoofer
Owner’s Manual
www.presonus.com
®

Table of Contents
1 Overview — 1
1.1 Introduction — 1
1.2 Summary of Temblor T8 Features — 1
2 Hookup — 2
2.1 What is in the Box — 2
2.2 Rear-Panel Connections and Controls — 2
2.1.1 Inputs — 2
2.1.2 Outputs — 2
2.1.3 Power — 3
2.1.4 User Controls — 3
2.2 Hookup Diagrams — 4
2.2.1 Basic Setup — 4
2.2.2 Advanced Setup — 5
2.2.3 Home Theater Setup — 6
3 Tutorials — 7
3.1 Subwoofer Placement — 7
3.2 Level Calibration — 7
4 Resources — 9
4.1 Technical Specifications — 9
4.3 Troubleshooting — 10
4.4 PreSonus Limited Warranty — 10

1 Overview
1.1 Introduction
Temblor T8
Owner’s Manual
1
1Overview
1.1 Introduction
Thank you for purchasing the PreSonus® Temblor™T8 active studio
subwoofer. PreSonus Audio Electronics has designed the T8 utilizing high-
grade components to ensure optimum performance that will last.
The Temblor T8 is an active subwoofer featuring a down-firing 8-inch glass-
composite driver with a high-density rubber surround in a front-ported cabinet.
This configuration provides responsive, defined bass with low distortion.
The result is a natural and musical sound that enhances full-range speakers
without overshadowing them. The variable (50 to 130 Hz) lowpass filter
lets you dial in the Temblor T8 to pair perfectly with your full-range system,
making it the ideal solution for 2.1 and surround sound applications.
PreSonus Audio Electronics is committed to constant product improvement,
and we value your suggestions highly. We believe the best way to achieve
our goal of constant product improvement is by listening to the real experts:
our valued customers. We encourage you to visit My.PreSonus.com with any
questions or comments regarding your PreSonus Temblor T8. We appreciate
the support you have shown us through the purchase of this product
and are confident that you will enjoy your Temblor T8!
ABOUT THIS MANUAL: We suggest that you use this manual to familiarize yourself
with the features, applications, and correct connection procedures for your Temblor T8
before connecting it. This will help you avoid problems during installation and setup.
In addition to all the basic info you’ll need to connect and operate
your Temblor T8, this manual also provides several tutorials that
cover subwoofer placement, connections, and calibration.
1.2 Summary of Temblor T8 Features
•Down-firing active subwoofer with 200 watt, Class AB amplifier
•8-inch glass-composite woofer with high-density rubber surround
•Frequency response: 30-200 Hz
•Variable lowpass filter control: 50-130 Hz
•80 Hz highpass filter (with defeat switch) for satellite connections
•Front-ported cabinet
•Power-down / Standby mode

2 Hookup
2.1 What is in the Box
Temblor T8
Owner’s Manual
2
2Hookup
2.1 What is in the Box
In addition to this manual, your Temblor T8 package contains the following:
•(1) PreSonus Temblor T8 powered subwoofer
•(1) IEC power cable
•(1) 2M ¼”TRS to TRS cable
2.2 Rear-Panel Connections and Controls
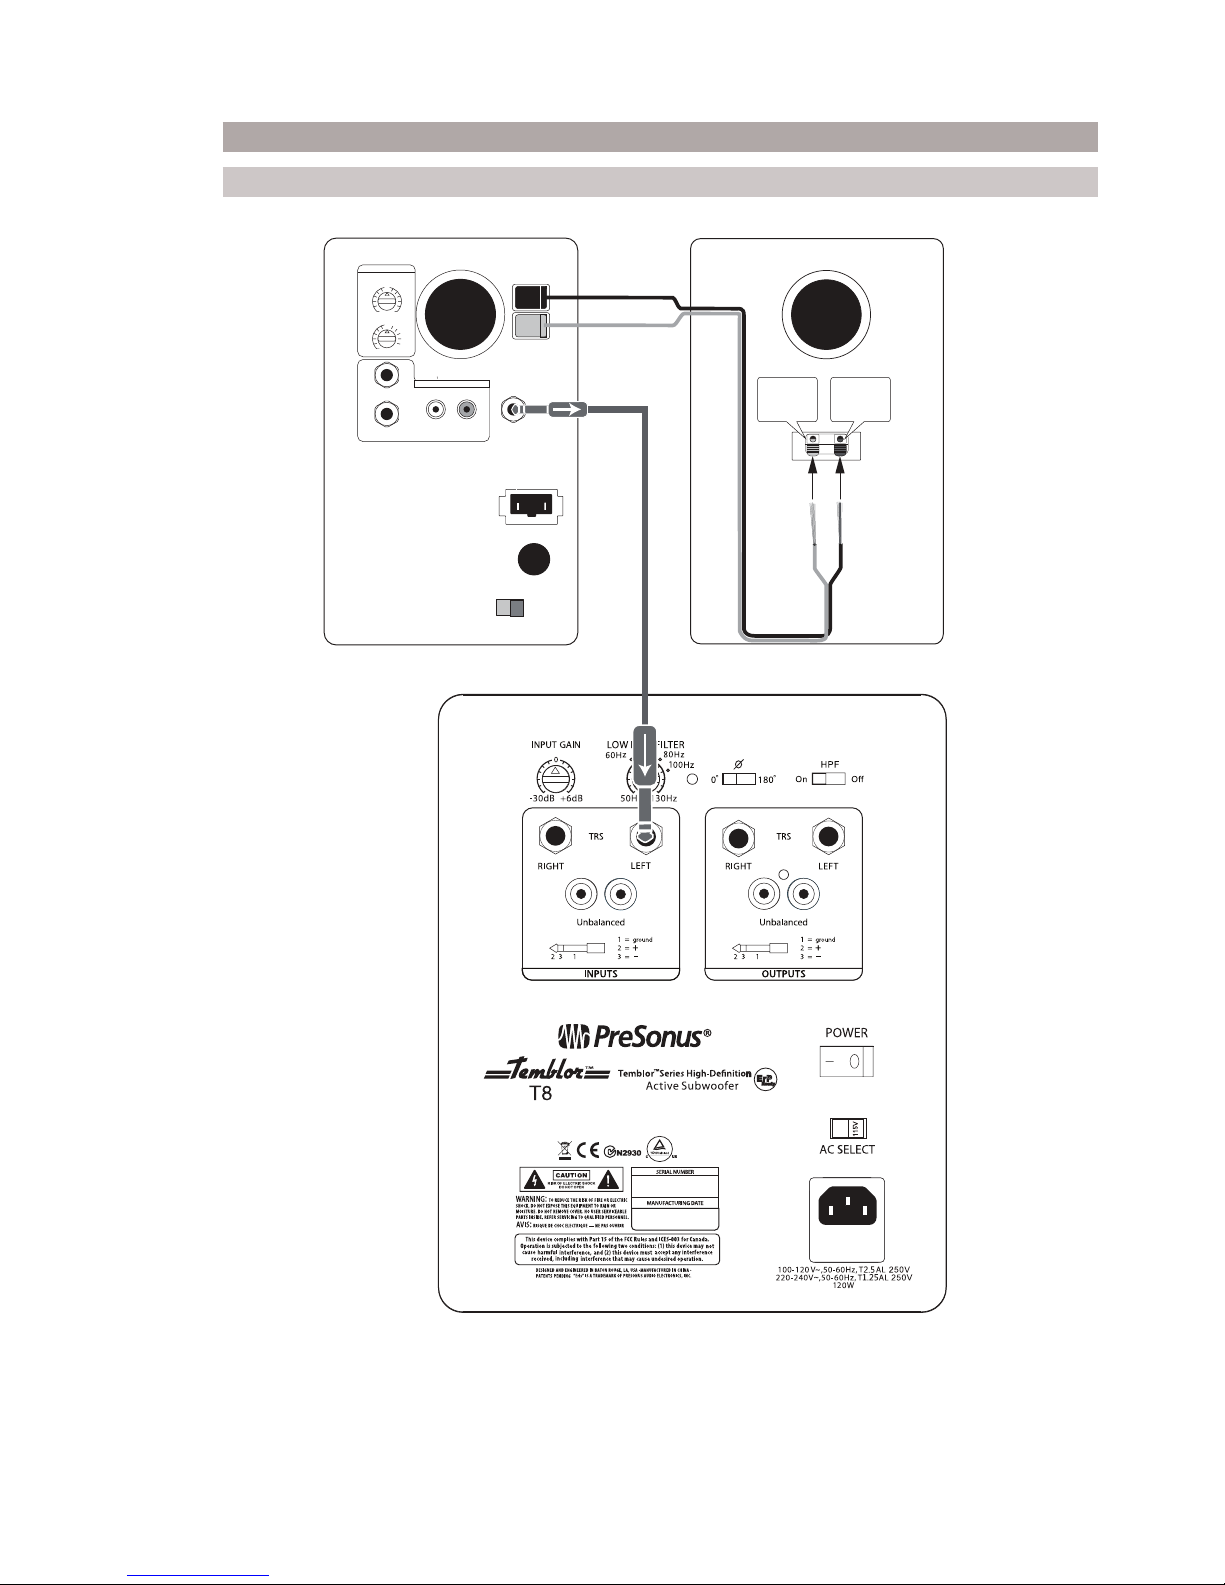
2.1.1 Inputs
Line-level Inputs: The Temblor T8 provides a choice of two input pairs: a pair
of balanced ¼”TRS inputs and one pair of RCA unbalanced inputs. When both
connections are in use, the RCA inputs will sum into the TRS connections.
Power User Tip: Connect both the left and right inputs if you are connecting your full-
range monitors to the T8’s outputs, or if you’re running your Temblor T8 independently
from a stereo source (such as the PreSonus Monitor Station). This will ensure that your
Temblor T8 receives the low-frequency content from both the left and right sides of a
stereo audio signal. If your audio source provides a mono or LFE output, you only need to
connect one input—either L or R.
Input Gain: Sets the level of the input signal before it is amplified.
2.1.2 Outputs
Outputs: The Temblor T8 provides two pairs of outputs: a pair of balanced
¼”TRS outputs and a pair of RCA unbalanced outputs. The full-range signal
connected to the stereo inputs on the T8 is passed through to these outputs.
Use these outputs to connect your main left and right studio monitors.
If the High Pass Filter switch is engaged, frequencies below 80 Hz are not sent from
these outputs.
Sleeve:
Ground
Ring:
[-]
Tip:
[+]
12 3Ground
XLR TRS
[-]
[+]

2 Hookup
2.2 Rear-Panel Connections and Controls
Temblor T8
Owner’s Manual
3
2.1.3 Power
IEC Power Connection: Your Temblor T8 accepts a standard IEC power cord.
Warning: Do not remove the center grounding prong or use a separate ground-lift
adapter, as this could result in electric shock.
Power Switch: This is the On/Off switch. The power status is indicated by the
illuminated logo on the front of the cabinet.
Power User Tip: Your Temblor T8 features a Standby mode. When no
signal is present for longer than ten minutes, your T8 will lower its power
consumption to less than 0.5W until signal is present again. The lighted logo
on the front of your T8 will turn white when Standby mode is active
AC Select Switch: The input-power voltage is set at the factory to correspond with
the country to which it was shipped. Use this switch only if you are using your
Temblor T8 in a country that uses a different standard voltage than is used in the
country where you purchased your T8.
2.1.4 User Controls
Polarity: The Polarity button reverses the polarity of the input signals.
Power User Tip: Once your have connected your T8 to your system, try experimenting
with each setting while listening to your favorite music. Leave this switch in the position
where the bass was the loudest.
High Pass Filter: Removes frequency content below 80 Hz from the full-range
signal sent from the T8 outputs. This is useful if your main studio monitors do not
have their own highpass filter.
Power User Tip: Leaving frequency content below 80 Hz in full-range monitors
can cancel out or reinforce the highest frequencies that are reproduced by
the Temblor T8. This can make the bass response of the overall system muddy
and ill-defined. By rolling off your full-range speakers, you will create a more
linear frequency response between the subwoofer and full-range content.
Low Pass Filter: This control determines the upper end of the frequency range
reproduced by the Temblor T8. If you have enabled the onboard highpass filter, set
the Low Pass Filter control to 80 Hz. Otherwise, set the Low Pass Filter control to the
lowest frequency that your main monitors can reliably reproduce.
0
2 Hookup
2.2 Hookup Diagrams
Temblor T8
Owner’s Manual
4
2.2 Hookup Diagrams
2.2.1 Basic Setup
Temblor T8
+
–
Left
High
TRS
R
Balanced
RCA
Unbalanced
OUTPUT TO
RIGHT SPEAKER
L
-6dB
0
0
+6dB
Low
ACOUSTIC TUNING
-6dB +6dB
INPUT
LRline
SUB OUT
FUSE
100-12V-, 50-60Hz-TIAL 250V
220-240V-, 50-60Hz-T500mAL 250V
60W
AC SELECT
Balanced
Input –+
Right
Ceres Active Speaker Ceres Passive Speaker
2 Hookup
2.2 Hookup Diagrams
Temblor T8
Owner’s Manual
5
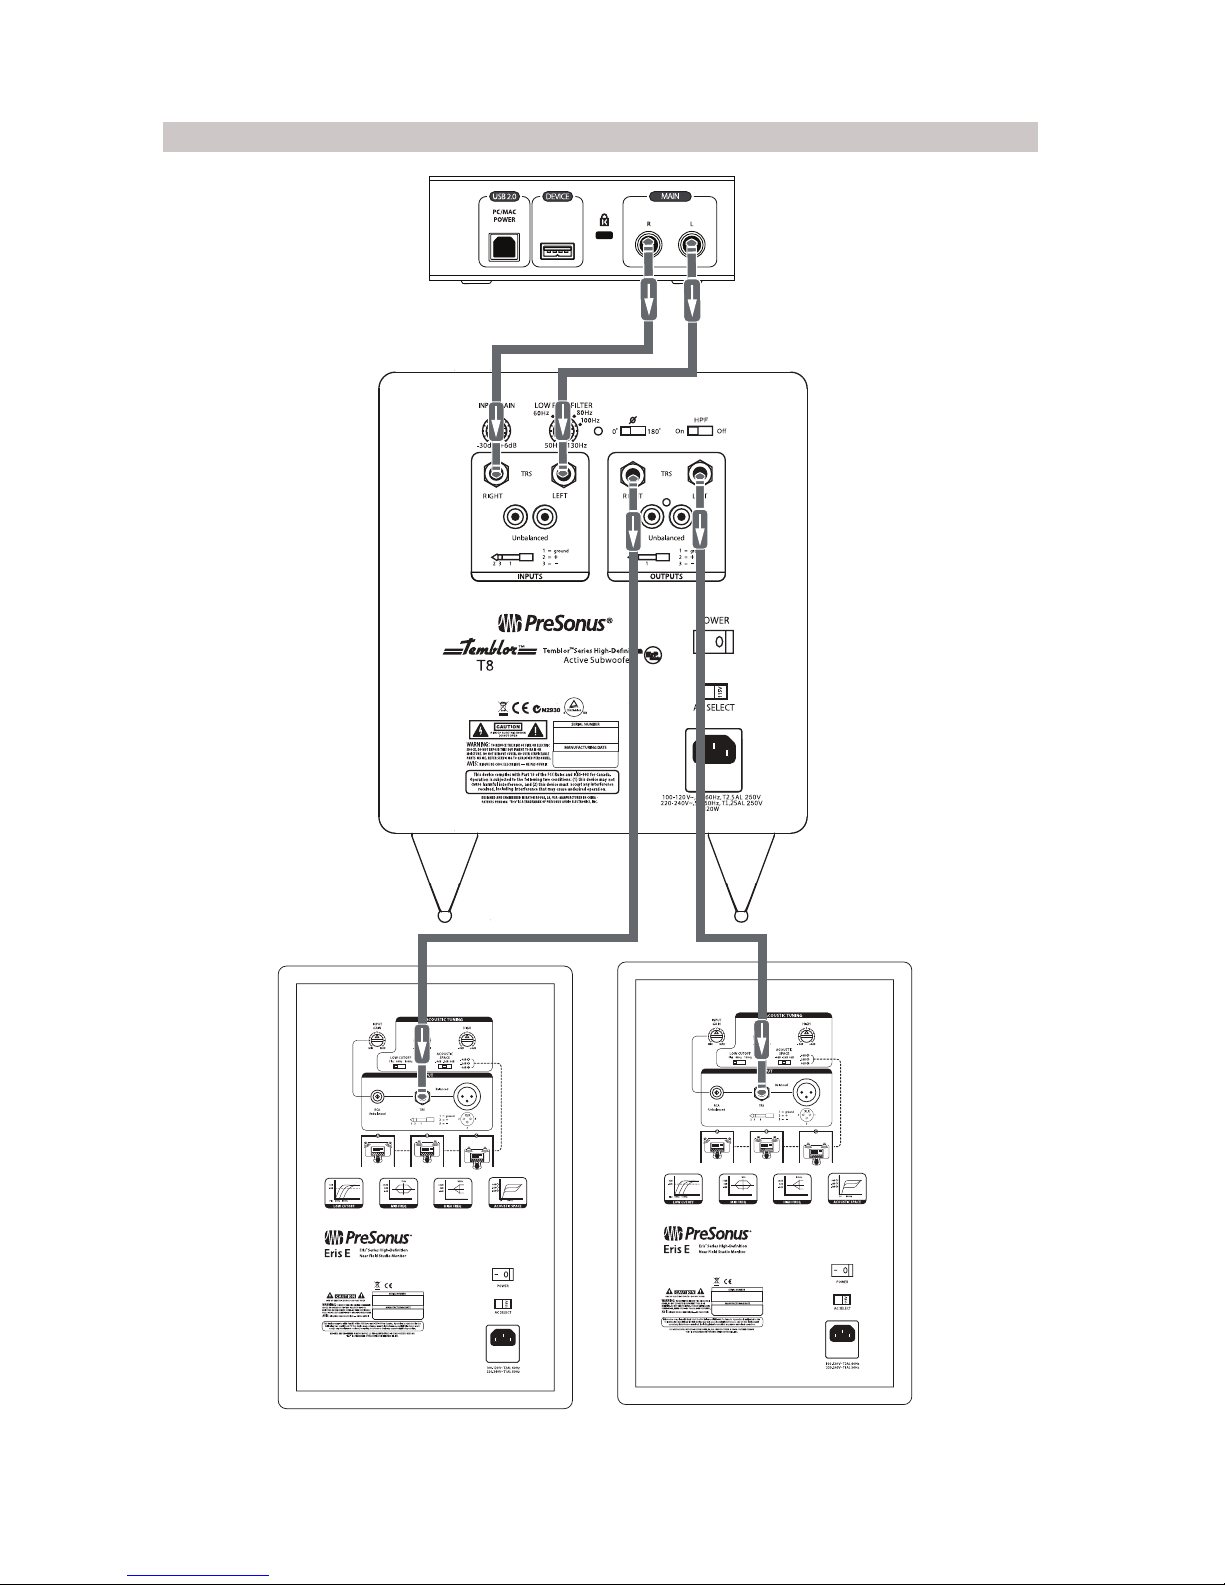
2.2.2 Advanced Setup
55
AudioBox iOne
Temblor T8
Eris E5 (Right) Eris E5 (Left)

2 Hookup
2.2 Hookup Diagrams
Temblor T8
Owner’s Manual
6
2.2.3 Home Theater Setup
Surround Preamp / Computer
Front Center Sub Out Rear
RL RL
5
Eris E5 (Right Rear)
5
Eris E5 (Left Rear)
5
Eris E5 (Right Front)
5
Eris E5 (Left Front)
5
Eris E5 (Center)
Temblor T8
3 Tutorials
3.1 Subwoofer Placement
Temblor T8
Owner’s Manual
7
3Tutorials
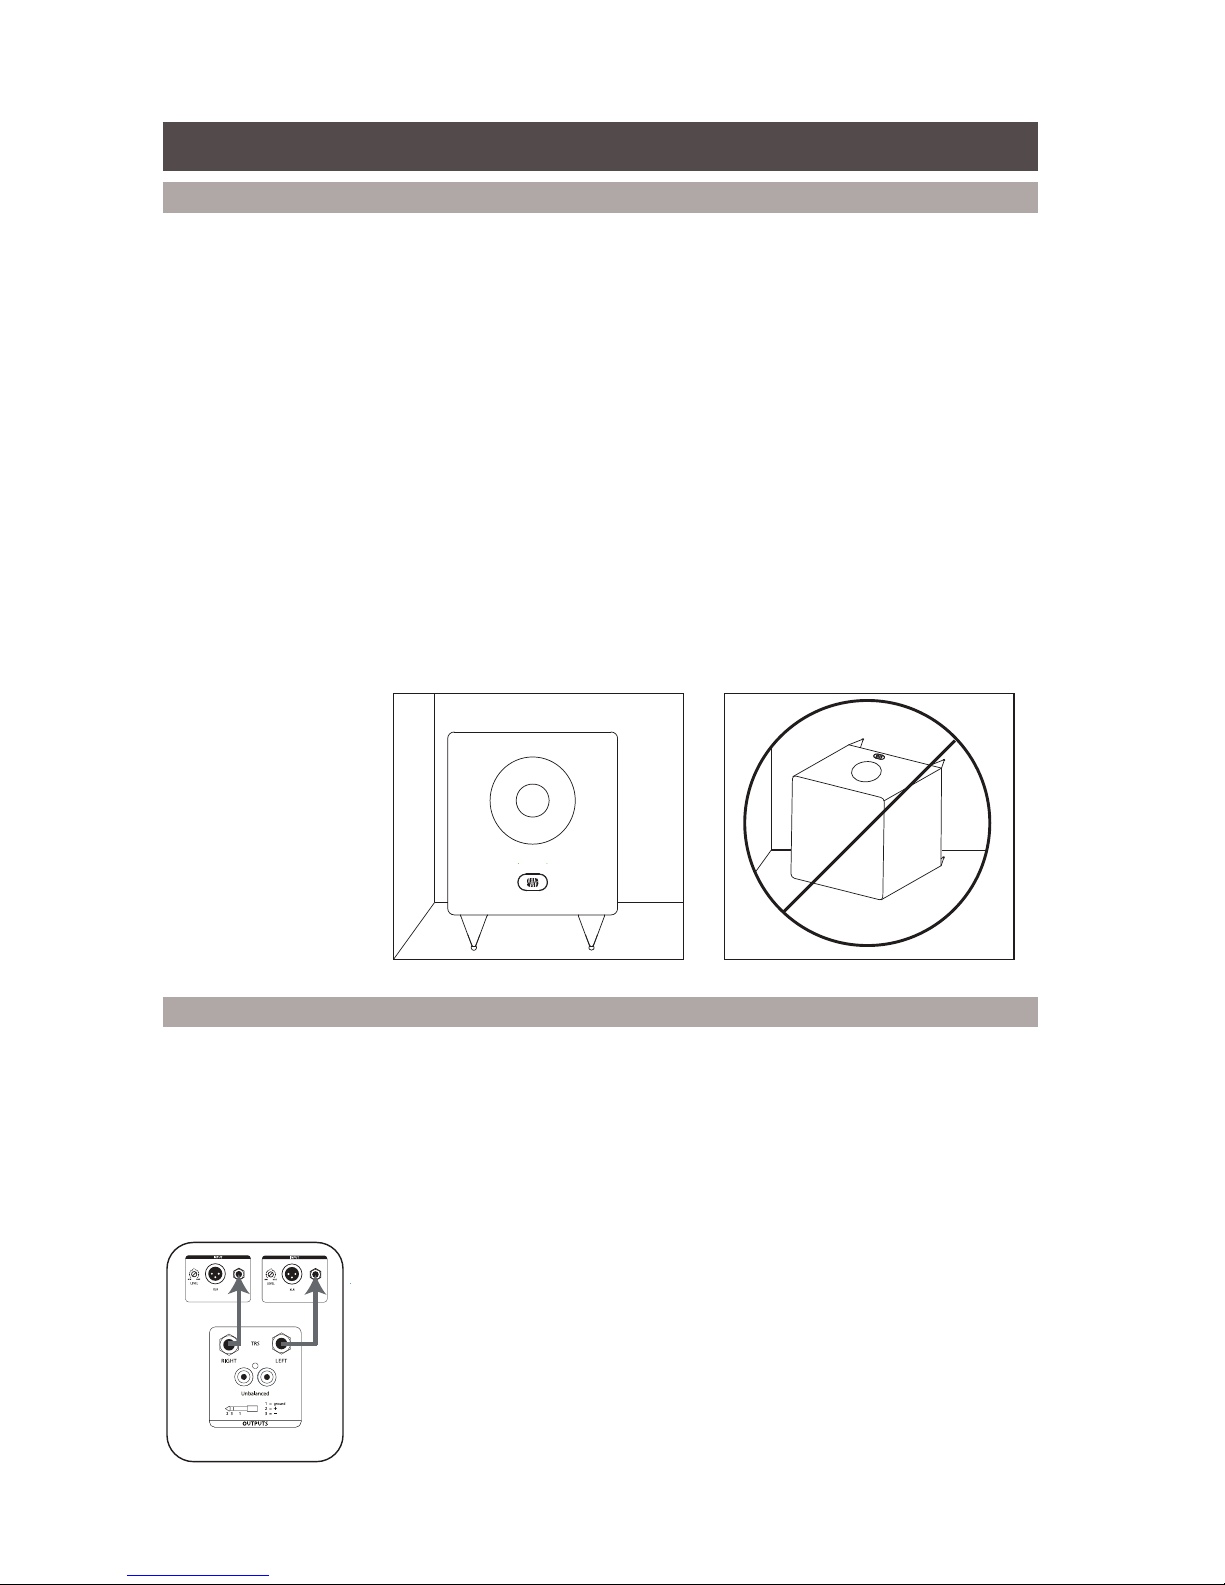
3.1 Subwoofer Placement
The goal of proper subwoofer placement is to set up your system so that
your subwoofer acts as a natural extension of your full-range monitors
without boosting the overall bass response of your room or exaggerating
any one frequency or frequency range. Because low frequencies are not
directional—that is, humans cannot perceive the direction from which low
frequencies are coming— you aren’t limited to placing it near your full-range
monitors. However, placing your T8 in the same side of the room as your
full-range monitors will typically provide the best listening experience.
A quick way to find the best location for your subwoofer is to temporarily
place it on the ground where you would normally be listening to your system,
then play some music that contains a lot of bass. Walk around the half of the
room where you have placed your full-range monitors until you find the spot
where the bass sounds its best. In general, you will want to avoid placing
your subwoofer too near to reflective surfaces, like a wall or in a corner as
this will exaggerate the bass energy and make your T8 sound “boomy.”
Once you find the place in the room where the bass sounds the smoothest,
place your T8 in that spot, return to the listening position and listen to it again.
You may need to adjust the location; just keep making small adjustment (a
foot or so at a time) until the bass response sounds as even as possible.
3.2 Level Calibration
Matching the levels of the monitors in your system with your subwoofer
is an easy extra step that will help you to achieve a consistent listening
environment. This will ensure that your subwoofer won’t be too loud with
some types of music and not nearly loud enough with others. You will need an
SPL meter and some pink noise to do this; luckily, there are many inexpensive
and free SPL meter apps for just about every type of smartphone, as well
as a variety of free pink noise samples online that will do the job nicely.
Below is a brief tutorial on how to level match your monitors:
1. Connect your monitors and Temblor T8 as shown either of the hookup diagrams
in Section 2.2.
Power User Tip: If your system has an EQ in it, turn it off. You can EQ your
complete system to taste once the levels are evenly matched.

3 Tutorials
3.2 Level Calibration
Temblor T8
Owner’s Manual
8
2. Turn your Temblor T8 and your full-range monitors’input levels to their
lowest setting.
3. Play pink noise through your speakers. You should not hear anything yet.
4. Begin slowly increasing the volume of your left monitor until
the acoustic level of the pink noise reaches 82 dB SPL on your
SPL meter when measured at your listening position. Turn off
your left monitor and repeat with your right monitor.
If you’re using monitors that provide a single level control for
both the left and right side, like the Ceres™ C3.5BT, C4.5BT or
Eris 4.5BT, play pink noise through both monitors, increase the
volume until your SPL meter reads 85 dB.
Power User Tip: If 82 dB or 85 dB is too loud or too quiet for your room, set
the level to one that is more comfortable for your listening requirements.
Just be sure to set the same level for both the left and the right monitor.
5. Turn your full-range monitors off. If your T8 is connected
to the Sub Out on a Ceres C3.5BT or C4.5BT, set the input
volume of your Temblor T8 to“0” and skip to Step 7.
6. Begin slowly increasing the input volume on your Temblor T8 until
the acoustic level of the pink noise reaches 79 dB SPL on your SPL
meter when measured at your listening position.
7. Set the lowpass filter on your T8 to 130 Hz. This will create a frequency overlap
between your T8 and your full-range system.
8. Play pink noise through your full system and experiment with the polarity
switch on your Temblor T8 to see which position provides the best bass
response. Leave the polarity switch where the bass is the loudest.
9. Now play some music through your system and experiment with the lowpass
filter on your T8 until you find the most natural transition between your
full-range monitors and your subwoofer. If your full-range monitors are
connected to the outputs of your T8, you may want to try turning on the
80 Hz highpass filter on the T8 and setting the lowpass filter to 80 Hz.
Power User Tip: Once you have matched the levels of your full-range monitors and T8, don’t
use their volume controls to adjust the overall level; instead, use the volume on your audio
device (computer, iPad, TV, etc.). This will ensure that your speaker levels remain matched.
SPL:
82 dB
SPL:
79 dB

4 Resources
4.1 Technical Specifications
Temblor T8
Owner’s Manual
9
4Resources
4.1 Technical Specifications
INPUTS
2- Balanced ¼”TRS
2- Unbalanced RCA
OUTPUTS
2- Balanced ¼”TRS (full range with 80 Hz HPF option)
2- Unbalanced RCA (full range with 80 Hz HPF option)
PERFORMANCE
Frequency Response 30 Hz – 200 Hz
Low Pass Filter Frequency 50 – 130 Hz (variable)
Signal-to-Noise Ratio >98 dB (A-weighted)
THD 0.05%
Amplifier Power 100W RMS / 200W Peak
Power Consumption 120W
Standby Power Consumption <0.5W
AmplifierType Class AB
Woofer 8”glass-composite with high-density rubber surround
USER CONTROLS
Input Gain Control -30 to +6 dB
Polarity Switch 0° or 180°
Low Pass Filter Control 50 Hz to 130 Hz
High Pass Filter Switch On/Off
PROTECTION
RF interference
Output-current limiting
Over-temperature
Turn-on/off transient
Subsonic filter
External mains fuse
POWER
100-120V ~50/60 Hz or 220-240V ~50/60 Hz
CABINET
Vinyl-laminated MDF
PHYSICAL
Width 10.2”(260 mm)
Depth 12.6”(320 mm)
Height 11”(280 mm)
Weight 21.2 lbs (9.6 kg)

4 Resources
4.3 Troubleshooting
Temblor T8
Owner’s Manual
10
4.3 Troubleshooting
No power. First ensure that your Temblor T8 is plugged in. If it’s connected to a
power conditioner, verify that the power conditioner is turned on and functioning.
If it is, yet there is still no power to the T8, contact PreSonus for a repair.
No audio. If your Temblor T8 appears to power on but you hear no sound
when playing audio (the lights are on but nobody’s home), first make sure
that the cables connected to the subwoofer are working correctly. Also,
verify that the Input Level control is set to provide high enough gain.
Hum. Usually, hum is caused by a ground loop. Verify that all audio equipment is
connected to the same power source. If you are not using a power conditioner,
we highly recommend that you add one. Not only will this help to minimize
hum, it will better protect your equipment from power surges, brownouts, etc.
Use balanced cables whenever possible. If your audio device does not
offer a balanced output, you can connect it to a DI (direct-injection) box,
which will provide a ground-lift switch and a balanced output.
Finally, make sure that your audio cables are not run near power cables,
and use cables that are the appropriate length for your application.
Using cables that are too long not only increases the risk of noise, it
increases the likelihood that the cables are coiled, which will essentially
create an antenna that picks up all kinds of audio interference.
4.4 Warranty
PreSonus’s warranty obligations for this hardware product
are limited to the terms set forth below:
How Consumer Law Relates To This Warranty:
THIS WARRANTY GIVES YOU SPECIFIC LEGAL RIGHTS, AND YOU MAY HAVE OTHER
RIGHTS THAT VARY FROM STATE TO STATE (OR BY COUNTRY OR PROVINCE). OTHER
THAN AS PERMITTED BY LAW, PRESONUS DOES NOT EXCLUDE, LIMIT OR SUSPEND
OTHER RIGHTS YOU MAY HAVE, INCLUDING THOSE THAT MAY ARISE FROM THE
NONCONFORMITY OF A SALES CONTRACT. FOR A FULL UNDERSTANDING OF YOUR
RIGHTS YOU SHOULD CONSULT THE LAWS OF YOUR COUNTRY PROVINCE OR STATE.
PreSonus Products And EU Statutory Warranty:
When you purchase PreSonus products, European Union consumer
law provides statutory warranty rights in addition to the coverage
you receive from the PreSonus limited warranty. A summary of the EU
Statutory Warranty and the PreSonus Limited Warranty is below:
EU Consumer Law PreSonus Limited Warranty
Repair or Replacement
Coverage For
Defects present when customer
takes delivery Defects arising after customer takes delivery
Warranty Period
2 years (minimum) from
original date of purchase (unless
superseded by PreSonus)
1 year from original date of purchase (unless superseded by PreSonus)
Cost of Coverage Provided at no additional cost Included at no additional cost
Who to contact to make
a claim The seller PreSonus technical support for your region
What This Warranty Covers:
PreSonus Audio Electronics, Inc., (“PreSonus”) warrants defects in material and
workmanship in PreSonus-branded products under normal use. This Limited
Warranty applies only to hardware products manufactured by or for PreSonus that
can be identified by the PreSonus trademark, trade name, or logo affixed to them.
4 Resources
4.4 Warranty
Temblor T8
Owner’s Manual
11
Exclusions and Limitations:
This warranty does not cover the following:
1. Damage caused by accident, abuse, improper installation, failure to
follow instructions in the applicable owner’s manual or improper
operation, rental, product modification, alteration, or neglect.
2. Damage from improper grounding, faulty wiring (AC and signal),
faulty equipment, or connection to a voltage range outside
published specifications (see applicable owner’s manual).
3. Damage to drivers or diaphragm assemblies found to have burnt voice
coils from over/under driving or signal surge from another device.
4. Damage occurring during shipment or improper handling.
5. Damage caused by repair or service performed by
persons not authorized by PreSonus.
6. Products on which the serial number has been altered, defaced, or removed.
7. Products purchased from an un-authorized PreSonus dealer (products
that have transferable warranties are excluded from this provision
provided the customer and the product are registered with PreSonus).
Who This Warranty Protects:
This Warranty protects only the original retail purchaser of the product
(products that have transferable warranties are excluded from this provision
provided the customer and the product are registered with PreSonus)
How Long This Warranty Lasts:
The Warranty begins on the original date of purchase from
the retail purchaser and the duration is as follows:
1-Year Limited Warranty
Product Category Model Transferable
Recording Interfaces
AudioBox iOne, AudioBox iTwo, AudioBox Stereo, AudioBox Studio, AudioBox USB,
AudioBox VSL (1818, 44, 22), FireStudio Project, FireStudio Mobile, FireStudio Mobile Studio,
Music Creation Suite
No
Pre-amplifiers ADL600, ADL700, BlueTube DP V2, DigiMax D8, Eureka, RC500, StudioChannel,TubePreV2 No
StudioLive Mixers SL-1642, SL-2442, SL-1602, SLM16.4.2 AI, SLM24.4.2 AI, SLM32.4.2AI No
Monitoring & Controlling Eris, Central Station Plus, FaderPort, HP4, HP60, Monitor Station, Monitor Station V2,
Sceptre, Temblor No
Signal Processing ACP88 No
Accessories Covers, Dolly, PRM1 mic, Sub Pole, Breakout Cables, Power Supplies, M10 Kit No
3-Years Limited Warranty
Product Category Model Transferable
Live Sound StudioLive AI 328, 312, 315, S18 Yes
What PreSonus Will Do:
PreSonus will repair or replace, at our sole and absolute option, products
covered by this warranty at no charge for labor or materials. If the product
must be shipped to PreSonus for warranty service, the customer must pay the
initial shipping charges. PreSonus will pay the return shipping charges.

4 Resources
4.4 Warranty
Temblor T8
Owner’s Manual
12
How to Get Warranty Service (USA):
1. You must have an active user account with PreSonus and your hardware must
be on file with your account. If you do not have an account, please go to: http://
www.presonus.com/registration and complete the registration process.
2. Contact our Technical Support Department at (225) 216-7887 or log a
support ticket at: http://support.presonus.com. TO AVOID THE POSSIBILITY
OF SENDING IN A PRODUCT THAT DOES NOT HAVE A PROBLEM, ALL SERVICE
REQUESTS SHALL BE CONFIRMED BY OUR TECH SUPPORT DEPARTMENT.
3. The return authorization number as well as shipping instructions shall
be provided after your service request is reviewed and confirmed.
4. The product should be returned for service in the original product packaging.
Products may be shipped in a manufactured“flight” or “road” style cases but
PreSonus will NOT cover any shipping damage to these cases. Products that are not
shipped in the original product package or a manufactured case may not receive
a warranty repair, at PreSonus’s sole discretion. Depending on the product model
and the condition of your original packaging, your product may not be returned
to you in the original packaging. The return shipping box may be a generic box
that has been fitted for that model tested if the original gift box is not available.
How to Get Warranty Service (outside of USA):
1. You must have an active user account with PreSonus and your hardware must
be on file with your account. If you do not have an account, please go to: http://
www.presonus.com/registration and complete the registration process.
2. Contact the Technical Support/Service Department for your region
at http://www.presonus.com/buy/international_distributors and
follow procedures provided by your PreSonus contact.
Limitation of Implied Warranties:
ANY IMPLIED WARRANTIES, INCLUDING WARRANTIES OF
MERCHANTABILITY AND FITNESS FOR A PARTICULAR PURPOSE, ARE
LIMITED IN DURATION TO THE LENGTH OF THIS WARRANTY.
Some states, countries, or provinces do not allow limitations on how long
an implied warranty lasts, so the above limitation may not apply to you.
Exclusion of Damages:
PRESONUS’S LIABILITY FOR ANY DEFECTIVE PRODUCT IS LIMITED TO THE
REPAIR OR REPLACEMENT OF THE PRODUCT, AT PRESONUS’S SOLE OPTION. IF
PRESONUS ELECTS TO REPLACE THE PRODUCT, THE REPLACEMENT MAY BE A
RECONDITIONED UNIT. IN NO EVENT WILL PRESONUS BE LIABLE FOR DAMAGES
BASED ON INCONVENIENCE, LOSS OF USE, LOST PROFITS, LOST SAVINGS, DAMAGE
TO ANY OTHER EQUIPMENT OR OTHER ITEMS AT THE SITE OF USE, AND, TO THE
EXTENT PERMITTED BY LAW, DAMAGES FOR PERSONAL INJURY, OR ANY OTHER
DAMAGES WHETHER INCIDENTAL, CONSEQUENTIAL OR OTHERWISE, EVEN IF
PRESONUS HAS BEEN ADVISED OF THE POSSIBILITY OF SUCH DAMAGES.
Some states, countries, or provinces do not allow limitations on how long
an implied warranty lasts, so the above limitation may not apply to you.
If you have any questions about this warranty or service received, please
contact PreSonus (USA) at (225) 216-7887 or one of our authorized international
distributors at: http://www.presonus.com/buy/international_distributors.
Product features, design, and specifications are subject to change without notice.

Added bonus: PreSonus’previously Top Secret recipe for…
Rice Dressing
Ingredients:
•1lb ground beef
•1 lb chopped chicken liver
•1 onion (diced)
•2 green peppers (diced)
•4-6 celery stalks (diced)
•2 garlic cloves (minced)
•¼C. chopped fresh parsley
•3 C. chicken stock
•6 C. cooked rice
•1 Tbs. oil
•Salt and pepper to taste
•Cayenne pepper to taste
Cooking Instructions:
1. In a large pot, heat oil on medium high and add meat, salt, and pepper to taste. Stir until meat begins to brown.
2. Lower heat and add all vegetables. Cook until onions are transparent and celery is very tender. Add stock as necessary to
prevent burning.
3. Stir in cooked rice. Add remaining stock and simmer on low until ready to serve.
© 2014 PreSonus Audio Electronics, Inc. All Rights Reserved. AudioBox, Ceres, CoActual, DigiMax, Eris, FireStudio, Nimbit, PreSonus, QMix, Riff to Release, Sceptre,Temblor,
StudioLive, and XMAX are trademarks or registered trademarks of PreSonus Audio Electronics, Inc. Capture, Impact, Mixverb Presence, RedLightDist, SampleOne, Studio One, and
Tricomp are trademarks or registered trademarks of PreSonus Software Ltd. Mac and Mac OS are registered trademarks of Apple, Inc., in the U.S. and other countries.Windows is
a registered trademark of Microsoft, Inc., in the U.S. and other countries.Temporal EQ and TQ are trademarks of Fulcrum Acoustic. Other product names mentioned herein may be
trademarks of their respective companies. All specifications subject to change without notice...except the recipe, which is a classic.
Dinner is Served

Part# 70-52000001-A
Temblor™T8
Active Studio Subwoofer
Owner’s Manual
18011 Grand Bay Ct. • Baton Rouge,
Louisiana 70809 USA• 1-225-216-7887
www.presonus.com
®
IPftUTGHN
LDWM:JSf1LTU.
.&
....
~':w.
•
HPI'"
~
101.
0 da::::l•...
...
a::::J
..
·lOdl
'"'
'
SOttl
UOH.I
,--______,_
@ns
@ ®
1IS
®
0
"""'
LEn
.aNT
O
liFT
@@
@(@)
._
,_
~:
:
!
~==r-
Oil
ACSELECT
''''''
PreSonus

PreSonus
Health,
Safety,
and
Compliance Guide ,
PreSonus
Safety
Warnings
and
Instructions
Electrical
information
and
warning
symbols
for
PreSonus
products
are
located
on
the
rear
electrical
panel
of
the
unit
adjacent
to
the
electrical
plug
or
on
the
bottom
of
the
unit
along
with
other
product
compliance
information
.
ATTENTION:
RISQUE DE CHOC ELECTRIQUE-NE PAS OUVRIR
This
lightning
flash
with
arrowhead
symbol
within
an
equilateral
triangle
is
intended
to
alert
the
user
to
the
presence
of
non-insulated
"dangerous
voltage"
within
the
product's
enclosure
that
may
be
of
sufficient
magnitude
to
constitute
a
risk
of
electric
shock.
WARNING
:
TO
REDUCE
THE
RISK
OF
ELECTRIC
SHOCK,
DO
NOT
REMOVE
COVER
(OR
BACK)
AS
THERE
ARE
NO
USER-SERVICEABLE
PARTS
INSIDE.
REFER
SERVICING
TO
QUALIFIED
PERSONNEL.
The
exclamation
point
within
an
equilateral
triangle
is
intended
to
alert
the
user
to
the
presence
of
important
operating
and
maintenance
instructions
in
the
literature
accompanying
the
appliance
.
A
CAUTION:
To
reduce
the
risk
of
electric
shock,
do
not
expose
this
appliance
to
~
rain
and
moisture
.
Do
not
expose
this
device
to
dripping
or
splashing
liquids
and
no
object
filled
with
liquids,
such
as
vases,
should
be
placed
on
the
device.
.f.\!
CAUTION:
These
service
instructions
are
for
use
by
qualified
service
~
personnel
only.
To
reduce
the
risk
of
electric
shock,
do
not
perform
any
servicing
other
than
that
contained
in
the
operation
instructions.
Qualified
service
personnel
must
perform
repairs.
1.
Read
these
instructions.
2.
Keep
these
instructions.
3.
Heed
all
warnings.
4.
Follow
all
instructions.
5.
Do
not
use
this
device
near
water.
6.
Clean
only
with
a
dry
cloth.
7.
Do
not
block
any
ventilation
openings
.
Install
in
accordance
with
the
manufacturer's
instructions.
8.
Do
not
install
near
any
heat
sources,
such
as
radiators,
heat
registers,
stoves,
or
other
device
(including
amplifiers)
that
produce
heat.
9.
Do
not
defeat
the
safety
purpose
ofthe
polarized
or
grounding-type
plug.
A
polarized
plug
has
two
blades
and
a
third
grounding
prong.
The
wide
blade
and
the
third
prong
are
provided
for
your
safety.lf
the
provided
plug
does
not
fit
into
your
outlet
,
consult
an
electrician
for
replacement
of
the
obsolete
outlet.
10
.
Protect
the
power
cord
from
being
walked
on
or
pinched,
particularly
at
plugs
,
convenience
receptacles,
and
the
point
where
they
exit
from
the
device.
11.
Use
only
attachments
/
accessories
specified
by
PreSonus
.
12
.
Use
only
with
a
cart,
stand,
tripod,
bracket,
or
table
specified
by
the
manufacturer
or
sold
with
this
device.
Use
caution
when
moving
a
cart
/
device
combination
to
avoid
injury
from
tip-over
.
13
.
Unplug
this
device
during
lightning
storms
or
when
unused
for
long
periods
.
14.
Servicing
is
required
when
the
device
has
been
damaged
in
any
way,
such
as
ifa
power-supply
cord
or
plug
is
damaged;
or
liquid
is
spilled,
or
objects
have
fallen
into
the
device
;
or
if
the
device
has
been
exposed
to
rain
or
moisture
,
does
not
operate
normally,
or
has
been
dropped
.
All
PreSonus
products
in
the
USA
should
be
serviced
at
the
PreSonus
factory
in
Baton
Rouge,
Louisiana
.
If
your
Pre
So
nus
product
requires
a
repair,
contact
support
@
presonus.com
to
arrange
for
a
return
authorization
number
.
Customers
outside
the
USA
should
contact
their
local
distributor.
Your
distributor's
contact
information
is
available
at
www
.
presonus
.
com
.
15.
Protective
grounding(earthing)
terminal.
The
apparatus
should
be
connected
to
a
mains
socket
outlet
with
a
protective
grounding(earthing)
connection.
16
.
Where
the
Mains
plug
or
an
appliance
coupler
is
used
as
the
disconnect
device,
the
disconnect
device
shall
remain
readily
operable.
PreSonus
Compliance
Information
European
Union
(EU)
( E
The
CE
mark
on
this
product
indicates
that
the
device
is
compliant
with
the
EU
Coun
c
il
Directives
and
Standards
relating
to
e
lectromagnetic
compatibility,
EMC
Directive
(2006
/
95
/
EC)
and
Low
Voltage
Directive
(2004/108
/
E()
as
well
as
EU
RoHS
Directive
20
12/
65
/
EU.
RoHS
This
produc
t
is
compliant
with
EU
Directive
2012
/
65
/
EU
for
the
Restrict
i
on
of
Certain
Hazardous
Substances
in
Electrical
and
Electronic
Equipment.
No
lead
(Pb),
cadmium
(Cd),
mercury
(
Hg)
,
hexavalent
chromium
(Cr+6).
PBBs
,
or
PBDEs
above
the
maximum
allowable
concentrated
value
has
been
intentionally
added
to
materials
used
in
this
device.
Any
traces
of
impurities
of
these
substances
that
may
be
found
in
this
dev
i
ce
are
below
allowable
RoHS
restricted
limits.
Specifics
on
conforming
standards
used
to
test
for
and
determine
compliance
w
ith
CE
marking
with
each
Pre
So
nus
model
are
listed
on
the
product's
CE
Declaration
of
Conformity
(
DoC).
For
a
copy
of
a
specifi
c
product
DoC.
contact
PreSonus
at
support
@
presonus.com.
REACh
Thi
s
product
is
compliant
with
EU
Directive
EC1907
/
206
for
the
Registration
,
Evaluation
,
Authorization
,
and
Restriction
of
chemicals
and
c
ontains
none
or
less
than
1%
if
the
chemicals
listed
as
SVHCs
.
WEEE
This
symbol
on
this
product
or
its
packaging
indicates
that
this
:a
produc
t
must
not
be
disposed
of
with
other
waste.
Instead,
it
is
your
re
s
ponsibility
to
dispose
of
your
waste
equipment
by
handing
it
over
to
a
designated
collection
point
for
the
recycling
of
wa
s
te
electrical
and
electronic
equipment.
The
s
eparat
e
colle
c
tion
and
recycling
of
your
waste
equipment
•
at
the
time
of
disposal
will
help
conserve
natural
resources
and
ensure
that
it
is
recycled
in
a
manner
that
protects
human
health
and
the
environment.
For
more
information
about
where
you
can
drop
off
your
waste
equipment
for
rec
y
cling,
please
contact
your
local
city
recycling
office
or
the
dealer
from
whom
you
purchased
the
product.
EMC
(Electromagnetic
Compliance)
PreSonu
s
products
are
designed
and
tested
to
comply
with
the
f
ollowing
standards
according
to
product
applicability:
FCC
Part
15
Class
B
EN
55103
-1
E1
,
E2,
E3
EN
55103
-2
E1
,
E2,
E3
AS
/
NZS
4538
Class
B
CISPR
22
Class
B
Radio
and
Television
Interference
If
these
symbols
ar
e
marked
on
the
product
,
the
device
complies
as
follows:
USA
:
Thi
s
equipment
has
be
en
tested
and
found
to
comply
with
the
limits
for
a
Cla
ssB
digital
device,
pursuant
to
Part
15
of
the
FCC
Rules.
These
limits
are
designed
to
provid
ere
asonable
protection
against
harmful
interference
in
a
residential
i
nstallation
.
This
equipment
generates,
uses
,
and
can
radiate
radio
frequency
energy,
and,
if
not
installed
in
accordance
with
the
instructions,
may
cause
harmful
interference
to
radio
communications.
However
,
there
is
no
guarantee
that
interference
will
not
occur
in
a
particular
installation.
If
this
equipment
does
cause
harmful
interference
to
radio
or
television
reception,
which
can
be
determined
by
turning
th
e
equipment
off
and
on
,
the
user
is
encouraged
to
try
to
correct
the
interfer
e
nce
by
one
or
more
of
the
following
measures:
Reorient
or
relo
c
ate
the
receiving
antenna.
Increas
e
the
separation
between
the
equipment
and
the
receiver.
Connect
the
equipment
into
an
outlet
on
a
circuit
different
from
that
to
which
the
recei
v
er
is
connected.
Consult
the
dealer
or
an
experienced
radio
/
TV
technician
for
help.
CAUTION:
Changes
or
modifications
to
this
device
not
expres
s
ly
approved
by
PreSonu
s
Audio
Electronics
could
void
the
user
's
authority
to
op
e
rate
the
equipment
under
FCC
rules
.
CALIFORNIA
PROP6S
WARNING:
Canadian
Compliance:
If
applicable
,
this
Class
B
digital
apparatus
complies
with
Canadian
ICES-003
.
le
ca
s
echeant,
ce
Bde
Classe
appareil
numerique
se
conforme
AUX
GLACES
canadiennes-003.
This
apparatus
does
not
exceed
the
Class
A/Cla
ssB
(whichever
is
applicable)
limits
for
radio
noise
emissions
from
digital
apparatus
set
out
in
the
radio
interfer
e
nce
regulations
of
the
Canadian
Department
of
Communications.
ATTENTION:
le
present
appareil
numerique
n'
emet
pas
de
bruits
radioelectriques
depassant
las
limites
applicables
aux
appareils
numerique
s
de
class
A/
de
class
B
(selon
le
cas)
prescrites
dans
le
reglement
s
ur
le
brouillage
radioelectrique
edicte
par
le
ministere
des
communications
du
Canada.
PreSonus
Health, Safety, and
Compliance
Guide
. Part#
SAF-PAEOOOl-G
©
2014
PreSonus
Audio
Electronics,
Inc.
All
Rights
Reserved.
18011
Grand
Bay
Ct.·
Baton
Rouge,
Louisiana
70809
USA
·1-225-216-7887
www.presonus.
com

Register online
for
software
downloads
and
a
handy
setup
tutorial.
Thanks for choosing PreSonus!
Registering your product online provides access
to the following goodies
...
• Included software
&
driver
downloads
• Detailed setup tutorials
• Complete product manuals
• Notification
of
software updates
• Important product news
my.presonus.com
For
information about your warranty, please
refer to your product Owner's Manual.
Registrieren
Sie
sich
online
und.erhalten
Sie
Zugriff auf Software-
Downloads
sowie
eine
praktische Anleitung
zur
lnbetriebnahme.
Vielen Dank, dass Sie sich fUr PreSonus
entschieden haben!
Durch eine Online-Registrierung lhres
Produkts erhalten Sie Zugriff
auf
folgende
Zusatzleistungen
...
• Downloads fUr die mitgelieferte
Software und Treiber
• Detaillierte Anleitungen
zur
Einrichtung
• Vollstandige Produkthandbucher
• Benachrichtigung uberSoftware-
Aktualisierungen
• Wichtige Produktneuigkeiten
my.presonus.com
lnformationen zur lhrer Garantie finden Sie in
der Bedienungsanleitungzu lhrem Produkt.
Registre
su
software
online
para
descargas
y tutoriales practicos
de
configuraci6n.
Gracias
par
elegirPreSonus!
El
registro de suproducto online proporciona
acceso a los siguientes beneficios
...
• Descargas de software incluido &
drivers
• Tutoriales de configuraci6n detal/ados
• Manua/es completos de productos
• Notificaciones de actualizaciones de software
• Noticias importantes sabre productos
my.presonus.com
Para mas informacion sabregarantfa,
por
favor
refierase a/manualde usuario de
su
producto.
Enregistrez-vous
en
ligne
pour
les
telechar-
gements
de
logiciels
et
un
didacticielpratique
d'installation.
Mercid'avoirchoisiPreSonus !
Enregistrer votre
produit
en ligne donne acces
auxavantages suivants.
..
• Telechargements des logiciels
et
pilotes inc/us
• Didacticiels d'installation detailles
• Modes
d'emploi
complets de
produit
• Avis
demises
a
jour
des /ogiciels
• Nouveautes importantes
pour
/es
produits
my.presonus.com
Pourdes informations
sur
votre garantie,
veuillez vous refererau mode
d'emploi
de votre
produit.
''''''
PreSonus
·
PI
N
825-PA
E
0009.C
Other manuals for Temblor T8
2
Table of contents
Other PRESONUS Subwoofer manuals

PRESONUS
PRESONUS Eris Sub8 User manual

PRESONUS
PRESONUS Temblor T8 User manual

PRESONUS
PRESONUS Temblor T10 User manual

PRESONUS
PRESONUS Temblor T10 User manual

PRESONUS
PRESONUS Eris Sub8 User manual

PRESONUS
PRESONUS CDL Sub18 User manual

PRESONUS
PRESONUS Eris Pro Sub 10 User manual

PRESONUS
PRESONUS Temblor T10 User manual

PRESONUS
PRESONUS Temblor T8 User manual

PRESONUS
PRESONUS Eris Sub 8BT User manual


