PrestigeSports XM-PRO II User manual

TREADMILLTREADMILL
MAINTENANCE GUIDEMAINTENANCE GUIDE
TREADMILL COMPONENTS?
UNDERSTAND
YOUR TREADMILL
XM-PRO II & III™
MAINTENANCE
SCHEDULE
LIVE LONGER!
LOOK AFTER YOUR
TREADMILL & SAVE ££’s
ESSENTIAL
TIPS
XM-PRO II™ & XM-PRO III™
Ocial Guide

2
PrestigeSports
Contents
XM-PRO II™ & XM-PRO III™ Treadmill Maintenance Guide
XM-PRO II™ Components Guide.................................................3-4
XM-PRO III™ Components Guide................................................5-6
Essential Treadmill TIPS....................................................................7
Maintenance Schedule.....................................................................8
Maintenance Instructions................................................................9
PrestigeSports Treadmill Maintenance Guide

3
PrestigeSports Treadmill Maintenance Guide
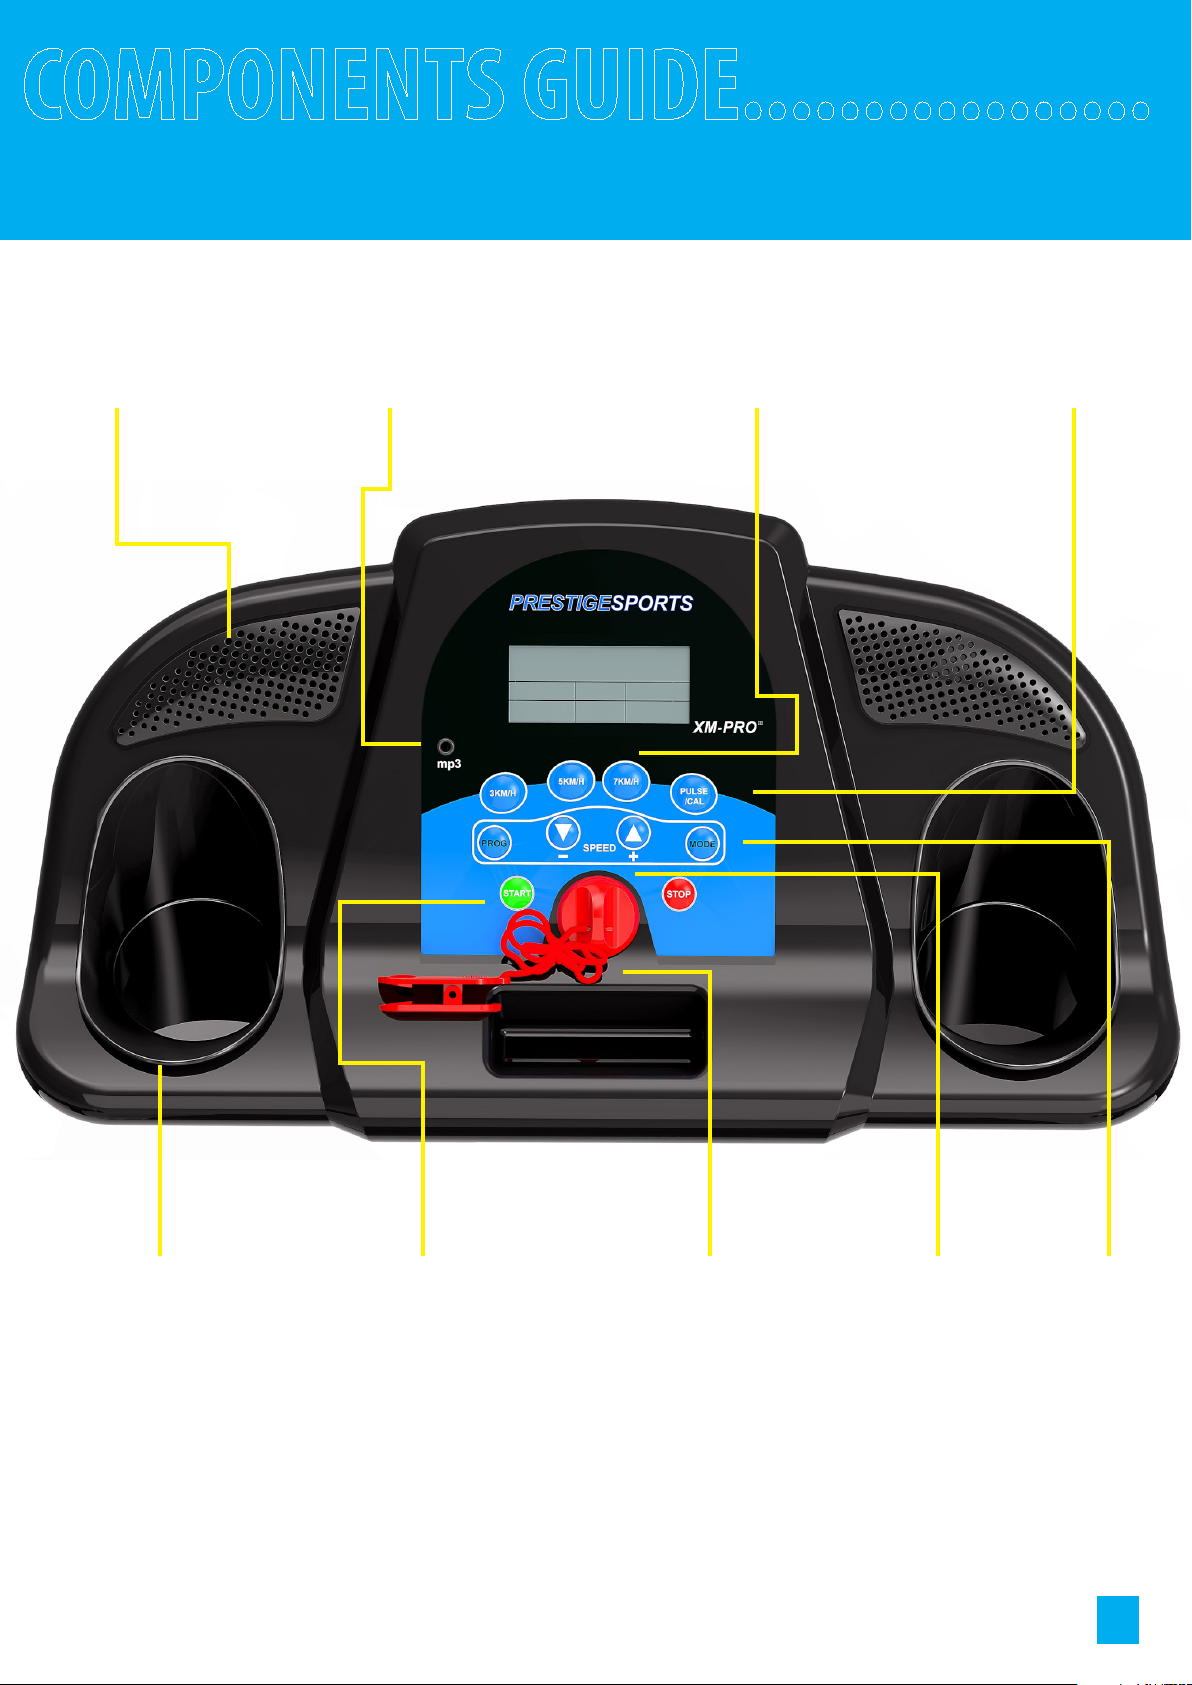
COMPONENTS GUIDE.................
XM-PRO II ™ MOTORIZED TREADMILL - MAIN
DISPLAY
BOTTLE HOLDER
HANDRAIL
TOWEL RAIL
QUICK RELEASE LOCK
SAFETY LOCK
MOTOR COVER
SIDE RAIL
RUNNING BOARD / BELT
END CAP / BELT ADJUSTER
FRONT FOOT REAR WHEELS

4
PrestigeSports Treadmill Maintenance Guide
COMPONENTS GUIDE.................
XM-PRO II ™ MOTORIZED TREADMILL - DISPLAY
BOTTLE HOLDER MAGNETIC SAFETY KEYSTART / STOP MODESPEED

5
PrestigeSports Treadmill Maintenance Guide
COMPONENTS GUIDE.................
XM-PRO III ™ MOTORIZED TREADMILL - MAIN
DISPLAY
BOTTLE HOLDER
HANDRAIL
TOWEL RAIL
QUICK RELEASE LOCK
SAFETY LOCK
MOTOR COVER
SIDE RAIL
RUNNING BOARD / BELT
END CAP / BELT ADJUSTER
ADJUSTABLE INCLINE
REAR WHEELS
HAND CONTROLS + PULSE SENSORS
6
PrestigeSports Treadmill Maintenance Guide
COMPONENTS GUIDE.................
XM-PRO III ™ MOTORIZED TREADMILL - DISPLAY
BOTTLE HOLDER MAGNETIC SAFETY KEYSTART / STOP MODESPEED
SPEAKERS AUDIO INPUT QUICK SPEED BUTTONS CAL / PULSE

7
PrestigeSports Treadmill Maintenance Guide
ESSENTIAL TREADMILL TIPS.......
START OFF, ON THE RIGHT FOOT!
Following these simple TIPS will help you to get started:
LOCATION - LOCATION:
• The most important point when choosing which room to use your treadmill is to avoid cold, damp
places such as a garage / conservatory. Cold damp areas will allow moisture to build up under the
motor cover and cause damage to the motherboard.
• Avoid places where pet hair / dirt will come into contact with the treadmill. Also avoiding places near
exterior doors helps to prevent excessive dirt / water coming into contact with the treadmill.
WHAT SURFACE IS BEST?
• Find a room with a level surface and try to use a soft mat to prevent any damage to your oor. This
will also help to reduce the impact when running on the treadmill.
• A solid concrete oor would be best however this is not always possible.
• If the room you are using has a laminated oor then expect to feel some“bounce” when running.
This is largely due to the fact that laminated ooring usually has a soft underlay and also bearing
in mind that the oor may not be perfectly level.
RUNNING BELT ALIGNMENT:
• All treadmill running belts will come out of alignment over time. This is normal and occurs due to
a number of factors. Uneven surfaces will cause alignment issues and some people nd that being
heavy footed on one side can also cause the belt to come out of alignment. Keeping the belt cor-
rectly aligned is a key part in looking after your treadmill.
• More detailed information can be found in the next section or in your user manual.
LUBE IT UP?
• All treadmill belts will come pre lubricated when new. You will not need to lubricate the belt for
the rst few months however the period of time between lubrication will largely depend on how
often the treadmill is being used. More specic information regarding lubrication can be found in
the next section of this e-book.

8
PrestigeSports Treadmill Maintenance Guide
MAINTENANCE SCHEDULE..........
LOOK AFTER YOUR TREADMILL & SAVE ££’s
Regular maintenance and safety checks extends the lifespan of your
treadmill and ensures safe operation:
BEFORE EVERY USE:
1. Always inspect the safety key to ensure that it stops the treadmill when pulled away from the display.
2. Check and tighten any loose screws / ttings. Even under normal use, ttings may come loose so
always check to ensure everything is tight. Loose ttings may cause excessive wear / increase the
chance of injury.
3. Check the power cable for damage and replace if necessary.
4. Wipe down the outer surfaces of the treadmill with a clean damp lint free cloth. Make sure the cloth
is only damp and not soaked. Do not use any strong cleaning chemicals i.e alcohol based products
and never spray any liquids directly on to your treadmill.
ONCE A MONTH:
1. Perform the basic daily checks listed above.
2. Inspect the running belt for excessive wear. Contact your retailer if the belt looks damaged.
3. Check the belt and adjust the tension / alignment if necessary. Refer to the user manual or mainte-
nance instructions within this guide and DO NOT overtighten.
3-4 MONTHS:
1. Perform both the basic daily & monthly checks listed above.
2. Lubricate the running surface with the lubricant provided. Alternatively you can purchase a good
quality treadmill lubricant (silicone spray) online. Lubricant goes between the under side of the
belt and the running surface. Please refer to the user manual or maintenance instructions within
this guide and DO NOT over lubricate the running surface or use lubricant on the side you stand
on.
EVERY 6 MONTHS:
1. Perform all the daily, monthly and quarterly checks listed above.
2. Power o the treadmill and allow a few minutes for the unit to discharge before removing the
power cable. Now remove the motor cover (shown in the components guide section). DO NOT
touch any electrical components to prevent the risk of shock or damage to the treadmill. Use a
vacuum cleaner to carefully remove any dust. Be careful not to knock any parts while cleaning and
do not use any liquids. A vaccum cleaner is sucient to clean the internal parts.
3. Inspect the motor belt for wear / damage. If the belt looks cracked or frayed then contact your
retailer for a replacement. The motor belt should easily last a year under normal use.
9
PrestigeSports Treadmill Maintenance Guide
MAINTENANCE INSTRUCTIONS....
FOLLOWING THE CORRECT PROCEDURES
Following the correct maintenance proceedures helps to avoid costly
repairs and ensures trouble free exercise:
WHEN TO ADJUST THE RUNNING BELT:
• People often ask when to adjust the belt, this largely depends on how often the treadmill is being
used and can be conrmed by literally looking at the belt and checking if the belt looks centered.
The belt should be in the middle of the platform with an even gap either side.
• If one side of the belt is loose then the belt will drift towards the loose side. For example if the belt is
drifting towards the left then you know that the left side needs adjusting.
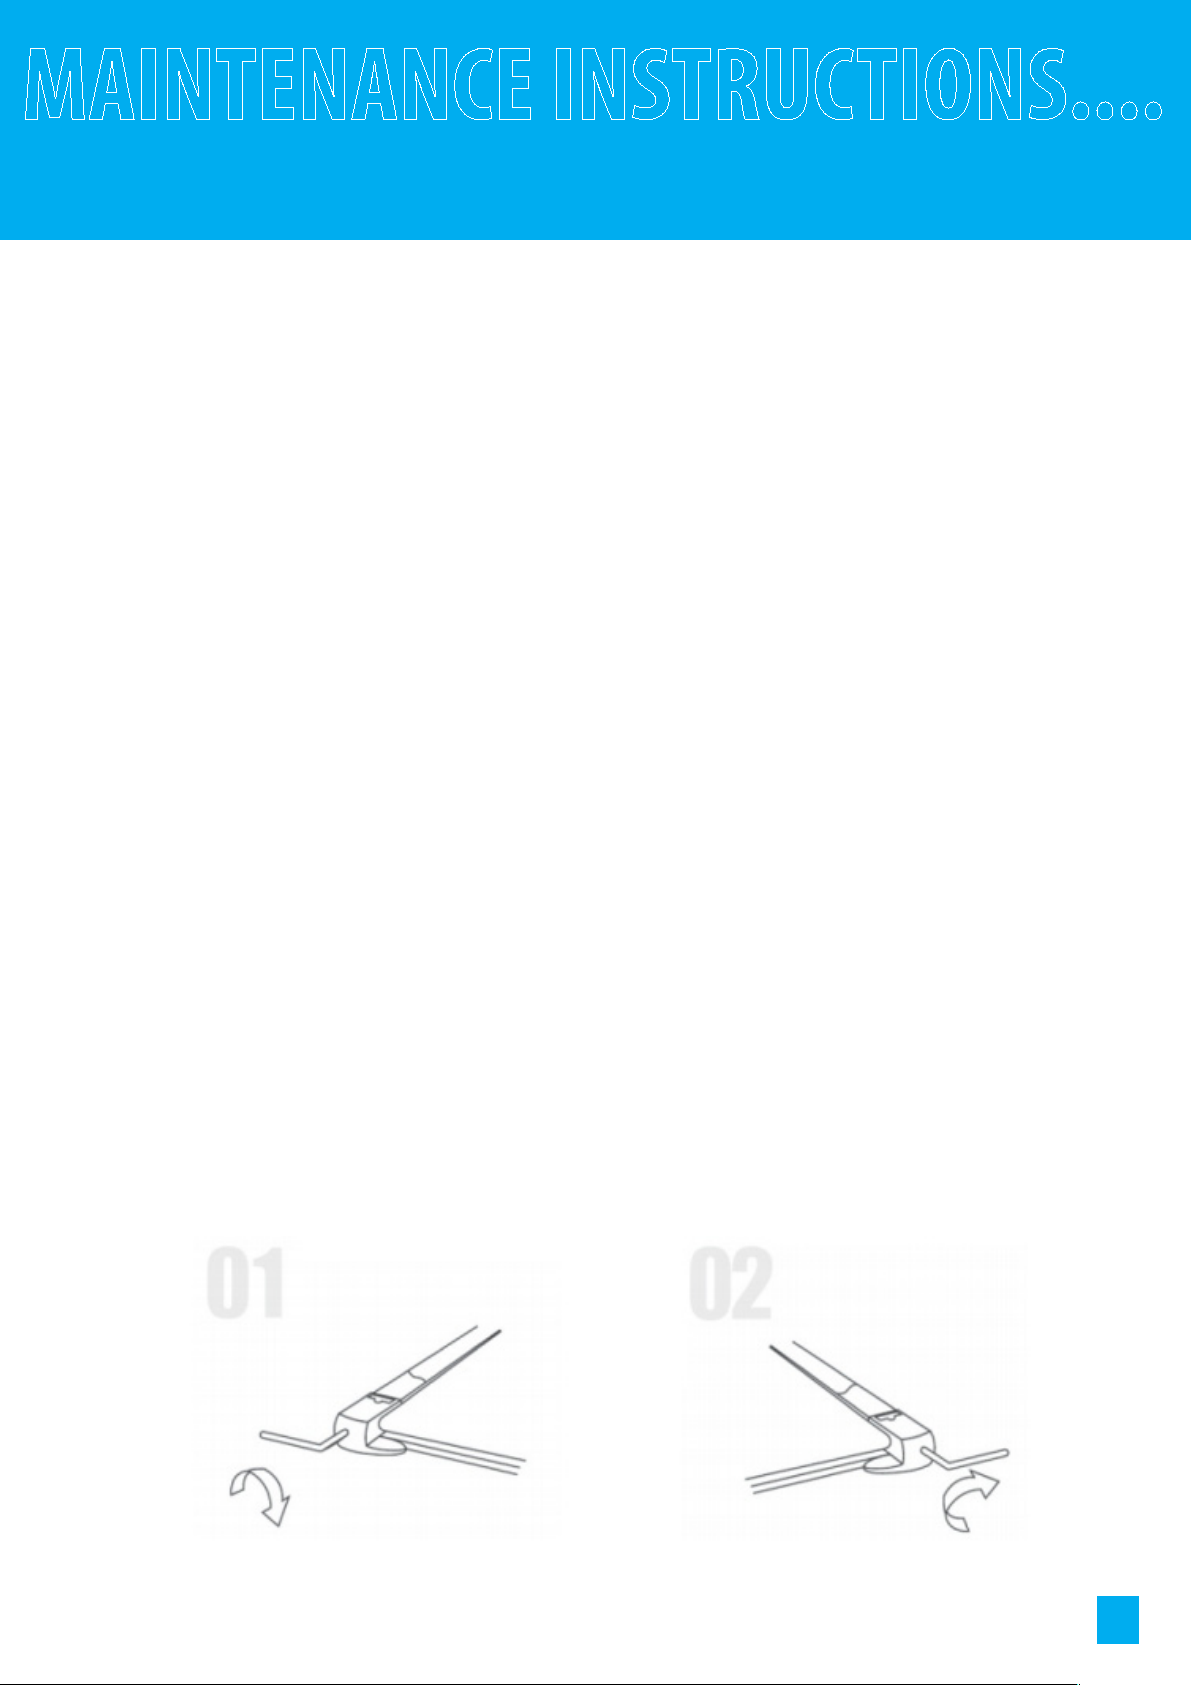
HOW TO ADJUST THE RUNNING BELT:
• Firstly you need to establish which side needs adjusting.
• If the belt has moved over towards the left then you will need to tighten the left side of the treadmill.
• Locate the relevant tension bolt, in this case it would be the left side (end cap shown in component
guide section above).
• Before you start making any adjustments, make sure the machine is switched on and the treadmill
is running at 3-4 KMH without anyone running on the belt. BE CAREFUL of moving parts and DO
NOT put your ngers near the running belt. REMEMBER to remove any jewelry / loose tting items
of clothing and tie back any long hair.
• Now using the allen key provided, turn the bolt clockwise by only a small amount (QUARTER TURN).
Once this rst adjustment is done, you will need to allow the machine to keep running for a minute
to allow the belt to move over.
• After adjusting the belt, walk or run for a few minutes to test. If the belt is still needs adjusting then
repeat the adjustment procedure again then re test.

10
PrestigeSports Treadmill Maintenance Guide
MAINTENANCE INSTRUCTIONS....
FOLLOWING THE CORRECT PROCEDURES
HOW TO LUBRICATE THE RUNNING BELT:
• If the running platform drys out, you will feel the belt sticking when trying to run / walk. You can
lubricate the belt with either the oil provided or silicone spray. The platform under the belt should
feel well lubricated when touched.
• To lubricate the platform you need to lift the edge of the belt and squit / spray some lubricant on
the platform (inline) with where you would run. Do this on both sides and make sure you dont use
too much. After lubricating the platform you should allow the treadmill to run for a few minutes to
spead the lubricant.
USAGE TIME WHEN TO LUBE
LIGHT 2 - 3 Hours Per Week Every 5 - 6 Months
MEDIUM
HEAVY
4 - 5 Hours Per Week
5 + Hours Per Week
Every 3 Months
Every 1 - 2 Months
For more detailed information including additional troubleshooting info
please refer to your user manual or contact your retailer.
CAUTION:
BE CAREFUL of moving parts and DO NOT put your ngers near the running belt. REMEMBER to always
remove any jewelry / loose tting items of clothing and tie back any long hair when working on your tread-
mill.
This manual suits for next models
1
Table of contents
Popular Treadmill manuals by other brands


NordicTrack
NordicTrack Pro 3000 Treadmill Gebruikershandleiding

Sunny Health & Fitness
Sunny Health & Fitness SF-T7945 user manual

SportsArt Fitness
SportsArt Fitness 3250 owner's manual

Everlast
Everlast 1650901 owner's manual

Christopeit Sport
Christopeit Sport TM200S Assembly and exercise instructions

BH FITNESS
BH FITNESS S1TiB owner's manual