Prestigio P370 DVD-X User manual

1PRESTIGIO P370DVD-X
ENG
Prestigio P370 DVD-X
User’s Manual
Before using this product, please read the security instructions first and bear them in mind when using the product.

2 PRESTIGIO P370DVD-X
ENG
Safety Instruction
Warning
TO PREVENT FIRE OR SHOCK HAZARD.
DO NOT EXPOSE THIS APPLIANCE TO RAIN OR MOISTURE.
THISSYMBOLISINTENDEDTOALERTTHE USERTOTHE PRESENCE OF UNINSULATED.DANGEROUSVOLTAGE.
WITHINTHEPRODUCTSENCLOSURETHATMAYBEOF SUFFICIENT MAGNITUDETOCONSTITUTEA RISK OF
ELECTRICSHOCKTOPERSONS.
THISSYMBOLIS INTENDEDTOALERTTHE USERTOTHE PRESENCE OFIMPORTANTOPERATING AND MAIN-
TENANCE (SERVICING)INSTRUCTIONS INTHE LITERATURE ACCOMPANYINGTHE APPLIANCE.
Disposal of Old Electrical & Electronic Equipment
(Applicable in the European Union and other European
countries with separate collection systems)
This symbol on the product or on its packaging indicates that this product shall not be treated as
householdwaste.Insteaditshallbe handed over to the applicablecollectionpointfortherecycling
ofelectrical andelectronicequipment.Byensuring thisproduct is disposed ofcorrectly,you will help preventpotential
negative consequences for the environment and human health, which could otherwise be caused by inappropriate
waste handling of this product. The recycling of materials will help to conserve natural resources. For more detailed
informationaboutrecycling of this product, pleasecontactyour local city office, yourhouseholdwaste disposal service
or the shop where you purchased the product.

3PRESTIGIO P370DVD-X
ENG
Important Safety Instructions
This equipment has been designed and manufactured to meet international safety standards but, like any electrical
equipment,caremustbetaken if you are to obtain the bestresultsandsafetyistobeassured.So,pleasereadthe points
belowforyourownsafety.Theyareofageneralnature,intendedto help you with allyourelectronic consumerproducts
and some points may not apply to the goods you have just purchased.
• Readtheseinstructions.
• Keeptheseinstructions.
• Heedallwarnings.
• Follow all instructions.
• Do not use this apparatus near
• Clean only with a dry cloth.
• Do not block any ventilation openings.Install in accordance with the manufacturer’s instructions.
• Donotinstall near anyheatsources such asradiators,heat registers, stoves,orother apparatus (including
amplifiers)that produce heat.
• This TV is not completely disconnected from a power supply line, as minute current is consumed even when
the POWER switch is turned off.
• Do not place hot objects or naked flame sources,such as lighted candles or highlights on,or close to theTV.
High temperatures canmelt plastic and lead tofires.
• Do not set on top of the TV any object or container that might spill liquids or small objects into theTV.
• Protect the power cord from being walked on or pinched, particularly at plugs, convenience receptacles, and
thepoint where it exits the apparatus.
• Onlyuseattachments/accessoriesspecifiedbythemanufacturer.
• Use only with the cart,stand,tripod,bracket,or table specified by the manufacturer,or sold with the apparatus.
When a cart is used,use caution when moving the cart/apparatus combination to avoid injury from tip-over.
• Unplug this apparatus during lightning storms or when unused for long periods of time.
• Referall servicing to qualifiedservice personnel. Servicingisrequired when theapparatus has been damaged
in any way,such as power supply cord or plug is damaged,liquid has been spilled or objects have fallen into
the apparatus,the apparatus has been exposed to rain or moisture,does not operate normally,or has been
dropped.
• The apparatus shall not be exposed to dripping or splashing and no objects filled with liquids, such as vases,
shall be placed on the apparatus.
CAUTION: Danger of explosion if battery is incorrectly replaced. Replace only with the same or
equivalent type.

4 PRESTIGIO P370DVD-X
ENG
Contents
SafetyInstruction ................................................ 2
Warning ................................................................ 2
ImportantSafetyInstructions ............................... 3
Overview ............................................................. 5
Front View ............................................................. 5
RearPanelJacks ..................................................... 5
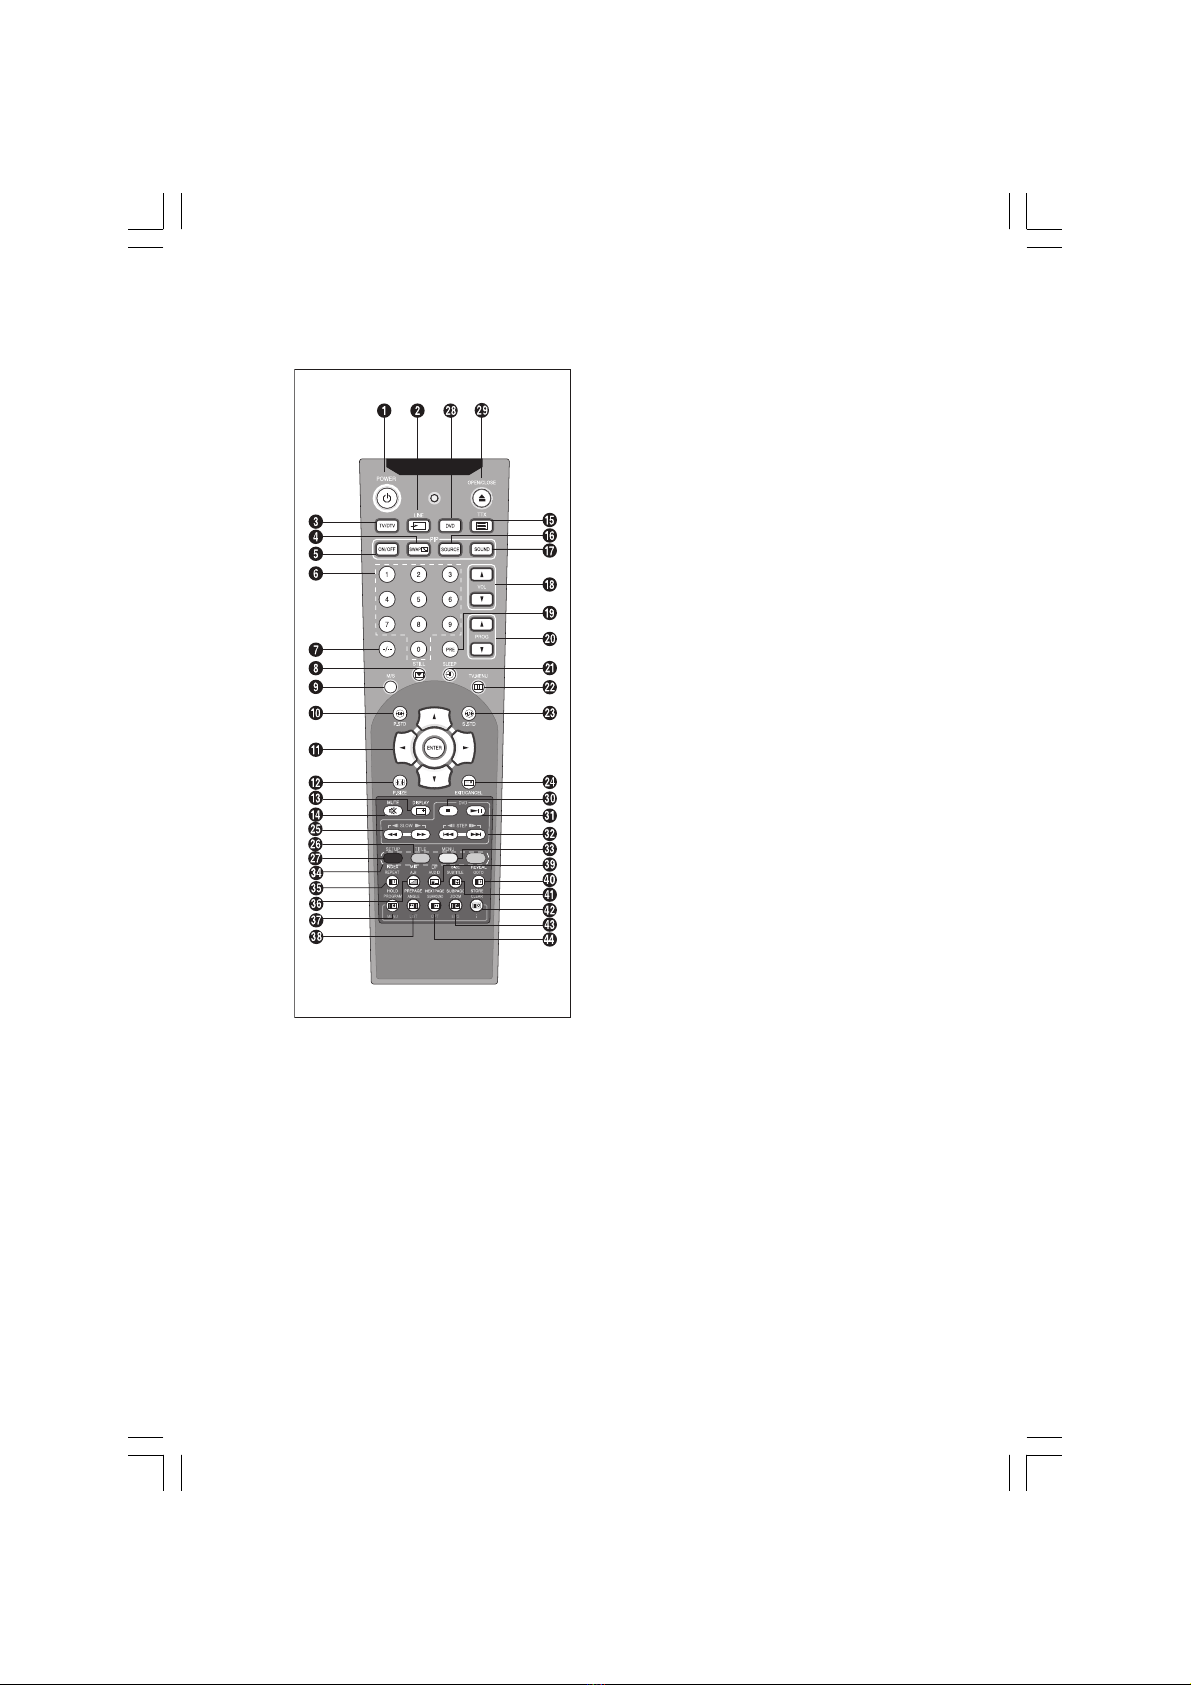
RemoteControl.................................................... 6
Connecting Your TV .............................................. 7
Connecting an Antenna or Cable without
a Decoder box ........................................................ 7
Connecting the Scart Jack ...................................... 7
Connectinga Digital Audio System
(Depend on the model) .......................................... 7
Connecting the Video or S-Video/Audio Jacks ........ 8
Connectinga ExternalTV ....................................... 8
Connecting the DTV Receiver ................................. 8
ConnectingtheDVI JACK (DVI-DOnly) .................... 9
Check Before Using ..............................................9
TVFunction ........................................................ 10
WatchingTV ...................................................... 10
Turning the TV On and OFF ................................... 10
Selectingthe Menu Language .............................. 10
Viewingthe Status Information ........................... 10
Adjustingthe Volume .......................................... 10
Muting the Sound ............................................... 10
Viewinga Video, DVD orCOMPONENT .................. 10
StoringChannelsAutomatically .......................... 11
Manual Storing of Channels ................................ 11
Channel Name ................................................... 11
ActivatingtheChildLock ..................................... 12
ProgramEdit ..................................................... 12
DeleteaProgram ................................................. 12
Copy a Program ................................................... 12
Moving a Program ............................................... 13
Skipping a Program Number ............................... 13
ChangingChannel .............................................. 13
When the Picture Quality is Pooror Unstable ....... 13
Selectingthe Picture Status ................................ 14
AdjustingthePictureSettings ............................. 14
Selecting the Sound Mode .................................. 15
AdjustingtheBALANCE ....................................... 15
Adjusting theHeadphone Volume ....................... 15
AdjustingtheEQUALIZER .................................... 16
Choosing a Soundtrack ...................................... 16
Changing the Screen Size ................................... 17
FreezingthePicture ........................................... 17
Viewing Picture-in-Picture ................................... 18
Changing the Source of the PIP Window ............. 18
Changing thePIP WindowChannel ..................... 19
Changing the POSITION of the PIP Window ......... 19
Selecting the Speaker Output in the PIP Screen
Mode ....................................................... 19
Swapping theMain andthe PIP Window ............. 20
Selecting the Headphone Output in the PIP Screen
Mode ....................................................... 20
Setting the Clock ................................................ 20
Setting the On/Off Timer .................................... 20
Selecting the ON Timer Channel/Adjusting the ON
Timer Volume ........................................... 21
Setting the Sleep Timer ...................................... 21
MELODYFunction ............................................... 22
Change Password .............................................. 22
TTX Function ...................................................... 23
Teletext ............................................................. 23
DisplayingtheTeletext Information .................... 23
Selecting a Page by Number ............................... 24
Usingthe various display options: ........................ 24
Using FLOF to Select a Page ................................ 24
Storing Teletext Pages........................................ 24
PCFunction ........................................................ 25
Connecting to a PC ............................................. 25
Connection Procedures ........................................ 25
AdjustingthePC ................................................. 25
Adjusting the Horizontal Position ........................ 25
Adjusting the Vertical Position ............................. 26
InitializingSettings(RESET) .................................. 26
Auto Adjust .......................................................... 26
DVD Function(Depend on the model) .................. 27
PlayingDVD’s ..................................................... 27
Displayingthe Playback Status ........................... 27
ForDVD Playback ................................................. 27
For CDPlayback .................................................... 27
Searching for a Specific Screen/Song .................. 27

5PRESTIGIO P370DVD-X
ENG
FastForward/Reverse ........................................... 27
SkipForward/Reverse ........................................... 28
SlowForward/Reverse ......................................... 28
STEP(Frame-by-Frame)Playback .......................... 28
Repeating a Title, Chapter(DVD), Track(CD) ......... 28
RepeatPlayback ................................................... 28
Repeating a Specific Section ................................ 28
ChangingtheAudioLanguage/Changing the Subtitle
Language ................................................. 29
Changing the Audio Language ............................ 29
Changingthe Subtitle Language .......................... 29
Changing the Size and Angle of the Screen.......... 29
Changing the Size of the Screen ........................... 29
Viewing from another Angle ............................... 29
AdditionalFunction ............................................. 30
Muting the sound ................................................ 30
BasicDisc Menu Controls ...................................... 30
Programming in a Specific Order ......................... 30
Programplay ....................................................... 30
Setting a Specific DVD Title or Chapter ................30
Programplay DIRECT Search(GO TO) forDVD ....... 30
DIRECTSearch(GO TO) for CD ................................ 31
PlayingMP3Discs .............................................. 31
To Play a MP3 File ................................................. 31
RepeatPlayback ................................................... 31
Playing DIVX Discs (option) ................................. 32
To Play aDIVX File ................................................. 32
Playing Kodak Picture CDand JPEG File ................ 32
To play Kodak Picture CD and JPEG File ................. 32
Changing the Size of the Screen ........................... 33
ImageRotation .................................................... 33
Changing JPEG SlideshowTransition Mode .......... 33
Starting musicslide show ..................................... 33
Starting slide show mode 1 .................................. 33
Starting slide show mode 2 .................................. 33
Starting slide show mode 3 .................................. 34
Stoping slide show mode ..................................... 34
Using the Setup Menu ........................................ 34
LanguageSetup ................................................... 34
Video Setup ......................................................... 34
SpeakerSetup ...................................................... 35
Audio Setup ......................................................... 35
CustomSetup ....................................................... 35
DivX Function(Dependon the model) .................. 37
DivX(option) ...................................................... 37
DivXFeatureTable ................................................ 37
DivX®VODPlayback ............................................. 38
Using ARMon the OuterWall .............................. 38
Troubleshooting ................................................ 39
Specifications .................................................... 41
Appendix ........................................................... 43

6 PRESTIGIO P370DVD-X
ENG
Overview
Front View
1.MASTERSWITCH
2. Remote ControlSensor
3.POWER:Turns the TV on and off.
4.LEDLights
5. VOLUME: Increasesor decreases thevolume. Thisis also
usedtoselectthe“MOVE&ADJUST”item on the on-screen
menu.
6.PROGRAM:Changeschannelsor“MOVE&ADJUST”toitems
on the on-screen menu.
7.MENU:Toaccessorclose menus,simultaneously.
8.TV/VIDEO:Selects anexternaldeviceconnectedtotheTV.
<DVD> - Depend on the model
9.PLAY/PAUSE:Playthe DVD or temporarilystopplayback.
10.STOP:Stop the DVD playback.
11.OPEN/CLOSE:OPEN/CLOSEtheDVD.
12.ON/DISCLED
Rear Panel Jacks
1.PCINPUT (VIDEO/AUDIO) JACKS
2.DVIINPUT(VIDEO/AUDIO:L/R)JACKS : DVI-D Only
3.COMPONENTJACKS (VIDEO :Y,Pb,Pr/AUDIO:L/R)
4.LINE (VIDEO/AUDIO) OUTPUTJACKS
5.VIDEO3(VIDEO/AUDIO)INPUTJACKS
6.S-VIDEOINPUTJACK
7.DIGITALAUDIOOUTPUT JACK(Depend onthemodel)
8.SCARTJACKS(BOTTOM:SCART1,TOP : SCART2)
9.HEADPHONE JACK: Usedforheadphonesthatcanbe pur-
chasedadditionally.
10. TV ANTENNA INPUT JACK
For more details on connections see page 6~7.

7PRESTIGIO P370DVD-X
ENG
Remote Control
1.POWER:Turns the TV on and off.
2. LINE: External input selection. (TV -> RGB -> Video1 -> Video2 -
> Video3 -> S-Video -> COMPONENT -> DVI -> PC)
3. TV: Switches to TV mode.
4.SWAP: Exchanges the videosignal source of themainscreen and the
PIPwindow.
5.ON/OFF:Turns PIP on or off.
6. NUMBER BUTTONS: Selects channels directly on the TV.
7. -/—: Selects channels over 10. For example, to select channel 21,
press“-/—”then press“2”,“1”.
8. STILL: Freezes a moving picture on the screen.
9. M/S: Sound mode selection.
10.P.STD: Configures various video settings.
11. ARROW/ENTER: Select an item of menu/Change confirmation.
12.P.SIZE:Changes the screen size.
13.DISPLAY:Displaysthecurrent channel and the audiovideo settings.
14. MUTE: Temporarily mute the sound.
15.TTX: Switches to Teletext mode.
16. SOURCE: Selects the signal source for the PIP window.
17.SOUND: Changes the audio signal sourcebetweenthe main screen
and the PIP window.
18. VOL: Increases or decreases the volume.
19. PRE: Moves to the previous channel.
20.PROG: Changeschannels.
21. SLEEP: Selects a preset time interval for automatic shutoff.
22.TV.MENU: Displays the OSD menu.
23. S.STD: Configures various audio settings.
24.EXIT/CANCEL:Exit the currentconfiguration or the teletext display.
<DVD> - Depend on the model
25. SCAN/SLOW: For fast and slow playback.
26. TITLE: For selecting a title on the disc.
27. SETUP: For initial DVD player settings.
28. DVD: Displays the DVD.
29. OPEN/CLOSE: OPEN/CLOSE the DVD tray.
30. STOP: Stop the DVD playback.
31. PLAY/PAUSE: Play the DVD or temporarily stop playback.
32. SKIP/STEP: For skipping to the next chapter/For playing one frame at a time.
33. MENU: For displaying the menu contained in the disc.
<DVD & TTX> - Depend on the model
34. COLOR KEY:Fasttext topic selection.
35. INDEX/REPEAT:Programme selection by name/ For specifying and repeating playback of a segment.
36. MIX/A-B: Video & TTX MIX/For repeated playback of disc titles, chapters or sound.
37. HOLD/PROGRAM: Teletext page/For playback in a specified order.
38. PRE PAGE/ANGLE: Teletext previous page/For viewing scenes from different.
39. L/F/AUDIO: Switching the LIST or FLOF mode./ For selecting the audio language.
40. REVEAL/GOTO:Teletext reveal/For jumping to a specified location.
41. SIZE/SUBTITLE:Teletext size selection/For selecting the SUBTITLE language.
42. STORE/CLEAR:To store the teletext in the LIST mode/To erase a program content.
43. SUB PAGE/ZOOM: Teletext SUB-PAGE/For magnifying the screen.
44. NEXT PAGE/SURROUND:Teletext NEXTPAGE/For stereophonic sound effect.

8 PRESTIGIO P370DVD-X
ENG
Connecting Your TV
Connecting an Antenna or Cable without a Decoder box
Connecting the Scart Jack
Connection Procedures
SCART1 is used for the equipment with an RGB output,
suchasvideo game devices orvideodisc players. This end
can be fitted with:
- A SCART connector
-ThreeRCAconnectors(VIDEO+AUDIO_L+AUDIO_R)
Procedures for watching a Video over a VCR
Turn the TV on,and select‘VIDEO1’using the LINE button
on the remote control.
If you have a second VCR and wish to copy cassette tape,
connect the source VCR to SCART1 and the target VCR to
SCART2 so that you can redirect the signal from SCART1 to SCART2.
Connecting a Digital Audio System (Depend on the model)
Connection Procedures
Connect the DIGITAL OUT (black) jack on the back of your
TV to the DIGITAL IN jack of the Decoder or AV amplifier.
To use the digital out
Turn the TV on,and select‘DVD’using the DVD button on
the remote control.
Turnthe digital amponandselectthe externalinput mode.

9PRESTIGIO P370DVD-X
ENG
Connecting the Video or S-Video/Audio Jacks
Connection Procedures
ConnecttheantennacabletotheANTENNAINterminalon
the back of your VCR.
Connect the VIDEO/AUDIO INPUT jacks of the TV and the
video/audio output jacks of your VCR with the video/au-
diocables.(Connect the cable totheterminal of the same
color)
-You can use the S-Video cable to connect aVCR or a DVD
player for better video quality.
- If your VCR does not support stereo sound, connect the
mono audio out jack to the AUDIO INPUT (left) jack.
Procedures for watching a video over a VCR
Turn the TV on,and select‘VIDEO 3’using the LINE button on the remote control.
-Ifyou haveconnected a S-Video cable,select‘S-VIDEO’.
Connecting a External TV
Connection Procedures
ConnecttheAUDIOCABLESbetweenthe AUDIOOUTL and
R jacks on the back of your TV and the corresponding
AUDIOINPUT jacks onexternalTV.
ConnecttheVIDEOCABLE between the VIDEOOUTjackon
the back of your TV and the corresponding VIDEO INPUT
jackon externalTV.
To watch the externalTV
Turnthe externalTVonand select‘VIDEO’usingtheexternal
input button.
Turn the your TV on.
Connecting the DTV Receiver
Connection Procedures
TheCOMPONENTVIDEO IN andCOMPONENTAUDIOINcon-
nectorsareusedforequipmentwithaDVDorDTVreceiver
out. (480i/60Hz, 480p/60Hz, 576i/50Hz, 576p/50Hz,
720p/50Hz, 720p/60Hz, 1080i/50Hz,1080i/60Hz)
To watch the DTV
Turn the TV on, and select ‘COMPONENT’using the LINE
button on the remote control.
Turn the DTV Receiver on.

10 PRESTIGIO P370DVD-X
ENG
Connecting the DVI JACK (DVI-D Only)
Connection Procedures
Connect the DVI input jack of the TV and the DVI output
jack of your DTV Receiver.
Connect the DVI audio input jacks of the TV and the DVI
audio output jacks of your DTV Receiver with the audio
cable.
Check Before Using
Please check the following check list before using theTV.
Is the antenna cable connected properly?
Are theremote control batteries installed properly?
-Install twoAAA sizebatteriesaccordingtothe correctpolarity.
- The remote control works up to about 7~10m from the TV, 3m to the left or right of theTV,
and to within 30 degrees from the remote control sensor of the TV.
Have the receive channels been configured?
Are the cables connected to any external devices connected properly?

11PRESTIGIO P370DVD-X
ENG
TV Function
Watching TV
Turning the TV On and OFF
Plug the mains lead into an appropriate socket.
Press the POWER switch on the bottom of the television toward“ON”(I).
Press the POWER button on the remote control (or on the front panel of the unit.)
You can also switch on by pressing the PROG /\ / \/ buttons.
• When you turn the power ON,the screen appears and the POWER/STANDBY light is turned off.
•When you turn the power OFF,the screen goes blank,and the POWER/STANDBY light turns red.
• Do not leave your television in Standby mode for long periods of time (when you are away on holiday,for example).
Turn your television off by pressingthePOWER switch toward“OFF”(O).It isbest to unplug the set fromthe mains and
aerial.
Selecting the Menu Language
PresstheTV.MENUbutton.TheOSDMENUwillbedisplayed.
SelectFUNCTIONusing the /\ / \/buttonandthenpressthe
> button.
LANGUAGE using the /\ / \/ button and then press the >
button.
Selectthedesiredmenulanguageusing the /\ / \/ button.
Pressthe EXIT/CANCEL buttonto exit the menu.
Viewing the Status Information
Pressthe DISPLAYbuttonon the remotecontrol.TheTV will display the input source,the picturemode,thesoundmode,
theSTEREOmode, the sleep time, thecurrenttime, and the pip mode.
Adjusting the Volume
Adjust the volume using the VOL /\ / \/ button.
Muting the Sound
Pressthe MUTEbutton.Youcan convenientlyusethe MUTE button when a telephone or a door bell rings.Tocancel,press
theMUTE button again.
Viewing a Video, DVD or COMPONENT
Press the LINE button. For connection and setup procedures, refer to page 6.

12 PRESTIGIO P370DVD-X
ENG
Storing Channels Automatically
PresstheTV.MENU button.TheOSD MENUwillbedisplayed.
SelectSETUPusing the /\ /\/button and then pressthe>
button.
Select AUTO PROGRAMMING using the /\ / \/ button and
then press the > button.
SelectCOUNTRYusingthe/\/\/buttonandthenpressthe
> button.
Select your COUNTRY using the /\ / \/ button and then
press the > button.The countries are displayed in the following order.
Select SEARCH using the /\ / \/ button and then press the > button.
Manual Storing of Channels
When storing channels manually,you can choose:
- Whether or not to store each of the channels found.
- the programme number by whichYou wish to identify
each stored channel.
PresstheTV.MENU button.TheOSD MENUwillbedisplayed.
SelectSETUPusing the /\ /\/button and then pressthe>
button.
SelectMANUALPROGRAM using the/\/\/buttonandthen
press the > button.
Select SYSTEM using the /\ / \/ button and then press the > button.
AUTO-> BG-> DK-> I -> L -> LP -> AUTO
Select PROGRAM NO. using the /\ / \/ button and then press the > button. And press the /\ / \/ button to select the
required channel number.
Select SEARCH using the /\ / \/ button and then press the > button.
Thetune scans the frequencyrange until the firstchannel on thechannel that you selectedis received on yourscreen.
Select STORE using the /\ / \/ button and then press the > button. And press the /\ / \/ button to select the OK.
Repeat Step 5 to 7 for each channel to be stored.
Channel Name
PresstheTV.MENU button.TheOSD MENUwillbedisplayed.
SelectSETUPusing the /\ /\/button and then pressthe>
button.
SelectNAMEusing the /\/\/ button andthenpress the >
button.And pressthe/\/\/ /</>buttonstoeditthe name.
/\/\/:Selectthecharacters(A~Z,0~9,-,+).
</>:move on the previous or next letter.
SelectSTOREusing the /\ /\/button and then pressthe>

13PRESTIGIO P370DVD-X
ENG
button. And press the /\ / \/ button to select the OK.
Pressthe EXIT/CANCEL buttonto exit the menu.
Activating the Child Lock
Thisfeature allows youtopreventunauthorizedusers,such
as children, from watching unsuitable programmers by
mutingoutvideoandaudio.ChildLockcannotbereleased
usingfrontpanelbuttons.Onlyremotecontrolcan release
the Child Lock setting, so keep the remote control away
from children.
PresstheTV.MENU button.TheOSD MENUwillbedisplayed.
SelectSETUPusing the /\ /\/button and then pressthe>
button.
Select MANUAL PROGRAM using the /\ / \/ button and then press the > button.
Select CHILD LOCK using the /\ / \/ button and then press the > button.
To lock the channel,select LOCK by pressing the /\ / \/ button.
Note
• When child lock is activated, only entering the correct password will proceed to the operation
before you can do auto or manual searches. Everything previously locked will be unlocked.
Program Edit
Thisfunction enables youtodelete,copy,moveorskipthe
storedprograms.
Select the channel to tune using the numeric or channel
buttons.
PresstheTV.MENU button.TheOSD MENUwillbedisplayed.
SelectSETUPusing the /\ /\/button and then pressthe>
button.
Select PROGRAM EDIT using the /\ / \/ button and then
press the > button.
Delete a Program
Select a program to the deleted with the /\ / \/ /</> buttons.
Press the RED button. The selected program is deleted. All the following programs are shifted up one position.”
Copy a Program
Select a program to the copied with the /\ / \/ /</> buttons.
Press theYELLOW button.
All the following programs are shifted down one position.

14 PRESTIGIO P370DVD-X
ENG
Moving a Program
Select a program to the moved with the /\ / \/ /</> buttons.
Press the GREEN button.
Move the program to the desired program number with the /\ / \/ /</> buttons.
Press the GREEN button again to release this function.
Skipping a Program Number
Select a program to the skipped with the /\ / \/ /</> buttons.
Pressthe BLUE button.The skipped programturns to Magenta.
Press the BLUE button again to release this function.
When a programnumber is skippedit means that you willbe unable to selectit using the /\/ \/ button duringnormal
TVviewing.Ifyou want to select the skipped program, directly enter program number with the number buttons or select
it in the program edit or table menu.
Changing Channel
Using the CHANNEL buttons
Press the PROG /\ / \/ buttons to change channels.
Youwill seeall the channelsthat theTVhas memorized.(TheTV musthavememorizedat least three channels.)
UsingtheNUMBER buttons
- To change to single-digit channels(0~9) faster,press“0”before the single digit.
Example:For channel 4,press“0”,then“4”.
- Toselect a channel over 10,press the -/— button first.
Example:For channel 42,press“-/—”,then“4”,then“2”.
Usingthe PreviousChannel
Press the PRE button on the remote control.
The TV changed to the last channels to the last channel you were watching.
When the Picture Quality is Poor or Unstable
Use fine tuning to adjust a particular channel for better
picturequalitywhennoiseinterferes,colorquality is poor,
orthe screen is unstable.
Select the channel to tune using the numeric or channel
buttons.
PresstheTV.MENU button.TheOSD MENUwillbedisplayed.
SelectSETUPusing the /\ /\/button and then pressthe>
button.
Select MANUAL PROGRAM using the /\ / \/ button and then press the > button.
Select FINE TUNE using the /\ / \/ button and then press the > button.
Press the /\ / \/ button to fine tune and then press the > button.

15PRESTIGIO P370DVD-X
ENG
If you are unable to fine-tune a channel, check that the SYSTEM settings are correct.
Select STORE using the /\ / \/ button and then press the > button. And press the /\ / \/ button to select OK.
Pressthe EXIT/CANCEL buttonto exit the menu.
Selecting the Picture Status
You can select a video mode from among USER,STANDARD,DYNAMIC,or MILD mode according to your personal pref-
erence.
QUICK! Press the P.STD button.
Wheneveryoupressthisbutton,PICTURESTATUS changes
toUSER -> STANDARD-> DYNAMIC->MILDmode,in this
order.
PresstheTV.MENU button.TheOSD MENUwillbedisplayed.
Select PICTUREusing the /\ /\/ button and then pressthe
> button.
Select the desiredPICTURESTATUSusingthe/\ / \/ button.Whenever youpressthis button,PICTURE STATUSchanges to
USER->STANDARD->DYNAMIC->MILDmode,inthisorder.
Pressthe EXIT/CANCEL buttonto exit the menu.
PictureStatus
• STANDARD: Select this mode when the surrounding illumination is bright.
• DYNAMIC: Select this mode to increase picture clarity and sharpness.
• MILD: Select this mode when viewing the TV when the light is low.
• USER: Select this mode if you want to adjust the settings according to your personal
preferences.
Adjusting the Picture Settings
PresstheTV.MENU button.TheOSD MENUwillbedisplayed.
Select PICTUREusing the /\ /\/ button and then pressthe
> button.
Selectthe desired itemtoadjustusingthe/\ /\/buttonand
then press the > button.
Selectthedesiredstatus using the </> button. Duringthe
adjustment,anadditionaladjustmentwindowwillbedis-
played.Inaddition,PICTURESTATUSisautomaticallychanged
toUSER mode.
Pressthe EXIT/CANCEL buttonto exit the menu.
Picture
• CONTRAST: Determines the difference in brightness between an object and the background.
• BRIGHTNESS: Determines the brightness of the screen.
• SHARPNESS: Determines the sharpness of an object image.
• COLOR: Determines the color density.

16 PRESTIGIO P370DVD-X
ENG
Selecting the Sound Mode
You can select a sound mode from among USER,STANDARD,MUSIC,or SPEECH mode according to your personal pref-
erence.
QUICK! Press the S.STD button.
Wheneveryoupressthis button,SOUNDSTATUSchangesto
USER->STANDARD->MUSIC->SPEECHmode,inthisorder.
PresstheTV.MENU button.TheOSD MENUwillbedisplayed.
SelectSOUNDusingthe/\/\/buttonandthen press the >
button.
SelectthedesiredSOUNDSTATUS using the/\/\/button.Wheneveryoupressthisbutton,SOUNDSTATUSchangestoUSER
->STANDARD->MUSIC -> SPEECH mode,inthisorder.
Pressthe EXIT/CANCEL buttonto exit the menu.
Sound Status
• STANDARD: Select this to listen to sound normally.
• MUSIC: Select this to listen to the original sound.
• SPEECH: Select this to listen to clear voice sound.
• USER: Select this if you want to adjust the settings according to your personal preferences.
Adjusting the BALANCE
Determines the volume ratio between the left and right
speakers.
PresstheTV.MENU button.TheOSD MENUwillbedisplayed.
SelectSOUNDusingthe/\/\/buttonandthen press the >
button.
SelectBALANCEusingthe/\/\/ button and then pressthe
> button.
Selectthedesiredstatus using the </> button. Duringthe
adjustment,anadditional adjustment window willbedisplayed. Also, the SoundStatus
isautomatically changed to USERmode.
Pressthe EXIT/CANCEL buttonto exit the menu.
Adjusting the Headphone Volume
You can listen to the sound of the main or sub PIP using
the headphones.You can also adjust the volume of the
headphones.
PresstheTV.MENU button.TheOSD MENUwillbedisplayed.
SelectSOUNDusingthe/\/\/buttonandthen press the >
button.

17PRESTIGIO P370DVD-X
ENG
Select HEADPHONE VOLUME using the /\ / \/ button and then press the > button.
Select the desiredvolume level using the/\ / \/ button.
Prolonged use of headphones at a high volume may damage your hearing.
Adjusting the EQUALIZER
Determines the volume of the frequency range (low to
high tones).
PresstheTV.MENU button.TheOSD MENUwillbedisplayed.
SelectSOUNDusingthe/\/\/buttonandthen press the >
button.
Move to theEQUALIZER item using the/\ / \/ button.
Move to the desired frequency using the > button.
120(Low Tone) -> 1K(Mid Tone) -> 10K(High Tone).
Selectthedesired status usingthe/\ / \/button.
Whenyouhave adjustedtheEQUALIZER,the SOUND STATUS is automatically changed toUSERMODE.
Choosing a Soundtrack
The M/Sbutton displays/controls theprocessing and out-
put of the audio signal. When power is switched ON, the
mode is automatically preset to either DUAL or STEREO,
depending on the current transmission.
Quick!Pressing the M/Sbutton.
Whenever you press this button, the mode changes to
STEREO/MONOmode,inthis order.
PresstheTV.MENU button.TheOSD MENUwillbedisplayed.
Select SOUND using the /\ / \/ button and then press the > button.
Select STEREO or DUAL using the /\ / \/ button and then press the > button.
Selectthe desired statususing the /\/ \/ button.
Pressthe EXIT/CANCEL buttonto exit the menu.
- If the receiving conditions deteriorate, listening will be easier if the mode is set to the MONO position using the M/S
button.
-Ifthestereosignalis weak( or if intermittent Stereo-Mono)andautomaticswitching occurs, then switch totheMONO
mode.
-When receiving mono sound in the AV mode, connect to the‘L’input jack on the panels.
- If the mono sound comes out only from the left speaker,then press the M/S button.

18 PRESTIGIO P370DVD-X
ENG
Changing the Screen Size
You can select a desired screen size for each video.
Pressthe P.SIZEbutton.
Wheneveryoupressthe P.SIZEbutton,thescreensizechangestoWIDE-> NORMAL ->ZOOM1-> ZOOM2-> PANORAMA,
in this order.(Note that you can select eitherWIDE or NORMAL mode in PC input mode.)
Screen Size Menu
• WIDE: Set the picture to 16:9 wide mode.
• NORMAL: Sets the picture to 4:3 normal mode. This is a standard TV screen size.
• ZOOM1: Magnifies the size of the picture on the screen.
• ZOOM2: Magnifies the size of the picture on the screen leaving the subtitles visible.
• PANORAMA: Use this mode for the wide aspect ratio of a panoramic picture.
Note
• You can select only WIDE,NORMAL(4:3) screen size in the PC Mode.
Freezing the Picture
You can freeze a moving picture on the screen.
Quick! Press the STILL button.
Whenever you press this button, the freezing function is turned on or off.
Note
• Even if the picture has been frozen, the audio sound continues normally.
• The freezing function will not work for the PIP window in PIP mode.

19PRESTIGIO P370DVD-X
ENG
Viewing Picture-in-Picture
You can watch two videos on the screen simultaneously.
Quick! Pressing the ON/OFF button.
Pressing the button turns the PIP screen on or off.
PresstheTV.MENU button.TheOSD MENUwillbedisplayed.
SelectFUNCTIONusing the /\ / \/ buttonandthenpressthe
> button.
Select PIP using the /\ / \/ button and then press the > button.
Press the > button again. Select PIP using the /\ / \/ button and press the > button.
ThePIP menu willbe displayed.
Whenever you press the \/ button,PIP mode is turned PIP,DW or OFF.Selecting OFF turns off PIP mode.
You can switch between DW1 and DW2 by pressing the Picture button on the remote control when you are in DW
mode. When entering DWmode by pressing thePIP button, the lastmode will be memorizedto display DW1 orDW2
aspreviouslyselected.
Pressthe EXIT/CANCEL buttonto exit the menu.
Note
• Since this product has a single tuner, you cannot watch two TV channels simultaneously in PIP
mode.
• You can only listen to one sound output from either the main screen or the PIP window.
• Refer to the PIP configuration table (Page 34).
Changing the Source of the PIP Window
You can change the video source of the PIP window from
anyexternallyconnected devices.
Quick! Pressing the SOURCE button.
Whenever you press this button, the source of the PIP
window is changed to the next video signal of an exter-
nally connected device,in that order.
STEP1~STEP4 is thesame as that ofViewing Picture-in-Picture.
SelectSOURCEusing the /\/\/ button and thenpress the > button.Select the desired externalinputsignal using the/
\ / \/ button and then press the > button.Since this product has a single tuner,you cannot watch two TV channels
simultaneouslywhen in PIP mode.
Pressthe EXIT/CANCEL buttonto exit the menu.

20 PRESTIGIO P370DVD-X
ENG
Changing the PIP Window Channel
Whenthe PIP windowshows normal broadcasting (TVand CATV) channels,youcanchangethe PIP windowchannel.
Quick! Press the PROG /\ / \/ button.
Wheneveryou press this button, the channel ischanged.
STEP1~STEP4 is the same as that of Viewing Picture-in-
Picture.
SelectCHANNELusingthe/\/\/buttonandthenpressthe
> button.
Selectthedesiredchannel using the /\ / \/button and then
press the > button.Since this product has a single tuner,you cannot watch twoTV channels simultaneously when in
PIPmode.
Pressthe EXIT/CANCEL buttonto exit the menu.
Changing the POSITION of the PIP Window
Youcan select the locationofthePIPwindowfromamong
the corners of the TV screen.
STEP1~STEP4 is the same as that of Viewing Picture-in-
Picture.
SelectPOSITIONusingthe/\/\/buttonand then press the
> button.
Selectthedesiredposition using the /\/\/button. When-
ever you press this button, the PIP window moves from
one corner to the next of the TV screen.
Pressthe EXIT/CANCEL buttonto exit the menu.
Selecting the Speaker Output in the PIP Screen Mode
You can select the desired audio source from either the main screen or the PIP window.
Quick! Pressing the SOUND button.
Whenever you press this button, the mode is changed to
MAIN->SUB/PIP.
WhenMAINisselected:Audio of the main screen isheard.
WhenSUB isselected: Audio of the DW screen is heard.
When PIP is selected: Audio of the PIP screen is heard.
STEP1~STEP4 is the same as that of Viewing Picture-in-
Picture.
Select SPEAKER OUTPUT using the /\ / \/ button and then press the > button.
Selecta desired status(MAIN or SUB/PIP) by pressingthe /\ /\/ button.
Table of contents
Languages:
Other Prestigio LCD TV manuals