Pret a Pousser Lilo Connect User manual
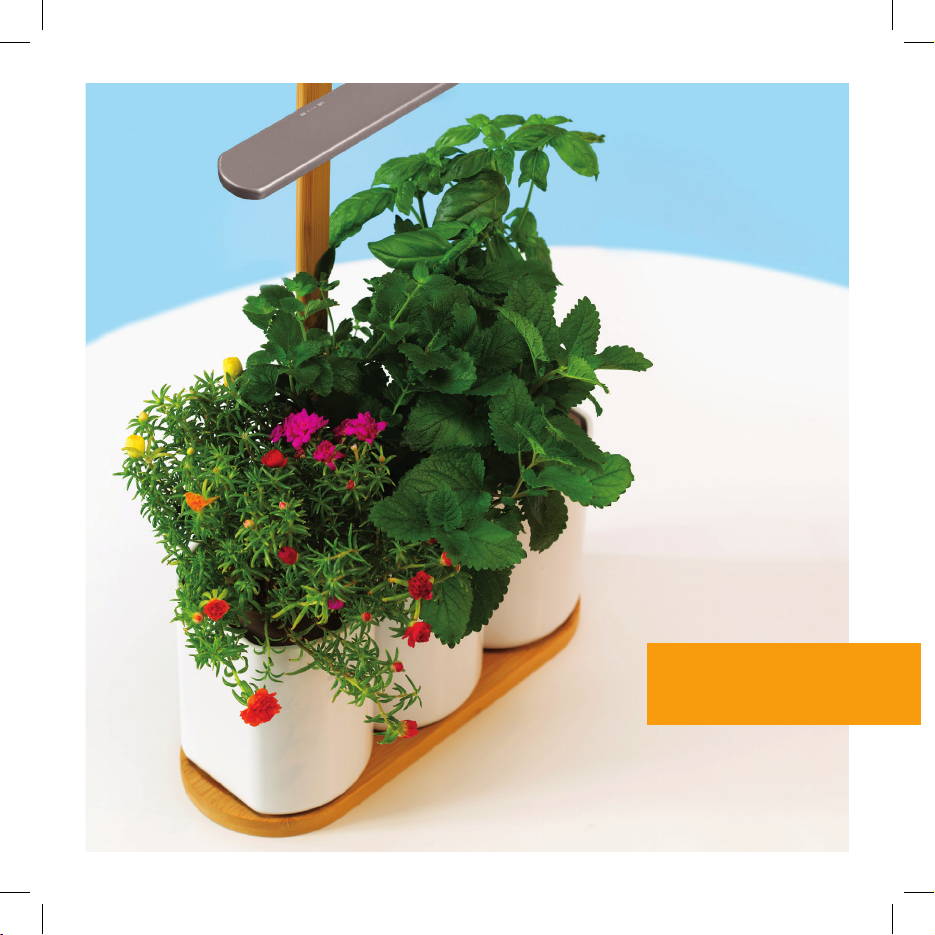
Lilo

2

3
WELCOME / BIENVENUE / WILKOMMEN
Nous sommes ravis de vous compter parmi nos utilisateurs et vous souhaitons
une merveilleuse pousse avec Lilo! 4
10
16
22
28
34
We are delighted to have you join our community of home growers and we wish
you a happy harvest with Lilo!
Wir freuen uns Sie zu unseren Kunden zählen zu dürfen und wünschen Ihnen
ein gutes Wachsen mit Lilo!
Wat leuk om te zien dat je de wereld wat groener gaat kleuren! We wensen
je veel frisheid en een mooie oogst toe met Lilo!
¡Estamos encantados que seas parte de nuestros usuarios y te deseamos
una maravillosa colecta con Lilo!
Siamo veramente contenti che le auguriamo una piacevole esperienza con Lilo !
français
4
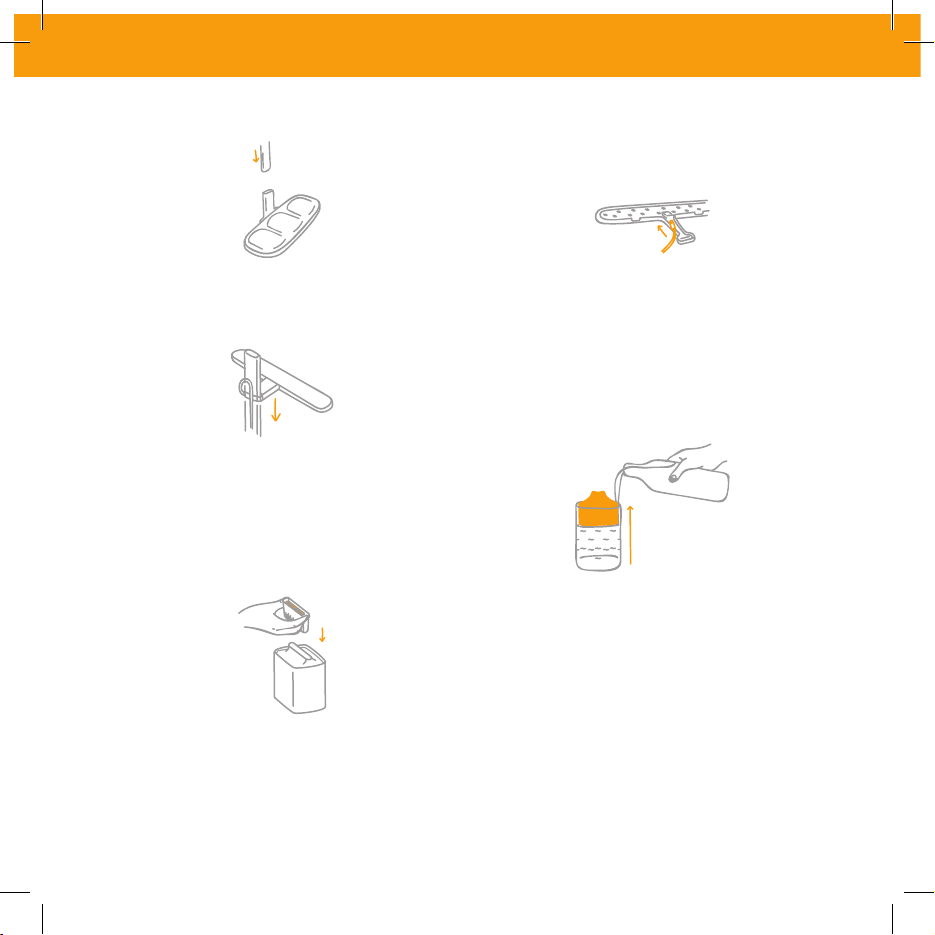
INSTALLEZ VOTRE LILO EN 5 MINUTES
1. Insérez la tige en bois dans le socle
Pas besoin d’enfoncer la tige jusqu’au bout: un petit espace
vide sera visible.
2. Branchez le câble d’alimentation dans le
luminaire
Vérifiez que le câble soit bien enfoncé jusqu’au bout.
N’utilisez pas d’autre chargeur que celui fourni et n’utilisez
pas le chargeur de Lilo pour charger un autre appareil : ils ne
sont pas compatibles entre eux même s’ils se ressemblent.
3. Placez le luminaire sur la tige
Branchez-le et actionnez le bouton ON/OFF vers OFF, puis
vers ON à l’heure à laquelle vous souhaitez qu’il s’allume
tous les jours : le cycle d’éclairage est alors configuré pour
fonctionner entre 12h et 14h par jour. Lilo doit rester branché
tel quel pour qu’il puisse s’allumer les jours suivants à la
même heure.
4. Mettez le flotteur dans le pot
Remplissez avec de l’eau jusqu’à ce que la partie haute du
flotteur dépasse lègèrement de votre pot.
EN AVANT
LA POUSSE !
5. Insérez la capsule dans le flotteur
Les plantes germent à des vitesses différentes, veillez ainsi
à insérer les capsules des plantes les plus « lentes » une
semaine avant les plus «rapides ». Pour un coup de pouce,
rendez-vous sur l’application Prêt à Pousser !

français
5
TÉLÉCHARGEZ L’APPLICATION
PRÊT À POUSSER
pour profiter de tous nos conseils
Flasher le QR code pour télécharger l’application mobile
bonjour@pretapousser.fr
www.pretapousser.fr
Créez votre journal de pousse pour surveiller l’avancement de vos plantes, avec des conseils
adaptés à chaque étape de pousse et pour chaque variété.
Retrouvez les questions les plus posées, des idées recette, ainsi que la fiche d’identité de
chaque plante.
Contactez-nous directement depuis l’application pour toute question sur vos plantes !

français
6
RÉGLEZ LE LUMINAIRE DE VOTRE LILO
Toutes les plantes n’ont pas besoin de la même lumière pour se développer.
Retrouvez le mode lumineux adapté à vos plantes sur notre application mobile. Si vos plantes ont des
besoins lumineux différents, choisissez toujours le mode «printemps».
Lorsque vous le branchez et/ou appuyez sur le bouton ON, le luminaire s’allume et débute son cycle.
Par exemple, si vous allumez votre luminaire à 8h du matin en mode «été », Lilo s’éteindra à 22h pour
se rallumer automatiquement à 8h le lendemain matin. L’allumage et l’extinction du luminaire se
fait progressivement sur 30 minutes pour simuler le lever et le coucher du soleil et ne pas brusquer
vos plantes.
Gardez impérativement une distance de 10 cm entre vos plantes et le luminaire. Coupez vos plantes
ou passez en mode « printemps » si cela n‘est pas possible.
Le mode «été» de votre luminaire correspond à une intensité lumineuse forte et à un cycle de
lumière de 14h pour les plantes habituées à un soleil d’été.
Le mode «printemps » correspond à une intensité lumineuse plus douce et à un cycle de
lumière de 12h pour les plantes de printemps.
Un bouton ON/OFF et un bouton
pour ajuster la lumière
Positionnez le luminaire
à 10 cm de vos plantes
Ensuite, suivez la croissance
du plant le plus grand
français
7
La plante germe et grandit depuis la capsule, qui contient les graines ainsi que les nutriments
adaptés à chacune de vos plantes. Chaque capsule est accompagnée d’une petite fiche pleine de
conseils pour assurer une pousse optimale à vos plantes.
Veillez à ce qu’il y ait toujours de l’eau dans les pots: un rapide coup d’œil suffit pour le vérifier.
Pour en remettre, faîtes lentement couler l’eau sur les côtés du flotteur pour qu’elle s’écoule dans le
pot. Il est préférable de remettre régulièrement de l’eau à vos plantes plutôt que d’attendre qu’il n’y
en ait plus : gardez donc les flotteurs le plus haut possible.
Téléchargez l’application pour savoir quand et comment récolter votre plante. En fin de pousse,
insérez une nouvelle capsule pour découvrir une autre plante. Replantez l’ancienne capsule en
pleine terre (la coque en plastique végétal est biocompostable).
INSÉREZ SIMPLEMENT LA CAPSULE POUR DÉMARRER LA POUSSE
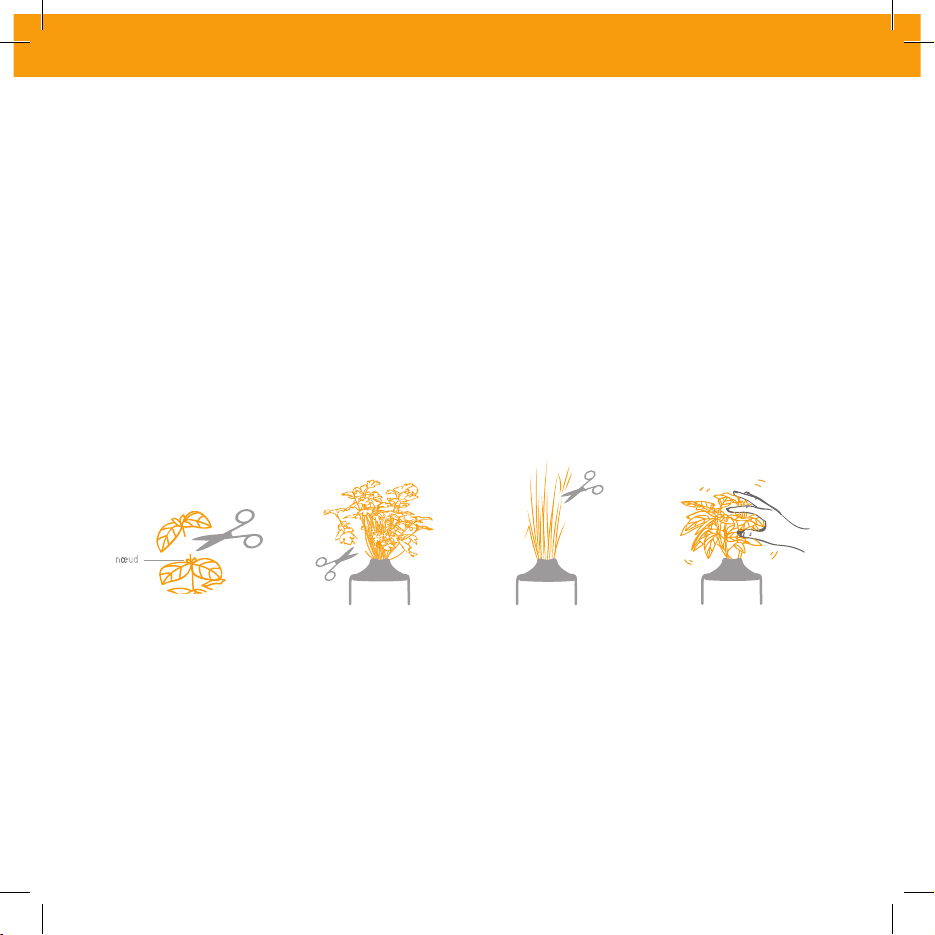
RÉCOLTEZ VOTRE PLANTE
Basilic, Agastache,
Sauge et autres
aromates dressés
Cueillez les tiges
au-dessus d’un nœud,
en conservant 15 cm
de pied.
Persil, Coriandre
et autres aromates
en taillis
Ces plantes poussent
en forme de rosace,
récoltez les grandes tiges
qui sont à l’extérieur.
Ciboulette, Thym,
Estragon et aromates
buissonnants
Coupez l’ensemble des
tiges en laissant 10 cm de
pied. N’hésitez pas à les
tailler régulièrement pour
qu’elles se fortifient.
Petits fruits
& mini-légumes
Passez votre main dans
la plante pour simuler
l’effet du vent et de la
pollinisation. Cela favorisera
l’apparition des fruits!

français
8
EN SAVOIR PLUS SUR LILO
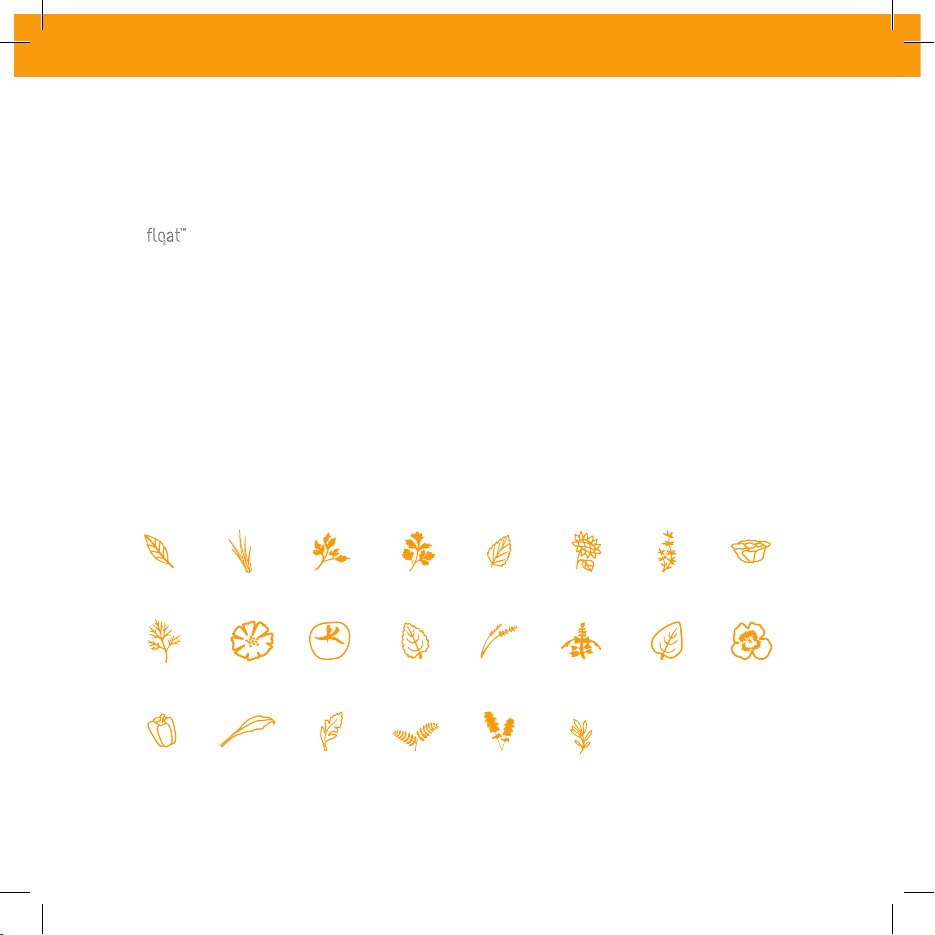
CULTIVEZ PLUS DE 40 PLANTES AVEC VOTRE LILO !
Nos semences sont soigneusement séléctionnées
Notre équipe teste de nombreuses semences afin de sélectionner pour vous les meilleures variétés.
Nos graines d’aromates sont Bio et proviennent de semenciers français.
Le design : parfait pour des racines en pleine forme !
Le design breveté du flotteur permet aux racines d’être naturellement oxygénées.
Un éventail de sels minéraux de qualité pour vos plantes
En pleine terre, vos plantes se nourrissent de sels minéraux. Les nutriments intégrés aux capsules
vont fournir à vos plantes ces mêmes sels minéraux. Ils permettent à vos plantes de bien grandir et
de développer toutes leurs qualités gustatives.
Chacune de ces plantes est unique, découvrez-les grâce à notre application Prêt à Pousser !
... et beaucoup plus!
Basilic
mini-poivrons
Aneth
Ciboulette
Moutarde
Pourpier
Persil
Verveine
Mini-tomates
Coriandre
Mimosa
pudica
Mélisse
Menthe
Agastache
Lavande
Tournesol
Estragon
Salvia
Splendens
Thym
Origan
Salade
Pensée

français
9
Attention : le luminaire peut être très chaud. Manipulez-le après l’avoir éteint.
Pour nettoyer le luminaire, utiliser un chiffon sec et doux. Pour nettoyer Lilo, le débrancher et attendre
30 minutes le refroidissement du luminaire. Pour nettoyer un pot, le sortir de Lilo et le nettoyer avec
une éponge humide et un produit nettoyant. Bien rincer avant de le reposer dans l’appareil. Les pots
blancs peuvent être mis directement au lave-vaisselle, mais cela est déconseillé pour les flotteurs.
1/ Le mode d’emploi que vous tenez entre les mains est aussi trépidant que le dernier tome d’Harry Potter, lisez le ! 2/ Les
capsules et leur contenu ne se mangent pas. 3/ Ne touchez jamais le luminaire et la source de la lumière, au risque de vous
brûler. Surveillez notamment les enfants pour s’assurer qu’ils ne jouent pas avec Lilo. 4/ Pendant qu’on parle du luminaire…
Ne regardez pas la lumière par-dessous, vous risquez de vous éblouir (de toute façon c’est pas poli de regarder par-dessous).
5/ Le produit doit être installé dans une pièce (à l’abri de la pluie et du vent notamment) et non à l’extérieur. Lilo aime être à
l’intérieur. Merci pour lui. 6/ N’utilisez pas le produit s’il ne fonctionne pas correctement, s’il a été endommagé ou si le câble
d’alimentation ou la fiche sont endommagés. Afin d’éviter tout danger, faites-les obligatoirement remplacer en contactant
le service client sur l’adresse mail bonjo[email protected]. 7/ Ne laissez pas le câble d’alimentation à portée de mains des
enfants, à proximité ou en contact avec les parties chaudes du produit, près d’une source de chaleur ou sur un angle vif. 8/ Lilo
est conçu pour fonctionner uniquement en courant alternatif. Vérifiez que la tension d’alimentation indiquée sur l’alimentation
de Lilo correspond bien à celle de votre installation électrique. 9/ Lilo n’aime pas être éclaboussé. Ça vous fait un point commun.
10/ On pourrait même dire qu’il est hydrophobe. Du coup soyez gentils, placez- le avec ses éléments à 1 m de toute source
d’eau. 11/ Lilo ne doit pas être couvert par du papier, des serviettes, des torchons ou tout produit inflammable. 12/ Ne déplacez
pas Lilo lorsqu’il est en fonctionnement. 13/ Ne débranchez pas Lilo en tirant fort sur le cordon. 14/ Le nettoyage et l’entretien
c’est vous. Les choses un peu plus techniques c’est nous ! Signé le super SAV de Prêt à Pousser. 15/ Pour votre sécurité, ne pas
utiliser d’accessoires ou de pièces de rechange, autres que ceux fournis par le service client. 16/ Lilo est exclusivement destiné
à un usage domestique et légal. Prêt à Pousser décline toute responsabilité et se réserve le droit de résilier la garantie en cas
d’utilisation commerciale ou inadaptée ou de non-respect des consignes. 17/ Lilo n’est pas un lampadaire. Priorité à vos plantes.
NETTOYAGE ET ENTRETIEN
CONSIGNES DE SÉCURITÉ POUR LILO

10
english
SETTING UP LILO IN 5 MINUTES
1. Insert the bamboo rod into the base
No need to force the rod all the way into the base, a small
space will still be visible.
2. Plug the power cable into the light
Check if the cable has been plugged all the way. Warning:
Do not use any other charger than the one supplied with your
indoor garden (for instance, the one of your smartphone).
They are not compatible, even though they look alike.
3. Place the light on the rod
Connect the light and activate it by switching the ON/OFF
button once, leaving it on ON, at the time you would like it to
light up: this will set the light cycle. Lilo should stay plugged
and will turn on at the same hour the next day, automatically.
4. Put the floaters in the pots
Fill them with water until the top of the floater reaches just
above the pot.
AND WE’RE
READY TO GROW!
5. Insert the pod into the floater
Every plant grows at a different speed, so it would be best to
insert the “slowest” plants up to a week before the speedy
ones, so that all of your plants will be able to grow up together.
To help you with this, check out the Prêt à Pousser app!

11
english
DOWNLOAD THE
PRÊT À POUSSER
app to guide you along the way
Scan the QR code to download our app
hello@pretapousser.co.uk
www.pretapousser.co.uk
Create your growth diary to monitor the progress of your plants, with tips and tricks at each
stage of growth for every plant.
Find the frequently asked questions, recipe ideas and growing guide of every plant.
Contact us directly through the app for any question about your plants!

12
english
HOW CAN I ADJUST THE LIGHT?
Not all plants depend on the same light intensity. Due to this, it’s normal if they don’t all grow at the
same rate.
Find the right light settings in the app. Note: if your 3 plants have different needs in terms of light
intensity, always choose “spring” mode.
When you connect the light and switch on the ON button, the light will start its cycle. For instance,
if you have turned on the light at 8am in “summer“ mode, it will turn off automatically at 10pm and
will turn on again at 8am the next morning. The light will turn on and off progressively to simulate
the sun and to not shock your plants too much.
Always keep a gap of at least 10cm between the light and your plants. If your plants are too close to
the light, change to “spring“ mode or cut your plants.
The “summer“ mode corresponds to a higher light intensity and a 14h cycle, it suits plants
that are used to being bathed in sunlight.
The “spring“ mode corresponds to a softer light intensity and a 12h cycle, for the more
delicate plants.
A ON/OFF button and a button
to adjust the light
Keep a distance of 10cm
between the plants and light
Afterwards, ajust accordingly to
the height of your tallest plant

13
english
Your plant grows from the pod. This pod contains all the seeds and nutrients necessary for each of
your plants. Each pod comes with a growing guide that will help you make the most of your plants.
Make sure that there is always enough water in the pots: to refill the pots, slowly run the water
down the sides of the floater, so that the water flows into the pot. It’s better to regularly fill the pots,
rather than wait until the floaters have reached the bottom.
Download the app to find out when and how to harvest your plant. At the end of its lifecycle, try out
a new pod and discover a new plant! Repot the old pod in your garden (even the plant based plastic
is biodegradable!).
INSERT THE POD TO KICK OFF THE GERMINATION
HARVEST YOUR PLANTS
Basil, Anise Hyssop,
Sage and other
straight aromatics
Cut the stems just
above the nodes, leaving
your plant at least
15 cm tall.
Parsley, Coriander
and other bushy
aromatics
These plants grow
from the inside out,
make sure to first harvest
the outermost stems.
Chives, Mint, Thyme
and other shrubby
aromatics
Cut all the stems together,
leaving about 10cm from
the base. Don’t hesitate
to harvest frequently, your
plant will get stronger
from this.
Small fruits
& mini veggies
Simulate a wind effect
by slowly passing your hand
over your plants, in order
to promote the appearance
of fruits. This will help
pollinate the flowers.
node
14
english
MORE ABOUT LILO
GROW OVER 40 DIFFERENT PLANT VARIETIES WITH YOUR LILO!
Our seeds are carefully selected
Our team tests plenty of seeds before selecting the best varieties for you. The herb seeds are organic
and come from French seed companies.
The design: perfect for healthy roots!
The pattented design of the floater allows roots to be naturally oxygenated.
A range of quality mineral salts for your plants
Out in the open ground, your plants feed on mineral salts. The nutrients incorporated into the pods
will provide your plants with the same salts. They allow your plants to grow well and develop to their
full potential.
Each of these plants are unique, head over to the Prêt à Pousser app to find out more!
... and many more!
Basil
Mini Bell
Peppers
Dill
Chives
Mustard
Moss
rose
Parsley
Vervain
Mini-Tomatoes
Coriander
Touch-
Me-Not
Lemon
balm
Mint
Anise
Hyssop
Lavender
Sunflower
Tarragon
Tropical
Sage
Thyme
Oregano
Salad
Pansy

15
english
Warning: the light can be very hot. Only touch it while off.
To clean Lilo, unplug and wait 30 minutes to cool down. To clean the light, use a soft and dry
towel. To clean the pots, remove them from the base and clean them with a damp sponge and a
cleaning product. Rinse well before putting them back. The white pots can also be put directly into
a dishwasher, however this isn’t recommended for the floaters.
1/ The user guide that you have gotten your hands on is as brilliant as the latest Harry Potter. Make sure to read it closely!
2/ The pods are not edible. 3/ Do not touch the light, you risk burning yourself. Make sure that children don’t play with Lilo. 4/
While we’re talking about the light... Don’t look at it from below, you risk being dazzled (after all, one does not look under a
man’s kilt). 5/ The product should be installed in a room (sheltered from the rain and wind) and not outside. 6/ Do not use this
product if it doesn’t work properly or if the product, the power cord or the plug is damaged. To avoid any danger, please contact
our customer service at [email protected] and we will replace the damaged part of your product. 7/ Do not leave the
electricity cable within reach of children, close to or in contact with the warm parts of the product or near a heat source or
a sharp object. 8/ Lilo is designed to operate only on AC power. Check if the supply voltage indicated on the power supply
corresponds to your electrical installation. 9/ Lilo does not like to be splashed on. 10/ We could even say that Lilo is somewhat
hydrophobic, so be gentil and keep him at least 1m away from any source of water. 11/ Lilo should not be covered by paper,
towels or any other kind of flammable product. 12/ Do not move Lilo while it is plugged in. 13/ Do not unplug Lilo by pulling
hard on the cable. 14/ Cleaning and maintenance is on you. The more technical problems are on us! Yours truly, Prêt à Pousser’s
rockin’ customer service department. 15/ For your safety, do not use any accessories or spare parts other than those provided by
our customer service. 16/ Lilo is exclusively for domestic and legal usage. Prêt à Pousser declines all responsibility and reserves
the right to terminate the warranty in the event of commercial or unsuitable use or non-compliance with the instructions. 17/
Lilo is not a lamp post. Priority to your plants.
CLEANING AND MAINTENANCE
SAFETY INSTRUCTIONS FOR LILO

16
deutsch
DEN LILO IN NUR 5 MINUTEN EINRICHTEN
1. Stecken Sie den Holzstab in den Ständer
Sie brauchen den Stab nicht ganz rein zu stecken, ein wenig
Spielraum ist normal.
2. Schließen Sie die Lampe an
Achtung! Verwenden Sie kein anderes Ladekabel, nur das
Original-Kabel des Lilos. Verbinden Sie den Lilo nicht mit
einem anderen Gerät wie etwa Ihrem Smartphone. Sie sind
nicht kompatibel, auch wenn die Anschlüsse sich ähneln.
3. Stecken Sie die Lampe auf den Stab
Schließen Sie die Lampe an Ihren Wecker an, um den Tag-
Nacht-Zyklus automatisch einzurichten. Ihr Lilo sollte
durchgehend angeschlossen bleiben.
4. Legen Sie den Schwimmer in den Topf
Und füllen Sie diesen mit Wasser auf, bis der Schwimmer
oben im Topf treibt.
UND LOS GEHT’S!
5. Legen Sie die Kapsel in den Schwimmer ein
Nicht alle Pflanzen keimen gleich schnell. Legen Sie
„langsame” Pflanzen ca. eine Woche vor den „schnelleren”
ein. Weitere Tipps hierzu finden Sie in der Prêt à Pousser-App!

17
deutsch
LADEN SIE DIE PRÊT À POUSSER
App herunter und Sie erhalten alle nützlichen
Tipps und Tricks
Scannen Sie den QR-Code
Führen Sie Buch über das Wachstum Ihrer Pflanzen. Sie erhalten passende Tipps zu jeder
Wachstumsphase und Pflanzenart.
Hier finden Sie die FAQ, Rezeptideen und Infoblätter zu allen Pflanzen.
Sie können uns jederzeit direkt über die App erreichen, sollten Sie Fragen zu Ihren Pflanzen
haben!
hallo@pretapousser.de
www.pretapousser.de

18
deutsch
WIE KANN ICH DEN BELEUCHTUNGSZYKLUS ANPASSEN?
Nicht alle Pflanzen haben die gleichen Lichtbedürfnisse. Diese natürlichen Unterschiede haben wir
auch in Ihrem Kräutergarten beachtet.
Jeder Kapsel liegt ein Infoblatt bei, in welchem der passende Beleuchtungsmodus angegeben wird.
Merke: Sollten Ihre drei Pflanzen unterschiedliche Beleuchtung bevorzugen, ist der Frühlingsmodus
die richtige Wahl.
Wählen Sie die Uhrzeit aus, zu welcher die Lampe morgens angehen soll. Schalten Sie die Beleuchtung
zum entsprechenden Zeitpunkt an (ON/OFF-Knopf). Die Beleuchtung schaltet sich dann automatisch
aus und morgens zur gleichen Uhrzeit (wie Sie sie eingeschaltet haben) wieder an. Wenn Sie also die
Beleuchtung im Sommermodus um 8:00 Uhr einschalten, geht diese um 22:00 Uhr aus und am nächsten
Morgen um 8:00 Uhr automatisch wieder an.
Achten Sie auf mindestens 10 cm Abstand zwischen den Pflanzen und der Lampe. Sollten Ihre Pflanzen
der Lampe zu nah kommen, schalten Sie in den Frühlingsmodus und schneiden Sie Ihre Pflanzen.
Der Sommermodus entspricht einem 14-Stunden-Zyklus bei erhöhter Lichtintensität. Für
Pflanzen, die das Sonnenbaden lieben.
Der Frühlingsmodus entspricht einem 12-Stunden-Zyklus bei moderater Lichtintensität. Für
empfindliche Pflanzen.
Ein ON/OFF Schalter und
ein Schalter um das Licht
einzustellen
Bevor Ihre
Pflanzen keimen
Im Laufe des Wachstums
Ihrer Pflanze

19
deutsch
Die Pflanze wächst dann aus der Kapsel heraus. In der Kapsel befinden sich das Saatgut und alle
Nährstoffe, die Ihre Pflanze braucht. Jeder Kapsel liegt ein Infoblatt bei mit hilfreichen Tipps und
Tricks für das optimale Wachstum Ihrer Pflanze.
Sorgen Sie dafür, dass Ihre Pflanzen immer genügend Wasser haben: lassen Sie beim
Wassernachfüllen das Wasser langsam auf die Ränder der Schwimmer laufen.
Laden Sie die App herunter, um zu erfahren, wann und wie Sie Ihre Pflanzen ernten können. Ist Ihre
Pflanze ausgewachsen, können Sie eine neue Kapsel einlegen und eine neue Pflanze kennenlernen.
Die alte Kapsel können Sie umtopfen (selbst die Schale besteht aus pflanzlichem Kunststoff und
ist biologisch abbauen).
LEGEN SIE DIE KAPSELN EIN. BALD WIRD DIE PFLANZE KEIMEN
IHRE PFLANZEN ERNTEN
Basilikum,
Agastache, Salbei
und sonstige
Staudenpflanzen
Schneiden Sie die Stängel
oberhalb eines Knotens
an. Lassen Sie mindestens
15 cm stehen.
Petersilie,
Koriander
und andere
Doldenblütler
Diese Pflanzen sind
kreisförmig wie ein Busch.
Ernten Sie die äußersten
Stängel zuerst.
Schnittlauch,
Minze, Thymian und
sonstige Lippen-
blütengewächse
Schneiden Sie sämtliche
Stängel ab. Lassen
Sie mindestens 10 cm
stehen.
Kleine Obst
& Gemüsesorten
Fahren Sie mit der Hand
durch die Pflanzen,
um einen Windzug zu
simulieren. Das fördert
die Fruchtbildung und die
Übertragung des Pollens.
knoten

20
deutsch
WEITERE INFORMATIONEN ZUM LILO
EIN LILO, MEHR ALS 40 PFLANZENARTEN!
Wir wählen unser Saatgut sorgfältig aus
Unser Team testet viele verschiedene Saatgut-Arten, um für Sie nur das Beste auszuwählen. Wir
möchten schöne, leckere Pflanzen anbieten und gleichzeitig die Umwelt schonen. Daher beziehen
wir unser biozertifiziertes Saatgut ausschließlich von französischen Produzenten.
Das -Design: Gesunde Wurzeln garantiert!
Durch das patentierte Design der Schwimmer werden die Wurzeln optimal mit Sauerstoff versorgt.
Reichlich hochwertige Mineralien für die Pflanzen
Unter freiem Himmel ernähren sich die Pflanzen durch Mineralien aus dem Boden. Dieselben
Mineralien finden sich auch in unseren Kapseln wieder und versorgen Ihre Pflanzen. Diese können
optimal wachsen und entwickeln ihren vollen Geschmack.
Jede Pflanze ist einzigartig. Unsere Prêt à Pousser-App stellt Ihnen jede einzelne vor!
... und mehr!
Basilikum
Mini-Paprika
Dill
Schnittlauch
Senf
Portu-
lakröschen
Petersilie
Eisenkraut
Kirchto-
maten
Koriander
Mimose
Melisse
Minze
Agastache
Lavendel
Sonnenblume
Estragon
Feuersalbei
Thymian
Oregano
Salat
Stiefmüt-
terchen
Other manuals for Lilo Connect
3
This manual suits for next models
1
Table of contents
Languages:
Other Pret a Pousser Home Improvement manuals

Pret a Pousser
Pret a Pousser NANO GARDEN User manual

Pret a Pousser
Pret a Pousser Lilo Connect User manual

Pret a Pousser
Pret a Pousser MODULO User manual

Pret a Pousser
Pret a Pousser MODULO 2 User manual

Pret a Pousser
Pret a Pousser Lilo Connect User manual

Pret a Pousser
Pret a Pousser Lilo Connect User manual


