Pretorian Game On 1 User manual
INSTRUCTIONS
Eye-Gaze Gaming device
Product Description
Game On with Pretorian Technologies is a unique
assistive gaming product, allowing users of eye-gaze
enabled AAC devices and computers to achieve full
control of computer games using only their eyes.
It may be used to play games either on a standard PC or
on an Xbox via an Xbox Adaptive Controller. The user’s
AAC device, such as a computer* or Grid Pad running
Grid 3, displays a special gaming grid set with a similar
layout to a standard game controller handset.
Simply gaze at any of the grid cells and the
corresponding game controller action is sent to the
game console/ gaming computer to successfully play
the game. Every one of the controls on a standard
game controller is reproduced in the grid set,
including both momentary and timed thumbstick
movements and single, double and timed presses
of all buttons, bumper and triggers. A Rapid-Fire
option is also included for all buttons and triggers.
The grid set may be easily customised for particular users
and/or particular games, a feature which is especially
useful when the user has low cognition and would be
unable to understand a full game controller layout.
Editing the grid set may also be beneficial when using
Game On with Co-Pilot.
The display and keypad on Game On with Pretorian
Technologies allows the user to adapt the degree
of thumbstick movement and all timer periods
and may optionally be saved as a Profile. Up to six
Profiles may be stored and recalled, either using
the keypad or directly on the AAC device using
eye-gaze. Profiles are useful both for customising
the gaming experience for individual games or for
individual users, depending on their preferences
and particular needs.
Game On with Pretorian Technologies also allows
up to four players to be in the same room, a facility
which can equally enable co-operative gaming,
where each player takes control of a subset of the
controls, or to allow gaming tournaments where
multiple gamers are playing individually in the same
setting. Each player will need his or her own Game
On device.
*PC running Grid 3 must have an infra-red output, for
example by connecting an Abilia Progress Star USB.
Pack Contents
Carefully check the contents of the
box, which are:
Game On unit
2 x USB cables
4 x colour coded switch cables
Colour coded D-Pad decal
These instructions
®
Features and Benefits
• Allows eye-gaze enabled AAC device users to access computer games using only
their eyes.
• Implements all the controls on a game controller, or a subset.
• Interfaces to a gaming computer or an Xbox via an Xbox Adaptive Controller.
• Can be used with Co-Pilot to allow a gaming partner to assist with game play.
• Stores up to six Profiles to allow customisation for individual users and/or
individual games.
• Multi-player facility allows both co-operative play of a single game, or
simultaneous game play in a single setting.
• Fully customisable grid sets allow the grid to be changed according to the user’s
unique requirements.
• Can also be used for gaming using switch scanning instead of eye-gaze.
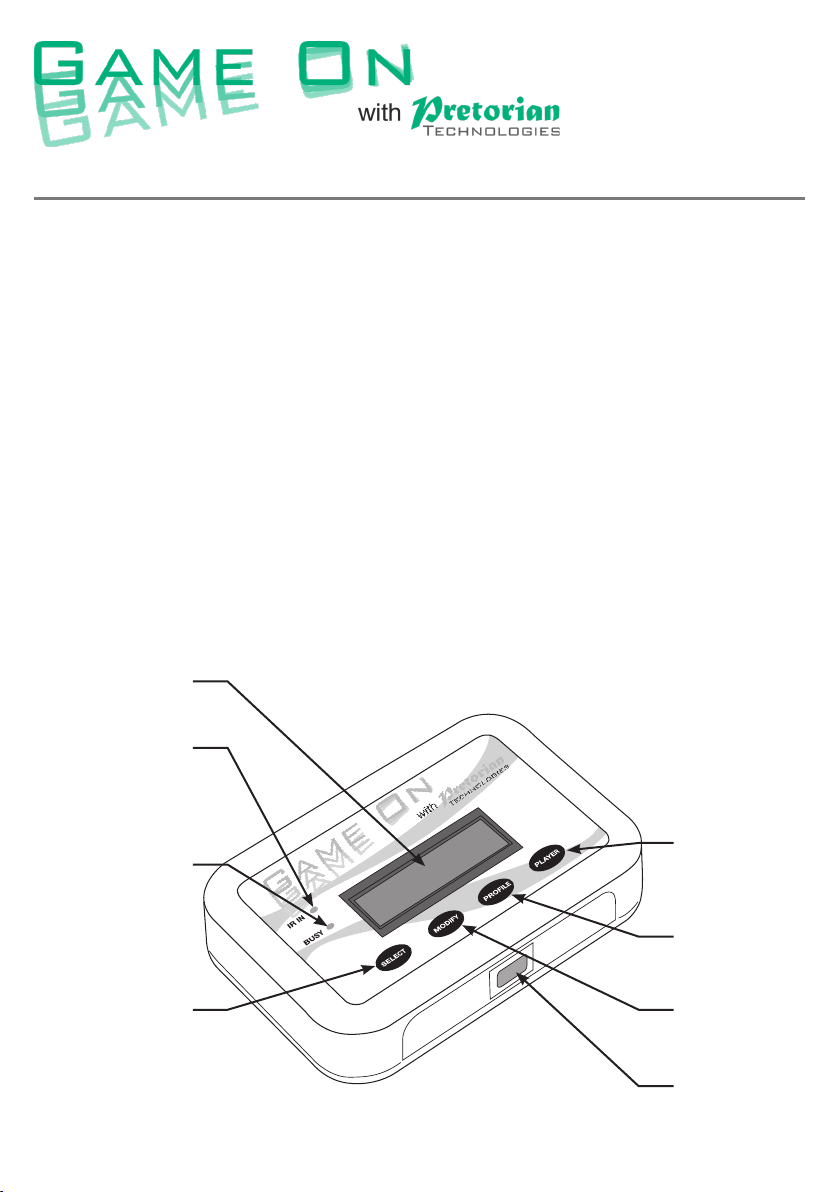
1 LCD display
2 Infra-red
input LED
3 Busy LED
4 Select
Button 5 Modify
Button
8 Infa-red
Window
6 Profile
Button
7 Player
Button
®
Connecting your Game On
Connecting to a gaming PC
Game On may be connected to a gaming PC or to an Xbox via an Xbox Adaptive Controller. The connection
method differs substantially between the two types of host, so please refer to the relevant section below for
full connection details.
Because Xbox Adaptive Controller has been adopted as the de facto standard adaptive device for gaming by
most gaming console providers, it is expected that there will be more connection options available as time
goes by. We recommend you refer to Pretorian Technologies’ website for the most up to date information.
Connection to a gaming PC is achieved using a single USB cable but it is important to make sure it is plugged
into the socket marked PC/ XAC LEFT [9]. Then plug it into a spare USB socket on the PC. You do not need
to turn off the PC when doing this. The first time Game On is plugged in, the computer will install a driver, a
process which takes a few seconds. The computer will tell you once the driver has successfully been installed.
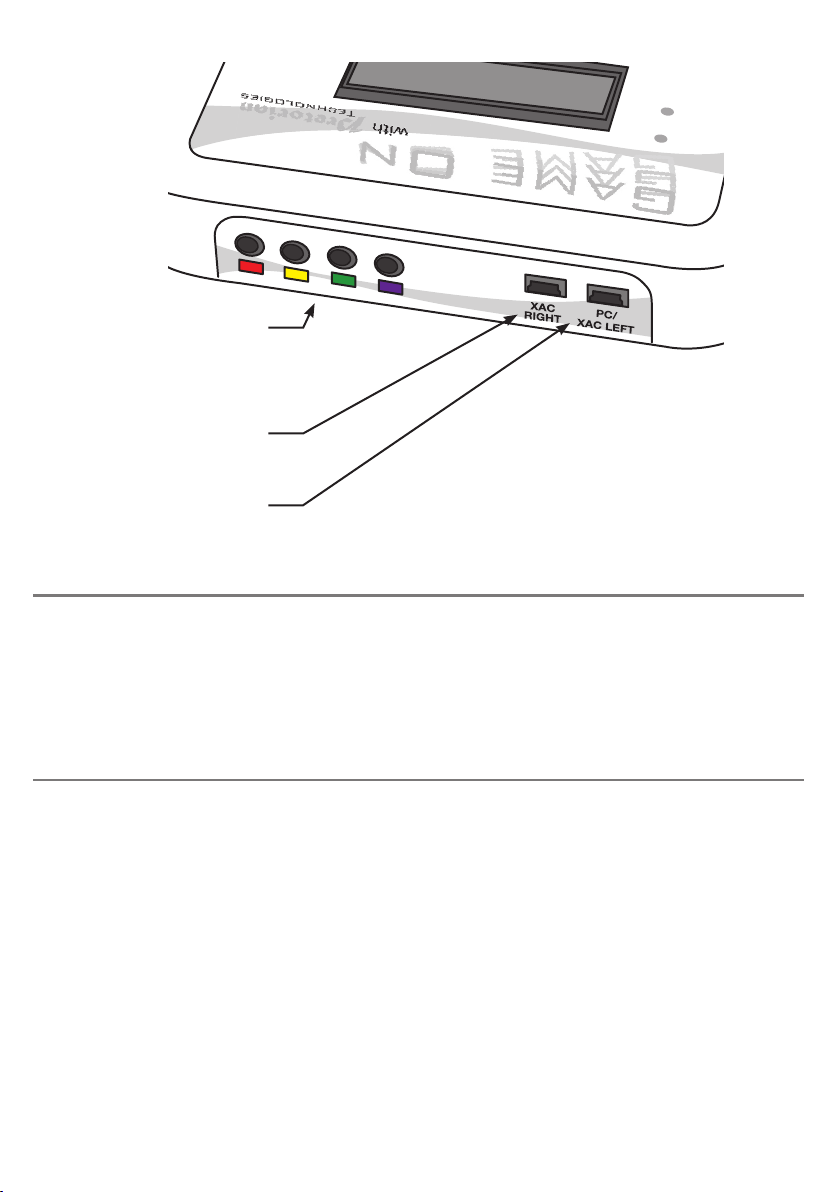
Nothing should be connected to the USB socket marked XAC RIGHT [10], nor to the D-Pad connection sockets [11].
Game On appears to the computer as a generic game controller, whereas some games (for example Forza)
will only respond to proprietary game controllers. If you are intending to play a game of this kind, there are
two options open to you:
• Install Game On via an Xbox Adaptive Controller, by reference to the section below and then connecting
the Xbox Adaptive Controller to the PC via a USB-C to USB-A cable. Your computer must be running
Windows 10 or later.
• Use an Xbox Controller Emulator such as X360CE. This will make Game On appear to the computer as a
standard Xbox game controller. Please refer to the Knowledge Base on our website for further details
by following the QR code at the back of these instructions.
Games and gaming platforms change very quickly, so when using Game On to play games on a platform such
as Steam, please refer to the Knowledge Base on our website for details of how to connect by following the
QR code at the back of these instructions.
IR IN
BUSY
9 Left USB
Socket
10 Right USB
Socket
11 D-Pad
Connection
Sockets
A
B
Connecting to an Xbox game console
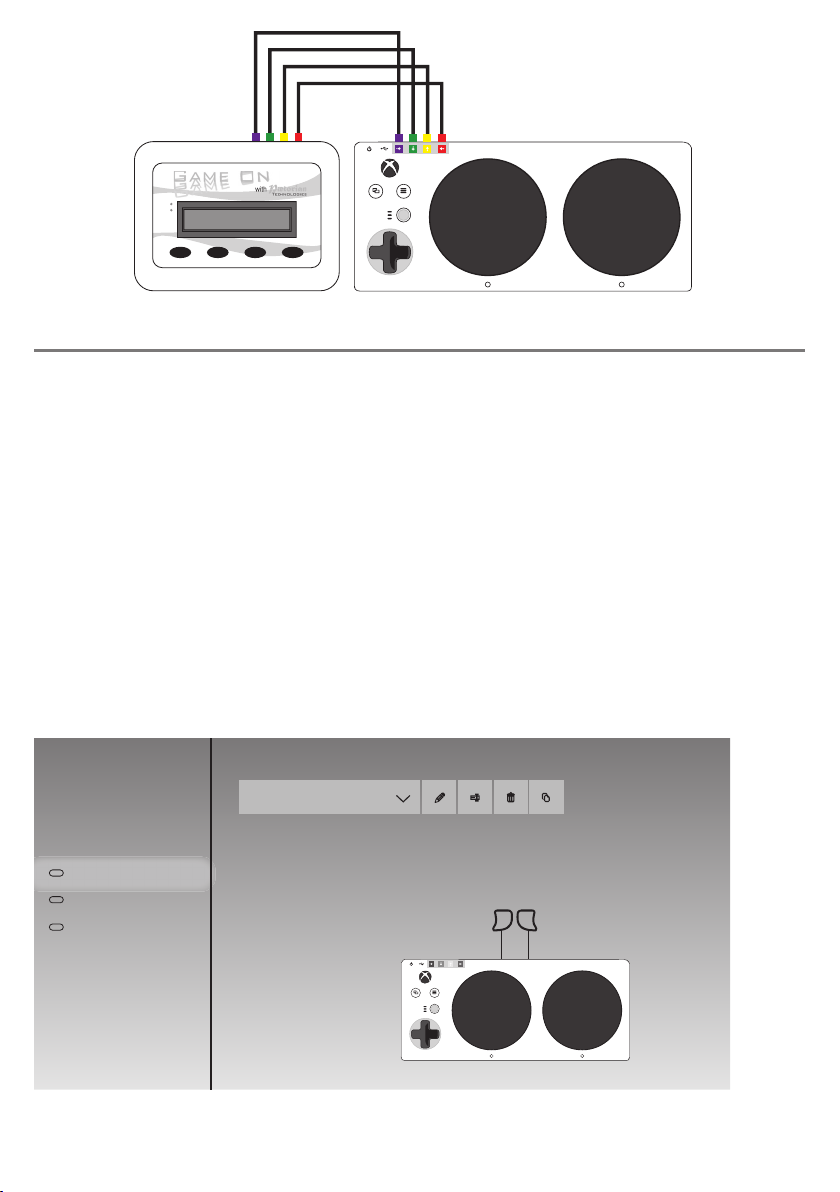
Connecting D-Pad cables
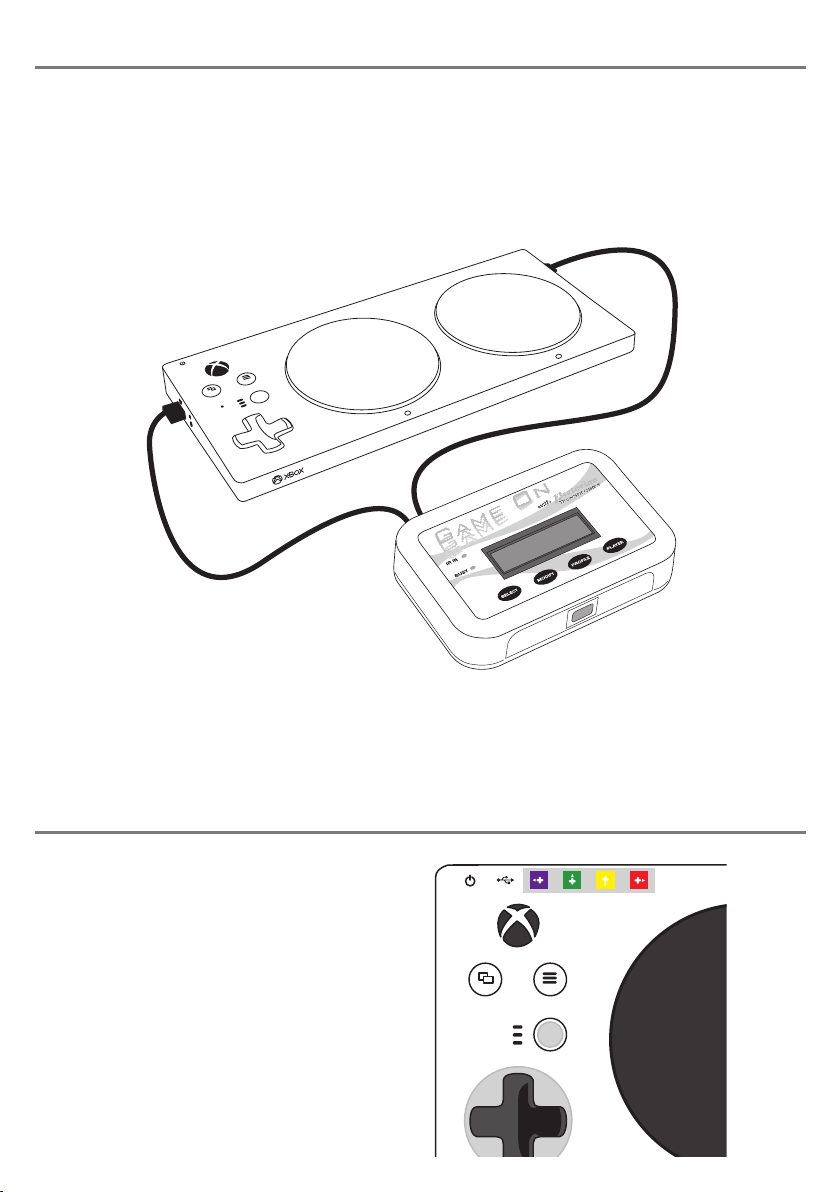
To connect to an Xbox game console, you will first need to connect Game On to an Xbox Adaptive Controller.
Do not connect Game On to any of the USB sockets on the Xbox console as these do not support generic game
controllers. Instead, connect the socket marked PC/ XAC LEFT [9] to the left socket on the Xbox Adaptive
Controller and the socket marked XAC RIGHT [10] to the right socket. This is necessary because each socket
on Xbox Adaptive Controller only supports some of the game controller functions. Please refer to Figure 1.
Many games can be played perfectly well without the
D-Pad buttons. However, if the D-Pad is necessary
for the games you intend to play, you will need to
make four more connections between Game On and
the Xbox Adaptive Controller using sockets [11]. We
have provided four colour coded cables and a decal
to make this easier. Begin by attaching the coloured
decal to your Xbox Adaptive Controller as shown
in Figure 2, making sure it is correctly orientated
and adjacent to the four D-Pad sockets. (Note that
an ‘L’ and ‘R’ is included on the decal to help with
orientation). Now connect the corresponding cables
to the Game On sockets and to the Xbox Adaptive
Controller, so red goes to red, yellow to yellow and so
on. See Figure 3.
Unfortunately, neither of the sockets support the D-Pad functions, nor the Left and Right Triggers. If these
are required for the games you intend to play, you will need to follow one or both of the next two steps:
Figure 1
Figure 2
A B
L R
Trigger Emulation with Xbox Adaptive Controller
Because neither of the USB sockets on Xbox Adaptative Controller support Left and Right Trigger (LT and
RT), if you need these for gaming, you will need to re-assign X1 and X2 to be LT and RT by following these
steps:
1. On your Xbox, select Accessories, then when the XAC screen appears, select Configure.
2. Select New Profile and give it a name, e.g. Game On.
3. Navigate to X1 and select (by default it is set to Left Stick Up). Select Primary and then pick Left
Trigger from the list. Then dismiss this menu by pressing B (by default, the large black button on the
right).
4. Navigate to X2 and select (by default it is set to Left Stick Down). Select Primary and then pick Right
Trigger from the list. Then dismiss this menu by pressing B.
5. Now press B to get back to the Profiles menu, navigate to the slot number drop-down and assign your
new Game On profile to a slot number. Figure 4 shows how the summary screen should look.
6. Make sure your Xbox Adaptive Controller is set to the corresponding Slot number whenever you are
using Game On. For example if you are using Slot 1, ensure that the top LED is lit. If not, press the
adjacent button until it is.
Figure 3
Figure 4
A B
LR
SELECT
IR IN
MODIFY PROFILE PLAYER
BUSY
A B
LR
ProfilesGame on
New profile
Profile 2
Default
Profile 1
+
2
3
Game on
1
Slot 1
LT RT
Because most games make use of the Trigger controls, we recommend you always make this modification to
the Xbox Adaptative Controller configuration on your Xbox console. A video has been produced illustrating
these steps- please refer to our Knowledge Base using the QR code at the back of these instructions.
Using your Game On with Xbox Co-Pilot
Setting up your Game On
Co-Pilot is a feature built into Xbox to allow the controls to be split between two separate controllers, either
to allow a single person to use two controllers or to allow two people to act as one.
The latter option is especially useful with Game On as it allows the disabled user to access a limited number
of controls according to their abilities and the remaining controls to be operated by another disabled user
or a family member/friend. For example, if the user’s abilities allow them only to activate the Fire button
using Game On, the remaining controls could be operated by somebody else, perhaps using a standard game
controller (or alternatively it is possible to use two Xbox Adaptive Controller/Game On configurations so
that two eye-gaze users can act as one).
When a disabled user is using this facility, it may be beneficial to reduce the number of controls in the grid
set and/or make the remaining ones larger. This will make it easier for them to play using eye-gaze. More
detail on how to modify the Game On grid sets can be found in the manual for Grid 3.
To turn on Co-Pilot, first of all make sure that both controllers are connected to your Xbox. Then navigate to
Settings Ease of Access Controller and select Co-Pilot Settings. Select Turn on Co-Pilot. It doesn’t
matter which controller you use to do this but please remember that it then becomes the ‘Pilot’ controller and
is to be used when turning Co-Pilot back off again. The Pilot also accrues all game scores and achievements.
Note that all the controls work on both controllers simultaneously. To limit the number of controls available
to the Game On user, edit the grid set as described above.
The keypad [4,5,6 and 7] and the LCD display [1] are used to view and change the degree of movement of both
thumbsticks and the times for which the buttons, thumbstick buttons, Triggers and Bumpers are pressed. It
also allows you to set up the double-click and Rapid-Fire functions. You will almost certainly need to change
these settings depending on the games you play and your particular requirements. Up to six complete sets
of these settings may be stored and recalled; each is called a Profile.
First use the Profile button [6] to select the Profile which you intend to view or change. The Profile number
is shown on the LCD display [1]. Press Profile [6] repeatedly until you see the number you require. Whenever
a Profile is being viewed or changed, game play is suspended.
To view the various settings, press Select [4] repeatedly and the LCD display [1] will cycle around all of the
settings that are available. If you wish to make a change to any setting, simply press the Modify button [5]
until you see the particular value you need.
Once you have a made a change, you may either press Select [4] again to move to the next setting, or simply
wait. After a few seconds of no further button presses being made, ALL of the settings for this Profile are
saved and the display returns to showing ‘Active’, showing that game play can re-commence. Note that
Profiles are stored in non-volatile memory in Game On, so they will continue to be available after it is
powered down or moved to another gaming configuration.
The following sections summarise each of the parameters in a Profile:
Note there while there is no requirement for Slow Speed to be less than Fast Speed, it is expected that it will always be
configured in this way.
Definition: The lower of the two speed parameters. Applies to all directions of
both left and right thumbsticks.
Possible settings: 10% through 100% in 10% steps.
Default Setting: 60%
Definition: The higher of the two speed parameters. Applies to all directions of
both left and right thumbsticks.
Possible settings: 10% through 100% in 10% steps.
Default Setting: 100%
Slow
Speed
Fast
Speed
Definition: The time for which a momentary movement of either left or right
thumbstick occurs
Possible settings: 1 to 10, where each increment represents a time of 125ms
Default Setting: 2 (approx. 0.25sec)
Joystick
Time
Definition: The time for which a momentary movement on the D-Pad occurs.
Possible settings: 1 to 10, where each increment represents a time of 125ms
Default Setting: 2 (approx. 0.25sec)
D-Pad
Time
Definition: The time for which a momentary press on A, B, X, Y, Left Thumbstick
button, Right Thumbstick button, Left Bumper or Right Bumper occurs
Possible settings: 1 to 10, where each increment represents a time of 125ms
Default Setting: 2 (approx. 0.25sec)
Button
Time
Double-click timing comprises a single click of duration Button Time, followed by a single gap of Rapid-Fire Gap Time and
then a second click of duration Button Time.
Rapid-Fire timing comprises a single click of duration Button Time followed by a single gap of Rapid-Fire Gap time repeated
the number of times specified by the Rapid Fire Hits setting. See Section entitled Rapid-Fire for more details.
Definition: The time between successive clicks when a double click or Rapid-Fire
on A, B, X, Y,LT or RT buttons occurs.
Possible settings: 1 to 10, where each increment represents a time of 125ms
Default Setting: 1 (approx. 0.125sec)
Rapid
Fire Gap
Time
See Section entitled Rapid-Fire for more details.
Definition: The number of Rapid-Fire presses on A, B, X, Y, LT or RT.
Possible settings: 1 to 20, where each increment represents a time of 125ms
Default Setting: 5
Rapid
Fire
Hits
Note that all Hold commands may be ended sooner than the Hold time by selecting their corresponding Stop commands.
Definition: The time for which a Hold press/movement on Left and Right
Thumbsticks, Left or Right Triggers and D-Pad occurs
Possible settings: 5sec to 30sec in 5sec increments
Default Setting: 20s
Hold
Time
Definition: The time for which a momentary press on Left or Right Triggers occurs
Possible settings: 1 to 10, where each increment represents a time of 125ms
Default Setting: 6 (approx. 0.75sec)
Trigger
Time
Definition: The time for which a long press on A, B, X or Y buttons occurs
Possible settings: 10 to 30, where each increment represents a time of 125ms
Default Setting: 15 (approx. 2 sec)
Long
Button
Time

Positioning your Game On
Game On uses Infra-Red data which is sent from the AAC device whenever a command is selected. Because
infra-red is a form of light, it travels in straight lines. Although it tends to ricochet off walls and so ‘bounces’
around the room, the optimum position for Game On is such that the infra-red window [8] is in direct sight
of the infra-red output device on the corresponding AAC device, which is usually on the back of the device.
This alignment will be especially important when using more than one Game On in the same setting. Although
Game On is designed only to respond to commands relating to the Player number which you have set up, it
works best when the infra-red commands coming from the corresponding AAC device are stronger than any
coming from the others.
Provided Game On and its corresponding AAC device are close to one another and in direct line of sight
between the infra-red windows on each, you are unlikely to experience problems even in a multi-player setting.
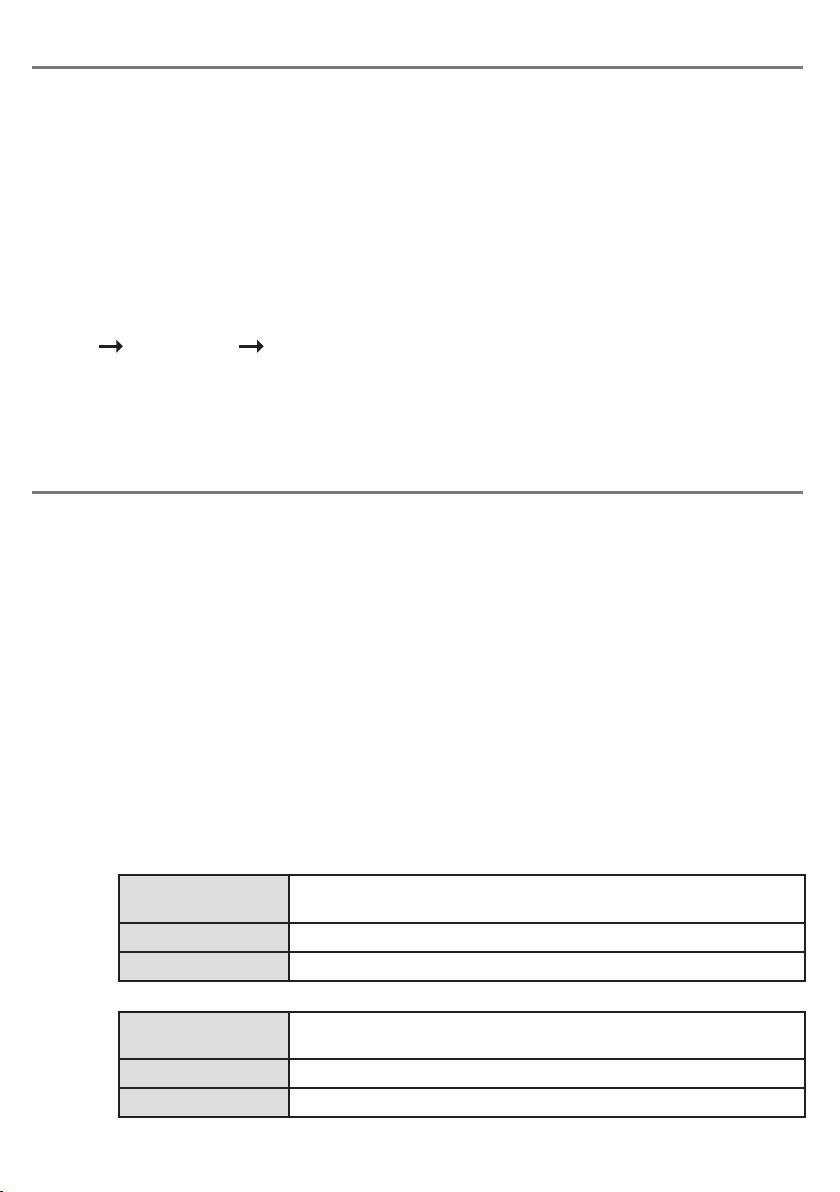
Configuring your AAC Device
This section is written with Grid 3 software in
mind, although support for AAC devices from other
vendors will be added over time. Please refer to
our Knowledge Base using the QR code at the back
of these instructions for up to date information on
your particular AAC device.
From the Grid Explorer, go to Menu - Add grid sets -
Online Grids and search for Game On. You will see a
number of grid sets to suit particular games which
have been uploaded by the online community. Look
for the grid set called Smartbox Game On Templates.
Within this grid set are templates which you can use
as a starting point to modify for specific users or
games. Select either the Simple or Intermediate grid
and copy and paste the required extra cells from the
Full grid (for example a rapid-fire button).
Once you have installed your required grid sets, select
the one you would like to use in Grid Explorer. You will
first need to select the Player number to correspond
with the Player number you have selected on Game
On. Please refer to the section entitled Setting the
Player Number for more information.
Figure 5 shows a typical intermediate grid set. The
D-Pad and right thumbstick actions are grouped
together in a cross shape to correspond with the
direction of movement. Momentary buttons are
towards the inside of the group and Hold buttons
towards the outside. A Stop button is provided
for each thumbstick, which will end any actions
currently taking place. Note that the left thumbstick
Stop button only stops left thumbstick actions and
the right Stop button only stop right thumbstick
actions. The thumbstick button is in the centre of
the group in both cases.
Whenever you select a thumbstick movement,
any previous movement on the same thumbstick
is cancelled. So, for example, if you selected left
thumbstick Fast Hold Up and before it timed out
selected left thumbstick Fast Hold Right, the
thumbstick output would switch from up to right
and the Hold timer will start over again.
The D-Pad group may be operated either
momentarily or with Hold and its stop button is in
the centre of this group.
The left and right Bumper and Trigger groups are
in the corresponding corner groups. Note that the
Bumpers are always momentary whereas the Triggers
may be either momentary, long-press, double-click,
rapid-fire or with Hold. The stop button may be used
to end any lengthy action prematurely. Please refer
to the section entitled Trigger compatibility for more
information on how to make best use of the Left and
Right Triggers.
Setting the Player Number
Up to four Game On units can be used simultaneously in the same setting provided they are each set to a
different Player number. Game On will ignore data coming from AAC devices which are set to a Player number
other than the one to which Game On itself is set. The current Player number is shown on the LCD display [1]
and may be changed at any time by pressing the Player button [7].
If you are using Game On alone, it does not matter which Player number it is set to, provided the AAC device
is set to the same Player number.
If you are using Game On at the same time as others in the same setting, make sure you each use a unique
Player number both on Game On and on the corresponding AAC device.
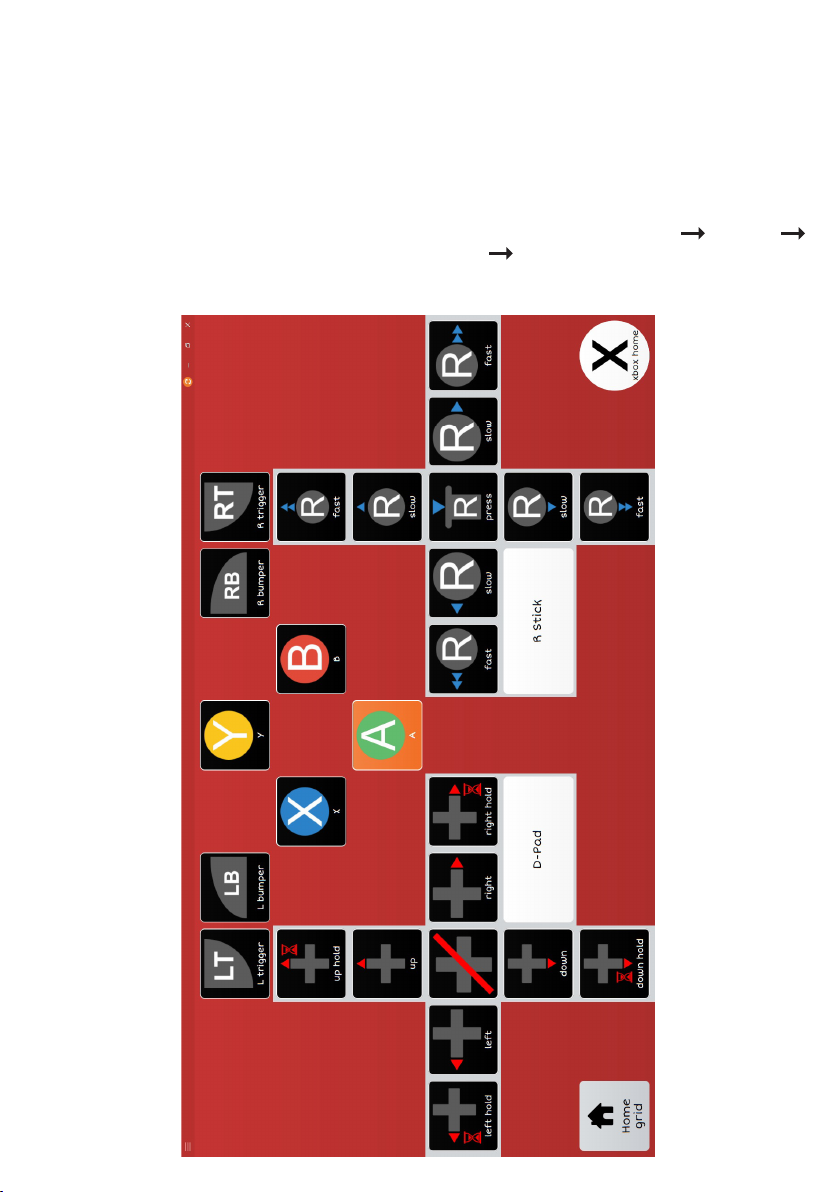
The A, B, X and Y buttons are available in momentary,
double-click, rapid-fire and extended press forms.
Note that the extended press is configured using the
Long Button Time setting and not the Hold time.
The full grid set also includes a facility to recall any
of the six Profiles. This is in addition to being able to
select them using the Game On keypad and display
and is useful in empowering some users to make their
own changes as they switch from game to game.
One of the key advantages of using Grid 3 is the
ability to be able to edit grid sets to suit your exact
needs. Users with limited cognition may benefit
from having a reduced set of controls, allowing the
remaining controls to be laid out more clearly and
each of the remaining cells to be larger. If you wish
to customise the grid sets provided, please refer
to Smartbox documentation for full details on how
to achieve this or follow the QR code at the back of
these instructions.
Before using the grid set for gaming, you may wish
to review the current eye-gaze settings to make
sure they are optimal. Go to Menu Settings
Access Eye gaze to review and make changes.
Figure 5

Trigger Compatibility
Rapid-Fire Capability
Left and Right Trigger can occasionally cause difficulties when it comes to gamepad compatibility. Some
games expect Left and Right Trigger to be a single control, with Left Trigger giving positive movement and
Right Trigger giving negative movement. This is fine for racing games where the Triggers are usually brake
and accelerator, since these are mutually exclusive, i.e. you would never need brake and accelerator pressed
at the same time.
Other games require the two Triggers to be entirely separate, for example in shooting games. Game On
reports the Triggers over USB as separate controls. When connected to a PC, if this causes a problem with
operating the game, we recommend that you ether connect via an Xbox Adaptive Controller instead, or
perhaps use the X360CE Controller Emulator software by referring to our Knowledge Base (see QR code at
the back of these instructions).
Game On has been provided with a Rapid-Fire capability to compensate for users who are unable to press
the buttons quickly enough to achieve meaningful game play. Rapid-Fire timing comprises a single click of
duration Button Time, followed by a single gap of Rapid-Fire Gap time, both repeated the number of times
specified by the Rapid-Fire Hits setting. For example, if the Button Time and the Rapid-Fire Gap are both
set to 1 (0.125s), the time for each full press and release is 0.25 seconds. This is the fastest rate of fire
which can be achieved and is approximately four presses per second, broadly equivalent to the maximum
rate which an able-bodied user might achieve. If, for example, Rapid-Fire Hits is set to 10, each rapid-fire will
comprise ten hits of 0.25s duration, i.e. 2.5 seconds altogether.
If, alternatively, the Button Time was set to 2 (0.25s) and the Rapid-Fire Gap to 2 (0.25s), the total time would
be 0.5 seconds, or two presses per second. (There is no requirement for the two settings to be the same).
The longest press cycle time is when Button Time and the Rapid-Fire Gap are both set to 10 (1.25s), the time
for each full press and release is 2.5 seconds. If Rapid-Fire Hits were also set to maximum (20) the total
rapid-fire time would be 50 seconds.
Rapid-Fire of LT and RT can be cancelled by selecting the corresponding Stop grid cell. In the case of rapid
fire of A, B, X or Y, the best way to cancel a rapid-fire is to select the corresponding single-hit grid cell.
Note that double-clicking is just a special case of rapid-fire where the number of hits is pre-set at 2. All the
above example timings hold true for double-clicking as well as rapid-fire.
Game On!
You are now ready to begin game play. Enjoy!
Note that whenever Game On receives a command from an AAC device set to the same Player number, the ‘IR
IN’ LED [2] flashes briefly.
Additionally, whenever an action is taking place, the ‘BUSY’ LED [3] is lit, allowing the user to see immediately
whether any command is currently executing. This is particularly useful with timed, double-click, rapid-fire
and Hold commands.
Important Note:Important Note: In providing the Rapid-Fire capability, Pretorian is in no way condoning the use of Game OnGame On as a means for
able-bodied users to gain an unfair advantage during gaming. We respectfully ask that all users treat Game OnGame On for what
it is - a method of enabling gamers with disabilities to play the games they wish. Pretorian takes great pride in providing
devices such as Game OnGame On for the benefit of mankind. Please do not undermine those efforts.
Maintenance
Your Game On unit has no user serviceable parts. If repair becomes necessary, the unit should be returned to
Pretorian Technologies or an authorised distributor.
Warranty
Your Game On unit is warranted for 24 months from the date of purchase against defects in manufacture or
component failure. The unit is designed for domestic and educational applications. Use outside these areas
will invalidate the warranty. Unauthorised repair or modification, mechanical abuse, immersion in any liquid
or connection to incompatible equipment or an incompatible power supply will invalidate the warranty.
Troubleshooting
If your Game On unit does not operate correctly, please use the following guide to determine the cause. If,
after following this guide and consulting our Knowledge Base, your unit still does not operate, please contact
your supplier before returning it. There is an on-line chat facility on the Pretorian Technologies’ website and
we’re here to help.
Symptom Possible Cause/Remedy
No output from Game On • Player number on Game On and AAC device do not match.
Make both the same.
• USB cable plugged into incorrect socket. For PC applications,
make sure cable is plugged into socket [9]. For Xbox
applications, make sure the cables are the correct way
around- refer to Figure 1.
• No line of sight between AAC device and Game On infra-red
window [8]. Re-orientate and remove any obstructions.
Output from Game On does not
correspond to the settings I made
• Make sure you have the correct Profile selected, either using
the Profile button [6] or the Profile cells in the grid set.
When connected via an Xbox
Adaptive Controller, the left and
right thumbstick and some of the
buttons are the wrong way around
• Make sure you have the USB cables the correct way around in
the two USB sockets on Xbox Adaptive Controller. Refer to
Figure 1.
When connected via an Xbox
Adaptive Controller, the D-Pad
controls do not work, or are the
wrong way around
• Make sure you have connected the four D-Pad wires according
to the section entitled Connecting D-Pad Cables and that
they are correctly orientated according to the colour scheme.
When connected via an Xbox
Adaptive Controller the Left
Trigger and Right Trigger
result in movement of the left
thumbstick
• Make sure you have re-assigned X1 and X2 according to
the section entitled Trigger Emulation with Xbox Adaptive
Controller.
• Make sure you have the correct Slot selected on Xbox
Adaptive Controller to correspond with the Slot you re-
assigned X1 and X2 in.
When connected to a gaming PC,
Left and Right Trigger do not
function as I expect.
• Please refer to the section entitled Trigger compatibility.
www.pretorianuk.com
Unit 37 Corringham Road Industrial Estate
Gainsborough Lincolnshire DN21 1QB UK
Tel +44 (0) 1427 678990 Fax +44 (0) 1427 678992
All trademarks are for illustrative purposes only, are the property of their respective owners and are acknowledged.
Pretorian Technologies would like to thank Tom Wagner, Smartbox Assistive Technology, Everyone Can and SpecialEffect
for their considerable assistance in developing Game On.
Game On with Pretorian Technologies is a registered trademark of Pretorian Technologies Ltd.
For use with Game On 1 Version 1.3 (firmware 114.0 and 115.0)
www.everyonecan.org.uk
www.thinksmartbox.com/product/game-on
www.pretorianuk.com/game-on-1
®
S040147
This manual suits for next models
1
Table of contents
Other Pretorian Video Gaming Accessories manuals

Popular Video Gaming Accessories manuals by other brands

Ricmotech
Ricmotech AP-Xtreme Assembly guide

EastPoint
EastPoint 1-1-02341 Assembly instructions

LumiSource
LumiSource boomchair VPR owner's manual

Thrustmaster
Thrustmaster TH8S Shifter Add-on user manual

Tippmann
Tippmann Supplier Requirements manual

Carmelli
Carmelli PATRIOT 5-ft AIR HOCKEY TABLE Assembly instructions


