Prima Vista Carver 396 User manual

1| P a g e
OPERATIONS MANUAL
Prima Vista
Carver 396
Motor Vessel

2| P a g e
Welcome aboard!
We are happy you have chosen Prima Vista for your northwest vacation. Thank you!
This guide is to help you become familiar with Prima Vista, but if you have questions please do
not hesitate to ask the Anacortes Yacht Club (AYC) staff. They are here to make certain you have
a wonderful time. We hope to have done everything we can to ensure you enjoy cruising the lovely
islands and waterways of the Pacific Northwest on our vessel.
Naturally, your main job is to be safe and have fun, but if anything is not how it should be, please
write it down for us to address upon your return. There’s a notebook on-board to help us address
maintenance on all the many working parts on a yacht like this. Anytime throughout your trip,
please let us know how we can make your next charter with us even more enjoyable.
Thank you and enjoy Prima Vista and the beautiful places she takes you!
Joel & Carol, Prima Vista owners
Seattle, Washington
THIS IS A “NO SHOE BOAT”
PLEASE REMOVE YOUR SHOES BEFORE ENTERING THE
MAIN SALON.

3| P a g e
TABLE OF CONTENTS
Boat Operations
Engine Inspection Page 4
Start-Up Page 5
Shutdown Page 5
Getting Underway Page 6
Using the Canvas Page 6
Cruising Page 7
Docking Page 8
Fueling Page 9
Boat Electrical
A.C. (Shore) Systems Page 10
Diesel Generator Page 12
D.C. (House) Systems Page 12
Battery Map Page 13
Sanitation System
Marine Toilets Page 15
Holding Tanks Page 16
Y-Valve & Macerator Pump Page 16
Water Systems
Fresh Water Tanks Page 17
Hot Water & Showers Page 17
Showers Page 17
Galley
Stove/Oven/Microwave Page 18
Refrigeration/ Ice Maker Page 18
Heating Systems
Diesel Heater (DC) Page 19
Portable Electric Heaters Page 19
Electronics
VHF Radios, Depth Sounder, Radar Page 20
GPS/Plotter Page 20
Entertainment Systems
AM/FM Radio Page 21
TVs/Stereo Page 21
Other Operations
Anchoring/Mooring Cans Page 22
Barbecue Page 24
Dinghy/Outboard Page 25
Crabbing/Fishing Page 26
Bilge Pumps/Safety Page 27
Engine Spare Parts Page 27
Thru Hull Locations Page 27
Yacht Owner’s Manual Page 27

4| P a g e
BOAT OPERATION
Important things to do DAILY
Remember to check a couple things each morning PRIOR to start-up.
1. Engine Coolant
a. Check the level of COOLANT in the expansion tanks on the
top of each engine.
b. Refill only to COLD fill line if needed.
c. You will need to lift the floor deck to access the tank for
refilling
2. Engine Oil
a. Check the level of OIL in each engine by checking
your dipsticks. Look at the etch marks on each dipstick
that indicate the proper oil level.
b. DO NOT OVERFILL!
i. Only fill if oil levels are nearing the ½ way
mark in 1 quart increments
3. USE the generator!
a. Don’t let the house voltage go below 12v
b. Think about running the generator at least each night and morning at a minimum
4. Head use
a. Put in SLEEP mode when away from the vessel or at night
b. Make sure there’s water in the bowl to prevent vacuum loss and to keep the pump from running
continuously

5| P a g e
Main Engines
Before starting the engines, do your daily inspection.
1. Ensure GEARSHIFTS are in ‘NEUTRAL’ as the engines
cannot be started because of the “neutral lockout”.
2. Starboard engine goes first
3. Turn the key clockwise partially until the ENGINE
ALARM sounds and pre-heat the engine for 15-25
seconds for a cold engine; only 5 seconds for warm
engine.
4. Then turn the key fully clockwise to engage the starter.
5. Once started, and while in NEUTRAL, PULL THE
THROTTLE LEVER BY THE BASE STRAIGHT TO
THE SIDE and increase RPM’s to warm up the engine @
950 –1000 rpms.
6. Check oil pressure and charging voltage for proper operation @ 950 - 1000 rpm
7. Check the engine exhaust for both WHITE STEAM/SMOKE and exhaust WATER.
a. Shut down engine immediately if there is an issue
8. If all is well, repeat procedure for PORT engine
9. Turn DC panel switches for the Blowers to ON.
a. (3 switches total - main blower switch in upper left and 2 switches on the right hand bank)
10. Warm the engine for about 5 minutes before engaging transmission.
11. Observe the readings of the gauges.
a. The oil pressure will register about 30-40 PSI.
b. The engine temperature should rise slowly.
Troubleshooting TIPs:
If the starter does not engage when the key is turned, move the gearshift lever slightly until you find neutral and try
again.
If oil pressure is LOW, shut down engine, and inspect engine compartment and look for possible causes (for
example, loss of oil.) If the oil pressure needle is bouncing all over the place, a metal fragment may be stuck in the
oil pressure sending unit. This is usually a temporary problem. If the oil pressure is truly low, you should hear an
alarm similar to when pre-heating at startup.
If an engine is overheating or there is lack of raw water expelled in the engine exhaust, stop the engine immediately.
Recheck the raw water-cooling system to ensure the seacock is ‘open’ (handle in-line with valve). If open, close and
check the raw water strainer for debris. Remove the strainer, clean, re-assemble, and reopen the raw water intake
valve (seacock). Restart the engine and re-check water flow from the exhaust. If water is not flowing properly, the
RAW WATER PUMP may need to be serviced. Seek help by calling AYC first.
If the engine cranks too slowly or fails to turn over, check the condition of the battery on the ELECTRICAL
PANEL. If the battery is low, run the generator for a while, or try the BATTERY PARALLEL SWITCH (located
beneath the first stair in the salon and in the panel in the aft stateroom) to connect the other engine battery. TURN
OFF AFTER USING!

6| P a g e
Getting Underway
1. DISCONNECT the shore power cord at the dock electrical box first, then at the boat. Store cord on the
boat for use at other marinas.
2. Close things up to prevent water and exhaust vapors from coming in
a. ALL the PORTHOLES (especially AFT)
b. the salon WINDOWS
c. FORWARD Deck HATCH.
3. Double check all electrical panel switches for proper settings
4. Turn on your VHF and electronics.
5. ASSIGN crew members their various positions.
6. Once outside the marina, idle the engines while crew brings in fenders and lines.
7. Enjoy your time on the water
Using the Canvas
The canvas and glass inserts are made to be used to make you comfortable, and all of it fits together. Be firm but
try not to stress the zipper ends too much. Try another approach if you’re having difficulty.
1. If it feels like the Zipper doesn’t quite reach…
a. Disconnect/loosen another part of the panel (below, beside, above)
b. Wait until it warms up in the sun –the glass and canvas stretches better
c. Unzip the next connected panel
2. Salt leaves a residue on the glass
a. Use only the approved cleaners and soft clothes in the flybridge locker
b. The best approach is a fresh water bath and use the squeegee in the flybridge locker
c. In the morning, the early riser could use the squeegee on all the glass because it is often wet with
dew
d. Even salt water and the squeegee will work, but it’s NOT ideal for the view or the glass
3. Use the many BLACK ties w/snaps to hold the glass panels in place
a. DO NOT remove the panels entirely from the boat –roll them up and tie in place
b. especially the main windshield panel which can whip up in the wind
c. the main aft doorway rolls up neatly and should be secured with two straps
TIP: The center windshield screen will be used frequently. Rather than remove it to
provide ventilation, simply roll it forward and put a loop around it to hold it in place. To
close it up, it can be a tight fit when the canvas is cold. Easiest remedy is UNZIP the top
of the starboard windshield panel and manually pull the bimini frame down to zip the
center panel more easily.

7| P a g e
Cruising
GEARSHIFTS/Throttles
–Ensure the throttles are in the ‘idle’ position before engaging the gearshifts to avoid transmission damage.
–Move gearshift slowly to point of transmission engagement, either FWD or BACK, then engage more
throttle
–Be smooth and purposeful with the shifters and throttle
–Maintain RPM balance between engines
Cruising speed is usually about 1500-1750 RPM and the engine maximum is no more than 2300 RPM’s for short
periods –as in avoiding a ferry bearing down on you.
Your speed will vary depending upon the weight and load and weather conditions. TRIM TABS are adjustable at
the helm if desired. They adjust the BOW, as in BOW UP or BOW DOWN port and starboard. She will ride high
on the starboard side until trimmed out. Perfect trim is when she is riding flat and you maybe pick up a little speed.
Always avoid higher engine speeds as it causes higher engine temperature, possible damage, and higher fuel
consumption. If you run at 2000 RPM’s you will cruise at 10-11 knots and use about 12 gallons of diesel per hour
($35-$40/hour total for both engines) –while maybe only half that fuel consumption at 1500 RPM traveling at 8-9
knots. See below for approximate diesel usage.
Turbo Engines –5 minute Cool-down required
Before turning off the ignition, allow the engines to ‘idle’ at about 700 RPM for
about 5 minutes to cool them gradually and uniformly. This is very important
since the engines are Turbo charged and the residual oil in the turbocharger needs
time to cool down or it could damage delicate moving parts. The time preparing to
dock the boat is usually sufficient.
Ensure each GEARSHIFT is in the ‘neutral’ position and each THROTTLE is in the
‘idle’ position. Turn off engines; remove the keys and place in the electrical panel cabinet in the main salon.
Turn Blower switches off after 5-10 minutes to conserve battery.
Max RPM’s is 2300
Approximate GPH @ RPM’s

8| P a g e
Docking
During docking, have your crew make ready the lines and fenders and give clear instructions on how you will be
docking. Often times your crew will need to step off from the swim step with the stern line. Another crew member
will need to be at the bow or mid-ship to hand over the next lines. Prima Vista has high walkways. A good trick is
to secure a line from one side cleat to another with a lot of slack drooping down the side toward the water. This
allows a person on the dock to easily grab the side line and pull you in.
NEVER PUT A PIECE OF YOUR BODY BETWEEN THE DOCK AND THE BOAT (HAND, FOOT, ARM,
ETC.) YOU WILL LOSE OR BREAK SOMETHING, AND IT WON’T BE THE 40,000 POUND BOAT.
While moving slowly to the dock or mooring location, center the WHEEL (e.g. rudders straight) and use only the
GEARSHIFTS and THROTTLES to maneuver the boat.
REMEMBER TO DO EVERTHING IN SLOW MOTION.
ONLY USE GEARSHIFTS and THROTTLES TO MANEUVER (NOT THE WHEEL)
Source: Google

9| P a g e
Fueling Up with DIESEL
There are two filler locations located just outside the sundeck doors on
each side of the vessel. OPEN FILLER CAP(S) with a DECK
FITTING KEY kept in the salon electrical panel cabinet. Open and fill
ONE SIDE at a time. Be careful to NOT lose the covers overboard!
MAKE SURE YOU HAVE THE RIGHT FUEL! DIESEL! DIESEL!
DIESEL! MAKE SURE IT IS GOING INTO THE CORRECT DECK
FILL! Double-check since the waste and diesel fittings are near each
other on the starboard side. DO NOT POUR DIESEL INTO THE WASTE LINE AND DO NOT ALLOW
ANYONE TO PUMP-OUT THE DIESEL FUEL TANK!
Before pumping, have oil/fuel sorbs handy to soak up spilled fuel. You should calculate a rough idea of the
number of gallons you will need –each ¼ tank is about 35 gallons. If needed, periodically have a helper turn the
ignition key (only to the alarm position) to watch the fuel gauge.
Place the DIESEL nozzle into the tank opening, pump slowly and evenly, and note the sound of the fuel flow.
Pumping too fast may not allow enough time for air to escape, which may result in spouting from the tank opening.
As the tank fills, the sound will rise in pitch or gurgle. Top off carefully, and be prepared to catch spilled fuel.
Spillage may result in a nasty fine from law enforcement.
Replace each tank cap immediately. Wash hands with soap and water thoroughly.
You can fill up with DIESEL fuel (and pump out) at many places in the San Juan’s. Cap Sante Marina, just ½ mile
north of Anacortes Marina is great. Cap Sante has lots of space, free pump out and good fuel prices.
The Pumpout station and the Fuel station have large access and reliable services.

10 | P a g e
BOAT ELECTRICAL
The electrical system is divided into two distribution systems: 12-volt DC –top, 110-volt
AC bottom.
The systems are controlled from the AC & DC ELECTRICAL PANELS located in the salon near the television.
The AUXILIARY PANEL and BATTERY SWITCHES are located beneath the first salon stair and in the aft
stateroom.
12volt DC System
When not connected to shore power, batteries are providing all power. Therefore, monitor the use of onboard
electricity carefully with your volt meter located in the electrical panels and turn off electrical devices that are not
needed. We have replaced most of the lighting with LED to conserve battery life for you.
Some breakers are labeled by colored dots. Green signifies “usually on”. Red is “usually off”. Blue dots are water
pressure or water-related like pumps that you will likely want on when cruising. Yellow signifies important items
like blowers that need to be turned on/off as needed. No dots are breakers that signify irregular use or use with
discretion.
110-Volt AC System
SHORE POWER supports all AC equipment and receptacles on board, as well as the battery chargers.

11 | P a g e
To connect to shore power, plug the 30 amp POWER CORD into the boat and then into the dock receptacle. Check
the power rating/plug size of the nearest dock receptacle (that is 50 amps, 30 amps, 20 amps, or 15 amps). If
necessary, add a CORD ADAPTER located at the end of the shore power cord. Turn the dock power on. Cords
coming off the bow can be wrapped loosely around the bow line.
At the ELECTRICAL PANEL, flip the SHORE CIRCUIT
BREAKER on. Then turn on appropriate breakers for battery
charger, refrigeration and water heater. Watch your amp
meter for load. If the load exceeds circuit amperage, you will
pop your breaker. If this occurs, wait to turn on one of your
systems (i.e. water heater) until your use of amps drop. On
30 amp power, you will usually not be able to use more than
one or two devices that consume lots of AC power (hair
dryer, microwave, space heater, hot water heater, and
vacuum).
If your outlets fail to work, check your GFIs to make sure
that they have not been tripped. GFI protected outlets are in
galley, both heads and aft port salon. Other circuits may be
connected to them also so if an outlet doesn’t work, check
the GFI’s.

12 | P a g e
Kohler Diesel Generator
It’s quiet and easy to use, so feel free to use it as needed. The generator controls are located in the electrical panels
by the television in the salon.
1. To START
a. Lift the switch for about 3 seconds to start.
b. After starting, make sure water and exhaust is exiting the exhaust below the port swim step and that
small bubbles coming from the underwater exhaust.
2. Next - turn off switch to shore power
3. Slide the protective bar up on the panel to “block” shore power
4. Turn power selector generator switch ON
5. Then turn on AC systems as you would on shore power one system at a time.
Stop the generator by simply switching generator switch to OFF.
House (12-volt) System
Four battery banks support 12-volt DC power: 1) one port engine battery 2) one starboard engine battery 3) two
house batteries 4) one Generator battery
The MAIN BATTERY SWITCHES are located beneath the first step in the salon and in the aft stateroom.
Normally, leave the ENGINE/ GENERATOR and HOUSE SWITCHES in the ‘ON’ position.
Note -- Do not change the position of the switches while the engines are running or the alternator diodes
will be damaged. Change positions only with the engines off.
(This guest has her left foot on the stair where the House Battery Bank & Switch is located)
The HOUSE BATTERY BANK provides power for all DC systems, except the engines and automatic bilge pumps.
When disconnected from shore power, all 12-volt devices drain the house batteries. Use devices as needed. The DC
voltmeter on the DC panel can be switched to measure charging or resting battery voltages. The voltmeters for the
engine batteries are on the fly bridge console.

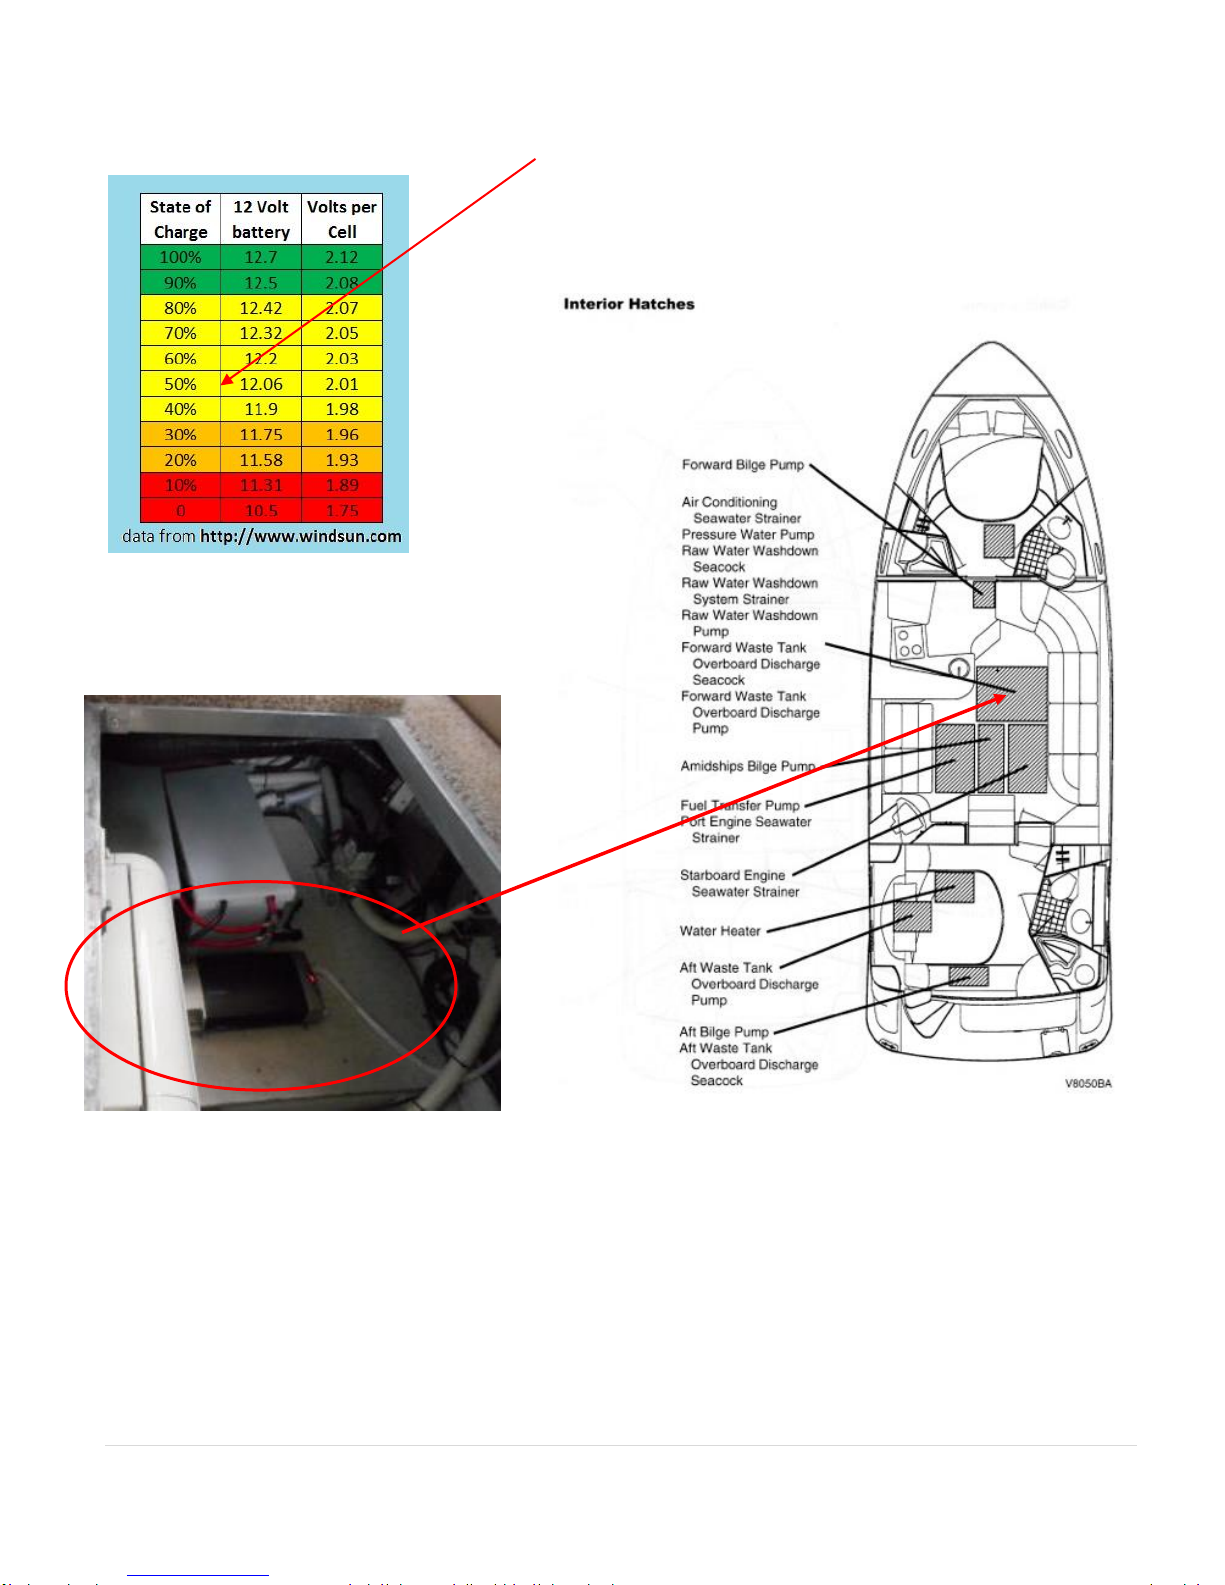
13 | P a g e
When a battery bank is being charged, the voltage will read from about 13.1 volts to 14.4 volts depending upon
state-of-charge of the battery bank. When the battery bank is at rest, (that is, not being charged), the voltmeter can
give a rough indication of the state-of-charge of the battery bank.
Engine and house batteries are charged by the engine ALTERNATORS while underway. The engine/house batteries
are charged by the BATTERY CHARGER when connected to shore power. Ensure the Battery Charger circuit
breakers at the electrical panel in the aft stateroom are ON. The GENERATOR will also charge the batteries if the
battery charger switch is on.
PLEASE don’t let the battery charge get below 12v as it’s very hard on the battery life. Use the Generator –that’s
what it’s for and it works great!
House 110v Batteries
Inverter
Starboard Engine
Starting Battery
Port Engine
Starting Battery
Generator
Battery
House 12v Batteries
14 | P a g e
Voltage (Wet Cell Battery) indicates that 12v is really lower than you would want for maintaining healthy batteries.
As you can see, 12v is only 50% capacity.
Always keep the main house system
at or above 12 volts. Use the
generator as often as needed.
This is the inverter and additional house batteries for 110v. It’s located under the floor
panel if RESET is ever needed following an overload situation.

15 | P a g e
Sanitation System
Vacuflush Marine Toilets
Prima Vista has Sealand Vacuflush toilets and they work great –when you do a few simple things properly. The
valves, openings, and pumps may clog if you aren’t careful. If the toilet clogs, it is YOUR RESONSIBILITY! It is
important that every member of the crew be informed on the proper use of the MARINE TOILET.
TIPS:
1. The wall switch in each head must be in the “RUN” position for the vacuum to charge after each flush.
2. Flush solids first, then flush small amounts of toilet paper. Too much of anything at once can be bad news.
3. Depressing the foot pedal all the way activates the flushing mechanism. Let the foot pedal “snap back”to
close the valve properly.
a. Letting the pedal up slowly might leave a gap and the vacuum pump will keep trying to rebuild the
vacuum.
b. You will hear the vacuum pump about 20-30 times to recharge the vacuum in the tanks after each
flush. If the pump keeps cycling, then there is a leak in the system somewhere and it cannot build a
vacuum. (Sometimes a bit of toilet paper gets stuck in the seal.)
4. Make sure you leave some water in the bowl after flushing. Lift the foot pedal to add water.
5. Ideally flush the head for small children to make sure nothing foreign is being flushed.
6. At night or when you are away from the vessel, ALWAYS put the heads in SLEEP mode.
NEVER put paper towels, tampons, Kleenex, sanitary napkins, household toilet paper or any food into the marine
toilet. Use only the special dissolving marine toilet tissue provided by AYC.
Good news/bad news - The Vacuflush system draws fresh water from the tanks, not sea water. This is very
important to remember. You have a limited supply of fresh water; however, using fresh water is what keeps the
odor off the boat.
Troubleshooting
If the worst happens and you plug the toilet, try the steps in this link. (Be careful the toilet does not suck the plastic
bag into the system!)
https://www.youtube.com/watch?v=rC4-gQNXgOw
1. If the bowl doesn’t refill with water but you hear a sucking noise, something is preventing the seal from
closing. If this occurs, make sure the gasket is free of toilet paper and depress the foot pedal and let it “snap
back”into position.
2. At night, the toilet wall switches (in the heads) can be placed on “SLEEP” so that you don’t hear the toilets
recharging.
Waste Water Holding Tanks
There are two tanks –fore and aft - each sanitation HOLDING TANK holds approximately 40 gallons. Be aware of
the rate of waste production as overfilled tanks can break a hose, clog a vent, or burst the tank resulting in an
indescribable catastrophe and a very EXPENSIVE FIX to you. Watch the monitors carefully and pump out waste
tanks EVERY OTHER DAY or as needed to avoid this problem.
You can check the levels of waste in the tanks by:
Turn on the waste monitor switches in the DC panel and checking the level
gauge inside the medicine cabinets of each head. Each monitor has 4 lights
to tell you the current status.

16 | P a g e
The holding tanks are emptied in two ways:
1. At the Marine Pump-Out Station, safely remove the WASTE deck
fill caps located fore and aft along the starboard toerail.
a. Insert the pump-out nozzle into the waste opening.
Double-check your deck fitting!
b. Turn on pump and open valve located on pump out hose
handle.
c. When pumping is finished, close lever on handle and turn
off pump. Remove from deck fitting.
d. Rinse the tank by adding fresh water for about 2 minutes
e. Re-pump to leave the tank rinsed for the next charter.
This also eliminates head odors.
2. The tank’s contents can be discharged with the overboard
discharge only in Canadian waters. To operate, open the thru-hull
fittings at each holding tank location, pull up the nearby pump
switches and turn on the waste pump switches on the DC panel.
The forward head tank is in the starboard engine room in front of
the engine. The overboard thru hull fitting and pump switch are
nearby. For the aft head, the thru hull fitting and switch are
beneath the lift-up panel beneath the stern window aft. Listen to
the macerator’s sound. When the pitch becomes higher, the tank is
empty. Discharge is underwater. It should only take a few
minutes to empty the tank.
Y-Valve
The Y-VALVES direct waste effluent overboard beneath the boat. The Y-VALVES are located as described above
in the starboard engine room and beneath the stern window aft. A plastic strap keeps the handle in the closed
position in respect to Coast Guard regulations. Please leave it “as is” unless there is an emergency. Be familiar with
the applicable laws concerning dumping sewage directly overboard. NEVER TURN ON THE MACERATOR
PUMPS WHEN THE VALVES ARE IN THE CLOSED POSTION!!
TIP:
A word to the wise, if the US Coast Guard boards you and your valves are not closed and strapped, you are in for a
tough day and expensive ticket. There are commercial pumpers at most docks.

17 | P a g e
FRESH WATER SYSTEM
Fresh Water –about 90 gallon capacity
There is one deck fitting for refilling the freshwater tanks on the starboard side rail near the front window that fills
both tanks.
Fresh Water Pressure Pump
The WATER PRESSURE PUMP is activated at the electrical panel and is physically located in the forward bilge
beneath the sink. If the water pump continues to run, you are either out of water or a faucet is open somewhere on
the vessel.
Hot Water –10 gallon capacity
The HOT WATER HEATER is available only when connected to shore power or using the on-board generator. To
use, turn on the “water heater”breaker on the AC electrical panel. Do not use the water heater if the water tank level
is very low. The water heater is located beneath the bed in the aft stateroom.
Boat Showers
Before taking a SHOWER, make sure water pressure and shower sump breakers are on. Take only very short “boat”
showers (turning off water between soaping up and rinsing). To keep shower tidy wipe down the shower stall and
check for accumulation of hair in the shower and sink drains. Ensure that the faucets and nozzle are completely off
after use. The showers and sinks drain slowly as they are draining through the hull fittings.
TIP:
If you run out of water SHUT OFF YOUR HOT WATER HEATER on the AC panel or serious damage will occur!
Only turn on the hot water heater switch in the AC panel if the boat has plenty of fresh water. Remember the toilets
use fresh water for flushing.
Remember to watch your waste water levels as there’s only so much capacity.

18 | P a g e
GALLEY
Most galley appliances can be operated at any time (via an Inverter in the engine room) from the house battery
bank. However, they will not all run at once unless the generator is running or the vessel is using shore power.
Microwave or Range
Turn on the “microwave” breaker and/or the “range”
breaker on the AC panel.
Coffee Maker
The 12 cup coffee maker also uses an AC panel
switch.
Refrigerator
The Nova Kool REFRIGERATOR is dual voltage
(both 12-volt and 110-volt power). It will
automatically use 110-volt power when the shore
power is connected; otherwise, it will operate on 12-
volt power.
TIP:
Monitor the use of the refrigerator when the engines are not
charging the 12-volt house battery system. There is a dial
located inside the back right of the refrigerator set to 5 or 6
when operating normally under full power. Simply reduce to
1 or 2 when anchored or moored or when turning in for the
night to conserve battery power.

19 | P a g e
HEATING & Cooling
Webasto Diesel Heater (DC)
The DIESEL FORCED-AIR FURNACE (located in the vented cabinet near the door to the aft stateroom) provides
heat in much the same way as a household furnace. There are vents in both staterooms, main salon and the bridge
that can be opened or closed. It only works so-so in our opinion
To use, simply turn on the TOGGLE SWITCH located on heater thermostat and set the THERMOSTAT to the
desired temperature –normally just over halfway up the dial scale. Once it is on, allow it to run for at least 15
minutes before turning it off.
Turn ‘off’ the furnace heater by turning the dial down and turning the toggle switch off.
TIP:
Check The furnace EXHAUST PORT located on the starboard side for any obstruction such as fenders or lines. Do
not block this opening when operating the furnace. The aft vents are closer to the heater and get warmer than the
bow and should be closed if the front is not getting warm enough.
Portable Heating & Cooling
There are two portable heaters to use as well. Located in the aft stateroom closet. They WILL draw a lot of power
so be careful with their use when not using the generator or you are on shore power.
There is also a fan in aft stateroom closet which is quiet and doesn’t draw much power.

20 | P a g e
Electronics –Navigation and Radio
Electronics:
Garmin 840xs Chartplotter system installed in 2015 is very
intuitive to operate. The unit has GPS and directional
information, Depth Sounder/Sonar and Radar all in one unit.
Simply power on, select the Home Key and you will be able to
pick from many functions and display combinations.
The Garmin Autopilot is mainly used to help you hold your
selected course heading and will not protect you from floating
debris, wildlife or other hazards. There is no substitute for an
attentive captain.
Using the Garmin 840sx to select your “Go to” or “route to” headings or waypoint, then select “engage” on the
autopilot.
Radar
Garmin Radar is installed and available on the 840sx console via the main menu.
Select Radar and then transmit signal to spin up the radar unit. Select Cruising from
the menu and you should be good to go. Turn the radar off upon reaching your
destination as it takes a lot of power to keep it spinning. While you should NOT be
operating in conditions requiring radar, you may find yourself in need.
VHF Radio
There is a VHF RADIO located on the fly bridge and a handheld unit in the main
salon. Make sure the “bridge electronics” breaker is on located at the DC panel. Always monitor channel 16 while
underway. Approved radio operations protocol is to be followed.
Weather is accessed via the menu system:
1. From the main menu, press the Right Arrow key, then select WX. Channel 4 is often chosen.
TIP:
Remember you are not allowed to travel in FOG, at night or in serious wind conditions. GPS is considered a
navigational aid. Do not rely on it. Compasses, charts, and dividers are the tools to plot position, course, and speed.
Table of contents
Popular Boat manuals by other brands


Jeanneau
Jeanneau SUN ODYSSEY 41 DS owner's manual

Meridian
Meridian 490 Pilothouse owner's manual

Advanced Elements
Advanced Elements AdvancedFrame Expedition AE1009 owner's manual

Robo Marine Indonesia
Robo Marine Indonesia GEOMAR user manual

Swallow Boats
Swallow Boats BayRaider owner's manual

X SHORE
X SHORE EELEX 8000 owner's manual


