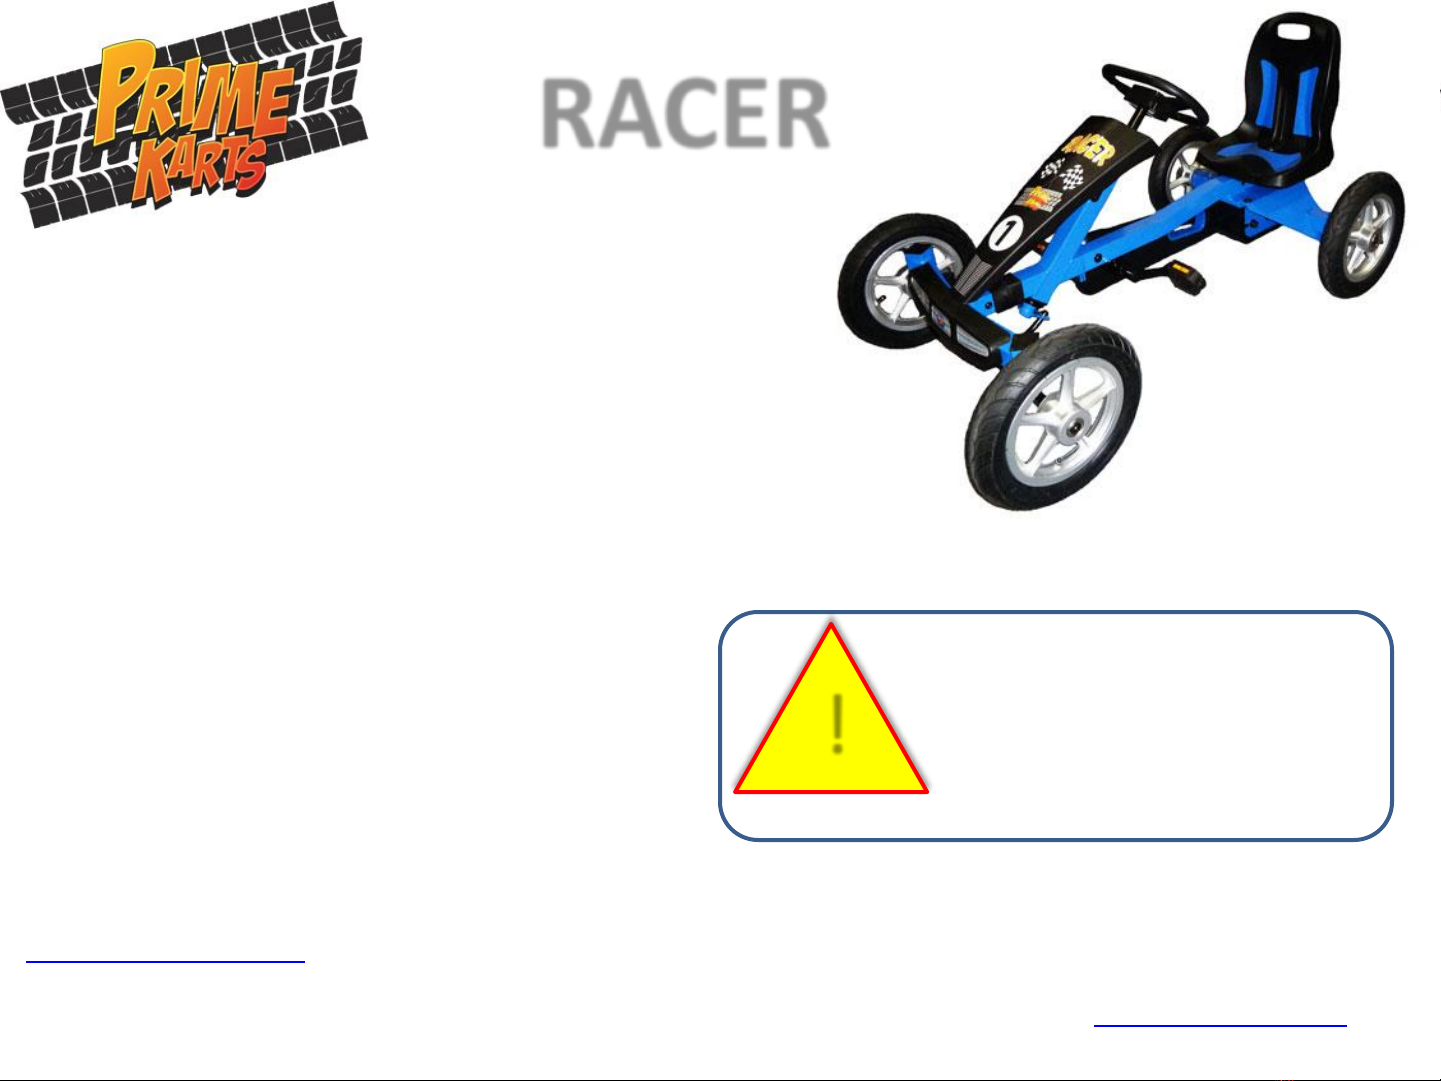
Prime Karts Racer User manual
PRIME Pedal Karts, LLC
9235 Roe St.
Pensacola, FL 32514
www.primekarts.com
Tel . 866-475-0450
Congratulations on your purchase of your
PRIME Racer kart!
The PRIME name has been synonymous with
quality and durability for nearly 50 years and
our line of commercial quality karts are
designed and manufactured with safety in
mind. With some basic periodic maintenance,
your Prime Racer will give you years of FUN
riding!
As you grow out of your PRIME Racer, be sure
to check out our web site at
www.primekarts.com to check out our
complete line of PRIME karts with models for
“kids” of all ages. Even adults!
!
WARNING
Choking hazard small parts
Adult supervision and
assembly is required
Owners Manual
RACER

SAFETY PRECAUTIONS
All assembly of your PRIME Racer must be performed by an adult. If there are any questions about the assembly,
please contact PRIME or your authorized dealer before attempting to ride your Racer kart
Do not ride the Racer kart on public streets
Always use under adult supervision
Do not turn sharp at higher speeds or the Racer can flip
Use extreme caution when riding on hills
Do not ride backwards too fast or you can lose control
Do not exceed the weight limit of 100 lbs.
Only (1) one rider is allowed
Do not ride at night
Do not wear loose clothing that can get caught in moving parts
Always wear proper shoes when riding
Always ride with a safety flag for visibility
Always use the pedal brakes to stop
Keep your feet on the pedals at all times while moving
Avoid any contact with the wheels while the Racer is in motion
Make sure tires are set at the proper air pressure
Any broken, damaged or worn parts must be replaced before riding
Collisions or stunts can be dangerous and cause injuries to the rider and others and can cause damage
Make sure that the steering and brakes are working properly before each use
Make sure that all bolts are properly tightened before each use
All covers and guards must be in place before riding
Make sure seat and steering wheel are properly adjusted for the rider before each use
A helmet should be used when riding
ABOVE ALL, USE COMMON SENSE WHEN USING YOUR PRIME RACER KART

Carefully unpack your new PRIME Racer kart. If there is any damage to the
package or the kart, please contact the shipping carrier immediately and advise
them of any shipping claims for loss or damage. If there are any questions about
assembly, please contact PRIME at info@primekarts.com or call 850-475-0450.
ASSEMBLY

1. Carefully unpack the contents of the box and
remove the protective wrap from the frame
components. PLEASE DISCARD THE PROTECTIVE
WRAP SAFELY
Contents:
A. 3- Coast wheels
B. 1- Drive wheel
C. 1- Seat
D. 1- Spoiler
E. 1 –Steering Wheel
F. 1 - Steering Wheel stem
G. 1- Rear Assembly
H. 1- Front Assembly
I. 1- Spoiler mounting bracket
J. 1- Decal graphics set
K. 1 –Assembly set
a. Steering wheel cap
b. (4) spoiler bracket mounting screws
c. Open end wrench (10mm/13mm)
d. Hex wrench
e. Seat Clip
f. Short front/rear connection bolt set
g. Long front/rear connection bolt
1 –Safety flag (not pictured)
NOTE: A Philips screw driver (not supplied)
will also be needed for assembly
ADULT ASSEMBLY IS REQUIRED
A A
A
B
C
D
E
F
G
H
I
J
K
a
b
c d e
f
g

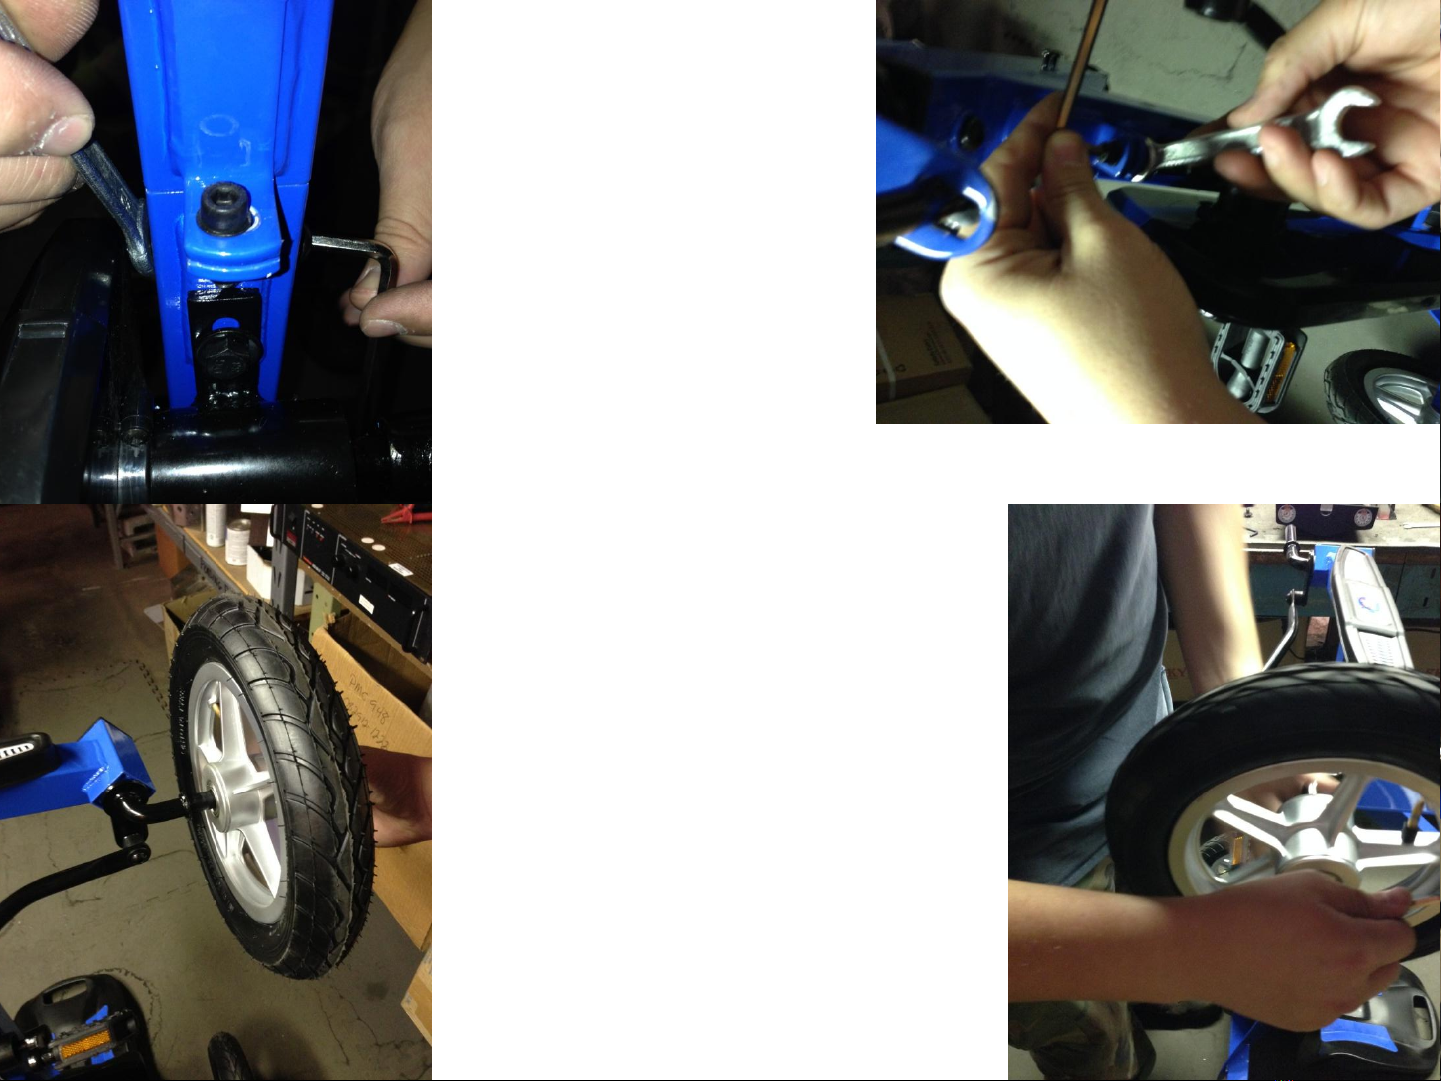
Remove the bolt from both rear axles. Install one of the 3 coast wheels on the right rear axle. Please note the
direction of the tread is facing forward. Install the bolt and tighten using the hex wrench that is included.
Locate the drive wheel. It is the wheel without a bearing on one side. The wheel hub will match with the pattern on the drive gear on the left
rear axle. Install the bolt and tighten using the hex wrench that is included.
2. 3.
4. 5.

Remove the protective plastic cap
from the seat post and place seat in
the last adjustment hole.
Stand the back end up resting on the seat. Insert front end tube into rear tube.
6. 7. 8.
9.
Install SHORT front/rear connection bolt set.
DO NOT TIGHTEN YET
10.
Install LONG front/rear
connection bolt set.
Note the washer is
installed on the bolt
before it is installed into
the tube
Using the 10mm open end wrench and hex wrench,
tighten the SHORT front/rear connection bolt
11. 12.
Using the 13mm open end
wrench and hex wrench,
tighten the LONG front/rear
connection bolt
Remove bolts from both front axles.
Install both front coast wheels. NOTE:
the “V” tread pattern of the tire faces
forward
13.
Tighten both front wheel
bolts using the hex wrench
14.
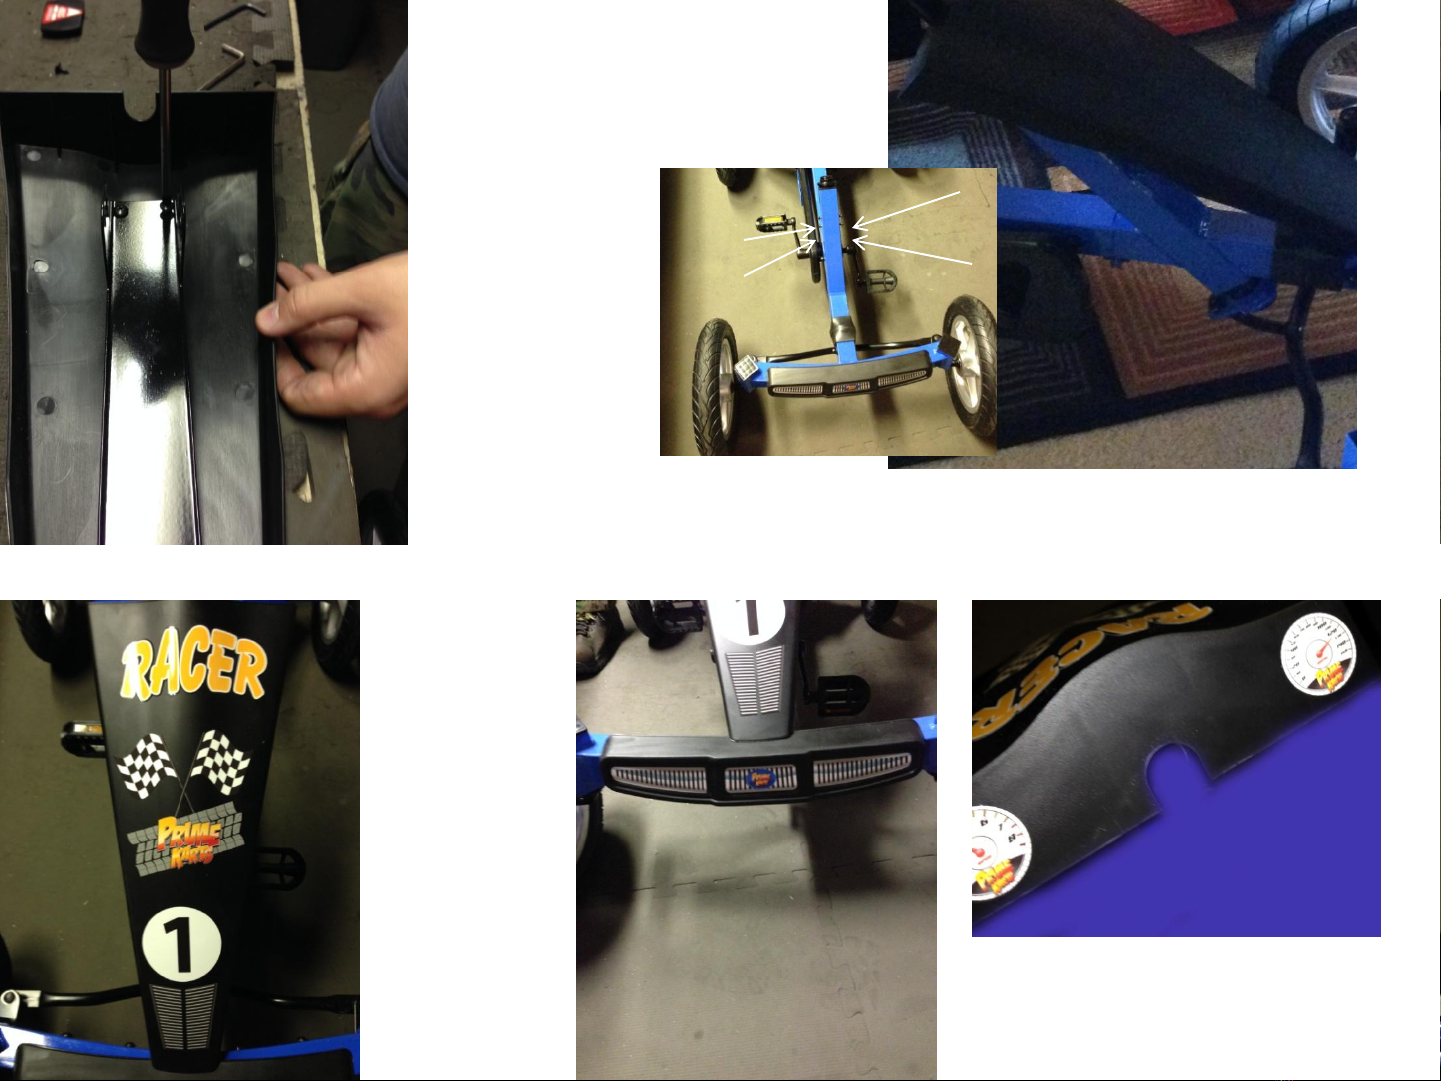
Mount the spoiler
bracket to the under side
of the spoiler. Note the
position of the tabs of
the bracket are toward
the top . Attach the
bracket using (4) small
screws with a Phillips
screw driver (screw
driver not included)
15. 16.
Remove (4) Phillips head crews from the steering column. Line up
the spoiler mounting bracket holes with the 4 screw holes in the
steering column. Attach the spoiler using 4 Phillips screws
17..
16..
17.. Install the
front spoiler
graphics as
shown

Re-attach the wedge nut to the steering shaft bolt so there is
about ½” of threads exposed past the wedge nut
20..
Wedge nut
Remove the wedge nut from the steering shaft bolt.
18.
Steering shaft bolt
Once the steering shaft bolt has been removed from the steering
shaft, place it through the steering wheel and slide the steering shaft
over the bolt. Align the triangle at the end of the steering shaft with
the triangle detent on the back of the steering wheel
19..
Insert steering shaft into steering tube.
21..
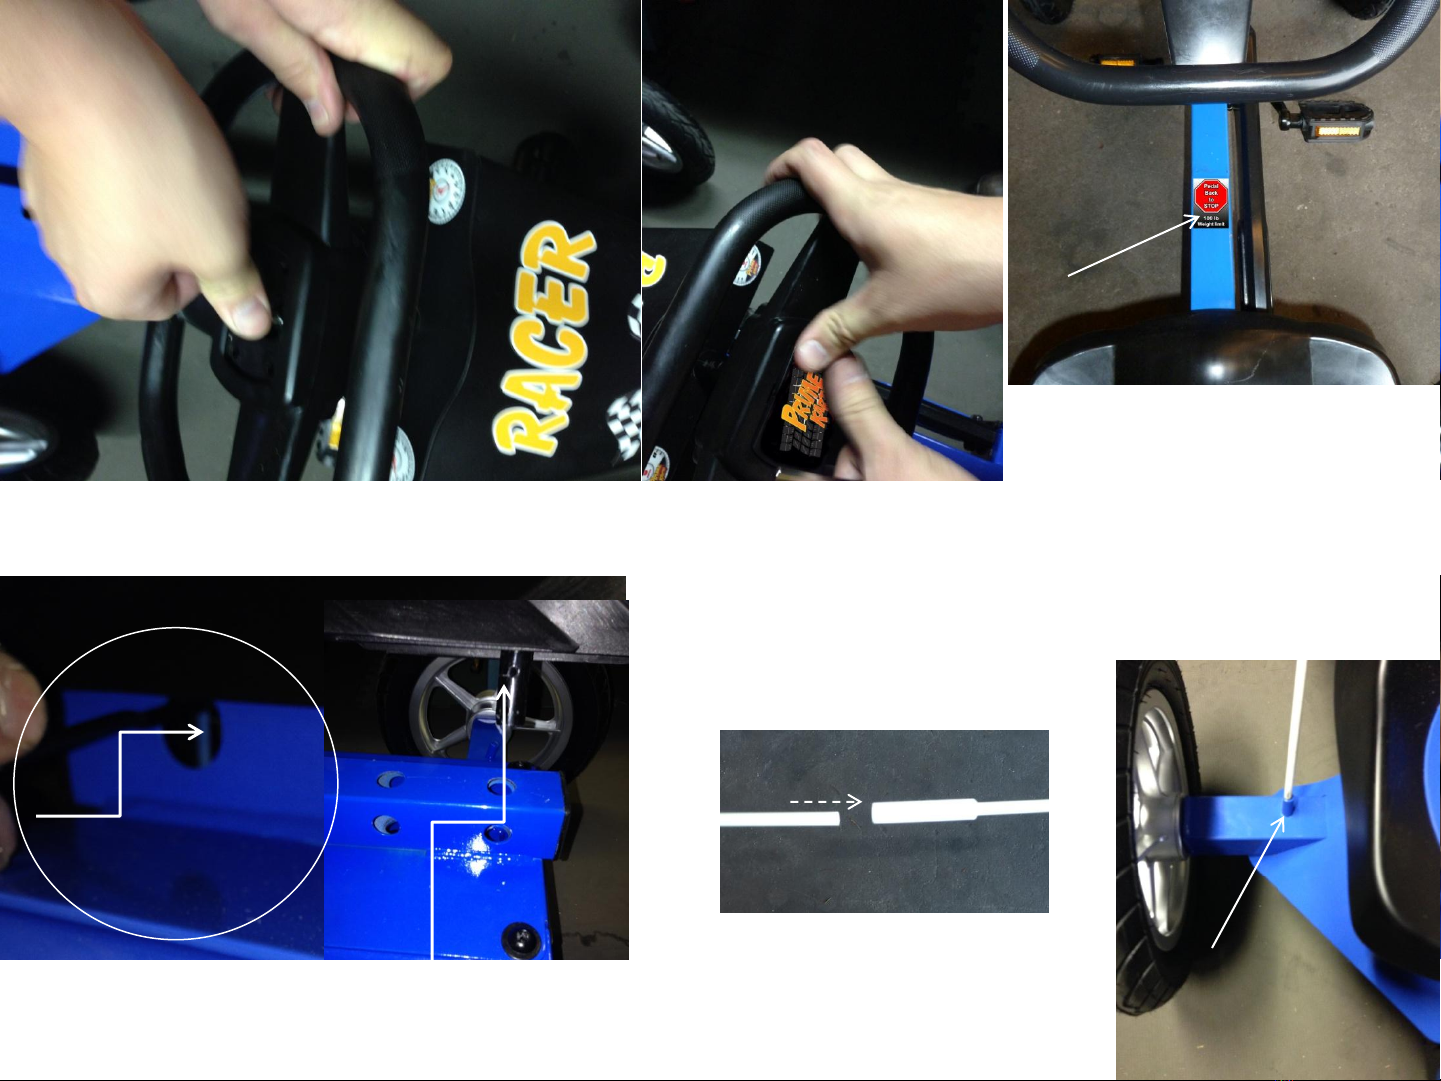
22..
With the steering wheel and the front wheels straight, set the
steering wheel about 2” from spoiler and tighten the steering
shaft bold in the center of the steering wheel.
23..
After the steering shaft bolt has been
tightened, snap the steering wheel
cap in place and apply the “Prime
Karts.com” decal to the cap
Adjust the seat into the proper position for the rider. Be sure that the seat post is
all the way into the bottom hole and sits flat on the square seat adjustment
base. Insert the locking pin into the hole from either side of the seat adjustment
base. Make sure the pin is through the hole in the seat post
25..
Insert the safety flag
into the flag mount
located on the right
rear axle
27..
24..
Attach braking instruction and
weight limit decal to center frame
as shown.
Assemble the safety flag by
connecting the 2 pieces
together
26..

Item
Commercial Use
Consumer use
Front Chain
Weekly
Monthly
Rear Chain
Every 2 weeks
Every 3 months
Crank bolts and BB
Weekly
Monthly
Wheels and tires
(30 psi)
Daily
Daily
Steering adjust
Weekly
As needed
Grease front axles
Monthly
Every 6 months
Rear Axle
Monthly
As needed
Caution –Periodic maintenance must be performed on your pedal kart to keep it in safe and good working order. The items listed below are
some common components that will need periodic adjustment or replacement. This maintenance guide is not meant to be a complete
overhaul manual. If you have any questions, please contact Prime or a local dealer. Current replacement parts for your model can be found at
www.prime karts.com
GENERAL MAINTENANCE

1. Drive Chain
The chain used on your Prime Pedal Kart
is a standard duty bicycle chain and is
designed to withstand years of normal
use at the recommended weight rating.
However, like all chains, they will stretch
with use over time. Therefore it is
important that they be checked for
proper adjustment. To check the front
chain, remove screws (A) and lift the top
and bottom chain guard. There should
be about ½” travel by pushing on the
center of the chain. If the chain is too
tight, the transmission and drive
components will wear out quickly and
the kart will be hard to pedal. The chain
should be checked weekly for
commercial or rental use and monthly
for consumer use.
To adjust the front chain, loosen bolts (B)
and slide the pedal assembly forward to
tighten. Re-tighten bolts (B) before the
chainguard is re-assembled
A
B
A

A
2. Rear Chain
Remove the top chainguard and loosen the front chain as described in
the previous step. Next, remove rear transmission cover by removing
six (6) Phillips screws (3 on each side) as shown (A). Next loosen the
nuts (B) on the outside of each side of the transmission box. Slide the
transmission forward to tighten the chain, back to loosen the chain.
The chain should have about 1/8” up and down movement in the
center. When the chain is set at the desired tension, re-tighten the
outside nuts (B) on the transmission. The rear chain should be checked
after the first week of use. Then again monthly for commercial and
rental use and yearly for consumer use.
NOTE: After the back chain has been adjusted, the front chain will also
need adjustment. (Refer to previous page to adjust).
B
B
A

3. Crank bolts and bottom bracket axle
Using a 14mm socket, check that the bolts (A) are tightened to 23 ft. lbs. Be careful not to
over tighten. Check bolts on the right and left sides of the pedal cranks.
Check the bottom bracket axle (B) weekly for excess play. If the bottom bracket axle needs
to be tightened, remove the crank using a special bicycle crank tool and tighten the axle
using a special bottom bracket tool. NOTE, the side with the sprocket tightens to the LEFT.
These special tools can be purchased from Prime and will work on all Prime pedal karts and
most other brands.
4. Tires and wheels
The wheels are made out of a strong flexible elastomer that allows it to slightly flex if there is
impact, unlike a metal spoke rim that will dent and be damaged. If you notice any cracks in
the rim, replace it. If the wheel bearings become damaged, replace them as soon as possible.
The proper tire pressure is 30 PSI for all wheels. DO NOT EXCEED 35 psi. Tires should be
checked daily. If the tires become worn or damaged, replace them immediately.
A B
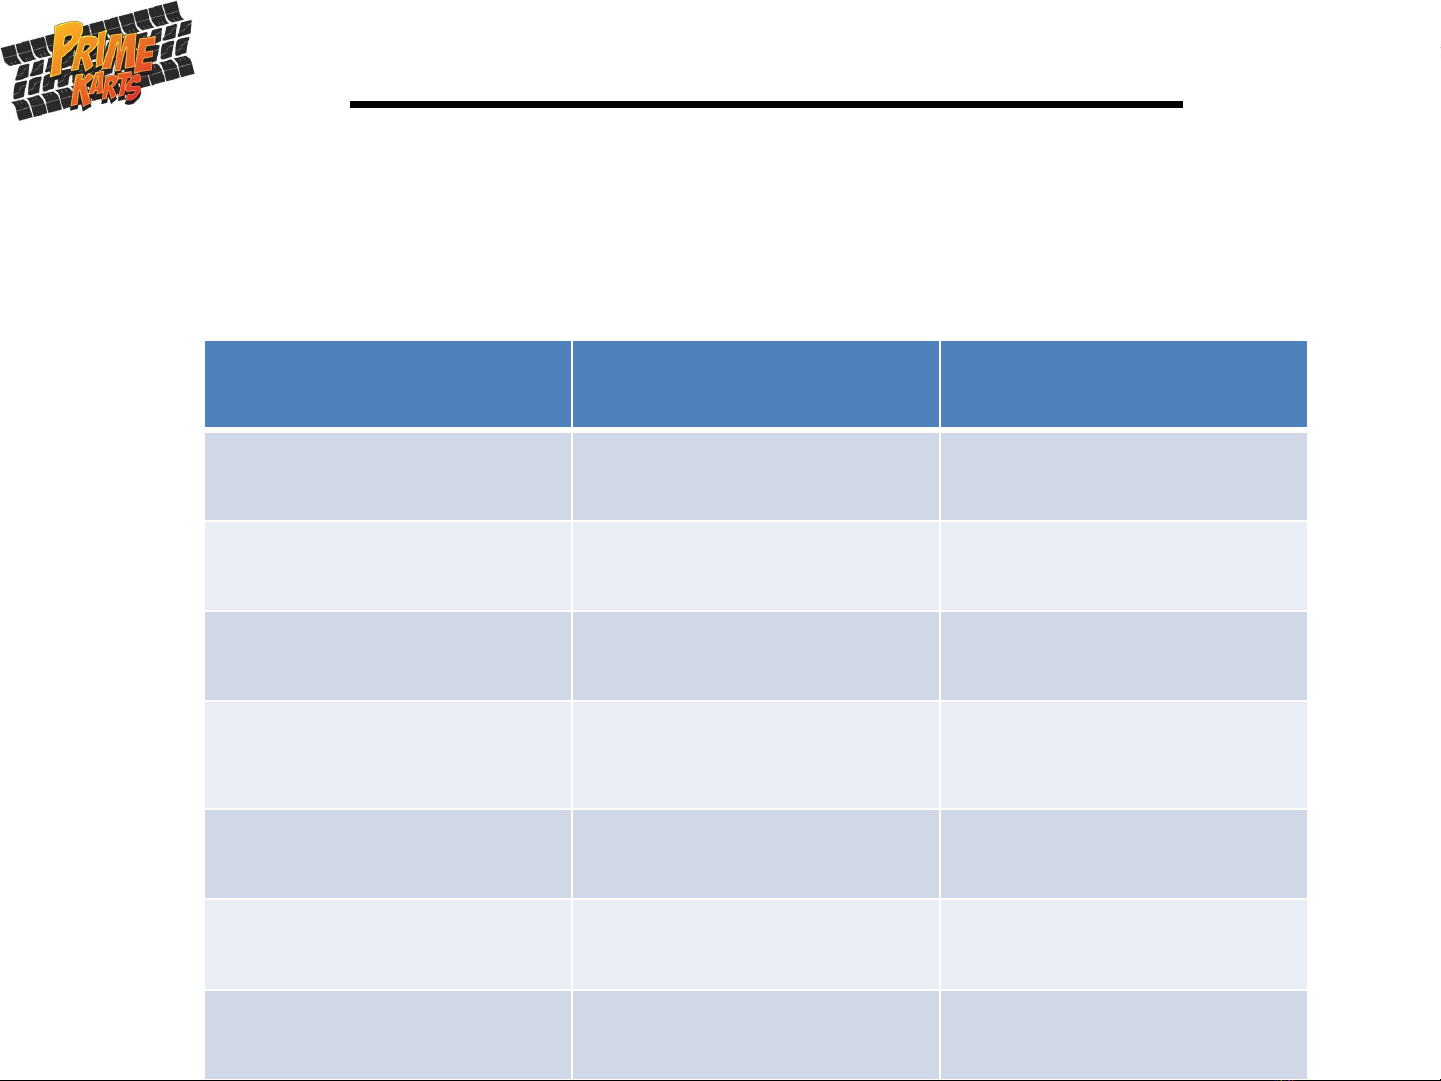
5. Rear drive axle
If you notice a noise from the rear
transmission box, it is likely that the
drive sprocket set screw or collar set
screw has come loose and is causing a
chain alignment problem. Remove
the transmission cover as described in
section 3. Loosen set screw on the
rear axle drive sprocket to align the
sprocket with the transmission. Once
aligned, re-tighten set screws.
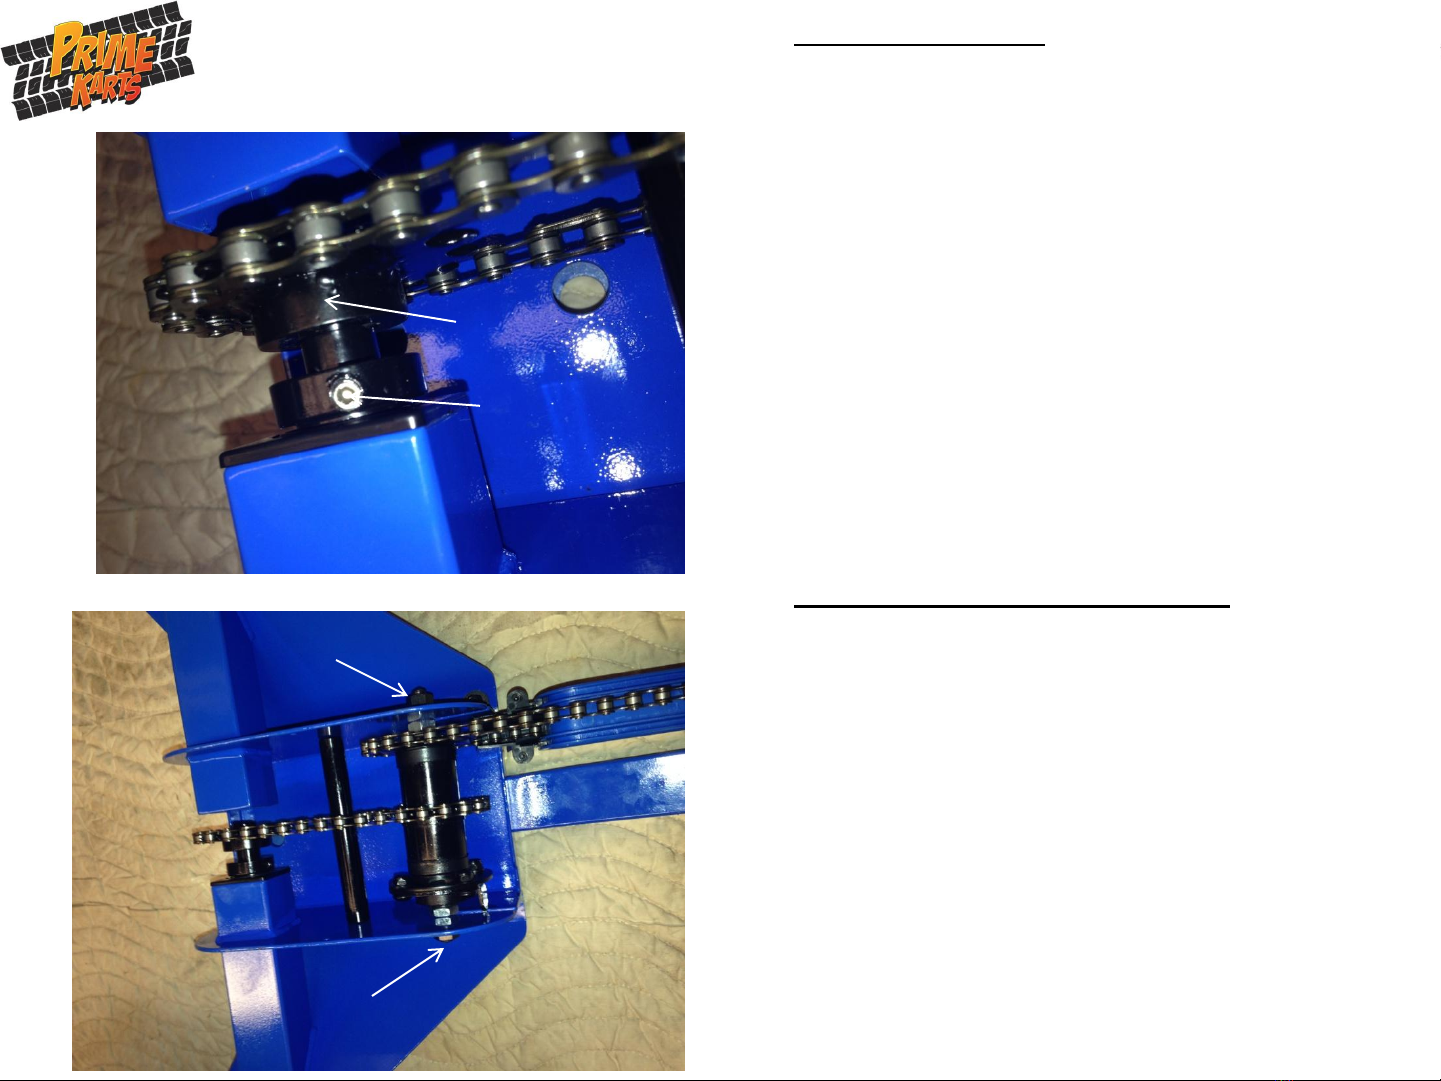
6. Coaster brake/transmission
The mounting nuts (A) need to be
checked for tightness weekly. If they
loosen up, damage to the
transmission, chain or sprockets may
occur. (See section 2 for chain
adjustment).
There are no user serviceable parts
with the coaster brake. If the part
becomes worn or damaged, replace it
with a new coaster brake.
A
A
Collar set screw
Sprocket set screw
Note: It is not
necessary to
remove the
cover as shown
to tighten the
transmission
nuts

7. Frame
The frame of the pedal kart is made from strong steel tubing and is protected with
durable powder coat paint. If the powder coating becomes damaged, touch up paint can
be purchased from Prime to keep the frame from rusting.
A complete listing of genuine PRIME spare parts can be found at www.primekarts.com
Table of contents
Popular Utility Vehicle manuals by other brands


Cushman
Cushman Turf Truckster 84069 Parts & maintenance manual

Landoll
Landoll 900D Series Operator's manual

Westward
Westward Go-4 XTR Operator's manual

Club Car
Club Car Carryall I 1999 owner's manual

Etnyre
Etnyre Street Flusher operation, maintenance, parts and safety manual

Landoll
Landoll 340 Operator's manual