PrimeDTV Technologies PHD-VRX2 User manual

Full HD 1080p Dual Tuner Digital
HDTV Recorder, Receiver and
Media Center Box
OWNER
MODEL :
Full HD 1080p Dual Tuner Digital
HDTV Recorder, Receiver and
Media Center Box
OWNER
MODEL :
Full HD 1080p Dual Tuner Digital
HDTV Recorder, Receiver and
Media Center Box
OWNER
’
S MANUAL
MODEL :
PHD
Full HD 1080p Dual Tuner Digital
HDTV Recorder, Receiver and
Media Center Box
S MANUAL
PHD
-VRX2
©
Copyright 20
Full HD 1080p Dual Tuner Digital
HDTV Recorder, Receiver and
Media Center Box
S MANUAL
VRX2
Copyright 20
13
Full HD 1080p Dual Tuner Digital
HDTV Recorder, Receiver and
13
,
PrimeDTV
Full HD 1080p Dual Tuner Digital
HDTV Recorder, Receiver and
PrimeDTV
Technologies, Inc.
Full HD 1080p Dual Tuner Digital
Technologies, Inc.

WARNING
HAZARD, DO
OR MOISTURE
This device complies with part 15 of the FCC Rules.
Operation is subject to the following two
(1)
This device may not cause harmful interference, and
(2)
This device must accept any interference that may
cause undesired operatio
C
AUTION
unauthorized changes or
equipment may void the
it.
Note to CABLE/TV Installer:
provided to call cabl
to Article 820
(Section 54 of Canadian Electrical Code, Part I), that
provides guidelines for
particular, specifies that the cable ground shall be
connected to th
close to the point of
I
MPORTANT
unauthorized recording of copyrighted TV programs
is
an infringement of U.S. copyright laws.
Certain Canadian programs may als
and any unauthorized recording in whole or in
may be in violation of these rights.
C
AUTION:
DO NOT REMOVE
NO USER
REFER SERVICING TO QUALIFIED SERVICE
WARNING
:
TO PREVENT FIRE OR ELECTRIC SHOCK
HAZARD, DO
NOT EXPOSE THIS PRODUCT TO RA
OR MOISTURE
This device complies with part 15 of the FCC Rules.
Operation is subject to the following two
This device may not cause harmful interference, and
This device must accept any interference that may
cause undesired operatio
n.
This lighting flash with arrowhead symbol
indicates high
is dangerous to make any kind of
with any inside part of this product.
This symbol indicates “dangerous voltage”
inside the product that present
electric shock or personal injury.
AUTION
:
FCC regulations start that any
unauthorized changes or
equipment may void the
Note to CABLE/TV Installer:
provided to call cabl
e TV
to Article 820
-
40 of the National Electrical Code
(Section 54 of Canadian Electrical Code, Part I), that
provides guidelines for
particular, specifies that the cable ground shall be
connected to th
e grounding system of the building as
close to the point of
cable entry as practical.
MPORTANT
:
One Federal Court has held that
unauthorized recording of copyrighted TV programs
an infringement of U.S. copyright laws.
Certain Canadian programs may als
and any unauthorized recording in whole or in
may be in violation of these rights.
CAUTION
RISK OF ELECTRIC
AUTION:
TO
REDUCE THE RISK OF
SHOCK
DO NOT REMOVE
NO USER
-
SERVICEABLE PARTS INSIDE
REFER SERVICING TO QUALIFIED SERVICE
PESONNEL
Important Safety Instructions
TO PREVENT FIRE OR ELECTRIC SHOCK
NOT EXPOSE THIS PRODUCT TO RA
This device complies with part 15 of the FCC Rules.
Operation is subject to the following two
conditions:
This device may not cause harmful interference, and
This device must accept any interference that may
n.
This lighting flash with arrowhead symbol
indicates high
voltage is present inside. It
is dangerous to make any kind of
with any inside part of this product.
This symbol indicates “dangerous voltage”
inside the product that present
electric shock or personal injury.
FCC regulations start that any
unauthorized changes or
modifications to this
equipment may void the
user’s authority to operate
Note to CABLE/TV Installer:
This reminder is
e TV
system installer’s attention
40 of the National Electrical Code
(Section 54 of Canadian Electrical Code, Part I), that
proper grounding and, in
particular, specifies that the cable ground shall be
e grounding system of the building as
cable entry as practical.
One Federal Court has held that
unauthorized recording of copyrighted TV programs
an infringement of U.S. copyright laws.
Certain Canadian programs may als
o be copyrighted
and any unauthorized recording in whole or in
may be in violation of these rights.
CAUTION
RISK OF ELECTRIC
REDUCE THE RISK OF
SHOCK
DO NOT REMOVE
COVER (
OR BACK)
SERVICEABLE PARTS INSIDE
REFER SERVICING TO QUALIFIED SERVICE
PESONNEL
Important Safety Instructions
TO PREVENT FIRE OR ELECTRIC SHOCK
NOT EXPOSE THIS PRODUCT TO RA
IN
This device complies with part 15 of the FCC Rules.
conditions:
This device may not cause harmful interference, and
This device must accept any interference that may
This lighting flash with arrowhead symbol
voltage is present inside. It
is dangerous to make any kind of
contact
with any inside part of this product.
This symbol indicates “dangerous voltage”
inside the product that present
s a risk of
electric shock or personal injury.
FCC regulations start that any
modifications to this
user’s authority to operate
This reminder is
system installer’s attention
40 of the National Electrical Code
(Section 54 of Canadian Electrical Code, Part I), that
proper grounding and, in
particular, specifies that the cable ground shall be
e grounding system of the building as
cable entry as practical.
One Federal Court has held that
unauthorized recording of copyrighted TV programs
an infringement of U.S. copyright laws.
o be copyrighted
and any unauthorized recording in whole or in
part
REDUCE THE RISK OF
ELECTRIC
OR BACK)
SERVICEABLE PARTS INSIDE
REFER SERVICING TO QUALIFIED SERVICE
Important Safety Instructions
This symbol indicates “dangerous voltage”
system installer’s attention
(Section 54 of Canadian Electrical Code, Part I), that
e grounding system of the building as
unauthorized recording of copyrighted TV programs
o be copyrighted
IMPORTANT
Read these instructions.
Keep these instructions.
Heed all warnings.
Follow all instructions.
Do not use this apparatus
Clean only with dry cloth.
Do
accordance with the manufacturer’s instructions.
Do not install near any heat sources such as
radiators, heat registers, stoves, or other apparatus
(Including amplifie
●
Do not defeat the safety purpose of the polarized or
grounding
Blades with one wider than the other. A grounding
type plug has two blades and a third grounding
prong .The wide blade or the third
provided for your safety. If the provided plug does
not fit into your outlet, consult an electrician for
replacement of the obsolete outlet.
●
Protect the power cord from being walked on or
pinched particularly at plugs, convenience
receptacles,
apparatus.
●
Only use
attachments/accessories
specified by the manufacturer.
●
Use
table specified by the manufacturer,
apparatus
moving the cart/apparatus combination to avoid
injury from tip
●
Unplug this apparatus during lightning storms or
when unused for long periods of time.
●
Refer all servicing to qualified service personnel.
Servicing is required when
damaged in any way, such as power
plug is damaged, liquid has been spilled or objects
have fallen into the apparatus, the apparatus has
been exposed to rain or moisture, does not operate
normally, or has been dropped.
Important Safety Instructions
IMPORTANT
SAFETY INSTRUCTIONS
Read these instructions.
Keep these instructions.
Heed all warnings.
Follow all instructions.
Do not use this apparatus
Clean only with dry cloth.
Do
not block
any
accordance with the manufacturer’s instructions.
Do not install near any heat sources such as
radiators, heat registers, stoves, or other apparatus
(Including amplifie
Do not defeat the safety purpose of the polarized or
grounding
-
type plug. A polarized plug has two
Blades with one wider than the other. A grounding
type plug has two blades and a third grounding
prong .The wide blade or the third
provided for your safety. If the provided plug does
not fit into your outlet, consult an electrician for
replacement of the obsolete outlet.
Protect the power cord from being walked on or
pinched particularly at plugs, convenience
receptacles,
and the point where they exit from the
apparatus.
Only use
attachments/accessories
specified by the manufacturer.
Use
only with the cart,
table specified by the manufacturer,
apparatus
w
hen a cart is used
moving the cart/apparatus combination to avoid
injury from tip
-
over.
Unplug this apparatus during lightning storms or
when unused for long periods of time.
Refer all servicing to qualified service personnel.
Servicing is required when
damaged in any way, such as power
plug is damaged, liquid has been spilled or objects
have fallen into the apparatus, the apparatus has
been exposed to rain or moisture, does not operate
normally, or has been dropped.
SAFETY INSTRUCTIONS
Read these instructions.
Keep these instructions.
Heed all warnings.
Follow all instructions.
Do not use this apparatus
near water.
Clean only with dry cloth.
any
ventilation
openings.
accordance with the manufacturer’s instructions.
Do not install near any heat sources such as
radiators, heat registers, stoves, or other apparatus
(Including amplifie
rs) that produce heat.
Do not defeat the safety purpose of the polarized or
type plug. A polarized plug has two
Blades with one wider than the other. A grounding
type plug has two blades and a third grounding
prong .The wide blade or the third
provided for your safety. If the provided plug does
not fit into your outlet, consult an electrician for
replacement of the obsolete outlet.
Protect the power cord from being walked on or
pinched particularly at plugs, convenience
and the point where they exit from the
attachments/accessories
specified by the manufacturer.
only with the cart,
stand tripod, bracket,
table specified by the manufacturer,
hen a cart is used
moving the cart/apparatus combination to avoid
over.
Unplug this apparatus during lightning storms or
when unused for long periods of time.
Refer all servicing to qualified service personnel.
Servicing is required when
the apparatus has
damaged in any way, such as power
plug is damaged, liquid has been spilled or objects
have fallen into the apparatus, the apparatus has
been exposed to rain or moisture, does not operate
normally, or has been dropped.
Page
SAFETY INSTRUCTIONS
near water.
openings.
Install
accordance with the manufacturer’s instructions.
Do not install near any heat sources such as
radiators, heat registers, stoves, or other apparatus
rs) that produce heat.
Do not defeat the safety purpose of the polarized or
type plug. A polarized plug has two
Blades with one wider than the other. A grounding
type plug has two blades and a third grounding
prong .The wide blade or the third
prong are
provided for your safety. If the provided plug does
not fit into your outlet, consult an electrician for
replacement of the obsolete outlet.
Protect the power cord from being walked on or
pinched particularly at plugs, convenience
and the point where they exit from the
stand tripod, bracket,
or
table specified by the manufacturer,
or
sold with the
hen a cart is used
use caution when
moving the cart/apparatus combination to avoid
Unplug this apparatus during lightning storms or
when unused for long periods of time.
Refer all servicing to qualified service personnel.
the apparatus has
damaged in any way, such as power
-
supply cord or
plug is damaged, liquid has been spilled or objects
have fallen into the apparatus, the apparatus has
been exposed to rain or moisture, does not operate
normally, or has been dropped.
Page
2
in
accordance with the manufacturer’s instructions.
radiators, heat registers, stoves, or other apparatus
Do not defeat the safety purpose of the polarized or
type plug. A polarized plug has two
Blades with one wider than the other. A grounding
type plug has two blades and a third grounding
provided for your safety. If the provided plug does
not fit into your outlet, consult an electrician for
Protect the power cord from being walked on or
and the point where they exit from the
or
sold with the
use caution when
moving the cart/apparatus combination to avoid
Unplug this apparatus during lightning storms or
Refer all servicing to qualified service personnel.
the apparatus has
been
supply cord or
plug is damaged, liquid has been spilled or objects
have fallen into the apparatus, the apparatus has
been exposed to rain or moisture, does not operate

IMPORTANT SAFETY INS
INTRODUCTION
................................
T
ECHNICAL OVERVIEW
What are Digital TV, NTSC, ATSC, QAM, SDTV, and
HDTV?
What kinds
the Digital HDTV Tuner?
What equipment is required to view HDTV
programming?
Resolution an
Input formats
Video / Audio Switcher, Scaling and Enhancing
Video output
Aspect ratio
Screen format examples
U
NPACKING
FRONT
P
REAR P
ANEL
R
EMOTE
CONNECTIONS
C
ONNECTING
C
ONNECTING EXTE
C
ONNECTING
C
ONNECTING
C
ONNECTING
C
ONNECTING
C
ONNECTING
C
ONNECTING
O
UTPUTS
POWER UP AND SETUP
Q
UICK
T
IME
D
AYLIGHT
T
UNER
T
UNER
A
UTO
MAIN MENU
Congratulations on choosing
Recorder, Receiver and Media Center Box
For your convenience, this manual will provide pictures and descriptions t
easy as possible. In order to use and maintain the set better, please follow its operating
instructions.
IMPORTANT SAFETY INS
INTRODUCTION
................................
................................
................................
ECHNICAL OVERVIEW
................................
What are Digital TV, NTSC, ATSC, QAM, SDTV, and
HDTV?
................................
What kinds
of TV programming can I watch with
the Digital HDTV Tuner?
What equipment is required to view HDTV
programming?
................................
Resolution an
d interlacing
Input formats
................................
Video / Audio Switcher, Scaling and Enhancing
Video output
................................
Aspect ratio
................................
Screen format examples
NPACKING
................................
P
ANEL
................................
ANEL
................................
EMOTE
CONTROL
................................
CONNECTIONS
................................
ONNECTING
ANTENNA
/C
ONNECTING EXTE
RNAL
ONNECTING
VGA/PC
I
ONNECTING
HDMI I
NPUT
ONNECTING
C
OMPONENT
ONNECTING
C
OMPOSITE
ONNECTING
NETWORK
................................
ONNECTING
HDMI, C
OMPOSITE
UTPUTS
................................
POWER UP AND SETUP
UICK
SET UP
................................
IME
ZONE
................................
AYLIGHT
S
AVING
UNER
SOURCE S
EL
UNER
MEDIUM S
ELECT
UTO
TUNING
................................
Auto Tuning –
Tu
Auto Tuning –
Tuner2
Auto Tuning –
Channel List
MAIN MENU
:
................................
Congratulations on choosing
Recorder, Receiver and Media Center Box
For your convenience, this manual will provide pictures and descriptions t
easy as possible. In order to use and maintain the set better, please follow its operating
instructions.
Thanks for your cooperation.
IMPORTANT SAFETY INS
TRUCTIONS
................................
................................
................................
What are Digital TV, NTSC, ATSC, QAM, SDTV, and
................................
................................
of TV programming can I watch with
the Digital HDTV Tuner?
................................
What equipment is required to view HDTV
................................
.........................
d interlacing
................................
................................
............................
Video / Audio Switcher, Scaling and Enhancing
................................
.............................
................................
..............................
Screen format examples
................................
................................
............................
................................
......................
................................
........................
................................
................................
..................
/C
ABLE SIGNAL SOURCE
RNAL
USB
STORAGE DEVICES
I
NPUT
................................
NPUT
................................
OMPONENT
(YPBPR) I
NPUT
OMPOSITE
VIDEO INPUT
..................
................................
OMPOSITE
V
IDEO AND
................................
.............................
POWER UP AND SETUP
................................
................................
................................
..................
AVING
TIME
................................
EL
ECT
..............................
ELECT
...............................
................................
Tu
ner1
................................
Tuner2
................................
Channel List
........................
................................
......................
Congratulations on choosing
PrimeDTV
Recorder, Receiver and Media Center Box
For your convenience, this manual will provide pictures and descriptions t
easy as possible. In order to use and maintain the set better, please follow its operating
Thanks for your cooperation.
Contents
TRUCTIONS
.................2
................................
...................5
................................
.............5
................................
.............5
What are Digital TV, NTSC, ATSC, QAM, SDTV, and
................................
.......5
of TV programming can I watch with
................................
.........5
What equipment is required to view HDTV
.........................
6
................................
.....6
............................
6
Video / Audio Switcher, Scaling and Enhancing
..7
.............................
7
..............................
7
................................
.........8
............................
9
......................
10
........................
11
................................
...............12
..................
14
ABLE SIGNAL SOURCE
......14
STORAGE DEVICES
....14
................................
14
................................
....15
NPUT
............15
..................
15
................................
........16
IDEO AND
AUDIO
.............................
16
................................
...17
................................
.............17
..................
17
................................
18
..............................
18
...............................
19
................................
..............19
................................
..19
................................
..19
........................
19
......................
20
PrimeDTV
PHD
-
Recorder, Receiver and Media Center Box
.
Please read this manual carefully before operation.
For your convenience, this manual will provide pictures and descriptions t
easy as possible. In order to use and maintain the set better, please follow its operating
Thanks for your cooperation.
Contents
P
ICTURE
A
UTO
V
IEW
RESET
HDMI
T
REBLE
E
QUALIZER
O
PTICAL
D
IGITAL
B
ALANCE
M
ASTER
F
AVORITES
T
UNER
S
CAN
F
IND
EPG
I
NPUT
C
LOSED
D
AT
M
ENU
S
YSTEM
N
ETWORKING
H
OME
R
ESET
R
ATINGS
C
HANNEL
F
RONT
-
VRX2,
Full HD 1080p Dual Tuner Digital HDTV
Please read this manual carefully before operation.
For your convenience, this manual will provide pictures and descriptions t
easy as possible. In order to use and maintain the set better, please follow its operating
ICTURE
S
ETTINGS
UTO
ASPECT
................................
IEW
MODE
................................
RESET
PICTURE
HDMI
OUTPUT R
ESOLUTION
REBLE
& BASS
................................
QUALIZER
................................
PTICAL
OUT
(SPDIF)
IGITAL
P
REFERENCE
ALANCE
................................
ASTER
LIST
................................
AVORITES
................................
UNER
................................
CAN
CHANNELS
IND
CHANNEL
................................
EPG
TUNING M
ODE
NPUT
LABELS
................................
LOSED
C
APTIONS
Caption Rendering
Basic Selection
Advanced Selection
Advanced Appearance
Caption Preference
RESET CC
AT
E& TIME
................................
Time Zone
Daylight Saving Time
Manual Time
ENU
LANGUAGE
YSTEM
INFO
................................
ETWORKING
................................
Network Type
Network Setup
Test Connection
OME
NETWORK
................................
ESET
ALL
................................
ATINGS
LOCKS
................................
Block Unrated Shows
USA -
TV
USA -
Movie
CAN -
English
CAN -
English
HANNEL
LOCKS
................................
RONT
PANEL L
OCK
Full HD 1080p Dual Tuner Digital HDTV
Please read this manual carefully before operation.
For your convenience, this manual will provide pictures and descriptions t
easy as possible. In order to use and maintain the set better, please follow its operating
ETTINGS
................................
................................
................................
PICTURE
................................
ESOLUTION
................................
................................
................................
(SPDIF)
................................
REFERENCE
................................
................................
.............................
................................
................................
................................
................................
................................
................................
ODE
................................
................................
APTIONS
................................
Caption Rendering
................................
Basic Selection
................................
Advanced Selection
................................
Advanced Appearance
................................
Caption Preference
................................
RESET CC
................................
................................
Time Zone
................................
Daylight Saving Time
................................
Manual Time
Setting
................................
ANGUAGE
................................
................................
................................
Network Type
................................
Network Setup
................................
Test Connection
................................
................................
................................
................................
Block Unrated Shows
................................
TV
................................
Movie
................................
English
................................
English
................................
................................
OCK
................................
Full HD 1080p Dual Tuner Digital HDTV
Please read this manual carefully before operation.
For your convenience, this manual will provide pictures and descriptions t
o make operation as
easy as possible. In order to use and maintain the set better, please follow its operating
Page
................................
...............
................................
......................
................................
.........................
................................
..............
................................
................................
...................
................................
..........................
................................
.........
................................
...........
.............................
................................
.......................
................................
..........................
................................
................................
.................
................................
....................
................................
..............
................................
......................
................................
...............
................................
.......
................................
............
................................
................................
................................
......
................................
.....................
................................
........................
................................
.....................
................................
................................
................................
.................
................................
.......................
................................
.......................
................................
...............
................................
..............
................................
...........
................................
..................
................................
..........................
................................
...................
................................
................................
.......................
................................
..................
................................
...............
................................
...............
................................
..................
................................
.............
Full HD 1080p Dual Tuner Digital HDTV
Please read this manual carefully before operation.
o make operation as
easy as possible. In order to use and maintain the set better, please follow its operating
Page
3
...............
21
......................
22
.........................
22
..............
22
................................
.22
...................
23
..........................
23
.........
24
...........
24
.............................
24
.......................
25
..........................
25
................................
.25
.................
26
....................
26
..............
26
......................
27
...............
28
.......
28
............
28
................................
.....29
................................
29
......
30
.....................
30
........................
30
.....................
30
................................
..31
................................
....31
.................
31
.......................
31
.......................
32
...............
32
..............
32
...........
32
..................
33
..........................
33
...................
34
................................
..34
.......................
34
..................
36
...............
36
...............
36
..................
37
.............
37

C
HANGE
RESET
R
ECORDINGS
o
o
o
o
................................
o
o
o
o
o
o
o
VIDEO
................................
o
o
o
MUSIC
................................
o
o
o
o
PHOTO
................................
o
o
F
ORWARD
B
ACKWARD
USB P
OP UP
P
ROGRAM
Program Guide
M
ANUAL
Manual Schedule
R
ECORDING
USB D
ISK
USB S
PEED
USB D
ISK
PHD-
VRX2
(EPG)
................................
(1) C
URRENT
(2) C
HANNEL
(3) P
ROGRAM
(4) C
URRENT
(5) P
ROGRAM
(6) G
UIDE
HOW TO US
FEATURES
TO USE
PHD
FEATURES
HANGE
PIN
................................
LOCKS
................................
ECORDINGS
................................
File List Screen
Preview Screen
Video Time Line Screen
Modify Recorded TV Program Titles:
................................
................................
Quick Menu
................................
Program Information Screen
Closed Caption
Aspect Control
Quick Menu
................................
INFO key
................................
Resume Playback Feature
................................
File List Screen
Preview Screen
Video Time Li
ne Screen
................................
File List Screen
Album Picture Screen
Music Details Screen
Music Time Line Screen
................................
Thumbnail Mode
List Mode
................................
ORWARD
SKIP TIME
................................
ACKWARD
SKIP TIME
................................
OP UP
MESSAGE
................................
ROGRAM
GUIDE
................................
Program Guide
................................
ANUAL
SCHEDULE
................................
Manual Schedule
................................
ECORDING
HISTORY
................................
ISK
STATUS
................................
PEED
CHECK
................................
ISK
FORMAT
................................
VRX2
ELECTRONIC PROGRAM G
................................
URRENT
GUIDE
S
HANNEL
NAME
................................
ROGRAM
TITLE
................................
URRENT
C
HANNEL
ROGRAM
D
ETAIL
UIDE
N
AVIGATION
HOW TO US
E PHD-
VRX2
FEATURES
................................
PHD
-VRX2
TIMESHIFT AND LIVE P
FEATURES
................................
................................
.......................
................................
..................
................................
.......................
File List Screen
................................
Preview Screen
................................
Video Time Line Screen
..............................
Modify Recorded TV Program Titles:
................................
................................
Program Information Screen
......................
Closed Caption
................................
Aspect Control
................................
................................
................................
.......................
Resume Playback Feature
..........................
................................
................................
File List Screen
................................
Preview Screen
................................
ne Screen
..............................
................................
................................
File List Screen
................................
Album Picture Screen
................................
Music Details Screen
................................
Music Time Line Screen
.............................
................................
................................
Thumbnail Mode
................................
................................
.....................
................................
................................
................................
................................
................................
........................
................................
................................
.....................
................................
................................
................................
................................
ELECTRONIC PROGRAM G
................................
................................
S
TATUS
..............................
................................
................................
HANNEL
VIDEO
...........................
ETAIL
DESCRIPTIONS
..................
AVIGATION
KEYS
.............................
VRX2
TIMESHIFTING
................................
............................
TIMESHIFT AND LIVE P
................................
............................
Contents
.......................
37
..................
37
.......................
38
................................
............38
................................
............39
..............................
39
Modify Recorded TV Program Titles:
........39
................................
...........39
................................
..................39
......................
40
................................
............41
................................
............41
................................
..................42
.......................
42
..........................
42
................................
.43
................................
............44
................................
............44
..............................
44
................................
45
................................
............45
................................
.45
................................
..45
.............................
45
................................
46
................................
..........46
.....................
46
................................
............47
................................
..........47
................................
........47
................................
.................48
........................
48
................................
..............49
.....................
49
................................
............50
................................
...............50
................................
.............51
................................
..............51
ELECTRONIC PROGRAM G
UIDE
................................
.....53
..............................
53
................................
..........53
................................
..........54
...........................
54
..................
54
.............................
54
TIMESHIFTING
............................
55
TIMESHIFT AND LIVE P
AUSE
............................
55
Contents
T
O START TIMESHIFTING
HOW TO USE PHD
FEATURES
T
O RECORD
T
O START RECORDIN
T
O CHECK OR MODIFY RE
T
O CHECK THE RECORDED
T
O
T
O RECORD
HOW TO USE PHD
PLAYBACK FEATURES
R
ECORDINGS
O START TIMESHIFTING
HOW TO USE PHD
FEATURES
................................
O RECORD
TV
SHOWS
O START RECORDIN
1.
Record Now
2.
Manual Recording
o
Weekly
O CHECK OR MODIFY RE
O CHECK THE RECORDED
O
PLAY RECORDED SHOWS
O RECORD
TV
SHOWS FROM BOTH TUNE
HOW TO USE PHD
PLAYBACK FEATURES
ECORDINGS
S
ECTION
o
File List Screen
o
Preview Screen
o
Video Time Line Screen
o
Modify Recorded TV Program Titles:
o
Quick Menu
o
Program Information Screen
o
Closed Caption
o
Aspect Contr
o
Quick Menu
o
INFO key
o
Resume Playback Feature
O START TIMESHIFTING
................................
HOW TO USE PHD
-VRX2
RECORDING
................................
............................
SHOWS
................................
O START RECORDIN
G
................................
Record Now
................................
Manual Recording
................................
Weekly
................................
O CHECK OR MODIFY RE
CORD SCHEDULES
O CHECK THE RECORDED
TV
PROGRAM
PLAY RECORDED SHOWS
................................
SHOWS FROM BOTH TUNE
HOW TO USE PHD
-VRX2
TV PROGRAM
PLAYBACK FEATURES
................................
ECTION
................................
File List Screen
................................
Preview Screen
................................
Video Time Line Screen
................................
Modify Recorded TV Program Titles:
Quick Menu
................................
Program Information Screen
Closed Caption
................................
Aspect Contr
ol
................................
Quick Menu
................................
INFO key
................................
Resume Playback Feature
Page
................................
........
RECORDING
............................
................................
.........
................................
...........
................................
..................
................................
........
................................
...............
CORD SCHEDULES
.............
PROGRAM
................
................................
SHOWS FROM BOTH TUNE
RS
...........
TV PROGRAM
................................
.......
................................
..........
................................
..............
................................
..............
................................
Modify Recorded TV Program Titles:
.............
................................
....................
Program Information Screen
..........................
................................
..............
................................
...............
................................
....................
................................
........................
Resume Playback Feature
............................
Page
4
........
56
............................
58
.........
58
...........
58
..................
58
........
59
...............
60
.............
62
................
65
................................
...66
...........
67
.......
68
..........
68
..............
69
..............
69
................................
.69
.............
69
....................
70
..........................
71
..............
71
...............
72
....................
72
........................
72
............................
73

Introduction
To ensure proper use of this product, please read this owner’s manual carefully and retain for future
reference.
This manual provides information on the operation
HDTV Recorder, Receiver and Media Center Box
unpacking, front panel, Rear panel, and Remote control.
Technical overview
This paragraph explains the technical
capabilities of the PHD
ba
ckground information on digital television.
Topics covered here include:
What are Digital TV, NTSC, ATSC, QAM,
SDTV, and HDTV?
What kinds of TV programming can I watch
with the Digital HDTV Tuner?
What equipment is required to view HDTV
programming?
Video
Enhancing
Video output options
Aspect ratio
Screen formats
W
hat are
and HDTV?
Digital TV
Digital television (sometimes called DTV) is a
newer method of broadcasting TV signals that
delivers
higher quality audio and video. Digital
TV is broadcast in two sets of formats, SDTV and
HDTV.
NTSC
NTSC (National Television Standards
Committee) refers to the group that first
established the standards used for conventional
analog television broadcasts
ATSC
Introduction
To ensure proper use of this product, please read this owner’s manual carefully and retain for future
reference.
This manual provides information on the operation
HDTV Recorder, Receiver and Media Center Box
unpacking, front panel, Rear panel, and Remote control.
Technical overview
This paragraph explains the technical
capabilities of the PHD
ckground information on digital television.
Topics covered here include:
What are Digital TV, NTSC, ATSC, QAM,
SDTV, and HDTV?
What kinds of TV programming can I watch
with the Digital HDTV Tuner?
What equipment is required to view HDTV
programming?
Video
/ Audio Switcher, Scaling and
Enhancing
Video output options
Aspect ratio
Screen formats
hat are
Digital
TV, NTSC, ATSC,
and HDTV?
Digital TV
Digital television (sometimes called DTV) is a
newer method of broadcasting TV signals that
higher quality audio and video. Digital
TV is broadcast in two sets of formats, SDTV and
NTSC (National Television Standards
Committee) refers to the group that first
established the standards used for conventional
analog television broadcasts
To ensure proper use of this product, please read this owner’s manual carefully and retain for future
This manual provides information on the operation
HDTV Recorder, Receiver and Media Center Box
unpacking, front panel, Rear panel, and Remote control.
Technical overview
This paragraph explains the technical
capabilities of the PHD
-VRX2
and provides
ckground information on digital television.
Topics covered here include:
What are Digital TV, NTSC, ATSC, QAM,
What kinds of TV programming can I watch
with the Digital HDTV Tuner?
What equipment is required to view HDTV
/ Audio Switcher, Scaling and
Video output options
TV, NTSC, ATSC,
QAM,
Digital television (sometimes called DTV) is a
newer method of broadcasting TV signals that
higher quality audio and video. Digital
TV is broadcast in two sets of formats, SDTV and
NTSC (National Television Standards
Committee) refers to the group that first
established the standards used for conventional
analog television broadcasts
and TV equipment.
Introduction
To ensure proper use of this product, please read this owner’s manual carefully and retain for future
This manual provides information on the operation
HDTV Recorder, Receiver and Media Center Box
. This chapter explains the Technical overview,
unpacking, front panel, Rear panel, and Remote control.
This paragraph explains the technical
and provides
ckground information on digital television.
What are Digital TV, NTSC, ATSC, QAM,
What kinds of TV programming can I watch
What equipment is required to view HDTV
/ Audio Switcher, Scaling and
QAM,
SDTV,
Digital television (sometimes called DTV) is a
newer method of broadcasting TV signals that
higher quality audio and video. Digital
TV is broadcast in two sets of formats, SDTV and
NTSC (National Television Standards
Committee) refers to the group that first
established the standards used for conventional
and TV equipment.
Introduction
To ensure proper use of this product, please read this owner’s manual carefully and retain for future
This manual provides information on the operation
of your PHD
. This chapter explains the Technical overview,
unpacking, front panel, Rear panel, and Remote control.
What are Digital TV, NTSC, ATSC, QAM,
What kinds of TV programming can I watch
What equipment is required to view HDTV
/ Audio Switcher, Scaling and
TV is broadcast in two sets of formats, SDTV and
established the standards used for conventional
and TV equipment.
ATSC (Advanced Television Systems Committee)
is the group who has been working to establish
the standards for digital television broadcasts
and digital television equipment
both SDTV and HDTV.
QAM
QAM (Quadrature amplitud
method of modulating digital signals on a cable
television system in order to transmit digital
cable TV channels.
SDTV
SDTV (Standard
format that provides a high quality picture at
resolutions that can be d
TV sets (see more on resolutions later in this
chapter).
HDTV
HDTV (High
that provides the highest quality picture at
resolutions that can be displayed on HDTV
ready TV displays, HDTV
computer monitors.
W
hat kinds of TV programming can I watch
with the Digital HDTV Tuner?
The PHD
Tuner, which provides you with the ability to
receive television programs from a wide range
of sources, and to display
HDTV or monitor.
To ensure proper use of this product, please read this owner’s manual carefully and retain for future
of your PHD
-VRX2,
Full HD 1080p Dual Tuner Dig
. This chapter explains the Technical overview,
ATSC (Advanced Television Systems Committee)
is the group who has been working to establish
the standards for digital television broadcasts
and digital television equipment
both SDTV and HDTV.
QAM
QAM (Quadrature amplitud
method of modulating digital signals on a cable
television system in order to transmit digital
cable TV channels.
SDTV
SDTV (Standard
-
Definition TV) is a digital TV
format that provides a high quality picture at
resolutions that can be d
TV sets (see more on resolutions later in this
chapter).
HDTV
HDTV (High
-
Definition TV) is a digital TV format
that provides the highest quality picture at
resolutions that can be displayed on HDTV
ready TV displays, HDTV
computer monitors.
hat kinds of TV programming can I watch
with the Digital HDTV Tuner?
The PHD
-VRX2
has full feature of Digital HDTV
Tuner, which provides you with the ability to
receive television programs from a wide range
of sources, and to display
HDTV or monitor.
To ensure proper use of this product, please read this owner’s manual carefully and retain for future
Full HD 1080p Dual Tuner Dig
. This chapter explains the Technical overview,
ATSC (Advanced Television Systems Committee)
is the group who has been working to establish
the standards for digital television broadcasts
and digital television equipment
both SDTV and HDTV.
QAM (Quadrature amplitud
e modulation) is a
method of modulating digital signals on a cable
television system in order to transmit digital
cable TV channels.
Definition TV) is a digital TV
format that provides a high quality picture at
resolutions that can be d
isplayed on standard
TV sets (see more on resolutions later in this
Definition TV) is a digital TV format
that provides the highest quality picture at
resolutions that can be displayed on HDTV
ready TV displays, HDTV
Monitors and,
computer monitors.
hat kinds of TV programming can I watch
with the Digital HDTV Tuner?
has full feature of Digital HDTV
Tuner, which provides you with the ability to
receive television programs from a wide range
of sources, and to display
them on general
HDTV or monitor.
Page
To ensure proper use of this product, please read this owner’s manual carefully and retain for future
Full HD 1080p Dual Tuner Dig
. This chapter explains the Technical overview,
ATSC (Advanced Television Systems Committee)
is the group who has been working to establish
the standards for digital television broadcasts
and digital television equipment
–
including
e modulation) is a
method of modulating digital signals on a cable
television system in order to transmit digital
Definition TV) is a digital TV
format that provides a high quality picture at
isplayed on standard
TV sets (see more on resolutions later in this
Definition TV) is a digital TV format
that provides the highest quality picture at
resolutions that can be displayed on HDTV
-
Monitors and,
hat kinds of TV programming can I watch
has full feature of Digital HDTV
Tuner, which provides you with the ability to
receive television programs from a wide range
them on general
Page
5
To ensure proper use of this product, please read this owner’s manual carefully and retain for future
Full HD 1080p Dual Tuner Dig
ital
ATSC (Advanced Television Systems Committee)
is the group who has been working to establish
the standards for digital television broadcasts
including
e modulation) is a
method of modulating digital signals on a cable
television system in order to transmit digital
Definition TV) is a digital TV
format that provides a high quality picture at
isplayed on standard
TV sets (see more on resolutions later in this
Definition TV) is a digital TV format
that provides the highest quality picture at
-
hat kinds of TV programming can I watch
has full feature of Digital HDTV
Tuner, which provides you with the ability to
receive television programs from a wide range
them on general

U
sing either or both
the back of the Digital HDTV Tuner, you can
receive local television programs.
T
o view cable TV programming,
programming subscriptions are also
required.
W
hat equipment is r
programming?
To view HDTV programming, an addition to
your PHD
-
or television set.
To receive digital
broadcasts, you’
outdoor
antenna.
To rec
eive analog and digital cable TV
programming, you’ll need a cable TV connection
(provided by your local cable TV service
provider).
R
esolution an
Two of the elements that determine the quality
of a TV picture are resolution and interlacing.
R
esolution
For TV equipment and broadcasts, resolution
is defined by the number of horizontal lines
displayed to make up each frame of a video
image. The more lines of resolution used to
draw each frame of video, the more detailed
and sharp the picture wil
resolution uses 480 horizontal lines to make
up each of video.
HDTV uses either 720 lines, or 1080 lines to
make each video frame.
Interlacing
When TVs display video, they display a new
video frame at a rate that is faster than your
eye
can see (from 24 to 60 frames per
second, depending on the TV and broadcast).
sing either or both
coaxial RF connector
the back of the Digital HDTV Tuner, you can
receive local television programs.
o view cable TV programming,
programming subscriptions are also
required.
hat equipment is r
equired to view HDTV
programming?
To view HDTV programming, an addition to
-
VRX2
, you will need an HDTV monitor
or television set.
To receive digital
over
-
broadcasts, you’
ll need either an indoor or
antenna.
eive analog and digital cable TV
programming, you’ll need a cable TV connection
(provided by your local cable TV service
provider).
esolution an
d
interlacing
Two of the elements that determine the quality
of a TV picture are resolution and interlacing.
esolution
For TV equipment and broadcasts, resolution
is defined by the number of horizontal lines
displayed to make up each frame of a video
image. The more lines of resolution used to
draw each frame of video, the more detailed
and sharp the picture wil
resolution uses 480 horizontal lines to make
up each of video.
HDTV uses either 720 lines, or 1080 lines to
make each video frame.
Interlacing
When TVs display video, they display a new
video frame at a rate that is faster than your
can see (from 24 to 60 frames per
second, depending on the TV and broadcast).
coaxial RF connector
the back of the Digital HDTV Tuner, you can
receive local television programs.
o view cable TV programming,
programming subscriptions are also
equired to view HDTV
To view HDTV programming, an addition to
, you will need an HDTV monitor
-
the-
air (OTA)
ll need either an indoor or
eive analog and digital cable TV
programming, you’ll need a cable TV connection
(provided by your local cable TV service
interlacing
Two of the elements that determine the quality
of a TV picture are resolution and interlacing.
For TV equipment and broadcasts, resolution
is defined by the number of horizontal lines
displayed to make up each frame of a video
image. The more lines of resolution used to
draw each frame of video, the more detailed
and sharp the picture wil
l be. Standard TV
resolution uses 480 horizontal lines to make
HDTV uses either 720 lines, or 1080 lines to
make each video frame.
When TVs display video, they display a new
video frame at a rate that is faster than your
can see (from 24 to 60 frames per
second, depending on the TV and broadcast).
Introduction
coaxial RF connector
s on
the back of the Digital HDTV Tuner, you can
o view cable TV programming,
programming subscriptions are also
equired to view HDTV
To view HDTV programming, an addition to
, you will need an HDTV monitor
air (OTA)
television
ll need either an indoor or
eive analog and digital cable TV
programming, you’ll need a cable TV connection
(provided by your local cable TV service
Two of the elements that determine the quality
of a TV picture are resolution and interlacing.
For TV equipment and broadcasts, resolution
is defined by the number of horizontal lines
displayed to make up each frame of a video
image. The more lines of resolution used to
draw each frame of video, the more detailed
l be. Standard TV
resolution uses 480 horizontal lines to make
HDTV uses either 720 lines, or 1080 lines to
When TVs display video, they display a new
video frame at a rate that is faster than your
can see (from 24 to 60 frames per
second, depending on the TV and broadcast).
Introduction
, you will need an HDTV monitor
programming, you’ll need a cable TV connection
Two of the elements that determine the quality
Interlacing refers to whether each of those
frames contains all of the lines of video for
each frame or every other line. Interlaced
signals take every other line frame 2 frames
of video (each lasting 1/60
combine them into one frame lasting 1/30
of a second. In this way, interlacing tricks
your eye into thinking it is seeing twice the
resolution that is actually being displayed.
In non
progressive scan video), video frames are
displayed every 1/60
all of the lines of video information for each
frame.
The specifications for video resolutions are
usually stated by giving the number of
horizontal lin
for interlaced video, or p for progressive scan
(non
HDTV digital TV broadcasts use 480p.
The ATSC specification for HDTV broadcasts and
equipment requires either 1080i or 720p.
O
is to allow scaling HD 1080i/720p video up
to 1080p @ 60Hz video quality. The results,
video has more fine pixels and vivid on
many high
Input formats
The PHD
HDTV Recorder, Receiver and Media Center
Box, is able to receive broadcasts in any of the
resolutions mentioned above. It will then do the
appropriate conversion from input signal
format to general TV display format.
The table below details the results you
each combination of input signal format.
Interlacing refers to whether each of those
frames contains all of the lines of video for
each frame or every other line. Interlaced
signals take every other line frame 2 frames
of video (each lasting 1/60
combine them into one frame lasting 1/30
of a second. In this way, interlacing tricks
your eye into thinking it is seeing twice the
resolution that is actually being displayed.
In non
-
interlaced video, (r
progressive scan video), video frames are
displayed every 1/60
all of the lines of video information for each
frame.
The specifications for video resolutions are
usually stated by giving the number of
horizontal lin
es, followed by either the letter I,
for interlaced video, or p for progressive scan
(non
-
interlaced) video. Some DVDs and non
HDTV digital TV broadcasts use 480p.
The ATSC specification for HDTV broadcasts and
equipment requires either 1080i or 720p.
O
ne of
the enhanced features of PHD
is to allow scaling HD 1080i/720p video up
to 1080p @ 60Hz video quality. The results,
video has more fine pixels and vivid on
many high
-
end TV display.
Input formats
The PHD
-VRX2
, Full HD 1080p Dual Tuner Digital
HDTV Recorder, Receiver and Media Center
Box, is able to receive broadcasts in any of the
resolutions mentioned above. It will then do the
appropriate conversion from input signal
format to general TV display format.
The table below details the results you
each combination of input signal format.
Interlacing refers to whether each of those
frames contains all of the lines of video for
each frame or every other line. Interlaced
signals take every other line frame 2 frames
of video (each lasting 1/60
th
of a second), and
combine them into one frame lasting 1/30
of a second. In this way, interlacing tricks
your eye into thinking it is seeing twice the
resolution that is actually being displayed.
interlaced video, (r
eferred to as
progressive scan video), video frames are
displayed every 1/60
th
of a second containing
all of the lines of video information for each
The specifications for video resolutions are
usually stated by giving the number of
es, followed by either the letter I,
for interlaced video, or p for progressive scan
interlaced) video. Some DVDs and non
HDTV digital TV broadcasts use 480p.
The ATSC specification for HDTV broadcasts and
equipment requires either 1080i or 720p.
the enhanced features of PHD
is to allow scaling HD 1080i/720p video up
to 1080p @ 60Hz video quality. The results,
video has more fine pixels and vivid on
end TV display.
, Full HD 1080p Dual Tuner Digital
HDTV Recorder, Receiver and Media Center
Box, is able to receive broadcasts in any of the
resolutions mentioned above. It will then do the
appropriate conversion from input signal
format to general TV display format.
The table below details the results you
each combination of input signal format.
Page
Interlacing refers to whether each of those
frames contains all of the lines of video for
each frame or every other line. Interlaced
signals take every other line frame 2 frames
of a second), and
combine them into one frame lasting 1/30
of a second. In this way, interlacing tricks
your eye into thinking it is seeing twice the
resolution that is actually being displayed.
eferred to as
progressive scan video), video frames are
of a second containing
all of the lines of video information for each
The specifications for video resolutions are
usually stated by giving the number of
es, followed by either the letter I,
for interlaced video, or p for progressive scan
interlaced) video. Some DVDs and non
HDTV digital TV broadcasts use 480p.
The ATSC specification for HDTV broadcasts and
equipment requires either 1080i or 720p.
the enhanced features of PHD
-
is to allow scaling HD 1080i/720p video up
to 1080p @ 60Hz video quality. The results,
video has more fine pixels and vivid on
end TV display.
, Full HD 1080p Dual Tuner Digital
HDTV Recorder, Receiver and Media Center
Box, is able to receive broadcasts in any of the
resolutions mentioned above. It will then do the
appropriate conversion from input signal
format to general TV display format.
The table below details the results you
get with
each combination of input signal format.
Page
6
Interlacing refers to whether each of those
frames contains all of the lines of video for
each frame or every other line. Interlaced
signals take every other line frame 2 frames
of a second), and
combine them into one frame lasting 1/30
th
of a second. In this way, interlacing tricks
your eye into thinking it is seeing twice the
resolution that is actually being displayed.
progressive scan video), video frames are
of a second containing
all of the lines of video information for each
The specifications for video resolutions are
es, followed by either the letter I,
for interlaced video, or p for progressive scan
interlaced) video. Some DVDs and non
-
The ATSC specification for HDTV broadcasts and
-
VRX2
is to allow scaling HD 1080i/720p video up
to 1080p @ 60Hz video quality. The results,
video has more fine pixels and vivid on
, Full HD 1080p Dual Tuner Digital
HDTV Recorder, Receiver and Media Center
Box, is able to receive broadcasts in any of the
resolutions mentioned above. It will then do the
get with

Type
18
H
D
T
V
17
16
15
14
13
12
S
D
T
V
11
10
9
8
7
6
5
4
3
2
1
Video / Audio Switcher, Scaling and Enhancing
PHD-
VRX2
acts like video/audio switcher. PHD
accept many different indivi
including
RGB, HDMI, composite and USB input
playing
video, p
pressing
INPUT
VRX2
can quickly switch to any one input as
desired.
Type
Aspect
Ratio
16:9
4:3
Video / Audio Switcher, Scaling and Enhancing
VRX2
is also a Media Center Box, which
acts like video/audio switcher. PHD
accept many different indivi
including
tuner 1, tuner 2,
RGB, HDMI, composite and USB input
video, p
hoto
and music files. With
INPUT
button on remote control, PHD
can quickly switch to any one input as
Compression
Size Values
1920×1080
1280×720
704×480
640×480
Video / Audio Switcher, Scaling and Enhancing
is also a Media Center Box, which
acts like video/audio switcher. PHD
accept many different indivi
dual A/V inputs
tuner 1, tuner 2,
component (Y
RGB, HDMI, composite and USB input
and music files. With
button on remote control, PHD
can quickly switch to any one input as
Introduction
Frame
Rate
30p
24p
30i
60p
30p
24p
60p
30p
24p
30i
60p
30p
24p
30i
60p
30p
24p
30i
Video / Audio Switcher, Scaling and Enhancing
is also a Media Center Box, which
acts like video/audio switcher. PHD
-VRX2 can
dual A/V inputs
component (Y
-Pb-
Pr),
RGB, HDMI, composite and USB input
s for
and music files. With
button on remote control, PHD
-
can quickly switch to any one input as
Introduction
Pr),
PHD
1080p from HDMI output. It equips superior
color management system provides a great
viewing experience using edge and color
enhancements.
V
ideo output
PHD
the resolutions m
display programs on TVs capable of displaying
any of those resolutions.
To set up your PHD
combinations of incoming video formats and TV
display capabilities, you simply press
button on remote control
highest resolution your TV is capable of
displaying. (If you’re not sure about your TV’s
resolution, see your TV’s manual for this
specification.)
PHD
conversion from input signal format to display
form
Video output formats
Output
Connection
Composite VIDEO
HDMI
A
spect ratio
In addition to resolution and interlacing, HDTV
is also defined by the aspect ratio of its
broadcasts.
Aspect ratio means the shape of the s
defined by the ratio of the screen’s width to its
height. For analog TV and SDTV, the aspect ratio
is 4 units wide by 3 units high (usually written
4:3).
This is familiar shape of conventional TVs
slightly wider than they are tall.
PHD
-VRX2 c
an scale all video resolutions up to
1080p from HDMI output. It equips superior
color management system provides a great
viewing experience using edge and color
enhancements.
ideo output
PHD
-VRX2
is able to receive broadcasts in any of
the resolutions m
display programs on TVs capable of displaying
any of those resolutions.
To set up your PHD
combinations of incoming video formats and TV
display capabilities, you simply press
button on remote control
highest resolution your TV is capable of
displaying. (If you’re not sure about your TV’s
resolution, see your TV’s manual for this
specification.)
PHD
-VRX2
will then do the appropriate
conversion from input signal format to display
form
at.
Video output formats
Output
Connection
Composite VIDEO
HDMI
spect ratio
In addition to resolution and interlacing, HDTV
is also defined by the aspect ratio of its
broadcasts.
Aspect ratio means the shape of the s
defined by the ratio of the screen’s width to its
height. For analog TV and SDTV, the aspect ratio
is 4 units wide by 3 units high (usually written
4:3).
This is familiar shape of conventional TVs
slightly wider than they are tall.
an scale all video resolutions up to
1080p from HDMI output. It equips superior
color management system provides a great
viewing experience using edge and color
is able to receive broadcasts in any of
the resolutions m
entioned above. It can also
display programs on TVs capable of displaying
any of those resolutions.
To set up your PHD
-VRX2
to handle the
combinations of incoming video formats and TV
display capabilities, you simply press
button on remote control
to set to match the
highest resolution your TV is capable of
displaying. (If you’re not sure about your TV’s
resolution, see your TV’s manual for this
will then do the appropriate
conversion from input signal format to display
Video output formats
Available Formats
Composite VIDEO
480i
1080p/
720p
In addition to resolution and interlacing, HDTV
is also defined by the aspect ratio of its
Aspect ratio means the shape of the s
defined by the ratio of the screen’s width to its
height. For analog TV and SDTV, the aspect ratio
is 4 units wide by 3 units high (usually written
This is familiar shape of conventional TVs
slightly wider than they are tall.
Page
an scale all video resolutions up to
1080p from HDMI output. It equips superior
color management system provides a great
viewing experience using edge and color
is able to receive broadcasts in any of
entioned above. It can also
display programs on TVs capable of displaying
to handle the
combinations of incoming video formats and TV
display capabilities, you simply press
V.MODE
to set to match the
highest resolution your TV is capable of
displaying. (If you’re not sure about your TV’s
resolution, see your TV’s manual for this
will then do the appropriate
conversion from input signal format to display
Available Formats
720p
In addition to resolution and interlacing, HDTV
is also defined by the aspect ratio of its
Aspect ratio means the shape of the s
creen as
defined by the ratio of the screen’s width to its
height. For analog TV and SDTV, the aspect ratio
is 4 units wide by 3 units high (usually written
This is familiar shape of conventional TVs
----
slightly wider than they are tall.
Page
7
an scale all video resolutions up to
1080p from HDMI output. It equips superior
color management system provides a great
is able to receive broadcasts in any of
entioned above. It can also
display programs on TVs capable of displaying
combinations of incoming video formats and TV
V.MODE
to set to match the
displaying. (If you’re not sure about your TV’s
conversion from input signal format to display
In addition to resolution and interlacing, HDTV
creen as
defined by the ratio of the screen’s width to its
height. For analog TV and SDTV, the aspect ratio
is 4 units wide by 3 units high (usually written
----

For HDTV br
(nearly twice as wide as it is tall).
This is, not coincidentally, more like the shape
of movies shown in theaters.
This makes HDTV an ideal format for
broadcasting and viewing movies on a TV.
But what happens if you are
square-
shaped 4:3 broadcast on a rectangular
16:9 TV. The
Tuner Digital HDTV Recorder, Receiver and
Media Center Box
variety of screen formats to help you dealing
with those scenar
PHD-
VRX2
change to different screen formats as:
Normal, Full Screen, Panoramic, Zoom1,
Zoom2,
PHD-
VRX2
ratio adjustments to ease video over
issues on differ
bring up main
Window to fine adjust screen size.
S
creen format examples
To deal with the mismatches that can occur
between the shapes of TVs and the aspect
ratios of program broadcasts, the Digital HDTV
Tuner provides you with a set of screen form
controls.
These controls allows you to pick a format to
use for both 4:3 TVs showing 16:9 programs,
and for 16:9 TVs showing 4:3 programs.
Here is an explanation of the options.
For HDTV br
oadcasts, the aspect ratio is 16:9
(nearly twice as wide as it is tall).
This is, not coincidentally, more like the shape
of movies shown in theaters.
This makes HDTV an ideal format for
broadcasting and viewing movies on a TV.
But what happens if you are
shaped 4:3 broadcast on a rectangular
16:9 TV. The
PHD-
VRX2
Tuner Digital HDTV Recorder, Receiver and
Media Center Box
, allows you to choose from a
variety of screen formats to help you dealing
with those scenar
ios.
VRX2
is providing several options to
change to different screen formats as:
Normal, Full Screen, Panoramic, Zoom1,
Zoom2,
4:3 and Direct
VRX2
is also providing custom aspect
ratio adjustments to ease video over
issues on differ
ent TV sizes. User needs to
bring up main
MENU
Window to fine adjust screen size.
creen format examples
To deal with the mismatches that can occur
between the shapes of TVs and the aspect
ratios of program broadcasts, the Digital HDTV
Tuner provides you with a set of screen form
These controls allows you to pick a format to
use for both 4:3 TVs showing 16:9 programs,
and for 16:9 TVs showing 4:3 programs.
Here is an explanation of the options.
oadcasts, the aspect ratio is 16:9
(nearly twice as wide as it is tall).
This is, not coincidentally, more like the shape
of movies shown in theaters.
This makes HDTV an ideal format for
broadcasting and viewing movies on a TV.
But what happens if you are
watching a nearly
shaped 4:3 broadcast on a rectangular
VRX2
,
Full HD 1080p Dual
Tuner Digital HDTV Recorder, Receiver and
, allows you to choose from a
variety of screen formats to help you dealing
is providing several options to
change to different screen formats as:
Normal, Full Screen, Panoramic, Zoom1,
4:3 and Direct
options.
is also providing custom aspect
ratio adjustments to ease video over
ent TV sizes. User needs to
MENU
→ Se ngs
Window to fine adjust screen size.
creen format examples
To deal with the mismatches that can occur
between the shapes of TVs and the aspect
ratios of program broadcasts, the Digital HDTV
Tuner provides you with a set of screen form
These controls allows you to pick a format to
use for both 4:3 TVs showing 16:9 programs,
and for 16:9 TVs showing 4:3 programs.
Here is an explanation of the options.
Introduction
oadcasts, the aspect ratio is 16:9
This is, not coincidentally, more like the shape
This makes HDTV an ideal format for
broadcasting and viewing movies on a TV.
watching a nearly
shaped 4:3 broadcast on a rectangular
Full HD 1080p Dual
Tuner Digital HDTV Recorder, Receiver and
, allows you to choose from a
variety of screen formats to help you dealing
is providing several options to
change to different screen formats as:
Normal, Full Screen, Panoramic, Zoom1,
is also providing custom aspect
ratio adjustments to ease video over
-
scan
ent TV sizes. User needs to
→ Se ngs
→ Scale
Window to fine adjust screen size.
To deal with the mismatches that can occur
between the shapes of TVs and the aspect
ratios of program broadcasts, the Digital HDTV
Tuner provides you with a set of screen form
at
These controls allows you to pick a format to
use for both 4:3 TVs showing 16:9 programs,
and for 16:9 TVs showing 4:3 programs.
Here is an explanation of the options.
Introduction
is providing several options to
change to different screen formats as:
Normal, Full Screen, Panoramic, Zoom1,
is also providing custom aspect
scan
ent TV sizes. User needs to
→ Scale
Window to fine adjust screen size.
Signal
N
ormal
Ful
l
Zoom
4:3
16:9 TVs showing
16:9 TVs showing
4:3 TVs showing
Page
16:9
4:3 TVs showing
Page
8
4:3 TVs showing

Unpacking
M
ake sure you have received all these items listed below with the
HDTV Recorder, Receiver and Media Center Box
Unpacking
ake sure you have received all these items listed below with the
HDTV Recorder, Receiver and Media Center Box
Remote
Control
ake sure you have received all these items listed below with the
HDTV Recorder, Receiver and Media Center Box
Full HD 1080p Dual Tuner Digital HDTV Recorder,
Control
Introduction
ake sure you have received all these items listed below with the
HDTV Recorder, Receiver and Media Center Box
.
PHD
Full HD 1080p Dual Tuner Digital HDTV Recorder,
Receiver and Media Center Box
Batteries
PHD
-
Unit
Introduction
ake sure you have received all these items listed below with the
PHD
PHD
-VRX2
Full HD 1080p Dual Tuner Digital HDTV Recorder,
Receiver and Media Center Box
Batteries
Quick Start Guide
-
VRX2
PHD
-VRX2,
Full HD 1080p Dual Tuner Digital
Full HD 1080p Dual Tuner Digital HDTV Recorder,
Receiver and Media Center Box
HDMI
Quick Start Guide
Full HD 1080p Dual Tuner Digital
Full HD 1080p Dual Tuner Digital HDTV Recorder,
HDMI
Cable
Page
Full HD 1080p Dual Tuner Digital
Page
9
Full HD 1080p Dual Tuner Digital

Front Panel
Menu
CH+
CH
V+
V
No lights are in Standby mode.
Front Panel
Menu
:
Display
CH+
:
Move TV channel number up.
CH
-:
Move TV channel number down.
V+
:
Increase audio volume.
V
-:
Reduce audio volume.
:
Switch unit in Standby or Operation mode.
: Green light is in Operation mo
No lights are in Standby mode.
Display
On-
screen (OSD) Main Menu.
Move TV channel number up.
Move TV channel number down.
Increase audio volume.
Reduce audio volume.
Switch unit in Standby or Operation mode.
: Green light is in Operation mo
No lights are in Standby mode.
Introduction
screen (OSD) Main Menu.
Move TV channel number up.
Move TV channel number down.
Increase audio volume.
Reduce audio volume.
Switch unit in Standby or Operation mode.
: Green light is in Operation mo
de. : Red light is in Recording Mode.
No lights are in Standby mode.
Introduction
screen (OSD) Main Menu.
Move TV channel number down.
Switch unit in Standby or Operation mode.
de. : Red light is in Recording Mode.
de. : Red light is in Recording Mode.
de. : Red light is in Recording Mode.
Page
de. : Red light is in Recording Mode.
Page
10

Rear Panel
Two Tuners
(RF1, RF2)
Two USB ports
(USB1, USB2)
VGA/ Audio in
HDMI input
Composite
Video and Audio
input
Component
video input
10/100 Ethernet
Port
Composite
Video and Audio
output
HDMI output
Optical Digital
Audio Output
Rear Panel
Two Tuners
(RF1, RF2)
Two USB ports
(USB1, USB2)
VGA/ Audio in
HDMI input
Composite
Video and Audio
Component
video input
10/100 Ethernet
Composite
Video and Audio
output
HDMI output
Optical Digital
Audio Output
RF1 (Tuner 1), an ATSC/QAM/NT
channels.
RF2 (Tuner 2), an ATSC/QAM tuner to receive only digital cha
Note: PHD-
VRX2
Use any of USB ports to connect external USB storage devices or
WiFi adapters.
To record, connecting external U
either ext2 or NTFS format. PHD
device
plugged in (assigned as “usba”).
To Playback, connecting any USB storage devices with either ext2, NTFS or
FAT32 format. PHD
picture files.
Note: PHD-
VRX2
Accept video (VGA/RGB) and audio
Accept
HDMI input from external devices like Blu
Accept
composite video (480i) and stereo audio inputs from external devices.
Accept
component (Y
Connecting to external network.
Connect NTP (Network Time Protocol) server to synchronize the time for
accuracy.
On
-
line video streaming capable.
Composite video (480i) and audio
is outputting simultaneously with HDMI output.
HDMI output (
video output
Connecting to digital (optica
sound.
Introduction
RF1 (Tuner 1), an ATSC/QAM/NT
channels.
RF2 (Tuner 2), an ATSC/QAM tuner to receive only digital cha
VRX2
can only record or timeshift on digital channels only, not on analog channels.
Use any of USB ports to connect external USB storage devices or
WiFi adapters.
To record, connecting external U
either ext2 or NTFS format. PHD
plugged in (assigned as “usba”).
To Playback, connecting any USB storage devices with either ext2, NTFS or
FAT32 format. PHD
-
VRX2
picture files.
VRX2
has built-
in USB utility menu to test USB speed and partition USB to ext2
Accept video (VGA/RGB) and audio
HDMI input from external devices like Blu
composite video (480i) and stereo audio inputs from external devices.
component (Y
-
Pb
Connecting to external network.
Connect NTP (Network Time Protocol) server to synchronize the time for
accuracy.
line video streaming capable.
Composite video (480i) and audio
is outputting simultaneously with HDMI output.
HDMI output (
720p / 1080p). It
video output
.
Connecting to digital (optica
Introduction
RF1 (Tuner 1), an ATSC/QAM/NT
SC tuner to receive digital &
RF2 (Tuner 2), an ATSC/QAM tuner to receive only digital cha
can only record or timeshift on digital channels only, not on analog channels.
Use any of USB ports to connect external USB storage devices or
To record, connecting external U
SB Hard Drive (HDD) or USB Flash stick with
either ext2 or NTFS format. PHD
-
VRX2
plugged in (assigned as “usba”).
To Playback, connecting any USB storage devices with either ext2, NTFS or
VRX2
will act as media player to play video, music and
in USB utility menu to test USB speed and partition USB to ext2
Accept video (VGA/RGB) and audio
inputs from PC VGA port.
HDMI input from external devices like Blu
composite video (480i) and stereo audio inputs from external devices.
Pb
-
Pr) video (720p/1080i) input from
Connecting to external network.
Connect NTP (Network Time Protocol) server to synchronize the time for
line video streaming capable.
Composite video (480i) and audio
output to analog TV or monitor. This video
is outputting simultaneously with HDMI output.
720p / 1080p). It
is outputting simultaneously with composite
Connecting to digital (optica
l) audio equipment. Supporting 5.1 surround
SC tuner to receive digital &
RF2 (Tuner 2), an ATSC/QAM tuner to receive only digital cha
can only record or timeshift on digital channels only, not on analog channels.
Use any of USB ports to connect external USB storage devices or
SB Hard Drive (HDD) or USB Flash stick with
VRX2
will re
cord TV shows on the first USB
plugged in (assigned as “usba”).
To Playback, connecting any USB storage devices with either ext2, NTFS or
will act as media player to play video, music and
in USB utility menu to test USB speed and partition USB to ext2
inputs from PC VGA port.
HDMI input from external devices like Blu
-
composite video (480i) and stereo audio inputs from external devices.
Pr) video (720p/1080i) input from
Connect NTP (Network Time Protocol) server to synchronize the time for
output to analog TV or monitor. This video
is outputting simultaneously with HDMI output.
is outputting simultaneously with composite
l) audio equipment. Supporting 5.1 surround
SC tuner to receive digital &
RF2 (Tuner 2), an ATSC/QAM tuner to receive only digital cha
can only record or timeshift on digital channels only, not on analog channels.
Use any of USB ports to connect external USB storage devices or
SB Hard Drive (HDD) or USB Flash stick with
cord TV shows on the first USB
To Playback, connecting any USB storage devices with either ext2, NTFS or
will act as media player to play video, music and
in USB utility menu to test USB speed and partition USB to ext2
inputs from PC VGA port.
-
ray player and etc.
composite video (480i) and stereo audio inputs from external devices.
Pr) video (720p/1080i) input from
external devices
Connect NTP (Network Time Protocol) server to synchronize the time for
output to analog TV or monitor. This video
is outputting simultaneously with composite
l) audio equipment. Supporting 5.1 surround
Page
SC tuner to receive digital &
analog
RF2 (Tuner 2), an ATSC/QAM tuner to receive only digital cha
nnels.
can only record or timeshift on digital channels only, not on analog channels.
Use any of USB ports to connect external USB storage devices or
optional
USB
SB Hard Drive (HDD) or USB Flash stick with
cord TV shows on the first USB
To Playback, connecting any USB storage devices with either ext2, NTFS or
will act as media player to play video, music and
in USB utility menu to test USB speed and partition USB to ext2
ray player and etc.
composite video (480i) and stereo audio inputs from external devices.
external devices
Connect NTP (Network Time Protocol) server to synchronize the time for
output to analog TV or monitor. This video
is outputting simultaneously with composite
l) audio equipment. Supporting 5.1 surround
Page
11
can only record or timeshift on digital channels only, not on analog channels.
USB
SB Hard Drive (HDD) or USB Flash stick with
cord TV shows on the first USB
To Playback, connecting any USB storage devices with either ext2, NTFS or
will act as media player to play video, music and
composite video (480i) and stereo audio inputs from external devices.
external devices
.
Connect NTP (Network Time Protocol) server to synchronize the time for
output to analog TV or monitor. This video
is outputting simultaneously with composite

Remote Control
Remote Control
Introduction
POWER
FUNCTION
KEYS
NUMBERS &
DOT
MENU
NAVIGATION
EXIT
MUTE
CH+/CH
INFO
ACTIONS
Introduction
POWER
FUNCTION
KEYS
NUMBERS &
DOT
MENU
NAVIGATION
EXIT
MUTE
CH+/CH
-
INFO
ACTIONS
Switch unit ON
CC
: turn closed caption on or off.
ASPECT
V.MODE
(720p/1080p).
SLEEP
shut off.
TV
: directly jump to Tuner 1 or
Tuner 2 when unit is in other input.
PIP
: (future option)
FREEZE
AUDIO
mode change.
NUMBERS &
Press to enter numbers or change
channel numbers
D
isplay On
NAVIGATION
Directions (Up, Down, Right, Left) and
OK keys to navigate menu
Exit the current menu or operation
Temporarily turn off sound.
Change channel up and down
Show current input sta
Mode,
show channel status and quick
program guide.
To play video/audio programs for
recorded TV show, timeshift, media
player, video streaming.
RWD
FF
: Fast Forward program quickly.
PREVIOUS
slow RWD.
NEXT
timeshift.
STOP
PAUSE
PLAY
program
REC
Switch unit ON
or standby mode
: turn closed caption on or off.
ASPECT
: change screen size.
V.MODE
: change video resolution
(720p/1080p).
SLEEP
: select preset
shut off.
: directly jump to Tuner 1 or
Tuner 2 when unit is in other input.
: (future option)
FREEZE
: Pause video
AUDIO
: digital/analog audio sound
mode change.
Press to enter numbers or change
channel numbers
.
isplay On
-
Screen (OSD) main menu
Directions (Up, Down, Right, Left) and
OK keys to navigate menu
Exit the current menu or operation
Temporarily turn off sound.
Change channel up and down
Show current input sta
show channel status and quick
program guide.
To play video/audio programs for
recorded TV show, timeshift, media
player, video streaming.
RWD
: Rewind program quickly.
: Fast Forward program quickly.
PREVIOUS
: Move to
slow RWD.
NEXT
: Move to next, or slow
timeshift.
STOP
: Stop playback.
PAUSE
: Pause current program.
PLAY
: Play or resume a paused
program
REC
: Start recording program.
Page
or standby mode
.
: turn closed caption on or off.
: change screen size.
: change video resolution
: select preset
timer for auto
: directly jump to Tuner 1 or
Tuner 2 when unit is in other input.
: (future option)
: Pause video
: digital/analog audio sound
Press to enter numbers or change
Screen (OSD) main menu
Directions (Up, Down, Right, Left) and
OK keys to navigate menu
.
Exit the current menu or operation
Temporarily turn off sound.
Change channel up and down
.
Show current input sta
tus.
In TV
show channel status and quick
To play video/audio programs for
recorded TV show, timeshift, media
player, video streaming.
: Rewind program quickly.
: Fast Forward program quickly.
: Move to
previous
: Move to next, or slow
FF in
: Stop playback.
: Pause current program.
: Play or resume a paused
: Start recording program.
Page
12
: turn closed caption on or off.
: change video resolution
timer for auto
Tuner 2 when unit is in other input.
: digital/analog audio sound
Press to enter numbers or change
Screen (OSD) main menu
Directions (Up, Down, Right, Left) and
Exit the current menu or operation
.
show channel status and quick
To play video/audio programs for
recorded TV show, timeshift, media
: Rewind program quickly.
: Fast Forward program quickly.
or
FF in
: Pause current program.
: Play or resume a paused
: Start recording program.
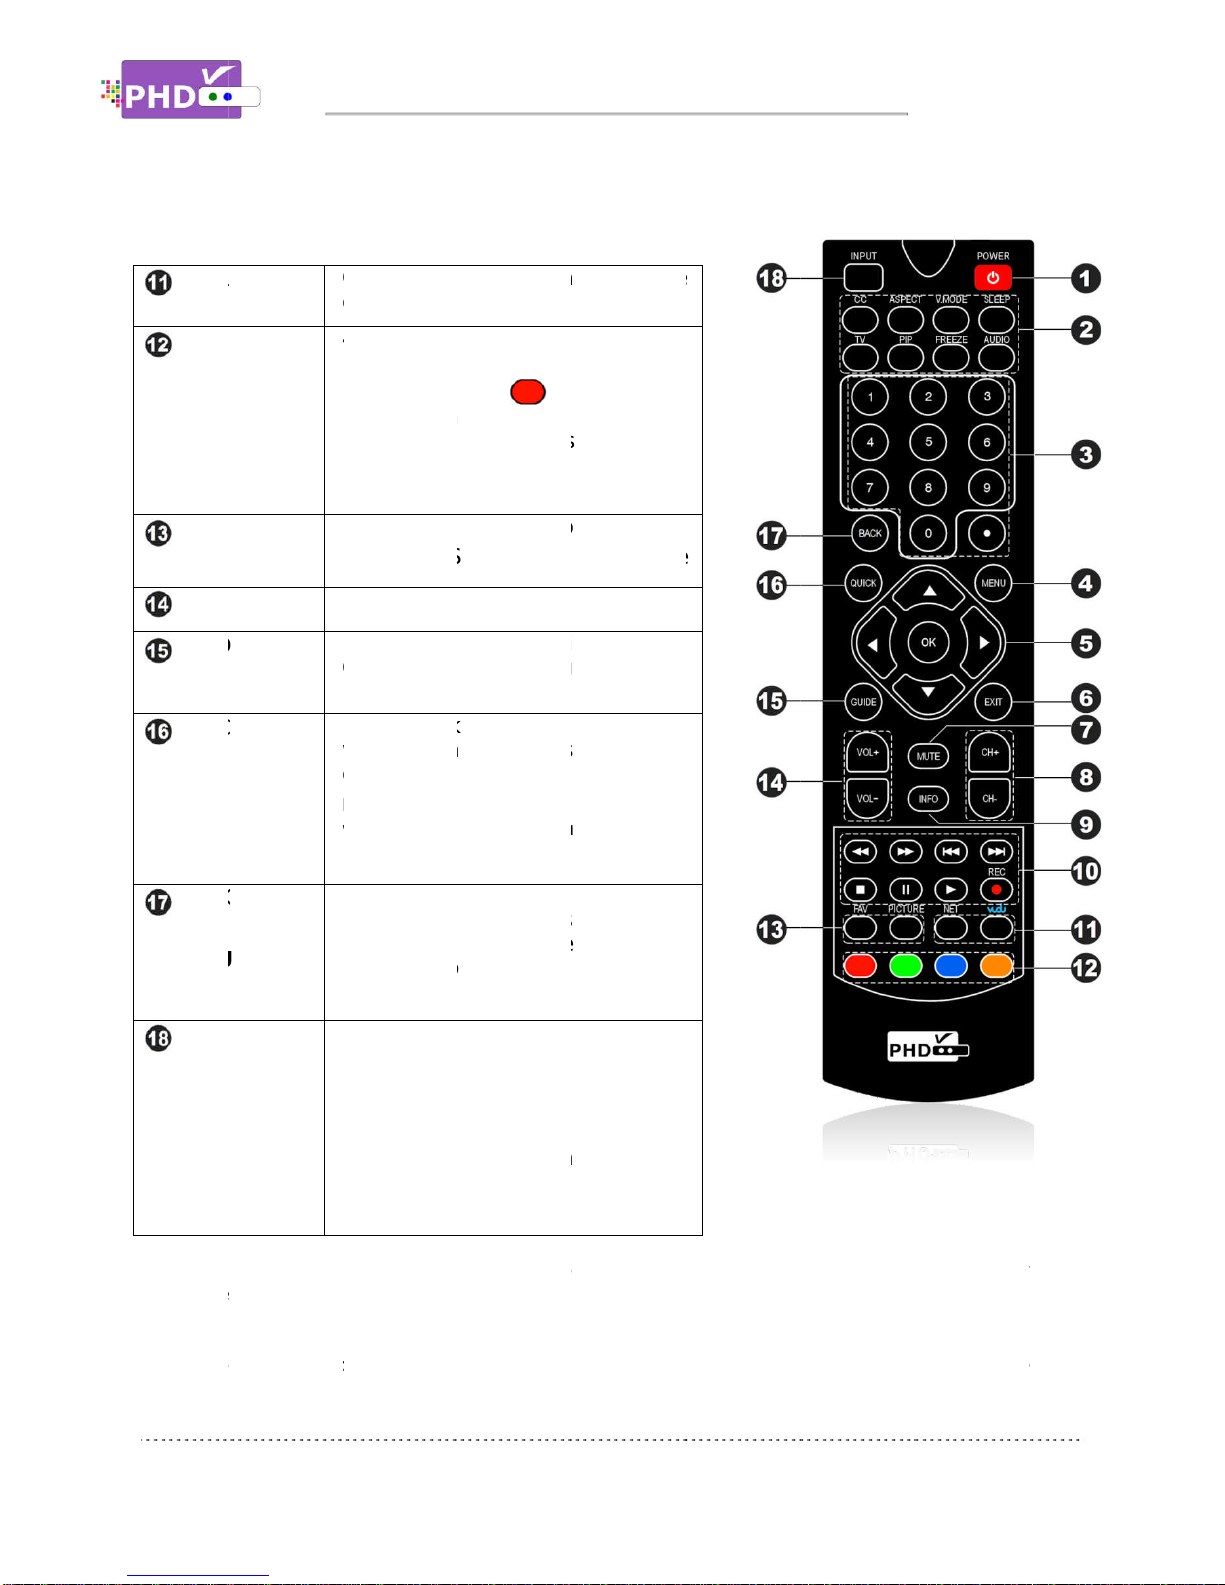
Remote Control
ON-
LINE KEYS
SHORTCUT
KEYS
FUNCTION
KEYS
VOL+/VOL
GUIDE
QUICK
BACK
(also
RETURN
INPUT
Installing Batteries:
open
battery cover from the back of the remote. Install
cover
back onto the remote
Remote C
ontrol Operation
between, and then presses
Remote Control
LINE KEYS
On
option)
SHORTCUT
4
features and quick access.
In TV mode, press to enable
timeshift function, which can pause
live TV program as well as instantly
rewind, fast forward, slow motion on
live TV program.
FUNCTION
VOL+/VOL
-
Increase
GUIDE
Show
Guide
recording capability.
QUICK
Display quick access menu
with different quick access features
during different operation modes.
Note:
without bringing up main menu and steps for
accessing a s
BACK
(also
RETURN
key)
This key will bring the current menu or
function to the previous state (acts as
RETURN
jump back to the previous channel
tuned to.
INPUT
Press
selecti
PHD
switch from:
(1) Tuner 1, (2) Tuner 2, (3) CVBS
composite video, (4) Component
YPbPr, (5) HDMI, (6) VGA
Installing Batteries:
b
efore the remote control can be
battery cover from the back of the remote. Install
back onto the remote
ontrol Operation
between, and then presses
On
-
line video streaming access (future
option)
.
4
-
color keys correspond to different
features and quick access.
In TV mode, press to enable
timeshift function, which can pause
live TV program as well as instantly
rewind, fast forward, slow motion on
live TV program.
FAV
: Add or delete favorite channels
PICTURE
: Select preset video picture
settings.
Increase
or r
educe audio volume.
Show
full screen
Guide
wit
h schedule program
recording capability.
Display quick access menu
with different quick access features
during different operation modes.
Note:
Quick menu is very useful and handy
without bringing up main menu and steps for
accessing a s
pecific function.
This key will bring the current menu or
function to the previous state (acts as
RETURN
key)
jump back to the previous channel
tuned to.
Press
this key
selecti
on.
PHD
-VRX2
has following inputs to
switch from:
(1) Tuner 1, (2) Tuner 2, (3) CVBS
composite video, (4) Component
YPbPr, (5) HDMI, (6) VGA
efore the remote control can be
battery cover from the back of the remote. Install
back onto the remote
control.
ontrol Operation
:
point the remote control directly at the unit front panel
between, and then presses
the
desired
Introduction
line video streaming access (future
color keys correspond to different
features and quick access.
In TV mode, press to enable
timeshift function, which can pause
live TV program as well as instantly
rewind, fast forward, slow motion on
live TV program.
: Add or delete favorite channels
: Select preset video picture
educe audio volume.
full screen
Electronics Program
h schedule program
recording capability.
Display quick access menu
with different quick access features
during different operation modes.
Quick menu is very useful and handy
without bringing up main menu and steps for
pecific function.
This key will bring the current menu or
function to the previous state (acts as
key)
.
In TV mode, this key will
jump back to the previous channel
this key
to bring up input
has following inputs to
(1) Tuner 1, (2) Tuner 2, (3) CVBS
composite video, (4) Component
YPbPr, (5) HDMI, (6) VGA
–
efore the remote control can be
battery cover from the back of the remote. Install
point the remote control directly at the unit front panel
desired
buttons.
Introduction
line video streaming access (future
color keys correspond to different
features and quick access.
In TV mode, press to enable
timeshift function, which can pause
live TV program as well as instantly
rewind, fast forward, slow motion on
: Add or delete favorite channels
: Select preset video picture
educe audio volume.
Electronics Program
h schedule program
Display quick access menu
.
It comes
with different quick access features
during different operation modes.
Quick menu is very useful and handy
without bringing up main menu and steps for
This key will bring the current menu or
function to the previous state (acts as
In TV mode, this key will
jump back to the previous channel
to bring up input
has following inputs to
(1) Tuner 1, (2) Tuner 2, (3) CVBS
–
composite video, (4) Component
–
–
PC input.
efore the remote control can be
used, two b
atteries (size AAA) need to be i
battery cover from the back of the remote. Install
2x
fresh batter
point the remote control directly at the unit front panel
line video streaming access (future
: Add or delete favorite channels
: Select preset video picture
This key will bring the current menu or
In TV mode, this key will
atteries (size AAA) need to be i
fresh batter
ies
in the battery
point the remote control directly at the unit front panel
atteries (size AAA) need to be i
in the battery
compartment
point the remote control directly at the unit front panel
with no solid objects blocked in
Page
atteries (size AAA) need to be i
nstalled.
First
compartment
. N
ext, snap the
with no solid objects blocked in
Page
13
First
,
ext, snap the
with no solid objects blocked in

Connections
This paragraph tells you connecting the PHD
inputs to TV, Display, and home theater.
Connecting Anten
1.
Connect an outdoor or indoor antenna directly to either Tuner 1 or Tuner 2 jack with a coaxial
cable. This is to receive over
2.
Connect the c
Connecting external USB storage devices
1.
To record TV shows, plug USB 2.0 support Hard Disk Drive (HDD) or Flash stick with the size from
2GB up to 2TB. PHD
which USB port is.
2.
To playback TV, Movie, Music and Photo files, connect USB device to any one of USB ports.
3.
To upload firmware, Plug USB flash stick in and follow the firmware upgrade guideline.
Connecting VGA/PC Input
PHD-
VRX2
sync signal
Connections
This paragraph tells you connecting the PHD
inputs to TV, Display, and home theater.
Connecting Anten
Connect an outdoor or indoor antenna directly to either Tuner 1 or Tuner 2 jack with a coaxial
cable. This is to receive over
Connect the c
able signal source using a coaxial RF cable
Connecting external USB storage devices
To record TV shows, plug USB 2.0 support Hard Disk Drive (HDD) or Flash stick with the size from
2GB up to 2TB. PHD
which USB port is.
To playback TV, Movie, Music and Photo files, connect USB device to any one of USB ports.
To upload firmware, Plug USB flash stick in and follow the firmware upgrade guideline.
Connecting VGA/PC Input
VRX2
has one
sync signal
s and
audio
This paragraph tells you connecting the PHD
inputs to TV, Display, and home theater.
Connecting Anten
na/Cable signal source
Connect an outdoor or indoor antenna directly to either Tuner 1 or Tuner 2 jack with a coaxial
cable. This is to receive over
able signal source using a coaxial RF cable
Connecting external USB storage devices
To record TV shows, plug USB 2.0 support Hard Disk Drive (HDD) or Flash stick with the size from
2GB up to 2TB. PHD
-VRX2
will record TV shows on the first USB device plugged
which USB port is.
To playback TV, Movie, Music and Photo files, connect USB device to any one of USB ports.
To upload firmware, Plug USB flash stick in and follow the firmware upgrade guideline.
Connecting VGA/PC Input
has one
VGA input port, which can be connect
audio
.
Connections
This paragraph tells you connecting the PHD
-
VRX2
inputs to TV, Display, and home theater.
na/Cable signal source
Connect an outdoor or indoor antenna directly to either Tuner 1 or Tuner 2 jack with a coaxial
cable. This is to receive over
-the-
air digital TV signals from TV broadcasters.
able signal source using a coaxial RF cable
Connecting external USB storage devices
To record TV shows, plug USB 2.0 support Hard Disk Drive (HDD) or Flash stick with the size from
will record TV shows on the first USB device plugged
To playback TV, Movie, Music and Photo files, connect USB device to any one of USB ports.
To upload firmware, Plug USB flash stick in and follow the firmware upgrade guideline.
VGA input port, which can be connect
Connections
VRX2
Dual Tuner Digital HDTV Recorder, Receiver
na/Cable signal source
Connect an outdoor or indoor antenna directly to either Tuner 1 or Tuner 2 jack with a coaxial
air digital TV signals from TV broadcasters.
able signal source using a coaxial RF cable
Connecting external USB storage devices
To record TV shows, plug USB 2.0 support Hard Disk Drive (HDD) or Flash stick with the size from
will record TV shows on the first USB device plugged
To playback TV, Movie, Music and Photo files, connect USB device to any one of USB ports.
To upload firmware, Plug USB flash stick in and follow the firmware upgrade guideline.
VGA input port, which can be connect
Dual Tuner Digital HDTV Recorder, Receiver
Connect an outdoor or indoor antenna directly to either Tuner 1 or Tuner 2 jack with a coaxial
air digital TV signals from TV broadcasters.
able signal source using a coaxial RF cable
to either Tuner 1 or Tuner 2 jack
To record TV shows, plug USB 2.0 support Hard Disk Drive (HDD) or Flash stick with the size from
will record TV shows on the first USB device plugged
To playback TV, Movie, Music and Photo files, connect USB device to any one of USB ports.
To upload firmware, Plug USB flash stick in and follow the firmware upgrade guideline.
VGA input port, which can be connect
ed
to PC or external devices with RGB, H/V
Dual Tuner Digital HDTV Recorder, Receiver
Connect an outdoor or indoor antenna directly to either Tuner 1 or Tuner 2 jack with a coaxial
air digital TV signals from TV broadcasters.
to either Tuner 1 or Tuner 2 jack
To record TV shows, plug USB 2.0 support Hard Disk Drive (HDD) or Flash stick with the size from
will record TV shows on the first USB device plugged
To playback TV, Movie, Music and Photo files, connect USB device to any one of USB ports.
To upload firmware, Plug USB flash stick in and follow the firmware upgrade guideline.
to PC or external devices with RGB, H/V
Page
Dual Tuner Digital HDTV Recorder, Receiver
and other
Connect an outdoor or indoor antenna directly to either Tuner 1 or Tuner 2 jack with a coaxial
to either Tuner 1 or Tuner 2 jack
.
To record TV shows, plug USB 2.0 support Hard Disk Drive (HDD) or Flash stick with the size from
will record TV shows on the first USB device plugged
in no matter
To playback TV, Movie, Music and Photo files, connect USB device to any one of USB ports.
To upload firmware, Plug USB flash stick in and follow the firmware upgrade guideline.
to PC or external devices with RGB, H/V
Page
14
and other
Connect an outdoor or indoor antenna directly to either Tuner 1 or Tuner 2 jack with a coaxial
To record TV shows, plug USB 2.0 support Hard Disk Drive (HDD) or Flash stick with the size from
in no matter
to PC or external devices with RGB, H/V

Connecting HDMI Input
PHD-
VRX2
players, DVD players, PS
Connecting Component (YPbPr) Input
PHD-
VRX2
to
external HD devices
Connecting Composite Video Input
PHD-
VRX
be connect
Connecting HDMI Input
VRX2
has
one HDMI input port. It can be connected to
players, DVD players, PS
Connecting Component (YPbPr) Input
VRX2
has one Compon
external HD devices
Connecting Composite Video Input
VRX
2
has one Composite video (CVBS) input
be connect
ed
to any 480i/ Analog video
Connecting HDMI Input
one HDMI input port. It can be connected to
players, DVD players, PS
3, HD cable or
Connecting Component (YPbPr) Input
has one Compon
ent (Y
external HD devices
with YPbPr output.
Connecting Composite Video Input
has one Composite video (CVBS) input
to any 480i/ Analog video
Connections
one HDMI input port. It can be connected to
3, HD cable or
satellite boxes.
Connecting Component (YPbPr) Input
ent (Y
-Pb-
Pr) video input and audio (R/L) input,
with YPbPr output.
Connecting Composite Video Input
has one Composite video (CVBS) input
to any 480i/ Analog video
external devices such like VCR or
Connections
one HDMI input port. It can be connected to
satellite boxes.
Connecting Component (YPbPr) Input
Pr) video input and audio (R/L) input,
has one Composite video (CVBS) input
port with associated audio (R/L) input
external devices such like VCR or
one HDMI input port. It can be connected to
different HDMI devices
Pr) video input and audio (R/L) input,
port with associated audio (R/L) input
external devices such like VCR or
different HDMI devices
Pr) video input and audio (R/L) input,
which can be connect
port with associated audio (R/L) input
external devices such like VCR or
DVD players
Page
different HDMI devices
such like Blu
which can be connect
port with associated audio (R/L) input
,
which can
DVD players
.
Page
15
such like Blu
-Ray
which can be connect
ed
which can
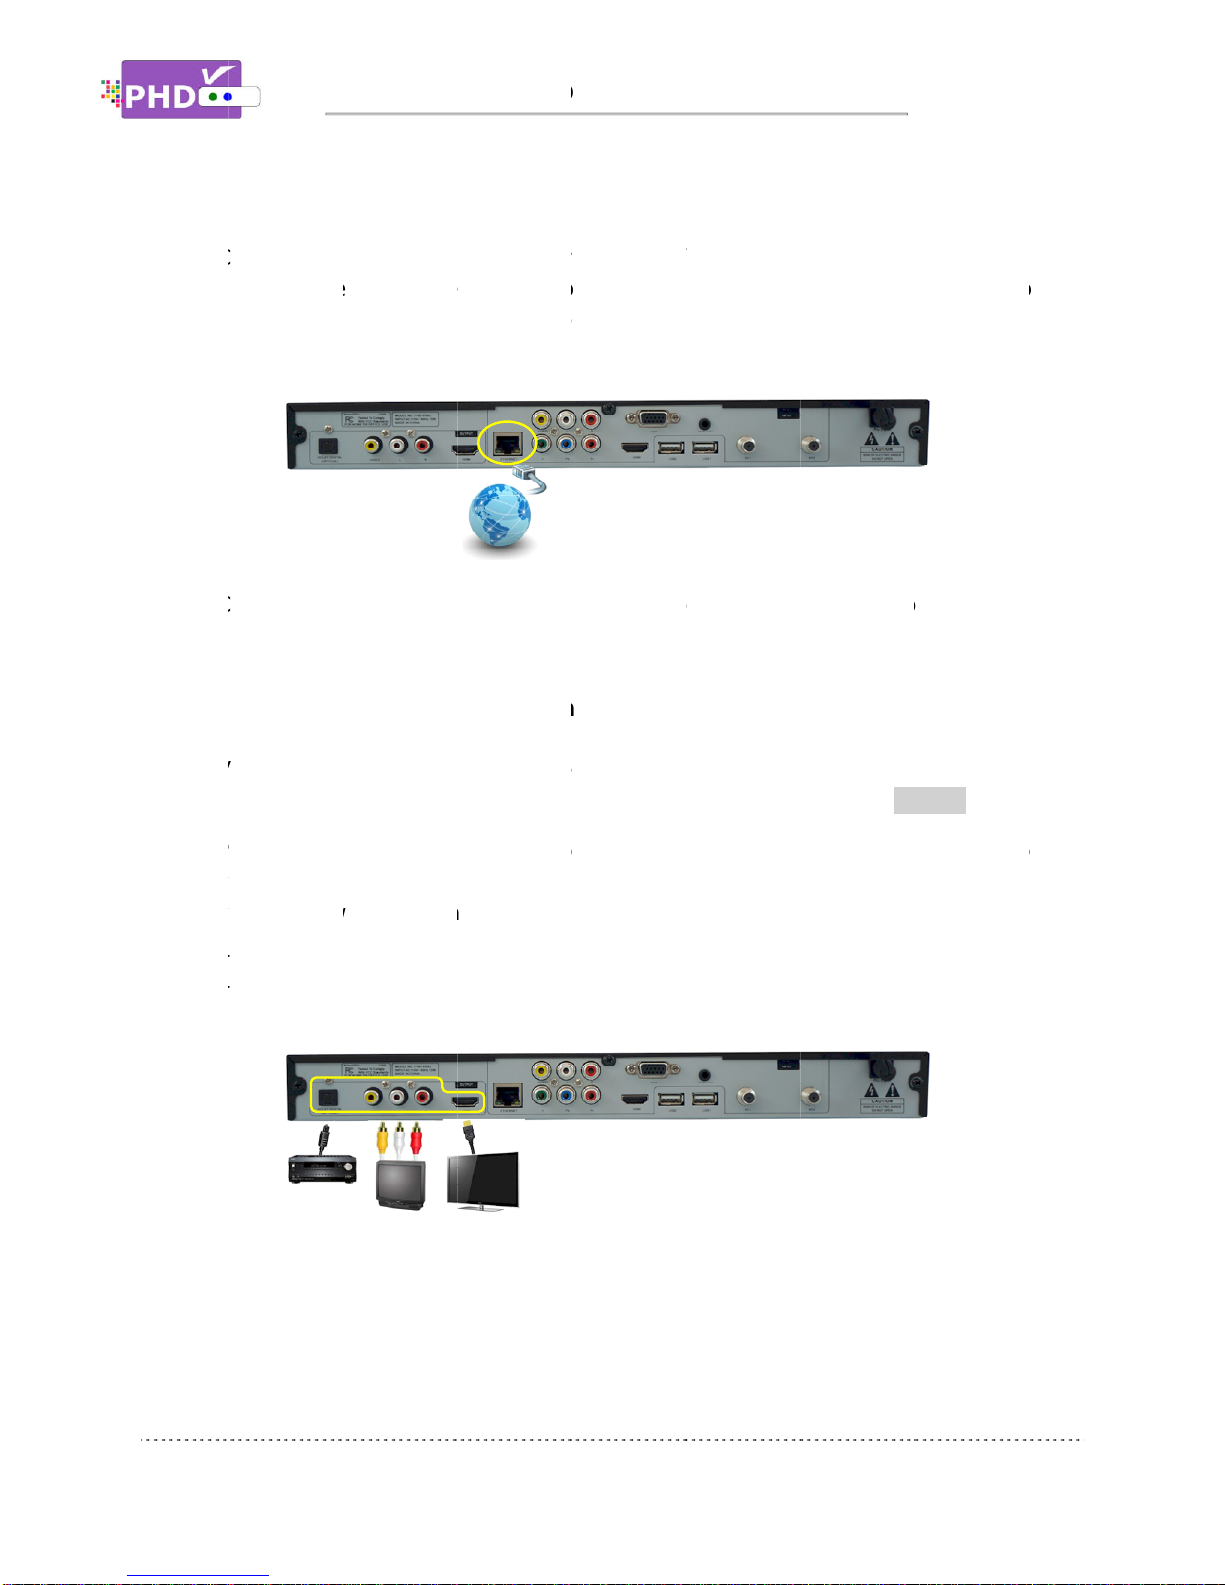
Connecting Network
1.
Connect PHD
router. The network connection will prompt the unit in sync with NTP (Network Time
for precise timing reference as well as on
connection.
2.
Connect to wireless net
Connecting HDMI, Composite Video and Audio Outputs
1.
For high quality video viewing, connect HDMI output to your HD TVs or HD Projectors. PHD
VRX2
Output resolution can b
2.
PHD
viewing and monitoring. There is no on
video/audio will be simultaneously outputting with HDMI.
3.
To receive
Theater
Connecting Network
Connect PHD
-
VRX2
router. The network connection will prompt the unit in sync with NTP (Network Time
for precise timing reference as well as on
connection.
Connect to wireless net
Connecting HDMI, Composite Video and Audio Outputs
For high quality video viewing, connect HDMI output to your HD TVs or HD Projectors. PHD
VRX2
has capacity to scale and enhance all input vi
Output resolution can b
PHD
-VRX2
composite video and audio outputs are connecting to conventional a
viewing and monitoring. There is no on
video/audio will be simultaneously outputting with HDMI.
To receive
highest quality audio
Theater
A/V receiver.
Connecting Network
VRX2
Ethernet port to wired network from DSL,
router. The network connection will prompt the unit in sync with NTP (Network Time
for precise timing reference as well as on
Connect to wireless net
work by using USB WiFi adapter is achievable (future optional).
Connecting HDMI, Composite Video and Audio Outputs
For high quality video viewing, connect HDMI output to your HD TVs or HD Projectors. PHD
has capacity to scale and enhance all input vi
Output resolution can b
e adjusted among 720p
composite video and audio outputs are connecting to conventional a
viewing and monitoring. There is no on
video/audio will be simultaneously outputting with HDMI.
highest quality audio
A/V receiver.
Connections
Ethernet port to wired network from DSL,
router. The network connection will prompt the unit in sync with NTP (Network Time
for precise timing reference as well as on
work by using USB WiFi adapter is achievable (future optional).
Connecting HDMI, Composite Video and Audio Outputs
For high quality video viewing, connect HDMI output to your HD TVs or HD Projectors. PHD
has capacity to scale and enhance all input vi
e adjusted among 720p
composite video and audio outputs are connecting to conventional a
viewing and monitoring. There is no on
-
screen
video/audio will be simultaneously outputting with HDMI.
highest quality audio
sound, connect
Connections
Ethernet port to wired network from DSL,
router. The network connection will prompt the unit in sync with NTP (Network Time
for precise timing reference as well as on
-
line video streaming and home network video server
work by using USB WiFi adapter is achievable (future optional).
Connecting HDMI, Composite Video and Audio Outputs
For high quality video viewing, connect HDMI output to your HD TVs or HD Projectors. PHD
has capacity to scale and enhance all input vi
deo/audio signals up to 1080p resolution.
e adjusted among 720p
/1080p
composite video and audio outputs are connecting to conventional a
screen
menu available in this output and composite
video/audio will be simultaneously outputting with HDMI.
sound, connect
optical digital audio output
Ethernet port to wired network from DSL,
Cable modem or home network
router. The network connection will prompt the unit in sync with NTP (Network Time
line video streaming and home network video server
work by using USB WiFi adapter is achievable (future optional).
Connecting HDMI, Composite Video and Audio Outputs
For high quality video viewing, connect HDMI output to your HD TVs or HD Projectors. PHD
deo/audio signals up to 1080p resolution.
/1080p
by using remote key
composite video and audio outputs are connecting to conventional a
menu available in this output and composite
video/audio will be simultaneously outputting with HDMI.
optical digital audio output
Cable modem or home network
router. The network connection will prompt the unit in sync with NTP (Network Time
line video streaming and home network video server
work by using USB WiFi adapter is achievable (future optional).
For high quality video viewing, connect HDMI output to your HD TVs or HD Projectors. PHD
deo/audio signals up to 1080p resolution.
by using remote key
V.MODE
composite video and audio outputs are connecting to conventional a
menu available in this output and composite
optical digital audio output
port to your
Page
Cable modem or home network
router. The network connection will prompt the unit in sync with NTP (Network Time
Protocol)
line video streaming and home network video server
work by using USB WiFi adapter is achievable (future optional).
For high quality video viewing, connect HDMI output to your HD TVs or HD Projectors. PHD
-
deo/audio signals up to 1080p resolution.
V.MODE
.
composite video and audio outputs are connecting to conventional a
nalog TV
for
menu available in this output and composite
port to your
Home
Page
16
Cable modem or home network
Protocol)
line video streaming and home network video server
-
deo/audio signals up to 1080p resolution.
for
menu available in this output and composite
Home

Power Up and Setup
After c
onnecting PHD
and run initial setup procedures including an automatic channel
during the first time using the unit, or after activating
initial stage.
To start:
1.
Plug the Power cord from back of the unit into AC
outlet.
2.
The clock will light up “12:00A”on the unit front
panel LED display to indicate it is in standby mode.
Press either
button to turn on the unit.
3.
Boot up time usually takes about 30 seconds and
the front panel will display “BOOT”. There will be
NO video on TV screen during boot up time. After
boot up is complet
and a green light.
4.
At this point, your TV screen should display
the first initial set up menu from PHD
HDMI output port. Then, f
screen initial setups
procedures:
Quick Set up
Press
remote control
proper language you want to use for menus and
message screens
Time Zone
Press remote control
proper time zone in your area.
Power Up and Setup
onnecting PHD
-
and run initial setup procedures including an automatic channel
during the first time using the unit, or after activating
initial stage.
Plug the Power cord from back of the unit into AC
outlet.
The clock will light up “12:00A”on the unit front
panel LED display to indicate it is in standby mode.
Press either
remote
button to turn on the unit.
Boot up time usually takes about 30 seconds and
the front panel will display “BOOT”. There will be
NO video on TV screen during boot up time. After
boot up is complet
and a green light.
At this point, your TV screen should display
the first initial set up menu from PHD
HDMI output port. Then, f
screen initial setups
procedures:
Quick Set up
:
remote control
▲
proper language you want to use for menus and
message screens
.
Time Zone
:
Press remote control
▲
proper time zone in your area.
Power Up and Setup
VRX2
with proper input and output sources
and run initial setup procedures including an automatic channel
during the first time using the unit, or after activating
Plug the Power cord from back of the unit into AC
The clock will light up “12:00A”on the unit front
panel LED display to indicate it is in standby mode.
remote
POWER
button to turn on the unit.
Boot up time usually takes about 30 seconds and
the front panel will display “BOOT”. There will be
NO video on TV screen during boot up time. After
boot up is complet
e, the front panel shows “no ch”
and a green light.
At this point, your TV screen should display
the first initial set up menu from PHD
HDMI output port. Then, f
ollow
screen initial setups
to complete
▲
/▼, then
OK
proper language you want to use for menus and
▲
/▼
and then
proper time zone in your area.
Power Up & Initial Setup
with proper input and output sources
and run initial setup procedures including an automatic channel
during the first time using the unit, or after activating
Plug the Power cord from back of the unit into AC
The clock will light up “12:00A”on the unit front
panel LED display to indicate it is in standby mode.
POWER
key or front panel
Boot up time usually takes about 30 seconds and
the front panel will display “BOOT”. There will be
NO video on TV screen during boot up time. After
e, the front panel shows “no ch”
At this point, your TV screen should display
the first initial set up menu from PHD
-
VRX2
ollow
several on
to complete
the
OK
to select the
proper language you want to use for menus and
and then
OK
to select the
Power Up & Initial Setup
with proper input and output sources
and run initial setup procedures including an automatic channel
during the first time using the unit, or after activating
the “Reset All”feature to set the unit back to its
Plug the Power cord from back of the unit into AC
The clock will light up “12:00A”on the unit front
panel LED display to indicate it is in standby mode.
key or front panel
Boot up time usually takes about 30 seconds and
the front panel will display “BOOT”. There will be
NO video on TV screen during boot up time. After
e, the front panel shows “no ch”
At this point, your TV screen should display
VRX2
several on
-
to select the
proper language you want to use for menus and
to select the
Power Up & Initial Setup
with proper input and output sources
, you
will
and run initial setup procedures including an automatic channel
scan. This
the “Reset All”feature to set the unit back to its
will
need to
power up the unit
scan. This
initial setup
the “Reset All”feature to set the unit back to its
Page
power up the unit
initial setup
is required only
the “Reset All”feature to set the unit back to its
Page
17
power up the unit
is required only
the “Reset All”feature to set the unit back to its
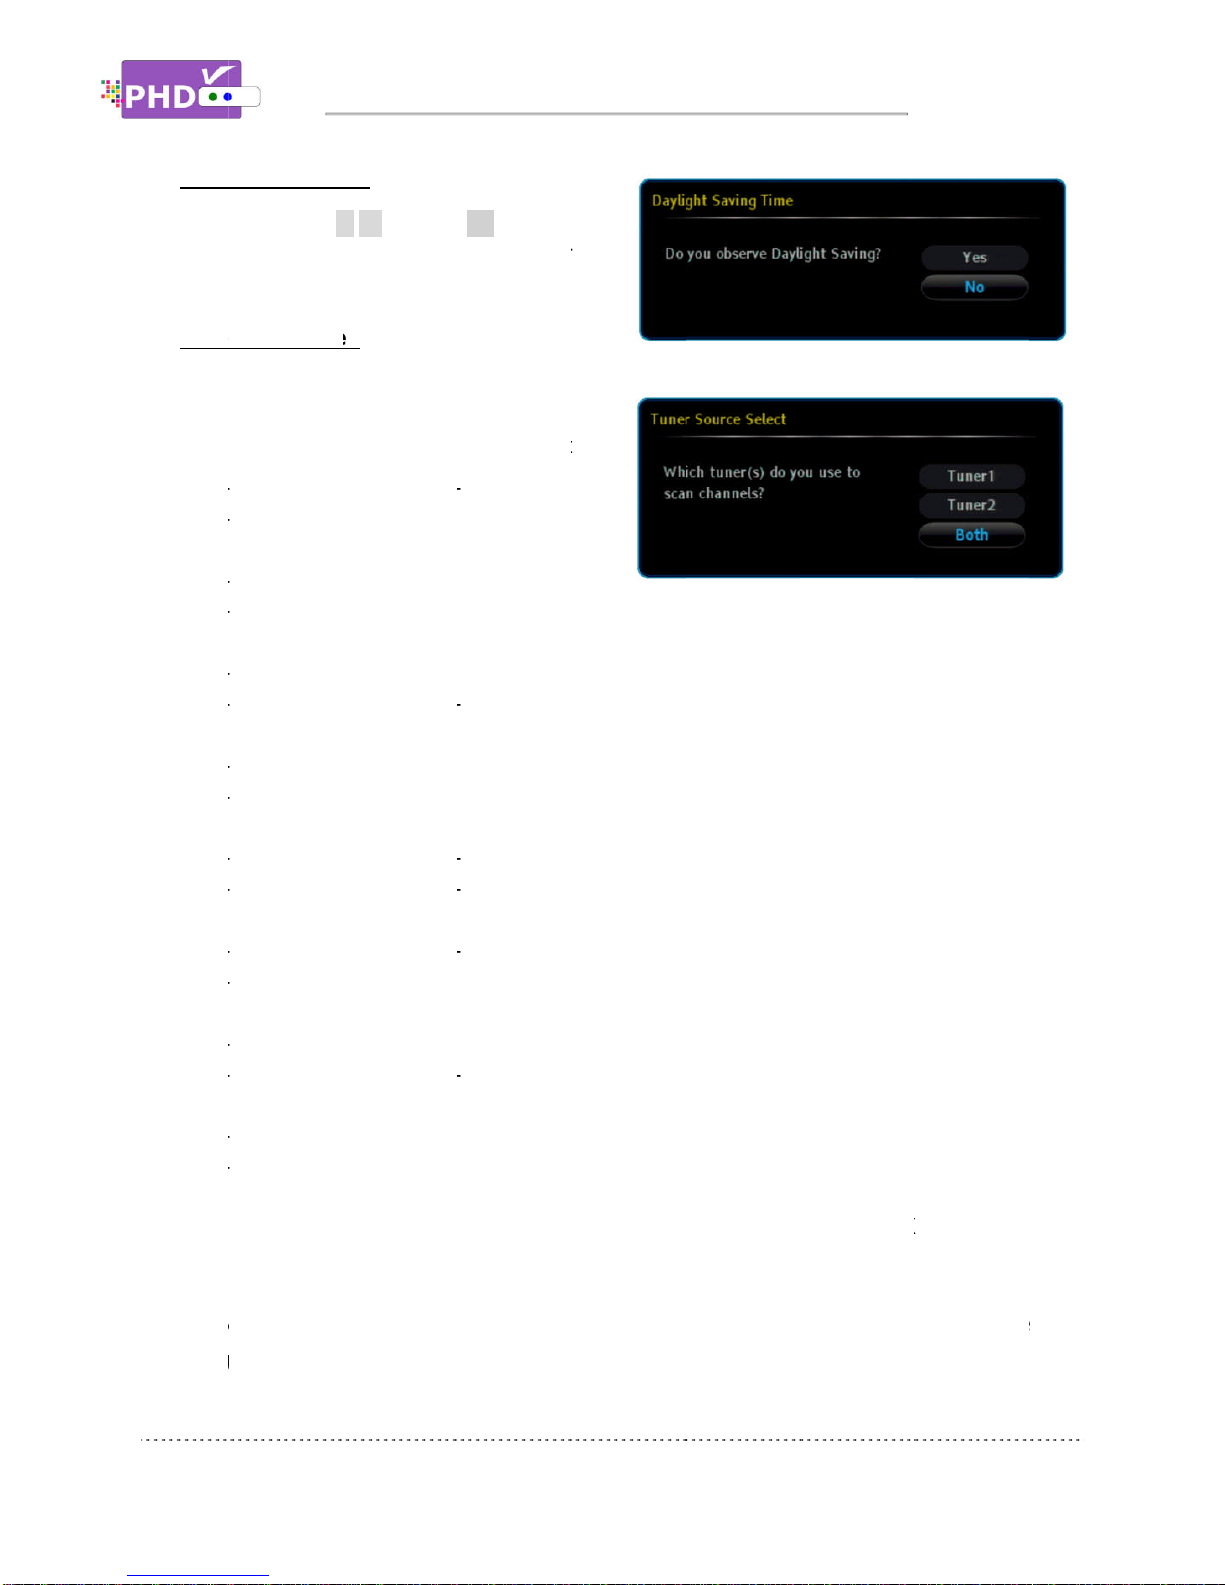
Daylight Saving Time
Press remote control
or no for the daylight saving time option in your
area.
Tuner Source Select
Since PHD
connect either over
QAM signals with any of the following combinations:
(1)
Tuner
Tuner 2 (RF2): None
(2)
Tuner 1 (RF1): Cable (QAM/NTSC)
Tuner 2 (RF2): None
(3)
Tuner 1 (RF1): None
Tuner 2 (RF2): Antenna (ATSC)
(4)
Tuner 1 (RF1): None
Tuner 2 (RF2): Cable (QAM)
(5)
Tuner 1 (RF1): Antenna (ATSC/NTSC)
Tuner 2 (RF2): Ant
(6)
Tuner 1 (RF1): Antenna (ATSC/NTSC)
Tuner 2 (RF2): Cable (QAM)
(7)
Tuner 1 (RF1):
Tuner 2 (RF2): Antenna (ATSC)
(8)
Tuner 1 (RF1): Cable (QAM/NTSC)
Tuner 2 (RF2): Cable (QAM)
Select either the “Tuner 1”or “Tuner 2”option to connect
“Both”option to connect both tuners with signals.
ATSC refers to over
to analog signal, which can be either sent from a TV broadca
Daylight Saving Time
Press remote control
▲
or no for the daylight saving time option in your
Tuner Source Select
Since PHD
-VRX2
has two built
connect either over
-
the
QAM signals with any of the following combinations:
Tuner
1 (RF1): Antenna (ATSC/NTSC)
Tuner 2 (RF2): None
Tuner 1 (RF1): Cable (QAM/NTSC)
Tuner 2 (RF2): None
Tuner 1 (RF1): None
Tuner 2 (RF2): Antenna (ATSC)
Tuner 1 (RF1): None
Tuner 2 (RF2): Cable (QAM)
Tuner 1 (RF1): Antenna (ATSC/NTSC)
Tuner 2 (RF2): Ant
Tuner 1 (RF1): Antenna (ATSC/NTSC)
Tuner 2 (RF2): Cable (QAM)
Tuner 1 (RF1):
Tuner 2 (RF2): Antenna (ATSC)
Tuner 1 (RF1): Cable (QAM/NTSC)
Tuner 2 (RF2): Cable (QAM)
Select either the “Tuner 1”or “Tuner 2”option to connect
“Both”option to connect both tuners with signals.
ATSC refers to over
to analog signal, which can be either sent from a TV broadca
Daylight Saving Time
:
▲
/▼and the
n
or no for the daylight saving time option in your
Tuner Source Select
:
has two built
-
in tuners, you can
the
-
air antenna signals or cable
QAM signals with any of the following combinations:
1 (RF1): Antenna (ATSC/NTSC)
Tuner 2 (RF2): None
Tuner 1 (RF1): Cable (QAM/NTSC)
Tuner 2 (RF2): None
Tuner 1 (RF1): None
Tuner 2 (RF2): Antenna (ATSC)
Tuner 1 (RF1): None
Tuner 2 (RF2): Cable (QAM)
Tuner 1 (RF1): Antenna (ATSC/NTSC)
Tuner 2 (RF2): Ant
enna (ATSC)
Tuner 1 (RF1): Antenna (ATSC/NTSC)
Tuner 2 (RF2): Cable (QAM)
Cable (QAM/NTSC)
Tuner 2 (RF2): Antenna (ATSC)
Tuner 1 (RF1): Cable (QAM/NTSC)
Tuner 2 (RF2): Cable (QAM)
Select either the “Tuner 1”or “Tuner 2”option to connect
“Both”option to connect both tuners with signals.
ATSC refers to over
-the-
air (antenna) digital signal; QAM refers to cable digital signal. NTSC refers
to analog signal, which can be either sent from a TV broadca
Power Up & Initial Setup
n
OK
to select yes
or no for the daylight saving time option in your
in tuners, you can
air antenna signals or cable
QAM signals with any of the following combinations:
1 (RF1): Antenna (ATSC/NTSC)
Tuner 1 (RF1): Cable (QAM/NTSC)
Tuner 2 (RF2): Antenna (ATSC)
Tuner 2 (RF2): Cable (QAM)
Tuner 1 (RF1): Antenna (ATSC/NTSC)
enna (ATSC)
Tuner 1 (RF1): Antenna (ATSC/NTSC)
Tuner 2 (RF2): Cable (QAM)
Cable (QAM/NTSC)
Tuner 2 (RF2): Antenna (ATSC)
Tuner 1 (RF1): Cable (QAM/NTSC)
Tuner 2 (RF2): Cable (QAM)
Select either the “Tuner 1”or “Tuner 2”option to connect
“Both”option to connect both tuners with signals.
air (antenna) digital signal; QAM refers to cable digital signal. NTSC refers
to analog signal, which can be either sent from a TV broadca
Power Up & Initial Setup
to select yes
or no for the daylight saving time option in your
in tuners, you can
air antenna signals or cable
QAM signals with any of the following combinations:
Select either the “Tuner 1”or “Tuner 2”option to connect
only one signal to PHD
“Both”option to connect both tuners with signals.
air (antenna) digital signal; QAM refers to cable digital signal. NTSC refers
to analog signal, which can be either sent from a TV broadca
ster or Cable Company.
Power Up & Initial Setup
only one signal to PHD
air (antenna) digital signal; QAM refers to cable digital signal. NTSC refers
ster or Cable Company.
only one signal to PHD
-
VRX2
air (antenna) digital signal; QAM refers to cable digital signal. NTSC refers
ster or Cable Company.
Page
VRX2
. Select the
air (antenna) digital signal; QAM refers to cable digital signal. NTSC refers
Page
18
air (antenna) digital signal; QAM refers to cable digital signal. NTSC refers
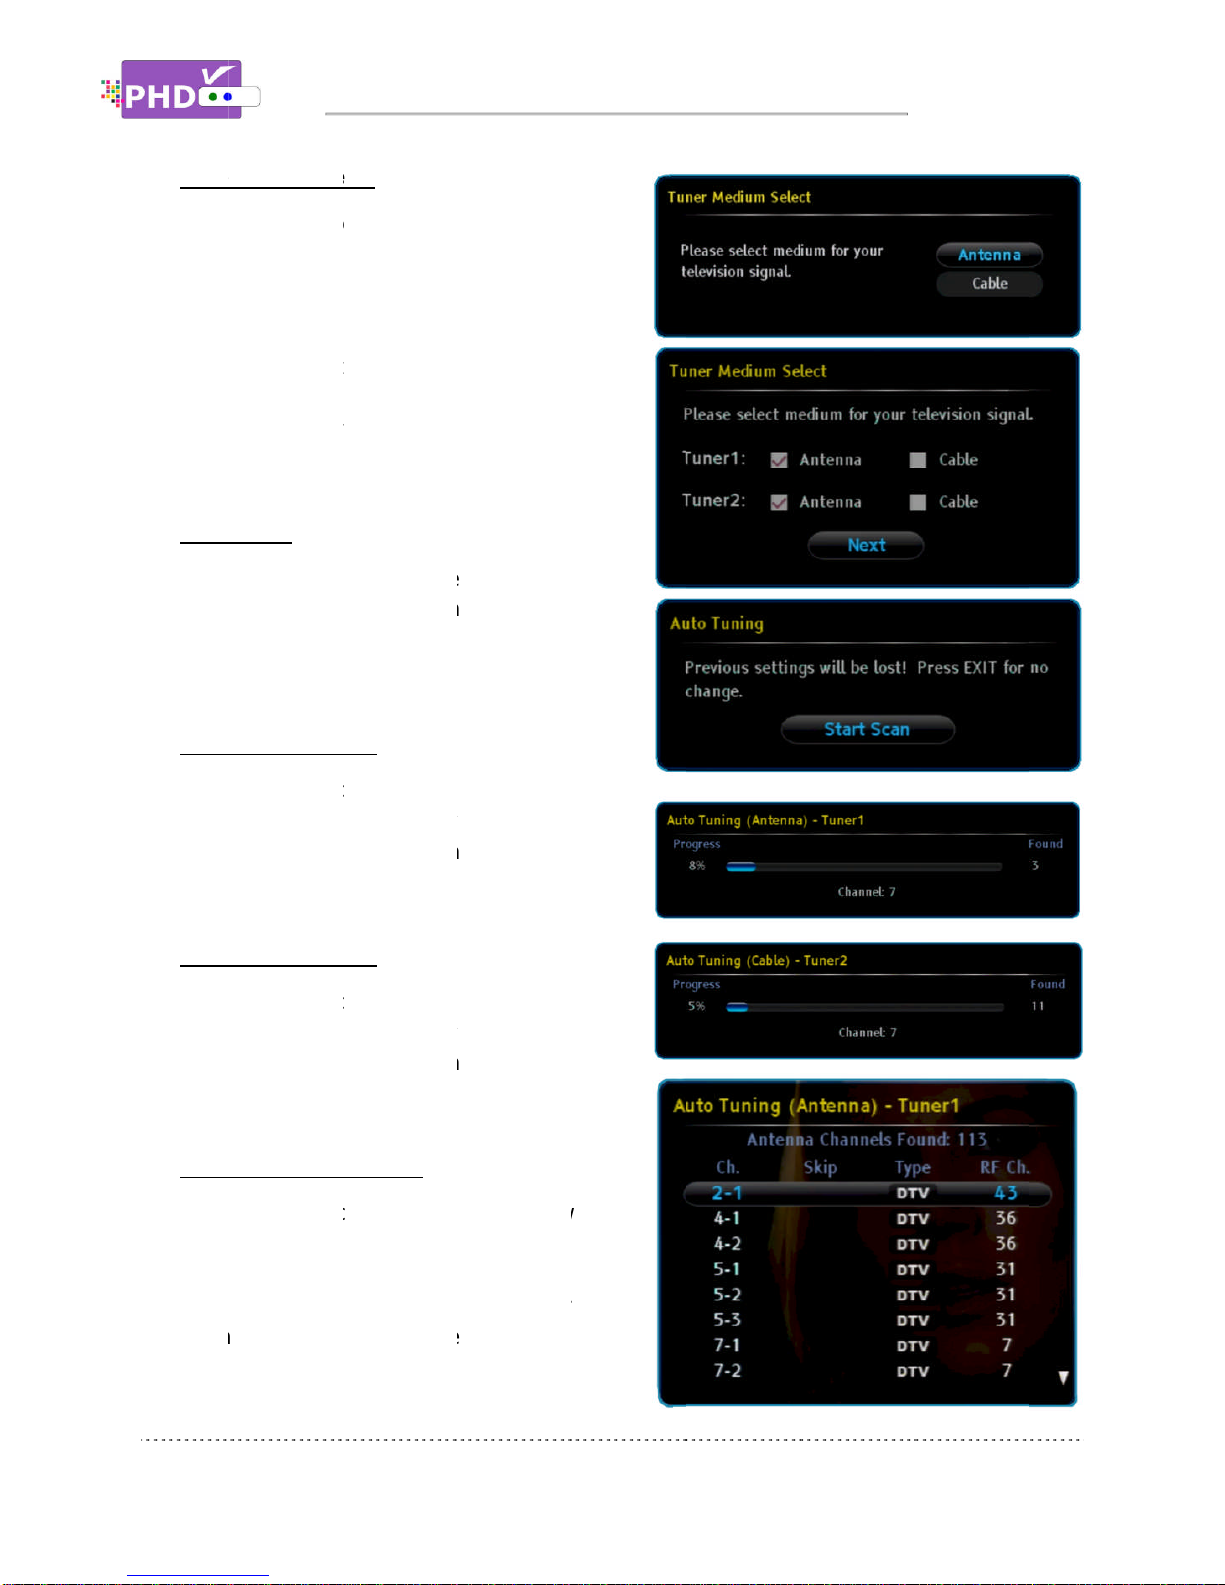
Tuner Medium Select
If the single tuner option is chosen, then the Tuner
Medium Select screen will prompt you to select either
Antenna or Cable as your input RF signal source. Once
selected, PHD
If
you choose the “Both”tuners option, then the Tuner
Medium Select screen will prompt you to select the
signal source for each tuner input in detail.
Auto Tuning
Once the RF signal source(s) has been selected, PHD
VRX2
is ready for auto scanning. This s
confirm the action.
Auto Tuning
PHD-
VRX2
1 input signal source. The screen will show scanning
progress and how many channels have been found.
Auto Tuning
PHD-
VRX2
2 input signal source. The screen will show scanning
progress and how many channels have been found.
Auto Tuning
After completing the channel scan, PHD
show first tuner channel master list. This in
channel number with sub number (e.g. 2
indicates whether it is a digital channel (DTV) or an
analog channel (ATV) as well as the physical RF
channel number.
Tuner Medium Select
If the single tuner option is chosen, then the Tuner
Medium Select screen will prompt you to select either
Antenna or Cable as your input RF signal source. Once
selected, PHD
-VRX2
will go to the next screen.
you choose the “Both”tuners option, then the Tuner
Medium Select screen will prompt you to select the
signal source for each tuner input in detail.
Auto Tuning
:
Once the RF signal source(s) has been selected, PHD
is ready for auto scanning. This s
confirm the action.
Auto Tuning
–
Tuner1
VRX2
is starting channel scanning based on Tuner
1 input signal source. The screen will show scanning
progress and how many channels have been found.
Auto Tuning
–
Tuner2
VRX2
is starting
channel scanning based on Tuner
2 input signal source. The screen will show scanning
progress and how many channels have been found.
Auto Tuning
–
Channel List
After completing the channel scan, PHD
show first tuner channel master list. This in
channel number with sub number (e.g. 2
indicates whether it is a digital channel (DTV) or an
analog channel (ATV) as well as the physical RF
channel number.
Tuner Medium Select
:
If the single tuner option is chosen, then the Tuner
Medium Select screen will prompt you to select either
Antenna or Cable as your input RF signal source. Once
will go to the next screen.
you choose the “Both”tuners option, then the Tuner
Medium Select screen will prompt you to select the
signal source for each tuner input in detail.
Once the RF signal source(s) has been selected, PHD
is ready for auto scanning. This s
Tuner1
:
is starting channel scanning based on Tuner
1 input signal source. The screen will show scanning
progress and how many channels have been found.
Tuner2
:
channel scanning based on Tuner
2 input signal source. The screen will show scanning
progress and how many channels have been found.
Channel List
:
After completing the channel scan, PHD
show first tuner channel master list. This in
channel number with sub number (e.g. 2
indicates whether it is a digital channel (DTV) or an
analog channel (ATV) as well as the physical RF
Power Up & Initial Setup
If the single tuner option is chosen, then the Tuner
Medium Select screen will prompt you to select either
Antenna or Cable as your input RF signal source. Once
will go to the next screen.
you choose the “Both”tuners option, then the Tuner
Medium Select screen will prompt you to select the
signal source for each tuner input in detail.
Once the RF signal source(s) has been selected, PHD
is ready for auto scanning. This s
creen is to
is starting channel scanning based on Tuner
1 input signal source. The screen will show scanning
progress and how many channels have been found.
channel scanning based on Tuner
2 input signal source. The screen will show scanning
progress and how many channels have been found.
After completing the channel scan, PHD
-VRX2
will
show first tuner channel master list. This in
cludes
channel number with sub number (e.g. 2
-
1), and
indicates whether it is a digital channel (DTV) or an
analog channel (ATV) as well as the physical RF
Power Up & Initial Setup
If the single tuner option is chosen, then the Tuner
Medium Select screen will prompt you to select either
Antenna or Cable as your input RF signal source. Once
you choose the “Both”tuners option, then the Tuner
Medium Select screen will prompt you to select the
Once the RF signal source(s) has been selected, PHD
-
creen is to
is starting channel scanning based on Tuner
1 input signal source. The screen will show scanning
progress and how many channels have been found.
channel scanning based on Tuner
2 input signal source. The screen will show scanning
progress and how many channels have been found.
will
cludes
1), and
indicates whether it is a digital channel (DTV) or an
Power Up & Initial Setup
Page
Page
19

PHD-
VRX2
certain key features easily. To access the Main Menu, press remote
button. PHD
Main Menu
The Main Menu consists of seven menu items:
To navigate the Main Menu, use remote
remote
OK
During menu navigation, press the remote
menu screen. Or press the remote
menu location.
VRX2
provides the on
certain key features easily. To access the Main Menu, press remote
button. PHD
-VRX2
will display menu graphics on your TV screen.
Main Menu
:
The Main Menu consists of seven menu items:
: Picture
: Settings
: Record
To navigate the Main Menu, use remote
OK
key to move to the next level.
During menu navigation, press the remote
menu screen. Or press the remote
menu location.
Navigating t
provides the on
-
screen Main Menu to access all major features and the Quick
certain key features easily. To access the Main Menu, press remote
will display menu graphics on your TV screen.
The Main Menu consists of seven menu items:
To navigate the Main Menu, use remote
key to move to the next level.
During menu navigation, press the remote
menu screen. Or press the remote
menu location.
Navigating t
he On
screen Main Menu to access all major features and the Quick
certain key features easily. To access the Main Menu, press remote
will display menu graphics on your TV screen.
The Main Menu consists of seven menu items:
To navigate the Main Menu, use remote
▲/▼,
key to move to the next level.
During menu navigation, press the remote
menu screen. Or press the remote
BACK
he On
-
Screen Menus
screen Main Menu to access all major features and the Quick
certain key features easily. To access the Main Menu, press remote
will display menu graphics on your TV screen.
: Audio
: Locks
/
keys to choose a sub
During menu navigation, press the remote
MENU k
ey again or the
BACK
key as the return function to go back to the previous
Screen Menus
screen Main Menu to access all major features and the Quick
certain key features easily. To access the Main Menu, press remote
MENU
will display menu graphics on your TV screen.
keys to choose a sub
ey again or the
key as the return function to go back to the previous
Screen Menus
screen Main Menu to access all major features and the Quick
MENU
key or the front panel MENU
: Channel
:
Media Player
keys to choose a sub
-
menu or option. Or press the
ey again or the
EXIT
key any time to exit the
key as the return function to go back to the previous
Page
screen Main Menu to access all major features and the Quick
Menu to get to
key or the front panel MENU
: Channel
Media Player
menu or option. Or press the
key any time to exit the
key as the return function to go back to the previous
Page
20
Menu to get to
key or the front panel MENU
menu or option. Or press the
key any time to exit the
key as the return function to go back to the previous
Table of contents
Other PrimeDTV Technologies TV Receiver manuals


