PrimeDTV Technologies PHD-VRX User manual
©Copyright 2012,PrimeDTV Technologies, Inc.
Full HD 1080p Dual Tuner Digital
HDTV Recorder, Receiver and
Media Center Box
Quick Start Guide
MODEL : PHD-VRX
Toviewfullversionof
PHD‐VRXusermanual,USBDTVRecordingand
TimeshiftingOperationGuide,pleasegoto
www.epvision.com/HDTVSTB/phdvrxmain.htm.
PrimeDTVTechnologies
DOC#VRX‐sv1.02
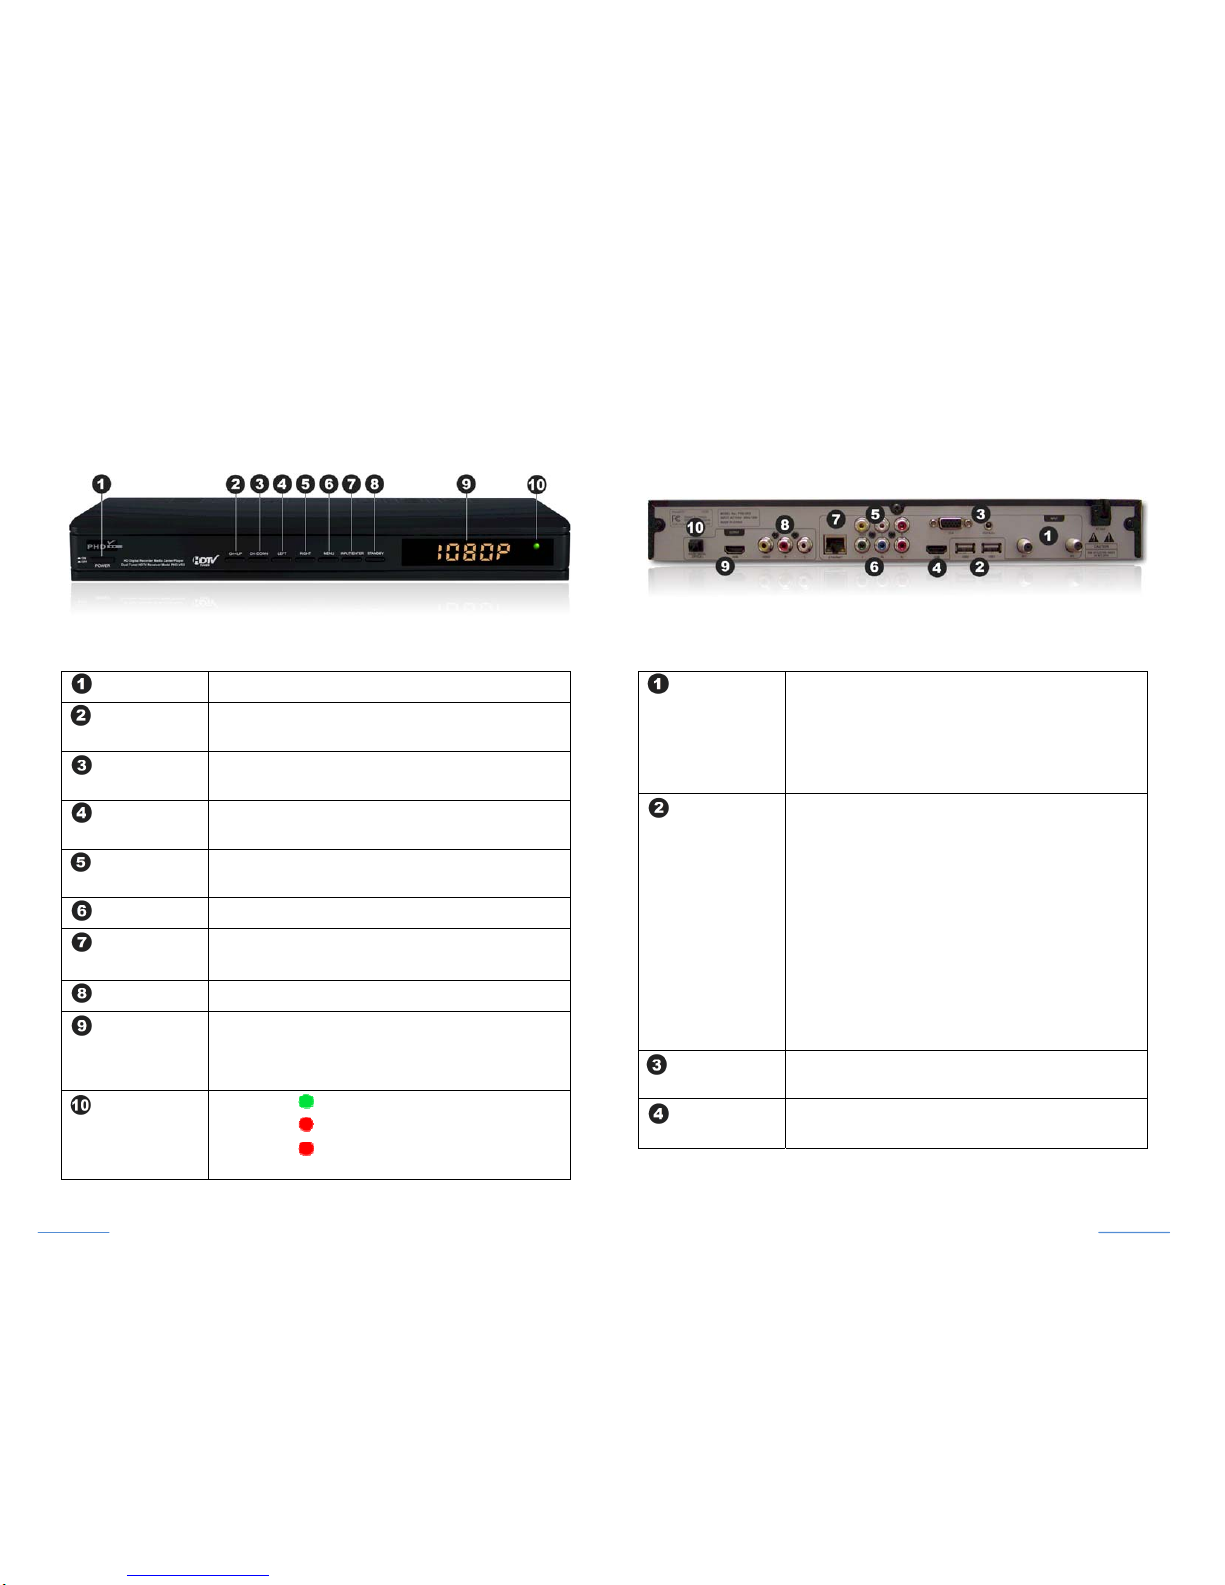
POWER SwitchunitONandOFF.
CH+/UP •MoveTVchannelnumberup,or
•Movetheon‐screenhighlightup.
CH‐/DOWN•MoveTVchannelnumberdown,or
•Movetheon‐screenhighlightdown.
LEFT/VOL‐ •Movetheon‐screenhighlighttoleft,or
•Reduceaudiovolume.
RIGHT/VOL+•Movetheon‐screenhighlighttoright,or
•Increaseaudiovolume.
MENU•DisplayOn‐screen(OSD)MainMenu.
INPUT/ENTER•BringupINPUTmenutoselectinputsource,or
•SelecttheitemhighlightedonOSDmenus.
STANDBYSwitchunitinStandbyorOperationmode.
6‐DigitLED•InTVMode,showscurrentchannelnumber.
•InotherINPUTsorStandbymode,shows
currentclocktime.
StatusLED•Displaysduringnormaloperationmode.
•Displaysduringstandbymode.
•DisplayswhenisinRecordingor
Timeshiftingmode.
TwoTuners
(RF1,RF2)
•
RF1(Tuner1),anATSC/QAM/NTSCtunerto
receivedigitalandanalogchannels.
•RF2(Tuner2),anATSC/QAMtunertoreceive
onlydigitalchannels.
Note:PHD‐VRXcanonlyrecordortimeshiftondigital
channelsonly,notonanalogchannels.
TwoUSBports
(USB1,USB2)
UseanyofUSBportstoconnectexternalUSB
storagedevicesoroptionalUSBWiFiadapters.
•Torecord,connectingexternalUSBHardDrive
(HDD)orUSBFlashstickwitheitherext2or
NTFSformat.PHD‐VRXwillrecordTVshowson
thefirstUSBdevicepluggedin(assignedas
“usba”).
•ToPlayback,connectinganyUSBstorage
deviceswitheitherext2,NTFSorFAT32
format.PHD‐VRXwillactasmediaplayerto
playallvideo,musicandpicturefiles.
Note:PHD‐VRXhasbuilt‐inUSButilitymenutotestUSB
speedandpartitionUSBtoext2format.
VGA(RGB)w/
Audioinputs
Acceptvideoandaudio inputsfromPCVGA
port.
HDMIinputAcceptHDMIinputfromexternaldeviceslike
Blu‐rayplayerandetc.
FrontView Back View
Page1Page2
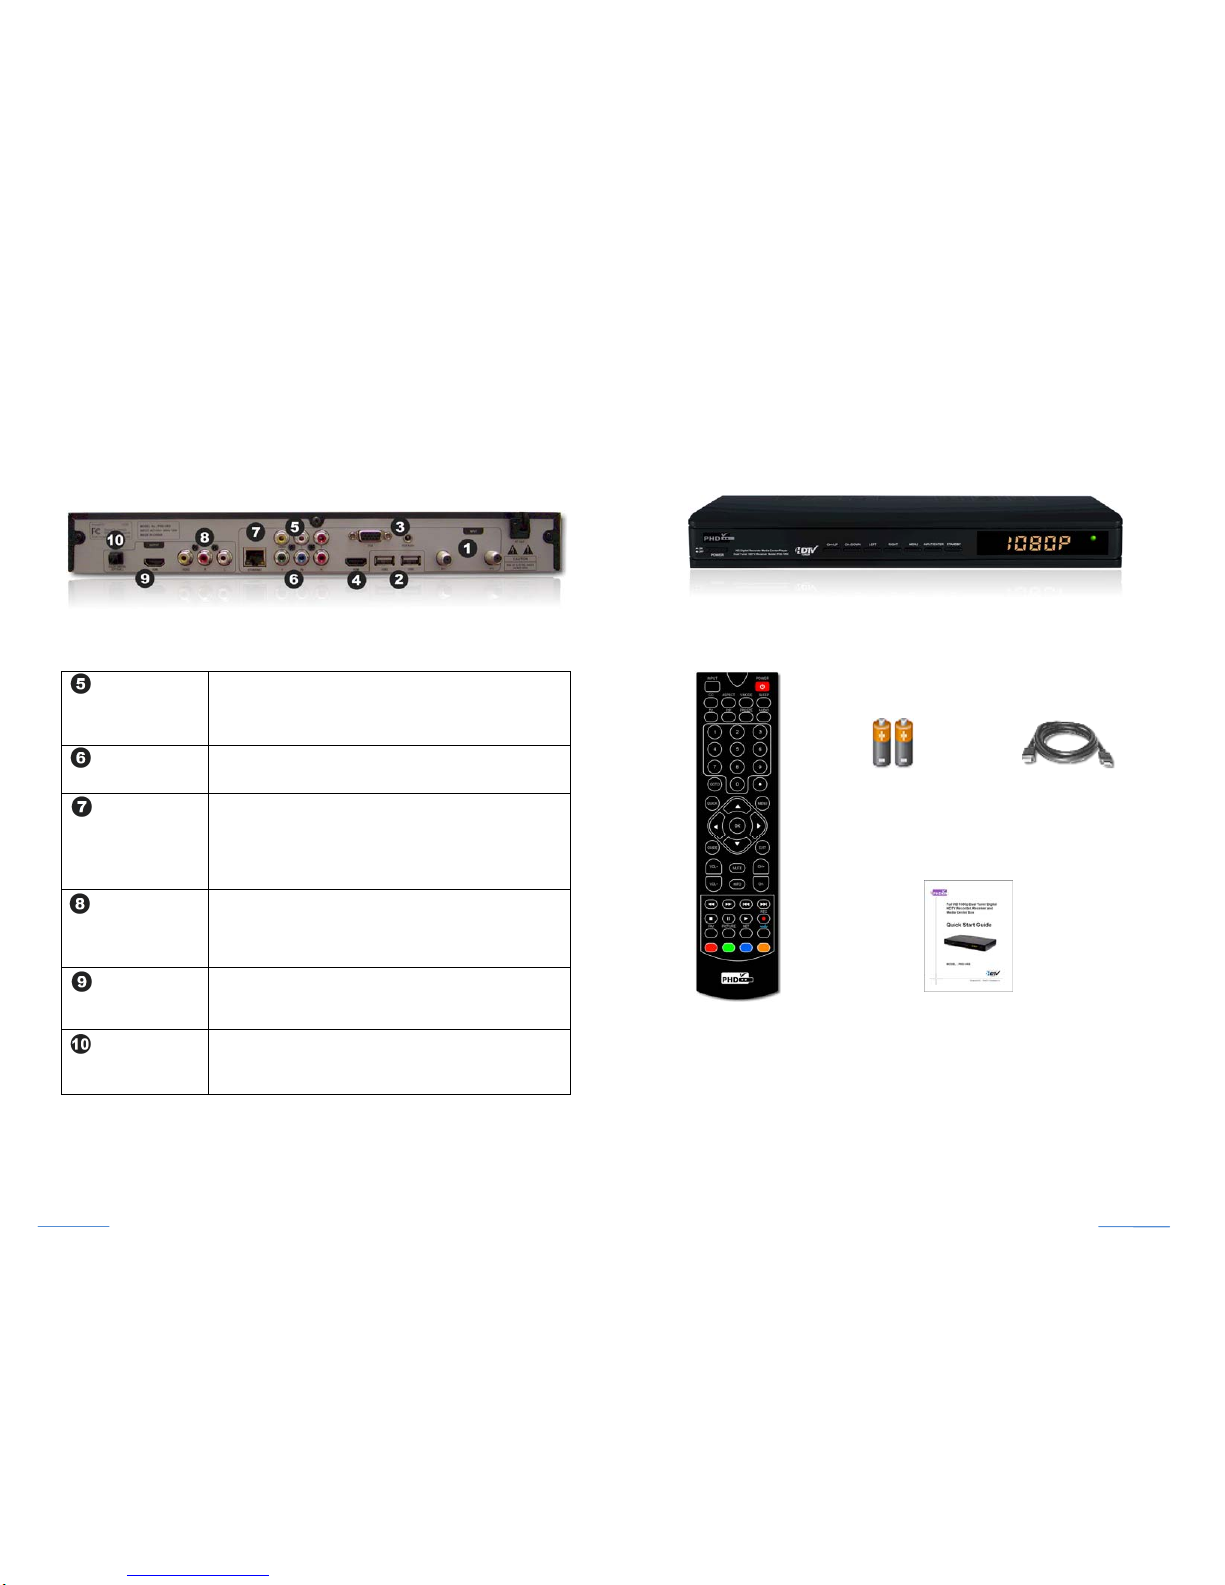
Composite
Videoand
Audioinputs
Acceptcompositevideo(480i)andstereoaudio
inputsfromexternaldevices.
Component
videoinput
Acceptcomponent(Y‐Pb‐Pr)video
(480p/720p/1080i)inputfromexternaldevices.
10/100
EthernetPort
Connectingtoexternalnetwork.
•ConnectNTP(NetworkTimeProtocol)server
tosynchronizethetimeforaccuracy.
•On‐linevideostreamingcapable.
Composite
Videoand
Audiooutput
Compositevideo(480i)andaudiooutputto
analogTVormonitor.Thisvideoisoutputting
simultaneouslywithHDMIoutput.
HDMIoutputHDMIoutput(480p/720p/1080p).Itis
outputtingsimultaneouslywithcompositevideo
output.
OpticalDigital
AudioOutput
Connectingtodigital(optical)audioequipment.
Supporting5.1surroundsound.
PHD‐VRXUnit
BackView(cont.) Contents
RemoteControl
2xAAABatteriesHDMICable
QuickStartGuide
Page3Page4

POWER SwitchunitONorstandbymode.
FUNCTION
KEYS
•
CC:turnclosedcaptiononoroff.
•ASPECT:changescreensize.
•V.MODE:changevideoresolution
(480p/720p/1080p).
•SLEEP:selectpresettimerforautoshutoff.
•TV:directlyjumptoTuner1whenunitisin
otherinput.
•PIP:(futureoption)
•FREEZE:Pausevideo
•AUDIO:digital/analogaudiosoundmode
change.
NUMBERS&
DOT
Presstoenternumbersorchangechannel
numbers.
MENUDisplayOn‐Screen(OSD)mainmenu
NAVIGATIONDirections(Up,Down,Right,Left)andOKkeysto
navigatemenu.
EXITExitthecurrentmenuoroperation.
MUTETemporarilyturnoffsound.
CH+/CH‐ Changechannelup anddown.
INFOShowcurrentinputstatus.InTVMode,show
channelstatusandquickprogramguide.
ACTIONSToplayvideo/audioprogramsforrecordedTV
show,timeshift,mediaplayer,videostreaming.
RWD:Rewindprogramquickly.
FF:FastForwardprogramquickly.
PREVIOUS:Movetoprevious,orslowRWD.
NEXT:Movetonext,orslowFFintimeshift.
STOP:Stopplayback.
PAUSE:Pausecurrentprogram.
PLAY:Playorresumeapausedprogram
REC:Startrecordingprogram.
RemoteControl
Page5Page6
ON‐LINEKEYS On‐linevideostreamingaccess(futureoption).
SHORTCUT
KEYS
4‐colorkeyscorrespondtodifferentfeatures
andquickaccess.
InTVmode,presstoenabletimeshift
function,whichcanpauseliveTVprogramas
wellasinstantlyrewind,fastforward,slow
motiononliveTVprogram.
FUNCTION
KEYS
•FAV:Addordeletefavoritechannels
•PICTURE:Selectpresetvideopicturesettings.
VOL+/VOL‐ Increaseorreduceaudiovolume.
GUIDEShowfullscreenElectronicsProgramGuidewith
scheduleprogramrecordingcapability.
QUICKDisplayquickaccessmenu. Itcomeswith
differentquickaccessfeaturesduringdifferent
operationmodes.
Note:Quickmenuisveryusefulandhandywithoutbringing
upmainmenuandstepsforaccessingaspecificfunction.
GOTO
(RETURN)
Thiskeywillbringthecurrentmenuorfunction
tothepreviousstate.InTVmode,thiskeywill
jumpbacktothepreviouschanneltunedto.
INPUTPressthiskeytobringupinputselection.
PHD‐VRXhasfollowinginputstoswitchfrom:
(1)Tuner1,(2)Tuner2,(3)CVBS–composite
video,(4)Component–YPbPr,(5)HDMI,(6)VGA
–PCinput.
Installing Batteries: before the remote control can be used, two batteries (size
AAA) need to be installed. First, open battery cover from the back of the remote.
Install 2x fresh batteries in the battery compartment. Next, snap the cover back
onto the remote control.
Remote Control Operation: point the remote control directly at the unit front
panel with no solid objects blocked in between, then press the desired buttons.
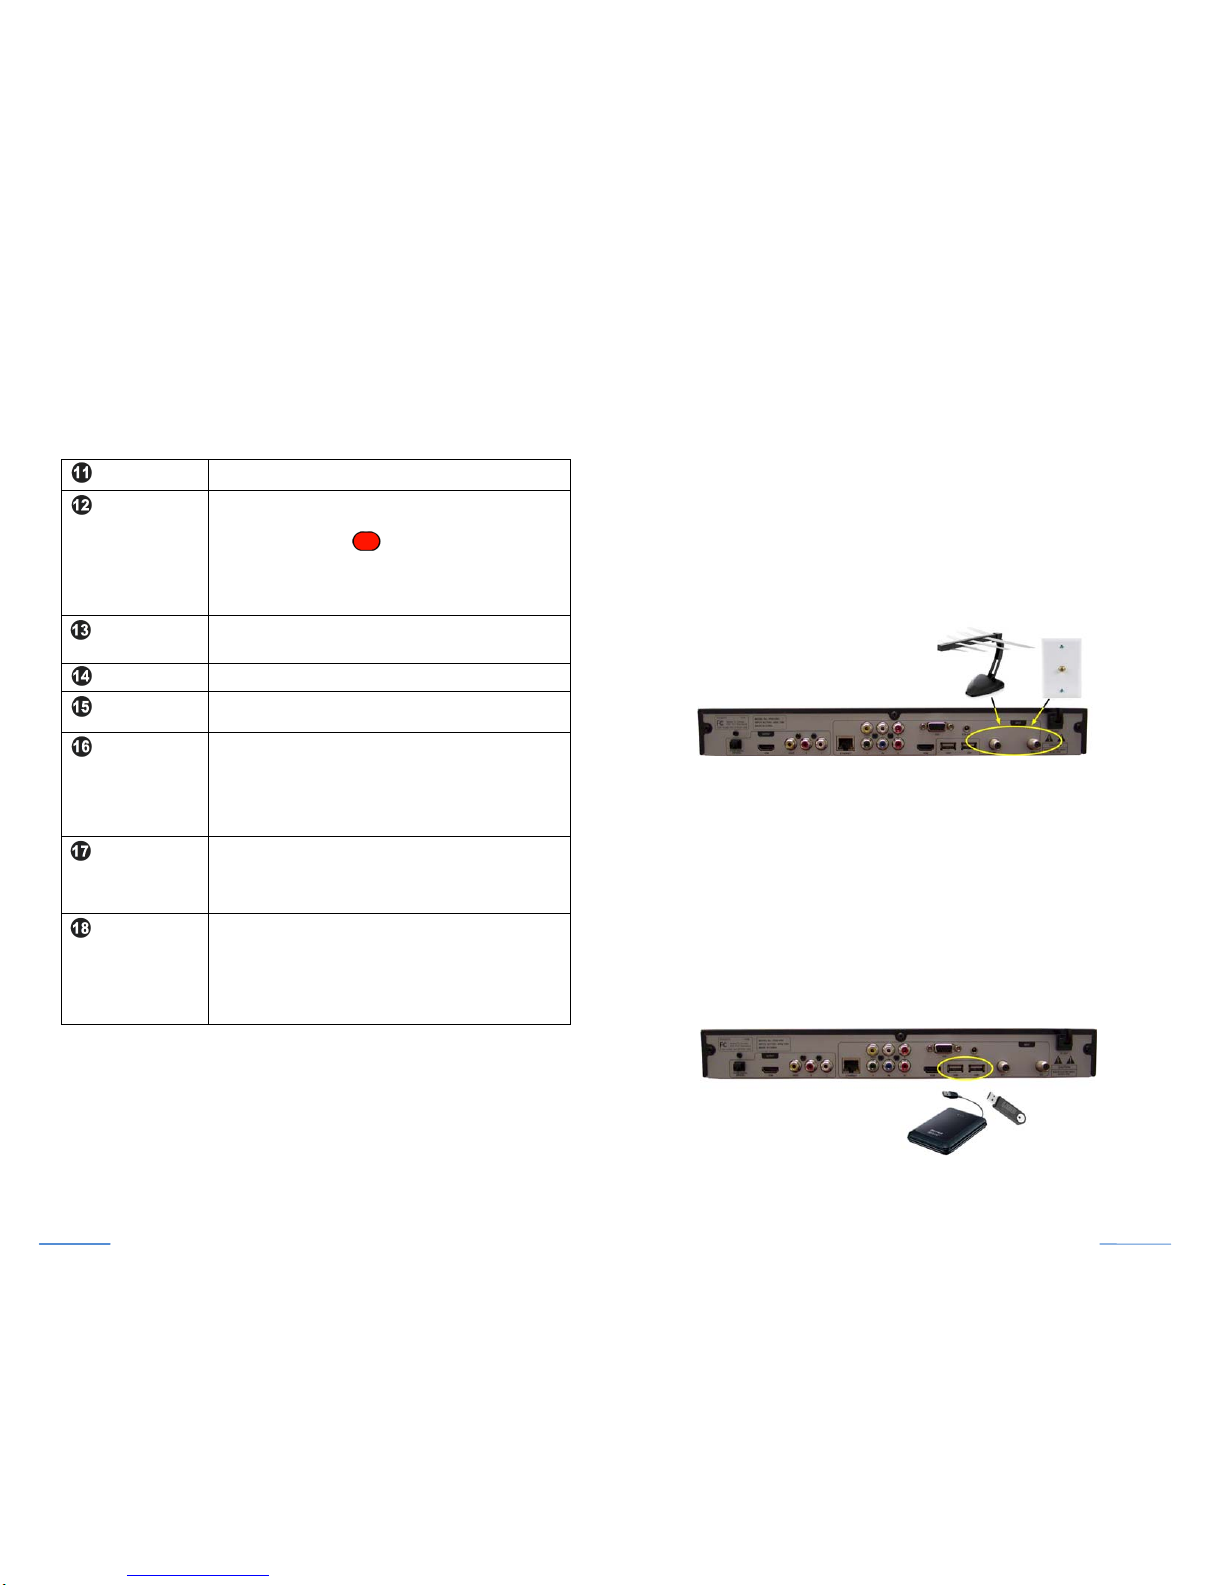
ConnectingAntenna/Cablesignalsource
1. ConnectanoutdoororindoorantennadirectlytoeitherTuner1
orTuner2jackwithacoaxialcable.Thisistoreceiveover‐the‐air
digitalTVsignalsfromTVbroadcasters.
2. ConnectCablesignalsourceusingacoaxialRFcabletoeither
Tuner1orTuner2jack.
ConnectingexternalUSBstoragedevices
1. TorecordTVshows,plugUSB2.0supportHardDiskDrive(HDD)
orFlashstickwiththesizefrom2GBupto2TB.PHD‐VRXwill
recordTVshowsonthefirstUSBdevicepluggedinnomatter
whichUSBportis.
2. ToplaybackTV,Movie,MusicandPhotofiles,connectUSB
devicetoanyoneofUSBports.
3. Touploadfirmware,PlugUSBflashstickinandfollowthe
firmwareupgradeguideline.
Connections&Setup
Page7Page8
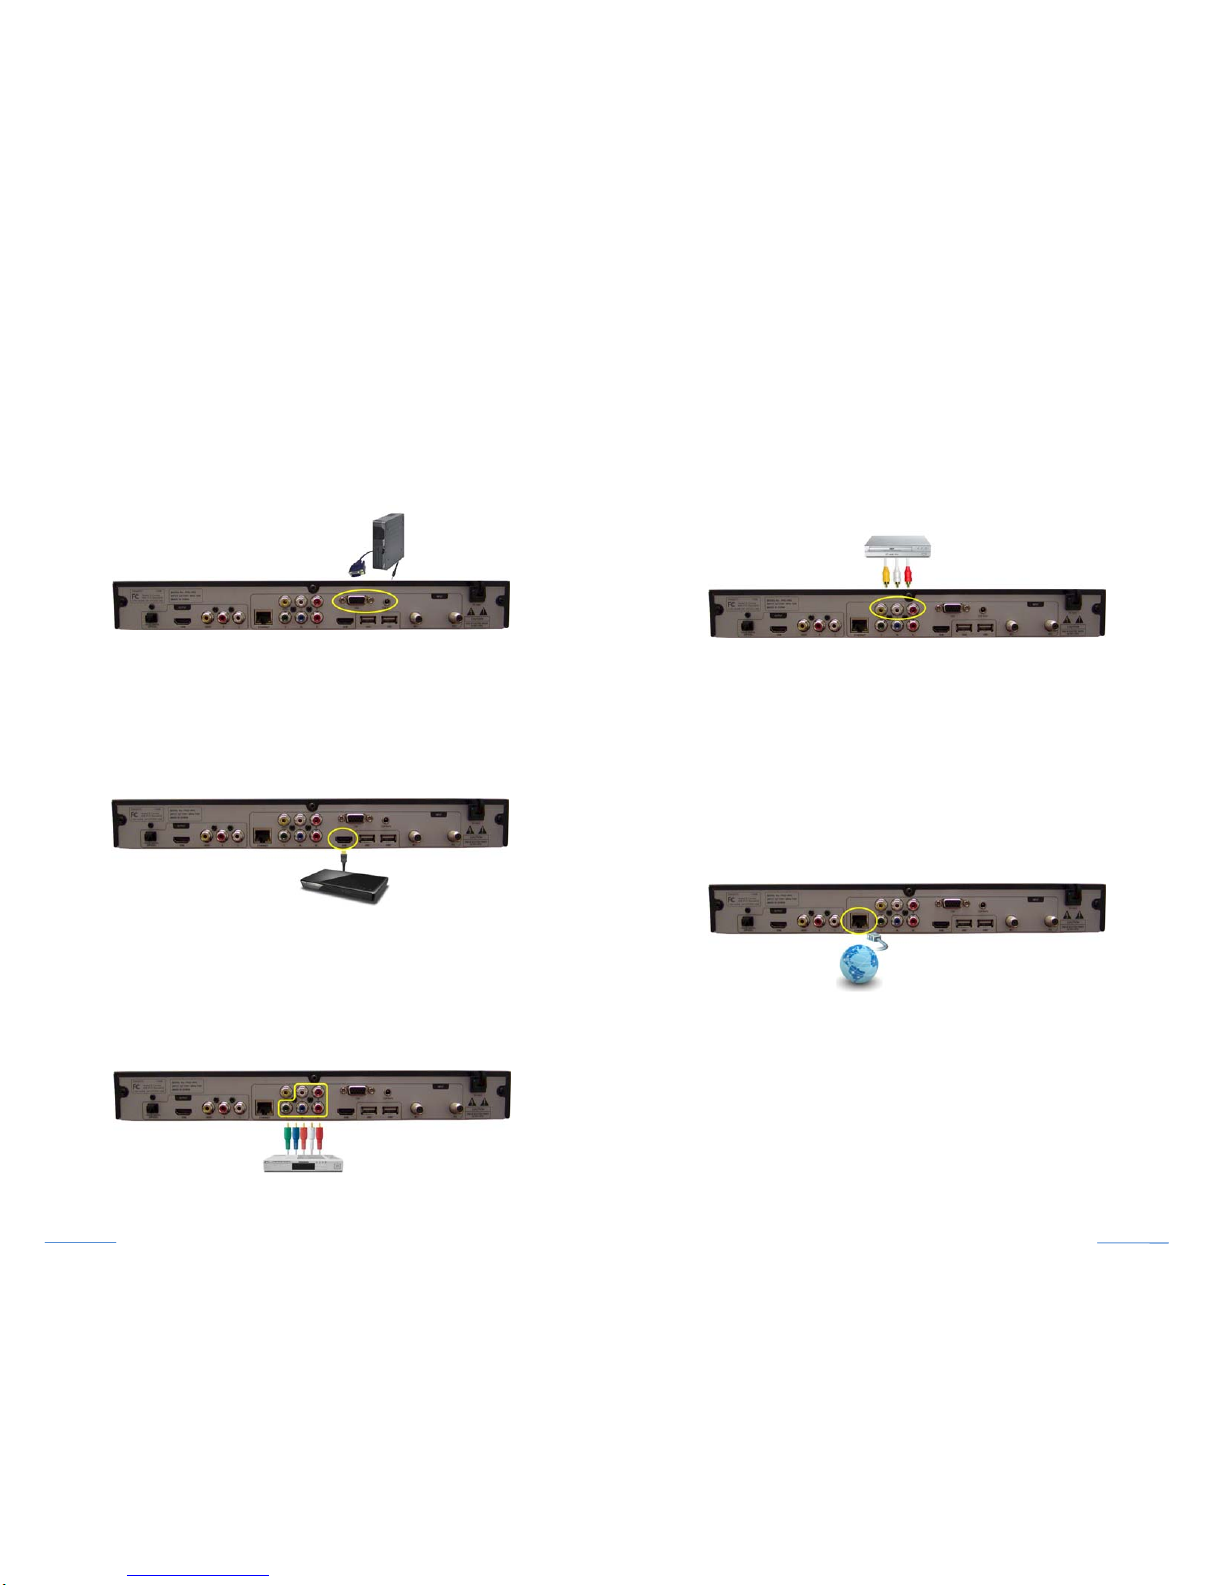
ConnectingVGA/PCInput
PHD‐VRXhasoneVGAinputport,whichcanbeconnectedtoPCor
externaldeviceswithRGB,H/Vsyncsignalsandaudio.
ConnectingHDMIInput
PHD‐VRXhasoneHDMIinputport.Itcanbeconnectedtodifferent
HDMIdevicessuchlikeBlu‐Rayplayer,DVDplayer,PS3,HDcableor
satelliteboxes.
ConnectingComponent(YPbPr)Input
PHD‐VRXhasoneComponent(Y‐Pb‐Pr)videoinputandaudio(R/L)
input,whichcanbeconnectedtoexternalHDdeviceswithYPbPr
output.
ConnectingCompositeVideoInput
PHD‐VRXhasoneCompositevideo(CVBS)inputportwithassociated
audio(R/L)input,whichcanbeconnectedtoany480i/Analogvideo
externaldevicessuchlikeVCR,DVDplayers.
ConnectingNetwork
1. ConnectPHD‐VRXEthernetporttowirednetworkfromDSL,
Cablemodemorhomenetworkrouter.Thenetworkconnection
willprompttheunitinsyncwithNTP(NetworkTimeProtocol)
forprecisetimingreferenceaswellason‐linevideostreaming
andhomenetworkvideoserverconnection.
2. ConnecttowirelessnetworkbyusingUSBWiFiadapteris
achievable(optional).
Page9Page10
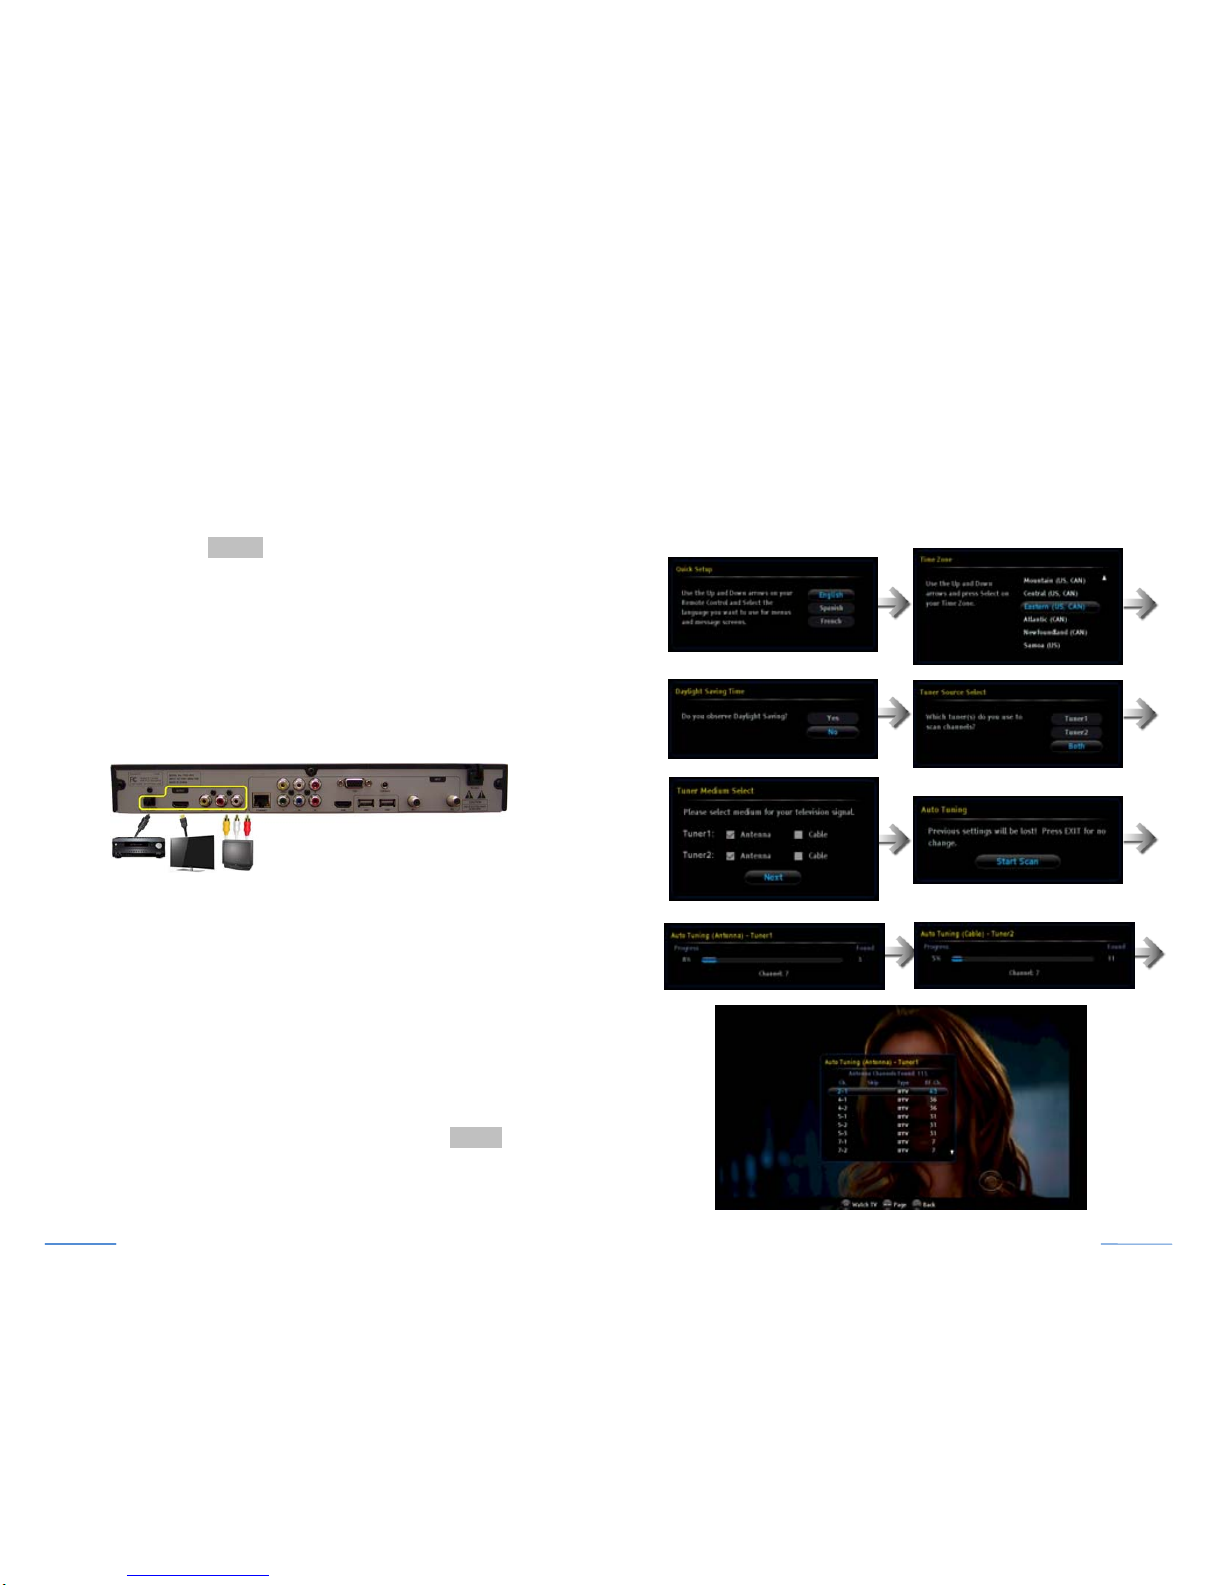
ConnectingHDMI,CompositeVideoandAudioOutputs
1. Forhighqualityvideoviewing,connectHDMIoutputtoyourHD
TVsorHDProjectors.PHD‐VRXhascapacitytoscaleandenhance
allinputvideo/audiosignalsupto1080presolution.Output
resolutioncanbeadjustedamong480p/720p/1080pbyusing
remotekeyV.MODE.
2. PHD‐VRXcompositevideoandaudiooutputsareconnectingto
conventionalanalogTVforviewingandmonitoring.Thereisno
on‐screenmenuavailableinthisoutputandcomposite
video/audiowillbesimultaneouslyoutputtingwithHDMI.
3. Toreceivehighestqualityaudiosound,connectopticaldigital
audiooutputporttoyourHomeTheaterA/Vreceiver.
PoweringUpandInitialSetup
AfterconnectingPHD‐VRXwithproperinput/outputsources,you
needtopowerupunitandruninitialsetupincludingautomatically
scanningavailablechannels.Thisinitialsetupisonlyrequiredonceat
thefirsttimeturningontheunit.
1. PlugthePowercordfrombackoftheunitintoACoutlet.
2. PressPowerbuttonontheleftsideoffrontpanel.Waituntilred
light/clocktimecameout.PresseitherremotePOWERkeyor
Standbybuttontoturnontheunit.
3. Bootuptimeisusuallytakingabout30secondsandfrontpanel
displayshowing“BOOT”.TherewillbeNOvideoonTVscreen
duringbootuptime.Afterbootupcomplete,frontpanelshows
“noch”andgreenlight.
4. Followon‐screeninitialsetupmenustocompletetheprocedures:
Page11Page12
Other manuals for PHD-VRX
2
Table of contents
Other PrimeDTV Technologies TV Receiver manuals


