PrimeLight VoxBox Pro User manual

®
Operating Instructions
www.voxbox.pro


3
Table of contents
Chapter 1 Intended use & Warnings............................................................................4
Chapter 2 Identifying the parts................................................................................5-6
Chapter 3 How to attach the main box to the camera................................................7-9
3.1. How to attach to 15mm rails.................................................................7
3.2. How to adjust the height of the main box ..............................................8
3.3. How to attach if the camera has no rails (such as DSLR)........................9
Chapter 4 How to insert the two-way mirror..............................................................10
Chapter 5 Positioning the interviewer.................................................................. 11-13
5.1. To position the interviewer camera right (recommended) .....................11
5.2. To position the interviewer camera left................................................11
5.3. Interviewing while operating the camera .............................................12
5.4. Fourth position for the interviewer ......................................................13
5.5. Lighting the interviewer......................................................................13
Chapter 6 Filming the interview & tips for success....................................................14
Chapter 7 Using the VoxBox Pro®as a Teleprompter device......................................15
Chapter 8 Warranty ..................................................................................................16
Chapter 9 Support and parts ....................................................................................17

4
The VoxBox Pro® is a two-way mirror box which is positioned in front of the camera lens. It allows lm
makers to shoot down-the-lens interviews while maintaining eye contact between the interviewer and
the subject. The tablet holder accessory allows the unit to be converted into a Teleprompter.
WARNINGS
This product contains sheet glass. To avoid serious injury, handle with extreme care at all times.
Check all screws and clamps are secure to ensure glass parts do not detach from the unit.
Do not allow any part of the product to get wet.
1. Intended Use
5
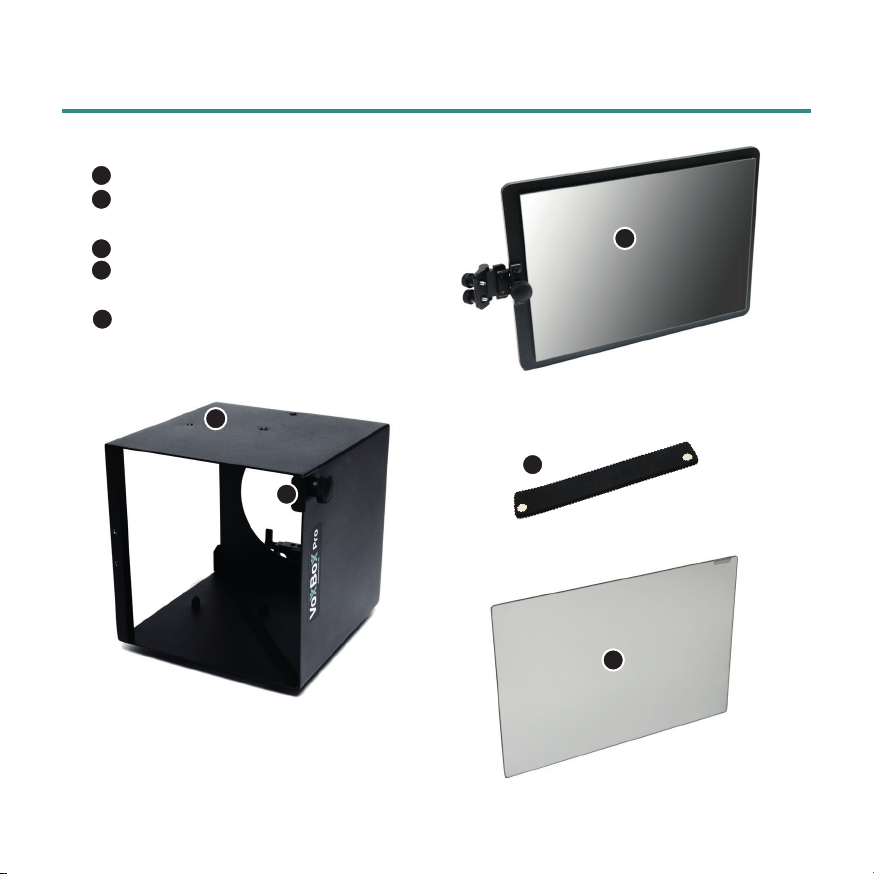
• Main box - positions in front of the lens
• Two-way mirror - inserts into the VoxBox Pro®
main box
• Glass retainer
• Side mirror - optional use depending on
position of interviewer
• Side ag - optional use with side mirror
2. Identifying the parts
1
1
4
4
5
5
6
6
7
7

6
2. Identifying the parts
• Rail block - to slide onto 15mm rails
• L-bracket - supports the main box
• Tablet holder - to convert the unit into a
Teleprompter
• Doughnuts (63, 76 & 112mm) - ts on lens
to prevent light entering the main box
• Cleaning cloth - for handling and cleaning
the mirrors
• 16mm receiver - optional to allow the unit
to be mounted on a standard lighting stand
• Hex key to adjust Rail block
2
2
8
8
3
3
9
9
10
10
11
11
12
12
7
There are two methods to attach the main box
depending on your camera setup. We strongly
encourage you to mount the unit to your existing
standard 15mm rails.
3.1. How to attach to 15mm rails
NOTE: It is recommended to insert the two-way
mirror after the main box is securely attached to
the camera.
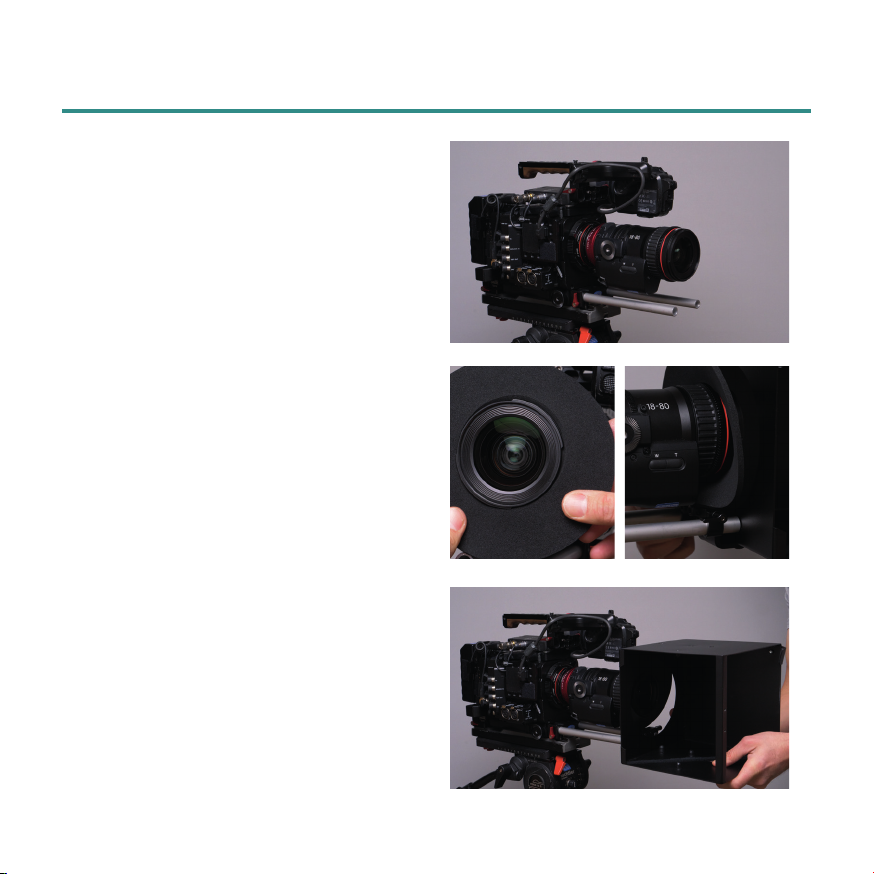
1. Remove your matte box, if tted.
2. Ensure the rails do not extend beyond the
front of the lens. For best results, rail ends
should be in line the front of the lens.
3. Choose a suitable doughnut and t around
the rim of the lens.
4. Loosen the two levers on the rail block,
slide the main box onto the rails. The front
of the lens should be in line with the hole
in the main box. (The height of the main
box can be adjusted by re-positioning the
rail block to so that the lens is centred in
the hole.)
5. Re-tighten the two levers on the rail block
to secure the main box.
6. Re-balance tripod head if necessary.
3. How to attach the main box to the camera
8
3. How to attach the main box to the camera
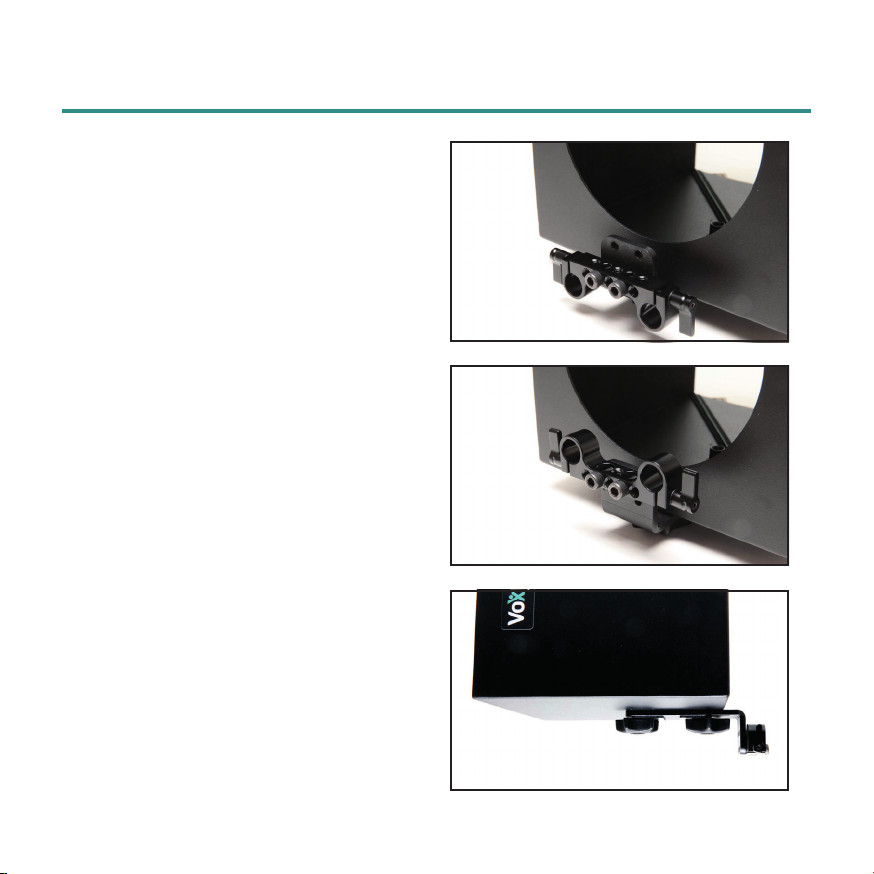
3.2. How to adjust the height of the main box
This section only applies when the main box is
mounted onto 15mm rails.
The height of the main box can be adjusted so that
the lens is aligned with the centre of the hole.
1. Place the main box onto a rm surface.
2. Using the hex key, remove the two hex
screws holding the rail block.
3. Locate the rail block in the alternative holes.
Note that the rail block can be inverted to
give a total of four different heights.
Never invert the L-bracket in order to adjust the
height. The rubber buffers on the bracket are
designed to protect the paintwork and prevent
damage to the threads on the main box.
If you need to raise the height of the main box
further than is possible by repositioning the rail
block, we suggest using a riser, available from your
equipment supplier.
Alternative position
Inverted rail block
Never invert the L-bracket x

9
The main box can be mounted onto a standard
lighting stand having a 16mm spigot.
3.3. How to attach if the camera does not have rails
(such as DSLR)
NOTE: This mounting method is recommended if
your tripod is lightweight, or using a DSLR.
1. Remove the L-bracket using the two hand
wheels.
2. Screw the 16mm receiver through the centre
hole on the main box. Do not over-tighten as
this will damage the threads on the 16mm
receiver.
3. Slide the 16mm receiver onto your lighting
stand.
4. Choose a suitable doughnut and t it around
the rim of the lens.
5. The main box is now ready to be positioned
in front of the lens.
TIP: Use the side mirror when mounted onto a
lighting stand. The tilting mirror feature will allow a
more comfortable eye-line.
3. How to attach the main box to the camera

10
4. How to insert the two-way mirror
WARNING - handle the two-way mirror with extreme
care. Treat these surfaces like you would a lens.
Handle using the cleaning cloth.
One side of the two-way mirror has a reective
coating; the other side is non-reective and faces the
lens, indicated by a label on the glass.
1. Loosen the thumbscrew on the glass retainer
and rotate 90 degrees.
2. Observe the label on the two-way mirror.
Slide the two-way mirror into the main box
using the felt strips as a guide. DO NOT let
any part of the glass come into contact with
the metal surfaces of the main box.
3. Push the mirror all the way to the corners of
the main box, so that glass in seated into the
V-shape of the foam pads.
4. Rotate the glass retainer to back to its
original position and push towards the edge
of the two-way mirror to create a rm hold.
Whilst rmly holding the glass retainer in this
position, re-tighten the thumbscrew.
TIP: The two-way mirror can remain tted in the
main box when packed away for transportation.
To clean, brush or wash loose debris away. Clean
using only the Selvyt cleaning cloth, using non-
greasy window cleaner.
Other manuals for VoxBox Pro
1
Table of contents
Other PrimeLight Camera Accessories manuals


Popular Camera Accessories manuals by other brands

Viltrox
Viltrox EF-NEX Mount instructions

Calumet
Calumet 7100 Series CK7114 operating instructions

Ropox
Ropox 4Single Series User manual and installation instructions

Cambo
Cambo Wide DS Digital Series Main operating instructions

Samsung
Samsung SHG-120 Specification sheet

Ryobi
Ryobi BPL-1820 Owner's operating manual


