Primetime 2BL455 User manual

2BLomp1.ai
HONEYCOMB
14" BARN DOORS
& REFLECTIVE
INSERTS
14" BARN DOORS
GENERAL INFORMATION
Thank you for your selection of one of the most effective studio luminaires, the 2BL-55.This high
performance luminaire should provide many years of low cost operation. The 2BL455 is designed
to maximize "throw" or "punch" by collimating the light while remaining "cool" and minimizing shadows.
Unwanted spill is controlled with optional barn doors, egg crates or honeycomb. Throw is doubled with
the reflectorized barn door. The fixture can accomodate gel frames and/or honeycombs and egg crates.
The 2BL4 is an excellent replacement for most scoops or soft lights using 25% of the energy.
All PrimeTime studio Lights are equipped with advanced reflector technology.
The 2BL455 is available in standard full power (non-dimming), Voltage dimming, analog signal dimming
(0-10 volts) and full DMX
-512 discrete dimming (1 luminaire per channel). This degree of availability
provides for compatibility with most current control scenarios.
The 2BL455 is made of welded steel and powder coated in non-reflective black. Accessories are
made of aircraft alloy aluminum. Standard luminaires are equipped with detachable 10' long power
cords. Each 120 volt cord is equipped with Edison 3 prong connectors. Other voltage models are
shipped without plug unless specified. A fused power in and out recepticle is supplied for
120 volt models. Adjacent fixtures may be powered with this connector so long as the load does
not ecxceed 10 amps. (fig. 2) The switch controlls the power to the one fixture. Power to the luminaire
is indicated when the switch is lit.
The 2BL455, like most of the line, is mountable in horizontal or vertical orientation. Ordinary grip
devices allow stand mounting as well.
For instructions on dimming models see dimming addendum.
fig. 1
INSTRUCTION MANUAL
Model: 2BL455
Lamps: 4 FT55DL Lamps
Ballast: Electronic, high frequency, SS
Reflector: 95% specular reflectance
Voltage: 120, 230, 277 50-60 Hz
Manufacturer: PL Systems, Inc.
Address: 10529 Olympic Drive, # 102
Dallas, TX 75220
(214)-393-5998 (voice)
(214)-393-5999 (fax)
e-mail: inf[email protected]
Web page: KW2.com
p1
GEL FRAME

2blonmp2.ai
fig 2
fig 3
on/off switch
Fused power out for fluorescent studio luminaires only. Total string watts 800.
power in
fuse
The control panel is shown in fig. 2. This panel is the same in appearance to the voltage dimming
model. A label containing the serial number indicating voltage and dimming capacity can be found
on this plate.
Figure 3 indicates the features of the luminaire. They are:
1. Fresnel reflectors made with KW/2 technology exhibit 95% specular reflectance. Spectral response
curve is flat over the visible range.
2. Four twin tube 55 watt studio lamps in several colors and performance levels are available in table 1.
Lamps are long life, rated at 10,000 hours.
3. Lamp retainers locate and retain the engaged lamp. See "Lamp Installation".
4. Heavy duty adjustment knobs provide for precise altitude pointing.
5.Yoke or "bale" suspends the luminaire and allows azimuth pointing.
6. Rotation about both mounts allows hemispherical pointing.
7. Control panel including switch and power connections. See fig. 2.
8. Mounting slot retains gel frames and honeycombs.
9. Lamp holders. See lamp installation. Never attempt to remove or install lamps with power on!
1
2
9
3
4
5
7
8
p 2
INSTALLATION:
Remove the luminaire from the shipping carton and inspect for any damage during shipping.
If attenuators are ordered they may be installed in the aperture. If so, loosen the accessory
slot cover retaining screws and slide the cover back to expose the slot. Remove the accessory
to install the lamps which are shipped separately. see figure 4. Check the base of each
lamp to insure that you have the correct lamp color and CRI. See Table 1 for available lamps.
Table 1
LAMP COLOR KELVIN CRI LUMENS PLS PART#
TUNGSTEN 3,000 82 4,800 FT55DL/830
TUNGSTEN 3,000 98 3,000 FT55DL/930
TUNGSTEN 3,200 85 4,000 FT55DL/832
OFFICE 3,500 82 4,800 FT55DL/835
OFFICE 4,100 82 4,800 FT55DL/841
DAYLIGHT 5,400 98 3,000 FT55DL/950
DAYLIGHT 5,600 85 4,000 FT55DL/856
After determining that the lamps are correct, install the lamps by gently inserting one side
of the lamp into the lamp clip. Then slide the base of the lamp into the socket while
aligning the four pins with the holes. A "snap" is felt when fully plugged in. See fig 3.
Caution: never remove or install lamps with active power to sockets as arcing can occur.
Always turn off the switch or unplug the power cable at the rear of the fixture housing.
When changing lamps allow a few minutes for cooling. Caution should be taken whether
installing or removing as glass chards could occur.
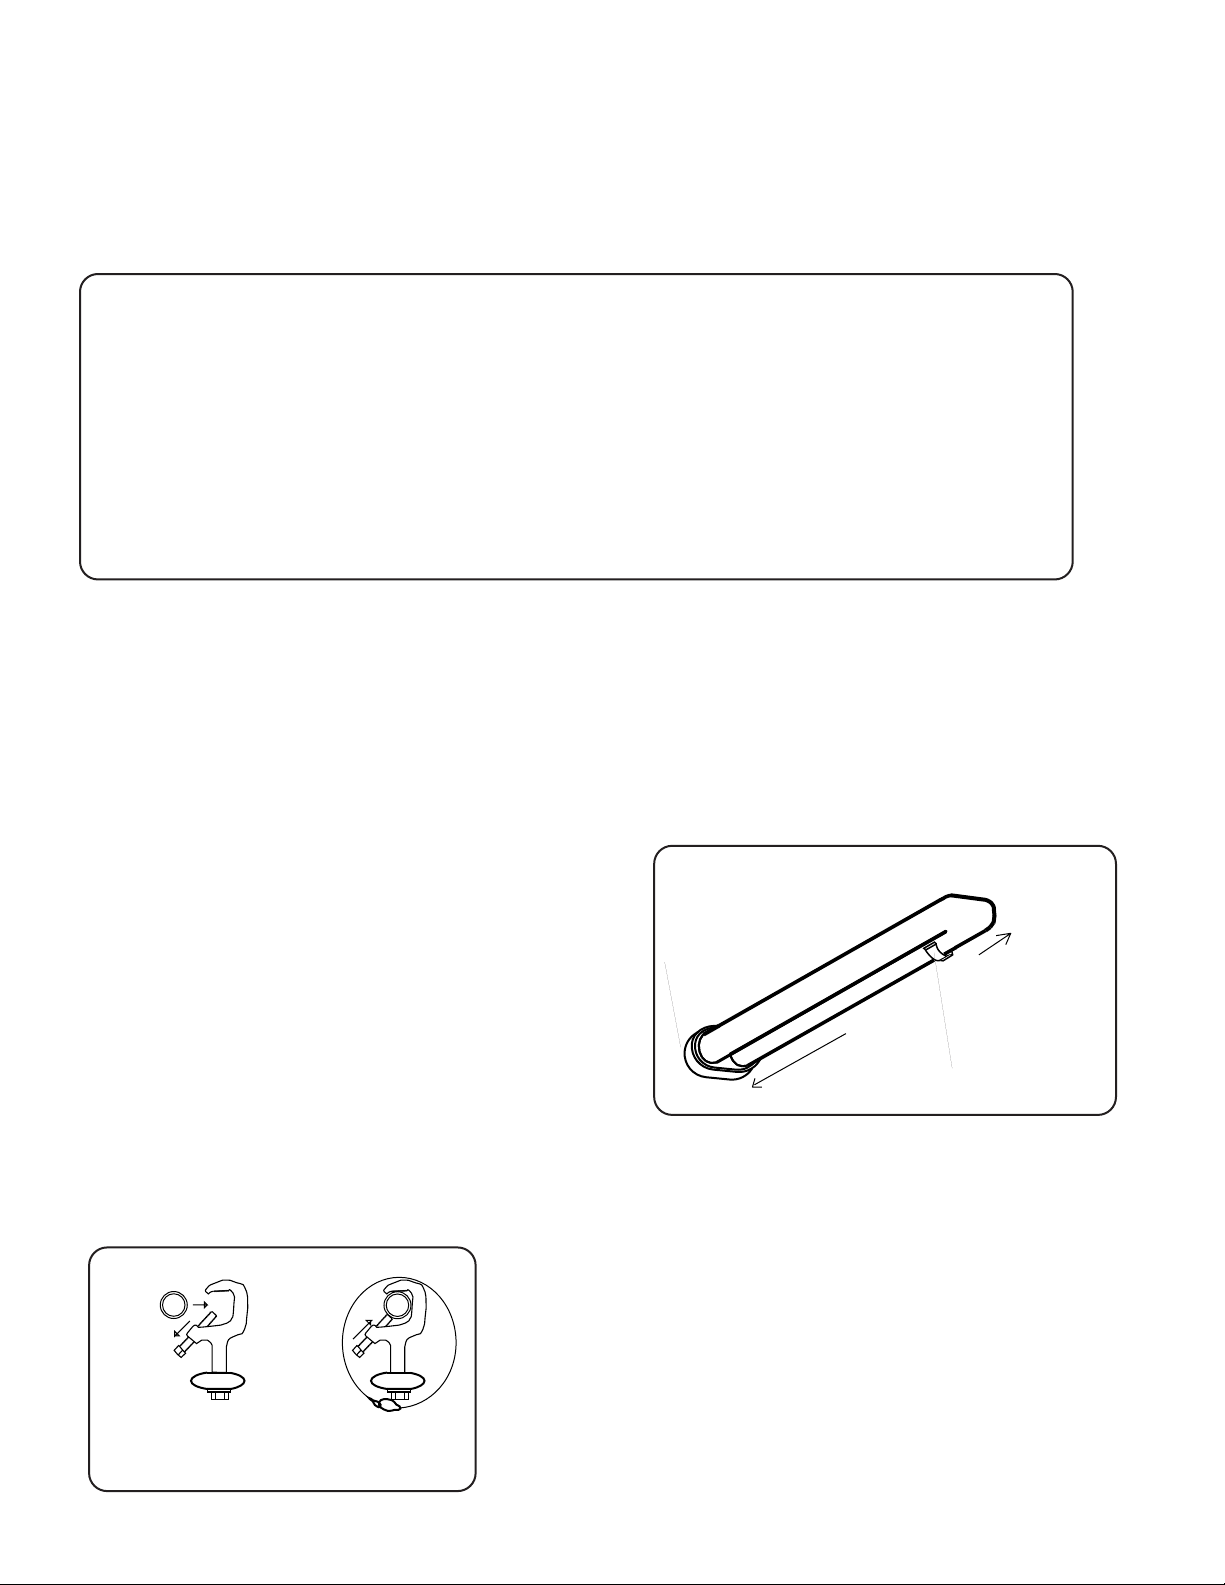
When the lamps are installed, it is advisable to
bench test each fixture. Plug the the power cord
in one luminaire and turn the switch on the
control panel ( fig 2 ). The switch should be lighted
if the ballast has power. The lamps should start.
Full intensity and correct color will be attained in
about 5 to10 minutes. Next, the hanging means
should be mounted on the yoke (fig 5 ) with a 1/2"
bolt supplied with the "C" clamp and or stem. If
vertical mounting is desired, the hanger or stem
should be attached on one end of the yoke brace. If daisy chain power is desired, up to
a total string wattage up to 800 watts, use of the "power out" receptacle. in figure (2).
Never install any lamp except twin tube Dulux or Biax with a
rating of 55 watts. Improper lamp installation will produce poor
color and will shorten ballast life. Avoid mounting over people
without a lens of some type (neutral filter) in case of non-
passive lamp failure. With the stems and "C"clamps attached,
hang each assembly in the desired location on the 2" pipe
grid or other qualified hanging system. Immediately add a
fig 5 safety cable as per fig. ( 5 )
For assistance call (214)-393-5998, fax 393-5999
2blomp3.A1
remove
lamp
install lamp
lamp holder
lamp clip
fig 4
SECURE CLAMP TO BALE
OPEN
BOLT
TO CLEAR
PIPE
TIGHTEN
BOLT
AGAINST
PIPE
SECURE
SAFETY
CABLE
p 3
The mirrored surface of this lighting product has the highest specular reflectance of
any commercially available material. With proper care it should perform well for
many years.
Fingerprints show up clearly and should be avoided. Dust adhering to the reflective
surface shows, as well. In the event that soiling should occur, the reflector can be
cleaned with little effort. It is best to start with a feather duster.
The clear coating of the reflective surface is chemically resistant and relatively
tough but can be scratched by rubbing dusty grit causing marks. The effect is
mostly cosmetic but should be avoided, especially for open fixtures. The best
cleaners are those which leave no residue. Glass cleaners work well, as do very
dilute solutions of hand dish wash detergents (1 drop/quart). Solvents stronger
than iso-propyl alcohol should never be used.
Never use paper towels or tissues as these materials are made from wood and will
cause scratches. Only soft cotton cloths should be used to wipe the surface. Use
single strokes along the long axis of the reflector. Never use an orbital motion. The
idea is that linear scratches don’t show as much. Most scratches are caused by
dust and dirt being rubbed into the surface. Before wetting the mirror surface,
remove as much dust as possible using a feather duster or compressed air. Cloth
diapers or soft, (well used) terry cloth works best. Never use spray cleaners like
Formula 409, as these compounds leave residue. Spray on glass and mirror
cleaners work best. If you have any questions call (214)-393-5998.
CAUTION: ALWAYS DISCONNECT POWER BEFORE CLEANING THE
LUMINAIRE
REFLECTIVE SURFACE CARE AND MAINTENANCE
TROUBLE SHOOTING
onmpage4.ai
PrimeTime
L i g h t i n g S y s t e m s
If the luminaire will not strike, first determinme if power is available to the switch.
If the switch glows, there is power. Units older than 5 years may have plain switches.
In this case, check for power at the outlets on the light and source. If the luminaire
does not strike, the lamps may not be seated. Sometimes lamps are not seatedl
fully into the socket. Never try to replace lamp wth the fixture power on. This light
is rated to start at 50 degrees F or below. High temperatures affect lamp
colors and cause shortened ballast life. If the light flashes but won't stay on,
there may be a loose wire or bad electnonic ballast. Consult Fatory if the
luminaire is non-responsive. (214)-393-5998
page 4
Manufactured in the USA by:
PL Systems, Inc.
10529 OLympic Drive Suite 102
Dallas, TX 75220 (214)-393-5998
fusedir.ai
9-08
FUSE REPLACEMENT FOR FIXTURES
WITH DETACHABLE POWER CORDS.
spare
active fuse
AB
DIRECTIONS
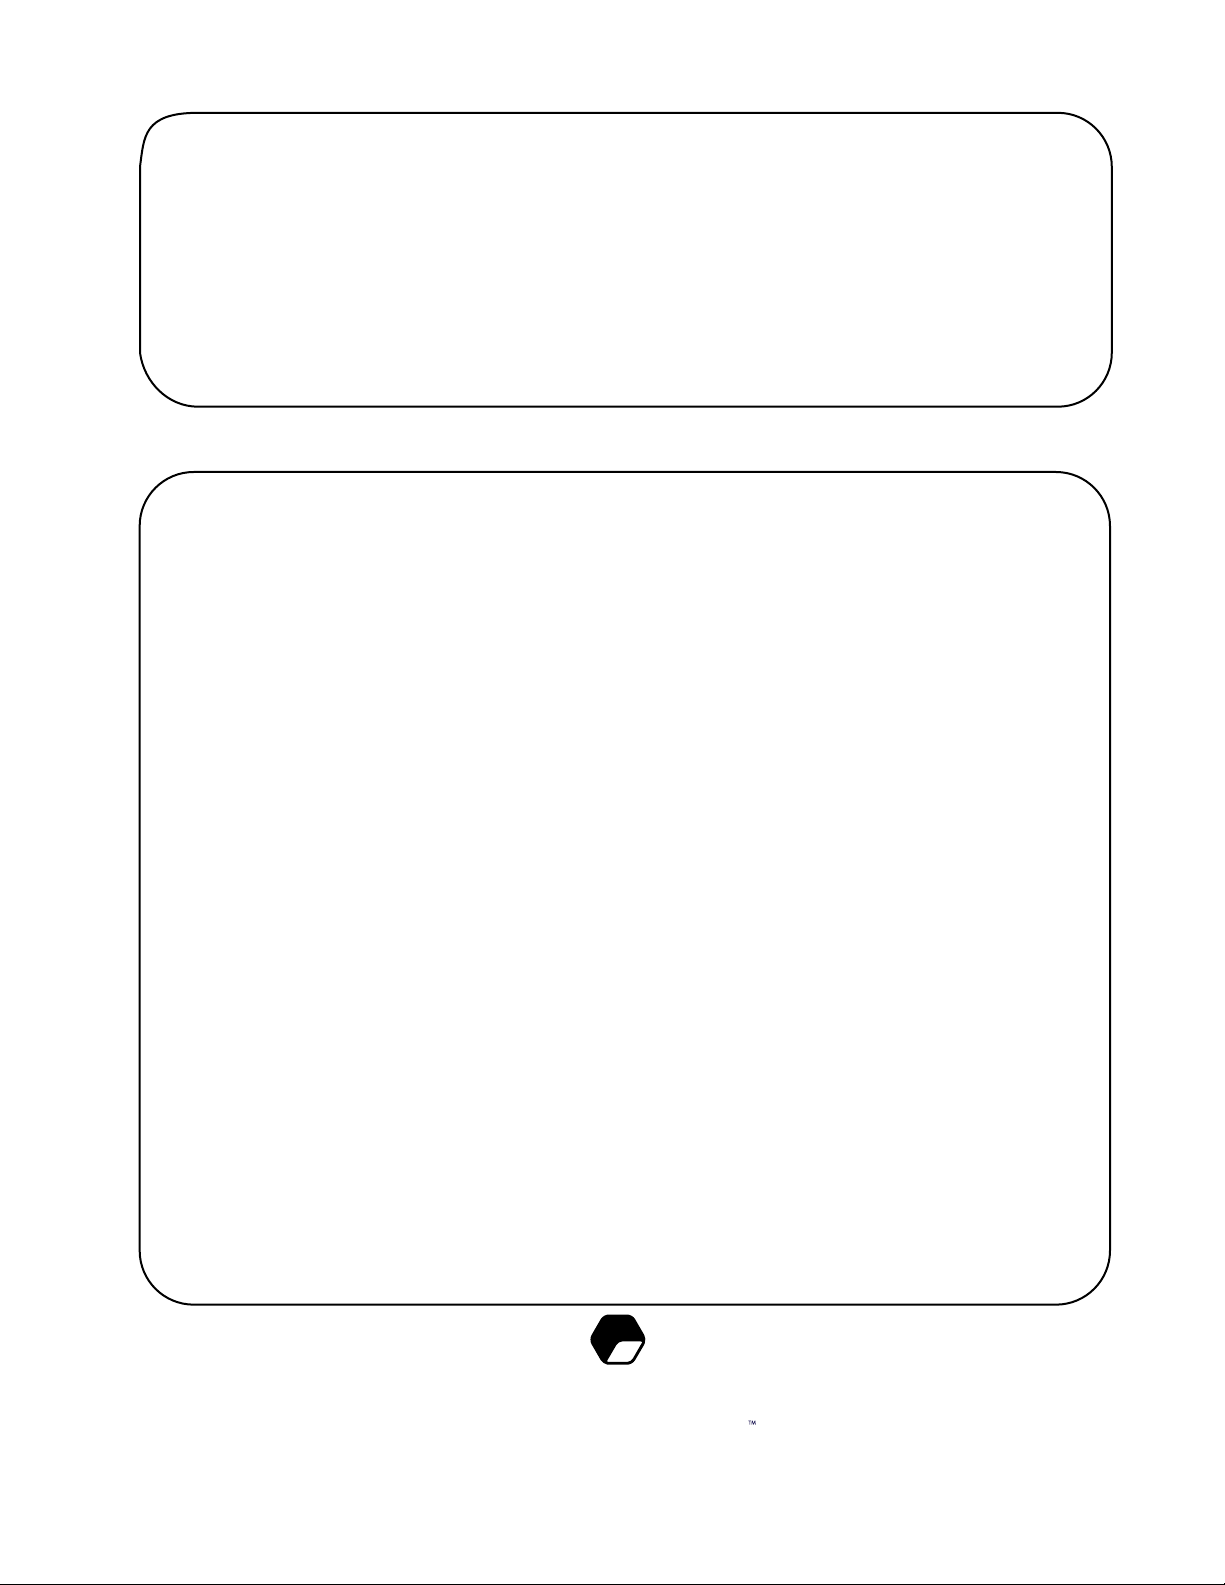
Fixtures equipped with detachable power cords contain fuses which are rated at ten amps
@ 250 Vac. To replace fuse remove power cord exposing the receptacle as shown in figure
A. Make certain there are no other cords attached to the fixture. Using a small flat screw
driver, pry up the fuse holder shown in figure B. Replace the fuse in the active slot and
snap the fuse holder back into place. Use only fast acting type 217, 5 x 20 mm , 10 amp
fuses.
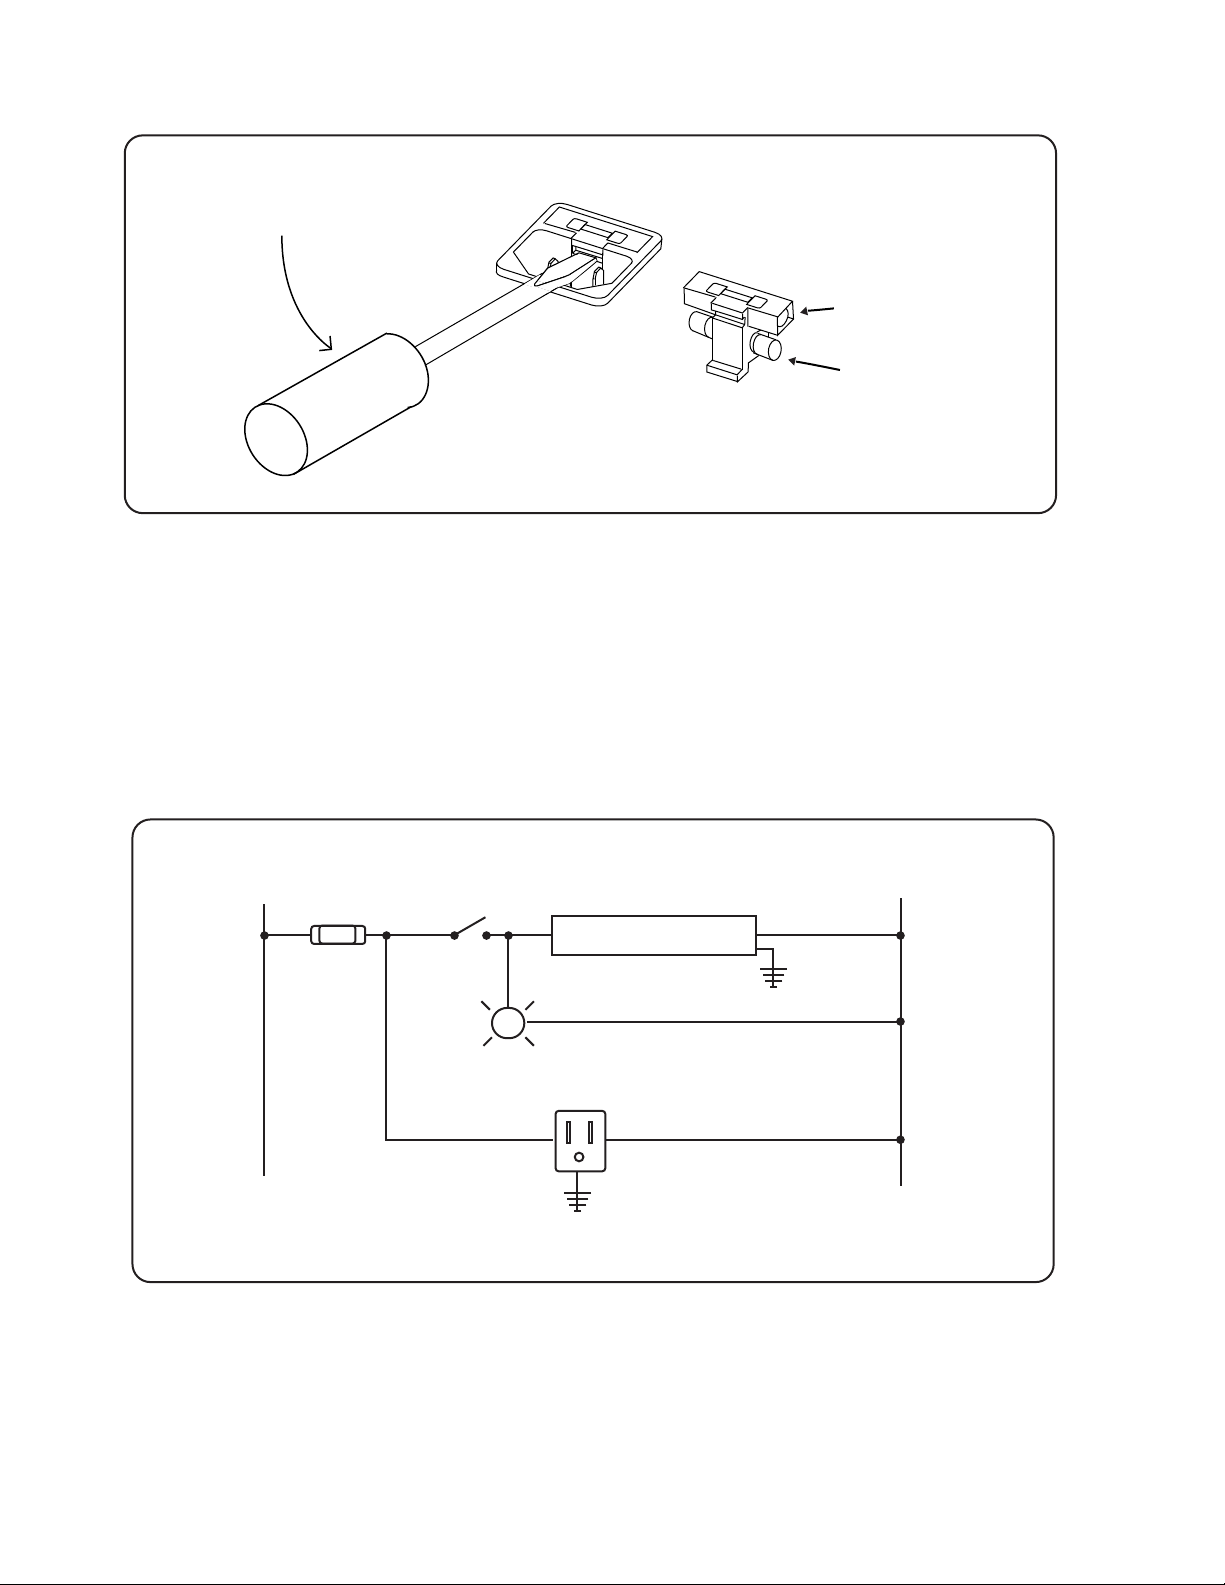
black white
2 lamp ballast
fused power out
switch indicator light
10 A fuse switch
LINE POWER SCHEMATIC
CAUTION
Fused power out receptacle to be used for fluorescent studio lights only. Maximum
string wattage is 800. Fast acting fuse type 217, 5 x 20 mm , 10 Amps, 250 V.
PL Systems, Inc.10529 Olympic Drive
Dallas, TX 75220 (214)-393-5998.
p5
Table of contents
Other Primetime Light Fixture manuals

Popular Light Fixture manuals by other brands

AB Tecno
AB Tecno Abexo VOLT APE-550/1010 Assembly and use instructions

Tepex
Tepex PSF 28 LED user manual

HAMPTON BAY
HAMPTON BAY HD22458 instructions

AquaticLife
AquaticLife 420012 Installation & maintenance guide

Heath Zenith
Heath Zenith Motion Sensing Halogen Fixture SH-5525 owner's manual

Evo-lite
Evo-lite Evo Spot 180 user manual


