Primochill Myriad User manual

1
FacePlatePrepforInstall
RemoveacrylicfaceplatefromBox3andplaceit
facedownonyourflatworkarea.Thecountersink
holesandLEDLightchannelsshouldbefacing
down.
Usingyourfingernail,startinonecornerandslowly
peeltheprotectivepaperbackuntilit’s3/4ofthe
wayremovedandstop.Nowlaythepaperback
downontheacrylic.Itwillnotstickagain,butwill
protecttheacrylicfromgettingscratchedwhile
youmoveontothenextstep.
SetthispieceasideandproceedtoStep5.
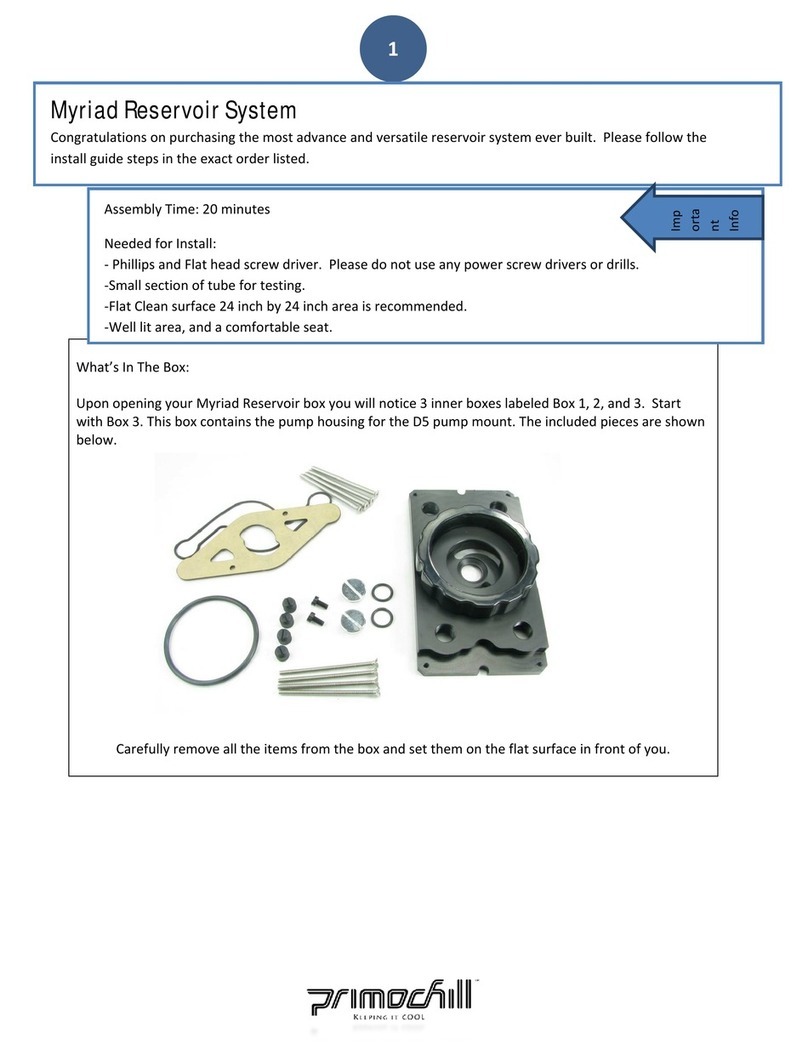
MyriadReservoirSystem
Congratulationsonpurchasingthemostadvanceandversatilereservoirsystemeverbuilt.Pleasefollowthe
installguidestepsintheexactorderlisted.
AssemblyTime:20minutes
NeededforInstall:
‐PhillipsandFlatheadscrewdriver.Pleasedonotuseanypowerscrewdriversordrills.
‐FlatCleansurface24inchby24inchareaisrecommended.
‐Welllitarea,andacomfortableseat.
Imp
orta
nt
Info

2
Tips:
Foreveryinch,stopandpressFIRMLYontheO‐
ringintothechannel.
YouwillseethattheO‐ringlikestopopout
aroundthedipsaroundthescrews.Takeextra
timeintheseareastoinsureyouarepressingthe
O‐ringfirmlyintothechannel.
CenterFrame–O‐RingInstall
Nextisthemostdifficultstepandrequiresthe
mostpatience.Pleasereadcompletelyand
carefullybeforeattempting.Seetipsunderthe
picturetotheleft.
DryHandsareneeded.Youmayneedtokeepa
towelhandytokeepyourhandsdrythroughoutthe
process.
Removethecenterframefromthebox.
EachsideofthecenterframehasanO‐ringthat
needstobeinstalled.Laytheframedownonyour
flatsurfaceandstarttheO‐ringinonecornerofthe
frame.
Beginfeedingitandpressingitintothegrooveof
theframe.Takeyourtime,ifyougotoofasttheO‐
RingWILLpopout.Asyoudothis,youwillneedto
stretchtheO‐ringandpushitintothechannela
littleeach¼inch.Ifyougetallthewayaroundthe
frameandyourO‐ringisshortyoudidnotstretch
theO‐ringenoughwheninstalling.StartOver.
Onceonesideiscomplete,flipoverframeandset
onflatsurface.(ThiswillhelpkeeptheO‐ringin
placewhileyouinstallthenextone.)Repeat.
Frameto6PortBack
OncebothsidesoftheframehaveO‐ringsinstalled,
theframecannowbeattachedtothepump
housing.
Placetheframesoitisflushontheedgesandthe
holeslineupforthethroughscrews.Doublecheck
thattheO‐ringsarestillinplaceandarenotvisible.

3
Step7 FaceplateInstall(8screws)
Tightenscrew1to80%,nextTightenscrew2to
80%,nextTightenscrew3to80%,andnext
Tightenscrew4to80%.Onceallscrewsare80%,
startprocessovertillscrewsare100%.
NOTE:DONOTOVERTIGHTEN.Thisreservoirdoes
notrequirealargeamountoftorquetowork
properly,sodonotwrenchdownonthescrewsor
theacrylicwillcrackandleak.
Oncethecentralframeisproperlyfittedtothe
pumphousing,removetherestoftheprotective
paperofftheacrylicfaceplateandlaygentlyonthe
frame.MakesuretheO‐ringisstillinthechannel
andnotprotrudingoutANYWHERE.
Oncethefaceplateisinplace,locatethe2xfour
packsof6‐32screwsinthebagWITHtheplastic
caps.(Seepicturetotheleft).
Gentlyplacethescrewsintotheholes.Gently
tightenthescrewsintheordershowninthepicture
to80%,thenrepeatto100%.100%shouldbethe
equivalenttohandtighttension.DONOT
OVERTIGHTEN.

4
Step8 MountingBracketThroughScrews–4Corners
Withthe4centerscrewsinplace,proceedtopeel
offthepaperonthetwoedgesnexttotheLED
Lightchannel.Leavethecenterpieceunpeeledfor
now.
Onceyoupeeloffthepaperontheedgesyouwill
seetheO‐ringmakingcontactwiththeacrylicface
plateiftheO‐ringhasbeeninstalledproperly.
Insertthescrewsintotheholesandbeginto
tighten.Followthesametighteningprocessasyou
didpreviously.
Tighteningthesescrewstohandtighttensionjust
likethecenterscrewsisadequatetomakeawater
tightseal.IfthesescrewsareovertighteneditWILL
CAUSETHEACRYLICTOCRACK.
Thebelowpictureillustratestheleveloftightness
youshouldachieve.IMPORTANT:Ifyouseethat
theacrylicistouching(makingcontact)withthe
framethenthescrewistootight.Untightenthe
screwuntilitdoesnotmakecontactwiththe
frame.

5
DualBayMountingSystem
OptionalThumbscrewsareincludedifyour
specificcomputercaserequiresthem.
Thesebracketsaredesignedtogivethereservoir
moreflexibiltyonwhereandhowthereservoiris
installed.Thefollowingstepsexplainhowto
mountthereservoirintothe2x5¼DriveBays.
a.Assemblethemountingbrackets:
Placethefirstbracketonaflatsurfaceandslide
oneoftheplatesunderneathitandtightenscrews
intoplate.Tightenthescrewsallthewaydown
andthenuntightenapproximately½turnoruntil
theplateslidesbackandforth.Repeatforother
bracket.Thereare8screwsperbrackettobe
installed.
MarrybodyWithMount
Now,gentlyplacethereservoironitsface.Next,lay
theanti‐vibrationpadoverthe2exposedscrews
andlineuptheshapetomatchthecut‐outonthe
reservoir.
Finally,lineupthebracketwiththecut‐outshape
andscrewonthenutcaps.Repeatforotherside.
Thesecapssecurethebracketstothereservoirand
allowyoutomountitintoyourdrivebays.

6
Removepumpfromstockhousingandplaceinto
therearpumpmountareaofthereservoir.Next,
slippumpwirethroughthepumpretainingcapand
beginscrewingcapontorearpumpmounthousing,
securingthepumpinplace.Youmayhavetoturn
thecapcounterclockwiseandthenclockwiseto
properlyalignthethreadsevenly.Thecapwillnot
secureproperlyifcrooked.
Finally,tightentheretainingcapuntilitstops
turning.
Aproperlyinstalledcapwillbeperfectlyhorizontal
withthepumpandhousing.Ifthecapiscrookedit
willleak.Unscrewthecapandrepeatuntilthecap
isinstalledproperly.
FillandTest
Aswithanywatercoolingproject,testingnew
hardwarebeforeputtingitintoserviceisrequired.
Addfluidwithsuppliedfunnel.De‐Ionizedor
Distiledwaterisrecommended.Thiswillneedtobe
dumpedoncetestingiscomplete.
Connectapumpandrunforaminimumof24hrs.
After24hrs,checkforleaksorpuddlesforming
nearthereservoir.AslongasyourO‐ringsare
installedproperlythereshouldbenoleaks.
Oncetestingiscompletedraintestfluid.

7
Step13 FinalInstall
a.InstallBrushAluminumFaceCover:Peelpaper
offthedoublesidedadhesivetapeandsticktothe
acrylicfaceplate.Makesurealltheedgesareflush
andpressstickysideagainstfaceplate.
b.InstallReservoirintoCase:Picktwobaysand
slidein.(InstallationisjustlikeinstallingaDVD
drivethatistwiceastall.)
Insertthereservoirsoitsflushwiththecaseand
tightenthescrewsonthebracketplates.Youmay
needtoremovethereservoirandrepeatthis
processacoupletimestogettheperfectfit.
Onceyouaresatisfiedwiththefit,tightenthe
screwscompletelysothereservoirdoesnotslide.
Youarenowreadytocompletetherestofyour
watercooingrigandreaptherewardsofyournew
reservoir.
Stillhavequestions?ContactusatPrimochill.comorcallustollfreeat(800‐690‐9081).
Other Primochill Water System manuals
Popular Water System manuals by other brands

Rain Soft
Rain Soft TC Series owner's manual

HydroNovation
HydroNovation WP1 Series Installation, operation and troubleshooting instructions

Hilti
Hilti DD-REC1 operating instructions

Aqua-Base
Aqua-Base ESW Series owner's manual

Culligan
Culligan Aqua-Cleer Maintenance Instruction

Vortex
Vortex Setur-M user manual